




Table of Contents
前言
本书分为六个部分,包括 Redis 源码日志,服务框架,基础数据结构,内功心法,应用,其他,从源码层面循序渐进的了解 Redis。通过阅读本书,读者可以快速、有效地了解 Redis 的内部构造以及运作机制,更好、更高效地使用 Redis。
第一部分,主要是在阅读代码过程中的日志和笔记。
第二部分,主要介绍了 Redis 的主要框架,以及 Redis 是如何提供服务的,从一个最简单的命令开始讲起。
第三部分,主要介绍 Redis 底层用作存储的数据结构,这一部分很有趣。
第四部分,主要讲解了 Redis 的核心功能,包括持久化,订阅/发布模式,主从复制,事务机制,集群等等。
第五部分,展示了 Redis 的几个简单的应用。
第六部分,介绍了 Redis 和 Memcached 的区别,以及稍稍讲解了 Memcached,主要摘自我之前的一些博客。
适用人群
Redis 是 NoSQL 数据库领域的佼佼者,如果你需要了解 Redis 是如何实现高并发、海量数据存储的,那么本书将会是你的最佳选择。
学习前提
学习本书前提,我们假定你已经对 Redis 有了一定的了解,能够自主的搭建 Redis 环境,并进行相关配置和操作。
1
作者简介
基本信息
昵称:郑思愿daoluan
所在地:广东 梅州
性别:男
博客:http://daoluan.net
简介:Quite simple - daoluan.net
工作信息
公司:Tencent
地区:广东 ,深圳
教育信息
大学:华南师范大学 (2010年)
作者随笔
过去的一年,确实有点压力,就快喘息不过来了。原因有二,一是工作,一是《Redis 源码日志》。
《Redis 源码日志》在前天发布了,心里的石头总算落地。发布之前好好将排版做了一遍,内容上除了代码,也通读了一遍,尽量语句连贯,最主要是把问题解释到位就好。之前还疑惑着怎么发布这本电子书好,是免费在博客上发布 PDF 的好,还是将其制作成网页发布在博客上。虽然都是免费观看,但前者和后者不太一样,以 PDF 文件发布的话,会在网上存在很多的副本,到时想要修改的话,不好办;网页形式发布的话,工作有点繁琐,因此也放弃了这个想法。
最后找到了 selfstore.io 这个电子书发布平台:戳这里,以免费/自愿付费的形式发布,售价定的比较低——1.99 元,但在简介的后面填补了微信和支付宝的付款入口,扫码支付,后期将内容修订和完善结束后,可考虑提高价格。这是最好的发布方式了。一方面,这本书没有专业人士校验,可能存在很多的错误,仅仅以收过高费的方式发布未免遭人嫌;另一方面自愿付费的结果能表达众人对这本书的认可,也是对我的认可。但有一点疏忽了,在书简介中没有将“书是免费”这一点传达给读者,上传的预览本和正式版本是一样的,这会给用户带来误解,selfstore 的工作人员提示后改过来了。之前还是学生学习的过程中,自己一直是一个伸手党,但现在写完一本书下来深知,写作者的创造过程不容易。如果你在阅读本书的过程中,发现什么问题,请一定和我联系:
毕业的时候,暗暗下定决心要在 2015 新年之前将这本书完成,但没好运气在那个时间之前完成,只能推迟在 2015 的上半年,也算是提前完成了计划,收到底还是坚持下来了,不得不佩服自己。
接下来,终于可以一边工作,一边做自己喜欢的事情了。看书,吉他,旅行,亲朋好友聚会,好久没有这么惬意了。
捣乱
2015-5-16
2
源码日志
在大学实习的时候,用到了 Python 里头的一个小模块 ulrilb2,是一个简单的爬虫,这个模块出错的时候,会抛出各种异常,突然想知道为什么会抛出这些异常,而且 Python 自带的模块都是开源的,能拿到一手的源码,于是把它读完了。这也是第一次知道最简单的爬虫是怎么样的。
接着,实习项目中用到了 Python 的 Web 框架 Django,非常强大。Django book 看完后,就能写出一个简单的网页。Django 是典型的 MVC 框架(?),那时对 Web 的知识很少,是知道有 HTTP 协议这些东西,但 Django 里每个模块之间是如何协同工作的呢,MVC 又是怎么体现的?这些对当时的我来说都非常的感兴趣。当 Django 收到一个 HTTP 请求,到浏览器展示一个页面,Django 里头到底发生了什么。带着这些简单的问题,开始翻阅 Django 的源代码。之后的 Libevent, Memcache 和 Redis 都一样。
阅读代码是很好的锻炼耐心和毅力的机会。看别人代码的过程,即针对一个疑问,收集线索,有点连成线的过程,所以中间肯定有一段时间非常难熬与枯燥;而当读完所有的代码,所有的线索都连成一条线,就能体会柳暗花明了。
一些优秀的开源项目里有些很值得新手学习的地方,譬如框架,设计模式等。但并不是说阅读了大量的代码就能写出很牛的代码,写代码需要对当前需求的把握和清晰的逻辑思维,这是我们在实践中可以慢慢培养的。千万不要读得太多,而写得太少。
这个问题简单,程序从哪里开始就哪里开始读起。譬如,C 代码,当然是从 main(),其他语言也是类似的。但阅读的时候,要带着问题去读。
带着最简单的问题,开始阅读源码。
拿到一个别人写的代码,或多或少,细节有很多,不可能一开始就能把所有的细节都吃透,所以需要一个简单的问题先把整个代码系统的阅读一遍,知道里面的整体框架是怎么样的。譬如 Memcache/Redis 这种 key/value 系统,当它们收到一个 set/get key 请求,是如何做相应的呢?整个服务是如何运作起来的?譬如 Django,当它拿到一个 HTTP 请求,是如何做相应的呢?带着这些简单的问题,浏览源代码能更快了解它们的代码框架是怎么样的,对于之后继续阅读里面的模块,也是非常有好处的。
读源代码,框架才是最先需要了解的,细节才是最重要的。
看到一个函数, 首先要做的是知道这个函数到底做了什么, 而不是他底层是怎么实现的。这有点类似于英语中的阅读理解,遇到文中陌生的单词,首先是根据上下文来判断它是什么意思,到最后真的不能理解再回头拿字典去查单词。
忽略变量声明。好的开源 C 代码会将所有变量提前声明,即放在函数的开头。实际上,没必要例会这一大坨的变量,等遇到用到这个变量的时候自然就能懂得这个参数是用来做什么,而不用我们首次见到就猜测它的用处。 画出函数的调用链,用自己认为最合适的图表说明问题。有时候 Redis 里面的调用链比较长,经常画满一张 A4 纸。在每个函数旁边都标注它所完成的事情,这是收集线索的一个过程,可能会非常的枯燥。
我会在小册子的最后推荐几款源码阅读的软件。
并不推荐一上来就是看源码,一般是当你在某个方向上有一定的基本知识积累了才开始去尝试阅读。譬如c 服务器的后台代码,当然是需要对 linux 下的网络/系统编程有一定的认识,甚至读过 W.Richard Stevens 的几本经典之作。譬如 Django Web 框架,当然是需要对 Python 和 Web 方面有一定的认识。不然,完全的新人去阅读代码,只会信心受打击。
推荐每一位初学者在某一技术方向上有基本的积累后,可以找一个优秀的开源项目,并试着阅读。不懂没有关系,既然是优秀且开源的项目,网上必定会有很多的资料以及文档,这些都能为你读懂源码提供很多的帮助。你会有很多的收获,首先可以见识业界的编程规范如何,这是程序员的基本素质;可以接触到一些优秀的框架或者模式,这些是前人在大量的实践中总结出来的,必定是行而有效的,夯实你在某个技术方向上的认知;最后,就是练就你的耐心和毅力了。阅读源码本身是枯燥乏味的过程,我经常看一个模块一两天,来来回回往往复复,假使心浮气躁,容易浅尝辄止,半途而废。
一般是“麻雀虽小五脏俱全”的项目适合阅读,在这里 C/C++ 方面的可以推荐几个供读者参考:
- TinyXML
- cJSON
- Libevent
- Memcached
- Redis
- Leveldb
- Nginx
- Lua
- ……
Python Web 框架方面:
- Flask
- Django
JavaScript 方面:
- jQuery
这些都能在网络上找到一手的源码,有兴趣的可以试试。
3
Redis 服务框架
大学的时候我们都学过一种数据结构——哈希表,查询效率非常高,复杂度为 O(1),通常关注查询性能的地方都会用到这个东西。
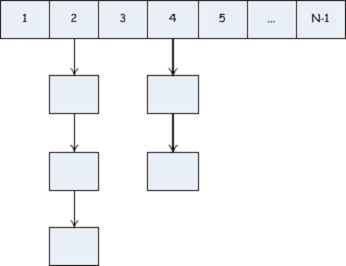
缓存系统,就是一个哈希表。只是通常哈希表的场景都是在本机,把哈希表放到远程的机器上,本机通过网络访问(增删查改)哈希表,就成了现在的缓存系统了。
我们还可以尝试强化这个哈希表,比如支持存储各种类型的数据;存储有价值数据的哈希表时,需要定时备份这个哈希表;访问的频率太大了,需要将数据分散到多个远程的哈希表中;远程的哈希表节点多了,又该如何管理他们等等。
所以缓存系统只是哈希表的一种延伸,它只是一种数据结构的应用。同样,Redis 也是。
这一章带大家大概浏览一下 Redis。
Redis 在缓存系统所处的位置
通常,在系统中,我们会把数据交由数据库来存储,但传统的数据库增删查改的性能较差,且比较复杂。根据 80/20 法则,百分之八十的业务访问集中在百分之二十的数据上。是否可以有一个存在于物理内存中的数据中间层,来缓存一些常用的数据,解决传统数据库数据读写性能问题。常用的数据都存储在内存中,读写性能非常可观。
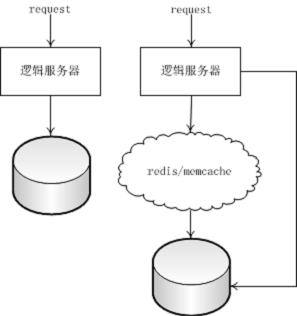
这种思维在计算机中很常见,之前学习计算机系统的时候就有见过这张图:越往上层的存储设备,存储的速度就会更快。诸如,Redis, Memcache 是将可访问的数据存储在内存中,可见它们可以弥补传统数据库的不足。
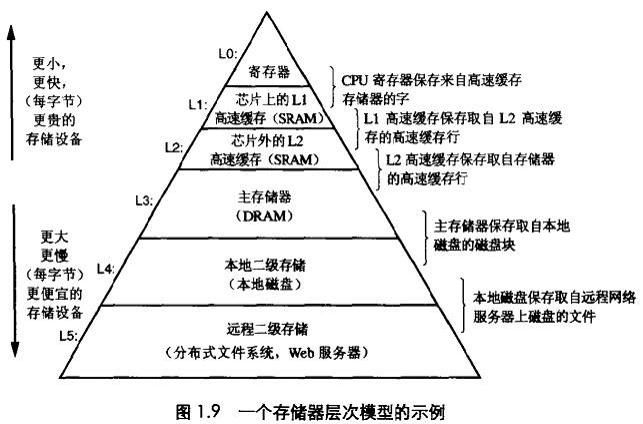
包括 Redis/Memcache 这样的 key-value 内存存储系统,非常适合于读多写少的业务场景,而 Redis 是一个基于多种数据结构的内存存储系统,让缓存系统更加好玩。
概述
在讲述 Redis 如何提供服务之前,有必要介绍 Redis 的事件驱动模型。
我们知道,进程能够进行网络的读写操作,但有些时候这些读写操作是不可行的,譬如因为内核的网络发送缓冲区满了导致不可写;网络收取缓存中无数据可读,导致不可读。那如果有一种机制,可以在一个事件(可读或者可写)发生的时候,才告知到进程,这样就避免了进程在一个事件出现等待阻塞的情况,提高了进程的吞吐能力。 Redis 内部有一个小型的事件驱动,它和 Libevent 网络库的事件驱动一样,都是依托操作系统的 I/O 多路复用技术支撑起来的,这种 IO 驱动模型有个经典的名字:Reactor 模型,反应炉。
利用 I/O 多路复用技术,监听感兴趣的 I/O 事件,例如读事件,写事件等,同时也要维护一个以文件描述符为主键,数据为某个预设函数的事件表,这里其实就是一个数组或者链表。当事件触发时,比如某个文件描述符可读,系统会返回文件描述符值,用这个值在事件表中找到相应的数据项(包括回调函数等),从而实现回调。同样的,定时事件也是可以实现的,因为系统提供的 I/O 多路复用技术中的函数允许我们设置等待超时的时间,预设定时间内没有事件发生时,会返回。
上面一段话比较综合,可能需要一些 Linux 系统编程和网络编程的基础,但你会看到多数 Reactor 事件驱动程序都是这么实现的。
事件驱动数据结构
Redis 事件驱动内部有四个主要的数据结构,分别是:事件循环结构体,文件事件结构体,时间事件结构体和触发事件结构体。
// 文件事件结构体
/* File event structure */
typedef struct aeFileEvent {
int mask; /* one of AE_(READABLE|WRITABLE) */
// 回调函数指针
aeFileProc *rfileProc;
aeFileProc *wfileProc;
// clientData 参数一般是指向redisClient 的指针
void *clientData;
} aeFileEvent;
// 时间事件结构体
/* Time event structure */
typedef struct aeTimeEvent {
long long id; /* time event identifier. */
long when_sec; /* seconds */
long when_ms; /* milliseconds */
// 定时回调函数指针
aeTimeProc *timeProc;
// 定时事件清理函数,当删除定时事件的时候会被调用
aeEventFinalizerProc *finalizerProc;
// clientData 参数一般是指向redisClient 的指针
void *clientData;
// 定时事件表采用链表来维护
struct aeTimeEvent *next;
} aeTimeEvent;
// 触发事件
/* A fired event */
typedef struct aeFiredEvent {
int fd;
int mask;
} aeFiredEvent;
// 事件循环结构体
/* State of an event based program */
typedef struct aeEventLoop {
int maxfd; /* highest file descriptor currently registered */
int setsize; /* max number of file descriptors tracked */
// 记录最大的定时事件id + 1
long long timeEventNextId;
// 用于系统时间的矫正
time_t lastTime; /* Used to detect system clock skew */
// I/O 事件表
aeFileEvent *events; /* Registered events */
// 被触发的事件
aeFiredEvent *fired; /* Fired events */
// 定时事件表
aeTimeEvent *timeEventHead;
// 事件循环结束标识
int stop;
// 对于不同的I/O 多路复用技术,有不同的数据,详见各自实现
void *apidata; /* This is used for polling API specific data */
// 新的循环前需要执行的操作
aeBeforeSleepProc *beforesleep;
} aeEventLoop;
上面的数据结构能给我们很好的提示:事件循环结构体维护 I/O 事件表,定时事件表和触发事件表。
事件循环中心
Redis 的主函数中调用 initServer() 函数从而初始化事件循环中心(EventLoop),它的主要工作是在 aeCreateEventLoop() 中完成的。
aeEventLoop *aeCreateEventLoop(int setsize) {
aeEventLoop *eventLoop;
int i;
// 分配空间
if ((eventLoop = zmalloc(sizeof(*eventLoop))) == NULL) goto err;
// 分配文件事件结构体空间
eventLoop->events = zmalloc(sizeof(aeFileEvent)*setsize);
// 分配已触发事件结构体空间
eventLoop->fired = zmalloc(sizeof(aeFiredEvent)*setsize);
if (eventLoop->events == NULL || eventLoop->fired == NULL) goto err;
eventLoop->setsize = setsize;
eventLoop->lastTime = time(NULL);
// 时间事件链表头
eventLoop->timeEventHead = NULL;
// 后续提到
eventLoop->timeEventNextId = 0;
eventLoop->stop = 0;
eventLoop->maxfd = -1;
// 进入事件循环前需要执行的操作,此项会在redis main() 函数中设置
eventLoop->beforesleep = NULL;
// 在这里,aeApiCreate() 函数对于每个IO 多路复用模型的实现都有不同,
// 具体参见源代码,因为每种IO 多路复用模型的初始化都不同
if (aeApiCreate(eventLoop) == -1) goto err;
/* Events with mask == AE_NONE are not set. So let's initialize the
* vector with it. */
// 初始化事件类型掩码为无事件状态
for (i = 0; i < setsize; i++)
eventLoop->events[i].mask = AE_NONE;
return eventLoop;
err:
if (eventLoop) {
zfree(eventLoop->events);
zfree(eventLoop->fired);
zfree(eventLoop);
}
return NULL;
}
有上面初始化工作只是完成了一个空的事件中心而已,并没有注册一些感兴趣的事件。要想驱动事件循环,还需要下面的工作。
Redis 事件驱动原理
事件注册详解
文件 I/O 事件注册主要操作在 aeCreateFileEvent() 中完成。aeCreateFileEvent() 会根据文件描述符的数值大小在事件循环结构体的 I/O 事件表中取一个数据空间,利用系统提供的 I/O 多路复用技术监听感兴趣的 I/O 事件,并设置回调函数。

int aeCreateFileEvent(aeEventLoop *eventLoop, int fd, int mask,
aeFileProc *proc, void *clientData)
{
if (fd >= eventLoop->setsize) {
errno = ERANGE;
return AE_ERR;
}
// 在I/O 事件表中选择一个空间
aeFileEvent *fe = &eventLoop->events[fd];
// aeApiAddEvent() 只在此函数中调用,对于不同IO 多路复用实现,会有所不同
if (aeApiAddEvent(eventLoop, fd, mask) == -1)
return AE_ERR;
fe->mask |= mask;
// 设置回调函数
if (mask & AE_READABLE) fe->rfileProc = proc;
if (mask & AE_WRITABLE) fe->wfileProc = proc;
fe->clientData = clientData;
if (fd > eventLoop->maxfd)
eventLoop->maxfd = fd;
return AE_OK;
}
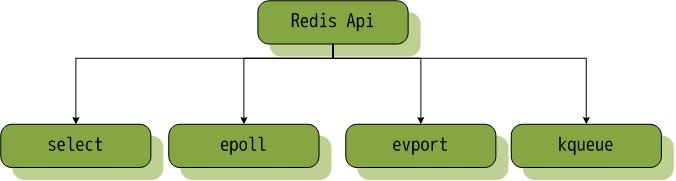
对于不同版本的 I/O 多路复用,比如 epoll,select,kqueue 等,Redis 有各自的版本,但接口统一,譬如 aeApiAddEvent(),会有多个版本的实现。
准备监听工作
initServer() 中调用了 aeCreateEventLoop() 完成了事件中心的初始化,initServer() 还做了监听的准备。
/* Open the TCP listening socket for the user commands. */
// listenToPort() 中有调用listen()
if (server.port != 0 &&
listenToPort(server.port,server.ipfd,&server.ipfd_count) == REDIS_ERR)
exit(1);
// UNIX 域套接字
/* Open the listening Unix domain socket. */
if (server.unixsocket != NULL) {
unlink(server.unixsocket); /* don't care if this fails */
server.sofd = anetUnixServer(server.neterr,server.unixsocket,
server.unixsocketperm);
if (server.sofd == ANET_ERR) {
redisLog(REDIS_WARNING, "Opening socket: %s", server.neterr);
exit(1);
}
}
从上面可以看出,Redis 提供了 TCP 和 UNIX 域套接字两种工作方式。以 TCP 工作方式为例,listenPort() 创建绑定了套接字并启动了监听,这是网络编程的基础部分了。
为监听套接字注册事件
在进入事件循环前还需要做一些准备工作。紧接着,initServer() 为所有的监听套接字注册了读事件(读事件表示有新的连接到来),响应函数为 acceptTcpHandler() 或者 acceptUnixHandler()。
// 创建接收TCP 或者UNIX 域套接字的事件处理
// TCP
/* Create an event handler for accepting new connections in TCP and Unix
* domain sockets. */
for (j = 0; j < server.ipfd_count; j++) {
// acceptTcpHandler() tcp 连接接受处理函数
if (aeCreateFileEvent(server.el, server.ipfd[j], AE_READABLE,
acceptTcpHandler,NULL) == AE_ERR)
{
redisPanic(
"Unrecoverable error creating server.ipfd file event.");
}
}
// UNIX 域套接字
if (server.sofd > 0 && aeCreateFileEvent(server.el,server.sofd,AE_READABLE,
acceptUnixHandler,NULL) == AE_ERR)
redisPanic("Unrecoverable error creating server.sofd file event.");
来看看 acceptTcpHandler() 做了什么:
void acceptTcpHandler(aeEventLoop *el, int fd, void *privdata, int mask) {
int cport, cfd;
char cip[REDIS_IP_STR_LEN];
REDIS_NOTUSED(el);
REDIS_NOTUSED(mask);
REDIS_NOTUSED(privdata);
// 接收客户端请求
cfd = anetTcpAccept(server.neterr, fd, cip, sizeof(cip), &cport);
// 出错
if (cfd == AE_ERR) {
redisLog(REDIS_WARNING,"Accepting client connection: %s", server.neterr);
return;
}
// 记录
redisLog(REDIS_VERBOSE,"Accepted %s:%d", cip, cport);
// 真正有意思的地方
acceptCommonHandler(cfd,0);
}
接收套接字与客户端建立连接后,调用 acceptCommonHandler()。acceptCommonHandler()主要工作就是:
- 建立并保存服务端与客户端的连接信息,这些信息保存在一个 struct redisClient 结构 体中;
- 为与客户端连接的套接字注册读事件,相应的回调函数为 readQueryFromClient(),readQueryFromClient() 作用是从套接字读取数据,执行相应操作并回复客户端。
简而言之,就是接收一个 TCP 请求。
事件循环
以上做好了准备工作,可以进入事件循环。跳出 initServer() 回到 main() 中,main() 会调用 aeMain()。进入事件循环发生在 aeProcessEvents() 中:
- 根据定时事件表计算需要等待的最短时间;
- 调用 redis api aeApiPoll() 进入监听轮询,如果没有事件发生就会进入睡眠状态,其实 就是 I/O 多路复用 select() epoll() 等的调用;
- 有事件发生会被唤醒,处理已触发的 I/O 事件和定时事件。
来看看 aeMain() 的具体实现:
void aeMain(aeEventLoop *eventLoop) {
eventLoop->stop = 0;
while (!eventLoop->stop) {
// 进入事件循环可能会进入睡眠状态。在睡眠之前,执行预设置的函数
// aeSetBeforeSleepProc()。
if (eventLoop->beforesleep != NULL)
eventLoop->beforesleep(eventLoop);
// AE_ALL_EVENTS 表示处理所有的事件
aeProcessEvents(eventLoop, AE_ALL_EVENTS);
}
}
事件触发
这里以 select 版本的 redis api 实现作为讲解,aeApiPoll() 调用了 select() 进入了监听轮 询。aeApiPoll() 的 tvp 参数是最小等待时间,它会被预先计算出来,它主要完成:
- 拷贝读写的 fdset。select() 的调用会破坏传入的fdset,实际上有两份 fdset,一份作为 备份,另一份用作调用。每次调用 select() 之前都从备份中直接拷贝一份;
- 调用 select();
- 被唤醒后,检查 fdset 中的每一个文件描述符,并将可读或者可写的描述符记录到触 发表当中。
接下来的操作便是执行相应的回调函数,代码在上一段中已经贴出:先处理 I/O 事件,再 处理定时事件。
static int aeApiPoll(aeEventLoop *eventLoop, struct timeval *tvp) {
aeApiState *state = eventLoop->apidata;
int retval, j, numevents = 0;
/*
真有意思,在aeApiState 结构中:
typedef struct aeApiState {
fd_set rfds, wfds;
fd_set _rfds, _wfds;
} aeApiState;
在调用select() 的时候传入的是_rfds 和_wfds,所有监听的数据
在rfds 和wfds 中。
在下次需要调用selec() 的时候,会将rfds 和wfds 中的数据拷贝
进_rfds 和_wfds 中。*/
memcpy(&state->_rfds,&state->rfds,sizeof(fd_set));
memcpy(&state->_wfds,&state->wfds,sizeof(fd_set));
retval = select(eventLoop->maxfd+1,
&state->_rfds,&state->_wfds,NULL,tvp);
if (retval > 0) {
// 轮询
for (j = 0; j <= eventLoop->maxfd; j++) {
int mask = 0;
aeFileEvent *fe = &eventLoop->events[j];
if (fe->mask == AE_NONE) continue;
if (fe->mask & AE_READABLE && FD_ISSET(j,&state->_rfds))
mask |= AE_READABLE;
if (fe->mask & AE_WRITABLE && FD_ISSET(j,&state->_wfds))
mask |= AE_WRITABLE;
// 添加到触发事件表中
eventLoop->fired[numevents].fd = j;
eventLoop->fired[numevents].mask = mask;
numevents++;
}
}
return numevents;
}
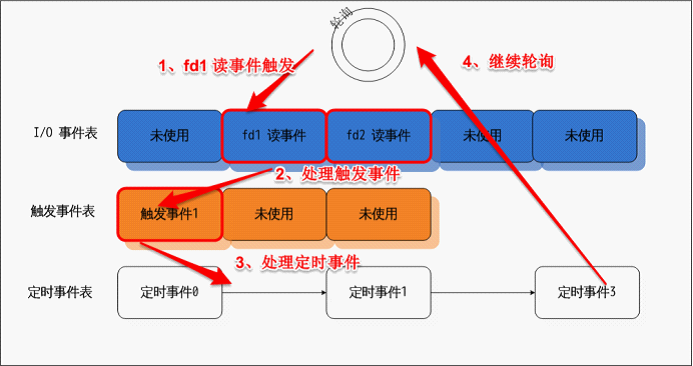
Redis 的事件驱动总结如下:
- 初始化事件循环结构体
- 注册监听套接字的读事件
- 注册定时事件
- 进入事件循环
- 如果监听套接字变为可读,会接收客户端请求,并为对应的套接字注册读事件
- 如果与客户端连接的套接字变为可读,执行相应的操作
在刚刚接触 Redis 的时候,最想要知道的是一个’set name Jhon’ 命令到达 Redis 服务器的时候,它是如何返回’OK’ 的?里面命令处理的流程如何,具体细节怎么样?你一定有问过自己。阅读别人的代码是很枯燥的,但带着好奇心阅读代码,是一件很兴奋的事情,接着翻到了 Redis 源码的 main() 函数。
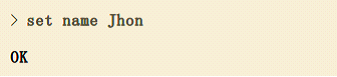
Redis 在启动做了一些初始化逻辑,比如配置文件读取,数据中心初始化,网络通信模块初始化等,待所有初始化任务完毕后,便开始等待请求。
当请求到来时,Redis 进程会被唤醒,原理是 epoll. select, kqueue 等一些 I/O 多路复用的系统调用。如果有阅读上一章节,应该理解这一句话。接着读取来来自客户端的数据,解析命令,查找命令,并执行命令。
执行命令’set name Jhon’ 的时候,Redis 会在预先初始化好的哈希表里头, 查找 key=’name’ 对应的位置,并存入。
最后,把回复的内容准备好回送给客户端,客户端于是收到了’OK’. 接下来,我们看看详细的过程是怎么样的。
详细的过程
了解了 Redis 的事件驱动模型后,带着命令是如何被处理的这个问题去读代码。刚开始的时候,会有一堆的变量和函数等着读者,但只要抓住主干就好了,下面就是 Redis 的主干部分。
int main(int argc, char **argv) {
......
// 初始化服务器配置,主要是填充 redisServer 结构体中的各种参数
initServerConfig();
......
// 初始化服务器
initServer();
......
// 进入事件循环
aeMain(server.el);
}
分别来看看它们主要做了什么?
initServerConfig()
initServerConfig() 主要是填充 struct redisServer 这个结构体,Redis 所有相关的配置都 在里面。
void initServer() {
// 创建事件循环结构体
server.el = aeCreateEventLoop(server.maxclients+REDIS_EVENTLOOP_FDSET_INCR);
// 分配数据集空间
server.db = zmalloc(sizeof(redisDb)*server.dbnum);
/* Open the TCP listening socket for the user commands. */
// listenToPort() 中有调用listen()
if (server.port != 0 &&
listenToPort(server.port,server.ipfd,&server.ipfd_count) == REDIS_ERR)
exit(1);
......
// 初始化redis 数据集
/* Create the Redis databases, and initialize other internal state. */
for (j = 0; j < server.REDIS_DEFAULT_DBNUM; j++) { // 初始化多个数据库
// 哈希表,用于存储键值对
server.db[j].dict = dictCreate(&dbDictType,NULL);
// 哈希表,用于存储每个键的过期时间
server.db[j].expires = dictCreate(&keyptrDictType,NULL);
server.db[j].blocking_keys = dictCreate(&keylistDictType,NULL);
server.db[j].ready_keys = dictCreate(&setDictType,NULL);
server.db[j].watched_keys = dictCreate(&keylistDictType,NULL);
server.db[j].id = j;
server.db[j].avg_ttl = 0;
}
......
// 创建接收TCP 或者UNIX 域套接字的事件处理
// TCP
/* Create an event handler for accepting new connections in TCP and Unix
* domain sockets. */
for (j = 0; j < server.ipfd_count; j++) {
// acceptTcpHandler() tcp 连接接受处理函数
if (aeCreateFileEvent(server.el, server.ipfd[j], AE_READABLE,
acceptTcpHandler,NULL) == AE_ERR)
{
redisPanic(
"Unrecoverable error creating server.ipfd file event.");
}
}
......
}
在这里,创建了事件中心,是 Redis 的网络模块,如果你有学过 linux 下的网络编程,那么知道这里一定和 select/epoll/kqueue 相关。
接着,是初始化数据中心,我们平时使用 Redis 设置的键值对,就是存储在里面。这里不急着深入它是怎么做到存储我们的键值对的,接着往下看好了,因为我们主要是想把大致的脉络弄清楚。
在最后一段的代码中,Redis 给 listen fd 注册了回调函数 acceptTcpHandler,也就是说当新的客户端连接的时候,这个函数会被调用,详情接下来再展开。
aeMain()
接着就开始等待请求的到来。
void aeMain(aeEventLoop *eventLoop) {
eventLoop->stop = 0;
while (!eventLoop->stop) {
// 进入事件循环可能会进入睡眠状态。在睡眠之前,执行预设置
// 的函数aeSetBeforeSleepProc()。
if (eventLoop->beforesleep != NULL)
eventLoop->beforesleep(eventLoop);
// AE_ALL_EVENTS 表示处理所有的事件
aeProcessEvents(eventLoop, AE_ALL_EVENTS);
}
}
前面的两个函数都属于是初始化的工作,到这里的时候,Redis 正式进入等待接收请求的状态。具体的实现,和 select/epoll/kqueue 这些 IO 多路复用的系统调用相关,而这也是网络编程的基础部分了。继续跟踪调用链:
int aeProcessEvents(aeEventLoop *eventLoop, int flags)
{
......
// 调用IO 多路复用函数阻塞监听
numevents = aeApiPoll(eventLoop, tvp);
// 处理已经触发的事件
for (j = 0; j < numevents; j++) {
// 找到I/O 事件表中存储的数据
aeFileEvent *fe = &eventLoop->events[eventLoop->fired[j].fd];
int mask = eventLoop->fired[j].mask;
int fd = eventLoop->fired[j].fd;
int rfired = 0;
/* note the fe->mask & mask & ... code: maybe an already processed
* event removed an element that fired and we still didn't
* processed, so we check if the event is still valid. */
// 读事件
if (fe->mask & mask & AE_READABLE) {
rfired = 1;
fe->rfileProc(eventLoop,fd,fe->clientData,mask);
}
// 写事件
if (fe->mask & mask & AE_WRITABLE) {
if (!rfired || fe->wfileProc != fe->rfileProc)
fe->wfileProc(eventLoop,fd,fe->clientData,mask);
}
processed++;
}
}
// 处理定时事件
/* Check time events */
if (flags & AE_TIME_EVENTS)
processed += processTimeEvents(eventLoop);
return processed; /* return the number of processed file/time events */
}
可以看到,aeApiPoll 即是 IO 多路复用调用的地方,当有请求到来的时候,进程会觉醒以处理到来的请求。如果你有留意到上面的定时事件处理,也就明白相应的定时处理函数是在哪里触发的了。
新连接的处理流程
在 initServer() 的讲解中,Redis 注册了回调函数 acceptTcpHandler(),当有新的连接到来时,这个函数会被回调,上面的函数指针 rfileProc() 实际上就是指向了 acceptTcpHandler()。
下面是 acceptTcpHandler() 的核心代码:
// 用于TCP 接收请求的处理函数
void acceptTcpHandler(aeEventLoop *el, int fd, void *privdata, int mask) {
int cport, cfd;
char cip[REDIS_IP_STR_LEN];
REDIS_NOTUSED(el);
REDIS_NOTUSED(mask);
REDIS_NOTUSED(privdata);
// 接收客户端请求
cfd = anetTcpAccept(server.neterr, fd, cip, sizeof(cip), &cport);
// 出错
if (cfd == AE_ERR) {
redisLog(REDIS_WARNING,"Accepting client connection: %s", server.neterr);
return;
}
// 记录
redisLog(REDIS_VERBOSE,"Accepted %s:%d", cip, cport);
// 真正有意思的地方
acceptCommonHandler(cfd,0);
}
anetTcpAccept 是接收一个请求cfd,真正有意思的地方是acceptCommonHandler,而 acceptCommonHandler 最核心的调用是 createClient。Redis 对于每一个客户端的连接,都会对应一个结构体 struct redisClient。下面是 createClient 的核心代码:
redisClient *createClient(int fd) {
redisClient *c = zmalloc(sizeof(redisClient));
/* passing -1 as fd it is possible to create a non connected client.
* This is useful since all the Redis commands needs to be executed
* in the context of a client. When commands are executed in other
* contexts (for instance a Lua script) we need a non connected client. */
if (fd != -1) {
anetNonBlock(NULL,fd);
anetEnableTcpNoDelay(NULL,fd);
if (server.tcpkeepalive)
anetKeepAlive(NULL,fd,server.tcpkeepalive);
// 为接收到的套接字注册监听事件
// readQueryFromClient() 应该为处理客户端请求的函数
if (aeCreateFileEvent(server.el,fd,AE_READABLE,
readQueryFromClient, c) == AE_ERR)
{
close(fd);
zfree(c);
return NULL;
}
}
......
return c;
}
可以看到,createClient 在事件中心为与客户端连接的套接字注册了 readQueryFrom-Client() 回调函数,而这也就是说当客户端有请求数据过来的时候,acceptTcpHandler() 会被调用。于是,我们找到了’set name Jhon’ 开始处理的地方。
请求的处理流程
readQueryFromClient() 则是获取来自客户端的数据,接下来它会调用processInput-Buffer() 解析命令和执行命令,对于命令的执行,调用的是函数 processCommand()。下面是 processCommand() 核心代码:
int processCommand(redisClient *c) {
......
// 查找命令,redisClient.cmd 在此时赋值
/* Now lookup the command and check ASAP about trivial error conditions
* such as wrong arity, bad command name and so forth. */
c->cmd = c->lastcmd = lookupCommand(c->argv[0]->ptr);
// 没有找到命令
if (!c->cmd) {
flagTransaction(c);
addReplyErrorFormat(c,"unknown command '%s'",
(char*)c->argv[0]->ptr);
return REDIS_OK;
// 参数个数不符合
} else if ((c->cmd->arity > 0 && c->cmd->arity != c->argc) ||
(c->argc < c->cmd->arity)) {
flagTransaction(c);
addReplyErrorFormat(c,"wrong number of arguments for '%s' command",
c->cmd->name);
return REDIS_OK;
}
.....
// 加入命令队列的情况
/* Exec the command */
if (c->flags & REDIS_MULTI &&
c->cmd->proc != execCommand && c->cmd->proc != discardCommand &&
c->cmd->proc != multiCommand && c->cmd->proc != watchCommand)
{
// 命令入队
queueMultiCommand(c);
addReply(c,shared.queued);
// 真正执行命令。
// 注意,如果是设置了多命令模式,那么不是直接执行命令,而是让命令入队
} else {
call(c,REDIS_CALL_FULL);
if (listLength(server.ready_keys))
handleClientsBlockedOnLists();
}
return REDIS_OK;
}
如上可以看到,Redis 首先根据客户端给出的命令字在命令表中查找对应的 c->cmd, 即 struct redisCommand()。
c->cmd = c->lastcmd = lookupCommand(c->argv[0]->ptr);
Redis 在初始化的时候准备了一个大数组,初始化了所有的命令,即初始化多个 structredisCommand,在 struct redisCommand 中就有该命令对应的回调函数指针。找到命令结构体后,则开始执行命令,核心调用是call()。
执行命令
call() 做的事情有很多,但这里只关注这一句话:call() 调用了命令的回调函数。
// call() 函数是执行命令的核心函数,真正执行命令的地方
/* Call() is the core of Redis execution of a command */
void call(redisClient *c, int flags) {
......
// 执行命令对应的处理函数
c->cmd->proc(c);
......
}
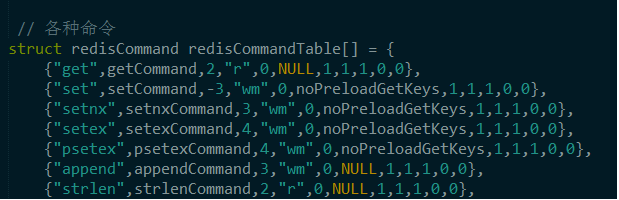
对于’set name Jhon’ 命令,对应的回调函数是 setCommand() 函数。setCommand 对 set 命令的参数做了检测,因为还提供设置一个键值对的过期时间等功能,这里只关注最简单的情况。
void setCommand(redisClient *c) {
......
setGenericCommand(c,flags,c->argv[1],c->argv[2],expire,unit,NULL,NULL);
}
void setGenericCommand(redisClient *c, int flags, robj *key,
robj *val, robj *expire, int unit, robj *ok_reply,
robj *abort_reply) {
......
setKey(c->db,key,val);
......
addReply(c, ok_reply ? ok_reply : shared.ok);
}
void setKey(redisDb *db, robj *key, robj *val) {
if (lookupKeyWrite(db,key) == NULL) {
dbAdd(db,key,val);
} else {
dbOverwrite(db,key,val);
}
......
}
setKey() 首先查看 key 是否存在于数据集中,如果存在则覆盖写;如果不存在则添加到数据集中。这里关注 key 不存在的情况:
void dbAdd(redisDb *db, robj *key, robj *val) {
sds copy = sdsdup(key->ptr);
int retval = dictAdd(db->dict, copy, val);
redisAssertWithInfo(NULL,key,retval == REDIS_OK);
}
dictAdd() 就是把 key 存到字典中,实际上即是存到一个哈希表。
在哪里回复客户端
最后,回到 setGenericCommand(), 会调用 addReply()。addReply() 会为与客户端连接的套接字注册可写事件,把’ok’ 添加到客户端的回复缓存中。待再一次回到事件循环的时候,如果这个套接字可写,相应的回调函数就可以被回调了。回复缓存中的数据会被发送到客户端。
由此’set name Jhon’ 命令执行完毕。在把这个流程捋顺的过程,我省去了很多的细节,只关注场景最简单情况最单一的时候,其他的代码都没有去看,譬如主从复制的,持久化的相关逻辑。这对我们快速了解一个系统的原理是很关键的。同样,在面对其他系统代码的时候,也可以带着这三个最简单的问题去阅读:它是谁,它从哪里来,又到哪里去。
4
Redis 基础数据结构
这里所说的数据结构用于 Redis 内部存储 key-value 的,其他诸如 Redis 配置相关的数据结构,不在此篇讨论范围。
一览 Redis 数据结构
dict
dict,哈希表,Redis 所有的 key-value 都存储在里面。如果曾经学过哈希表这种数据结构,那么很容易能写出一个来,但 redis dict 考虑了更多的功能。
// 哈希表(字典)数据结构,Redis 的所有键值对都会存储在这里。其中包含两个哈希表。
typedef struct dict {
// 哈希表的类型,包括哈希函数,比较函数,键值的内存释放函数
dictType *type;
// 存储一些额外的数据
void *privdata;
// 两个哈希表
dictht ht[2];
// 哈希表重置下标,指定的是哈希数组的数组下标
int rehashidx; /* rehashing not in progress if rehashidx == -1 */
// 绑定到哈希表的迭代器个数
int iterators; /* number of iterators currently running */
} dict;
redisObject
redisObject,任何 value 都会被包装成一个 redisObject,redisObject 能指定 value 的类型,编码方式等数据属性。
typedef struct redisObject {
// 刚刚好32 bits
// 对象的类型,字符串/列表/集合/哈希表
unsigned type:4;
// 未使用的两个位
unsigned notused:2; /* Not used */
// 编码的方式,Redis 为了节省空间,提供多种方式来保存一个数据
// 譬如:“123456789” 会被存储为整数123456789
unsigned encoding:4;
// 当内存紧张,淘汰数据的时候用到
unsigned lru:22; /* lru time (relative to server.lruclock) */
// 引用计数
int refcount;
// 数据指针
void *ptr;
} robj;
zset
zset,是一个跳表,插入删除速度非常快。
typedef struct zset {
// 哈希表
dict *dict;
// 跳表
zskiplist *zsl;
} zset;
adlist
adlist,普通的双链表。
typedef struct list {
// 头指针
listNode *head;
// 尾指针
listNode *tail;
// 数据拷贝函数指针
void *(*dup)(void *ptr);
// 析构函数指针
void (*free)(void *ptr);
// 数据比较指针
int (*match)(void *ptr, void *key);
// 链表长度
unsigned long len;
} list;
ziplist
ziplist,是一个压缩的双链表,实现了针对 CPU cache 的优化。ziplist 实际上一个字符串,通过一系列的算法来实现压缩双链表。
TODO 增加一个欢快的跳表结构图。
intset
intset,整数集合。
typedef struct intset {
// 每个整数的类型
uint32_t encoding;
// intset 长度
uint32_t length;
// 整数数组
int8_t contents[];
} intset;
sds
sds,字符串数据结构,因为经常涉及字符串的操作,Redis 做了特殊的实现,文档中将其称为 Hacking String.
typedef char *sds;
Redis 命令和相关的数据结构
以添加数据的一类命令 SET,HSET,LPUSH,SADD,ZADD 为例,分别看看哪个命令底层用了哪些数据结构。
SET 命令底层所使用的即为 sds,或者整型数据类型 int,long long 等,或者浮点型 float,double。不同的情况所使用的数据类不同,SET 底层所使用的数据类型是最为简单的。
HSET 命令底层所使用的即为压缩双链表 ziplist,而非哈希表 dict。LPUSH 命令底层所使用的即为压缩双链表ziplist。
SADD 命令情况较为特殊,SADD 所面向的是一个集合(set)。如果往集合总添加的数据都是整数,会采用整数集合intset;如果集合中的数据有一个不为整数,会采用哈希表 dict。因此,会一个特殊的情况,假使前N 个数据都为整数,第N+1 个数据为非整数,如字符串,那么数据结构会从 intset 转换为dict。
ZADD 也较为特殊,SADD 所面向的是一个有序集合(sorted set)。ZADD 底层数据结构可以采用跳表 skiplist 和哈希表 dict 的结合;也可以采用 ziplist。具体选用哪种需要看 server.zset_max_ziplist_entries 和server.zset_max_ziplist_value 两个配置变量的设置。前者掺合 dict 是为了能快速查找某个成员是否存在于跳表中。有序集一个较为普遍的应用是排行榜。
除了双链表 adlist,我将在接下来的系列文章中一一讲解每一个数据结构,以及选用相应数据结构的目的。
redisObject 结构简介
redis 是 key-value 存储系统,其中 key 类型一般为字符串,而 value 类型则为 redis 对象(redis object)。Redis 对象可以绑定各种类型的数据,譬如 string、list 和set。
typedef struct redisObject {
// 刚刚好32 bits
// 对象的类型,字符串/列表/集合/哈希表
unsigned type:4;
// 未使用的两个位
unsigned notused:2; /* Not used */
// 编码的方式,Redis 为了节省空间,提供多种方式来保存一个数据
// 譬如:“123456789” 会被存储为整数123456789
unsigned encoding:4;
// 当内存紧张,淘汰数据的时候用到
unsigned lru:22; /* lru time (relative to server.lruclock) */
// 引用计数
int refcount;
// 数据指针
void *ptr;
} robj;
其中,void *ptr 已经给了我们无限的遐想空间了。
redisObject 数据的属性
redis.h 中定义了 struct redisObject,它是一个简单优秀的数据结构,因为在 redisObject 中数据属性和数据分开来了,其中,数据属性包括数据类型,存储编码方式,淘汰时钟,引用计数。下面一一展开:
数据类型,标记了 Redis 对象绑定的是什么类型的数据,有下面几种可能的值;
/* Object types */
#define REDIS_STRING 0
#define REDIS_LIST 1
#define REDIS_SET 2
#define REDIS_ZSET 3
#define REDIS_HASH 4
存储编码方式,一个数据,可以以多种方式存储。譬如,数据类型为 REDIS_SET 的数据编码方式可能为 REDIS_ENCODING_HT,也可能为 REDIS_ENCODING_INTSET。
/* Objects encoding. Some kind of objects like Strings and Hashes can be
* internally represented in multiple ways. The 'encoding' field of the object
* is set to one of this fields for this object. */
#define REDIS_ENCODING_RAW 0 /* Raw representation */
#define REDIS_ENCODING_INT 1 /* Encoded as integer */
#define REDIS_ENCODING_HT 2 /* Encoded as hash table */
#define REDIS_ENCODING_ZIPMAP 3 /* Encoded as zipmap */
#define REDIS_ENCODING_LINKEDLIST 4 /* Encoded as regular linked list */
#define REDIS_ENCODING_ZIPLIST 5 /* Encoded as ziplist */
#define REDIS_ENCODING_INTSET 6 /* Encoded as intset */
#define REDIS_ENCODING_SKIPLIST 7 /* Encoded as skiplist */
淘汰时钟,Redis 对数据集占用内存的大小有「实时」的计算,当超出限额时,会淘汰超时的数据。
引用计数,一个 Redis 对象可能被多个指针引用。当需要增加或者减少引用的时候,必须调用相应的函数,程序员必须遵守这一准则。
// 增加 Redis 对象引用
void incrRefCount(robj *o) {
o->refcount++;
}
// 减少 Redis 对象引用。特别的,引用为零的时候会销毁对象
void decrRefCount(robj *o) {
if (o->refcount <= 0) redisPanic("decrRefCount against refcount <= 0");
// 如果取消的是最后一个引用,则释放资源
if (o->refcount == 1) {
// 不同数据类型,销毁操作不同
switch(o->type) {
case REDIS_STRING: freeStringObject(o); break;
case REDIS_LIST: freeListObject(o); break;
case REDIS_SET: freeSetObject(o); break;
case REDIS_ZSET: freeZsetObject(o); break;
case REDIS_HASH: freeHashObject(o); break;
default: redisPanic("Unknown object type"); break;
}
zfree(o);
} else {
o->refcount--;
}
}
得益于 Redis 是单进程单线程工作的,所以增加/减少引用的操作不必保证原子性,这在 memcache 中是做不到的(memcached 是多线程的工作模式,需要做到互斥)。structredisObject 把最后一个指针留给了真正的数据。
sds 结构简介
sds 被称为是 Hacking String. hack 的地方就在 sds 保存了字符串的长度以及剩余空间。sds 的实现在 sds.c 中。
sds 头部的实现:
struct sdshdr {
int len;
int free;
char buf[];
};
hacking sds
倘若使用指针即char *buf
,分配内存需要量两个步骤:一次分配结构体,一次分配char *buf
,在是否内存的时候也需要释放两次内存:一次为char *buf
,一次为结构体内存。而用长度为 0 的字符数组可以将分配和释放内存的次数都降低为 1 次,从而简化内存的管理。
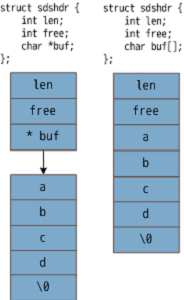
另外,长度为 0 的数组即 char buf[] 不占用内存:
// char buf[] 的情况
struct sdshdr s;
printf("%d",sizeof(s));
// 8
// char *buf 的情况
struct sdshdr s;
printf("%d",sizeof(s));
// 12
Redis 中涉及较多的字符串操作,譬如 APPEND 命令。相比普通的字符串,sds 获取字符串的长度以及剩余空间的复杂度都是 O(1),前者需要 O(N)。
// 返回sdshdr.len
static inline size_t sdslen(const sds s) {
struct sdshdr *sh = (void*)(s-(sizeof(struct sdshdr)));
return sh->len;
}
// 返回sdshdr.free
static inline size_t sdsavail(const sds s) {
struct sdshdr *sh = (void*)(s-(sizeof(struct sdshdr)));
return sh->free;
}
sds.c 中还实现了针对 sds 的字符串操作函数,譬如分配,追加,释放等,这些函数具体详细的实现读者可以自行剖析。
Redis 的键值对存储在哪里
在 Redis 中有多个数据集,数据集采用的数据结构是哈希表,用以存储键值对。默认所有的客户端都是使用第一个数据集,一个数据集对应一个哈希表。如果客户端有需要可以使用 select 命令来选择不同的数据集。Redis 在初始化服务器的时候就会初始化所有的数据集:
void initServer() {
......
// 分配数据集空间
server.db = zmalloc(sizeof(redisDb)*server.dbnum);
......
// 初始化redis 数据集
/* Create the Redis databases, and initialize other internal state. */
for (j = 0; j < server.REDIS_DEFAULT_DBNUM; j++) { // 初始化多个数据库
// 哈希表,用于存储键值对
server.db[j].dict = dictCreate(&dbDictType,NULL);
// 哈希表,用于存储每个键的过期时间
server.db[j].expires = dictCreate(&keyptrDictType,NULL);
......
}
......
}
哈希表 dict
我们来看看哈希表的数据结构是怎么样的:
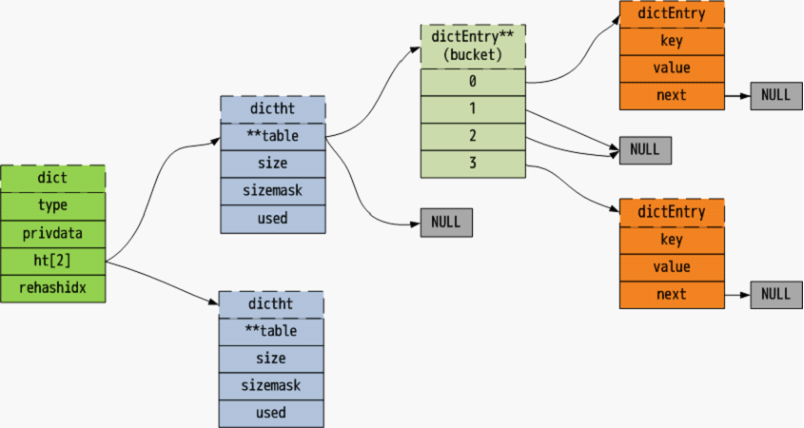
数据集采用的数据结构是哈希表,数据真正存储在哈希表中,用开链法解决冲突问题,struct dictht 即为一个哈希表。但在 Redis 哈希表数据结构 struct dict 中有两个哈希表,下文将两个哈希表分别称为第一个和第二个哈希表,Redis 提供两个哈希表是为了能够在不中断服务的情况下扩展(expand)哈希表,这是很有趣的一部分。
// 可以把它认为是一个链表,提示,开链法
typedef struct dictEntry {
void *key;
union {
\\ val 指针可以指向一个redisObject
void *val;
uint64_t u64;
int64_t s64;
} v;
struct dictEntry *next;
} dictEntry;
// 要存储多种多样的数据结构,势必不同的数据有不同的哈希算法,不同的键值比较算法,
// 不同的析构函数。
typedef struct dictType {
// 哈希函数
unsigned int (*hashFunction)(const void *key);
void *(*keyDup)(void *privdata, const void *key);
void *(*valDup)(void *privdata, const void *obj);
// 比较函数
int (*keyCompare)(void *privdata, const void *key1, const void *key2);
// 键值析构函数
void (*keyDestructor)(void *privdata, void *key);
void (*valDestructor)(void *privdata, void *obj);
} dictType;
// 一般哈希表数据结构
/* This is our hash table structure. Every dictionary has two of this as we
* implement incremental rehashing, for the old to the new table. */
typedef struct dictht {
// 两个哈希表
dictEntry **table;
// 哈希表的大小
unsigned long size;
// 哈希表大小掩码
unsigned long sizemask;
// 哈希表中数据项数量
unsigned long used;
} dictht;
// 哈希表(字典)数据结构,Redis 的所有键值对都会存储在这里。其中包含两个哈希表。
typedef struct dict {
// 哈希表的类型,包括哈希函数,比较函数,键值的内存释放函数
dictType *type;
// 存储一些额外的数据
void *privdata;
// 两个哈希表
dictht ht[2];
// 哈希表重置下标,指定的是哈希数组的数组下标
int rehashidx; /* rehashing not in progress if rehashidx == -1 */
// 绑定到哈希表的迭代器个数
int iterators; /* number of iterators currently running */
} dict;
扩展哈希表
Redis 为每个数据集配备两个哈希表,能在不中断服务的情况下扩展哈希表。平时哈希表扩展的做法是,为新的哈希表另外开辟一个空间,将原哈希表的数据重新计算哈希值,以移动到新哈希表。如果原哈希表数据过多,中间大量的计算过程较好费大量时间,这段时间 Redis 将不能提供服务。
Redis 扩展哈希表的做法有点小聪明:为第二个哈希表分配新空间,其空间大小为原哈希表键值对数量的两倍(是的,没错),接着逐步将第一个哈希表中的数据移动到第二个哈希表;待移动完毕后,将第二个哈希值赋值给第一个哈希表,第二个哈希表置空。在这个过程中,数据会分布在两个哈希表,这时候就要求在 CURD 时,都要考虑两个哈希表。而这里,将第一个哈希表中的数据移动到第二个哈希表被称为重置哈希(rehash)。
重置哈希表
在 CURD 的时候会执行一步的重置哈希表操作,在服务器定时程序 serverCorn() 中会 执行一定时间的重置哈希表操作。为什么在定时程序中重置哈希表了,还 CURD 的时候还 要呢?或者反过来问。一个可能的原因是 Redis 做了两手准备:在服务器空闲的时候,定 时程序会完成重置哈希表;在服务器过载的时候,更多重置哈希表操作会落在 CURD 的服 务上。 下面是重置哈希表的函数,其主要任务就是选择哈希表中的一个位置上的单链表,重 新计算哈希值,放到第二个哈希表。
int dictRehash(dict *d, int n) {
// 重置哈希表结束,直接返回
if (!dictIsRehashing(d)) return 0;
while(n--) {
dictEntry *de, *nextde;
// 第一个哈希表为空,证明重置哈希表已经完成,将第二个哈希表赋值给第一个,
// 结束
/* Check if we already rehashed the whole table... */
if (d->ht[0].used == 0) {
zfree(d->ht[0].table);
d->ht[0] = d->ht[1];
_dictReset(&d->ht[1]);
d->rehashidx = -1;
return 0;
}
/* Note that rehashidx can't overflow as we are sure there are more
* elements because ht[0].used != 0 */
assert(d->ht[0].size > (unsigned)d->rehashidx);
// 找到哈希表中不为空的位置
while(d->ht[0].table[d->rehashidx] == NULL) d->rehashidx++;
de = d->ht[0].table[d->rehashidx];
// 此位置的所有数据移动到第二个哈希表
/* Move all the keys in this bucket from the old to the new hash HT */
while(de) {
unsigned int h;
nextde = de->next;
/* Get the index in the new hash table */
// 计算哈希值
h = dictHashKey(d, de->key) & d->ht[1].sizemask;
// 头插法
de->next = d->ht[1].table[h];
d->ht[1].table[h] = de;
// 更新哈希表中的数据量
d->ht[0].used--;
d->ht[1].used++;
de = nextde;
}
// 置空
d->ht[0].table[d->rehashidx] = NULL;
// 指向哈希表的下一个位置
d->rehashidx++;
}
return 1;
}
低效率的哈希表添加、替换操作
在 Redis 添加替换的时候,都先要查看数据集中是否已经存在该键,也就是一个查找的过程,如果一个 Redis 命令导致过多的查找,会导致效率低下。可能是为了扬长避短,即高读性能和低写性能,Redis 中数据的添加和替换效率不高,特别是替换效率低的恶心。
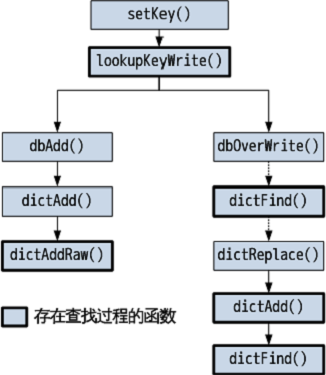
在 redis SET 命令的调用链中,添加键值对会导致了 2 次的键值对查找;替换键值对最多会导致 4 次的键值对查找。在 dict 的实现中,dictFind() 和_dictIndex() 都会导致键值对的查找,详细可以参看源码。所以,从源码来看,经常在 Redis 上写不是一个明智的选择。
哈希表的迭代
在 RDB 和 AOF 持久化操作中,都需要迭代哈希表。哈希表的遍历本身难度不大,但因为每个数据集都有两个哈希表,所以遍历哈希表的时候也需要注意遍历两个哈希表:第一个哈希表遍历完毕的时候,如果发现重置哈希表尚未结束,则需要继续遍历第二个哈希表。
// 迭代器取下一个数据项的入口
dictEntry *dictNext(dictIterator *iter)
{
while (1) {
if (iter->entry == NULL) {
dictht *ht = &iter->d->ht[iter->table];
// 新的迭代器
if (iter->index == -1 && iter->table == 0) {
if (iter->safe)
iter->d->iterators++;
else
iter->fingerprint = dictFingerprint(iter->d);
}
iter->index++;
// 下标超过了哈希表大小,不合法
if (iter->index >= (signed) ht->size) {
// 如果正在重置哈希表,Redis 会尝试在第二个哈希表上进行迭代,
// 否则真的就不合法了
if (dictIsRehashing(iter->d) && iter->table == 0) {
// 正在重置哈希表,证明数据正在从第一个哈希表整合到第二个哈希表,
// 则指向第二个哈希表
iter->table++;
iter->index = 0;
ht = &iter->d->ht[1];
} else {
// 否则迭代完毕,这是真正不合法的情况
break;
}
}
// 取得数据项入口
iter->entry = ht->table[iter->index];
} else {
// 取得下一个数据项人口
iter->entry = iter->nextEntry;
}
// 迭代器会保存下一个数据项的入口,因为用户可能会删除此函数返回的数据项
// 入口,如此会导致迭代器失效,找不到下一个数据项入口
if (iter->entry) {
/* We need to save the 'next' here, the iterator user
* may delete the entry we are returning. */
iter->nextEntry = iter->entry->next;
return iter->entry;
}
}
return NULL;
}
概述
在 Redis 中,list 有两种存储方式:双链表(LinkedList)和压缩双链表(ziplist)。双链 表即普通数据结构中遇到的,在 adlist.h 和 adlist.c 中实现。压缩双链表以连续的内存空间 来表示双链表,压缩双链表节省前驱和后驱指针的空间(8b),这在小的list 上,压缩效率 是非常明显的,因为一个普通的双链表中,前驱后驱指针在 64 位机器上需分别占用 8B; 压缩双链表在 ziplist.h 和 ziplist.c 中实现。这篇主要详述压缩双链表,普通双链表可以参看其他。
压缩双链表的具体实现
在压缩双链表中,节省了前驱和后驱指针的空间,在 64 位机器上共节省了 8 个字节, 这让数据在内存中更为紧凑。只要清晰的描述每个数据项的边界,就可以轻易得到前驱后 驱数据项的位置,ziplist 就是这么做的。
ziplist 的格式可以表示为:
<zlbytes><zltail><zllen><entry>...<entry><zlend>
zlbytes 是 ziplist 占用的空间;zltail 是最后一个数据项的偏移位置,这方便逆向遍历链 表,也是双链表的特性;zllen 是数据项entry 的个数;zlend 就是 255,占 1B。
下面详细展开 entry 的结构。entry 的格式即为典型的 type-lenght-value,即 TLV,表述如下:
|<prelen><<encoding+lensize><len>><data>|
|---1----------------2--------------3---|
域 1)是前驱数据项的大小。因为不用描述前驱的数据类型,描述较为简单。
域 2)是此数据项的的类型和数据大小。为了节省空间,redis 预设定了多种长度的字符串 和整数。
3 种长度的字符串:
#define ZIP_STR_06B (0 << 6)
#define ZIP_STR_14B (1 << 6)
#define ZIP_STR_32B (2 << 6)
5 种长度的整数:
#define ZIP_INT_16B (0xc0 | 0<<4)
#define ZIP_INT_32B (0xc0 | 1<<4)
#define ZIP_INT_64B (0xc0 | 2<<4)
#define ZIP_INT_24B (0xc0 | 3<<4)
#define ZIP_INT_8B 0xfe
域3)为真正的数据。 透过 ziplist 查找函数 ziplistFind(),来熟悉 ziplist entry 的数据格式:
// 在ziplist 中查找数据项
/* Find pointer to the entry equal to the specified entry. Skip 'skip' entries
* between every comparison. Returns NULL when the field could not be found. */
unsigned char *ziplistFind(unsigned char *p, unsigned char *vstr,
unsigned int vlen, unsigned int skip) {
int skipcnt = 0;
unsigned char vencoding = 0;
long long vll = 0;
while (p[0] != ZIP_END) {
unsigned int prevlensize, encoding, lensize, len;
unsigned char *q;
ZIP_DECODE_PREVLENSIZE(p, prevlensize);
// 跳过前驱数据项大小,解析数据项大小
// len 为data 大小
// lensize 为len 所占内存大小
ZIP_DECODE_LENGTH(p + prevlensize, encoding, lensize, len);
// q 指向data
q = p + prevlensize + lensize;
if (skipcnt == 0) {
/* Compare current entry with specified entry */
if (ZIP_IS_STR(encoding)) {
// 字符串比较
if (len == vlen && memcmp(q, vstr, vlen) == 0) {
return p;
}
} else {
// 整数比较
/* Find out if the searched field can be encoded. Note that
* we do it only the first time, once done vencoding is set
* to non-zero and vll is set to the integer value. */
if (vencoding == 0) {
// 尝试将vstr 解析为整数
if (!zipTryEncoding(vstr, vlen, &vll, &vencoding)) {
/* If the entry can't be encoded we set it to
* UCHAR_MAX so that we don't retry again the next
* time. */
// 不能编码为数字!!!会导致当前查找的数据项被跳过
vencoding = UCHAR_MAX;
}
/* Must be non-zero by now */
assert(vencoding);
}
/* Compare current entry with specified entry, do it only
* if vencoding != UCHAR_MAX because if there is no encoding
* possible for the field it can't be a valid integer. */
if (vencoding != UCHAR_MAX) {
// 读取整数
long long ll = zipLoadInteger(q, encoding);
if (ll == vll) {
return p;
}
}
}
/* Reset skip count */
skipcnt = skip;
} else {
/* Skip entry */
skipcnt--;
}
// 移动到ziplist 的下一个数据项
/* Move to next entry */
p = q + len;
}
// 没有找到
return NULL;
}
注意,ziplist 每次插入新的数据都要 realloc。
为什么要用 ziplist
redis HSET 命令官网的描述是: Sets field in the hash stored at key to value. If key does not exist, a new key holding a hash is created. If field already exists in the hash, it is overwritten.
实际上,HSET 底层所使用的数据结构正是上面所说的 ziplist,而不是平时所说的 hashtable. 那为什么要使用ziplist,反对的理由是查找来说,(ziplist O(N))VS(hashtable O(1))? redis
可是为内存节省想破了头。首先 ziplist 比 hashtable 更节省内存,再者,redis 考虑到 如果数据紧凑的 ziplist 能够放入 CPU 缓存(hashtable 很难,因为它是非线性的),那么查 找算法甚至会比 hashtable 要快!。ziplist 由此有性能和内存空间的优势。
概述
跳表(skiplist)是一个特俗的链表,相比一般的链表,有更高的查找效率,其效率可比拟于二叉查找树。
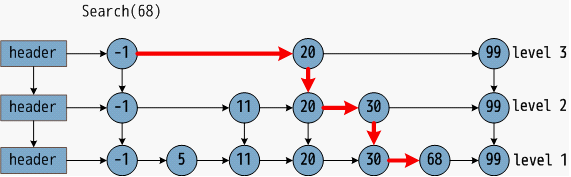
一张关于跳表和跳表搜索过程如下图:
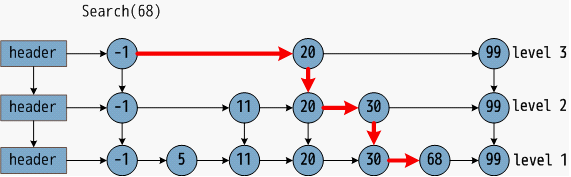
在图中,需要寻找 68,在给出的查找过程中,利用跳表数据结构优势,只比较了 3 次,横箭头不比较,竖箭头比较。由此可见,跳表预先间隔地保存了有序链表中的节点,从而在查找过程中能达到类似于二分搜索的效果,而二分搜索思想就是通过比较中点数据放弃另一半的查找,从而节省一半的查找时间。缺点即浪费了空间,自古空间和时间两难全。
插播一段:跳表在 1990 年由 William Pugh 提出,而红黑树早在 1972 年由鲁道夫·贝尔发明了。红黑树在空间和时间效率上略胜跳表一筹,但跳表实现相对简单得到程序猿们的青睐。Redis 和 Leveldb 中都有采用跳表。 这篇文章,借着 Redis 的源码了解跳表的实现。
跳表的数据结构
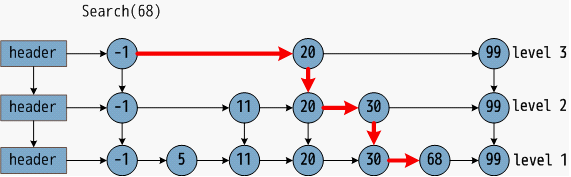
从上图中,总结跳表的性质:
- 由很多层结构组成
- 每一层都是一个有序的链表
- 最底层(Level 1) 的链表包含所有元素
- 如果一个元素出现在 Level i 的链表中,则它在 Level i 之下的链表也都会出现。
- 每个节点包含两个指针,一个指向同一链表中的下一个元素,一个指向下面一层的元素。
Redis 中跳表数据结构定义:
// 跳表节点结构体
/* ZSETs use a specialized version of Skiplists */
typedef struct zskiplistNode {
// 节点数据
robj *obj;
// 分数,游戏分数?按游戏分数排序
double score;
// 后驱指针
struct zskiplistNode *backward;
// 前驱指针数组TODO
struct zskiplistLevel {
struct zskiplistNode *forward;
// 调到下一个数据项需要走多少步,这在计算rank 的非常有帮助
unsigned int span;
} level[];
} zskiplistNode;
typedef struct zskiplist {
// 跳表头尾指针
struct zskiplistNode *header, *tail;
// 跳表的长度
unsigned long length;
// 跳表的高度
int level;
} zskiplist;
特别的,在上图中似乎每个数据都被保存了多次,其实只保存了一次。
在 struct zskiplistNode 中数据和指针是分开存储的,struct zskiplistLevel 即是一个描述跳表层级的数据结构。我们可以看到,一个节点主要由有一个存储真实数据的指针,一个后驱指针,和多个前驱指针。
TODO 可以在这里插入一张表跳表实际数据结构的示意图。
跳表的插入
跳表算法描述如下:找出每一层新插入数据位置的前驱并保存,在 Redis 中跳表插入是根据 score/member 的大小(看不懂可以参看 redis ZADD 命令)来决定插入的位置;将新数据插入到指定位置,并调整指针,在 redis 中还会调整 span。
什么是 span?
span 即从两个相邻节点间隔了多少节点。譬如 level 1,-1 的 span 就是 1;level 2,-1 的 span 为 2。 因为新出入数据的层数是随机的,有两种情况 ① 小于等于原有的层数;② 大于原有的层数。需要做特殊处理。
1)小于等于原有的层数
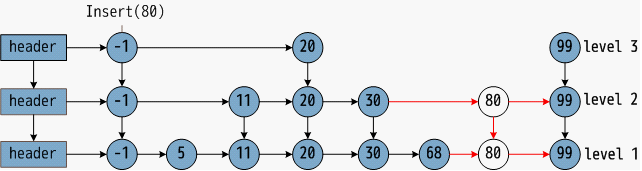
redis 中跳表插入算法的具体实现:
zskiplistNode *zslInsert(zskiplist *zsl, double score, robj *obj) {
// update 是插入节点所在位置的前一个节点。我们在学习链表插入的时候,需要找到插入
// 位置的前一个节点。因为在跳表中一个节点是有多个前驱指针的,所以这里需要保存的
// 是多个节点,而不是一个节点
zskiplistNode *update[ZSKIPLIST_MAXLEVEL], *x;
unsigned int rank[ZSKIPLIST_MAXLEVEL];
int i, level;
redisAssert(!isnan(score));
x = zsl->header;
// 遍历skiplist 中所有的层,找到数据将要插入的位置,并保存在update 中
for (i = zsl->level-1; i >= 0; i--) {
/* store rank that is crossed to reach the insert position */
rank[i] = i == (zsl->level-1) ? 0 : rank[i+1];
// 链表的搜索
while (x->level[i].forward &&
(x->level[i].forward->score < score ||
(x->level[i].forward->score == score &&
compareStringObjects(x->level[i].forward->obj,obj) < 0))) {
rank[i] += x->level[i].span;
x = x->level[i].forward;
}
// update[i] 记录了新数据项的前驱
update[i] = x;
}
// random 一个level,是随机的
/* we assume the key is not already inside, since we allow duplicated
* scores, and the re-insertion of score and redis object should never
* happen since the caller of zslInsert() should test in the hash table
* if the element is already inside or not. */
level = zslRandomLevel();
// random level 比原有的zsl->level 大,需要增加skiplist 的level
if (level > zsl->level) {
for (i = zsl->level; i < level; i++) {
rank[i] = 0;
update[i] = zsl->header;
update[i]->level[i].span = zsl->length;
}
zsl->level = level;
}
// 插入
x = zslCreateNode(level,score,obj);
for (i = 0; i < level; i++) {
// 新节点项插到update[i] 的后面
x->level[i].forward = update[i]->level[i].forward;
update[i]->level[i].forward = x;
/* update span covered by update[i] as x is inserted here */
x->level[i].span = update[i]->level[i].span - (rank[0] - rank[i]);
update[i]->level[i].span = (rank[0] - rank[i]) + 1;
}
// 更高的level 尚未调整span
/* increment span for untouched levels */
for (i = level; i < zsl->level; i++) {
update[i]->level[i].span++;
}
// 调整新节点的后驱指针
x->backward = (update[0] == zsl->header) ? NULL : update[0];
if (x->level[0].forward)
x->level[0].forward->backward = x;
else
zsl->tail = x;
// 调整skiplist 的长度
zsl->length++;
return x;
}
跳表的删除
跳表的删除算和插入算法步骤类似:找出每一层需删除数据的前驱并保存;接着调整指针,在 Redis 中还会调整 span。
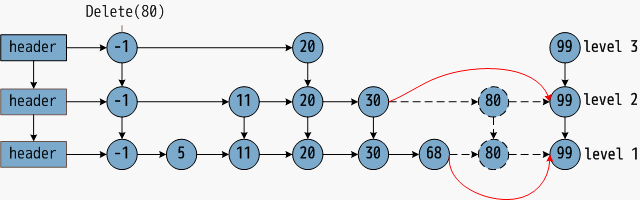
Redis 中跳表删除算法的具体实现:
// x 是需要删除的节点
// update 是每一个层x 的前驱数组
/* Internal function used by zslDelete, zslDeleteByScore and zslDeleteByRank */
void zslDeleteNode(zskiplist *zsl, zskiplistNode *x, zskiplistNode **update) {
int i;
// 调整span 和forward 指针
for (i = 0; i < zsl->level; i++) {
if (update[i]->level[i].forward == x) {
update[i]->level[i].span += x->level[i].span - 1;
update[i]->level[i].forward = x->level[i].forward;
} else {
// update[i]->level[i].forward == NULL,只调整span
update[i]->level[i].span -= 1;
}
}
// 调整后驱指针
if (x->level[0].forward) {
x->level[0].forward->backward = x->backward;
} else {
zsl->tail = x->backward;
}
// 删除某一个节点后,层数level 可能降低,调整level
while(zsl->level > 1 && zsl->header->level[zsl->level-1].forward == NULL)
zsl->level--;
// 调整跳表的长度
zsl->length--;
}
Redis 中的跳表
Redis 中结合跳表(skiplist)和哈希表(dict)形成一个新的数据结构 zset。添加 dict 是为了快速定位跳表中是否存在某个 member!
typedef struct zset {
dict *dict;
zskiplist *zsl;
} zset;
Redis 选用 skiplist 场景
ZXX 命令是针对有序集合(sorted set)的,譬如:
ZADD
ZCARD
ZCOUNT
ZINCRBY
ZINTERSTORE
ZLEXCOUNT
ZRANGE
ZRANGEBYLEX
ZRANGEBYSCORE
ZRANK
ZREM
ZREMRANGEBYLEX
ZREMRANGEBYRANK
ZREMRANGEBYSCORE
ZREVRANGE
ZREVRANGEBYSCORE
ZREVRANK
ZSCAN
ZSCORE
ZUNIONSTORE
Redis
intset 和 dict 都是 sadd 命令的底层数据结构,当添加的所有数据都是整数时,会使用前者;否则使用后者。特别的,当遇到添加数据为字符串,即不能表示为整数时,Redis 会把数据结构转换为 dict,即把 intset 中的数据全部搬迁到 dict。
本片展开的是 intset,dict 的文章可以参看之前写的《Redis 数据结构 dict》。
intset 结构体
intset 底层本质是一个有序的、不重复的、整型的数组,支持不同类型整数。
typedef struct intset {
// 每个整数的类型
uint32_t encoding;
// intset 长度
uint32_t length;
// 整数数组
int8_t contents[];
} intset;
结构体中 intset.contents 数组没有指定长度,这样是为了方便分配释放内存。encoding 能下面的三个值:分别是 16,32 和 64 位整数:
/* Note that these encodings are ordered, so:
* INTSET_ENC_INT16 < INTSET_ENC_INT32 < INTSET_ENC_INT64. */
#define INTSET_ENC_INT16 (sizeof(int16_t))
#define INTSET_ENC_INT32 (sizeof(int32_t))
#define INTSET_ENC_INT64 (sizeof(int64_t))
intset 搜索
intset 是有序的整数数组,可以用二分搜索查找。
static uint8_t intsetSearch(intset *is, int64_t value, uint32_t *pos) {
int min = 0, max = intrev32ifbe(is->length)-1, mid = -1;
int64_t cur = -1;
/* The value can never be found when the set is empty */
// 集合为空
if (intrev32ifbe(is->length) == 0) {
if (pos) *pos = 0;
return 0;
} else {
/* Check for the case where we know we cannot find the value,
* but do know the insert position. */
// value 比最大元素还大
if (value > _intsetGet(is,intrev32ifbe(is->length)-1)) {
if (pos) *pos = intrev32ifbe(is->length);
return 0;
// value 比最小元素还小
} else if (value < _intsetGet(is,0)) {
if (pos) *pos = 0;
return 0;
}
}
// 熟悉的二分查找
while(max >= min) {
mid = (min+max)/2;
cur = _intsetGet(is,mid);
if (value > cur) {
min = mid+1;
} else if (value < cur) {
max = mid-1;
} else {
break;
}
}
if (value == cur) {
if (pos) *pos = mid;
return 1;
} else {
if (pos) *pos = min;
return 0;
}
}
intset 插入
intset 实现中比较有意思的是插入算法部分。
/* Insert an integer in the intset */
intset *intsetAdd(intset *is, int64_t value, uint8_t *success) {
uint8_t valenc = _intsetValueEncoding(value);
uint32_t pos;
if (success) *success = 1;
/* Upgrade encoding if necessary. If we need to upgrade, we know that
* this value should be either appended (if > 0) or prepended (if < 0),
* because it lies outside the range of existing values. */
// 需要插入整数的所需内存超出了原有集合整数的范围,即内存类型不同,
// 则升级整数类型
if (valenc > intrev32ifbe(is->encoding)) {
/* This always succeeds, so we don't need to curry *success. */
return intsetUpgradeAndAdd(is,value);
// 正常,分配内存,插入
} else {
// intset 内部不允许重复
/* Abort if the value is already present in the set.
* This call will populate "pos" with the right position to insert
* the value when it cannot be found. */
if (intsetSearch(is,value,&pos)) {
if (success) *success = 0;
return is;
}
// realloc
is = intsetResize(is,intrev32ifbe(is->length)+1);
// 迁移内存,腾出空间给新的数据。intsetMoveTail() 完成内存迁移工作
if (pos < intrev32ifbe(is->length)) intsetMoveTail(is,pos,pos+1);
}
// 在腾出的空间中设置新的数据
_intsetSet(is,pos,value);
// 更新intset size
is->length = intrev32ifbe(intrev32ifbe(is->length)+1);
return is;
}
整数数组有可能遇到需要升级的时候,譬如往 int32_t 数组插入一个 ing64_t 整数的时候。当插入数据的内存占用比原有数据大的时候,intsetUpgradeAndAdd() 会被调用。
/* Upgrades the intset to a larger encoding and inserts the given integer. */
static intset *intsetUpgradeAndAdd(intset *is, int64_t value) {
uint8_t curenc = intrev32ifbe(is->encoding);
uint8_t newenc = _intsetValueEncoding(value);
int length = intrev32ifbe(is->length);
// value<0 头插,value>0 尾插
int prepend = value < 0 ? 1 : 0;
// realloc
/* First set new encoding and resize */
is->encoding = intrev32ifbe(newenc);
is = intsetResize(is,intrev32ifbe(is->length)+1);
// 逆向处理,防止数据被覆盖,一般的插入排序步骤
/* Upgrade back-to-front so we don't overwrite values.
* Note that the "prepend" variable is used to make sure we have an empty
* space at either the beginning or the end of the intset. */
while(length--)
_intsetSet(is,length+prepend,_intsetGetEncoded(is,length,curenc));
// value<0 放在集合开头,否则放在集合末尾。
// 因为,此函数是对整数所占内存进行升级,意味着value 不是在集合中最大就是最小!
/* Set the value at the beginning or the end. */
if (prepend)
_intsetSet(is,0,value);
else
_intsetSet(is,intrev32ifbe(is->length),value);
// 更新set size
is->length = intrev32ifbe(intrev32ifbe(is->length)+1);
return is;
}
5
Redis 内功心法
概述
在 Redis 中,允许用户设置最大使用内存大小 server.maxmemory,在内存限定的情况下是很有用的。譬如,在一台 8G 机子上部署了 4 个 Redis 服务点,每一个服务点分配 1G 的内存大小,减少内存紧张的情况,由此获取更为稳健的服务。Redis 内存数据集大小上升到一定大小的时候,就会施行数据淘汰策略。Redis 提供 6 种数据淘汰策略:
- volatile-lru:从已设置过期时间的数据集(server.db[i].expires)中挑选最近最少使用 的数据淘汰
- volatile-ttl:从已设置过期时间的数据集(server.db[i].expires)中挑选将要过期的数 据淘汰
- volatile-random:从已设置过期时间的数据集(server.db[i].expires)中任意选择数据 淘汰
- allkeys-lru:从数据集(server.db[i].dict)中挑选最近最少使用的数据淘汰
- allkeys-random:从数据集(server.db[i].dict)中任意选择数据淘汰
- no-enviction(驱逐):禁止驱逐数据
Redis 确定驱逐某个键值对后,会删除这个数据,并将这个数据变更消息发布到本地(AOF 持久化)和从机(主从连接)。
LRU 数据淘汰机制
在服务器配置中保存了 lru 计数器 server.lrulock,会定时(Redis 定时程序serverCorn())更新,server.lrulock 的值是根据 server.unixtime 计算出来的。
// redisServer 保存了lru 计数器
struct redisServer {
...
unsigned lruclock:22; /* Clock incrementing every minute, for LRU */
...
};
另外,从 struct redisObject 中可以发现,每一个 Redis 对象都会设置相应的 lru,即最近访问的时间。可以想象的是,每一次访问数据的时候,会更新 redisObject.lru。
LRU 数据淘汰机制是这样的:在数据集中随机挑选几个键值对,取出其中 lru 最大的键值对淘汰。所以,你会发现,Redis 并不是保证取得所有数据集中最近最少使用(LRU)的键值对,而只是随机挑选的几个键值对中的。
// 每一个redis 对象都保存了lru
#define REDIS_LRU_CLOCK_MAX ((1<<21)-1) /* Max value of obj->lru */
#define REDIS_LRU_CLOCK_RESOLUTION 10 /* LRU clock resolution in seconds */
typedef struct redisObject {
// 刚刚好32 bits
// 对象的类型,字符串/列表/集合/哈希表
unsigned type:4;
// 未使用的两个位
unsigned notused:2; /* Not used */
// 编码的方式,redis 为了节省空间,提供多种方式来保存一个数据
// 譬如:“123456789” 会被存储为整数123456789
unsigned encoding:4;
unsigned lru:22; /* lru time (relative to server.lruclock) */
// 引用数
int refcount;
// 数据指针
void *ptr;
} robj;
// redis 定时执行程序。联想:linux cron
int serverCron(struct aeEventLoop *eventLoop, long long id, void *clientData) {
......
/* We have just 22 bits per object for LRU information.
* So we use an (eventually wrapping) LRU clock with 10 seconds resolution.
* 2^22 bits with 10 seconds resolution is more or less 1.5 years.
**
Note that even if this will wrap after 1.5 years it's not a problem,
* everything will still work but just some object will appear younger
* to Redis. But for this to happen a given object should never be touched
* for 1.5 years.
**
Note that you can change the resolution altering the
* REDIS_LRU_CLOCK_RESOLUTION define.
*/
updateLRUClock();
......
}
// 更新服务器的lru 计数器
void updateLRUClock(void) {
server.lruclock = (server.unixtime/REDIS_LRU_CLOCK_RESOLUTION) &
REDIS_LRU_CLOCK_MAX;
}
TTL 数据淘汰机制
Redis 数据集数据结构中保存了键值对过期时间的表,即 redisDb.expires,在使用 SET 命令的时候,就有一个键值对超时时间的选项。和 LRU 数据淘汰机制类似,TTL 数据淘汰机制是这样的:从过期时间 redisDB.expires 表中随机挑选几个键值对,取出其中 ttl 最大的键值对淘汰。同样你会发现,Redis 并不是保证取得所有过期时间的表中最快过期的键值对,而只是随机挑选的几个键值对中的。
无论是什么机制,都是从所有的键值对中挑选合适的淘汰。
在哪里开始淘汰数据
Redis 每服务客户端执行一个命令的时候,会检测使用的内存是否超额。如果超额,即进行数据淘汰。
// 执行命令
int processCommand(redisClient *c) {
......
// 内存超额
/* Handle the maxmemory directive.
**
First we try to free some memory if possible (if there are volatile
* keys in the dataset). If there are not the only thing we can do
* is returning an error. */
if (server.maxmemory) {
int retval = freeMemoryIfNeeded();
if ((c->cmd->flags & REDIS_CMD_DENYOOM) && retval == REDIS_ERR) {
flagTransaction(c);
addReply(c, shared.oomerr);
return REDIS_OK;
}
}
......
}
这是我们之前讲述过的命令处理函数。在处理命令处理函数的过程,会涉及到内存使用量的检测,如果检测到内存使用超额,会触发数据淘汰机制。我们来看看淘汰机制触发的函数 freeMemoryIfNeeded() 里面发生了什么。
// 如果需要,是否一些内存
int freeMemoryIfNeeded(void) {
size_t mem_used, mem_tofree, mem_freed;
int slaves = listLength(server.slaves);
// redis 从机回复空间和AOF 内存大小不计算入redis 内存大小
// 关于已使用内存大小是如何统计的,我们会其他章节讲解,这里先忽略这个细节
/* Remove the size of slaves output buffers and AOF buffer from the
* count of used memory. */
mem_used = zmalloc_used_memory();
// 从机回复空间大小
if (slaves) {
listIter li;
listNode *ln;
listRewind(server.slaves,&li);
while((ln = listNext(&li))) {
redisClient *slave = listNodeValue(ln);
unsigned long obuf_bytes = getClientOutputBufferMemoryUsage(slave);
if (obuf_bytes > mem_used)
mem_used = 0;
else
mem_used -= obuf_bytes;
}
}
// server.aof_buf && server.aof_rewrite_buf_blocks
if (server.aof_state != REDIS_AOF_OFF) {
mem_used -= sdslen(server.aof_buf);
mem_used -= aofRewriteBufferSize();
}
// 内存是否超过设置大小
/* Check if we are over the memory limit. */
if (mem_used <= server.maxmemory) return REDIS_OK;
// redis 中可以设置内存超额策略
if (server.maxmemory_policy == REDIS_MAXMEMORY_NO_EVICTION)
return REDIS_ERR; /* We need to free memory, but policy forbids. */
/* Compute how much memory we need to free. */
mem_tofree = mem_used - server.maxmemory;
mem_freed = 0;
while (mem_freed < mem_tofree) {
int j, k, keys_freed = 0;
// 遍历所有数据集
for (j = 0; j < server.dbnum; j++) {
long bestval = 0; /* just to prevent warning */
sds bestkey = NULL;
struct dictEntry *de;
redisDb *db = server.db+j;
dict *dict;
// 不同的策略,选择的数据集不一样
if (server.maxmemory_policy == REDIS_MAXMEMORY_ALLKEYS_LRU ||
server.maxmemory_policy == REDIS_MAXMEMORY_ALLKEYS_RANDOM)
{
dict = server.db[j].dict;
} else {
dict = server.db[j].expires;
}
// 数据集为空,继续下一个数据集
if (dictSize(dict) == 0) continue;
// 随机淘汰随机策略:随机挑选
/* volatile-random and allkeys-random policy */
if (server.maxmemory_policy == REDIS_MAXMEMORY_ALLKEYS_RANDOM ||
server.maxmemory_policy == REDIS_MAXMEMORY_VOLATILE_RANDOM)
{
de = dictGetRandomKey(dict);
bestkey = dictGetKey(de);
}
// LRU 策略:挑选最近最少使用的数据
/* volatile-lru and allkeys-lru policy */
else if (server.maxmemory_policy == REDIS_MAXMEMORY_ALLKEYS_LRU ||
server.maxmemory_policy == REDIS_MAXMEMORY_VOLATILE_LRU)
{
// server.maxmemory_samples 为随机挑选键值对次数
// 随机挑选server.maxmemory_samples 个键值对,驱逐最近最少使用的数据
for (k = 0; k < server.maxmemory_samples; k++) {
sds thiskey;
long thisval;
robj *o;
// 随机挑选键值对
de = dictGetRandomKey(dict);
// 获取键
thiskey = dictGetKey(de);
/* When policy is volatile-lru we need an additional lookup
* to locate the real key, as dict is set to db->expires. */
if (server.maxmemory_policy == REDIS_MAXMEMORY_VOLATILE_LRU)
de = dictFind(db->dict, thiskey);
o = dictGetVal(de);
// 计算数据的空闲时间
thisval = estimateObjectIdleTime(o);
// 当前键值空闲时间更长,则记录
/* Higher idle time is better candidate for deletion */
if (bestkey == NULL || thisval > bestval) {
bestkey = thiskey;
bestval = thisval;
}
}
}
// TTL 策略:挑选将要过期的数据
/* volatile-ttl */
else if (server.maxmemory_policy == REDIS_MAXMEMORY_VOLATILE_TTL) {
// server.maxmemory_samples 为随机挑选键值对次数
// 随机挑选server.maxmemory_samples 个键值对,驱逐最快要过期的数据
for (k = 0; k < server.maxmemory_samples; k++) {
sds thiskey;
long thisval;
de = dictGetRandomKey(dict);
thiskey = dictGetKey(de);
thisval = (long) dictGetVal(de);
/* Expire sooner (minor expire unix timestamp) is better
* candidate for deletion */
if (bestkey == NULL || thisval < bestval) {
bestkey = thiskey;
bestval = thisval;
}
}
}
// 删除选定的键值对
/* Finally remove the selected key. */
if (bestkey) {
long long delta;
robj *keyobj = createStringObject(bestkey,sdslen(bestkey));
// 发布数据更新消息,主要是AOF 持久化和从机
propagateExpire(db,keyobj);
// 注意, propagateExpire() 可能会导致内存的分配,
// propagateExpire() 提前执行就是因为redis 只计算
// dbDelete() 释放的内存大小。倘若同时计算dbDelete()
// 释放的内存和propagateExpire() 分配空间的大小,与此
// 同时假设分配空间大于释放空间,就有可能永远退不出这个循环。
// 下面的代码会同时计算dbDelete() 释放的内存和propagateExpire() 分配空间的大小// propagateExpire(db,keyobj);
// delta = (long long) zmalloc_used_memory();
// dbDelete(db,keyobj);
// delta -= (long long) zmalloc_used_memory();
// mem_freed += delta;
/////////////////////////////////////////
/* We compute the amount of memory freed by dbDelete() alone.
* It is possible that actually the memory needed to propagate
* the DEL in AOF and replication link is greater than the one
* we are freeing removing the key, but we can't account for
* that otherwise we would never exit the loop.
**
AOF and Output buffer memory will be freed eventually so
* we only care about memory used by the key space. */
// 只计算dbDelete() 释放内存的大小
delta = (long long) zmalloc_used_memory();
dbDelete(db,keyobj);
delta -= (long long) zmalloc_used_memory();
mem_freed += delta;
server.stat_evictedkeys++;
// 将数据的删除通知所有的订阅客户端
notifyKeyspaceEvent(REDIS_NOTIFY_EVICTED, "evicted",
keyobj, db->id);
decrRefCount(keyobj);
keys_freed++;
// 将从机回复空间中的数据及时发送给从机
/* When the memory to free starts to be big enough, we may
* start spending so much time here that is impossible to
* deliver data to the slaves fast enough, so we force the
* transmission here inside the loop. */
if (slaves) flushSlavesOutputBuffers();
}
}
// 未能释放空间,且此时redis 使用的内存大小依旧超额,失败返回
if (!keys_freed) return REDIS_ERR; /* nothing to free... */
}
return REDIS_OK;
}
简介 Redis 持久化 RDB、AOF
为防止数据丢失,需要将 Redis 中的数据从内存中 dump 到磁盘,这就是持久化。Redis 提供两种持久化方式:RDB 和 AOF。Redis 允许两者结合,也允许两者同时关闭。
RDB 可以定时备份内存中的数据集。服务器启动的时候,可以从 RDB 文件中恢复数据集。
AOF(append only file) 可以记录服务器的所有写操作。在服务器重新启动的时候,会把所有的写操作重新执行一遍,从而实现数据备份。当写操作集过大(比原有的数据集还大),Redis 会重写写操作集。
为什么称为 append only file 呢?AOF 持久化是类似于生成一个关于 Redis 写操作的文件,写操作(增删)总是以追加的方式追加到文件中。
本篇主要讲的是 RDB 持久化,了解 RDB 的数据保存结构和运作机制。Redis 主要在 rdb.h 和 rdb.c 两个文件中实现 RDB 的操作。
数据结构 rio
持久化的 IO 操作在 rio.h 和 rio.c 中实现,核心数据结构是 struct rio。RDB 中的几乎每一个函数都带有 rio 参数。struct rio 既适用于文件,又适用于内存缓存,从 struct rio 的实现可见一斑,它抽象了文件和内存的操作。
struct _rio {
// 函数指针,包括读操作,写操作和文件指针移动操作
/* Backend functions.
* Since this functions do not tolerate short writes or reads the return
* value is simplified to: zero on error, non zero on complete success. */
size_t (*read)(struct _rio *, void *buf, size_t len);
size_t (*write)(struct _rio *, const void *buf, size_t len);
off_t (*tell)(struct _rio *);
// 校验和计算函数
/* The update_cksum method if not NULL is used to compute the checksum of
* all the data that was read or written so far. The method should be
* designed so that can be called with the current checksum, and the buf
* and len fields pointing to the new block of data to add to the checksum
* computation. */
void (*update_cksum)(struct _rio *, const void *buf, size_t len);
// 校验和
/* The current checksum */
uint64_t cksum;
// 已经读取或者写入的字符数
/* number of bytes read or written */
size_t processed_bytes;
// 每次最多能处理的字符数
/* maximum single read or write chunk size */
size_t max_processing_chunk;
// 可以是一个内存总的字符串,也可以是一个文件描述符
/* Backend-specific vars. */
union {
struct {
sds ptr;
// 偏移量
off_t pos;
} buffer;
struct {
FILE *fp;
// 偏移量
off_t buffered; /* Bytes written since last fsync. */
off_t autosync; /* fsync after 'autosync' bytes written. */
} file;
} io;
};
typedef struct _rio rio;
redis 定义两个 struct rio,分别是 rioFileIO 和 rioBufferIO,前者用于内存缓存,后者用于文件 IO:
// 适用于内存缓存
static const rio rioBufferIO = {
rioBufferRead,
rioBufferWrite,
rioBufferTell,
NULL, /* update_checksum */
0, /* current checksum */
0, /* bytes read or written */
0, /* read/write chunk size */
{ { NULL, 0 } } /* union for io-specific vars */
};
// 适用于文件IO
static const rio rioFileIO = {
rioFileRead,
rioFileWrite,
rioFileTell,
NULL, /* update_checksum */
0, /* current checksum */
0, /* bytes read or written */
0, /* read/write chunk size */
{ { NULL, 0 } } /* union for io-specific vars */
};
因此,在 RDB 持久化的时候可以将 RDB 保存到磁盘中,也可以保存到内存中,当然保存到内存中就不是持久化了。
RDB 持久化的运作机制
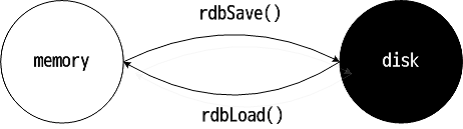
Redis 支持两种方式进行 RDB 持久化:当前进程执行和后台执行(BGSAVE)。RDB BGSAVE 策略是 fork 出一个子进程,把内存中的数据集整个 dump 到硬盘上。两个场景举例:
- Redis 服务器初始化过程中,设定了定时事件,每隔一段时间就会触发持久化操作; 进入定时事件处理程序中,就会 fork 产生子进程执行持久化操作。
- Redis 服务器预设了 save 指令,客户端可要求服务器进程中断服务,执行持久化操作。
这里主要展开的内容是 RDB 持久化操作的写文件过程,读过程和写过程相反。子进程的产生发生在 rdbSaveBackground() 中,真正的 RDB 持久化操作是在 rdbSave(),想要直接进行 RDB 持久化,调用 rdbSave() 即可。
以下主要以代码的方式来展开 RDB 的运作机制:
// 备份主程序
/* Save the DB on disk. Return REDIS_ERR on error, REDIS_OK on success */
int rdbSave(char *filename) {
dictIterator *di = NULL;
dictEntry *de;
char tmpfile[256];
char magic[10];
int j;
long long now = mstime();
FILE *fp;
rio rdb;
uint64_t cksum;
// 打开文件,准备写
snprintf(tmpfile,256,"temp-%d.rdb", (int) getpid());
fp = fopen(tmpfile,"w");
if (!fp) {
redisLog(REDIS_WARNING, "Failed opening .rdb for saving: %s",
strerror(errno));
return REDIS_ERR;
}
// 初始化rdb 结构体。rdb 结构体内指定了读写文件的函数,已写/读字符统计等数据
rioInitWithFile(&rdb,fp);
if (server.rdb_checksum) // 校验和
rdb.update_cksum = rioGenericUpdateChecksum;
// 先写入版本号
snprintf(magic,sizeof(magic),"REDIS%04d",REDIS_RDB_VERSION);
if (rdbWriteRaw(&rdb,magic,9) == -1) goto werr;
for (j = 0; j < server.dbnum; j++) {
// server 中保存的数据
redisDb *db = server.db+j;
// 字典
dict *d = db->dict;
if (dictSize(d) == 0) continue;
// 字典迭代器
di = dictGetSafeIterator(d);
if (!di) {
fclose(fp);
return REDIS_ERR;
}
// 写入RDB 操作码
/* Write the SELECT DB opcode */
if (rdbSaveType(&rdb,REDIS_RDB_OPCODE_SELECTDB) == -1) goto werr;
// 写入数据库序号
if (rdbSaveLen(&rdb,j) == -1) goto werr;
// 写入数据库中每一个数据项
/* Iterate this DB writing every entry */
while((de = dictNext(di)) != NULL) {
sds keystr = dictGetKey(de);
robj key,
*o = dictGetVal(de);
long long expire;
// 将keystr 封装在robj 里
initStaticStringObject(key,keystr);
// 获取过期时间
expire = getExpire(db,&key);
// 开始写入磁盘
if (rdbSaveKeyValuePair(&rdb,&key,o,expire,now) == -1) goto werr;
}
dictReleaseIterator(di);
}
di = NULL; /* So that we don't release it again on error. */
// RDB 结束码
/* EOF opcode */
if (rdbSaveType(&rdb,REDIS_RDB_OPCODE_EOF) == -1) goto werr;
// 校验和
/* CRC64 checksum. It will be zero if checksum computation is disabled, the
* loading code skips the check in this case. */
cksum = rdb.cksum;
memrev64ifbe(&cksum);
rioWrite(&rdb,&cksum,8);
// 同步到磁盘
/* Make sure data will not remain on the OS's output buffers */
fflush(fp);
fsync(fileno(fp));
fclose(fp);
// 修改临时文件名为指定文件名
/* Use RENAME to make sure the DB file is changed atomically only
* if the generate DB file is ok. */
if (rename(tmpfile,filename) == -1) {
redisLog(REDIS_WARNING,"Error moving temp DB file on the final"
"destination: %s", strerror(errno));
unlink(tmpfile);
return REDIS_ERR;
}
redisLog(REDIS_NOTICE,"DB saved on disk");
server.dirty = 0;
// 记录成功执行保存的时间
server.lastsave = time(NULL);
// 记录执行的结果状态为成功
server.lastbgsave_status = REDIS_OK;
return REDIS_OK;
werr:
// 清理工作,关闭文件描述符等
fclose(fp);
unlink(tmpfile);
redisLog(REDIS_WARNING,"Write error saving DB on disk: %s", strerror(errno));
if (di) dictReleaseIterator(di);
return REDIS_ERR;
}
// bgsaveCommand(),serverCron(),syncCommand(),updateSlavesWaitingBgsave() 会调用
// rdbSaveBackground()
int rdbSaveBackground(char *filename) {
pid_t childpid;
long long start;
// 已经有后台程序了,拒绝再次执行
if (server.rdb_child_pid != -1) return REDIS_ERR;
server.dirty_before_bgsave = server.dirty;
// 记录这次尝试执行持久化操作的时间
server.lastbgsave_try = time(NULL);
start = ustime();
if ((childpid = fork()) == 0) {
int retval;
// 取消监听
/* Child */
closeListeningSockets(0);
redisSetProcTitle("redis-rdb-bgsave");
// 执行备份主程序
retval = rdbSave(filename);
// 脏数据,其实就是子进程所消耗的内存大小
if (retval == REDIS_OK) {
// 获取脏数据大小
size_t private_dirty = zmalloc_get_private_dirty();
// 记录脏数据
if (private_dirty) {
redisLog(REDIS_NOTICE,
"RDB: %zu MB of memory used by copy-on-write",
private_dirty/(1024*1024));
}
}
// 退出子进程
exitFromChild((retval == REDIS_OK) ? 0 : 1);
} else {
/* Parent */
// 计算fork 消耗的时间
server.stat_fork_time = ustime()-start;
// fork 出错
if (childpid == -1) {
// 记录执行的结果状态为失败
server.lastbgsave_status = REDIS_ERR;
redisLog(REDIS_WARNING,"Can't save in background: fork: %s",
strerror(errno));
return REDIS_ERR;
}
redisLog(REDIS_NOTICE,"Background saving started by pid %d",childpid);
// 记录保存的起始时间
server.rdb_save_time_start = time(NULL);
// 子进程ID
server.rdb_child_pid = childpid;
updateDictResizePolicy();
return REDIS_OK;
}
return REDIS_OK; /* unreached */
}
如果采用 BGSAVE 策略,且内存中的数据集很大,fork() 会因为要为子进程产生一份虚拟空间表而花费较长的时间;如果此时客户端请求数量非常大的话,会导致较多的写时拷贝操作;在 RDB 持久化操作过程中,每一个数据都会导致 write() 系统调用,CPU 资源很紧张。因此,如果在一台物理机上部署多个 Redis,应该避免同时持久化操作。
那如何知道 BGSAVE 占用了多少内存?子进程在结束之前,读取了自身私有脏数据 Private_Dirty 的大小,这样做是为了让用户看到 Redis 的持久化进程所占用了有多少的空间。在父进程 fork 产生子进程过后,父子进程虽然有不同的虚拟空间,但物理空间上是共存的,直至父进程或者子进程修改内存数据为止,所以脏数 Private_Dirty 可以近似的认为是子进程,即持久化进程占用的空间。
RDB 数据的组织方式
RDB 的文件组织方式为:数据集序号1:操作码:数据1:结束码:校验和—-数据集序号2:操作码:数据2:结束码:校验和……
其中,数据的组织方式为:过期时间:数据类型:键:值,即 TVL(type,length,value)。
举两个字符串存储的例子,其他的大概都以至于的形式来组织数据:
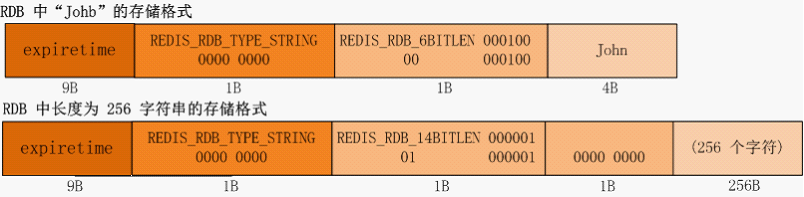
可见,RDB 持久化的结果是一个非常紧凑的文件,几乎每一位都是有用的信息。如果对 redis RDB 数据组织方式的细则感兴趣,可以参看 rdb.h 和 rdb.c 两个文件的实现。
对于每一个键值对都会调用 rdbSaveKeyValuePair(),如下:
int rdbSaveKeyValuePair(rio *rdb, robj *key, robj *val,
long long expiretime, long long now)
{
// 过期时间
/* Save the expire time */
if (expiretime != -1) {
/* If this key is already expired skip it */
if (expiretime < now) return 0;
if (rdbSaveType(rdb,REDIS_RDB_OPCODE_EXPIRETIME_MS) == -1) return -1;
if (rdbSaveMillisecondTime(rdb,expiretime) == -1) return -1;
}
/* Save type, key, value */
// 数据类型
if (rdbSaveObjectType(rdb,val) == -1) return -1;
// 键
if (rdbSaveStringObject(rdb,key) == -1) return -1;
// 值
if (rdbSaveObject(rdb,val) == -1) return -1;
return 1;
}
在 rdb.h, rdb.c 中有关于每种数据的编码和解码的代码,感兴趣的同学可以详细研读一下。
简介
AOF 持久化和 RDB 持久化的最主要区别在于,前者记录了数据的变更,而后者是保存了数据本身。本篇主要讲的是AOF 持久化,了解 AOF 的数据组织方式和运作机制。Redis 主要在 aof.c 中实现 AOF 的操作。
同样,AOF 持久化也会涉及文件的读写,会用到数据结构 rio。关于 rio 已经在上一个篇章已经讲述,在此不做展开。
AOF 数据组织方式
假设 redis 内存有「name:Jhon」的键值对,那么进行 AOF 持久化后,AOF 文件有如下内容:
*2 # 2 个参数
$6 # 第一个参数长度为6
SELECT # 第一个参数
$1 # 第二参数长度为1
8 # 第二参数
*3 # 3 个参数
$3 # 第一个参数长度为4
SET # 第一个参数
$4 # 第二参数长度为4
name # 第二个参数
$4 # 第三个参数长度为4
Jhon # 第二参数长度为4
所以对上面的内容进行恢复,能得到熟悉的一条 Redis 命令:SELECT 8;SET name Jhon. 可以想象的是,Redis 遍历内存数据集中的每个 key-value 对,依次写入磁盘中;Redis 启动的时候,从 AOF 文件中读取数据,恢复数据。
AOF 持久化运作机制
和 redis RDB 持久化运作机制不同,redis AOF 有后台执行和边服务边备份两种方式。

1)AOF 后台执行的方式和 RDB 有类似的地方,fork 一个子进程,主进程仍进行服务,子进程执行AOF 持久化,数据被dump 到磁盘上。与 RDB 不同的是,后台子进程持久化过程中,主进程会记录期间的所有数据变更(主进程还在服务),并存储在 server.aof_rewrite_buf_blocks 中;后台子进程结束后,Redis 更新缓存追加到 AOF 文件中,是 RDB 持久化所不具备的。
来说说更新缓存这个东西。Redis 服务器产生数据变更的时候,譬如 set name Jhon,不仅仅会修改内存数据集,也会记录此更新(修改)操作,记录的方式就是上面所说的数据组织方式。
更新缓存可以存储在 server.aof_buf 中,你可以把它理解为一个小型临时中转站,所有累积的更新缓存都会先放入这里,它会在特定时机写入文件或者插入到server.aof_-rewrite_buf_blocks 下链表(下面会详述);server.aof_buf 中的数据在 propagrate() 添加,在涉及数据更新的地方都会调用propagrate() 以累积变更。更新缓存也可以存储在 server.aof_-rewrite_buf_blocks,这是一个元素类型为 struct aofrwblock 的链表,你可以把它理解为一个仓库,当后台有AOF 子进程的时候,会将累积的更新缓存(在 server.aof_buf 中)插入到链表中,而当 AOF 子进程结束,它会被整个写入到文件。两者是有关联的。
这里的意图即是不用每次出现数据变更的时候都触发一个写操作,可以将写操作先缓存到内存中,待到合适的时机写入到磁盘,如此避免频繁的写操作。当然,完全可以实现让数据变更及时更新到磁盘中。两种做法的好坏就是一种博弈了。
下面是后台执行的主要代码:
// 启动后台子进程,执行AOF 持久化操作。bgrewriteaofCommand(),startAppendOnly(),
// serverCron() 中会调用此函数
/* This is how rewriting of the append only file in background works:
**1) The user calls BGREWRITEAOF
* 2) Redis calls this function, that forks():
* * 2a) the child rewrite the append only file in a temp file.
* 2b) the parent accumulates differences in server.aof_rewrite_buf.
* 3) When the child finished '2a' exists.
* 4) The parent will trap the exit code, if it's OK, will append the
* data accumulated into server.aof_rewrite_buf into the temp file, and
* finally will rename(2) the temp file in the actual file name.
* The the new file is reopened as the new append only file. Profit!
*/
int rewriteAppendOnlyFileBackground(void) {
pid_t childpid;
long long start;
// 已经有正在执行备份的子进程
if (server.aof_child_pid != -1) return REDIS_ERR;
start = ustime();
if ((childpid = fork()) == 0) {
char tmpfile[256];
// 子进程
/* Child */
// 关闭监听
closeListeningSockets(0);
// 设置进程title
redisSetProcTitle("redis-aof-rewrite");
// 临时文件名
snprintf(tmpfile,256,"temp-rewriteaof-bg-%d.aof", (int) getpid());
// 开始执行AOF 持久化
if (rewriteAppendO nlyFile(tmpfile) == REDIS_OK) {
// 脏数据,其实就是子进程所消耗的内存大小
// 获取脏数据大小
size_t private_dirty = zmalloc_get_private_dirty();
// 记录脏数据
if (private_dirty) {
redisLog(REDIS_NOTICE,
"AOF rewrite: %zu MB of memory used by copy-on-write",
private_dirty/(1024*1024));
}
exitFromChild(0);
} else {
exitFromChild(1);
}
} else {
/* Parent */
server.stat_fork_time = ustime()-start;
if (childpid == -1) {
redisLog(REDIS_WARNING,
"Can't rewrite append only file in background: fork: %s",
strerror(errno));
return REDIS_ERR;
}
redisLog(REDIS_NOTICE,
"Background append only file rewriting started by pid %d",childpid);
// AOF 已经开始执行,取消AOF 计划
server.aof_rewrite_scheduled = 0;
// AOF 最近一次执行的起始时间
server.aof_rewrite_time_start = time(NULL);
// 子进程ID
server.aof_child_pid = childpid;
updateDictResizePolicy();
// 因为更新缓存都将写入文件,要强制产生选择数据集的指令SELECT ,以防出现数据
// 合并错误。
/* We set appendseldb to -1 in order to force the next call to the
* feedAppendOnlyFile() to issue a SELECT command, so the differences
* accumulated by the parent into server.aof_rewrite_buf will start
* with a SELECT statement and it will be safe to merge. */
server.aof_selected_db = -1;
replicationScriptCacheFlush();
return REDIS_OK;
}
return REDIS_OK; /* unreached */
}
如上,子进程执行 AOF 持久化,父进程则会记录一些 AOF 的执行信息。下面来看看 AOF 持久化具体是怎么做的?
// AOF 持久化主函数。只在rewriteAppendOnlyFileBackground() 中会调用此函数
/* Write a sequence of commands able to fully rebuild the dataset into
* "filename". Used both by REWRITEAOF and BGREWRITEAOF.
**
In order to minimize the number of commands needed in the rewritten
* log Redis uses variadic commands when possible, such as RPUSH, SADD
* and ZADD. However at max REDIS_AOF_REWRITE_ITEMS_PER_CMD items per time
* are inserted using a single command. */
int rewriteAppendOnlyFile(char *filename) {
dictIterator *di = NULL;
dictEntry *de;
rio aof;
FILE *fp;
char tmpfile[256];
int j;
long long now = mstime();
/* Note that we have to use a different temp name here compared to the
* one used by rewriteAppendOnlyFileBackground() function. */
snprintf(tmpfile,256,"temp-rewriteaof-%d.aof", (int) getpid());
// 打开文件
fp = fopen(tmpfile,"w");
if (!fp) {
redisLog(REDIS_WARNING, "Opening the temp file for AOF rewrite in"
"rewriteAppendOnlyFile(): %s", strerror(errno));
return REDIS_ERR;
}
// 初始化rio 结构体
rioInitWithFile(&aof,fp);
// 如果设置了自动备份参数,将进行设置
if (server.aof_rewrite_incremental_fsync)
rioSetAutoSync(&aof,REDIS_AOF_AUTOSYNC_BYTES);
// 备份每一个数据集
for (j = 0; j < server.dbnum; j++) {
char selectcmd[] = "*2\r\n$6\r\nSELECT\r\n";
redisDb *db = server.db+j;
dict *d = db->dict;
if (dictSize(d) == 0) continue;
// 获取数据集的迭代器
di = dictGetSafeIterator(d);
if (!di) {
fclose(fp);
return REDIS_ERR;
}
// 写入AOF 操作码
/* SELECT the new DB */
if (rioWrite(&aof,selectcmd,sizeof(selectcmd)-1) == 0) goto werr;
// 写入数据集序号
if (rioWriteBulkLongLong(&aof,j) == 0) goto werr;
// 写入数据集中每一个数据项
/* Iterate this DB writing every entry */
while((de = dictNext(di)) != NULL) {
sds keystr;
robj key, *o;
long long expiretime;
keystr = dictGetKey(de);
o = dictGetVal(de);
// 将keystr 封装在robj 里
initStaticStringObject(key,keystr);
// 获取过期时间
expiretime = getExpire(db,&key);
// 如果已经过期,放弃存储
/* If this key is already expired skip it */
if (expiretime != -1 && expiretime < now) continue;
// 写入键值对应的写操作
/* Save the key and associated value */
if (o->type == REDIS_STRING) {
/* Emit a SET command */
char cmd[]="*3\r\n$3\r\nSET\r\n";
if (rioWrite(&aof,cmd,sizeof(cmd)-1) == 0) goto werr;
/* Key and value */
if (rioWriteBulkObject(&aof,&key) == 0) goto werr;
if (rioWriteBulkObject(&aof,o) == 0) goto werr;
} else if (o->type == REDIS_LIST) {
if (rewriteListObject(&aof,&key,o) == 0) goto werr;
} else if (o->type == REDIS_SET) {
if (rewriteSetObject(&aof,&key,o) == 0) goto werr;
} else if (o->type == REDIS_ZSET) {
if (rewriteSortedSetObject(&aof,&key,o) == 0) goto werr;
} else if (o->type == REDIS_HASH) {
if (rewriteHashObject(&aof,&key,o) == 0) goto werr;
} else {
redisPanic("Unknown object type");
}
// 写入过期时间
/* Save the expire time */
if (expiretime != -1) {
char cmd[]="*3\r\n$9\r\nPEXPIREAT\r\n";
if (rioWrite(&aof,cmd,sizeof(cmd)-1) == 0) goto werr;
if (rioWriteBulkObject(&aof,&key) == 0) goto werr;
if (rioWriteBulkLongLong(&aof,expiretime) == 0) goto werr;
}
}
// 释放迭代器
dictReleaseIterator(di);
}
// 写入磁盘
/* Make sure data will not remain on the OS's output buffers */
fflush(fp);
aof_fsync(fileno(fp));
fclose(fp);
// 重写文件名
/* Use RENAME to make sure the DB file is changed atomically only
* if the generate DB file is ok. */
if (rename(tmpfile,filename) == -1) {
redisLog(REDIS_WARNING,"Error moving temp append only file on the "
"final destination: %s", strerror(errno));
unlink(tmpfile);
return REDIS_ERR;
}
redisLog(REDIS_NOTICE,"SYNC append only file rewrite performed");
return REDIS_OK;
werr:
// 清理工作
fclose(fp);
unlink(tmpfile);
redisLog(REDIS_WARNING,"Write error writing append only file on disk: "
"%s", strerror(errno));
if (di) dictReleaseIterator(di);
return REDIS_ERR;
}
刚才所说,AOF 在持久化结束后,持久化过程产生的数据变更也会追加到 AOF 文件中。如果有留意定时处理函数 serverCorn():父进程会在子进程结束后,将 AOF 持久化过程中产生的数据变更,追加到 AOF 文件。这就是 backgroundRewriteDoneHandler() 要做的:将 server.aof_rewrite_buf_blocks 追加到 AOF 文件。
// 后台子进程结束后,Redis 更新缓存server.aof_rewrite_buf_blocks 追加到AOF 文件中
// 在AOF 持久化结束后会执行这个函数, backgroundRewriteDoneHandler() 主要工作是
// 将server.aof_rewrite_buf_blocks,即AOF 缓存写入文件
/* A background append only file rewriting (BGREWRITEAOF) terminated its work.
* Handle this. */
void backgroundRewriteDoneHandler(int exitcode, int bysignal) {
......
// 将AOF 缓存server.aof_rewrite_buf_blocks 的AOF 写入磁盘
if (aofRewriteBufferWrite(newfd) == -1) {
redisLog(REDIS_WARNING,
"Error trying to flush the parent diff to the rewritten AOF: %s",
strerror(errno));
close(newfd);
goto cleanup;
}
......
}
// 将累积的更新缓存server.aof_rewrite_buf_blocks 同步到磁盘
/* Write the buffer (possibly composed of multiple blocks) into the specified
* fd. If no short write or any other error happens -1 is returned,
* otherwise the number of bytes written is returned. */
ssize_t aofRewriteBufferWrite(int fd) {
listNode *ln;
listIter li;
ssize_t count = 0;
listRewind(server.aof_rewrite_buf_blocks,&li);
while((ln = listNext(&li))) {
aofrwblock *block = listNodeValue(ln);
ssize_t nwritten;
if (block->used) {
nwritten = write(fd,block->buf,block->used);
if (nwritten != block->used) {
if (nwritten == 0) errno = EIO;
return -1;
}
count += nwritten;
}
}
return count;
}
2)边服务边备份的方式,即 Redis 服务器会把所有的数据变更存储在 server.aof_buf 中,并在特定时机将更新缓存写入预设定的文件(server.aof_filename)。特定时机有三种:
- 进入事件循环之前
- Redis 服务器定时程序 serverCron() 中
- 停止 AOF 策略的 stopAppendOnly() 中
Redis 无非是不想服务器突然崩溃终止,导致过多的数据丢失。Redis 默认是每隔固定时间进行一次边服务边备份,即隔固定时间将累积的变更的写入文件。
下面是边服务边执行 AOF 持久化的主要代码:
// 同步磁盘;将所有累积的更新server.aof_buf 写入磁盘
/* Write the append only file buffer on disk.
**
Since we are required to write the AOF before replying to the client,
* and the only way the client socket can get a write is entering when the
* the event loop, we accumulate all the AOF writes in a memory
* buffer and write it on disk using this function just before entering
* the event loop again.
**
About the 'force' argument:
**
When the fsync policy is set to 'everysec' we may delay the flush if there
* is still an fsync() going on in the background thread, since for instance
* on Linux write(2) will be blocked by the background fsync anyway.
* When this happens we remember that there is some aof buffer to be
* flushed ASAP, and will try to do that in the serverCron() function.
**
However if force is set to 1 we'll write regardless of the background
* fsync. */
void flushAppendOnlyFile(int force) {
ssize_t nwritten;
int sync_in_progress = 0;
// 无数据,无需同步到磁盘
if (sdslen(server.aof_buf) == 0) return;
// 创建线程任务,主要调用fsync()
if (server.aof_fsync == AOF_FSYNC_EVERYSEC)
sync_in_progress = bioPendingJobsOfType(REDIS_BIO_AOF_FSYNC) != 0;
// 如果没有设置强制同步的选项,可能不会立即进行同步
if (server.aof_fsync == AOF_FSYNC_EVERYSEC && !force) {
// 推迟执行AOF
/* With this append fsync policy we do background fsyncing.
* If the fsync is still in progress we can try to delay
* the write for a couple of seconds. */
if (sync_in_progress) {
if (server.aof_flush_postponed_start == 0) {
// 设置延迟冲洗时间选项
/* No previous write postponinig, remember that we are
* postponing the flush and return. */
// /* Unix time sampled every cron cycle. */
server.aof_flush_postponed_start = server.unixtime;
return;
// 没有超过2s,直接结束
} else if (server.unixtime - server.aof_flush_postponed_start < 2) {
/* We were already waiting for fsync to finish, but for less
* than two seconds this is still ok. Postpone again. */
return;
}
// 否则,要强制写入磁盘
/* Otherwise fall trough, and go write since we can't wait
* over two seconds. */
server.aof_delayed_fsync++;
redisLog(REDIS_NOTICE,"Asynchronous AOF fsync is taking too long (disk"
" is busy?). Writing the AOF buffer without waiting for fsync to "
"complete, this may slow down Redis.");
}
}
// 取消延迟冲洗时间设置
/* If you are following this code path, then we are going to write so
* set reset the postponed flush sentinel to zero. */
server.aof_flush_postponed_start = 0;
/* We want to perform a single write. This should be guaranteed atomic
* at least if the filesystem we are writing is a real physical one.
* While this will save us against the server being killed I don't think
* there is much to do about the whole server stopping for power problems
* or alike */
// AOF 文件已经打开了。将server.aof_buf 中的所有缓存数据写入文件
nwritten = write(server.aof_fd,server.aof_buf,sdslen(server.aof_buf));
if (nwritten != (signed)sdslen(server.aof_buf)) {
/* Ooops, we are in troubles. The best thing to do for now is
* aborting instead of giving the illusion that everything is
* working as expected. */
if (nwritten == -1) {
redisLog(REDIS_WARNING,"Exiting on error writing to the append-only"
" file: %s",strerror(errno));
} else {
redisLog(REDIS_WARNING,"Exiting on short write while writing to "
"the append-only file: %s (nwritten=%ld, "
"expected=%ld)",
strerror(errno),
(long)nwritten,
(long)sdslen(server.aof_buf));
if (ftruncate(server.aof_fd, server.aof_current_size) == -1) {
redisLog(REDIS_WARNING, "Could not remove short write "
"from the append-only file. Redis may refuse "
"to load the AOF the next time it starts. "
"ftruncate: %s", strerror(errno));
}
}
exit(1);
}
// 更新AOF 文件的大小
server.aof_current_size += nwritten;
// 当server.aof_buf 足够小, 重新利用空间,防止频繁的内存分配。
// 相反,当server.aof_buf 占据大量的空间,采取的策略是释放空间,可见redis
// 对内存很敏感。
/* Re-use AOF buffer when it is small enough. The maximum comes from the
* arena size of 4k minus some overhead (but is otherwise arbitrary). */
if ((sdslen(server.aof_buf)+sdsavail(server.aof_buf)) < 4000) {
sdsclear(server.aof_buf);
} else {
sdsfree(server.aof_buf);
server.aof_buf = sdsempty();
}
/* Don't fsync if no-appendfsync-on-rewrite is set to yes and there are
* children doing I/O in the background. */
if (server.aof_no_fsync_on_rewrite &&
(server.aof_child_pid != -1 || server.rdb_child_pid != -1))
return;
// sync, 写入磁盘
/* Perform the fsync if needed. */
if (server.aof_fsync == AOF_FSYNC_ALWAYS) {
/* aof_fsync is defined as fdatasync() for Linux in order to avoid
* flushing metadata. */
aof_fsync(server.aof_fd); /* Let's try to get this data on the disk */
server.aof_last_fsync = server.unixtime;
} else if ((server.aof_fsync == AOF_FSYNC_EVERYSEC &&
server.unixtime > server.aof_last_fsync)) {
if (!sync_in_progress) aof_background_fsync(server.aof_fd);
server.aof_last_fsync = server.unixtime;
}
}
细说更新缓存
上面两次提到了「更新缓存」,它即是 Redis 累积的数据变更。
更新缓存可以存储在 server.aof_buf 中,可以存储在 server.server.aof_rewrite_buf_blocks 连表中。他们的关系是:每一次数据变更记录都会写入 server.aof_buf 中,同时如果后台子进程在持久化,变更记录还会被写入 server.server.aof_rewrite_buf_blocks 中。server.aof_buf 会在特定时期写入指定文件,server.server.aof_rewrite_buf_blocks 会在后台持久化结束后追加到文件。
Redis 源码中是这么实现的:propagrate()->feedAppendOnlyFile()->aofRewriteBufferAppend()
注意,feedAppendOnlyFile() 会把更新添加到server.aof_buf;接下来会有一个判断,如果存在 AOF 子进程,则调用aofRewriteBufferAppend() 将server.aof_buf 中的所有数据插入到 server.aof_rewrite_buf_blocks 链表。这样,就能够理解为什么在AOF 持久化子进程结束后,父进程会将 server.aof_rewrite_buf_blocks 追加到 AOF 文件了。
// 向AOF 和从机发布数据更新
/* Propagate the specified command (in the context of the specified database id)
* to AOF and Slaves.
**
flags are an xor between:
* + REDIS_PROPAGATE_NONE (no propagation of command at all)
* + REDIS_PROPAGATE_AOF (propagate into the AOF file if is enabled)
* + REDIS_PROPAGATE_REPL (propagate into the replication link)
*/
void propagate(struct redisCommand *cmd, int dbid, robj **argv, int argc,
int flags)
{
// AOF 策略需要打开,且设置AOF 传播标记,将更新发布给本地文件
if (server.aof_state != REDIS_AOF_OFF && flags & REDIS_PROPAGATE_AOF)
feedAppendOnlyFile(cmd,dbid,argv,argc);
// 设置了从机传播标记,将更新发布给从机
if (flags & REDIS_PROPAGATE_REPL)
replicationFeedSlaves(server.slaves,dbid,argv,argc);
}
// 将数据更新记录到AOF 缓存中
void feedAppendOnlyFile(struct redisCommand *cmd, int dictid, robj **argv,
int argc) {
sds buf = sdsempty();
robj *tmpargv[3];
/* The DB this command was targeting is not the same as the last command
* we appendend. To issue a SELECT command is needed. */
if (dictid != server.aof_selected_db) {
char seldb[64];
snprintf(seldb,sizeof(seldb),"%d",dictid);
buf = sdscatprintf(buf,"*2\r\n$6\r\nSELECT\r\n$%lu\r\n%s\r\n",
(unsigned long)strlen(seldb),seldb);
server.aof_selected_db = dictid;
}
if (cmd->proc == expireCommand || cmd->proc == pexpireCommand ||
cmd->proc == expireatCommand) {
/* Translate EXPIRE/PEXPIRE/EXPIREAT into PEXPIREAT */
buf = catAppendOnlyExpireAtCommand(buf,cmd,argv[1],argv[2]);
} else if (cmd->proc == setexCommand || cmd->proc == psetexCommand) {
/* Translate SETEX/PSETEX to SET and PEXPIREAT */
tmpargv[0] = createStringObject("SET",3);
tmpargv[1] = argv[1];
tmpargv[2] = argv[3];
buf = catAppendOnlyGenericCommand(buf,3,tmpargv);
decrRefCount(tmpargv[0]);
buf = catAppendOnlyExpireAtCommand(buf,cmd,argv[1],argv[2]);
} else {
/* All the other commands don't need translation or need the
* same translation already operated in the command vector
* for the replication itself. */
buf = catAppendOnlyGenericCommand(buf,argc,argv);
}
// 将生成的AOF 追加到server.aof_buf 中。server. 在下一次进入事件循环之前,
// aof_buf 中的内容将会写到磁盘上
/* Append to the AOF buffer. This will be flushed on disk just before
* of re-entering the event loop, so before the client will get a
* positive reply about the operation performed. */
if (server.aof_state == REDIS_AOF_ON)
server.aof_buf = sdscatlen(server.aof_buf,buf,sdslen(buf));
// 如果已经有AOF 子进程运行,redis 采取的策略是累积子进程AOF 备份的数据和
// 内存中数据集的差异。aofRewriteBufferAppend() 把buf 的内容追加到
// server.aof_rewrite_buf_blocks 数组中
/* If a background append only file rewriting is in progress we want to
* accumulate the differences between the child DB and the current one
* in a buffer, so that when the child process will do its work we
* can append the differences to the new append only file. */
if (server.aof_child_pid != -1)
aofRewriteBufferAppend((unsigned char*)buf,sdslen(buf));
sdsfree(buf);
}
// 将数据更新记录写入server.aof_rewrite_buf_blocks,此函数只由
// feedAppendOnlyFile() 调用
/* Append data to the AOF rewrite buffer, allocating new blocks if needed. */
void aofRewriteBufferAppend(unsigned char *s, unsigned long len) {
// 尾插法
listNode *ln = listLast(server.aof_rewrite_buf_blocks);
aofrwblock *block = ln ? ln->value : NULL;
while(len) {
/* If we already got at least an allocated block, try appending
* at least some piece into it. */
if (block) {
unsigned long thislen = (block->free < len) ? block->free : len;
if (thislen) { /* The current block is not already full. */
memcpy(block->buf+block->used, s, thislen);
block->used += thislen;
block->free -= thislen;
s += thislen;
len -= thislen;
}
}
if (len) { /* First block to allocate, or need another block. */
int numblocks;
// 创建新的节点,插到尾部
block = zmalloc(sizeof(*block));
block->free = AOF_RW_BUF_BLOCK_SIZE;
block->used = 0;
// 尾插法
listAddNodeTail(server.aof_rewrite_buf_blocks,block);
/* Log every time we cross more 10 or 100 blocks, respectively
* as a notice or warning. */
numblocks = listLength(server.aof_rewrite_buf_blocks);
if (((numblocks+1) % 10) == 0) {
int level = ((numblocks+1) % 100) == 0 ? REDIS_WARNING :
REDIS_NOTICE;
redisLog(level,"Background AOF buffer size: %lu MB",
aofRewriteBufferSize()/(1024*1024));
}
}
}
}
一副可以缓解视力疲劳的图片——AOF 持久化运作机制:
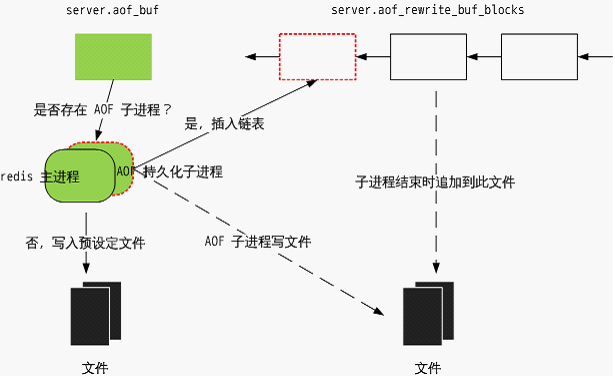
两种数据落地的方式,就是 AOF 的两个主线。因此,redis AOF 持久化机制有两条主线:后台执行和边服务边备份,抓住这两点就能理解 redis AOF 了。
这里有一个疑问,两条主线都会涉及文件的写:后台执行会写一个AOF 文件,边服务边备份也会写一个,以哪个为准?
后台持久化的数据首先会被写入“temp-rewriteaof-bg-%d.aof”,其中“%d”是AOF 子进程 id;待 AOF 子进程结束后,“temp-rewriteaof-bg-%d.aof”会被以追加的方式打开,继而写入 server.aof_rewrite_buf_blocks 中的更新缓存,最后“temp-rewriteaof-bg-%d.aof”文件被命名为 server.aof_filename,所以之前的名为 server.aof_filename 的文件会被删除,也就是说边服务边备份写入的文件会被删除。边服务边备份的数据会被一直写入到 server.aof_filename文件中。
因此,确实会产生两个文件,但是最后都会变成 server.aof_filename 文件。这里可能还有一个疑问,既然有了后台持久化,为什么还要边服务边备份?边服务边备份时间长了会产生数据冗余甚至备份过旧的数据,而后台持久化可以消除这些东西。看,这里是 Redis 的双保险。
AOF 恢复过程
AOF 的数据恢复过程设计很巧妙,它模拟一个 Redis 的服务过程。Redis 首先虚拟一个客户端,读取 AOF 文件恢复 Redis 命令和参数;接着过程就和服务客户端一样执行命令相应的函数,从而恢复数据,这样做的目的无非是提高代码的复用率。这些过程主要在 loadAppendOnlyFile() 中实现。
// 加载AOF 文件,恢复数据
/* Replay the append log file. On error REDIS_OK is returned. On non fatal
* error (the append only file is zero-length) REDIS_ERR is returned. On
* fatal error an error message is logged and the program exists. */
int loadAppendOnlyFile(char *filename) {
struct redisClient *fakeClient;
FILE *fp = fopen(filename,"r");
struct redis_stat sb;
int old_aof_state = server.aof_state;
long loops = 0;
// 文件大小不能为0
if (fp && redis_fstat(fileno(fp),&sb) != -1 && sb.st_size == 0) {
server.aof_current_size = 0;
fclose(fp);
return REDIS_ERR;
}
if (fp == NULL) {
redisLog(REDIS_WARNING,"Fatal error: can't open the append log file "
"for reading: %s",strerror(errno));
exit(1);
}
// 正在执行AOF 加载操作,于是暂时禁止AOF 的所有操作,以免混淆
/* Temporarily disable AOF, to prevent EXEC from feeding a MULTI
* to the same file we're about to read. */
server.aof_state = REDIS_AOF_OFF;
// 虚拟出一个客户端,即redisClient
fakeClient = createFakeClient();
startLoading(fp);
while(1) {
int argc, j;
unsigned long len;
robj **argv;
char buf[128];
sds argsds;
struct redisCommand *cmd;
// 每循环1000 次,在恢复数据的同时,服务器也为客户端服务。
// aeProcessEvents() 会进入事件循环
/* Serve the clients from time to time */
if (!(loops++ % 1000)) {
loadingProgress(ftello(fp));
aeProcessEvents(server.el, AE_FILE_EVENTS|AE_DONT_WAIT);
}
// 可能aof 文件到了结尾
if (fgets(buf,sizeof(buf),fp) == NULL) {
if (feof(fp))
break;
else
goto readerr;
}
// 必须以“*”开头,格式不对,退出
if (buf[0] != '*') goto fmterr;
// 参数的个数
argc = atoi(buf+1);
// 参数个数错误
if (argc < 1) goto fmterr;
// 为参数分配空间
argv = zmalloc(sizeof(robj*)*argc);
// 依次读取参数
for (j = 0; j < argc; j++) {
if (fgets(buf,sizeof(buf),fp) == NULL) goto readerr;
if (buf[0] != '$') goto fmterr;
len = strtol(buf+1,NULL,10);
argsds = sdsnewlen(NULL,len);
if (len && fread(argsds,len,1,fp) == 0) goto fmterr;
argv[j] = createObject(REDIS_STRING,argsds);
if (fread(buf,2,1,fp) == 0) goto fmterr; /* discard CRLF */
}
// 找到相应的命令
/* Command lookup */
cmd = lookupCommand(argv[0]->ptr);
if (!cmd) {
redisLog(REDIS_WARNING,"Unknown command '%s' reading the "
"append only file", (char*)argv[0]->ptr);
exit(1);
}
// 执行命令,模拟服务客户端请求的过程,从而写入数据
/* Run the command in the context of a fake client */
fakeClient->argc = argc;
fakeClient->argv = argv;
cmd->proc(fakeClient);
/* The fake client should not have a reply */
redisAssert(fakeClient->bufpos == 0 && listLength(fakeClient->reply)
== 0);
/* The fake client should never get blocked */
redisAssert((fakeClient->flags & REDIS_BLOCKED) == 0);
// 释放虚拟客户端空间
/* Clean up. Command code may have changed argv/argc so we use the
* argv/argc of the client instead of the local variables. */
for (j = 0; j < fakeClient->argc; j++)
decrRefCount(fakeClient->argv[j]);
zfree(fakeClient->argv);
}
/* This point can only be reached when EOF is reached without errors.
* If the client is in the middle of a MULTI/EXEC, log error and quit. */
if (fakeClient->flags & REDIS_MULTI) goto readerr;
// 清理工作
fclose(fp);
freeFakeClient(fakeClient);
// 恢复旧的AOF 状态
server.aof_state = old_aof_state;
stopLoading();
// 记录最近AOF 操作的文件大小
aofUpdateCurrentSize();
server.aof_rewrite_base_size = server.aof_current_size;
return REDIS_OK;
readerr:
// 错误,清理工作
if (feof(fp)) {
redisLog(REDIS_WARNING,"Unexpected end of file reading the append "
"only file");
} else {
redisLog(REDIS_WARNING,"Unrecoverable error reading the append only "
"file: %s", strerror(errno));
}
exit(1);
fmterr:
redisLog(REDIS_WARNING,"Bad file format reading the append only file: "
"make a backup of your AOF file, then use ./redis-check-aof --fix "
"<filename>");
exit(1);
}
AOF 的适用场景
如果对数据比较关心,分秒必争,可以用 AOF 持久化,而且AOF 文件很容易进行分析。
两种订阅
Redis 提供两个订阅模式:频道(channel)订阅和 glob-style 模式(pattern)频道订阅。频道订阅容易理解,即CA(client A)向服务器订阅了频道 news,当 CB 向 news 发布消息的时候,CA 便能收到。
glob-style 模式(pattern)频道订阅,需要先解释什么是 glob-style?举一个简单的例子,rm *.jpg linux
下这条命令删除当前目录下所有 jpg 图片,所用到的是 glob-style 模式匹配,你可以将他理解为某种 style 的正则表达式;)
举例,CA(client A)向服务器订阅了频道*.news
:
- 当 CB 向 China.news 发布消息的时候,CA 能收到,
- 当 CB 向 America.news 发布消息的时候,CA 能收到,
- 当 CB 向 AV.news 发布消息的时候,CA 便能收到。
订阅相关数据结构
struct redisServer 和 struct redisClient 都维护了频道和模式频道,前者维护了所有频道和订阅频道的客户端,后者维护了客户端自己订阅的频道。
struct redisServer {
......
/* Pubsub */
dict *pubsub_channels; /* Map channels to list of subscribed clients */
list *pubsub_patterns; /* A list of pubsub_patterns */
......
}
typedef struct redisClient {
......
// 用户感兴趣的频道
dict *pubsub_channels; /* channels a client is interested in (SUBSCRIBE) */
// 用户感兴趣的模式
list *pubsub_patterns; /* patterns a client is interested in (SUBSCRIBE) */
......
} redisClient;
// 模式频道数据结构,list *pubsub_patterns 里的每个节点数据都是struct
// pubsubPattern。
typedef struct pubsubPattern {
redisClient *client;
robj *pattern;
} pubsubPattern;
频道订阅是一个 dict,每个 channel 被哈希进相应的桶,每个 channel 对应一个 clients,clients 都订阅了此 channel。当有消息发布的时候,检索 channel,遍历 clients,发布消息。
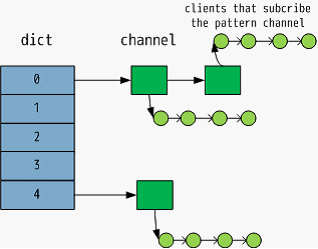
模式频道订阅是一个 list。当有消息发布的时候,channel 与 glob-style pattern 匹配,发布消息。
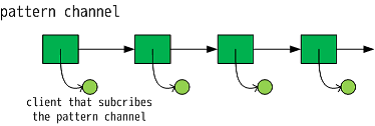
订阅过程
两种订阅模式是维护上述两种数据结构的过程,
// 订阅频道
/* Subscribe a client to a channel. Returns 1 if the operation succeeded, or
* 0 if the client was already subscribed to that channel. */
int pubsubSubscribeChannel(redisClient *c, robj *channel) {
struct dictEntry *de;
list *clients = NULL;
int retval = 0;
// redisClient.pubsub_channels 中保存客户端订阅的所有频道,可以查看客户端
// 订阅了多少频道以及客户端是否订阅某个频道
// server.pubsub_channels 中保存所有的频道和每个频道的订阅客户端,可以将
// 消息发布到订阅客户端
// 将频道加入redisClient.pubsub_channels
/* Add the channel to the client -> channels hash table */
if (dictAdd(c->pubsub_channels,channel,NULL) == DICT_OK) {
retval = 1;
incrRefCount(channel);
// 在服务器负责维护的channel->clients 哈希表中寻找指定的频道
/* Add the client to the channel -> list of clients hash table */
de = dictFind(server.pubsub_channels,channel);
// 未找到客户端指定的频道,需要创建
if (de == NULL) {
clients = listCreate();
// 将频道加入server.pubsub_channels
dictAdd(server.pubsub_channels,channel,clients);
incrRefCount(channel);
// 找到客户端指定的频道,直接获取这个频道
} else {
clients = dictGetVal(de);
}
// 将客户端添加到链表的尾部
listAddNodeTail(clients,c);
}
// 通知客户端
/* Notify the client */
addReply(c,shared.mbulkhdr[3]);
addReply(c,shared.subscribebulk);
addReplyBulk(c,channel);
addReplyLongLong(c,dictSize(c->pubsub_channels)+listLength(
c->pubsub_patterns));
return retval;
}
// 订阅模式频道
/* Subscribe a client to a pattern. Returns 1 if the operation succeeded,
or 0 if the client was already subscribed to that pattern. */
int pubsubSubscribePattern(redisClient *c, robj *pattern) {
int retval = 0;
// redisClient.pubsub_patterns 中保存客户端订阅的所有模式频道,可以查看
// 客户端订阅了多少频道以及客户端是否订阅某个频道
// server.pubsub_patterns 中保存所有的模式频道和每个模式频道的订阅客户端
// ,可以将消息发布到订阅客户端
// 未订阅模式频道,插入
if (listSearchKey(c->pubsub_patterns,pattern) == NULL) {
retval = 1;
pubsubPattern *pat;
// 将模式频道加入redisClient.pubsub_patterns
listAddNodeTail(c->pubsub_patterns,pattern);
incrRefCount(pattern);
// 将模式频道加入server.pubsub_patterns
pat = zmalloc(sizeof(*pat));
pat->pattern = getDecodedObject(pattern);
pat->client = c;
listAddNodeTail(server.pubsub_patterns,pat);
}
// 通知客户端
/* Notify the client */
addReply(c,shared.mbulkhdr[3]);
addReply(c,shared.psubscribebulk);
addReplyBulk(c,pattern);
addReplyLongLong(c,dictSize(c->pubsub_channels)+listLength(
c->pubsub_patterns));
return retval;
}
取消订阅的过程则相反。
消息发布
发布消息的过程则遍历上述两个数据结构(dict 和list),并将消息发布到匹配频道的所有客户端。
// 发布消息
/* Publish a message */
int pubsubPublishMessage(robj *channel, robj *message) {
int receivers = 0;
struct dictEntry *de;
listNode *ln;
listIter li;
// 发布消息有两个步骤,
// 指定频道的所有订阅者发布消息
// 指定模式频道的所有订阅者发布消息
//
// 寻找频道
/* Send to clients listening for that channel */
de = dictFind(server.pubsub_channels,channel);
// 向频道所有订阅者发布信息
if (de) {
list *list = dictGetVal(de);
listNode *ln;
listIter li;
listRewind(list,&li);
while ((ln = listNext(&li)) != NULL) {
redisClient *c = ln->value;
addReply(c,shared.mbulkhdr[3]);
addReply(c,shared.messagebulk);
addReplyBulk(c,channel);
addReplyBulk(c,message);
receivers++;
}
}
//
// 进行glob-style 模式匹配
/* Send to clients listening to matching channels */
if (listLength(server.pubsub_patterns)) {
listRewind(server.pubsub_patterns,&li);
channel = getDecodedObject(channel);
while ((ln = listNext(&li)) != NULL) {
pubsubPattern *pat = ln->value;
// 匹配成功,向订阅者发布消息
if (stringmatchlen((char*)pat->pattern->ptr,
sdslen(pat->pattern->ptr),
(char*)channel->ptr,
sdslen(channel->ptr),0)) {
addReply(pat->client,shared.mbulkhdr[4]);
addReply(pat->client,shared.pmessagebulk);
addReplyBulk(pat->client,pat->pattern);
addReplyBulk(pat->client,channel);
addReplyBulk(pat->client,message);
receivers++;
}
}
decrRefCount(channel);
}
return receivers;
}
注意, 只要客户端订阅了频道, 除了SUBCRIBE,UNSUBCRIBE,PSUBCRIBE,PSUBCRIBE,就不能执行其他命令。
int processCommand(redisClient *c) {
......
// 在订阅发布模式下,只允许处理SUBSCRIBE 或者UNSUBSCRIBE 命令
// 从下面的检测条件可以看出:只要存在redisClient.pubsub_channels 或者
// redisClient.pubsub_patterns,就代表处于订阅发布模式下
/* Only allow SUBSCRIBE and UNSUBSCRIBE in the context of Pub/Sub */
if ((dictSize(c->pubsub_channels) > 0 || listLength(c->pubsub_patterns) > 0)
&&
c->cmd->proc != subscribeCommand &&
c->cmd->proc != unsubscribeCommand &&
c->cmd->proc != psubscribeCommand &&
c->cmd->proc != punsubscribeCommand) {
addReplyError(c,"only (P)SUBSCRIBE / (P)UNSUBSCRIBE / QUIT allowed
"in this context");
return REDIS_OK;
}
......
}
概述
Redis 支持 master-slave(主从)模式,一个 redis server 可以设置为另一个 redis server 的主机(从机),从机定期从主机拿数据。特殊的,一个从机同样可以设置为一个 redis server 的主机,这样一来 master-slave 的分布看起来就是一个有向无环图 DAG,如此形成 redis server 集群,无论是主机还是从机都是 redis server,都可以提供服务。
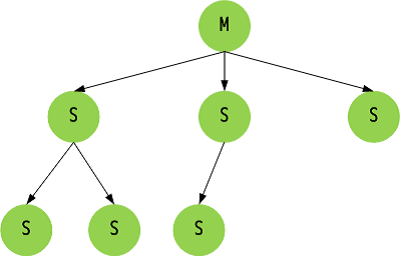
在配置后,主机可负责读写服务,从机只负责读。Redis 提高这种配置方式,为的是让其支持数据的弱一致性,即最终一致性。在业务中,选择强一致性还是弱一致性,应该取决于具体的业务需求,比如微博里的 timeline,可以使用弱一致性模型;比如支付宝的支付账单,要选用强一致性模型。
积压空间
binlog 是在 mysql 中的一种日志类型,它记录了所有数据库自备份一来的所有更新操作或潜在的更新操作,描述了数据的更改。因为 binlog 只记录了数据的更新,所以适合用来做实时备份和主从复制。同样,Redis 在主从复制上用的就是一种类似 binlog 的日志。在《AOF 持久化策略》中,介绍了更新缓存的概念,举一个例子:客户端发来命令:set name Jhon
,这一数据更新被记录为:*3/r/n$3/r/nSET/r/n$4/r/nname/r/n$3/r/nJhon/r/n
,并存储在更新缓存中。
同样,在主从连接中,也有更新缓存的概念。只是两者的用途不一样,前者被写入本地,后者被写入从机,这里我们把它成为积压空间。更新缓存存储在 server.repl_backlog,Redis 将其作为一个环形空间来处理,这样做节省了空间,避免内存再分配的情况。
struct redisServer {
......
/* Replication (master) */
// 最近一次使用(访问)的数据集
int slaveseldb; /* Last SELECTed DB in replication output */
// 全局的数据同步偏移量
long long master_repl_offset; /* Global replication offset */
// 主从连接心跳频率
int repl_ping_slave_period; /* Master pings the slave every N seconds */
// 积压空间指针
char *repl_backlog; /* Replication backlog for partial syncs */
// 积压空间大小
long long repl_backlog_size; /* Backlog circular buffer size */
// 积压空间中写入的新数据的大小
long long repl_backlog_histlen; /* Backlog actual data length */
// 下一次向积压空间写入数据的起始位置
long long repl_backlog_idx; /* Backlog circular buffer current offset */
// 积压数据的起始位置的所对应的全局主从复制偏移量
long long repl_backlog_off; /* Replication offset of first byte in the
backlog buffer. */
// 积压空间有效时间
time_t repl_backlog_time_limit; /* Time without slaves after the backlog
gets released. */
......
}
积压空间中的数据变更记录是什么时候被写入的?在执行一个 Redis 命令的时候,如果存在数据的修改(写),那么就会把变更记录传播。Redis 源码中是这么实现的:call()->propagate()->replicationFeedSlaves()。
需注意,命令真正执行的地方在 call() 中,call() 如果发现数据被修改(dirty),则传播 propagrate(),replicationFeedSlaves() 将修改记录写入积压空间和所有已连接的从机。
同样,在《AOF 持久化策略》提到的,propagrate() 也会将数据的修改记录写入到更新缓存中。
这里可能会有疑问:为什么把数据添加入积压空间,又把数据分发给所有的从机?为什么不仅仅将数据分发给所有从机呢?
因为有一些从机会因特殊情况,与主机断开连接。从机断开前有暂存主机的状态信息,因此这些断开的从机就没有及时收到更新的数据。Redis 为了让断开的从机在下次连接后能够获取更新数据,将更新数据加入了积压空间。从replicationFeedSlaves() 实现来看,在线的 slave 能马上收到数据更新记录;因某些原因暂时断开连接的slave,需要从积压空间中找回断开期间的数据更新记录。如果断开的时间足够长,master 会拒绝 slave 的部分 同步请求,从而slave 只能进行全同步。
下面是更细积压空间的核心代码注释:首先,在命令执行函数中,如果发现是涉及写的命令,会将修改传播,即调用 propagrate()
// call() 函数是执行命令的核心函数,真正执行命令的地方
/* Call() is the core of Redis execution of a command */
void call(redisClient *c, int flags) {
......
/* Call the command. */
c->flags &= ~(REDIS_FORCE_AOF|REDIS_FORCE_REPL);
redisOpArrayInit(&server.also_propagate);
// 脏数据标记,数据是否被修改
dirty = server.dirty;
// 执行命令对应的函数
c->cmd->proc(c);
dirty = server.dirty-dirty;
duration = ustime()-start;
......
// 将客户端请求的数据修改记录传播给AOF 和从机
/* Propagate the command into the AOF and replication link */
if (flags & REDIS_CALL_PROPAGATE) {
int flags = REDIS_PROPAGATE_NONE;
// 强制主从复制
if (c->flags & REDIS_FORCE_REPL) flags |= REDIS_PROPAGATE_REPL;
// 强制AOF 持久化
if (c->flags & REDIS_FORCE_AOF) flags |= REDIS_PROPAGATE_AOF;
// 数据被修改
if (dirty)
flags |= (REDIS_PROPAGATE_REPL | REDIS_PROPAGATE_AOF);
// 传播数据修改记录
if (flags != REDIS_PROPAGATE_NONE)
propagate(c->cmd,c->db->id,c->argv,c->argc,flags);
}
......
}
主要向两个方向传播修改记录,一个是 AOF 持久化,另一个则是主从复制。
// 向AOF 和从机发布数据更新
/* Propagate the specified command (in the context of the specified database id)
* to AOF and Slaves.
**
flags are an xor between:
* + REDIS_PROPAGATE_NONE (no propagation of command at all)
* + REDIS_PROPAGATE_AOF (propagate into the AOF file if is enabled)
* + REDIS_PROPAGATE_REPL (propagate into the replication link)
*/
void propagate(struct redisCommand *cmd, int dbid, robj **argv, int argc,
int flags)
{
// AOF 策略需要打开,且设置AOF 传播标记,将更新发布给本地文件
if (server.aof_state != REDIS_AOF_OFF && flags & REDIS_PROPAGATE_AOF)
feedAppendOnlyFile(cmd,dbid,argv,argc);
// 设置了从机传播标记,将更新发布给从机
if (flags & REDIS_PROPAGATE_REPL)
replicationFeedSlaves(server.slaves,dbid,argv,argc);
}
向从机传播更新记录的时候,Redis 主机会向所有的从机发送变更记录,同时也会写入到积压空间,方便已经断开的从机,再下一次重新连接的时候,拷贝数据。
// 向积压空间和从机发送数据
void replicationFeedSlaves(list *slaves, int dictid, robj **argv, int argc) {
listNode *ln;
listIter li;
int j, len;
char llstr[REDIS_LONGSTR_SIZE];
// 没有积压数据且没有从机,直接退出
/* If there aren't slaves, and there is no backlog buffer to populate,
* we can return ASAP. */
if (server.repl_backlog == NULL && listLength(slaves) == 0) return;
/* We can't have slaves attached and no backlog. */
redisAssert(!(listLength(slaves) != 0 && server.repl_backlog == NULL));
/* Send SELECT command to every slave if needed. */
if (server.slaveseldb != dictid) {
robj *selectcmd;
// 小于等于10 的可以用共享对象
/* For a few DBs we have pre-computed SELECT command. */
if (dictid >= 0 && dictid < REDIS_SHARED_SELECT_CMDS) {
selectcmd = shared.select[dictid];
} else {
// 不能使用共享对象,生成SELECT 命令对应的redis 对象
int dictid_len;
dictid_len = ll2string(llstr,sizeof(llstr),dictid);
selectcmd = createObject(REDIS_STRING,
sdscatprintf(sdsempty(),
"*2\r\n$6\r\nSELECT\r\n$%d\r\n%s\r\n",
dictid_len, llstr));
}
// 这里可能会有疑问:为什么把数据添加入积压空间,又把数据分发给所有的从机?
// 为什么不仅仅将数据分发给所有从机呢?
// 因为有一些从机会因特殊情况,与主机断开连接。从机断开前有暂存
// 主机的状态信息,因此这些断开的从机就没有及时收到更新的数据。redis 为了让
// 断开的从机在下次连接后能够获取更新数据,将更新数据加入了积压空间。
// 将SELECT 命令对应的redis 对象数据添加到积压空间
/* Add the SELECT command into the backlog. */
if (server.repl_backlog) feedReplicationBacklogWithObject(selectcmd);
// 将数据分发所有的从机
/* Send it to slaves. */
listRewind(slaves,&li);
while((ln = listNext(&li))) {
redisClient *slave = ln->value;
addReply(slave,selectcmd);
}
// 销毁对象
if (dictid < 0 || dictid >= REDIS_SHARED_SELECT_CMDS)
decrRefCount(selectcmd);
}
// 更新最近一次使用(访问)的数据集
server.slaveseldb = dictid;
// 将命令写入积压空间
/* Write the command to the replication backlog if any. */
if (server.repl_backlog) {
char aux[REDIS_LONGSTR_SIZE+3];
// 命令个数
/* Add the multi bulk reply length. */
aux[0] = '*';
len = ll2string(aux+1,sizeof(aux)-1,argc);
aux[len+1] = '\r';
aux[len+2] = '\n';
feedReplicationBacklog(aux,len+3);
// 逐个命令写入
for (j = 0; j < argc; j++) {
long objlen = stringObjectLen(argv[j]);
/* We need to feed the buffer with the object as a bulk reply
* not just as a plain string, so create the $..CRLF payload len
* ad add the final CRLF */
aux[0] = '$';
len = ll2string(aux+1,sizeof(aux)-1,objlen);
aux[len+1] = '\r';
aux[len+2] = '\n';
/* 每个命令格式如下:
$3
*3
SET
*4
NAME
*4
Jhon*/
// 命令长度
feedReplicationBacklog(aux,len+3);
// 命令
feedReplicationBacklogWithObject(argv[j]);
// 换行
feedReplicationBacklog(aux+len+1,2);
}
}
// 立即给每一个从机发送命令
/* Write the command to every slave. */
listRewind(slaves,&li);
while((ln = listNext(&li))) {
redisClient *slave = ln->value;
// 如果从机要求全同步,则不对此从机发送数据
/* Don't feed slaves that are still waiting for BGSAVE to start */
if (slave->replstate == REDIS_REPL_WAIT_BGSAVE_START) continue;
/* Feed slaves that are waiting for the initial SYNC (so these commands
* are queued in the output buffer until the initial SYNC completes),
* or are already in sync with the master. */
// 向从机命令的长度
/* Add the multi bulk length. */
addReplyMultiBulkLen(slave,argc);
}
}
主从数据同步机制概述
Redis 主从同步有两种方式(或者所两个阶段):全同步和部分同步。
主从刚刚连接的时候,进行全同步;全同步结束后,进行部分同步。如果有需要,slave 在任何时候都可以发起全同步。Redis 策略是,无论如何,首先会尝试进行部分同步,如不成功,要求从机进行全同步,并启动BGSAVE⋯⋯BGSAVE 结束后,传输 RDB 文件;如果成功,允许从机进行部分同步,并传输积压空间中的数据。
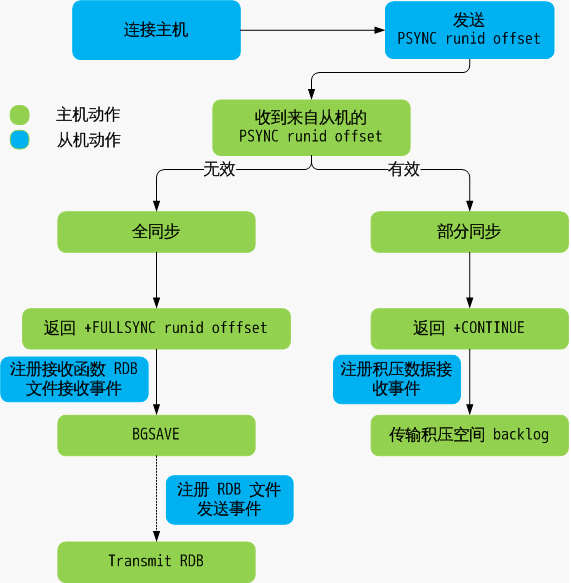
如需设置 slave,master 需要向slave 发送 SLAVEOF hostname port,从机接收到后会自动连接主机,注册相应读写事件(syncWithMaster())。
// 修改主机
void slaveofCommand(redisClient *c) {
if (!strcasecmp(c->argv[1]->ptr,"no") &&
!strcasecmp(c->argv[2]->ptr,"one")) {
// slaveof no one 断开主机连接
if (server.masterhost) {
replicationUnsetMaster();
redisLog(REDIS_NOTICE,"MASTER MODE enabled (user request)");
}
} else {
long port;
if ((getLongFromObjectOrReply(c, c->argv[2], &port, NULL) != REDIS_OK))
return;
// 可能已经连接需要连接的主机
/* Check if we are already attached to the specified slave */
if (server.masterhost && !strcasecmp(server.masterhost,c->argv[1]->ptr)
&& server.masterport == port) {
redisLog(REDIS_NOTICE,"SLAVE OF would result into synchronization with the master addReplySds(c,sdsnew("+OK Already connected to specified master\r\n"));
return;
}
// 断开之前连接主机的连接,连接新的。replicationSetMaster() 并不会真正连接主机,只是修改/* There was no previous master or the user specified a different one,
* we can continue. */
replicationSetMaster(c->argv[1]->ptr, port);
redisLog(REDIS_NOTICE,"SLAVE OF %s:%d enabled (user request)",
server.masterhost, server.masterport);
}
addReply(c,shared.ok);
}
// 设置新主机
/* Set replication to the specified master address and port. */
void replicationSetMaster(char *ip, int port) {
sdsfree(server.masterhost);
server.masterhost = sdsdup(ip);
server.masterport = port;
// 断开之前主机的连接
if (server.master) freeClient(server.master);
disconnectSlaves(); /* Force our slaves to resync with us as well. */
// 取消缓存主机
replicationDiscardCachedMaster(); /* Don't try a PSYNC. */
// 释放积压空间
freeReplicationBacklog(); /* Don't allow our chained slaves to PSYNC. */
// cancelReplicationHandshake() 尝试断开数据传输和主机连接
cancelReplicationHandshake();
server.repl_state = REDIS_REPL_CONNECT;
server.master_repl_offset = 0;
}
// 管理主从连接的定时程序定时程序,每秒执行一次
// 在serverCorn() 中调用
/* --------------------------- REPLICATION CRON ----------------------------- */
/* Replication cron funciton, called 1 time per second. */
void replicationCron(void) {
......
// 如果需要(EDIS_REPL_CONNECT),尝试连接主机,真正连接主机的操作在这里
/* Check if we should connect to a MASTER */
if (server.repl_state == REDIS_REPL_CONNECT) {
redisLog(REDIS_NOTICE,"Connecting to MASTER %s:%d",
server.masterhost, server.masterport);
if (connectWithMaster() == REDIS_OK) {
redisLog(REDIS_NOTICE,"MASTER <-> SLAVE sync started");
}
}
......
}
全同步
无论如何,Redis 首先会尝试部分同步,如果失败才尝试全同步。而刚刚建立连接的 master-slave 需要全同步。
从机连接主机后,会主动发起 PSYNC 命令,从机会提供 master_runid 和offset,主机验证 master_runid 和 offset 是否有效?master_runid 相当于主机身份验证码,用来验证从机上一次连接的主机,offset 是全局积压空间数据的偏移量。
验证未通过则,则进行全同步:主机返回+FULLRESYNC master_runid offset(从机接收并记录 master_runid 和 offset,并准备接收RDB 文件)接着启动 BGSAVE 生成 RDB 文件,BGSAVE 结束后,向从机传输,从而完成全同步。
主机和从机之间的交互图如下:
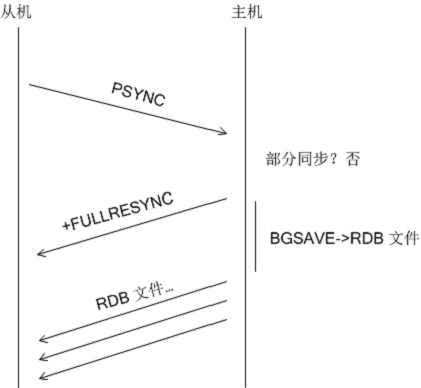
// 连接主机connectWithMaster() 的时候,会被注册为回调函数
void syncWithMaster(aeEventLoop *el, int fd, void *privdata, int mask) {
char tmpfile[256], *err;
int dfd, maxtries = 5;
int sockerr = 0, psync_result;
socklen_t errlen = sizeof(sockerr);
......
// 这里尝试向主机请求部分同步,主机会回复以拒绝或接受请求。如果拒绝部分同步,
// 会返回+FULLRESYNC master_runid offset
// 从机接收后准备进行全同步
psync_result = slaveTryPartialResynchronization(fd);
if (psync_result == PSYNC_CONTINUE) {
redisLog(REDIS_NOTICE, "MASTER <-> SLAVE sync: Master accepted a "
"Partial Resynchronization.");
return;
}
// 执行全同步
/* Fall back to SYNC if needed. Otherwise psync_result == PSYNC_FULLRESYNC
* and the server.repl_master_runid and repl_master_initial_offset are
* already populated. */
// 未知结果,进行出错处理
if (psync_result == PSYNC_NOT_SUPPORTED) {
redisLog(REDIS_NOTICE,"Retrying with SYNC...");
if (syncWrite(fd,"SYNC\r\n",6,server.repl_syncio_timeout*1000) == -1) {
redisLog(REDIS_WARNING,"I/O error writing to MASTER: %s",
strerror(errno));
goto error;
}
}
// 为什么要尝试5 次???
/* Prepare a suitable temp file for bulk transfer */
while(maxtries--) {
snprintf(tmpfile,256,
"temp-%d.%ld.rdb",(int)server.unixtime,(long int)getpid());
dfd = open(tmpfile,O_CREAT|O_WRONLY|O_EXCL,0644);
if (dfd != -1) break;
sleep(1);
}
if (dfd == -1) {
redisLog(REDIS_WARNING,"Opening the temp file needed for MASTER <-> "
"SLAVE synchronization: %s",strerror(errno));
goto error;
}
// 注册读事件,回调函数readSyncBulkPayload(), 准备读RDB 文件
/* Setup the non blocking download of the bulk file. */
if (aeCreateFileEvent(server.el,fd, AE_READABLE,readSyncBulkPayload,NULL)
== AE_ERR)
{
redisLog(REDIS_WARNING,
"Can't create readable event for SYNC: %s (fd=%d)",
strerror(errno),fd);
goto error;
}
// 设置传输RDB 文件数据的选项
// 状态
server.repl_state = REDIS_REPL_TRANSFER;
// RDB 文件大小
server.repl_transfer_size = -1;
// 已经传输的大小
server.repl_transfer_read = 0;
// 上一次同步的偏移,为的是定时写入磁盘
server.repl_transfer_last_fsync_off = 0;
// 本地RDB 文件套接字
server.repl_transfer_fd = dfd;
// 上一次同步IO 时间
server.repl_transfer_lastio = server.unixtime;
// 临时文件名
server.repl_transfer_tmpfile = zstrdup(tmpfile);
return;
error:
close(fd);
server.repl_transfer_s = -1;
server.repl_state = REDIS_REPL_CONNECT;
return;
}
全同步请求的数据是RDB 数据文件和积压空间中的数据。关于 RDB 数据文件,请参见《RDB 持久化策略》。如果没有后台持久化 BGSAVE 进程,那么 BGSVAE 会被触发,否则所有请求全同步的 slave 都会被标记为等待 BGSAVE 结束。BGSAVE 结束后,master 会马上向所有的从机发送 RDB 文件。
下面 syncCommand() 摘取全同步的部分:
// 主机SYNC 和PSYNC 命令处理函数,会尝试进行部分同步和全同步
/* SYNC ad PSYNC command implemenation. */
void syncCommand(redisClient *c) {
......
// 主机尝试部分同步,失败的话向从机发送+FULLRESYNC master_runid offset,
// 接着启动BGSAVE
// 执行全同步:
/* Full resynchronization. */
server.stat_sync_full++;
/* Here we need to check if there is a background saving operation
* in progress, or if it is required to start one */
if (server.rdb_child_pid != -1) {
/* 存在BGSAVE 后台进程。
1. 如果master 现有所连接的所有从机slaves 当中有存在
REDIS_REPL_WAIT_BGSAVE_END 的从机,那么将从机c 设置为
REDIS_REPL_WAIT_BGSAVE_END;
2. 否则,设置为REDIS_REPL_WAIT_BGSAVE_START*/
/* Ok a background save is in progress. Let's check if it is a good
* one for replication, i.e. if there is another slave that is
* registering differences since the server forked to save */
redisClient *slave;
listNode *ln;
listIter li;
// 检测是否已经有从机申请全同步
listRewind(server.slaves,&li);
while((ln = listNext(&li))) {
slave = ln->value;
if (slave->replstate == REDIS_REPL_WAIT_BGSAVE_END) break;
}
if (ln) {
// 存在状态为REDIS_REPL_WAIT_BGSAVE_END 的从机slave,
// 就将此从机c 状态设置为REDIS_REPL_WAIT_BGSAVE_END,
// 从而在BGSAVE 进程结束后,可以发送RDB 文件,
// 同时将从机slave 中的更新复制到此从机c。
/* Perfect, the server is already registering differences for
* another slave. Set the right state, and copy the buffer. */
// 将其他从机上的待回复的缓存复制到从机c
copyClientOutputBuffer(c,slave);
// 修改从机c 状态为「等待BGSAVE 进程结束」
c->replstate = REDIS_REPL_WAIT_BGSAVE_END;
redisLog(REDIS_NOTICE,"Waiting for end of BGSAVE for SYNC");
} else {
// 不存在状态为REDIS_REPL_WAIT_BGSAVE_END 的从机,就将此从机c 状态设置为
// REDIS_REPL_WAIT_BGSAVE_START,即等待新的BGSAVE 进程的开启。
// 修改状态为「等待BGSAVE 进程开始」
/* No way, we need to wait for the next BGSAVE in order to
* register differences */
c->replstate = REDIS_REPL_WAIT_BGSAVE_START;
redisLog(REDIS_NOTICE,"Waiting for next BGSAVE for SYNC");
}
} else {
// 不存在BGSAVE 后台进程,启动一个新的BGSAVE 进程
* Ok we don't have a BGSAVE in progress, let's start one */
redisLog(REDIS_NOTICE,"Starting BGSAVE for SYNC");
if (rdbSaveBackground(server.rdb_filename) != REDIS_OK) {
redisLog(REDIS_NOTICE,"Replication failed, can't BGSAVE");
addReplyError(c,"Unable to perform background save");
return;
}
// 将此从机c 状态设置为REDIS_REPL_WAIT_BGSAVE_END,从而在BGSAVE
// 进程结束后,可以发送RDB 文件,同时将从机slave 中的更新复制到此从机c。
c->replstate = REDIS_REPL_WAIT_BGSAVE_END;
// 清理脚本缓存???
/* Flush the script cache for the new slave. */
replicationScriptCacheFlush();
}
if (server.repl_disable_tcp_nodelay)
anetDisableTcpNoDelay(NULL, c->fd); /* Non critical if it fails. */
c->repldbfd = -1;
c->flags |= REDIS_SLAVE;
server.slaveseldb = -1; /* Force to re-emit the SELECT command. */
listAddNodeTail(server.slaves,c);
if (listLength(server.slaves) == 1 && server.repl_backlog == NULL)
createReplicationBacklog();
return;
}
主机执行完 BGSAVE 后,会将 RDB 文件发送给从机。
// BGSAVE 结束后,会调用
/* A background saving child (BGSAVE) terminated its work. Handle this. */
void backgroundSaveDoneHandler(int exitcode, int bysignal) {
// 其他操作
......
// 可能从机正在等待BGSAVE 进程的终止
/* Possibly there are slaves waiting for a BGSAVE in order to be served
* (the first stage of SYNC is a bulk transfer of dump.rdb) */
updateSlavesWaitingBgsave(exitcode == 0 ? REDIS_OK : REDIS_ERR);
}
// 当RDB 持久化(backgroundSaveDoneHandler()) 结束后,会调用此函数
// RDB 文件就绪,给所有的从机发送RDB 文件
/* This function is called at the end of every background saving.
* The argument bgsaveerr is REDIS_OK if the background saving succeeded
* otherwise REDIS_ERR is passed to the function.
**
The goal of this function is to handle slaves waiting for a successful
* background saving in order to perform non-blocking synchronization. */
void updateSlavesWaitingBgsave(int bgsaveerr) {
listNode *ln;
int startbgsave = 0;
listIter li;
listRewind(server.slaves,&li);
while((ln = listNext(&li))) {
redisClient *slave = ln->value;
// 等待BGSAVE 开始。调整状态为等待下一次BGSAVE 进程的结束
if (slave->replstate == REDIS_REPL_WAIT_BGSAVE_START) {
startbgsave = 1;
slave->replstate = REDIS_REPL_WAIT_BGSAVE_END;
// 等待BGSAVE 结束。准备向slave 发送RDB 文件
} else if (slave->replstate == REDIS_REPL_WAIT_BGSAVE_END) {
struct redis_stat buf;
// 如果RDB 持久化失败, bgsaveerr 会被设置为REDIS_ERR
if (bgsaveerr != REDIS_OK) {
freeClient(slave);
redisLog(REDIS_WARNING,"SYNC failed. BGSAVE child returned "
"an error");
continue;
}
// 打开RDB 文件
if ((slave->repldbfd = open(server.rdb_filename,O_RDONLY)) == -1 ||
redis_fstat(slave->repldbfd,&buf) == -1) {
freeClient(slave);
redisLog(REDIS_WARNING,"SYNC failed. Can't open/stat DB after"
" BGSAVE: %s", strerror(errno));
continue;
}
slave->repldboff = 0;
slave->repldbsize = buf.st_size;
slave->replstate = REDIS_REPL_SEND_BULK;
// 如果之前有注册写事件,取消
aeDeleteFileEvent(server.el,slave->fd,AE_WRITABLE);
// 注册新的写事件,sendBulkToSlave() 传输RDB 文件
if (aeCreateFileEvent(server.el, slave->fd, AE_WRITABLE,
sendBulkToSlave, slave) == AE_ERR) {
freeClient(slave);
continue;
}
}
}
// startbgsave == REDIS_ERR 表示BGSAVE 失败,再一次进行BGSAVE 尝试
if (startbgsave) {
/* Since we are starting a new background save for one or more slaves,
* we flush the Replication Script Cache to use EVAL to propagate every
* new EVALSHA for the first time, since all the new slaves don't know
* about previous scripts. */
replicationScriptCacheFlush();
if (rdbSaveBackground(server.rdb_filename) != REDIS_OK) {
/*BGSAVE 可能fork 失败,所有等待BGSAVE 的从机都将结束连接。这是
redis 自我保护的措施,fork 失败很可能是内存紧张*/
listIter li;
listRewind(server.slaves,&li);
redisLog(REDIS_WARNING,"SYNC failed. BGSAVE failed");
while((ln = listNext(&li))) {
redisClient *slave = ln->value;
if (slave->replstate == REDIS_REPL_WAIT_BGSAVE_START)
freeClient(slave);
}
}
}
}
部分同步
如上所说,无论如何,Redis 首先会尝试部分同步。部分同步即把积压空间缓存的数据,即更新记录发送给从机。
从机连接主机后,会主动发起 PSYNC 命令,从机会提供 master_runid 和offset,主机验证 master_runid 和 offset 是否有效?验证通过则,进行部分同步:主机返回 +CONTINUE(从机接收后会注册积压数据接收事件),接着发送积压空间数据。
主机和从机之间的交互图如下:
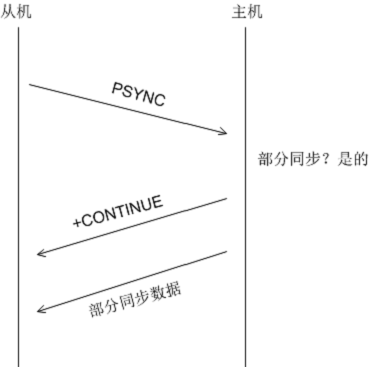
syncWithMaster() 已经被设置为回调函数,当与主机建立连接后,syncWithMaster() 会被回调,这一点查阅在 connectWithMaster() 函数。首先如果该从机从未与主机有过连接,那么会进行全同步,从主机拷贝所有的数据;否则,会尝试进行部分同步。
// 连接主机connectWithMaster() 的时候,会被注册为回调函数
void syncWithMaster(aeEventLoop *el, int fd, void *privdata, int mask) {
char tmpfile[256], *err;
int dfd, maxtries = 5;
int sockerr = 0, psync_result;
socklen_t errlen = sizeof(sockerr);
......
// 尝试部分同步,主机允许进行部分同步会返回+CONTINUE,从机接收后注册相应的事件
/* Try a partial resynchonization. If we don't have a cached master
* slaveTryPartialResynchronization() will at least try to use PSYNC
* to start a full resynchronization so that we get the master run id
* and the global offset, to try a partial resync at the next
* reconnection attempt. */
// 函数返回三种状态:
// PSYNC_CONTINUE:表示会进行部分同步,在slaveTryPartialResynchronization()
// 中已经设置回调函数readQueryFromClient()
// PSYNC_FULLRESYNC:全同步,会下载RDB 文件
// PSYNC_NOT_SUPPORTED:未知
psync_result = slaveTryPartialResynchronization(fd);
if (psync_result == PSYNC_CONTINUE) {
redisLog(REDIS_NOTICE, "MASTER <-> SLAVE sync: Master accepted a "
"Partial Resynchronization.");
return;
}
// 执行全同步
......
}
slaveTryPartialResynchronization() 主要工作是判断是进行全同步还是部分同步。
// 函数返回三种状态:
// PSYNC_CONTINUE:表示会进行部分同步,已经设置回调函数
// PSYNC_FULLRESYNC:全同步,会下载RDB 文件
// PSYNC_NOT_SUPPORTED:未知
#define PSYNC_CONTINUE 0
#define PSYNC_FULLRESYNC 1
#define PSYNC_NOT_SUPPORTED 2
int slaveTryPartialResynchronization(int fd) {
char *psync_runid;
char psync_offset[32];
sds reply;
/* Initially set repl_master_initial_offset to -1 to mark the current
* master run_id and offset as not valid. Later if we'll be able to do
* a FULL resync using the PSYNC command we'll set the offset at the
* right value, so that this information will be propagated to the
* client structure representing the master into server.master. */
server.repl_master_initial_offset = -1;
if (server.cached_master) {
// 缓存了上一次与主机连接的信息,可以尝试进行部分同步,减少数据传输
psync_runid = server.cached_master->replrunid;
snprintf(psync_offset,sizeof(psync_offset),"%lld",
server.cached_master->reploff+1);
redisLog(REDIS_NOTICE,"Trying a partial resynchronization "
"(request %s:%s).", psync_runid, psync_offset);
} else {
// 未缓存上一次与主机连接的信息,进行全同步
// psync ? -1 可以获取主机的master_runid
redisLog(REDIS_NOTICE,"Partial resynchronization not possible "
"(no cached master)");
psync_runid = "?";
memcpy(psync_offset,"-1",3);
}
// 向主机发送命令,并接收回复
/* Issue the PSYNC command */
reply = sendSynchronousCommand(fd,"PSYNC",psync_runid,psync_offset,NULL);
// 全同步
if (!strncmp(reply,"+FULLRESYNC",11)) {
char *runid = NULL, *offset = NULL;
/* FULL RESYNC, parse the reply in order to extract the run id
* and the replication offset. */
runid = strchr(reply,' ');
if (runid) {
runid++;
offset = strchr(runid,' ');
if (offset) offset++;
}
if (!runid || !offset || (offset-runid-1) != REDIS_RUN_ID_SIZE) {
redisLog(REDIS_WARNING,
"Master replied with wrong +FULLRESYNC syntax.");
/* This is an unexpected condition, actually the +FULLRESYNC
* reply means that the master supports PSYNC, but the reply
* format seems wrong. To stay safe we blank the master
* runid to make sure next PSYNCs will fail. */
memset(server.repl_master_runid,0,REDIS_RUN_ID_SIZE+1);
} else {
// 拷贝runid
memcpy(server.repl_master_runid, runid, offset-runid-1);
server.repl_master_runid[REDIS_RUN_ID_SIZE] = '\0';
server.repl_master_initial_offset = strtoll(offset,NULL,10);
redisLog(REDIS_NOTICE,"Full resync from master: %s:%lld",
server.repl_master_runid,
server.repl_master_initial_offset);
}
/* We are going to full resync, discard the cached master structure. */
replicationDiscardCachedMaster();
sdsfree(reply);
return PSYNC_FULLRESYNC;
}
// 部分同步
if (!strncmp(reply,"+CONTINUE",9)) {
/* Partial resync was accepted, set the replication state accordingly */
redisLog(REDIS_NOTICE,
"Successful partial resynchronization with master.");
sdsfree(reply);
// 缓存主机替代现有主机,且为PSYNC(部分同步) 做好准备
replicationResurrectCachedMaster(fd);
return PSYNC_CONTINUE;
}
/* If we reach this point we receied either an error since the master does
* not understand PSYNC, or an unexpected reply from the master.
* Reply with PSYNC_NOT_SUPPORTED in both cases. */
// 接收到主机发出的错误信息
if (strncmp(reply,"-ERR",4)) {
/* If it's not an error, log the unexpected event. */
redisLog(REDIS_WARNING,
"Unexpected reply to PSYNC from master: %s", reply);
} else {
redisLog(REDIS_NOTICE,
"Master does not support PSYNC or is in "
"error state (reply: %s)", reply);
}
sdsfree(reply);
replicationDiscardCachedMaster();
return PSYNC_NOT_SUPPORTED;
}
下面 syncCommand() 摘取部分同步的部分:
// 主机SYNC 和PSYNC 命令处理函数,会尝试进行部分同步和全同步
/* SYNC ad PSYNC command implemenation. */
void syncCommand(redisClient *c) {
......
// 主机尝试部分同步,允许则进行部分同步,会返回+CONTINUE,接着发送积压空间
/* Try a partial resynchronization if this is a PSYNC command.
* If it fails, we continue with usual full resynchronization, however
* when this happens masterTryPartialResynchronization() already
* replied with:
**
+FULLRESYNC <runid> <offset>
**
So the slave knows the new runid and offset to try a PSYNC later
* if the connection with the master is lost. */
if (!strcasecmp(c->argv[0]->ptr,"psync")) {
// 部分同步
if (masterTryPartialResynchronization(c) == REDIS_OK) {
server.stat_sync_partial_ok++;
return; /* No full resync needed, return. */
} else {
// 部分同步失败,会进行全同步,这时会收到来自客户端的runid
char *master_runid = c->argv[1]->ptr;
/* Increment stats for failed PSYNCs, but only if the
* runid is not "?", as this is used by slaves to force a full
* resync on purpose when they are not albe to partially
* resync. */
if (master_runid[0] != '?') server.stat_sync_partial_err++;
}
} else {
/* If a slave uses SYNC, we are dealing with an old implementation
* of the replication protocol (like redis-cli --slave). Flag the client
* so that we don't expect to receive REPLCONF ACK feedbacks. */
c->flags |= REDIS_PRE_PSYNC_SLAVE;
}
// 执行全同步:
......
}
主机虽然收到了来自从机的部分同步的请求,但主机并不一定会允许进行部分同步。在主机侧,如果收到部分同步的请求,还需要验证从机是否适合进行部分同步。
// 主机尝试是否能进行部分同步
/* This function handles the PSYNC command from the point of view of a
* master receiving a request for partial resynchronization.
**
On success return REDIS_OK, otherwise REDIS_ERR is returned and we proceed
* with the usual full resync. */
int masterTryPartialResynchronization(redisClient *c) {
long long psync_offset, psync_len;
char *master_runid = c->argv[1]->ptr;
char buf[128];
int buflen;
/* Is the runid of this master the same advertised by the wannabe slave
* via PSYNC? If runid changed this master is a different instance and
* there is no way to continue. */
if (strcasecmp(master_runid, server.runid)) {
// 当因为异常需要与主机断开连接的时候,从机会暂存主机的状态信息,以便
// 下一次的部分同步。
// 1)master_runid 是从机提供一个因缓存主机的runid,
// 2)server.runid 是本机(主机)的runid。
// 匹配失败,说明是本机(主机)不是从机缓存的主机,这时候不能进行部分同步,
// 只能进行全同步
// "?" 表示从机要求全同步
// 什么时候从机会要求全同步???
/* Run id "?" is used by slaves that want to force a full resync. */
if (master_runid[0] != '?') {
redisLog(REDIS_NOTICE,"Partial resynchronization not accepted: "
"Runid mismatch (Client asked for '%s', I'm '%s')",
master_runid, server.runid);
} else {
redisLog(REDIS_NOTICE,"Full resync requested by slave.");
}
goto need_full_resync;
}
// 从参数中解析整数,整数是从机指定的偏移量
/* We still have the data our slave is asking for? */
if (getLongLongFromObjectOrReply(c,c->argv[2],&psync_offset,NULL) !=
REDIS_OK) goto need_full_resync;
// 部分同步失败的情况:
// 1、不存在积压空间
if (!server.repl_backlog ||
// 2、psync_offset 太过小,即从机错过太多更新记录,安全起见,实行全同步
// 我们知道,积压空间的大小是有限的,如果某个从机错过的更新过多,将无法
// 在积压空间中找到更新的记录
psync_offset 越界
psync_offset < server.repl_backlog_off ||
psync_offset > (server.repl_backlog_off + server.repl_backlog_histlen))
// 经检测,不满足部分同步的条件,转而进行全同步
{
redisLog(REDIS_NOTICE,
"Unable to partial resync with the slave for lack of backlog "
"(Slave request was: %lld).", psync_offset);
if (psync_offset > server. ) {
redisLog(REDIS_WARNING,
"Warning: slave tried to PSYNC with an offset that is "
"greater than the master replication offset.");
}
goto need_full_resync;
}
// 执行部分同步:
// 1)标记客户端为从机
// 2)通知从机准备接收数据。从机收到+CONTINUE 会做好准备
// 3)开发发送数据
/* If we reached this point, we are able to perform a partial resync:
* 1) Set client state to make it a slave.
* 2) Inform the client we can continue with +CONTINUE
* 3) Send the backlog data (from the offset to the end) to the slave. */
// 将连接的客户端标记为从机
c->flags |= REDIS_SLAVE;
// 表示进行部分同步
// #define REDIS_REPL_ONLINE 9 /* RDB file transmitted, sending just
// updates. */
c->replstate = REDIS_REPL_ONLINE;
// 更新ack 的时间
c->repl_ack_time = server.unixtime;
// 添加入从机链表
listAddNodeTail(server.slaves,c);
// 告诉从机可以进行部分同步,从机收到后会做相关的准备(注册回调函数)
/* We can't use the connection buffers since they are used to accumulate
* new commands at this stage. But we are sure the socket send buffer is
* emtpy so this write will never fail actually. */
buflen = snprintf(buf,sizeof(buf),"+CONTINUE\r\n");
if (write(c->fd,buf,buflen) != buflen) {
freeClientAsync(c);
return REDIS_OK;
}
// 向从机写积压空间中的数据,积压空间存储有「更新缓存」
psync_len = addReplyReplicationBacklog(c,psync_offset);
redisLog(REDIS_NOTICE,
"Partial resynchronization request accepted. Sending %lld bytes of "
"backlog starting from offset %lld.", psync_len, psync_offset);
/* Note that we don't need to set the selected DB at server.slaveseldb
* to -1 to force the master to emit SELECT, since the slave already
* has this state from the previous connection with the master. */
refreshGoodSlavesCount();
return REDIS_OK; /* The caller can return, no full resync needed. */
need_full_resync:
......
// 向从机发送+FULLRESYNC runid repl_offset
}
缓存主机
从机因为某些原因,譬如网络延迟(PING 超时,ACK 超时等),可能会断开与主机的连接。这时候,从机会尝试保存与主机连接的信息,譬如全局积压空间数据偏移量等,以便下一次的部分同步,并且从机会再一次尝试连接主机。注意一点,如果断开的时间足够长,部分同步肯定会失败的。
void freeClient(redisClient *c) {
listNode *ln;
/* If this is marked as current client unset it */
if (server.current_client == c) server.current_client = NULL;
// 如果此机为从机,已经连接主机,可能需要保存主机状态信息,以便进行PSYNC
/* If it is our master that's beging disconnected we should make sure
* to cache the state to try a partial resynchronization later.
**
Note that before doing this we make sure that the client is not in
* some unexpected state, by checking its flags. */
if (server.master && c->flags & REDIS_MASTER) {
redisLog(REDIS_WARNING,"Connection with master lost.");
if (!(c->flags & (REDIS_CLOSE_AFTER_REPLY|
REDIS_CLOSE_ASAP|
REDIS_BLOCKED|
REDIS_UNBLOCKED)))
{
replicationCacheMaster(c);
return;
}
}
......
}
// 为了实现部分同步,从机会保存主机的状态信息后才会断开主机的连接,主机状态信息
// 保存在server.cached_master
// 会在freeClient() 中调用,保存与主机连接的状态信息,以便进行PSYNC
void replicationCacheMaster(redisClient *c) {
listNode *ln;
redisAssert(server.master != NULL && server.cached_master == NULL);
redisLog(REDIS_NOTICE,"Caching the disconnected master state.");
// 从客户端列表删除主机的信息
/* Remove from the list of clients, we don't want this client to be
* listed by CLIENT LIST or processed in any way by batch operations. */
ln = listSearchKey(server.clients,c);
redisAssert(ln != NULL);
listDelNode(server.clients,ln);
// 保存主机的状态信息
/* Save the master. Server.master will be set to null later by
* replicationHandleMasterDisconnection(). */
server.cached_master = server.master;
// 注销事件,关闭连接
/* Remove the event handlers and close the socket. We'll later reuse
* the socket of the new connection with the master during PSYNC. */
aeDeleteFileEvent(server.el,c->fd,AE_READABLE);
aeDeleteFileEvent(server.el,c->fd,AE_WRITABLE);
close(c->fd);
/* Set fd to -1 so that we can safely call freeClient(c) later. */
c->fd = -1;
// 修改连接的状态,设置server.master = NULL
/* Caching the master happens instead of the actual freeClient() call,
* so make sure to adjust the replication state. This function will
* also set server.master to NULL. */
replicationHandleMasterDisconnection();
}
总结
简单来说,主从同步就是 RDB 文件的上传下载;主机有小部分的数据修改,就把修改记录传播给每个从机。这篇文章详述了 Redis 主从复制的内部协议和机制。
Redis 事务简述
MULTI,EXEC,DISCARD,WATCH 四个命令是 Redis 事务的四个基础命令。其中:
- MULTI,告诉 Redis 服务器开启一个事务。注意,只是开启,而不是执行
- EXEC,告诉 Redis 开始执行事务
- DISCARD,告诉 Redis 取消事务
- WATCH,监视某一个键值对,它的作用是在事务执行之前如果监视的键值被修改,事务会被取消。
在介绍 Redis 事务之前,先来展开 Redis 命令队列的内部实现。
Redis 命令队列
Redis 允许一个客户端不间断执行多条命令:发送 MULTI 后,用户键入多条命令;再发送 EXEC 即可不间断执行之前输入的多条命令。因为,Redis 是单进程单线的工作模式,因此多条命令的执行是不会被中断的。
> MULTI
OK
> INCR foo
QUEUED
> INCR bar
QUEUED
> EXEC
1) (integer) 1
2) (integer) 1
内部实现不难:Redis 服务器收到来自客户端的 MULTI 命令后,为客户端保存一个命令队列结构体,直到收到 EXEC 后才开始执行命令队列中的命令。
下面是命令队列的数据结构:
// 命令结构体,命令队列专用
/* Client MULTI/EXEC state */
typedef struct multiCmd {
// 命令参数
robj **argv;
// 参数个数
int argc;
// 命令结构体,包含了与命令相关的参数,譬如命令执行函数
// 如需更详细了解,参看redis.c 中的redisCommandTable 全局参数
struct redisCommand *cmd;
} multiCmd;
// 命令队列结构体
typedef struct multiState {
// 命令队列
multiCmd *commands; /* Array of MULTI commands */
// 命令的个数
int count; /* Total number of MULTI commands */
// 以下两个参数暂时没有用到,和主从复制有关
int minreplicas; /* MINREPLICAS for synchronous replication */
time_t minreplicas_timeout; /* MINREPLICAS timeout as unixtime. */
} multiState;
通由上面给出的 Redis 客户端操作,来看看 Redis 服务器的状态变化:
> MULTI
OK
> INCR foo
QUEUED
> INCR bar
QUEUED
> EXEC
1) (integer) 1
2) (integer) 1
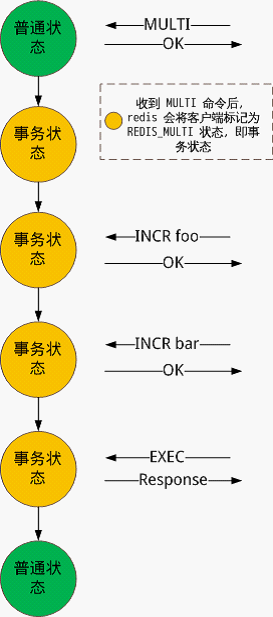
processCommand() 函数中的一段代码可以窥探命令入队的操作:
// 执行命令
int processCommand(redisClient *c) {
......
// 加入命令队列的情况
/* Exec the command */
if (c->flags & REDIS_MULTI &&
c->cmd->proc != execCommand && c->cmd->proc != discardCommand &&
c->cmd->proc != multiCommand && c->cmd->proc != watchCommand)
{
// 命令入队
queueMultiCommand(c);
addReply(c,shared.queued);
// 真正执行命令。
// 注意,如果是设置了多命令模式,那么不是直接执行命令,而是让命令入队
} else {
call(c,REDIS_CALL_FULL);
if (listLength(server.ready_keys))
handleClientsBlockedOnLists();
}
return REDIS_OK;
}
键值的监视
稍后再展开事务执行和取消的部分。
Redis 的官方文档上说,WATCH 命令是为了让 Redis 拥有 check-and-set(CAS) 的特性。CAS 的意思是,一个客户端在修改某个值之前,要检测它是否更改;如果没有更改,修改操作才能成功。
一个不含 CAS 特性的例子:
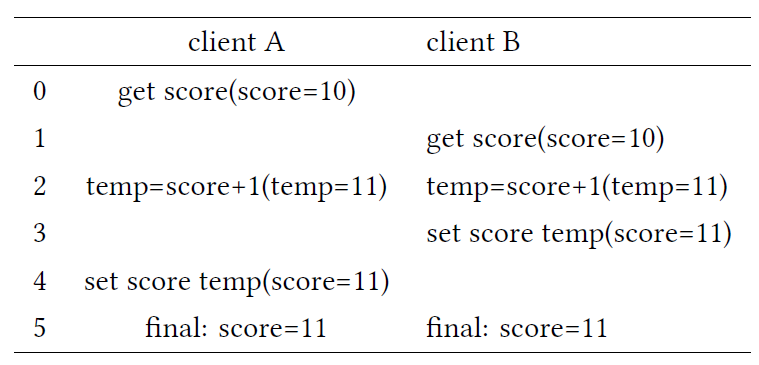
含有 CAS 特性的例子:
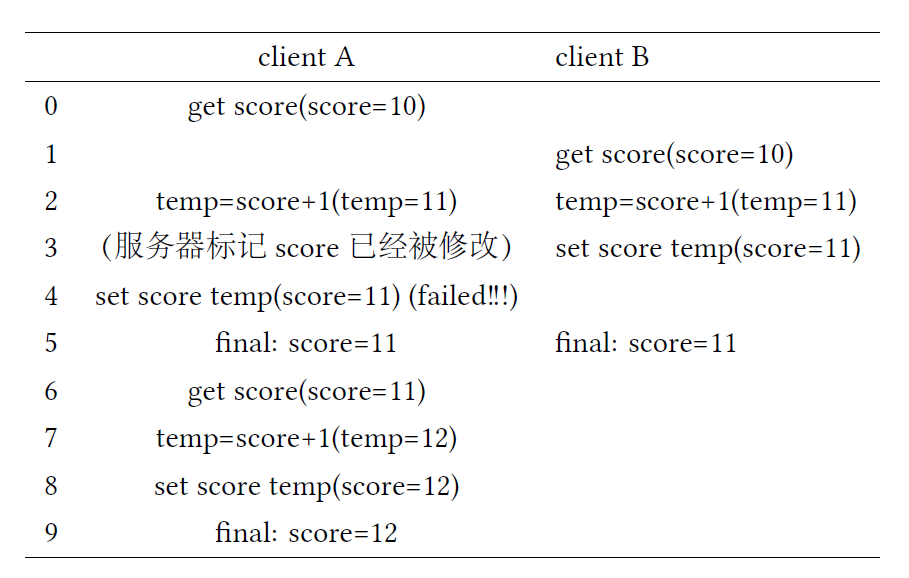
在后一个例子中,client A 第一次尝试修改失败,因为 client B 修改了 score.client A 失败过后,再次尝试修改才成功。Redis 事务的 CAS 特性借助了键值的监视。
Redis 数据集结构体 redisDB 和客户端结构体 redisClient 都会保存键值监视的相关数据。
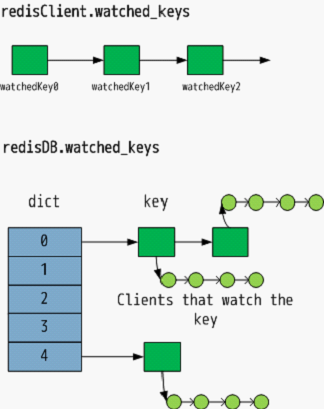
监视键值的过程:
// WATCH 命令执行函数
void watchCommand(redisClient *c) {
int j;
// WATCH 命令不能在MULTI 和EXEC 之间调用
if (c->flags & REDIS_MULTI) {
addReplyError(c,"WATCH inside MULTI is not allowed");
return;
}
// 监视所给出的键
for (j = 1; j < c->argc; j++)
watchForKey(c,c->argv[j]);
addReply(c,shared.ok);
}
// 监视键值函数
/* Watch for the specified key */
void watchForKey(redisClient *c, robj *key) {
list *clients = NULL;
listIter li;
listNode *ln;
watchedKey *wk;
// 是否已经监视该键值
/* Check if we are already watching for this key */
listRewind(c->watched_keys,&li);
while((ln = listNext(&li))) {
wk = listNodeValue(ln);
if (wk->db == c->db && equalStringObjects(key,wk->key))
return; /* Key already watched */
}
// 获取监视该键值的客户端链表
/* This key is not already watched in this DB. Let's add it */
clients = dictFetchValue(c->db->watched_keys,key);
// 如果不存在链表,需要新建一个
if (!clients) {
clients = listCreate();
dictAdd(c->db->watched_keys,key,clients);
incrRefCount(key);
}
// 尾插法。将客户端添加到链表尾部
listAddNodeTail(clients,c);
// 将监视键添加到redisClient.watched_keys 的尾部
/* Add the new key to the list of keys watched by this client */
wk = zmalloc(sizeof(*wk));
wk->key = key;
wk->db = c->db;
incrRefCount(key);
listAddNodeTail(c->watched_keys,wk);
}
当客户端键值被修改的时候,监视该键值的所有客户端都会被标记为 REDIS_DIRTY_-CAS,表示此该键值对被修改过,因此如果这个客户端已经进入到事务状态,它命令队列中的命令是不会被执行的。
touchWatchedKey() 是标记某键值被修改的函数,它一般不被 signalModifyKey() 函数包装。下面是 touchWatchedKey() 的实现。
// 标记键值对的客户端为REDIS_DIRTY_CAS,表示其所监视的数据已经被修改过
/* "Touch" a key, so that if this key is being WATCHed by some client the
* next EXEC will fail. */
void touchWatchedKey(redisDb *db, robj *key) {
list *clients;
listIter li;
listNode *ln;
// 获取监视key 的所有客户端
if (dictSize(db->watched_keys) == 0) return;
clients = dictFetchValue(db->watched_keys, key);
if (!clients) return;
// 标记监视key 的所有客户端REDIS_DIRTY_CAS
/* Mark all the clients watching this key as REDIS_DIRTY_CAS */
/* Check if we are already watching for this key */
listRewind(clients,&li);
while((ln = listNext(&li))) {
redisClient *c = listNodeValue(ln);
// REDIS_DIRTY_CAS 更改的时候会设置此标记
c->flags |= REDIS_DIRTY_CAS;
}
}
redis 事务的执行与取消
当用户发出 EXEC 的时候,在它 MULTI 命令之后提交的所有命令都会被执行。从代码的实现来看,如果客户端监视的数据被修改,它会被标记 REDIS_DIRTY_CAS,会调用 discardTransaction() 从而取消该事务。特别的,用户开启一个事务后会提交多个命令,如果命令在入队过程中出现错误,譬如提交的命令本身不存在,参数错误和内存超额等,都会导致客户端被标记 REDIS_DIRTY_EXEC,被标记 REDIS_DIRTY_EXEC 会导致事务被取消。
因此总结一下:
- REDIS_DIRTY_CAS 更改的时候会设置此标记
- REDIS_DIRTY_EXEC 命令入队时出现错误,此标记会导致 EXEC 命令执行失败
下面是执行事务的过程:
// 执行事务内的所有命令
void execCommand(redisClient *c) {
int j;
robj **orig_argv;
int orig_argc;
struct redisCommand *orig_cmd;
int must_propagate = 0; /* Need to propagate MULTI/EXEC to AOF / slaves? */
// 必须设置多命令标记
if (!(c->flags & REDIS_MULTI)) {
addReplyError(c,"EXEC without MULTI");
return;
}
// 停止执行事务命令的情况:
// 1. 被监视的数据被修改
// 2. 命令队列中的命令执行失败
/* Check if we need to abort the EXEC because:
* 1) Some WATCHed key was touched.
* 2) There was a previous error while queueing commands.
* A failed EXEC in the first case returns a multi bulk nil object
* (technically it is not an error but a special behavior), while
* in the second an EXECABORT error is returned. */
if (c->flags & (REDIS_DIRTY_CAS|REDIS_DIRTY_EXEC)) {
addReply(c, c->flags & REDIS_DIRTY_EXEC ? shared.execaborterr :
shared.nullmultibulk);
discardTransaction(c);
goto handle_monitor;
}
// 执行队列中的所有命令
/* Exec all the queued commands */
unwatchAllKeys(c); /* Unwatch ASAP otherwise we'll waste CPU cycles */
// 保存当前的命令,一般为MULTI,在执行完所有的命令后会恢复。
orig_argv = c->argv;
orig_argc = c->argc;
orig_cmd = c->cmd;
addReplyMultiBulkLen(c,c->mstate.count);
for (j = 0; j < c->mstate.count; j++) {
// 命令队列中的命令被赋值给当前的命令
c->argc = c->mstate.commands[j].argc;
c->argv = c->mstate.commands[j].argv;
c->cmd = c->mstate.commands[j].cmd;
// 遇到包含写操作的命令需要将MULTI 命令写入AOF 文件
/* Propagate a MULTI request once we encounter the first write op.
* This way we'll deliver the MULTI/..../EXEC block as a whole and
* both the AOF and the replication link will have the same consistency
* and atomicity guarantees. */
if (!must_propagate && !(c->cmd->flags & REDIS_CMD_READONLY)) {
execCommandPropagateMulti(c);
must_propagate = 1;
}
// 调用call() 执行
call(c,REDIS_CALL_FULL);
// 这几句是多余的
/* Commands may alter argc/argv, restore mstate. */
c->mstate.commands[j].argc = c->argc;
c->mstate.commands[j].argv = c->argv;
c->mstate.commands[j].cmd = c->cmd;
}
// 恢复当前的命令,一般为MULTI
c->argv = orig_argv;
c->argc = orig_argc;
c->cmd = orig_cmd;
// 事务已经执行完毕,清理与此事务相关的信息,如命令队列和客户端标记
discardTransaction(c);
/* Make sure the EXEC command will be propagated as well if MULTI
* was already propagated. */
if (must_propagate) server.dirty++;
......
}
如上所说,被监视的键值被修改或者命令入队出错都会导致事务被取消:
// 取消事务
void discardTransaction(redisClient *c) {
// 清空命令队列
freeClientMultiState(c);
// 初始化命令队列
initClientMultiState(c);
// 取消标记flag
c->flags &= ~(REDIS_MULTI|REDIS_DIRTY_CAS|REDIS_DIRTY_EXEC);;
unwatchAllKeys(c);
}
Redis 事务番外篇
你可能已经注意到「事务」这个词。在学习数据库原理的时候有提到过事务的 ACID,即原子性、一致性、隔离性、持久性。接下来,看看 Redis 事务是否支持 ACID。
原子性,即一个事务中的所有操作,要么全部完成,要么全部不完成,不会结束在中间某个环节。Redis 事务不支持原子性,最明显的是 Redis 不支持回滚操作。一致性,在事务开始之前和事务结束以后,数据库的完整性没有被破坏。这一点,Redis 事务能够保证。
隔离性,当两个或者多个事务并发访问(此处访问指查询和修改的操作)数据库的同一数据时所表现出的相互关系。Redis 不存在多个事务的问题,因为 Redis 是单进程单线程的工作模式。
持久性,在事务完成以后,该事务对数据库所作的更改便持久地保存在数据库之中,并且是完全的。Redis 提供两种持久化的方式,即 RDB 和 AOF。RDB 持久化只备份当前内存中的数据集,事务执行完毕时,其数据还在内存中,并未立即写入到磁盘,所以 RDB 持久化不能保证 Redis 事务的持久性。再来讨论 AOF 持久化,我在《深入剖析 Redis AOF 持久化策略》中讨论过:Redis AOF 有后台执行和边服务边备份两种方式。后台执行和 RDB 持久化类似,只能保存当前内存中的数据集;边备份边服务的方式中,因为 Redis 只是每间隔 2s 才进行一次备份,因此它的持久性也是不完整的!
当然,我们可以自己修改源码保证 Redis 事务的持久性,这不难。
还有一个亮点,就是 check-and-set CAS。一个修改操作不断的判断X 值是否已经被修改,直到 X 值没有被其他操作修改,才设置新的值。Redis 借助 WATCH/MULTI 命令来实现 CAS 操作的。
实际操作中,多个线程尝试修改一个全局变量,通常我们会用锁,从读取这个变量的时候就开始锁住这个资源从而阻挡其他线程的修改,修改完毕后才释放锁,这是悲观锁的做法。相对应的有一种乐观锁,乐观锁假定其他用户企图修改你正在修改的对象的概率很小,直到提交变更的时候才加锁,读取和修改的情况都不加锁。一般情况下,不同客户端会访问修改不同的键值对,因此一般 check 一次就可以 set 了,而不需要重复 check 多次。
这篇文章,主要是讲 Redis 和 Lua 是如何协同工作的以及 Redis 如何管理 Lua 脚本。
Lua 简介
Lua 以可嵌入,轻量,高效,提升静态语言的灵活性,有了 Lua,方便对程序进行改动或拓展,减少编译的次数,在游戏开发中特别常见。举一个在 C 语言中调用 Lua 脚本的例子:
//这是 Lua 所需的三个头文件
//当然,你需要链接到正确的 lib
extern "C"
{
#include "lua.h"
#include "lauxlib.h"
#include "lualib.h"
}
int main(int argc, char *argv[])
{
lua_State *L = lua_open();
// 此处记住,当你使用的是 5.1 版本以上的 Lua 时,请修改以下两句为
// luaL_openlibs(L);
luaopen_base(L);
luaopen_io(L);
// 记住, 当你使用的是 5.1 版本以上的 Lua 时请使用 luaL_dostring(L,buf);
lua_dofile("script.lua");
lua_close(L);
return 0;
}
lua_dofile(”script.lua”); 这一句能为我们提供无限的遐想,开发人员可以在 script.lua 脚本文件中实现程序逻辑,而不需要重新编译 main.cpp 文件。在上面给出的例子中,c 语言执行了 lua 脚本。不仅如此,我们也可以将c 函数注册到 lua 解释器中,从而在 lua 脚本中,调用 c 函数。
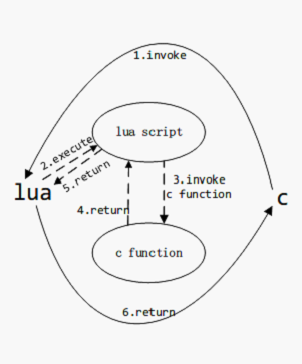
Redis 为什么添加 Lua 支持
从上所说,lua 为静态语言提供更多的灵活性,redis lua 脚本出现之前 Redis 是没有服务器端运算能力的,主要是用来存储,用做缓存,运算是在客户端进行,这里有两个缺点:一、如此会破坏数据的一致性,试想如果两个客户端先后获取(get)一个值,它们分别对键值做不同的修改,然后先后提交结果,最终 Redis 服务器中的结果肯定不是某一方客户端所预期的。二、浪费了数据传输的网络带宽。
lua 出现之后这一问题得到了充分的解决,非常棒!有了 Lua 的支持,客户端可以定义对键值的运算。总之,可以让 Redis 更为灵活。
Lua 环境的初始化
在 Redis 服务器初始化函数 scriptingInit() 中,初始化了 Lua 的环境。
- 加载了常用的 Lua 库,方便在 Lua 脚本中调用
- 创建 SHA1->lua_script 哈希表,可见 Redis 会保存客户端执行过的 Lua 脚本
SHA1 是安全散列算法产生的一个固定长度的序列,你可以把它理解为一个键值。可见 Redis 服务器会保存客户端执行过的 Lua 脚本。这在一个 Lua 脚本需要被经常执行的时候是非常有用的。试想,客户端只需要给定一个 SHA1 序列就可以执行相应的 Lua 脚本了。事实上,EVLASHA 命令就是这么工作的。
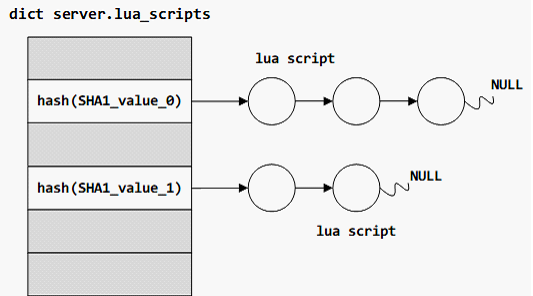
- 注册 Redis 的一些处理函数,譬如命令处理函数,日志函数。注册过的函数,可以在 lua 脚本中调用
- 替换已经加载的某些库的函数
- 创建虚拟客户端(fake client)。和 AOF,RDB 数据恢复的做法一样,是为了复用命令处理函数
重点展开第三、五点。
Lua 脚本执行 Redis 命令
要在lua 脚本中调用c 函数,会有以下几个步骤:
- 定义下面的函数:typedef int (*lua_CFunction) (lua_State *L)
; - 为函数取一个名字,并入栈
- 调用 lua_pushcfunction() 将函数指针入栈
- 关联步骤 2 中的函数名和步骤 3 的函数指针
在 Redis 初始化的时候,会将 luaRedisPCallCommand(), luaRedisPCallCommand() 两个函数入栈:
void scriptingInit(void) {
......
// 向lua 解释器注册redis 的数据或者变量
/* Register the redis commands table and fields */
lua_newtable(lua);
// 注册redis.call 函数,命令处理函数
/* redis.call */
// 将"call" 入栈,作为key
lua_pushstring(lua,"call");
// 将luaRedisPCallCommand() 函数指针入栈,作为value
lua_pushcfunction(lua,luaRedisCallCommand);
// 弹出"call",luaRedisPCallCommand() 函数指针,即key-value,
// 并在table 中设置key-values
lua_settable(lua,-3);
// 注册redis.pall 函数,命令处理函数
/* redis.pcall */
// 将"pcall" 入栈,作为key
lua_pushstring(lua,"pcall");
// 将luaRedisPCallCommand() 函数指针入栈,作为value
lua_pushcfunction(lua,luaRedisPCallCommand);
// 弹出"pcall",luaRedisPCallCommand() 函数指针,即key-value,
// 并在table 中设置key-values
lua_settable(lua,-3);
......
}
经注册后,开发人员可在 Lua 脚本中调用这两个函数,从而在 Lua 脚本也可以执行 Redis 命令,譬如在脚本删除某个键值对。以 luaRedisCallCommand() 为例,当它被回调的时候会完成:
- 检测参数的有效性,并通过 lua api 提取参数
- 向虚拟客户端 server.lua_client 填充参数
- 查找命令
- 执行命令
- 处理命令处理结果
fake client 的好处又一次体现出来了,这和 AOF 的恢复数据过程如出一辙。在 lua 脚本处理期间,Redis 服务器只服务于 fake client。
Redis Lua 脚本的执行过程
我们依旧从客户端发送一个 lua 相关命令开始。假定用户发送了 EVAL 命令如下:
eval 1 "set KEY[1] ARGV[1]" views 18000
此命令的意图是,将 views 的值设置为 18000。Redis 服务器收到此命令后,会调用对应的命令处理函数evalCommand() 如下:
void evalCommand(redisClient *c) {
evalGenericCommand(c,0);
}
void evalGenericCommand(redisClient *c, int evalsha) {
lua_State *lua = server.lua;
char funcname[43];
long long numkeys;
int delhook = 0, err;
// 随机数的种子,在产生哈希值的时候会用到
redisSrand48(0);
// 关于脏命令的标记
server.lua_random_dirty = 0;
server.lua_write_dirty = 0;
// 检查参数的有效性
if (getLongLongFromObjectOrReply(c,c->argv[2],&numkeys,NULL) != REDIS_OK)
return;
if (numkeys > (c->argc - 3)) {
addReplyError(c,"Number of keys can't be greater than number of args");
return;
}
// 函数名以f_ 开头
funcname[0] = 'f';
funcname[1] = '_';
// 如果没有哈希值,需要计算lua 脚本的哈希值
if (!evalsha) {
// 计算哈希值,会放入到SHA1 -> lua_script 哈希表中
// c->argv[1]->ptr 是用户指定的lua 脚本
// sha1hex() 产生的哈希值存在funcname 中
sha1hex(funcname+2,c->argv[1]->ptr,sdslen(c->argv[1]->ptr));
} else {
// 用户自己指定了哈希值
int j;
char *sha = c->argv[1]->ptr;
for (j = 0; j < 40; j++)
funcname[j+2] = tolower(sha[j]);
funcname[42] = '\0';
}
// 将错误处理函数入栈
// lua_getglobal() 会将读取指定的全局变量,且将其入栈
lua_getglobal(lua, "__redis__err__handler");
/* Try to lookup the Lua function */
// 在lua 中查找是否注册了此函数。这一句尝试将funcname 入栈
lua_getglobal(lua, funcname);
if (lua_isnil(lua,-1)) { // funcname 在lua 中不存在
// 将nil 出栈
lua_pop(lua,1); /* remove the nil from the stack */
// 已经确定funcname 在lua 中没有定义,需要创建
if (evalsha) {
lua_pop(lua,1); /* remove the error handler from the stack. */
addReply(c, shared.noscripterr);
return;
}
// 创建lua 函数funcname
// c->argv[1] 指向用户指定的lua 脚本
if (luaCreateFunction(c,lua,funcname,c->argv[1]) == REDIS_ERR) {
lua_pop(lua,1);
return;
}
// 现在lua 中已经有funcname 这个全局变量了,将其读取并入栈,
// 准备调用
lua_getglobal(lua, funcname);
redisAssert(!lua_isnil(lua,-1));
}
// 设置参数,包括键和值
luaSetGlobalArray(lua,"KEYS",c->argv+3,numkeys);
luaSetGlobalArray(lua,"ARGV",c->argv+3+numkeys,c->argc-3-numkeys);
// 选择数据集,lua_client 有专用的数据集
/* Select the right DB in the context of the Lua client */
selectDb(server.lua_client,c->db->id);
// 设置超时回调函数,以在lua 脚本执行过长时间的时候停止脚本的运行
server.lua_caller = c;
server.lua_time_start = ustime()/1000;
server.lua_kill = 0;
if (server.lua_time_limit > 0 && server.masterhost == NULL) {
// 当lua 解释器执行了100000,luaMaskCountHook() 会被调用
lua_sethook(lua,luaMaskCountHook,LUA_MASKCOUNT,100000);
delhook = 1;
}
// 现在,我们确定函数已经注册成功了. 可以直接调用lua 脚本
err = lua_pcall(lua,0,1,-2);
// 删除超时回调函数
if (delhook) lua_sethook(lua,luaMaskCountHook,0,0); /* Disable hook */
// 如果已经超时了,说明lua 脚本已在超时后背SCRPIT KILL 终结了
// 恢复监听发送lua 脚本命令的客户端
if (server.lua_timedout) {
server.lua_timedout = 0;
aeCreateFileEvent(server.el,c->fd,AE_READABLE,
readQueryFromClient,c);
}
// lua_caller 置空
server.lua_caller = NULL;
// 执行lua 脚本用的是lua 脚本执行专用的数据集。现在恢复原有的数据集
selectDb(c,server.lua_client->db->id); /* set DB ID from Lua client */
// Garbage collection 垃圾回收
lua_gc(lua,LUA_GCSTEP,1);
// 处理执行lua 脚本的错误
if (err) {
// 告知客户端
addReplyErrorFormat(c,"Error running script (call to %s): %s\n",
funcname, lua_tostring(lua,-1));
lua_pop(lua,2); /* Consume the Lua reply and remove error handler. */
// 成功了
} else {
/* On success convert the Lua return value into Redis protocol, and
* send it to * the client. */
luaReplyToRedisReply(c,lua); /* Convert and consume the reply. */
lua_pop(lua,1); /* Remove the error handler. */
}
// 将lua 脚本发布到主从复制上,并写入AOF 文件
......
}
对应 lua 脚本的执行流程图:
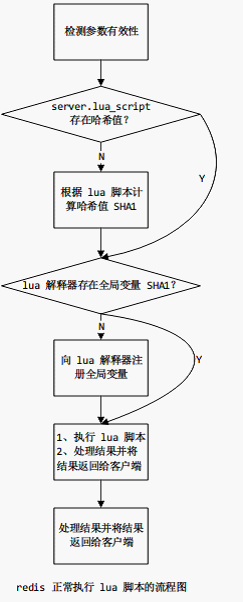
脏命令
在解释脏命令之前,先交代一点。
Redis 服务器执行的 Lua 脚本和普通的命令一样,都是会写入 AOF 文件和发布至主从复制连接上的。以主从复制为例,将 Lua 脚本中发生的数据变更发布到从机上,有两种方法。一,和普通的命令一样,只要涉及写的操作,都发布到从机上;二、直接将 Lua 脚本发送给从机。实际上,两种方法都可以的,数据变更都能得到传播,但首先,第一种方法中普通命令会被转化为 Redis 通信协议的格式,和 Lua 脚本文本大小比较起来,会浪费更多的带宽;其次,第一种方法也会浪费较多的 CPU 的资源,因为从机收到了 Redis 通信协议的格式的命令后,还需要转换为普通的命令,然后才是执行,这比纯粹的执行 lua 脚本,会浪费更多的 CPU 资源。明显,第二种方法是更好的。这一点 Redis 做的比较细致。
上面的结果是,直接将 Lua 脚本发送给从机。但这会产生一个问题。举例一个 Lua 脚本:
-- lua scrpit
local some_key
some_key = redis.call('RANDOMKEY') -- <--- TODO nil
redis.call('set',some_key,'123')
上面脚本想要做的是,从 Redis 服务器中随机选取一个键,将其值设置为 123。从 RANDOMKEY 命令的命令处理函数来看,其调用了 random() 函数,如此一来问题就来了:当 lua 脚本被发布到不同的从机上时,random() 调用返回的结果是不同的,因此主从机的数据就不一致了。
因此在 Redis 服务器配置选项目设置了两个变量来解决这个问题:
// 在lua 脚本中发生了写操作
int lua_write_dirty; /* True if a write command was called during the
execution of the current script. */
// 在lua 脚本发生了未决的操作,譬如RANDOMKEY 命令操作
int lua_random_dirty; /* True if a random command was called during the
execution of the current script. */
在执行 Lua 脚本之前,这两个参数会被置零。在执行 Lua 脚本中,执行命令操作之前,Redis 会检测写操作之前是否执行了 RANDOMKEY 命令,是则会禁止接下来的写操作,因为未决的操作会被传播到从机上;否则会尝试更新上面两个变量,如果发现写操作 lua_write_dirty = 1;如果发现未决操作,lua_random_dirty = 1。对于这段话的表述,有下面的流程图,大家也可以翻阅 luaRedisGenericCommand() 这个函数:
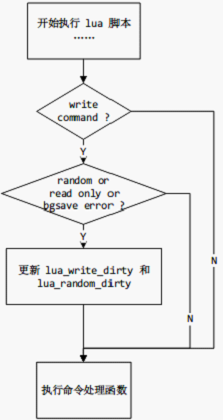
Lua 脚本的传播
如上所说,需要传播 Lua 脚本中的数据变更,Redis 的做法是直接将 lua 脚本发送给从机和写入 AOF 文件的。
Redis 的做法是,修改执行 Lua 脚本客户端的参数为“EVAL”和相应的lua 脚本文本,至于发送到从机和写入 AOF 文件,交由主从复制机制和 AOF 持久化机制来完成。下面摘一段代码:
void evalGenericCommand(redisClient *c, int evalsha) {
......
if (evalsha) {
if (!replicationScriptCacheExists(c->argv[1]->ptr)) {
/* This script is not in our script cache, replicate it as
* EVAL, then add it into the script cache, as from now on
* slaves and AOF know about it. */
// 从server.lua_scripts 获取lua 脚本
// c->argv[1]->ptr 是SHA1
robj *script = dictFetchValue(server.lua_scripts,c->argv[1]->ptr);
// 添加到主从复制专用的脚本缓存中
replicationScriptCacheAdd(c->argv[1]->ptr);
redisAssertWithInfo(c,NULL,script != NULL);
// 重写命令
// 参数1 为:EVAL
// 参数2 为:lua_script
// 如此一来在执行AOF 持久化和主从复制的时候,lua 脚本就能得到传播
rewriteClientCommandArgument(c,0,
resetRefCount(createStringObject("EVAL",4)));
rewriteClientCommandArgument(c,1,script);
}
}
}
总结
Redis 服务器的工作模式是单进程单线程,因为开发人员在写 Lua 脚本的时候应该特别注意时间复杂度的问题,不要让 Lua 脚本影响整个 Redis 服务器的性能。
Redis 哨兵的服务框架
哨兵也是 Redis 服务器,只是它与我们平时提到的 Redis 服务器职能不同,哨兵负责监视普通的 Redis 服务器,提高一个服务器集群的健壮和可靠性。哨兵和普通的 Redis 服务器所用的是同一套服务器框架,这包括:网络框架,底层数据结构,订阅发布机制等。
从主函数开始,来看看哨兵服务器是怎么诞生,它在什么时候和普通的 Redis 服务器分道扬镳:
int main(int argc, char **argv) {
// 随机种子,一般rand() 产生随机数的函数会用到
srand(time(NULL)^getpid());
gettimeofday(&tv,NULL);
dictSetHashFunctionSeed(tv.tv_sec^tv.tv_usec^getpid());
// 通过命令行参数确认是否启动哨兵模式
server.sentinel_mode = checkForSentinelMode(argc,argv);
// 初始化服务器配置,主要是填充redisServer 结构体中的各种参数
initServerConfig();
// 将服务器配置为哨兵模式,与普通的redis 服务器不同
/* We need to init sentinel right now as parsing the configuration file
* in sentinel mode will have the effect of populating the sentinel
* data structures with master nodes to monitor. */
if (server.sentinel_mode) {
// initSentinelConfig() 只指定哨兵服务器的端口
initSentinelConfig();
initSentinel();
}
......
// 普通redis 服务器模式
if (!server.sentinel_mode) {
......
// 哨兵服务器模式
} else {
// 检测哨兵模式是否正常配置
sentinelIsRunning();
}
......
// 进入事件循环
aeMain(server.el);
// 去除事件循环系统
aeDeleteEventLoop(server.el);
return 0;
}
在上面,通过判断命令行参数来判断 Redis 服务器是否启用哨兵模式,会设置服务器参数结构体中的redisServer.sentinel_mode 的值。在上面的主函数调用了一个很关键的函数:initSentinel(),它完成了哨兵服务器特有的初始化程序,包括填充哨兵服务器特有的命令表,struct sentinel 结构体。
// 哨兵服务器特有的初始化程序
/* Perform the Sentinel mode initialization. */
void initSentinel(void) {
int j;
// 如果 redis 服务器是哨兵模式,则清空命令列表。哨兵会有一套专门的命令列表,
// 这与普通的 redis 服务器不同
/* Remove usual Redis commands from the command table, then just add
* the SENTINEL command. */
dictEmpty(server.commands,NULL);
// 将sentinelcmds 命令列表中的命令填充到server.commands
for (j = 0; j < sizeof(sentinelcmds)/sizeof(sentinelcmds[0]); j++) {
int retval;
struct redisCommand *cmd = sentinelcmds+j;
retval = dictAdd(server.commands, sdsnew(cmd->name), cmd);
redisAssert(retval == DICT_OK);
}
/* Initialize various data structures. */
// sentinel.current_epoch 用以指定版本
sentinel.current_epoch = 0;
// 哨兵监视的 redis 服务器哈希表
sentinel.masters = dictCreate(&instancesDictType,NULL);
// sentinel.tilt 用以处理系统时间出错的情况
sentinel.tilt = 0;
// TILT 模式开始的时间
sentinel.tilt_start_time = 0;
// sentinel.previous_time 是哨兵服务器上一次执行定时程序的时间
sentinel.previous_time = mstime();
// 哨兵服务器当前正在执行的脚本数量
sentinel.running_scripts = 0;
// 脚本队列
sentinel.scripts_queue = listCreate();
}
我们查看 struct redisCommand sentinelcmds 这个全局变量就会发现,它里面只有七个命令,难道哨兵仅仅提供了这种服务?为了能让哨兵自动管理普通的 Redis 服务器,哨兵还添加了一个定时程序,我们从 serverCron() 定时程序中就会发现,哨兵的定时程序被调用执行了,这里包含了哨兵的主要工作:
int serverCron(struct aeEventLoop *eventLoop, long long id, void *clientData) {
......
run_with_period(100) {
if (server.sentinel_mode) sentinelTimer();
}
}
定时程序
定时程序是哨兵服务器的重要角色,所做的工作主要包括:监视普通的 Redis 服务器(包括主机和从机),执行故障修复,执行脚本命令。
// 哨兵定时程序
void sentinelTimer(void) {
// 检测是否需要启动sentinel TILT 模式
sentinelCheckTiltCondition();
// 对哈希表中的每个服务器实例执行调度任务,这个函数很重要
sentinelHandleDictOfRedisInstances(sentinel.masters);
// 执行脚本命令,如果正在执行脚本的数量没有超出限定
sentinelRunPendingScripts();
// 清理已经执行完脚本的进程,如果执行成功从脚本队列中删除脚本
sentinelCollectTerminatedScripts();
// 停止执行时间超时的脚本进程
sentinelKillTimedoutScripts();
// 为了防止多个哨兵同时选举,故意错开定时程序执行的时间。通过调整周期可以
// 调整哨兵定时程序执行的时间,即默认值REDIS_DEFAULT_HZ 加上一个任意值
server.hz = REDIS_DEFAULT_HZ + rand() % REDIS_DEFAULT_HZ;
}
哨兵与 Redis 服务器的互联
每个哨兵都有一个 struct sentinel 结构体,里面维护了多个主机的连接,与每个主机连接的相关信息都存储在 struct sentinelRedisInstance。透过这两个结构体,很快就可以描绘出,一个哨兵服务器所维护的机器的信息:
typedef struct sentinelRedisInstance {
......
/* Master specific. */
// 其他正在监视此主机的哨兵
dict *sentinels; /* Other sentinels monitoring the same master. */
// 次主机的从机列表
dict *slaves; /* Slaves for this master instance. */
......
// 如果是从机,master 则指向它的主机
struct sentinelRedisInstance *master; /* Master instance if it's slave. */
......
} sentinelRedisInstance;
哨兵服务器所能描述的 Redis 信息:
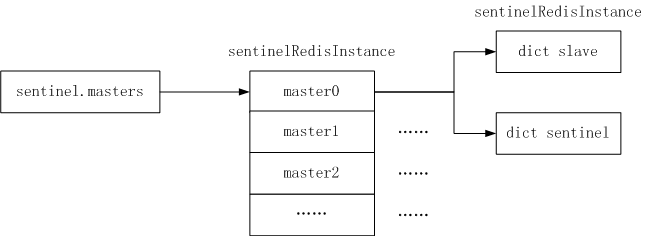
可见,哨兵服务器连接(监视)了多台主机,多台从机和多台哨兵服务器。有这样大概的脉络,我们继续往下看就会更有线索。
哨兵要监视 Redis 服务器,就必须连接 Redis 服务器。启动哨兵的时候需要指定一个配置文件,程序初始化的时候会读取这个配置文件,获取被监视 Redis 服务器的 IP 地址和端口等信息。
redis-server /path/to/sentinel.conf --sentinel
或者
redis-sentinel /path/to/sentinel.conf
如果想要监视一个 Redis 服务器,可以在配置文件中写入:
sentinel monitor <master-name> <ip> <redis-port> <quorum>
其中,master-name 是主机名,ip redis-port 分别是 IP 地址和端口,quorum 是哨兵用来判断某个 Redis 服务器是否下线的参数,之后会讲到。sentinelHandleConfiguration() 函数中,完成了对配置文件的解析和处理过程。
// 哨兵配置文件解析和处理
char *sentinelHandleConfiguration(char **argv, int argc) {
sentinelRedisInstance *ri;
if (!strcasecmp(argv[0],"monitor") && argc == 5) {
/* monitor <name> <host> <port> <quorum> */
int quorum = atoi(argv[4]);
// quorum >= 0
if (quorum <= 0) return "Quorum must be 1 or greater.";
if (createSentinelRedisInstance(argv[1],SRI_MASTER,argv[2],
atoi(argv[3]),quorum,NULL) == NULL)
{
switch(errno) {
case EBUSY: return "Duplicated master name.";
case ENOENT: return "Can't resolve master instance hostname.";
case EINVAL: return "Invalid port number";
}
}
......
}
可以看到里面主要调用了 createSentinelRedisInstance() 函数。createSentinelRedisInstance() 函数的主要工作是初始化 sentinelRedisInstance 结构体。在这里,哨兵并没有选择立即去连接这指定的 Redis 服务器,而是将 sentinelRedisInstance.flag 标记 SRI_DISCONNECT,而将连接的工作丢到定时程序中去,可以联想到,定时程序中肯定有一个检测 sentinelRedisInstance.flag 的函数,如果发现连接是断开的,会发起连接。这个策略和我们之前的讲到的主从连接时候的策略是一样的,是 Redis 的惯用手法。因为哨兵要和 Redis 服务器保持连接,所以必然会定时检测和 Redis 服务器的连接状态。
在定时程序的调用链中,确实发现了哨兵主动连接 Redis 服务器的过程:
sentinelTimer()->sentinelHandleRedisInstance()->sentinelReconnectInstance()
。
sentinelReconnectInstance() 负责连接被标记为 SRI_DISCONNECT 的 Redis 服务器。它对一个 Redis 服务器发起了两个连接:
- 普通连接(sentinelRedisInstance.cc,Commands connection)
- 订阅发布专用连接(sentinelRedisInstance.pc,publish connection)。为什么需要分这两个连接呢?因为对于一个客户端连接来说,redis 服务器要么专门处理普通的命令,要么专门处理订阅发布命令,这在之前订阅发布篇幅中专门有提及这个细节。
void sentinelReconnectInstance(sentinelRedisInstance *ri) {
if (!(ri->flags & SRI_DISCONNECTED)) return;
/* Commands connection. */
if (ri->cc == NULL) {
ri->cc = redisAsyncConnect(ri->addr->ip,ri->addr->port);
// 连接出错
if (ri->cc->err) {
// 错误处理
} else {
// 此连接被绑定到redis 服务器的事件中心
......
}
}
// 此哨兵会订阅所有主从机的hello 订阅频道,每个哨兵都会定期将自己监视的
// 服务器和自己的信息发送到主从服务器的hello 频道,从而此哨兵就能发现其
// 他服务器,并且也能将自己的监测的数据散播到其他服务器。这就是redis 所
// 谓的auto discover.
/* Pub / Sub */
if ((ri->flags & (SRI_MASTER|SRI_SLAVE)) && ri->pc == NULL) {
ri->pc = redisAsyncConnect(ri->addr->ip,ri->addr->port);
// 连接出错
if (ri->pc->err) {
// 错误处理
} else {
// 此连接被绑定到redis 服务器的事件中心
......
// 订阅了ri 上的__sentinel__:hello 频道
/* Now we subscribe to the Sentinels "Hello" channel. */
retval = redisAsyncCommand(ri->pc,
sentinelReceiveHelloMessages, NULL, "SUBSCRIBE %s",
SENTINEL_HELLO_CHANNEL);
......
}
}
Redis 在定时程序中会尝试对所有的 master 作重连接。这里会有一个疑问,之前有提到从机(slave),哨兵又是在什么时候连接了从机和哨兵呢?
HELLO 命令
我们从上面 sentinelReconnectInstance() 的源码得知,哨兵对于一个 Redis 服务器管理了两个连接:普通命令连接和订阅发布专用连接。其中,哨兵在初始化订阅发布连接的时候,做了两个工作:一是,向 Redis 服务器发送 SUBSCRIBE SENTINEL_HELLO_CHANNEL命令;二是,注册了回调函数 sentinelReceiveHelloMessages()。稍稍理解大概可以画出下面的数据流向图:
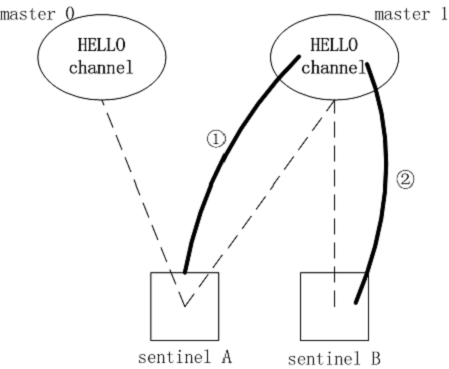
从源码来看,哨兵 A 向 master 1 的 HELLO 频道发布的数据有:哨兵 A 的 IP 地址,端口,runid,当前配置版本,以及 master 1 的 IP,端口,当前配置版本。从上图可以看出,其他所有监视同一 Redis 服务器的哨兵都能收到一份 HELLO 数据,这是订阅发布相关的内容。
在定时程序的调用链:sentinelTimer()->sentinelHandleRedisInstance()->sentinelPingInstance() 中,哨兵会向 Redis 服务器的 hello 频道发布数据。在 sentinel.c 文件中找到向 hello 频道发布数据的函数:
int sentinelSendHello(sentinelRedisInstance *ri) {
// ri 可以是一个主机,从机。
// 只是用主机和从机作为一个中转,主从机收到publish 命令后会将数据传输给
// 订阅了hello 频道的哨兵。这里可能会有疑问,为什么不直接发给哨兵???
char ip[REDIS_IP_STR_LEN];
char payload[REDIS_IP_STR_LEN+1024];
int retval;
sentinelRedisInstance *master = (ri->flags & SRI_MASTER) ? ri : ri->master;
sentinelAddr *master_addr = sentinelGetCurrentMasterAddress(master);
/* Try to obtain our own IP address. */
if (anetSockName(ri->cc->c.fd,ip,sizeof(ip),NULL) == -1) return REDIS_ERR;
if (ri->flags & SRI_DISCONNECTED) return REDIS_ERR;
// 格式化需要发送的数据,包括:
// 哨兵IP 地址,端口,runnid,当前配置版本,
// 主机IP 地址,端口,当前配置的版本
/* Format and send the Hello message. */
snprintf(payload,sizeof(payload),
"%s,%d,%s,%llu," /* Info about this sentinel. */
"%s,%s,%d,%llu", /* Info about current master. */
ip, server.port, server.runid,
(unsigned long long) sentinel.current_epoch,
/* --- */
master->name,master_addr->ip,master_addr->port,
(unsigned long long) master->config_epoch);
retval = redisAsyncCommand(ri->cc,
sentinelPublishReplyCallback, NULL, "PUBLISH %s %s",
SENTINEL_HELLO_CHANNEL,payload);
if (retval != REDIS_OK) return REDIS_ERR;
ri->pending_commands++;
return REDIS_OK;
}
redisAsync 系列的函数底层也是《Redis 事件驱动详解》中的内容。
当 Redis 服务器收到来自哨兵的数据时候,会向所有订阅 hello 频道的哨兵发布数据,由此刚才注册的回调函数sentinelReceiveHelloMessages() 就被调用了。回调函数 sentinelReceiveHelloMessages() 做了两件事情:
- 发现其他监视同一 Redis 服务器的哨兵
- 更新配置版本,当其他哨兵传递的配置版本更高的时候,会更新 Redis 主服务器配置(IP 地址和端口)
总结一下这里的工作原理,哨兵会向 hello 频道发送包括:哨兵自己的IP 地址和端口,runid,当前的配置版本;其所监视主机的 IP 地址,端口,当前的配置版本。【这里要说清楚,什么是 runid 和配置版本】虽然未知的信息很多,但我们可以得知,当一个哨兵新加入到一个 Redis 集群中时,就能通过 hello 频道,发现其他更多的哨兵,而它自己也能够被其他的哨兵发现。这是 Redis 所谓 auto discover 的一部分。
INFO 命令
同样,在定时程序的调用链:sentinelTimer()->sentinelHandleRedisInstance()->sentinelPingInstance() 中,哨兵向与 Redis 服务器的命令连接通道上,发送了一个INFO 命令(字符串);并注册了回调函数sentinelInfoReplyCallback()。Redis 服务器需要对 INFO 命令作出相应,能在 redis.c 主文件中找到 INFO 命令的处理函数:当 Redis 服务器收到INFO命令时候,会向该哨兵回传数据,包括:
关于该 Redis 服务器的细节信息,rRedis 软件版本,与其所连接的客户端信息,内存占用情况,数据落地(持久化)情况,各种各样的状态,主从复制信息,所有从机的信息,CPU 使用情况,存储的键值对数量等。
由此得到最值得关注的信息,所有从机的信息都在这个时候曝光给了哨兵,哨兵由此就可以监视此从机了。
Redis 服务器收集了这些信息回传给了哨兵,刚才所说哨兵的回调函数 sentinelInfoReplyCallback()会被调用,它的主要工作就是着手监视未被监视的从机;完成一些故障修复(failover)的工作。连同上面的一节,就是Redis 的 auto discover 的全貌了。
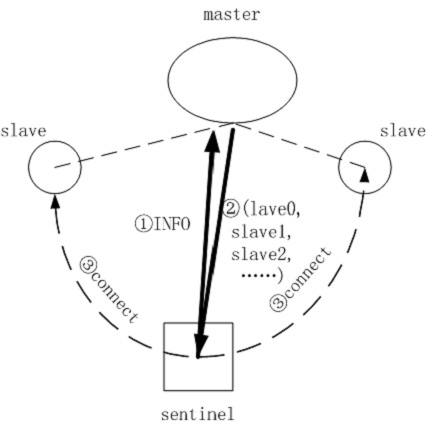
心跳
心跳是一种判断两台机器连接是否正常非常常用的手段,接收方在收到心跳包之后,会更新收到心跳的时间,在某个时间点如果检测到心跳包过久未收到(即超时),这证明网络环境不好,或者对方很忙,也为接收方接下来的行动提供指导:接收方可以等待心跳正常的时候再发送数据。在哨兵的定时程序中,哨兵会向所有的服务器,包括哨兵服务器,发送 PING 心跳,而哨兵收到来自 Redis 服务器的回应后,也会更新相应的时间点或者执行其他操作。
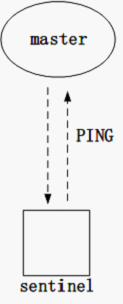
在线状态监测
哨兵有两种判断用户在线的方法,主观和客观方法,即 Check Subjectively Down 和 Check Objective Down。主观是说,Redis 服务器的在线判断依据是某个哨兵自己的信息;客观是说,Redis 服务器的在线判断依据是由其他监视此 Redis 服务器的哨兵的信息。
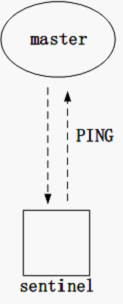
哨兵凭借的自己的信息判断 Redis 服务器是否下线的方法,称为主观方法,即通过判断前面有提到的 PING 心跳等其他通信时间是否超时来判断主机是否下线。主观的信息有可能是错的。
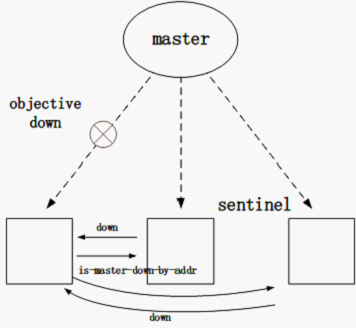
哨兵不仅仅凭借自己的信息,还依据其他哨兵提供的信息判断 Redis 服务器是否下线的方法称为客观方法,即通过所有其他哨兵报告的主机在线状态来判定某主机是否下线。前面提到,INFO 命令可以从其他哨兵服务器上获取信息,而这里面的信息就包含了他们共同关注主机的在线状态。客观判断方法是基于主观判断方法的,即如果一个 Redis 服务器被客观判定为下线,那么其早已被主观判断为下线了。因此客观判断的在线状态较有说服力,譬如在故障修复中就用到客观判断的结果。
void sentinelCheckObjectivelyDown(sentinelRedisInstance *master) {
dictIterator *di;
dictEntry *de;
int quorum = 0, odown = 0;
// 足够多的哨兵报告主机下线了,则设置Objectively down 标记
if (master->flags & SRI_S_DOWN) { // 此哨兵本身认为redis 服务器下线了
/* Is down for enough sentinels? */
quorum = 1; /* the current sentinel. */
/* Count all the other sentinels. */
// 查看其它哨兵报告的状况
di = dictGetIterator(master->sentinels);
while((de = dictNext(di)) != NULL) {
sentinelRedisInstance *ri = dictGetVal(de);
if (ri->flags & SRI_MASTER_DOWN) quorum++;
}
dictReleaseIterator(di);
// 足够多的哨兵报告主机下线了,设置标记
if (quorum >= master->quorum) odown = 1;
}
/* Set the flag accordingly to the outcome. */
if (odown) {
// 写日志,设置SRI_O_DOWN
if ((master->flags & SRI_O_DOWN) == 0) {
sentinelEvent(REDIS_WARNING,"+odown",master,"%@ #quorum %d/%d",
quorum, master->quorum);
master->flags |= SRI_O_DOWN;
master->o_down_since_time = mstime();
}
} else {
// 写日志,取消SRI_O_DOWN
if (master->flags & SRI_O_DOWN) {
sentinelEvent(REDIS_WARNING,"-odown",master,"%@");
master->flags &= ~SRI_O_DOWN;
}
}
}
故障修复
一个 Redis 集群难免遇到主机宕机断电的时候,哨兵如果检测主机被大多数的哨兵判定为下线,就很可能会执行故障修复,重新选出一个主机。一般在 Redis 服务器集群中,只有主机同时肩负读请求和写请求的两个功能,而从机只负责读请求,从机的数据更新都是由之前所提到的主从复制上获取的。因此,当出现意外情况的时候,很有必要新选出一个新的主机。
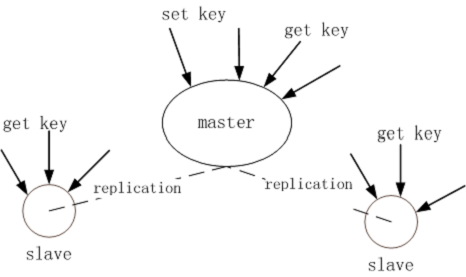
一般在 Redis 服务器集群中,只有主机同时肩负读请求和写请求的两个功能,而从机只负责读请求依然是在定时程序的调用链中, 我们能找到故障修复(failover) 诞生的地方:
sentinelTimer()->sentinelHandleRedisInstance()->sentinelStartFailoverIfNeeded()
。
sentinelStartFailoverIfNeeded() 函数判断是否有必要进行故障修复,这里有三个条件:
- Redis 主机必须已经被客观判定为下线了
- 针对 Redis 主机的故障修复尚未开始
- 限定时间内,不能多次执行故障修复
三个条件都得到满足,故障修复就开始了。
继续往下走:sentinelTimer()->sentinelHandleRedisInstance()->sentinelStartFailoverIfNeeded()->sentinelStartFailover()。sentinelStartFailover()
设置了一些故障修复相关的标记等数据。故障修复分成了几个步骤完成,每个步骤对应一个状态。
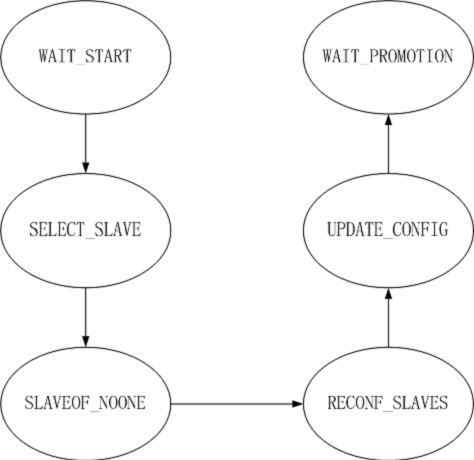
故障修复状态图
哨兵专门有一个故障修复状态机,
// 故障修复状态机,依据被标记的状态执行相应的动作
void sentinelFailoverStateMachine(sentinelRedisInstance *ri) {
redisAssert(ri->flags & SRI_MASTER);
if (!(ri->flags & SRI_FAILOVER_IN_PROGRESS)) return;
switch(ri->failover_state) {
case SENTINEL_FAILOVER_STATE_WAIT_START:
sentinelFailoverWaitStart(ri);
break;
case SENTINEL_FAILOVER_STATE_SELECT_SLAVE:
sentinelFailoverSelectSlave(ri);
break;
case SENTINEL_FAILOVER_STATE_SEND_SLAVEOF_NOONE:
sentinelFailoverSendSlaveOfNoOne(ri);
break;
case SENTINEL_FAILOVER_STATE_WAIT_PROMOTION:
sentinelFailoverWaitPromotion(ri);
break;
case SENTINEL_FAILOVER_STATE_RECONF_SLAVES:
sentinelFailoverReconfNextSlave(ri);
break;
}
}
WAIT_START
在哨兵服务器群中,有首领(leader)的概念,这个首领可以是系统管理员根据具体情况指定的,也可以是众多的哨兵中按一定的条件选出的。在 WAIT_STATE 中执行故障修复的哨兵首先确定自己是不是首领,如果不是故障修复会被拖延,到下一个定时程序再次检测自己是否为首领,超过一定时间会强制停止故障修复。
怎么样才可以当选一个首领呢?每一个哨兵都会有一个当前的配置版本号 current_-epoch,此版本号会经由hello,is-master-down 命令交换,以便将自身的版本号告知其他所有监视同一 Redis 服务器的哨兵。
每一个哨兵手里都会有一票投给其中一个配置版本最高的哨兵,它的投票信息将会通过 is-master-down 命令交换。is-master-down 命令在故障修复的时候会被强制触发,收到它的哨兵将会进行投票并返回自己的投票结果,哨兵会将它保存在对应的 sentinelRedisInstance 中。如此一来,执行故障修复的哨兵就能得到其他哨兵的投票结果,它就能确定自己是不是哨兵了。
struct sentinelState {
// 哨兵的配置版本
uint64_t current_epoch;
......
} sentinel;
typedef struct sentinelRedisInstance {
......
// 故障修复相关的参数
/* Failover */
// 所选首领的runid。runid 其实就是一个redis 服务器唯一标识
char *leader; /* If this is a master instance, this is the runid of
the Sentinel that should perform the failover. If
this is a Sentinel, this is the runid of the Sentinel
that this Sentinel voted as leader. */
// 所选首领的配置版本
uint64_t leader_epoch; /* Epoch of the 'leader' field. */
......
} sentinelRedisInstance;
因此, 只要某哨兵的配置版本足够高, 它就有机会当选为首领。在
sentinelTimer()-»sentinelHandleDictOfRedisInstances()-»sentinelHandleRedisInstance()-
»sentinelFailoverStateMachine()-»sentinelFailoverWaitStart()-»sentinelFailoverWaitStart()
你可以看到详细的投票过程。
总结了一下选举首领的过程:
- 遍历哨兵表中的所有哨兵,统计每个哨兵的得票情况,注意,得票哨兵的版本号必须和执行故障修复哨兵的配置版本号相同,这样做是为了确认执行故障修复版本号已经将自己的版本告诉了其他的哨兵。【这里在画图的时候可以说明白,其实低版本号的哨兵是没有机会进行故障修复的】
- 计算得票最多的哨兵
- 执行故障修复的哨兵自己给得票数最高的哨兵投一票,如果没有投票结果,则给自己投一票。当然投票的前提还是配置版本号要比自己的高。
- 再次计算得票最多的哨兵
- 满足两个条件:得票最多的哨兵的票数必须超过选举数的一半以上;得票最多的哨兵的票数必须超过主机的法定人数(quorum)。
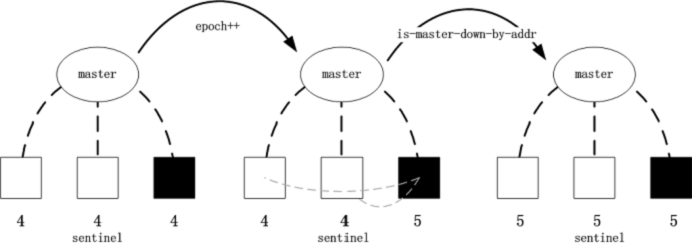
是一个比较曲折的过程。最终,如果确定当前执行故障修复的哨兵是首领,它则可以进入下一个状态:SELECT_SLAVE。
SELECT_SLAVE
SELECT_SLAVE 的意图很明确,因为当前的主机(master)已经挂了,需要重新指定一个主机,候选的服务器就是当前挂掉主机的所有从机(slave)。
在
sentinelTimer()-»sentinelHandleDictOfRedisInstances()-»sentinelHandleRedisInstance()-»sentinelFailoverStateMachine()-»sentinelFailoverSelectSlave()-»sentinelSelectSlave()
你可以看到详细的选举过程。
当前执行故障修复的哨兵会遍历主机的所有从机,只有足够健康的从机才能被成为候选主机。足够健康的条件包括:
- 不能有下面三个标记中的一个:SRI_S_DOWN|SRI_O_DOWN|SRI_DISCONNECTED
- ping 心跳正常
- 优先级不能为 0(slave->slave_priority)
- INFO 数据不能超时
- 主从连接断线会时间不能超时
满足以上条件就有机会成为候选主机,如果经过上面的筛选之后有多台从机,那么这些从机会按下面的条件排序:
- 优选选择优先级高的从机
- 优先选择主从复制偏移量高的从机,即从机从主机复制的数据越多
- 优先选择有 runid 的从机
- 如果上面条件都一样,那么将 runid 按字典顺序排序
所选用的排序算法是常用的快排。这是一个比较曲折的过程。如果没有从机符合要求,譬如最极端的情况,所有从机都跟着挂了,那么故障修复会失败;否则最终会确定一个从机成为候选主机。从机可以进入下一个状态:SLAVEOF_NOONE。
SLAVEOF_NOONE
这一步中,哨兵主要做的是向候选主机发送slaveof noone 命令。我们知道,slaveof noone 命令可以让一个从机转变为一个主机,Redis 从机收到会做从从机到主机的转换。发送 slaveof noone 命令之后,哨兵还会向候选主机发送 config rewrite 让候选主机当前配置信息写入配置文件,以方便候选从机下次重启的时候可以恢复。
void sentinelFailoverSendSlaveOfNoOne(sentinelRedisInstance *ri) {
int retval;
// 与候选从机的连接必须正常,且故障修复没有超时
/* We can't send the command to the promoted slave if it is now
* disconnected. Retry again and again with this state until the timeout
* is reached, then abort the failover. */
if (ri->promoted_slave->flags & SRI_DISCONNECTED) {
if (mstime() - ri->failover_state_change_time > ri->failover_timeout) {
sentinelEvent(REDIS_WARNING,"-failover-abort-slave-timeout",ri,"%@");
sentinelAbortFailover(ri);
}
return;
}
/* Send SLAVEOF NO ONE command to turn the slave into a master.
* We actually register a generic callback for this command as we don't
* really care about the reply. We check if it worked indirectly observing
* if INFO returns a different role (master instead of slave). */
retval = sentinelSendSlaveOf(ri->promoted_slave,NULL,0);
......
}
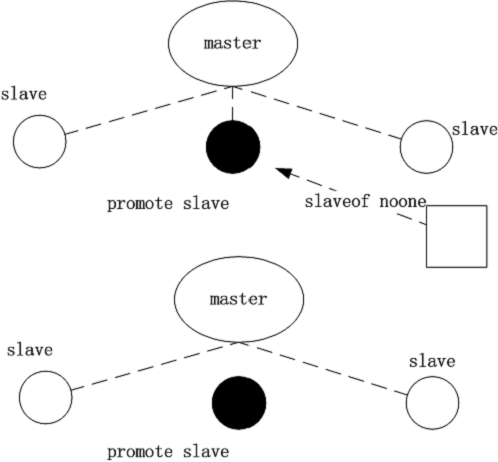
WAIT_PROMOTION
这一状态纯粹是为了等待上一个状态的执行结果(如候选主机的一些状态)被传播到此哨兵上,至于是如何传播的,之前我们有提到过 INFO 数据传输的过程。这一状态的执行函数 sentinelFailoverWaitPromotion() 只做了超时的判断,如果超时就会停止故障修复。那状态是如何转变的呢?就在哨兵捕捉到候选主机状态的时候。我们可以看到,在哨兵处理 Redis 服务器 INFO 输出的回调函数 sentinelInfoReplyCallback() 中,故障修复的状态从 WAIT_PROMOTION 转变到了下一个状态 RECONF_SLAVES。
RECONF_SLAVES
这是故障修复状态机里面的最后一个状态,后面还会有一个状态。这一状态主要做的是向其他非候选从机发送 slaveof promote_slave,即让候选主机成为他们的主机。其中会涉及几个 Redis 服务器状态的标记:SRI_RECONF_SENT,SRI_RECONF_INPROG,SRI_-RECONF_DONE,分别表示已经向从机发送 slaveof 命令,从机正在重新配置(这里需要一些时间),配置完成。同样,哨兵是通过 INFO 数据传输中获知这些状态变更的。
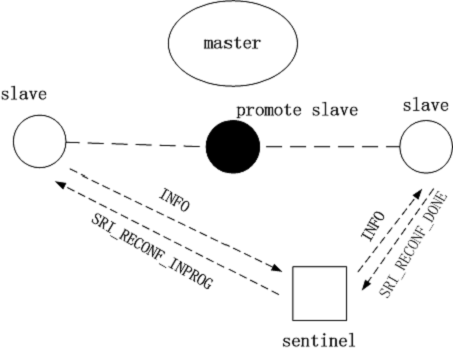
详细重新配置过程可以在
sentinelTimer()-»sentinelHandleDictOfRedisInstances()-
»sentinelHandleRedisInstance()-»sentinelFailoverStateMachine()-
»sentinelFailoverReconfNextSlave()-»sentinelSelectSlave()
最后会做从机配置状况的检测,如果所有从机都重新配置完成或者超时了,会进入最后一个状态 UPDATE_CONFIG。
UPDATE_CONFIG
这里还存在最后一个状态 UPDATE_CONFIG。在定时程序中如果发现进入了这一状态,会调用sentinelFailoverSwitchToPromotedSlave()-»sentinelResetMasterAndChangeAddress()。因为主机和从机发生了修改,所以 sentinel.masters 肯定需要修改,譬如主机的IP 地址和端口,所以最后的工作是将修改并整理哨兵服务器保存的信息,而这正是 sentinelResetMasterAndChangeAddress()的主要工作。
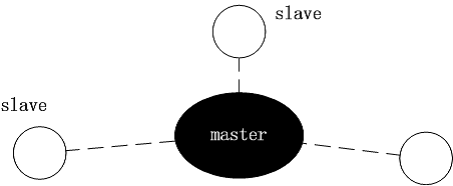
int sentinelResetMasterAndChangeAddress(sentinelRedisInstance *master, char *ip, int port) {
sentinelAddr *oldaddr, *newaddr;
sentinelAddr **slaves = NULL;
int numslaves = 0, j;
dictIterator *di;
dictEntry *de;
newaddr = createSentinelAddr(ip,port);
if (newaddr == NULL) return REDIS_ERR;
// 保存从机实例
/* Make a list of slaves to add back after the reset.
* Don't include the one having the address we are switching to. */
di = dictGetIterator(master->slaves);
while((de = dictNext(di)) != NULL) {
sentinelRedisInstance *slave = dictGetVal(de);
if (sentinelAddrIsEqual(slave->addr,newaddr)) continue;
slaves = zrealloc(slaves,sizeof(sentinelAddr*)*(numslaves+1));
slaves[numslaves++] = createSentinelAddr(slave->addr->ip,
slave->addr->port);
}
dictReleaseIterator(di);
// 主机也被视为从机添加到从机数组
/* If we are switching to a different address, include the old address
* as a slave as well, so that we'll be able to sense / reconfigure
* the old master. */
if (!sentinelAddrIsEqual(newaddr,master->addr)) {
slaves = zrealloc(slaves,sizeof(sentinelAddr*)*(numslaves+1));
slaves[numslaves++] = createSentinelAddr(master->addr->ip,
master->addr->port);
}
// 重置主机
// sentinelResetMaster() 会将很多信息清空,也会设置很多信息
/* Reset and switch address. */
sentinelResetMaster(master,SENTINEL_RESET_NO_SENTINELS);
oldaddr = master->addr;
master->addr = newaddr;
master->o_down_since_time = 0;
master->s_down_since_time = 0;
// 将从机恢复
/* Add slaves back. */
for (j = 0; j < numslaves; j++) {
sentinelRedisInstance *slave;
slave = createSentinelRedisInstance(NULL,SRI_SLAVE,slaves[j]->ip,
slaves[j]->port, master->quorum, master);
releaseSentinelAddr(slaves[j]);
if (slave) {
sentinelEvent(REDIS_NOTICE,"+slave",slave,"%@");
sentinelFlushConfig();
}
}
zfree(slaves);
// 销毁旧的地址结构体
/* Release the old address at the end so we are safe even if the function
* gets the master->addr->ip and master->addr->port as arguments. */
releaseSentinelAddr(oldaddr);
sentinelFlushConfig();
return REDIS_OK;
}
还有一个问题:故障修复过程中,一直没有发送 SLAVEOF promoted_slave 给旧的主机,因为已经和旧的主机断开连接,哨兵没有选择在故障修复的时候向它发送任何的数据。但在故障修复的最后一个状态中,哨兵依旧有将旧的主机塞到新主机的从机列表中,所以哨兵还是会超时发送 INFO HELLO 等数据,对旧的主机抱有希望。如果因为网络环境的不佳导致的故障修复,那旧的主机很可能恢复过来,只是这时它是一台从机了。哨兵选择在这个时候,发送 slaveof onone 重新配置旧的主机。
就此,故障修复结束。故障修复为 Redis 集群很好的自适应和自修复性。当某主机因为异常或者宕机而不能提供服务的时候,故障修复还能让 Redis 集群继续提供服务。
Redis 的监视机制允许某一个客户端监视 Redis 服务器的行为,这种服务对于测试来说比较有帮助。
监视机制通过 monitor 这个命令来实现。来看看它的实现:Redis 在这里只是简单讲这个客户端加到一个 redis.monitors 链表中,接着就回复 ok 给客户端。
void monitorCommand(redisClient *c) {
/* ignore MONITOR if already slave or in monitor mode */
if (c->flags & REDIS_SLAVE) return;
c->flags |= (REDIS_SLAVE|REDIS_MONITOR);
listAddNodeTail(server.monitors,c);
addReply(c,shared.ok);
}
这里可以想象,当这个 Redis 服务器处理其他命令的时候,会向这个链表中的所有客户端发送通知。我们找到执行命令的核心函数 call(),可以发现确实是这么做的:
// call() 函数是执行命令的核心函数,真正执行命令的地方
/* Call() is the core of Redis execution of a command */
void call(redisClient *c, int flags) {
long long dirty, start = ustime(), duration;
int client_old_flags = c->flags;
/* Sent the command to clients in MONITOR mode, only if the commands are
* not generated from reading an AOF. */
if (listLength(server.monitors) &&
!server.loading &&
!(c->cmd->flags & REDIS_CMD_SKIP_MONITOR))
{
replicationFeedMonitors(c,server.monitors,c->db->id,c->argv,c->argc);
}
......
}
replicationFeedMonitors() 的实现实际上就是将命令打包好,发送给每个监视器:
// 向监视器发送数据
void replicationFeedMonitors(redisClient *c, list *monitors, int dictid,
robj **argv, int argc) {
listNode *ln;
listIter li;
int j;
sds cmdrepr = sdsnew("+");
robj *cmdobj;
char peerid[REDIS_PEER_ID_LEN];
struct timeval tv;
// 时间
gettimeofday(&tv,NULL);
cmdrepr = sdscatprintf(cmdrepr,"%ld.%06ld ",(long)tv.tv_sec,(long)tv.tv_usec);
// 各种不同的客户端
if (c->flags & REDIS_LUA_CLIENT) {
cmdrepr = sdscatprintf(cmdrepr,"[%d lua] ",dictid);
} else if (c->flags & REDIS_UNIX_SOCKET) {
cmdrepr = sdscatprintf(cmdrepr,"[%d unix:%s] ",dictid,server.unixsocket);
} else {
getClientPeerId(c,peerid,sizeof(peerid));
cmdrepr = sdscatprintf(cmdrepr,"[%d %s] ",dictid,peerid);
}
for (j = 0; j < argc; j++) {
if (argv[j]->encoding == REDIS_ENCODING_INT) {
cmdrepr = sdscatprintf(cmdrepr, "\"%ld\"", (long)argv[j]->ptr);
} else {
cmdrepr = sdscatrepr(cmdrepr,(char*)argv[j]->ptr,
sdslen(argv[j]->ptr));
}
if (j != argc-1)
cmdrepr = sdscatlen(cmdrepr," ",1);
}
cmdrepr = sdscatlen(cmdrepr,"\r\n",2);
cmdobj = createObject(REDIS_STRING,cmdrepr);
// 发送
listRewind(monitors,&li);
while((ln = listNext(&li))) {
redisClient *monitor = ln->value;
addReply(monitor,cmdobj);
}
decrRefCount(cmdobj);
}
Redis 提供在线数据迁移的能力,把自身的数据往其他 Redis 服务器上迁移。如果需要将部分数据迁移到另一台Redis 服务器上,这个命令会非常有用。
redis migraiton 的实现比较简单。首先将需要迁移的命令打包好,发送到指定的 Redis 服务器上,回复ok 后则删除本地的键值对。
这里面用了前面讲到的 rio:读写对象既可以是文件也可以是内存,只需要安装相应的读写函数即可。这里不难理解。
网络传输部分,用到了 Redis 内部的 syncio 模块,syncio 即同步 io,每读/写入一部分数据会用 IO 多路复用的技术等待下一次可读写/的机会。在 migrateCommand() 的实现中,先用非阻塞的方式建立一个连接,接着将打包好的迁移数据发送到目标 Redis 服务器上,并等待目标 Redis 服务器的相应。
下面通过 migrateCommand() 来了解数据迁移是如何实现的:
/* MIGRATE host port key dbid timeout */
void migrateCommand(redisClient *c) {
int fd;
long timeout;
long dbid;
long long ttl = 0, expireat;
robj *o;
rio cmd, payload;
// 准备需要迁移的数据,这个数据可以由客户端来指定
......
// 建立一个非阻塞连接
/* Connect */
fd = anetTcpNonBlockConnect(server.neterr,c->argv[1]->ptr,
atoi(c->argv[2]->ptr));
if (fd == -1) {
addReplyErrorFormat(c,"Can't connect to target node: %s",
server.neterr);
return;
}
// 等待建立成功
if ((aeWait(fd,AE_WRITABLE,timeout*1000) & AE_WRITABLE) == 0) {
addReplySds(c,sdsnew("-IOERR error or timeout connecting to the client\r\n"));
return;
}
// rio 的读写可以对应的是文件读写,也可以是内存的读写,只需要安装相应的读写
// 函数
// 初始化一块空的sds buffer
/* Create RESTORE payload and generate the protocol to call the command. */
rioInitWithBuffer(&cmd,sdsempty());
// 把需要迁移的数据打包追加到
......
// 可以指定过期时间
expireat = getExpire(c->db,c->argv[3]);
if (expireat != -1) {
ttl = expireat-mstime();
if (ttl < 1) ttl = 1;
}
// 生成restore 命令
......
// 生成包含 Redis 版本和校验字段的 payload
/* Finally the last argument that is the serailized object payload
* in the DUMP format. */
createDumpPayload(&payload,o);
// 写入到迁移内容中
redisAssertWithInfo(c,NULL,rioWriteBulkString(&cmd,payload.io.buffer.ptr,
sdslen(payload.io.buffer.ptr)));
sdsfree(payload.io.buffer.ptr);
// 将迁移数据送往目标 Redis 服务器
/* Tranfer the query to the other node in 64K chunks. */
{
sds buf = cmd.io.buffer.ptr;
size_t pos = 0, towrite;
int nwritten = 0;
// 最多只传送64K
while ((towrite = sdslen(buf)-pos) > 0) {
towrite = (towrite > (64*1024) ? (64*1024) : towrite);
// 同步写
nwritten = syncWrite(fd,buf+pos,towrite,timeout);
if (nwritten != (signed)towrite) goto socket_wr_err;
pos += nwritten;
}
}
// 读取目标 Redis 服务器的回复
/* Read back the reply. */
{
char buf1[1024];
char buf2[1024];
/* Read the two replies */
if (syncReadLine(fd, buf1, sizeof(buf1), timeout) <= 0)
goto socket_rd_err;
if (syncReadLine(fd, buf2, sizeof(buf2), timeout) <= 0)
goto socket_rd_err;
if (buf1[0] == '-' || buf2[0] == '-') {
addReplyErrorFormat(c,"Target instance replied with error: %s",
(buf1[0] == '-') ? buf1+1 : buf2+1);
} else {
// 回复内容正常,说明数据已经迁移成功,删除原始 Redis 服务器的key-value
robj *aux;
dbDelete(c->db,c->argv[3]);
signalModifiedKey(c->db,c->argv[3]);
addReply(c,shared.ok);
server.dirty++;
// 将变更更新到从机,并写入AOF 文件
/* Translate MIGRATE as DEL for replication/AOF. */
aux = createStringObject("DEL",3);
rewriteClientCommandVector(c,2,aux,c->argv[3]);
decrRefCount(aux);
}
}
// 一些清理工作和错误处理
......
}
migrateCommand() 只是数据迁移的一部分代码,目标机器还要负责将数据存储到目标机器上,有兴趣可以参考 restoreCommand() 的实现,基本上和 migrateCommand() 是逆过来的。
前奏
集群的概念早在 Redis 3.0 之前讨论了,3.0 才在源码中出现。Redis 集群要考虑的问题:
- 节点之间怎么据的同步,如何做到数据一致性。一主一备的模式,可以用 Redis 内部实现的主从备份实现数据同步。但节点不断增多,存在多个 master 的时候,同步的难度会越大。
- 如何做到负载均衡?请求量大的时候,如何将请求尽量均分到各个服务器节点,负载均衡算法做的不好会导致雪崩。
- 如何做到平滑拓展?当业务量增加的时候,能否通过简单的配置即让新的 Redis 节点变为可用。
- 可用性如何?当某些节点鼓掌,能否快速恢复服务器集群的工作能力。
- ……
一个稳健的后台系统需要太多的考虑。
也谈一致性哈希算法(consistent hashing)
背景
通常,业务量较大的时候,考虑到性能的问题(索引速度慢和访问量过大),不会把所有的数据存放在一个 Redis 服务器上。这里需要将一堆的键值均分存储到多个 Redis 服务器,可以通过:
target = hash(key)\%N
,其中 target 为目标节点,key 为键,N 为 Redis 节点的个数哈希取余的方式会将不同的 key 分发到不同的服务器上。
但考虑如下场景:
- 业务量突然增加,现有服务器不够用。增加服务器节点后,依然通过上面的计算方式:hash(key)%(N+1)
做数据分片和分发,但之前的 key 会被分发到与之前不同的服务器上,导致大量的数据失效,需要重新写入(set)Redis 服务器。 - 其中的一个服务器挂了。如果不做及时的修复,大量被分发到此服务器请求都会失效。
这也是两个问题。
一致性哈希算法
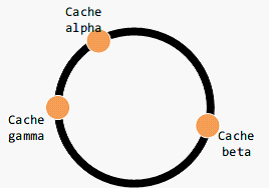
设定一个圆环上 0 23̂2-1 的点,每个点对应一个缓存区,每个键值对存储的位置也经哈希计算后对应到环上节点。但现实中不可能有如此多的节点,所以倘若键值对经哈希计算后对应的位置没有节点,那么顺时针找一个节点存储它。
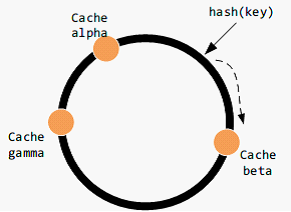
考虑增加服务器节点的情况,该节点顺时针方向的数据仍然被存储到顺时针方向的节点上,但它逆时针方向的数据被存储到它自己。这时候只有部分数据会失效,被映射到新的缓存区。
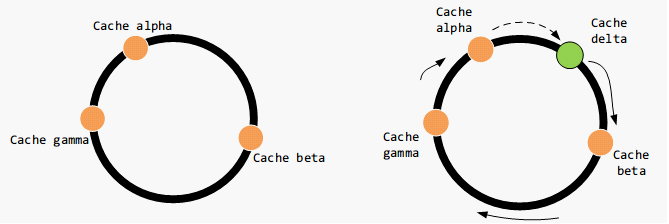
考虑节点减少的情况。该缺失节点顺时针方向上的数据仍然被存储到其顺时针方向上的节点,设为 beta,其逆时针方向上的数据会被存储到 beta 上。同样,只有有部分数据失效,被重新映射到新的服务器节点。
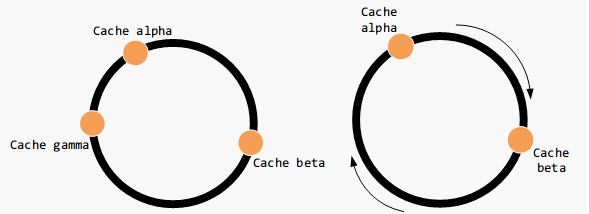
这种情况比较麻烦,上面图中 gamma 节点失效后,会有大量数据映射到 alpha 节点,最怕 alpha 扛不住,接下去 beta 也扛不住,这就是多米诺骨牌效应;)。这里涉及到数据平衡性和负载均衡的话题。数据平衡性是说,数据尽可能均分到每个节点上去,存储达到均衡。
虚拟节点简介
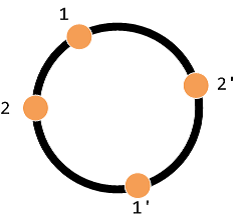
将多个虚拟节点对应到一个真实的节点,存储可以达到更均衡的效果。之前的映射方案为:
key -> node
中间多了一个层虚拟节点后,多了一层映射关系:
key -> <virtual node> -> node
为什么需要虚拟节点
虚拟节点的设计有什么好处?假设有四个节点如下:
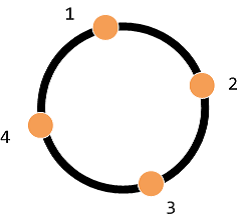
节点 3 突然宕机,这时候原本在节点 3 的数据,会被定向到节点 4。在三个节点中节点 4 的请求量是最大的。这就导致节点与节点之间请求量是不均衡的。
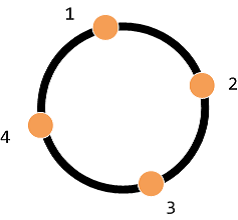
为了达到节点与节点之间请求访问的均衡,尝试将原有节点 3 的数据平均定向到到节点 1,2,4. 如此达到负载均衡的效果,如下:
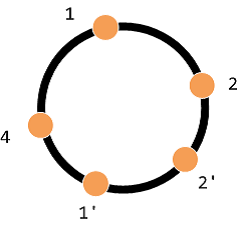
总之,一致性哈希算法是希望在增删节点的时候,让尽可能多的缓存数据不失效。
怎么实现?
一致性哈希算法,既可以在客户端实现,也可以在中间件上实现(如 proxy)。在客户端实现中,当客户端初始化的时候,需要初始化一张预备的 Redis 节点的映射表:hash(key)=> . 这有一个缺点,假设有多个客户端,当映射表发生变化的时候,多个客户端需要同时拉取新的映射表。
另一个种是中间件(proxy)的实现方法,即在客户端和 Redis 节点之间加多一个代理,代理经过哈希计算后将对应某个 key 的请求分发到对应的节点,一致性哈希算法就在中间件里面实现。可以发现,twemproxy 就是这么做的。
twemproxy - Redis 集群管理方案
twemproxy 是 twitter 开源的一个轻量级的后端代理,兼容 redis/memcache 协议,可用以管理 redis/memcache 集群。
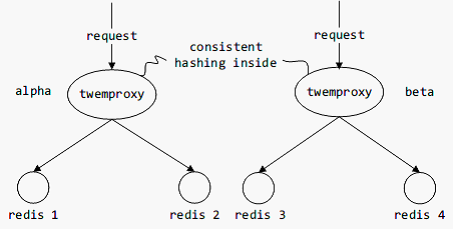
twemproxy 内部有实现一致性哈希算法,对于客户端而言,twemproxy 相当于是缓存数据库的入口,它无需知道后端的部署是怎样的。twemproxy 会检测与每个节点的连接是否健康,出现异常的节点会被剔除;待一段时间后,twemproxy 会再次尝试连接被剔除的节点。
通常,一个 Redis 节点池可以分由多个 twemproxy 管理,少数 twemproxy 负责写,多数负责读。twemproxy 可以实时获取节点池内的所有 Redis 节点的状态,但其对故障修复的支持还有待提高。解决的方法是可以借助 redis sentinel 来实现自动的主从切换,当主机 down 掉后,sentinel 会自动将从机配置为主机。而 twemproxy 可以定时向 redis sentinel 拉取信息,从而替换出现异常的节点。
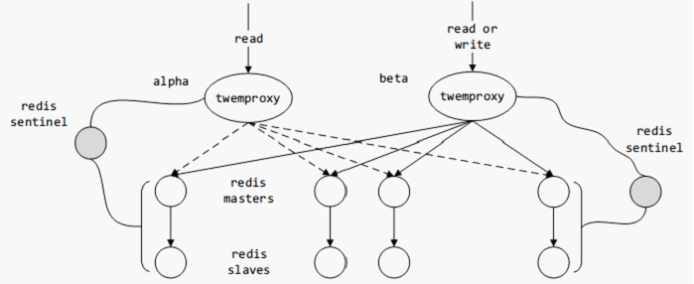
twemproxy 的更多细节,这里不再做深入的讨论。
Redis 官方版本支持的集群
最新版本的 Redis 也开始支持集群特性了,再也不用靠着外援过日子了。基本的思想是,集群里的每个 Redis 都只存储一定的键值对,这个“一定”可以通过默认或自定义的哈希函数来决定,当一个 Redis 收到请求后,会首先查看此键值对是否该由自己来处理,是则继续往下执行;否则会产生一个类似于 http 3XX 的重定向,要求客户端去请求集群中的另一个 Redis。
Redis 每一个实例都会通过遵守一定的协议来维护这个集群的可用性,稳定性。有兴趣可前往官网了解 Redis 集群的实现细则。
刚好 Redis 集群也 release 了,也顺带在这里展开一下。redis cluster 就是想要让一群的节点实现自治,有自我修复的功能,数据分片和负载均衡。
数据结构
基本上集群中的每一个节点都需要知道其他节点的情况,从而,如果网络中有五个节点就下面的图:
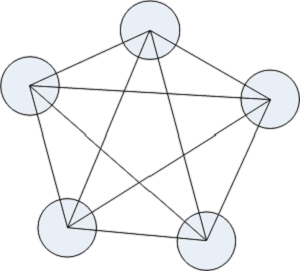
其中每条线都代表双向联通。特别的,如果 redis master 还配备了 replica,图画起来会稍微复杂一点。
redis cluster 中有几个比较重要的数据结构,一个用以描述节点 struct clusterNode,一个用以描述集群的状况 struct clusterState。
节点的信息包括:本身的一些属性,还有它的主从节点,心跳和主从复制信息,和与该节点的连接上下文。
typedef struct clusterNode {
mstime_t ctime; /* Node object creation time. */
char name[REDIS_CLUSTER_NAMELEN]; /* Node name, hex string, sha1-size */
int flags; /* REDIS_NODE_... */
uint64_t configEpoch; /* Last configEpoch observed for this node */
// 该节点会处理的slot
unsigned char slots[REDIS_CLUSTER_SLOTS/8]; /* slots handled by this node */
int numslots; /* Number of slots handled by this node */
// 从机信息
int numslaves; /* Number of slave nodes, if this is a master */
// 从机节点数组
struct clusterNode **slaves; /* pointers to slave nodes */
// 主机节点数组
struct clusterNode *slaveof; /* pointer to the master node */
// 一些有用的时间点
mstime_t ping_sent; /* Unix time we sent latest ping */
mstime_t pong_received; /* Unix time we received the pong */
mstime_t fail_time; /* Unix time when FAIL flag was set */
mstime_t voted_time; /* Last time we voted for a slave of this master */
mstime_t repl_offset_time; /* Unix time we received offset for this node */
long long repl_offset; /* Last known repl offset for this node. */
// 最近被记录的地址和端口
char ip[REDIS_IP_STR_LEN]; /* Latest known IP address of this node */
int port; /* Latest known port of this node */
// 与该节点的连接上下文
clusterLink *link; /* TCP/IP link with this node */
list *fail_reports; /* List of nodes signaling this as failing */
} clusterNode;
集群的状态包括下面的信息:
typedef struct clusterState {
clusterNode *myself; /* This node */
// 配置版本
uint64_t currentEpoch;
// 集群的状态
int state; /* REDIS_CLUSTER_OK, REDIS_CLUSTER_FAIL, ... */
// 存储所有节点的哈希表
int size; /* Num of master nodes with at least one slot */
dict *nodes; /* Hash table of name -> clusterNode structures */
// 黑名单节点,一段时间内不会再加入到集群中
dict *nodes_black_list; /* Nodes we don't re-add for a few seconds. */
// slot 数据正在迁移到migrating_slots_to[slot] 节点
clusterNode *migrating_slots_to[REDIS_CLUSTER_SLOTS];
// slot 数据正在从importing_slots_from[slot] 迁移到本机
clusterNode *importing_slots_from[REDIS_CLUSTER_SLOTS];
// slot 数据由slots[slot] 节点来处理
clusterNode *slots[REDIS_CLUSTER_SLOTS];
// slot 到key 的一个映射
zskiplist *slots_to_keys;
// 记录了故障修复的信息
/* The following fields are used to take the slave state on elections. */
mstime_t failover_auth_time; /* Time of previous or next election. */
int failover_auth_count; /* Number of votes received so far. */
int failover_auth_sent; /* True if we already asked for votes. */
int failover_auth_rank; /* This slave rank for current auth request. */
uint64_t failover_auth_epoch; /* Epoch of the current election. */
int cant_failover_reason; /* Why a slave is currently not able to
failover. See the CANT_FAILOVER_* macros. */
// 人工故障修复的一些信息
......
} clusterState;
如上,在正常的 Redis 集群中的任何一个节点都能感知到其他节点。里面的细节有很多,就不一一解释了,当遇到的时候再有需要解释一下。
上面频繁出现 slot 单词。之前我们学哈希表的时候,可以把 slot 理解为哈希表中的桶(bucket)。为什么需要slot?这和 redis cluster 的数据分区和访问有关。建议大概看完 Redis 对数据结构后,接着看 clusterCommand() 这个函数,由此知道 redis cluster 能提供哪些服务和功能。接着往下看。
数据访问
在 http 有 301 状态码:301 Moved Permanently,它表示用户所要访问的内容已经迁移到一个地址了,需要向新的地址发出请求。redis cluster 很明显也是这么做的。在前面讲到,redis cluster 中的每一个节点都需要知道其他节点的情况,这里就包括其他节点负责处理哪些键值对。
在主函数中,Redis 会检测在启用集群模式的情况下,会检测命令中指定的 key 是否该由自己来处理,如果不是的话,会返回一个类似于重定向的错误返回到客户端。而“是否由自己来处理”就是看 hash(key) 值是否落在自己所负责的 slot 中。
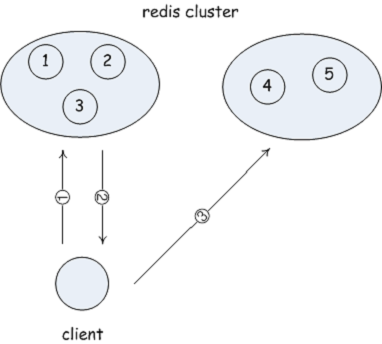
typedef struct clusterNode {
......
// 该节点会处理的slot
unsigned char slots[REDIS_CLUSTER_SLOTS/8]; /* slots handled by this node */
int numslots; /* Number of slots handled by this node */
......
} clusterNode;
可能会有疑问:这样的数据访问机制在不是会浪费一个请求吗?确实,如果直接向集群中的节点盲目访问一个 key 的话,确实需要发起两个请求。为此,redis cluster 配备了 slot 表,用户通过 slots 命令先向集群请求这个 slot 表,得到这个表可以获取哪些节点负责哪些 slot,继而客户端可以访问再访问集群中的数据。这样,就可以在大多数的场景下节省一个请求,直达目标节点。当然,这个 slot 表是随时出现变更的,所以客户端不能够一 本万利一直使用这个 slot 表,可以实现一个定时器,超时后再向集群节点获取 slot 表。
你可以阅读 getNodeByQuery(),流程不难。
新的节点
Redis 刚刚启动时候会检测集群配置文件中是否有预配置好的节点,如果有的话,会添加到节点哈希表中,在适当的时候连接这个节点,并和它打招呼–握手。
// 加载集群配置文件
int clusterLoadConfig(char *filename) {
......
// 如果该节点不在哈希表中,会添加
/* Create this node if it does not exist */
n = clusterLookupNode(argv[0]);
if (!n) {
n = createClusterNode(argv[0],0);
clusterAddNode(n);
}
/* Address and port */
if ((p = strrchr(argv[1],':')) == NULL) goto fmterr;
*p = '\0';
memcpy(n->ip,argv[1],strlen(argv[1])+1);
n->port = atoi(p+1);
......
}
注意,加载配置文件后,不会立即进入握手阶段。 另外两个新增节点的时机,当其他节点向该节点打招呼时候,该节点会记录下对端节点,以及对端所知悉的节点;Redis 管理人员告知,Redis 管理人员可以通过普通的 redis meet 命令,相当于是人工将某个节点加入到集群中。
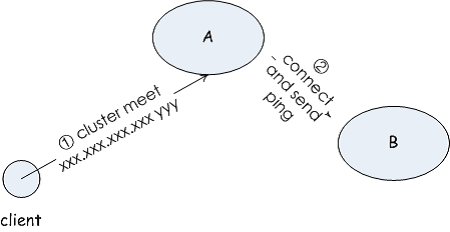
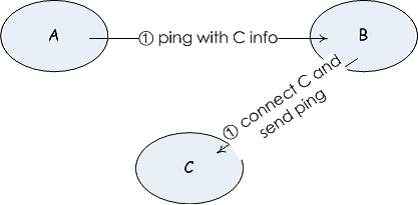
当和其他节点开始握手时,会调用 clusterStartHandshake(),它只会初始化握手的初始信息,并不会立刻向其他节点发起握手,:按照 Redis 的习惯是在集群定时处理函数 clusterCron() 中。
int clusterStartHandshake(char *ip, int port) {
clusterNode *n;
char norm_ip[REDIS_IP_STR_LEN];
struct sockaddr_storage sa;
// 分IPV4 和IPV6 两种情况
/* IP sanity check */
if (inet_pton(AF_INET,ip,
&(((struct sockaddr_in *)&sa)->sin_addr)))
{
sa.ss_family = AF_INET;
} else if (inet_pton(AF_INET6,ip,
&(((struct sockaddr_in6 *)&sa)->sin6_addr)))
{
sa.ss_family = AF_INET6;
} else {
errno = EINVAL;
return 0;
}
// 端口有效性检测
/* Port sanity check */
if (port <= 0 || port > (65535-REDIS_CLUSTER_PORT_INCR)) {
errno = EINVAL;
return 0;
}
// 标准化ip
/* Set norm_ip as the normalized string representation of the node
* IP address. */
memset(norm_ip,0,REDIS_IP_STR_LEN);
if (sa.ss_family == AF_INET)
inet_ntop(AF_INET,
(void*)&(((struct sockaddr_in *)&sa)->sin_addr),
norm_ip,REDIS_IP_STR_LEN);
else
inet_ntop(AF_INET6,
(void*)&(((struct sockaddr_in6 *)&sa)->sin6_addr),
norm_ip,REDIS_IP_STR_LEN);
// 如果这个节点正在握手状态,则不需要重复进入,直接退出
if (clusterHandshakeInProgress(norm_ip,port)) {
errno = EAGAIN;
return 0;
}
// 创建一个新的节点,并加入到节点哈希表中
/* Add the node with a random address (NULL as first argument to
* createClusterNode()). Everything will be fixed during the
* handshake. */
n = createClusterNode(NULL,REDIS_NODE_HANDSHAKE|REDIS_NODE_MEET);
memcpy(n->ip,norm_ip,sizeof(n->ip));
n->port = port;
clusterAddNode(n);
return 1;
}
其他节点收到后在 clusterProcessGossipSection() 中将新的节点添加到哈希表中。
心跳机制
还是那句话,redis cluster 中的每一个节点都需要知道其他节点的情况。要达到这个目标,必须有一个心跳机制来保持每个节点是可达的,监控的,并且节点的信息变更,也可以通过心跳中的数据包来传递。这样就很容易理解Redis 的心跳机制是怎么实现的。这有点类似于主从复制中的实现方法,总之就是一个心跳。在 redis cluster 只,这种心跳又叫 gossip 机制。
集群之间交互信息是用其内部专用连接的。redis cluster 中的每一个节点都监听了一个集群专用的端口,专门用作集群节点之间的信息交换。在 redis cluster 初始化函数 clusterInit() 中监听了该端口,并在事件中心注册了 clusterAcceptHandler()。 从 clusterAcceptHandler()的逻辑来看,当有新的连接到来时,会为新的连接注册 clusterReadHandler()回调函数。这一点和 redis 本身初始化的行为是一致的。
clusterSendPing() 中发送心跳数据。发送的包括:所知节点的名称,ip 地址等。这样,改节点就将主机所知的信息传播到了其他的节点。注意,从 clusterSendPing() 的实现来看,redis cluster 并不是一开始就向所有的节点发送心跳数据,而选取几个节点发送,因为 redis 考虑到集群网的形成并不需要每个节点向像集群中的所有其他节点发送 ping。
故障修复
故障修复曾经在主从复制中提到过。redis cluster 的故障修复分两种途径,一种是集群自治实现的故障修复,一种是人工触发的故障修复。
集群自治实现的故障修复中,是由从机发起的。上面所说,集群中的每个节点都需要和其他节点保持连接。从机如果检测到主机节点出错了(标记为 REDIS_NODE_FAIL),会尝试进行主从切换。在 cluster 定时处理函数中,有一段只有从机才会执行的代码段:
// 集群定时处理函数
/* This is executed 10 times every second */
void clusterCron(void) {
......
// 从机才需要执行下面的逻辑
if (nodeIsSlave(myself)) {
......
// 从机-> 主机替换
clusterHandleSlaveFailover();
......
}
......
}
从机的 clusterCron() 会调用 clusterHandleSlaveFailover() 已决定是否需要执行故障修复。通常,故障修复的触发点就是在其主机被标记为出错节点的时候。
故障修复的协议
在决定故障修复后,会开始进行协商是否可以将自己升级为主机。
// 主机已经是一个出错节点了,自己作为从机可以升级为主机
void clusterHandleSlaveFailover(void) {
......
// 故障修复超时,重新启动故障修复
if (auth_age > auth_retry_time) { // 两次故障修复间隔不能过短
// 更新一些时间
......
redisLog(REDIS_WARNING,
"Start of election delayed for %lld milliseconds "
"(rank #%d, offset %lld).",
server.cluster->failover_auth_time - mstime(),
server.cluster->failover_auth_rank,
replicationGetSlaveOffset());
// 告知其他从机
/* Now that we have a scheduled election, broadcast our offset
* to all the other slaves so that they'll updated their offsets
* if our offset is better. */
clusterBroadcastPong(CLUSTER_BROADCAST_LOCAL_SLAVES);
return;
}
......
// 开头投票
/* Ask for votes if needed. */
if (server.cluster->failover_auth_sent == 0) {
server.cluster->currentEpoch++;
server.cluster->failover_auth_epoch = server.cluster->currentEpoch;
redisLog(REDIS_WARNING,"Starting a failover election for epoch %llu.",
(unsigned long long) server.cluster->currentEpoch);
clusterRequestFailoverAuth();
server.cluster->failover_auth_sent = 1;
clusterDoBeforeSleep(CLUSTER_TODO_SAVE_CONFIG|
CLUSTER_TODO_UPDATE_STATE|
CLUSTER_TODO_FSYNC_CONFIG);
return; /* Wait for replies. */
}
}
上面有两个关键的函数:clusterBroadcastPong() 和clusterRequestFailoverAuth()。
在 clusterBroadcastPong()中,会向其他属于同一主从关系的其他从机发送 pong,以传递主机已经出错的信息。
clusterRequestFailoverAuth() 中,会向集群中的所有其他节点发送 CLUSTERMSG_-TYPE_FAILOVER_AUTH_REQUEST 信令,意即询问是否投票。
那收到这个信令的节点,是否会向源节点投票呢?先来看看 FAILOVER_AUTH_-REQUEST 信令中带有什么数据,顺着 clusterRequestFailoverAuth() 下去,会找到 cluster-BuildMessageHdr() 函数,它打包了一些数据。这里主要包括:
- RCmb 四个字符,相当于是 redis cluster 信令的头部校验值,
- type,命令号,这是属于什么信令
- sender info,发送信令节点的信息
- 发送信令节点的配置版本号
- 主从复制偏移量

在心跳机制那一节讲过,集群节点会为与其他节点的连接注册clusterReadHandler() 回调函数,FAILOVER_AUTH_REQUEST 信令的处理也在里面,对应的是 clusterSendFailover-AuthIfNeeded() 处理函数,在这里决定是否投对端节点一票。这里的决定因素有几个:配置版本号,节点本身和投票时间。
1.如果需要投票,索取投票的节点当前版本号必须比当前记录的版本一样,这样才有权索取投票;新的版本号必须是最新的。第二点,可能比较绕,譬如下面的场景,slave 是无法获得其他主机的投票的,other slave 才可以。这里的意思是,如果一个从机想要升级为主机,它与它的主机必须保持状态一致。
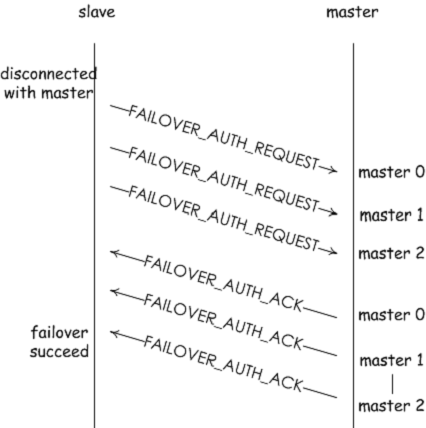
2.索取投票的节点必须是从机节点。这是当然,因为故障修复是由从机发起的
3.最后一个是投票的时间,因为当一个主机有多个从机的时候,多个从机都会发起故障修复,一段时间内只有一个从机会进行故障修复,其他的会被推迟。
这三点都在 clusterSendFailoverAuthIfNeeded() 中都有所体现。
当都满足了上述要求过后,即可开始投票:
// 决定是否投票,redis cluster 将根据配置的版本号决定是否投票
/* Vote for the node asking for our vote if there are the conditions. */
void clusterSendFailoverAuthIfNeeded(clusterNode *node, clusterMsg *request) {
......
// 投票走起
/* We can vote for this slave. */
clusterSendFailoverAuth(node);
server.cluster->lastVoteEpoch = server.cluster->currentEpoch;
node->slaveof->voted_time = mstime(); // 更新投票的时间
redisLog(REDIS_WARNING, "Failover auth granted to %.40s for epoch %llu",
node->name, (unsigned long long) server.cluster->currentEpoch);
}
投票函数 lusterSendFailoverAuth() 只是放一个 CLUSTERMSG_TYPE_FAILOVER_-AUTH_ACK 信令到达索取投票的从机节点,从而该从机获取了一票。让我们再回到索取投票的从机节点接下来会怎么做。
// 主机已经是一个出错节点了,自己作为从机可以升级为主机
void clusterHandleSlaveFailover(void) {
......
// 获得的选票必须是集群节点数的一般以上
/* Check if we reached the quorum. */
if (server.cluster->failover_auth_count >= needed_quorum) {
/* We have the quorum, we can finally failover the master. */
redisLog(REDIS_WARNING,
"Failover election won: I'm the new master.");
/* Update my configEpoch to the epoch of the election. */
if (myself->configEpoch < server.cluster->failover_auth_epoch) {
myself->configEpoch = server.cluster->failover_auth_epoch;
redisLog(REDIS_WARNING,
"configEpoch set to %llu after successful failover",
(unsigned long long) myself->configEpoch);
}
// 正式转换为主机,代替主机的功能
/* Take responsability for the cluster slots. */
clusterFailoverReplaceYourMaster();
} else {
clusterLogCantFailover(REDIS_CLUSTER_CANT_FAILOVER_WAITING_VOTES);
}
}
从机在获取集群节点数量半数以上的投票时,就可以正式升级为主机了。来回顾一下投票的全过程:
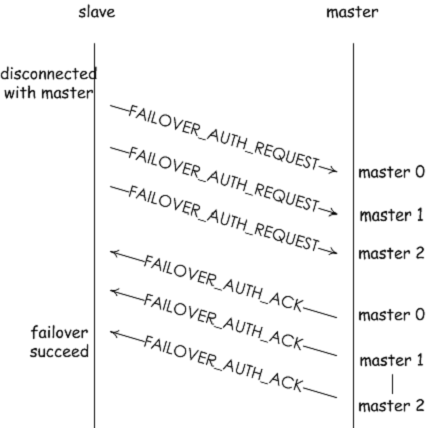
clusterFailoverReplaceYourMaster() 就是将其自身的配置从从机更新到主机,最后广播给所有的节点:我转正了。实际上,是发送一个 pong。
redis cluster 还提供了一种人工故障修复的模式,管理人员可以按需使用这些功能。你可以从 clusterCommand() 下找到人工故障修复流程开始执行的地方:
1.cluster failover takeover. 会强制将从机升级为主机,不需要一个投票的过程。
2.cluster failover force. 会强制启用故障修复,这和上面讲的故障修复过程一样。如果你留意 clusterHandleSlaveFailover() 中的处理逻辑的话,实际 cluster force 也是在其中处理的,同样需要一个投票的过程。
3.cluster failover. 默认的模式,会先告知主机需要开始进行故障修复流程,主机被告知会停止服务。之后再走接下来的主从修复的流程。
// cluster 命令处理。
void clusterCommand(redisClient *c) {
......
// 启动故障修复
} else if (!strcasecmp(c->argv[1]->ptr,"failover") &&
(c->argc == 2 || c->argc == 3))
{
......
if (takeover) {
......
// 产生一个新的配置版本号
clusterBumpConfigEpochWithoutConsensus();
// 直接将自己升级为主机,接着通知到所有的节点
clusterFailoverReplaceYourMaster();
} else if (force) {
......
// 直接标记为可以开始进行故障修复了,并不用告知主机
server.cluster->mf_can_start = 1;
} else {
// 先通知我的主机开始人工故障修复,再执行接下来的故障修复流程
clusterSendMFStart(myself->slaveof);
}
addReply(c,shared.ok);
}
......
}
4.发送信令节点的配置版本号
5.主从复制偏移量
人工故障修复模式,和自治实现的故障修复模式最大的区别在于对于从机来说,其主机是否可达。人工故障修复模式,允许主机可达的情况下,实现故障修复。因此,相比自治的故障修复,人工的还会多一道工序:主从复制的偏移量相等过后,才开始进行故障修复的过程。
从下面两种模式的处理来看,有很明显的区别:
// cluster 命令处理
void clusterCommand(redisClient *c) {
......
// 启动故障修复
} else if (!strcasecmp(c->argv[1]->ptr,"failover") &&
(c->argc == 2 || c->argc == 3))
{
......
if (takeover) {
......
// 产生一个新的配置版本号
clusterBumpConfigEpochWithoutConsensus();
// 直接将自己升级为主机,接着通知到所有的节点
clusterFailoverReplaceYourMaster();
} else if (force) {
......
// 直接标记为可以开始进行故障修复了,并不用告知主机
server.cluster->mf_can_start = 1;
} else {
// 先通知我的主机开始人工故障修复,再执行接下来的故障修复流程
clusterSendMFStart(myself->slaveof);
}
addReply(c,shared.ok);
}
}
- takeover 模式直接将自己升级为主机
- force 模式直接进入故障修复模式
- 默认模式会先告知(clusterSendMFStart())主机,接着再进行故障修复流程
来看看人工故障修复模式的状态机 clusterHandleManualFailover(),这个函数只会在 clusterCron() 中调用:
// 人工恢复状态机, 只在clusterCron() 中调用
void clusterHandleManualFailover(void) {
/* Return ASAP if no manual failover is in progress. */
if (server.cluster->mf_end == 0) return;
/* If mf_can_start is non-zero, the failover was already triggered so the
* next steps are performed by clusterHandleSlaveFailover(). */
if (server.cluster->mf_can_start) return;
if (server.cluster->mf_master_offset == 0) return; /* Wait for offset... */
if (server.cluster->mf_master_offset == replicationGetSlaveOffset()) {
/* Our replication offset matches the master replication offset
* announced after clients were paused. We can start the failover. */
server.cluster->mf_can_start = 1;
redisLog(REDIS_WARNING,
"All master replication stream processed, "
"manual failover can start.");
}
}
主要的几个变量这里解说一下:
- mf_end:在触发人工故障修复的时候就会被设置
- mf_master_offset:从机需要等待主机发送主从复制偏移量,如上所说,从机升级为 主机,需要和主机的偏移量相等
- mf_can_start:主从机偏移量相等时,就可以进行故障修复了
自治故障修复和人工故障修复流程都是在 clusterHandleSlaveFailover() 中开始执行的。这里不再复述。
这里大概总结一下人工故障修复默认模式的流程:
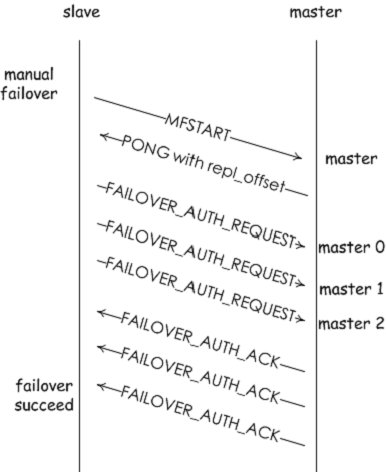
数据迁移
在之前有讲过 migrate 系列的命令,即数据迁移。在 redis cluster 中,搬迁 slot 的时候,就会用到 migrate 系列的命令。
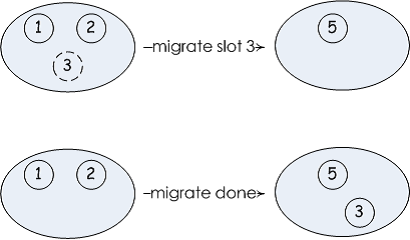
为了管理连接,redis cluster 还实现了长连接的管理,你可以在 migrateGetSocket() 中查看它的实现。
在集群状态结构体中存储了两个与数据迁移的数据:
typedef struct clusterState {
......
// slot 数据正在迁移到migrating_slots_to[slot] 节点
clusterNode *migrating_slots_to[REDIS_CLUSTER_SLOTS];
// slot 数据正在从importing_slots_from[slot] 迁移到本机
clusterNode *importing_slots_from[REDIS_CLUSTER_SLOTS];
......
} clusterState;
这些信息在数据访问的时候会有用。
总结
这篇文章依据笔者感兴趣的几个问题分了几个大的部分介绍 redis cluster,一些小的细节大家可以在源码中寻找答案。
6
Redis 应用
传统数据库跟不上业务处理能力的场景,都可以考虑用缓存系统。之于用哪个缓存系统,完全可以根据具体的业务场景和团队的技术能力来做选择。譬如用户积分排行榜的场景,完全可以用 Redis,因为 Redis 内有适用的数据结构。
需求
积分排行榜是 Redis 的经典应用。
倘若数据都存在数据库中,每次访问网页都需要对所有的数据做排序,对于日访问量大的网站来说,不仅服务器吃不消,用户体验也不佳。在 Redis 中提供了 sorted set 数据结构——有序集合,其底层实现是跳表,因此插入和删除的效率都很高,适用于需实时排序的场景,游戏中的积分排行榜就是一个例子。
ZSET 命令简介
针对有序集合,Redis 准备了一系列的命令,实现排行榜需要了解相关命令的使用。
- ZADD:添加新的元素,用法如下:ZADD key score member [score member …] key 表示有序集合的键名;member 即是元素数据,score 表示元素的积分。内部主要是按 member 和 score 来排序。
- ZRANGE:按分数从低到高返回给定排名区间的元素,用法如下:ZRANGE key start stop [WITHSCORES] start 表示起始排名,stop 为终止排名。ZRANGE 的实现也不难,类二分搜索即可。TODO
- ZREVRANGE:按分数从高到低返回给定排名区间的元素,用法和上面的一样。
- ZRANK:返回某个元素的排名,用法如下:ZRANK key member 原理类似,类二分搜索 TODO。
实现
拿论坛距离,需要在论坛首页展示最热的几个帖子,这些热帖会经常更新的。当某个帖子被访问时,对于帖子的访问次数,除了写数据库之外,还要写 Redis,即更新 score。
用 python 写一个 leaderboard:
# -*- coding: utf-8 -*-
#!/usr/bin/python
import redis
class Leaderboard:
def __init__(self,host,port,key,db):
self.host = host
self.port = port
self.key = key
self.db = db
self.r = redis.StrictRedis(host=self.host,port=self.port,db=self.db)
def isRedisValid(self):
return self.r is None
def addMember(self,member,score):
if self.isRedisValid():
return None
return self.r.zadd(self.key,score,member)
def delMember(self,member):
if self.isRedisValid():
return None
return self.r.zrem(self.key,member)
def incrScore(self,member,increment):
"""increase score on specified member"""
if self.isRedisValid():
return None
return self.r.zincrby(self.key,member,increment)
def getRankByMember(self,member):
"""Get ranking by specified member."""
if self.isRedisValid():
return None
return self.r.zrank(self.key,member)
def getLeaderboard(self,start,stop,reverse,with_score):
"""Return the whole leaderboard."""
if self.isRedisValid():
return None
return self.r.zrange(self.key,start,stop,reverse,with_score)
def getLeaderboardByPage(self,item_per_page,page_num,reverse=False,with_score=False):
"""Return part of leaderboard configurably."""
# fix parameters
if item_per_page <= 0:
item_per_page = 5
if page_num <= 0:
page_num = 1
# note: it is possible that return value is empty list.
return self.getLeaderboard((page_num-1)*item_per_page,
page_num*item_per_page-1,
reverse,with_score)
def getWholeLeaderboard(self,reverse=False,with_score=False):
"""Return the whole leaderboard."""
return self.getLeaderboard(0,-1,reverse,with_score)
性能
访问论坛首页的时候,就可以直接从 Redis 直接获取最热的帖子,返回某个帖子的排名复杂度为 O(logN * m),其中 N 为跳表的长度,m 为匹配长度。
实现
在*nix
系统编程中,遇到多个进程或者线程共享一块资源的时候,通常会使用系统自身提供的锁,譬如一个进程里的多线程,会用互斥锁;多个进程之间,会用信号量等。这个场景中所谓的共享资源仅仅限于本地,倘若共享资源存在于网络上,本地的“锁”就不起作用了。互斥访问某个网络上的资源,需要有一个存在于网络上的锁服务器,负责锁的申请与回收。Redis 可以充当锁服务器的角色。首先,Redis 是单进程单线程的工作模式,所有前来申请锁资源的请求都被排队处理,能保证锁资源的同步访问。
可以借助 Redis 管理锁资源,来实现网络资源的互斥。
我们可以在 Redis 服务器设置一个键值对,用以表示一把互斥锁,当申请锁的时候,要求申请方设置(SET)这个键值对,当释放锁的时候,要求释放方删除(DEL)这个键值对。譬如申请锁的过程,可以用下面的伪代码表示:
lock = redis.get("mutex_lock");
if(!lock)
error("apply the lock error.");
else
-- 确定可以申请锁
redis.set("mutex_lock","locking");
do_something();
这种申请锁的方法,涉及到客户端和 Redis 服务器的多次交互,当客户端确定可以加锁的时候,可能这时候锁已经被其他客户端申请了,最终导致两个客户端同时持有锁,互斥的语意非常容易被打破。在 Redis 官方文档描述了一些方法并且参看了网上的文章,好些方法都提及了这个问题。我们会发现,这些方法的共同特点就是申请锁资源的整个过程分散在客户端和服务端,如此很容易出现数据一致性的问题。
因此,最好的办法是将“申请/释放锁”的逻辑操作都放在服务器上,Redis Lua 脚本可以胜任。下面给出申请互斥锁的 Lua 脚本:
-- apply for lock
local key = KEYS[1]
local res = redis.call('get', key)
-- 锁被占用,申请失败
if res == '0' then
return -1
-- 锁可以被申请
else
local setres = redis.call('set', key, 0)
if setres['ok'] == 'OK' then
return 0
end
end
return -1
get 命令不成功返回(nil).
实验命令:保存lua 脚本redis-cli script load ”$(cat mutex_lock.lua)”
同样,释放锁的操作也可以在 Lua 脚本中实现:
-- releae lock
local key = KEYS[1]
local setres = redis.call('set', key, 1)
if setres['ok'] == 'OK' then
return 0
return -1
如上 Lua 脚本基本的锁管理的问题,将锁的管理逻辑放在服务器端,可见 Lua 能拓展 Redis 服务器的功能。但上面的锁管理方案是有问题的。
死锁的问题
首先是客户端崩溃导致的死锁。按照上面的方法,当某个客户端申请锁后因崩溃等原因无法释放锁,那么其他客户端无法申请锁,会导致死锁。
一般,申请锁是为了让多个访问方对某块数据作互斥访问(修改),而我们应该将访问的时间控制在足够短,如果持有锁的时间过长,系统整体的性能肯定是下降的。可以给定一个足够长的超时时间,当访问方超时后尚未释放锁,可以自动把锁释放。
Redis 提供了 TTL 功能,键值对在超时后会自动被剔除,在 Redis 的数据集中有一个哈希表专门用作键值对的超时。所以,我们有下面的 Lua 代码:
-- apply for lock
local key = KEYS[1]
local timeout = KEYS[2]
local res = redis.call('get', key)
-- 锁被占用,申请失败
if res == '0' then
return -1
-- 锁可以被申请
else
local setres = redis.call('set', key, 0)
local exp_res = redis.call('pexpire', key, timeout)
if exp_res == 1 then
return 0
end
end
return -1
如此能够解决锁持有者崩溃而锁资源无法释放带来的死锁问题。
再者是 Redis 服务器崩溃导致的死锁。当管理锁资源的 Redis 服务器宕机了,客户端既无法申请也无法释放锁,死锁形成了。一种解决的方法是设置一个备份 Redis 服务器,当 Redis 主机宕机后,可以使用备份机,但这需要保证主备的数据是同步的,不允许有延迟。
在同步有延迟的情况下,依旧会出现两个客户端同时持有锁的问题。
消息队列简介
接触 Linux 系统编程的时候,曾经学到消息队列是 IPC 的一种方式,这种通讯方式通常只用于本地的进程,基于共享内存的《无锁消息队列》即是一个很好的中间件,详见这里。但这篇提到的消息队列,也被称为消息中间件,通常在分布式系统中用到。
提及消息中间件的时候,还会涉及生产者和消费者两个概念。消息中间件是负责接收来自生产者的消息,并存储并转发给对应的消费者,生产者可以按 topic 发布各样消息,消费者也可以按 topic 订阅各样消息。生产者只管往消息队列里推送消息,不用等待消费者的回应;消费者只管从消息队列中取出数据并处理,可用可靠性等问题都交由消息中间件来负责。
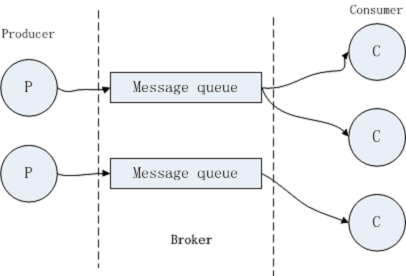
说白了,这种分布式的消息中间件即是网络上一个服务器,我们可以往里面扔数据,里面的数据会被消息中间件推送或者被别人拉取,消息中间件取到一个数据中转的作用。生产者和消费者通常有两种对应关系,一个生产者对应一个消费者,以及一个生产者对应多个消费者。在这篇文章中,介绍了消息中间件的三个特点:解耦,异步和并行。读者可以自行理解。一些不需要及时可靠响应的业务场景,消息中间件可以大大提高业务上层的 吞吐量。
目前消息中间件一族里边有一些优秀的作品,RabbitMQ, Jafka/Kafka。redis 也可以作为一个入门级的消息队列。上面提到的一个生产者对应一个消费者,Redis 的 blist 可以实现;一个生产者对应多个消费者,Redis 的pub/sub 模式可以实现。值得注意的是,使用 Redis 作为消息中间件,假如消费者有一段时间断开了与 Redis 的连接,它将不会收到这段时间内 Redis 内的数据,这一点从 pub/sub 的实现可以知道。严格意义上的消息中间件,需要保证数据的可靠性。
分布式的消息队列
在平时的开发当中,消息队列算是最常见的应用了。在本机的时候,可以使用系统提供的消息队列,或者基于共享内存的循环消息队列,来实现本机进程以及进程之间的通信。对于异机部署的多个进程,就需要用到分布式的消息队列了,来看看这个场景:
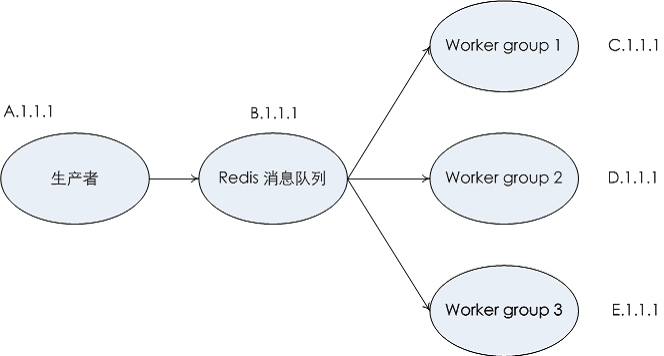
生产者,基于 Redis 的消息队列,3 个 worker 组都分别部署在不同的机器上,生产者会快速将产出内容(如需要存储的数据或者日志等)推送到消息队列服务器上,这是 worker group 就能消费了。
这种实现可以借助 Redis 中的 blist 实现。在这里用 C 实现了一个生产者和 worker group 的示例代码:
// comm.h
#ifndef COMM_H__
#define COMM_H__
#include <inttypes.h>
typedef struct {
char ip[32];
uint16_t port;
char queue_name[256];
} config_t ;
void Usage(char *program) {
printf("Usage: %s -h ip -p port -l test\n",program);
abort();
}
const size_t max_cmd_len = 512;
#endif
生产者的代码:
// producer.cc
#include <stdio.h>
#include <stdlib.h>
#include <unistd.h>
#include <string.h>
#include "comm.h"
#include "hiredis/hiredis.h"
void test_redis_client()
{
redisContext *rc = redisConnect("127.0.0.1",6379);
if(NULL == rc || rc != NULL && rc->err) {
fprintf(stderr,"error: %s\n",rc->errstr);
return;
}
// set name
redisReply *reply = (redisReply *)redisCommand(rc,"set name dylan");
printf("%s\n",reply->str);
// get name
reply = (redisReply *)redisCommand(rc,"get name");
printf("%s\n",reply->str);
}
int main(int argc, char *argv[]) {
if (argc < 7)
Usage(argv[0]);
config_t config;
for (int i = EOF;
(i = getopt(argc, argv, "h:p:l:")) != EOF;) {
switch (i) {
case 'h': snprintf(config.ip,sizeof(config.ip),"%s",optarg); break;
case 'p': config.port = atoi(optarg); break;
case 'l': snprintf(config.queue_name,sizeof(config.queue_name),"%s",
optarg); break;
default: Usage(argv[0]); break;
}
}
redisContext *rc = redisConnect(config.ip,config.port);
if (NULL == rc || rc != NULL && rc->err) {
fprintf(stderr,"error: %s\n",rc->errstr);
return -1;
}
redisReply *reply = NULL;
char cmd[max_cmd_len];
snprintf(cmd,sizeof(cmd),"LPUSH %s task",config.queue_name);
printf("cmd=%s\n",cmd);
int count = 100;
while (count--) {
reply = (redisReply *)redisCommand(rc,cmd);
if (reply && reply->type == REDIS_REPLY_INTEGER) {
} else {
printf("BLPUSH error\n");
}
}
return 0;
}
消费者的代码:
// consumer.cc
#include "comm.h"
#include "hiredis/hiredis.h"
int DoLogic(char *data, size_t len);
int main(int argc, char *argv[]) {
if (argc < 7)
Usage(argv[0]);
config_t config;
for (int i = EOF;
(i = getopt(argc, argv, "h:p:l:")) != EOF;) {
switch (i) {
case 'h': snprintf(config.ip,sizeof(config.ip),"%s",optarg); break;
case 'p': config.port = atoi(optarg); break;
case 'l': snprintf(config.queue_name,sizeof(config.queue_name),"%s",
optarg); break;
default: Usage(argv[0]); break;
}
}
redisContext *rc = redisConnect(config.ip,config.port);
if (NULL == rc || rc != NULL && rc->err) {
fprintf(stderr,"error: %s\n",rc->errstr);
return -1;
}
redisReply *reply = NULL;
char cmd[max_cmd_len];
snprintf(cmd,sizeof(cmd),"BRPOP %s task 30",config.queue_name);
int seq = 0;
while (true) {
reply = (redisReply *)redisCommand(rc,cmd);
if (reply && reply->type == REDIS_REPLY_STRING) {
DoLogic(reply->str,reply->len);
} else if (reply && reply->type == REDIS_REPLY_ARRAY) {
for (size_t i=0; i<reply->elements; i+=2) {
printf("%d->%s\n",seq++,reply->element[i]->str);
}
} else {
printf("BRPOP error, reply->type=%d\n",reply->type);
break;
}
}
return 0;
}
int DoLogic(char *data, size_t len) {
printf("reply=%s\n",data);
return 0;
}
HTTP 是无状态的协议,上一条和下一条没有什么联系,要建立联系需要在客户端和服务器作一些数据记录。
在 Web 的应用上,用 Redis/Memcached 来做 session 的存储,以加速后台业务的处理速度。譬如用户的购物车的数据,可以在服务端作存储。传统里把 session 数据库中,可以放在内存中,存储系统就派上有用场了。
下面的一段简单的 Python 的代码,如果 Redis 缓存的数据,先从 Redis 中取,否则从数据库中查询,接着返回数据给到前端。
def GetUserShopingCart(user_session):
goods = Redis.Get(user_session)
if goods is not null:
return goods
ret = Mysql.Query("select * from user_shoping_cart where sessionid = %d" %
(user_session))
return ret
def SaveUserShopingCart(user_session, goods):
ret = Redis.Set(user_session,goods)
if not ret:
Log("save redis error")
ret = Mysql.Query("insert into user_shoping_cart (sessionid, goods) values"
"(%s)",goods)
return ret
大概来看一下后台的设计图:
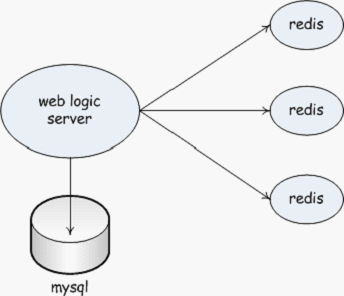
7
其他
共享对象
在 Redis 服务器初始化的时候,便将一些常用的字符串变量创建好了,免去 Redis 在线服务时不必要的字符串创建。共享对象的结构体为 struct sharedObjectsStruct,摘抄它的内容如下:
struct sharedObjectsStruct {
robj *crlf, *ok, *err, *emptybulk, *czero, *cone, *cnegone, *pong, *space,
......
};
譬如在 Redis 通信协议里面,会较多使用的”\r\n”
这些字符串都在 initServer() 函数被初始化。
两种内存分配策略
在 zmalloc.c 中 Redis 对内存分配策略做了包装。Redis 允许使用四种内存管理策略,分别是jemalloc,tcmalloc, 苹果系统自带的malloc 和其他系统自带的malloc。当有前面三种分配策略的时候,就使用前面三种,最后一个种分配策略是不选之选。
jemalloc 是 freebsd 操作系统自带的内存分配策略,它具有速度快,多线程优化的特点 TODO,firefox 以及facebook 都在使用 jemalloc。而 tcmalloc 是google 开发的,内部集成了很多内存分配的测试工具,chrome 浏览器和 protobuf TODO 用的都是 tcmalloc。两者在业界都很出名,性能也不分伯仲。Redis 是一个内存数据库,对存取的速度要求非常高,因此一个好的内存分配策略能帮助提升 Redis 的性能。
本篇不对这两种内存分配策略做深入的讲解。
memory aware 支持
Redis 所说的 memory aware 即为能感知所使用内存总量的特性,能够实时获取 Redis 所使用内存的大小,从而监控内存。所使用的思路较为简单,每次分配/释放内存的时候都更新一个全局的内存使用值。我们先来看malloc_size(void *ptr) 函数,这种类似的函数的存在只是为了方便开发人员监控内存。
上述的内存分配策略 jemalloc,tcmalloc 和苹果系统自带的内存分配策略可以实时获取指针所指内存的大小,如果上述三种内存分配策略都不支持,Redis 有一个种近似的方法来记录指针所指内存的大小,这个 trick 和 sds 字符串的做法是类似的。
zmalloc() 函数会在所需分配内存大小的基础上,预留一个整型的空间,来存储指针所指内存的大小。这种办法是备选的,其所统计的所谓“指针所指内存大小”不够准确。因为,平时我们所使用的 malloc() 申请内存空间的时候,可能实际申请的内存大小会比所需大,也就是说有一部分内存被浪费了,所以 Redis 提供的这种方法不能统计浪费的内存空间。
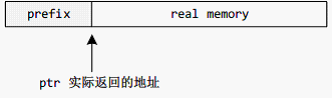
摘抄 zmalloc() 函数的实现:
void *zmalloc(size_t size) {
// 预留了一小段空间
void *ptr = malloc(size+PREFIX_SIZE);
// 内存溢出
// error. out of memory.
if (!ptr) zmalloc_oom_handler(size);
// 更新已用内存大小。
// jemalloc,tcmalloc 或者苹果系统支持实时获取指针所指内存大小
#ifdef HAVE_MALLOC_SIZE
update_zmalloc_stat_alloc(zmalloc_size(ptr));
return ptr;
// 其他情况使用 Redis 自己的策略获知指针所指内存大小
#else
*((size_t*)ptr) = size;
update_zmalloc_stat_alloc(size+PREFIX_SIZE);
return (char*)ptr+PREFIX_SIZE;
#endif
}
update_zmalloc_stat_alloc() 宏所要做的即为更新内存占用数值大小,因为这个数值是全局的,所以 Redis 做了互斥的保护。有同学可能会有疑问,Redis 服务器的工作模式不是单进程单线程的么,这里不需要做互斥的保护。在 Redis 关闭一些客户端连接的时候,有时 TODO 交给后台线程来做。因此,严格意义上来讲,互斥是要做的。
update_zmalloc_stat_alloc() 宏首先会检测 zmalloc_thread_safe 值是否为 1,zmalloc_-thread_safe 默认为 0,也就是说 Redis 默认不考虑互斥的情况;倘若 zmalloc_thread_safe 为 1,会使用原子操作函数或加锁的方式更新内存占用数值。
// 更新已使用内存大小
#define update_zmalloc_stat_alloc(__n) do { \
size_t _n = (__n); \
// 按4 字节向上取整
if (_n&(sizeof(long)-1)) _n += sizeof(long)-(_n&(sizeof(long)-1)); \
// 如果设置了线程安全,调用专门线程安全函数
if (zmalloc_thread_safe) { \
// 使用院子操作或者互斥锁,更新内存占用数值used_memory
update_zmalloc_stat_add(_n); \
} else { \
used_memory += _n; \
} \
} while(0)
上述是分配内存的情况,释放内存的情况则反过来。
zmalloc_get_private_dirty() 函数
在 RDB 持久化的篇章中,曾经提到这函数,我打算在这一节中稍微详细展开讲。操作系统为每一个进程维护了一个虚拟地址空间,虚拟地址空间对应着物理地址空间,在虚拟地址空间上的连续并不代表物理地址空间上的连续。
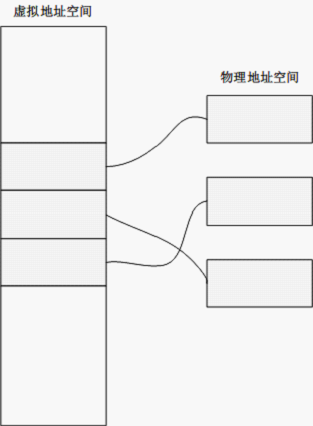
在 linux 编程中,进程调用 fork() 函数后会产生子进程。之前的做法是,将父进程的物理空间为子进程拷贝一份。出于效率的考虑,可以只在父子进程出现写内存操作的时候,才为子进程拷贝一份。如此不仅节省了内存空间,且提高了 fork() 的效率。在 RDB 持久化过程中,父进程继续提供服务,子进程进行 RDB 持久化。持久化完毕后,会调用 zmalloc_get_private_dirty() 获取写时拷贝的内存大小,此值实际为子进程在 RDB 持久化操作过程中所消耗的内存。
总结
Redis 是内存数据库,对内存的使用较为谨慎。
有一点建议。我们前面讲过,Redis 服务器中有多个数据集,在平时的数据集的选择上,可以按业务来讲不同来将数据存储在不同的数据集中。将数据集中在一两个数据集,查询的效率会降低。
Redis 日志
linux 的世界里,最好用的调试工具不是 gdb,而是日志和 printf。日志在一个软件系统中是非常常见的,一个关键的作用即定位错误,当系统出问题首先想到就是日志,查看日志能快速定位问题。Redis 中的日志模块较为简单。我们在 Redis 源码中,到处都可以见到 redisLog()。
通常,日志会分为几个级别。在 Redis 中 5 个日志级别,在 redis.h 文件中有定义:
/* Log levels */
#define REDIS_DEBUG 0 // 调试级别,这一级别产生最多的日志信息
#define REDIS_VERBOSE 1
#define REDIS_NOTICE 2
#define REDIS_WARNING 3
#define REDIS_LOG_RAW (1<<10) /* Modifier to log without timestamp */
#define REDIS_DEFAULT_VERBOSITY REDIS_NOTICE
服务器的配置结构体中,struct redisServer.verbosity 是用来设定日志级别的,譬如将日志级别设定为REDIS_NOTICE 后,代码中 REDIS_VERBOSE 和REDIS_DEBUG 级别的日志都不会被打印。
日志级别值越是低,日志级别越高,产生了日志也就越多,开发人员在产品上线之前会将日志级别调至最低,方便发现定位或发现潜在的问题。而上线之后,可以将志级别降低,减少调试日志。如果日志级别过高,则日志量大,可能会对线上的服务产生影响,因为写日志就是写文件操作,系统调用是要消耗时间的。
日志是想要记录某一个时间点,在哪里发送了什么事情,以方便出现问题的时候,恢复现场,快速定位问题所在。“某一时间点”即添加时间戳;“在哪里”即程序执行的位置,对应的是源码的文件,行号函数等;“发生了什么事情”即记录一些关键数据。
// redis 日志函数,会将给定的数据写入日志文件,和常用的printf 函数用法差不多
void redisLog(int level, const char *fmt, ...) {
va_list ap;
char msg[REDIS_MAX_LOGMSG_LEN];
// 如果日志级别小于预设的日志级别,直接返回
if ((level&0xff) < server.verbosity) return;
va_start(ap, fmt);
vsnprintf(msg, sizeof(msg), fmt, ap);
va_end(ap);
// redisLogRaw() 函数将给定的信息,在增加时间戳和进程id 后写入日志文件
redisLogRaw(level,msg);
}
Redis 断言
为什么需要断言?»»»»»»> TODO
当你认为某些事情在正常情况下不可能出现,应尽可能结束任务,而不是捕捉错误,尝试挽救。同样在西加加里,使用 try…catch() 会让程序的逻辑变乱,甚至让程序的行为变得不可预测,大胆的使用断言吧。
Redis 中不仅仅实现了断言,且在断言失败的时候会打印一些关键的信息。
在 Redis.h 中定义了两个断言相关的宏:
#define redisAssertWithInfo(_c,_o,_e) \
((_e)?(void)0 : \
(_redisAssertWithInfo(_c,_o,#_e,__FILE__,__LINE__),_exit(1)))
#define redisAssert(_e) \
((_e)?(void)0 : \
(_redisAssert(#_e,__FILE__,__LINE__),_exit(1)))
如果断言为真,执行一个空操作;断言为假,会打印关键的信息。
_redisAssert() 函数会记录断言发生的错误信息,文件名和行号
void _redisAssert(char *estr, char *file, int line) {
// 向日志文件中写入BUG 头部
bugReportStart();
// 将文件名,行号,错误信息写入日志
redisLog(REDIS_WARNING,"=== ASSERTION FAILED ===");
redisLog(REDIS_WARNING,"==> %s:%d '%s' is not true",file,line,estr);
// 如果需要,可以记录错误信息,文件名和行号,以便在进程崩溃后调试(gdb core?)
#ifdef HAVE_BACKTRACE
server.assert_failed = estr;
server.assert_file = file;
server.assert_line = line;
redisLog(REDIS_WARNING,"(forcing SIGSEGV to print the bug report.)");
#endif
// 强制segmentation fault。无效的内存访问,可以产生SIGSEGV,如此会
// 产生coredump 文件以供进程崩溃后调试使用
*((char*)-1) = 'x';
}
这有个小有意思的语句:*((char*)-1) = ’x’
;(char *)-1
表示指向地址值为 -1 的指针,它所指向的内存肯定是非法的,对非法内存的操作会触发 SIGSEGV 信号,进程结束后会产生 coredump 文件,方便调试使用。使用gdb、可执行文件和 coredump 文件能快速定位问题所在,即使进程已经崩溃了。
_redisAssertWithInfo() 函数会打印 Redis 服务器当前服务的客户端和某个关键 Redis 对象的信息,具体请参看源码,在这不展开了。
单进程单线程与单进程多线程
Redis 是单进程单线程的工作模式,所有的请求都被排队处理处理,因此缓存数据没有互斥的需求。而 Memcached 是单进程多线程的工作模式,请求到达时,主线程会将请求分发给多个工作线程,因此必须要做数据的互斥。
在处理请求的能力上,两者是不相上下的。理论上在一台支持多线程的机器上,Memecached 的 get 操作的吞吐量会较 Redis 高。
那到底是多线程还是单线程优秀?多线程一般会增加程序逻辑的复杂度,需要考虑线程与线程之间的同步与互斥,一定程度上拉低了每个线程的吞吐量(工作量),更多的时间是花在了等待互斥锁上。一般建议在系统设计的时候多考虑系统的横向扩展性。
使用每个进程单个线程的模式。这里没有信条,不是非黑即白,就看什么样的方法解决什么样的问题了。
丰富与简单的数据结构
Redis 有丰富的原生数据结构,包括字符串,链表,集合,有序集合,哈希表,二进制数组等,可见 Redis 能适用于更多的场景,可以当作一个数据结构数据库。Memcached 在这方面较 Redis 逊色,只能做简单的 key/value 存储。
其他
除了上面所说,与 Memcached 比较:
- Redis 原生支持主从复制,可以实现一主多从的场景,提高了可用性
- Redis 原生支持 RDB 和 AOF 两种持久化方式。前者是将内存中的数据整体落地,后者是将数据的更新落地,类似于 MySQL 中的 binlog。Memcached 原生并不支持持久化
- Redis 支持事务
- Redis 支持键值对的过期时间设置
- Redis 3.0 中已经开始支持 Redis 集群了
对比下来,Redis 好玩多了。
性能测试
曾经被问到 Redis 和 Memcached 哪个更快?在测试的时候,需要保证测试的客观环境是一样的,这包括测试机器,客户端除了在构造协议的逻辑部分不一样外,其他都应该是保持一致的。
测试环境:
ubuntu, Intel(R) Core(TM) i5-3210M CPU @ 2.50GHz 4 核心
memcache 1.4.14
redis 3.1.99
测试概括了一些结论:
- 随着 payload 增大,会越影响读写性能,尤其是 Redis
- Redis,Memcache(worker 线程数为1),读写性能不分上下,Redis 更优一点
- Memcache 的 worker 线程达到一定个数,会导致读写的性能下降
默认情况下,Memcached 默认键长设置为 256B,存储数据长度限制为 1M。可以通过 Memcached 的 -I 选项调整默认 slab 页面大小,从而可以调整存储数据长度的限制,但 Memcached 官方是不建议这种做法的。
没有非黑即白的答案,只有哪个工具在哪种场景下更为适用。
阅读 Memcached 最好有 libevent 基础,Memcached 是基于 Libevent 构建起来的。通由 Libevent 提供的事件驱动机制触发 Memcached 中的 IO 事件。已经有大牛剖析过 Libevent 源码了,可以在网络上搜索相关的资料。
个人认为,阅读源码的起初最忌钻牛角尖,如头文件里天花乱坠的结构体到底有什么用。源文件里稀里哗啦的函数是做什么的。刚开始并没必要事无巨细弄清楚头文件每个类型定义的具体用途; 很可能那些是不紧要的工具函数,知道他的功能和用法就没他事了。
来看 Memcached 内部做了什么事情。Memcached 是用 C 语言实现,必须有一个入口函数 main(),Memcached 的生命从这里开始。
初始化过程
- 建立并初始化 main_base,即主线程的事件中心,这是 Libevent 里面的概念,可以把它理解为事件分发中心。
- 建立并初始化 Memcached 内部容器数据结构。
- 建立并初始化空闲连接结构体数组。
- 建立并初始化线程结构数组,指定每个线程的入口函数是 worker_libevent(),并创建工作线程。从 worder_libevent() 的实现来看,工作线程都会调用 event_base_loop() 进入自己的事件循环。
根据 Memcached 配置,开启以下两种服务模式中的一种:
- 以 UNIX 域套接字的方式接受客户的请求
- 以 TCP/UDP 套接字的方式接受客户的请求
Memcached 有可配置的两种模式:UNIX 域套接字和 TCP/UDP,允许客户端以两种方式向 Memcached 发起请求。客户端和服务器在同一个主机上的情况下可以用 UNIX 域套接字,否则可以采用 TCP/UDP 的模式。两种模式是不兼容的。特别的,如果是 UNIX 域套接字或者 TCP 模式,需要建立监听套接字,并在事件中心注册了读事件,回调函数是 event_handler(),我们会看到所有的连接都会被注册回调函数是 event_handler()。
调用 event_base_loop() 开启 libevent 的事件循环。到此,Memcached 服务器的工作正式进入了工作。如果遇到致命错误或者客户明令结束 Memcached,那么才会进入接下来的清理工作。
UNIX 域套接字和 UDP/TCP 工作模式
在初始化过程中介绍了这两种模式,Memcached 这么做为的是让其能更加可配置。
TCP/UDP 自不用说,UNIX 域套接字有独特的优势:
- 在同一台主机上进行通信时,是不同主机间通信的两倍
- UNIX 域套接口可以在同一台主机上,不同进程之间传递套接字描述符
- UNIX 域套接字可以向服务器提供客户的凭证(用户id 或者用户组id)
工作线程管理和线程调配方式
在 thread_init(),setup_thread() 函数的实现中,Memcached 的意图是很清楚的。每个线程都有自己独有的连接队列,即 CQ,注意这个连接队列中的对象并不是一个或者多个 Memcached 命令,它对应一个客户!一旦一个客户交给了一个线程,它的余生就属于这个线程了! 线程只要被唤醒就立即进入工作状态,将自己 CQ 队列的任务所有完完成。当然,每一个工作线程都有自己的 libevent 事件中心。
很关键的线索是 thread_init() 的实现中,每个工作线程都创建了读写管道,所能给我们的提示是:只要利用 libevent 在工作线程的事件中心注册读管道的读事件,就可以按需唤醒线程,完成工作,很有意思,而setup_thread() 的工作正是读管道的读事件被注册到线程的事件中心,回调函数是 thread_libevent_process()。thread_libevent_process() 的工作就是从工作线程自己的 CQ 队列中取出任务执行,而往工作线程工作队列中添加任务的是 dispatch_conn_new(),此函数一般由主线程调用。下面是主线程和工作线程的工作流程:
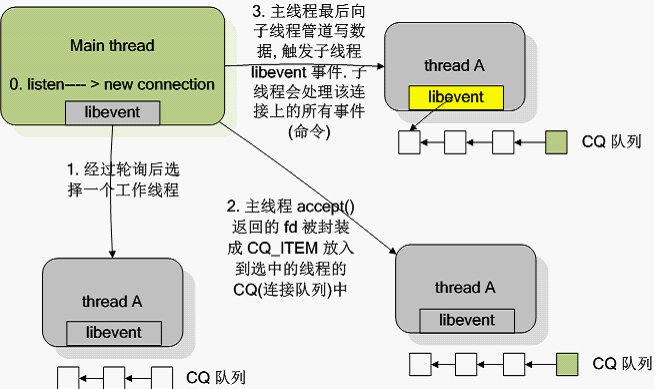
多任务并行处理的两种方式,一种是将所有的任务用队列存储起来,每个工作者依次去拿一个来处理,直到做完所有的> 任务为止。另一种是将任务平均分给工作者,先做完任务的工作者就去别的工作者那里拿一些任务来做,同样直到所有任务做完为止。两种方式的结果如何?根据自己的场景写码验证。
Memcached 所采用的模式就是这里所说的第二种! Memcached 的线程分配模式是:一个主线程和多个工作线程。主线程负责初始化和将接收的请求分派给工作线程,工作线程负责接收客户的命令请求和回复客户。
存储容器
Memcached 是做缓存用的,内部肯定有一个容器。回到 main() 中,调用 assoc_init() 初始化了容器–hashtable,采用头插法插入新数据,因为头插法是最快的。Memcached 只做了一级的索引,即 hash;接下来的就靠 memcmp() 在链表中找数据所在的位置。Memcached 容器管理的接口主要在 item.h .c 中。
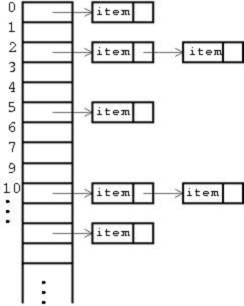
连接管理
每个连接都会建立一个连接结构体与之对应。main() 中会调用 conn_init() 建立连接结构体数组。连接结构体 struct conn 记录了连接套接字,读取的数据,将要写入的数据,libevent event 结构体以及所属的线程信息。
当有新的连接时,主线程会被唤醒,主线程选定一个工作线程 thread0,在thread0 的写管道中写入数据,特别的如果是接受新的连接而不是接受新的数据,写入管道的数据是字符’c’。工作线程因管道中有数据可读被唤醒,thread_libevent_process() 被调用,新连接套接字被注册了 event_handler() 回调函数,这些工作在conn_new() 中完成。因此,客户端有命令请求的时候(譬如发起 get key 命令),工作线程都会被触发调用 event_handler()。
当出现致命错误或者客户命令结束服务(quit 命令),关于此连接的结构体内部的数据会被释放(譬如曾经读取的数据),但结构体本身不释放,等待下一次使用。如果有需要,连接结构体数组会指数自增。
一个请求的工作流程
Memcached 服务一个客户的时候,是怎么一个过程,试着去调试模拟一下。当一个客户向 Memcached 发起请求时,主线程会被唤醒,接受请求。接下来的工作在连接管理中有说到。
客户已经与 Memcached 服务器建立了连接,客户在终端(黑框框) 敲击 get key + 回车键,一个请求包就发出去了。从连接管理中已经了解到所有连接套接字都会被注册回调函数为 event_handler(),因此 event_handler() 会被触发调用。
void event_handler(const int fd, const short which, void *arg) {
conn *c;
c = (conn *)arg;
assert(c != NULL);
c->which = which;
/* sanity */
if (fd != c->sfd) {
if (settings.verbose > 0)
fprintf(stderr, "Catastrophic: event fd doesn't match conn fd!\n");
conn_close(c);
return;
}
drive_machine(c);
/* wait for next event */
return;
}
event_handler() 调用了 drive_machine()。drive_machine() 是请求处理的开端,特别的当有新的连接时,listen socket 也是有请求的,所以建立新的连接也会调用 drive_machine(),这在连接管理有提到过。下面是 drive_machine() 函数的骨架:
// 请求的开端。当有新的连接的时候event_handler() 会调用此函数。
static void drive_machine(conn *c) {
bool stop = false;
int sfd, flags = 1;
socklen_t addrlen;
struct sockaddr_storage addr;
int nreqs = settings.reqs_per_event;
int res;
const char *str;
assert(c != NULL);
while (!stop) {
// while 能保证一个命令被执行完成或者异常中断(譬如IO 操作次数超出了一定的限制)
switch(c->state) {
// 正在连接,还没有accept
case conn_listening:
// 等待新的命令请求
case conn_waiting:
// 读取数据
case conn_read:
// 尝试解析命令
case conn_parse_cmd :
// 新的命令请求,只是负责转变conn 的状态
case conn_new_cmd:
// 真正执行命令的地方
case conn_nread:
// 读取所有的数据,抛弃!!! 一般出错的情况下会转换到此状态
case conn_swallow:
// 数据回复
case conn_write:
case conn_mwrite:
// 连接结束。一般出错或者客户显示结束服务的情况下回转换到此状态
case conn_closing:
}
}
return;
}
通过修改连接结构体状态 struct conn.state 执行相应的操作,从而完成一个请求,完成后 stop 会被设置为 true,一个命令只有执行结束(无论结果如何) 才会跳出这个循环。我们看到 struct conn 有好多种状态,一个正常执行的命令状态的转换是:
conn_new_cmd->conn_waiting->conn_read->conn_parse_cmd->conn_nread->conn_mwrite->conn_close
这个过程任何一个环节出了问题都会导致状态转变为 conn_close。带着刚开始的问题把从客户连接到一个命令执行结束的过程是怎么样的:
- 客户connect() 后,Memcached 服务器主线程被唤醒,接下来的调用链是 event_-handler()->drive_machine()
被调用,此时主线程对应 conn 状态为 conn_listining,接 受请求 - dispatch_conn_new(sfd, conn_new_cmd, EV_READ | EV_PERSIST,DATA_BUFFER_SIZE, tcp_transport);
- dispatch_conn_new() 的工作是往工作线程工作队列中添加任务(前面已经提到过),所以其中一个沉睡的工作线程会被唤醒,thread_libevent_process() 会被工作线程调用,注意这些机制都是由libevent 提供的。
- thread_libevent_process() 调用 conn_new() 新建 struct conn 结构体,且状态为 conn_-new_cmd,其对应的就是刚才accept() 的连接套接字。conn_new() 最关键的任务是将刚才接受的套接字在libevent 中注册一个事件,回调函数是event_handler()。循环继续,状态 conn_new_cmd 下的操作只是只是将conn 的状态转换为conn_waiting;
- 循环继续,conn_waiting 状态下的操作只是将conn 状态转换为conn_read,循环退出.
- 此后,如果客户端不请求服务,那么主线程和工作线程都会沉睡,注意这些机制都是由 libevent 提供的。
- 客户敲击命令「get key」后,工作线程会被唤醒,event_handler() 被调用了。看!又被调用了。event_handler()->drive_machine(),此时conn 的状态为conn_read。conn_read下的操作就是读数据了,如果读取成功,conn 状态被转换为conn_parse_cmd。
- 循环继续,conn_parse_cmd 状态下的操作就是尝试解析命令:可能是较为简单的命令,就直接回复,状态转换为conn_close,循环接下去就结束了;涉及存取操作的请求会导致conn_parse_cmd 状态转换为conn_nread。
- 循环继续,conn_nread 状态下的操作是真正执行存取命令的地方。里面的操作无非是在内存寻找数据项,返回数据。所以接下来的状态conn_mwrite,它的操作是为客户端回复数据。
- 状态又回到了conn_new_cmd 迎接新的请求,直到客户命令结束服务或者发生致命错误。大概就是这么个过程。
Memcached 的分布式
Memcached 的服务器没有向其他 Memcached 服务器收发数据的功能,意即就算部署多个 Memcached 服务器,他们之间也没有任何的通信,Memcached 所谓的分布式部署也是并非平时所说的分布式。所说的「分布式」是通过创建多个 Memcached 服务器节点,在客户端添加缓存请求分发器来实现的。Memcached 的更多的时候限制是来自网络 I/O,所以应该尽量减少网络 I/O。
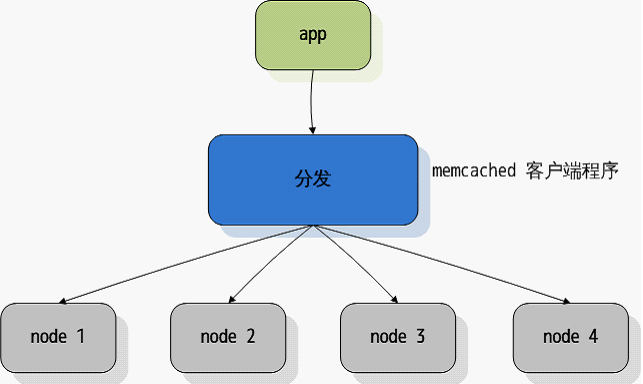
Memcached 自带了一个内存分配模块slab,自己在用户层实现了内存的分配,而不是完全依赖于系统的 malloc。这篇文章,来看看 Memcached slab 内存分配算法是怎么做的。
一个内存分配算法要考虑算法的效率,管理内存所占的空间和内存碎片的问题。这个是三个衡量点往往不能个个都得到满足,每个实现都会各有所长。slab 能较好的规避内存碎片的问题,但也带来了一定的内存浪费,算法的效率还不错。
Memcached slab 概述
在 Memcached 中,为键值对分配空间的时候都会调用 do_item_alloc() 函数,真正设计 slab 的是slabs_alloc() 这个函数:
void *slabs_alloc(size_t size, unsigned int id);
size 是所需分配空间的实际大小,id 是这个空间大小所对应的数量级。
slab class
slab 为空间的大小划分了数量级。在 memecached 初始化的时候可以设置 chrunk 和 factor 属性,前者是一个底数,后者是一个因子,前一个数量级乘于因子已得到新的数量级,依次可以推算下一级的数量级。
来看看内存管理的结构体 slabclass_t:
typedef struct {
// 每个内存块大小
unsigned int size; /* sizes of items */
// 每个slab 内存块的数量
unsigned int perslab; /* how many items per slab */
// 空闲的内存块会组成一个链表
void *slots; /* list of item ptrs */
// 当前空闲内存块的数量
unsigned int sl_curr; /* total free items in list */
// slab 数量
unsigned int slabs; /* how many slabs were allocated for this class */
// slab 指针
void **slab_list; /* array of slab pointers */
unsigned int list_size; /* size of prev array */
......
} slabclass_t;
现在对于某一级别的 slab 有如下印象图:
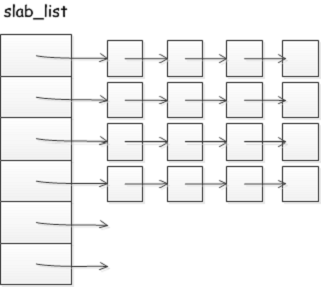
对于不同的 class 有如下印象图:

内存分配的过程
来看看 slab 内存分配入口函数做了什么?
void *slabs_alloc(size_t size, unsigned int id) {
void *ret;
// 每次内存的分配都需要加锁
pthread_mutex_lock(&slabs_lock);
ret = do_slabs_alloc(size, id);
pthread_mutex_unlock(&slabs_lock);
return ret;
}
do_slabs_alloc() 实际上会先检测是否有空闲的内存块,有则返回空闲的内存块;否则,会调用do_slabs_newslab() 分配新的内存。
static void *do_slabs_alloc(const size_t size, unsigned int id) {
slabclass_t *p;
void *ret = NULL;
item *it = NULL;
// 所需分配空间的数量级别不合法
if (id < POWER_SMALLEST || id > power_largest) {
MEMCACHED_SLABS_ALLOCATE_FAILED(size, 0);
return NULL;
}
p = &slabclass[id];
assert(p->sl_curr == 0 || ((item *)p->slots)->slabs_clsid == 0);
// 如果指定的slab 内还有空闲的内存块,返回空闲的内存块,否则调用
// do_slabs_newslab()
// do_slabs_newslab() 为指定的slab 分配更多的空间
if (! (p->sl_curr != 0 || do_slabs_newslab(id) != 0)) {
/* We don't have more memory available */
ret = NULL;
} else if (p->sl_curr != 0) {
/* return off our freelist */
it = (item *)p->slots;
p->slots = it->next;
if (it->next) it->next->prev = 0;
p->sl_curr--;
ret = (void *)it;
}
......
return ret;
}
我们来看看 do_slabs_newslab() 是怎么做的:首先会看 slab_list 是否已经满了,如果满 了则 resize slab_list 并分配空间,将新分配的空间初始化后切割插入到空闲链表中。
static int do_slabs_newslab(const unsigned int id) {
slabclass_t *p = &slabclass[id];
// 计算需要分配内存的大小
int len = settings.slab_reassign ? settings.item_size_max
: p->size * p->perslab;
char *ptr;
// 扩大slab_list,并分配内存
if ((mem_limit && mem_malloced + len > mem_limit && p->slabs > 0) ||
(grow_slab_list(id) == 0) ||
((ptr = memory_allocate((size_t)len)) == 0)) {
MEMCACHED_SLABS_SLABCLASS_ALLOCATE_FAILED(id);
return 0;
}
// 将新分配的内存初始化,并切割插入到空闲链表中
memset(ptr, 0, (size_t)len);
split_slab_page_into_freelist(ptr, id);
// 调整slab_list 指针指向新分配的空间
p->slab_list[p->slabs++] = ptr;
mem_malloced += len;
MEMCACHED_SLABS_SLABCLASS_ALLOCATE(id);
return 1;
}
do_slabs_newslab() 之前:
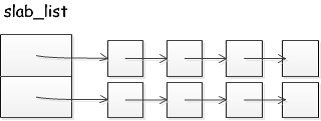
do_slabs_newslab() 之后:
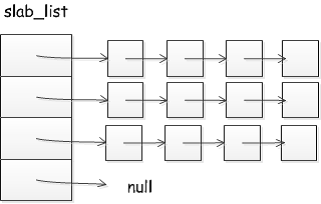
slab 能较好的规避内存碎片的问题,但也带来了一定的内存浪费,算法的效率还不错。现在能够较好的理解这一句话。因为 slab 内存分配算法预先分配了一大块的连续紧凑的内存空间,只一点能将内存的使用都限定在紧凑连续的空间内;但很明显它会带来一定的浪费,因为每个 slab class 内的每个内存块大小都是固定的,数据的大小必须小于等于内存块的大小。
lru 机制
Memcached slab 还有一个超时淘汰的机制,当发现某个 slab class 内无空间可分配的时候,并不是立即去像上面所说的一样去扩展空间,而是尝试从已经被使用的内存块中寻找是否有已经超时的块,如果超时了,则原有的数据会被删除,这个内存块被作为结果内存分配的结果。
那如何快速找到这个块呢?对于某个 slab class,所有已使用和空闲的内存块都会被组织成一个链表,
static item *heads[LARGEST_ID];
static item *tails[LARGEST_ID];
这两个全局变量就保存这些链表的头指针和尾指针。对于新的数据插入,会更新 heads[classid],对于超时被剔除的数据删除操作,会更新 tails[classid]。
下面图解上述的过程:
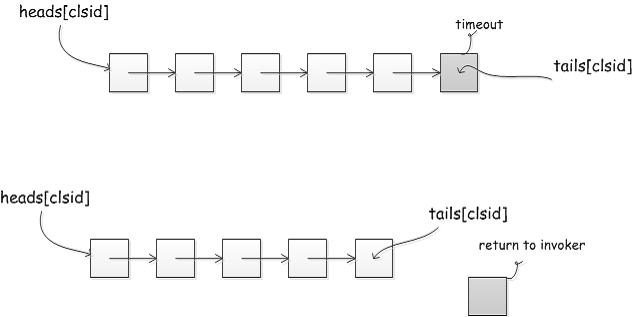
工欲善其事必先利其器,C/C++ 源码阅读工具用过几款,推荐给大家。
sublime text 2/3
sublime text 是功能很强的一款编辑器,可安装各种插件。刚开始尝试阅读代码的时候,用的就是这款。在这里推荐 sublime text 2 + ctags 或者直接使用 sublime text 3,能实现函数跳转的功能。
个人的偏好快捷键设置是:
[
{
"button": "button1", "count": 1,
"modifiers": ["ctrl", "shift"],
"press_command": "drag_select",
"command": "goto_definition"
},
{
"button": "button2", "count": 1,
"modifiers": ["ctrl", "shift"],
"press_command": "",
"command": "jump_back"
}
]
ctrl+shift 以及鼠标左键,跳转到函数的实现;ctrl+shift 以及鼠标右键,进行回退。
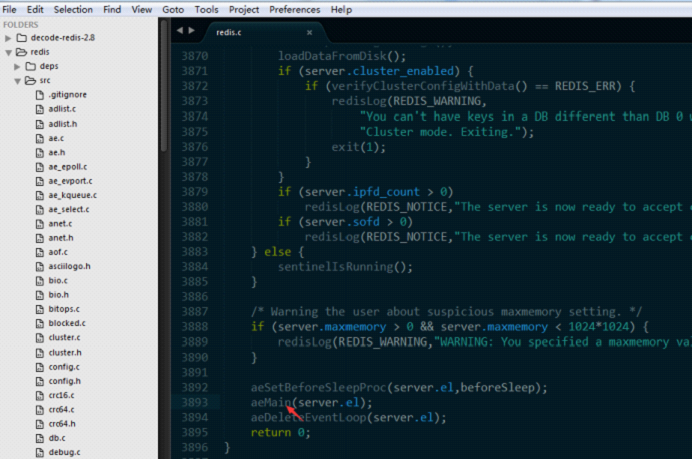
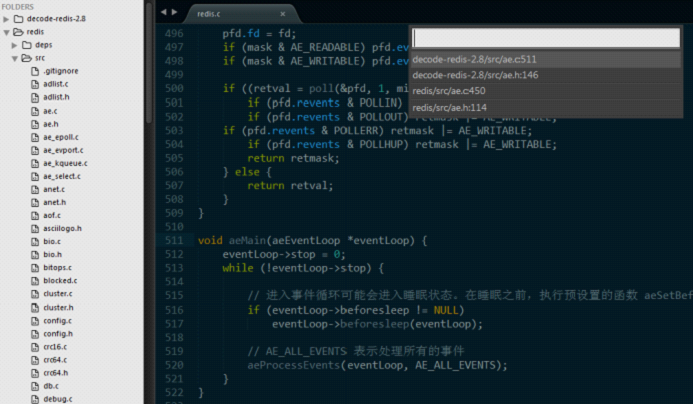
Eclipse CDT
Eclipse CDT 是专门为 C/C++ 开发者打造的 IDE,也非常不错。下载代码后导入到 Eclipse 中,就可以了。
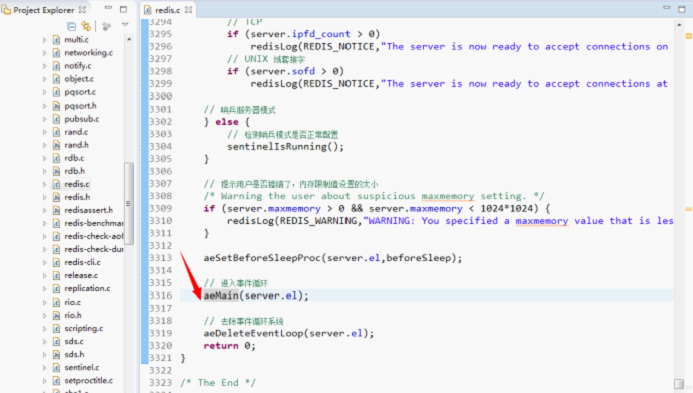
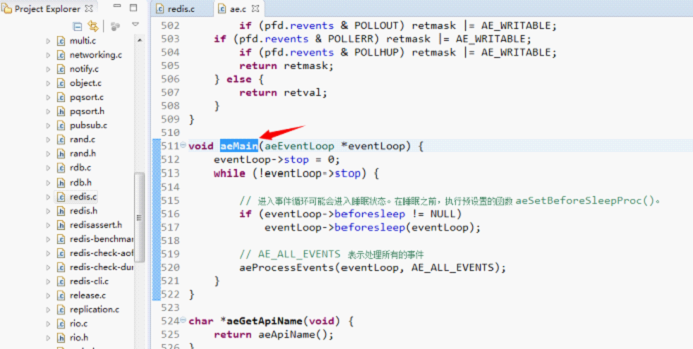
Source insight
Source insight 也是老牌的代码阅读利器了。
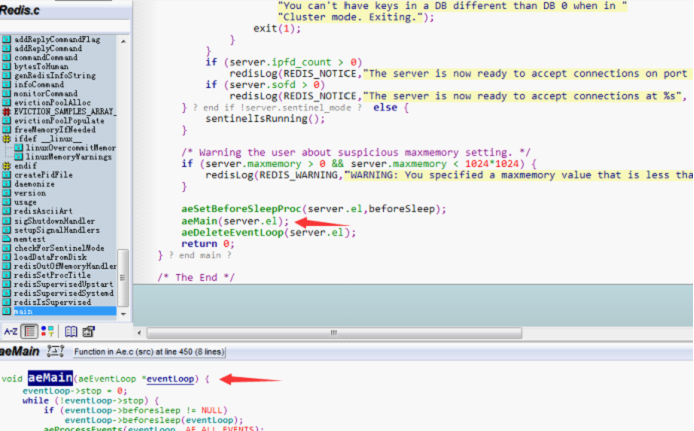
具体工具的使用方法,不在这里赘述了,网络上有很多很好的教程供大家参考。


更多信息请访问

