


采用在线镜像仓库安装依赖包。
安装前准备
服务器信息
操作系统版本
root@HKSZF-ZW-172-19-146-176:/topsoft# lsb_release -a
No LSB modules are available.
Distributor ID: Ubuntu
Description:    Ubuntu 18.04.5 LTS
Release:        18.04
Codename:       bionic
查内核信息
root@HKSZF-ZW-172-19-146-176:/soft# dpkg --print-architecture
amd64

root@HKSZF-ZW-172-19-146-176:/soft# arch
x86_64

root@HKSZF-ZW-172-19-146-176:/soft# uname -a
Linux HKSZF-ZW-172-19-146-176 4.15.0-112-generic #113-Ubuntu SMP Thu Jul 9 23:41:39 UTC 2020 x86_64 x86_64 x86_64 GNU/Linux

root@HKSZF-ZW-172-19-146-176:/soft# uname -r
4.15.0-112-generic

root@HKSZF-ZW-172-19-146-176:/soft# uname -m
x86_64
检查时区
发现时区是UTC,更改为CST 东八区(UTC:国际时间,CST:北京时间)。
如果已经是CST:北京时间 东八区则不用操作更改时区步骤。
--打印当前系统时区
root@HKSZF-ZW-172-19-146-176:/topsoft# timedatectl
                      Local time: Wed 2024-01-24 05:51:05 UTC
                  Universal time: Wed 2024-01-24 05:51:05 UTC
                        RTC time: Wed 2024-01-24 05:51:56
                       Time zone: Etc/UTC (UTC, +0000)
       System clock synchronized: no
systemd-timesyncd.service active: yes
                 RTC in local TZ: no
更改时区(可选)
--更改时区  执行tzselect命令

root@HKSZF-ZW-172-19-146-176:/topsoft# tzselect
Please identify a location so that time zone rules can be set correctly.
Please select a continent, ocean, "coord", or "TZ".
 1) Africa
 2) Americas
 3) Antarctica
 4) Asia
 5) Atlantic Ocean
 6) Australia
 7) Europe
 8) Indian Ocean
 9) Pacific Ocean
10) coord - I want to use geographical coordinates.
11) TZ - I want to specify the time zone using the Posix TZ format.

--找到Asia,输入4,回车
Please select a country whose clocks agree with yours.
 1) Afghanistan           18) Israel                35) Palestine
 2) Armenia               19) Japan                 36) Philippines
 3) Azerbaijan            20) Jordan                37) Qatar
 4) Bahrain               21) Kazakhstan            38) Russia
 5) Bangladesh            22) Korea (North)         39) Saudi Arabia
 6) Bhutan                23) Korea (South)         40) Singapore
 7) Brunei                24) Kuwait                41) Sri Lanka
 8) Cambodia              25) Kyrgyzstan            42) Syria
 9) China                 26) Laos                  43) Taiwan
10) Cyprus                27) Lebanon               44) Tajikistan
11) East Timor            28) Macau                 45) Thailand
12) Georgia               29) Malaysia              46) Turkmenistan
13) Hong Kong             30) Mongolia              47) United Arab Emirates
14) India                 31) Myanmar (Burma)       48) Uzbekistan
15) Indonesia             32) Nepal                 49) Vietnam
16) Iran                  33) Oman                  50) Yemen
17) Iraq                  34) Pakistan

--找到china,输入9,回车
Please select one of the following time zone regions.
1) Beijing Time
2) Xinjiang Time

--找到北京时间,输入1,回车
Please select one of the following time zone regions.
1) Beijing Time
2) Xinjiang Time

--选择yes,输入1,回车
The following information has been given:

        China
        Beijing Time

Therefore TZ='Asia/Shanghai' will be used.
Selected time is now:   Wed Jan 24 21:40:32 CST 2024.
Universal Time is now:  Wed Jan 24 13:40:32 UTC 2024.
Is the above information OK?
1) Yes
2) No

--更新设置
ln -sf /usr/share/zoneinfo/Asia/Shanghai /etc/localtime

--查看是否更改成功
root@HKSZF-ZW-172-19-146-176:/topsoft# date
Wed Jan 24 21:42:00 CST 2024

root@HKSZF-ZW-172-19-146-176:/topsoft# timedatectl
                      Local time: Wed 2024-01-24 21:42:06 CST
                  Universal time: Wed 2024-01-24 13:42:06 UTC
                        RTC time: Wed 2024-01-24 06:09:59
                       Time zone: Asia/Shanghai (CST, +0800)
       System clock synchronized: no
systemd-timesyncd.service active: yes
                 RTC in local TZ: no
安装java
上传 jdk-8u371-linux-x64.tar.gz
root@HKSZF-ZW-172-19-146-176:/soft# tar -zxvf jdk-8u371-linux-x64.tar.gz
root@HKSZF-ZW-172-19-146-176:/soft# cp -r jdk1.8.0_371/ /usr/local/
root@HKSZF-ZW-172-19-146-176:/usr/local# more /etc/profile
export JAVA_HOME=/usr/local/jdk1.8.0_371
export PATH=$JAVA_HOME/bin:$PATH
export CLASSPATH=.:$JAVA_HOME/lib/dt.jar:$JAVA_HOME/lib/tools.jar

root@HKSZF-ZW-172-19-146-176:/usr/local# source /etc/profile

root@HKSZF-ZW-172-19-146-176:/usr/local# java -version
java version "1.8.0_371"
Java(TM) SE Runtime Environment (build 1.8.0_371-b11)
Java HotSpot(TM) 64-Bit Server VM (build 25.371-b11, mixed mode)
配置镜像仓库
由于场景2需要安装的依赖太多,所以选择场景1的方式配置在线镜像仓库。如果现场不能连网,建议虚拟机一台上外网的下载并上传依赖包
场景1:配置在线镜像仓库
1、查操作系统版本
root@ubuntu:~# lsb_release -a
No LSB modules are available.
Distributor ID:	Ubuntu
Description:	Ubuntu 18.04.5 LTS
Release:	18.04
Codename:	bionic
2、原文件备份
sudo cp /etc/apt/sources.list /etc/apt/sources.list.bak_`date +%F`3、查镜像源信息
登录阿里yum仓库
选择ubuntu操作系统
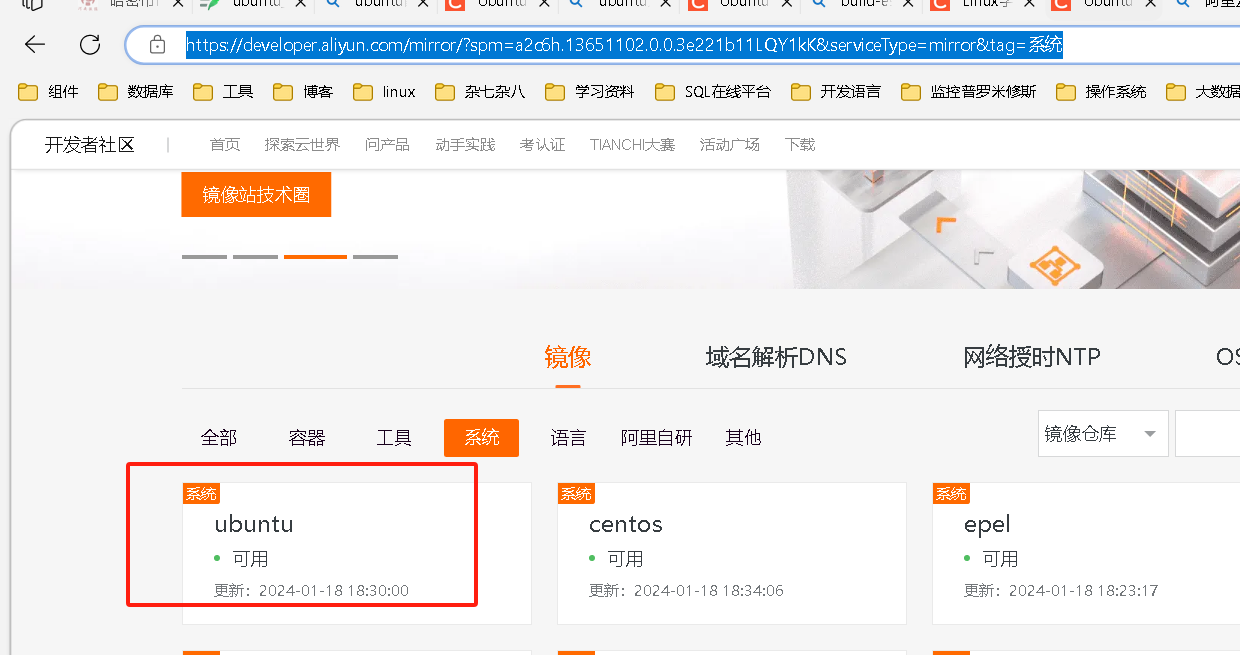
选择对应的版本,本文档使用18.04
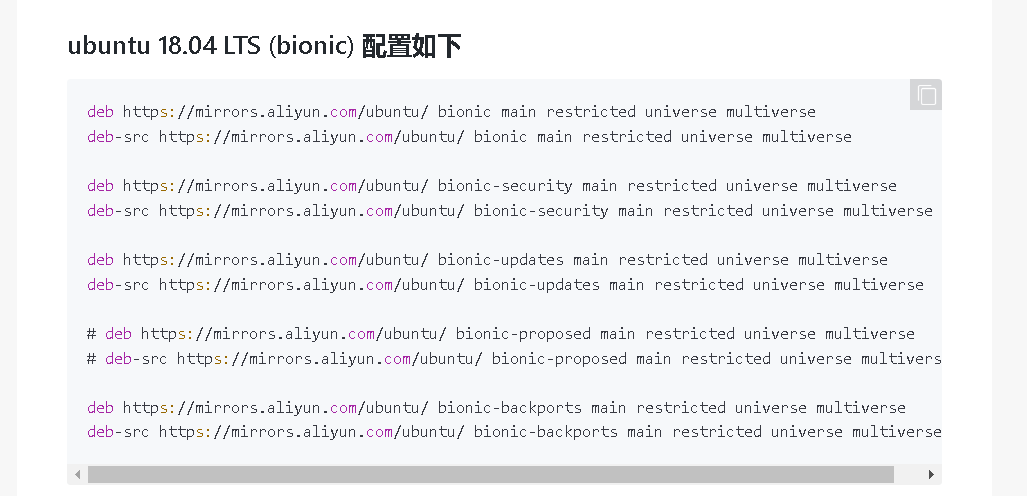
4、编辑源列表文件
sudo vi /etc/apt/sources.list5、将原来的内容删除,添加如下内容(阿里源镜像源)
deb https://mirrors.aliyun.com/ubuntu/ bionic main restricted universe multiverse
deb-src https://mirrors.aliyun.com/ubuntu/ bionic main restricted universe multiverse
deb https://mirrors.aliyun.com/ubuntu/ bionic-security main restricted universe multiverse
deb-src https://mirrors.aliyun.com/ubuntu/ bionic-security main restricted universe multiverse
deb https://mirrors.aliyun.com/ubuntu/ bionic-updates main restricted universe multiverse
deb-src https://mirrors.aliyun.com/ubuntu/ bionic-updates main restricted universe multiverse
# deb https://mirrors.aliyun.com/ubuntu/ bionic-proposed main restricted universe multiverse
# deb-src https://mirrors.aliyun.com/ubuntu/ bionic-proposed main restricted universe multiverse
deb https://mirrors.aliyun.com/ubuntu/ bionic-backports main restricted universe multiverse
deb-src https://mirrors.aliyun.com/ubuntu/ bionic-backports main restricted universe multiverse
即把这段替代刚打开那个文件,然后保存关闭。
6.更新软件源
sudo apt-get update场景2:配置离线镜像仓库
上传操作系统镜像ubuntu-18.04.5-server-amd64.iso至/opt
--查操作系统版本
root@ubuntu:~# lsb_release -a
No LSB modules are available.
Distributor ID:	Ubuntu
Description:	Ubuntu 18.04.5 LTS
Release:	18.04
Codename:	bionic

--原文件备份
sudo cp /etc/apt/sources.list /etc/apt/sources.list.bak_`date +%F`

--创建挂载目录
mkdir -p /media/cdrom

--挂载镜像文件
mount -t iso9660 -o loop /opt/ubuntu-18.04.5-server-amd64.iso /media/cdrom

--向source.list中添加一个新的光盘源文件
apt-cdrom -m -d /media/cdrom add

--更改sources.list
root@HKSZF-ZW-172-19-146-176:/etc/apt# cat sources.list
# See http://help.ubuntu.com/community/UpgradeNotes for how to upgrade to
# newer versions of the distribution.
deb cdrom:[Ubuntu-Server 18.04.5 LTS _Bionic Beaver_ - Release amd64 (20200810)]/ bionic main restricted
除deb cdrom内容,其它内容都注释掉

--更新软件源
apt-get update
Oracle11g安装介质
一共两个包
p13390677_112040_Linux-x86-64_1of7.zip
p13390677_112040_Linux-x86-64_2of7.zip
链接:https://pan.baidu.com/s/1T0aLC-ibbbhro3uof4x2iA?pwd=yyds
提取码:yyds

链接:https://pan.baidu.com/s/1KN0zBr1JNbM41-dt8MPidw?pwd=yyds
提取码:yyds
安装依赖包
本文采用场景2步骤。
场景1:在线仓库
sudo apt-get install automake -y
sudo apt-get install autotools-dev -y
sudo apt-get install binutils -y
sudo apt-get install bzip2 -y
sudo apt-get install elfutils -y
sudo apt-get install expat -y
sudo apt-get install gawk -y
sudo apt-get install gcc -y
sudo apt-get install gcc-multilib -y
sudo apt-get install g++-multilib -y
sudo apt-get install ia32-libs -y  --无
sudo apt-get install ksh -y
sudo apt-get install less -y
sudo apt-get install lesstif2 -y --无
sudo apt-get install lesstif2-dev -y  ---无
sudo apt-get install lib32z1 -y
sudo apt-get install libaio1 -y
sudo apt-get install libaio-dev -y
sudo apt-get install libc6-dev -y
sudo apt-get install libc6-dev-i386 -y
sudo apt-get install libc6-i386 -y
sudo apt-get install libelf-dev -y
sudo apt-get install libltdl-dev -y
sudo apt-get install libmotif4 -y  --无
sudo apt-get install libodbcinstq4-1 libodbcinstq4-1:i386 -y
sudo apt-get install libpth-dev -y
sudo apt-get install libpthread-stubs0 -y
sudo apt-get install libpthread-stubs0-dev -y
sudo apt-get install libstdc++5 -y
sudo apt-get install lsb-cxx -y
sudo apt-get install make -y
sudo apt-get install openssh-server -y
sudo apt-get install pdksh -y
sudo apt-get install rlwrap -y
sudo apt-get install rpm -y
sudo apt-get install sysstat -y
sudo apt-get install unixodbc -y
sudo apt-get install unixodbc-dev -y
sudo apt-get install unzip -y
sudo apt-get install x11-utils -y
sudo apt-get install zlibc -y
场景2:离线仓库
略
问题处理
Package gcc-7 is not configured yet
--问题描述
root@ubuntu:/opt# dpkg -i build-essential_12.4ubuntu1_amd64.deb
(Reading database ... 70742 files and directories currently installed.)
Preparing to unpack build-essential_12.4ubuntu1_amd64.deb ...
Unpacking build-essential (12.4ubuntu1) over (12.4ubuntu1) ...
dpkg: dependency problems prevent configuration of build-essential:
 build-essential depends on gcc (>= 4:7.2); however:
  Package gcc is not configured yet.
 build-essential depends on g++ (>= 4:7.2); however:
  Package g++ is not configured yet.

dpkg: error processing package build-essential (--install):
 dependency problems - leaving unconfigured
Errors were encountered while processing:
 build-essential

--分析过程
root@ubuntu:/opt# dpkg -l |grep gcc
iU  gcc                                    4:7.4.0-1ubuntu2.3                              amd64        GNU C compiler
iU  gcc-7                                  7.5.0-3ubuntu1~18.04                            amd64        GNU C compiler
ii  gcc-7-base:amd64                       7.5.0-3ubuntu1~18.04                            amd64        GCC, the GNU Compiler Collection (base package)
ri  gcc-8-base:amd64                       8.4.0-1ubuntu1~18.04                            amd64        GCC, the GNU Compiler Collection (base package)
iU  libgcc-7-dev:amd64                     7.5.0-3ubuntu1~18.04                            amd64        GCC support library (development files)
ii  libgcc1:amd64                          1:8.4.0-1ubuntu1~18.04                          amd64        GCC support library
root@ubuntu:/opt# dpkg -l | grep g++
iU  g++                                    4:7.3.0-3ubuntu2                                amd64        GNU C++ compiler
iU  g++-7                                  7.5.0-3ubuntu1~18.04                            amd64        GNU C++ compiler


 --解决办法
 apt --fix-broken install  #安装修复损坏的依赖包

 root@ubuntu:/opt# gcc --version
gcc (Ubuntu 7.5.0-3ubuntu1~18.04) 7.5.0
Copyright (C) 2017 Free Software Foundation, Inc.
This is free software; see the source for copying conditions.  There is NO
warranty; not even for MERCHANTABILITY or FITNESS FOR A PARTICULAR PURPOSE.

root@ubuntu:/opt# g++ --version
g++ (Ubuntu 7.5.0-3ubuntu1~18.04) 7.5.0
Copyright (C) 2017 Free Software Foundation, Inc.
This is free software; see the source for copying conditions.  There is NO
warranty; not even for MERCHANTABILITY or FITNESS FOR A PARTICULAR PURPOSE.

root@ubuntu:/opt# dpkg -l | grep gcc
ii  gcc                                    4:7.4.0-1ubuntu2.3                              amd64        GNU C compiler
ii  gcc-7                                  7.5.0-3ubuntu1~18.04                            amd64        GNU C compiler
ii  gcc-7-base:amd64                       7.5.0-3ubuntu1~18.04                            amd64        GCC, the GNU Compiler Collection (base package)
ri  gcc-8-base:amd64                       8.4.0-1ubuntu1~18.04                            amd64        GCC, the GNU Compiler Collection (base package)
ii  libgcc-7-dev:amd64                     7.5.0-3ubuntu1~18.04                            amd64        GCC support library (development files)
ii  libgcc1:amd64                          1:8.4.0-1ubuntu1~18.04                          amd64        GCC support library
root@ubuntu:/opt# dpkg -l | grep g++
ii  g++                                    4:7.3.0-3ubuntu2                                amd64        GNU C++ compiler
ii  g++-7                                  7.5.0-3ubuntu1~18.04                            amd64        GNU C++ compiler
gcc降级
--安装
sudo apt-get update
sudo apt-get -y install gcc-4.8 g++-4.8  cpp-4.8

#gcc、g++降级
ll /usr/bin/gcc*
ll /usr/bin/g++*
ll /usr/bin/cpp*

sudo mv /usr/bin/gcc /usr/bin/gcc-7
sudo mv /usr/bin/g++ /usr/bin/g++-7
sudo mv /usr/bin/cpp /usr/bin/cpp-7
sudo ln -sf /usr/bin/g++-4.8 /usr/bin/g++
sudo ln -sf /usr/bin/gcc-4.8 /usr/bin/gcc
sudo ln -sf /usr/bin/cpp-4.8 /usr/bin/cpp
sudo chmod 755 /usr/bin/g++
sudo chmod 755 /usr/bin/gcc
sudo chmod 755 /usr/bin/cpp

gcc -v
g++ -v
cpp -v
dpkg -l | grep libstdc
配置依赖包软链接
Oracle默认不支持ubuntu需要欺骗一下Oracle安装程序,执行以下命令
sudo mkdir -p /usr/lib64
sudo ln -sf /etc /etc/rc.d
sudo ln -sf /lib/x86_64-linux-gnu/libgcc_s.so.1 /lib64/
sudo ln -sf /usr/bin/awk /bin/awk
sudo ln -sf /usr/bin/basename /bin/basename
sudo ln -sf /usr/bin/rpm /bin/rpm
sudo ln -sf /usr/lib/x86_64-linux-gnu/libc_nonshared.a /usr/lib64/
sudo ln -sf /usr/lib/x86_64-linux-gnu/libpthread_nonshared.a /usr/lib64/
sudo ln -sf /usr/lib/x86_64-linux-gnu/libstdc++.so.6 /lib64/
sudo ln -sf /usr/lib/x86_64-linux-gnu/libstdc++.so.6 /usr/lib64/
创建用户
groupadd -g 502 oinstall
groupadd -g 503 dba
groupadd -g 504 oper
groupadd -g 505 asmadmin
useradd -u 502 -g oinstall -G dba,asmadmin,oper -s /bin/bash -m oracle
passwd oracle

echo "oracle ALL=(ALL) NOPASSWD: ALL" >> /etc/sudoers
目录规划
mkdir -p /u01/app/oracle/product/11.2.0/dbhome_1
chown -R oracle:oinstall /u01
chmod -R 775 /u01
创建/etc/oraInst.loc
cat > /etc/oraInst.loc <<"EOF"
inventory_loc=/u01/app/oraInventory
inst_group=oinstall
EOF

chown oracle:oinstall /etc/oraInst.loc
chmod 664 /etc/oraInst.loc

source /etc/oraInst.loc
配置环境变量
cat >> /home/oracle/.bash_profile <<"EOF"

export TMP=/tmp
export TMPDIR=$TMP
export ORACLE_SID=dhh
export ORACLE_BASE=/u01/app/oracle
export ORACLE_HOME=$ORACLE_BASE/product/11.2.0/dbhome_1
export PATH=/usr/sbin:$PATH
export PATH=$ORACLE_HOME/bin:$PATH
export LD_LIBRARY_PATH=$ORACLE_HOME/lib:/lib:/usr/lib
export CLASSPATH=$ORACLE_HOME/jlib:$ORACLE_HOME/rdbms/jlib

export NLS_DATE_FORMAT='YYYY-MM-DD HH24:mi:ss'

alias sqlplus='rlwrap sqlplus'
alias rman='rlwrap rman'
alias sas='sqlplus / as sysdba'

EOF
系统参数配置
sysctl.conf
参考
for 2GB Mem:
kernel.shmall = 419430
kernel.shmmax = 171796918

#for 4GB Mem:
#kernel.shmall = 838860
#kernel.shmmax = 3435973836

#for 8GB Mem:
#kernel.shmall = 1677721
#kernel.shmmax = 6871947673

#for 16GB Mem:
#kernel.shmall = 3774873
#kernel.shmmax = 8589934592

#for 32GB Mem:
#kernel.shmall = 7549747
#kernel.shmmax = 17179869184
#for 64GB Mem:
#kernel.shmall = 15099494
#kernel.shmmax = 34359738368
#for 128GB Mem:
#kernel.shmall = 30198988
#kernel.shmmax = 68719476736
#for 256GB Mem:
#kernel.shmall = 60397977
#kernel.shmmax = 137438953472
#for 512GB Mem:
#kernel.shmall = 120795955
#kernel.shmmax = 274877906944
echo 'fs.file-max = 6815744
kernel.sem = 250 32000 100 128
kernel.shmmni = 4096
kernel.shmall = 838860
kernel.shmmax = 3435973836
kernel.panic_on_oops = 1
net.core.rmem_default = 262144
net.core.rmem_max = 4194304
net.core.wmem_default = 262144
net.core.wmem_max = 1048576
net.ipv4.conf.all.rp_filter = 2
net.ipv4.conf.default.rp_filter = 2
fs.aio-max-nr = 1048576
net.ipv4.ip_local_port_range = 9000 65500
' >> /etc/sysctl.conf && sysctl -ppam_limits.so
echo 'session  required   /lib64/security/pam_limits.so
session  required   pam_limits.so
  ' >> /etc/pam.d/login
/etc/profile
echo 'if [ $USER = "oracle" ]; then
    if [ $SHELL = "/bin/ksh" ]; then
     ulimit -p 16384
     ulimit -n 65536
    else
     ulimit -u 16384 -n 65536
    fi
  fi
  ' >> /etc/profile
静默安装和建库
echo xfce4-session > /home/oracle/.xsession
chmod +x /home/oracle/.xsession
service xrdp restart
解压安装介质
unzip p13390677_112040_Linux-x86-64_1of7.zip && unzip p13390677_112040_Linux-x86-64_2of7.zip 静默安装数据库软件
静默安装数据库软件
--赋予权限
chown -R oracle:oinstall /opt/database

--静默安装
su - oracle
/opt/database/runInstaller -silent  -force -noconfig -IgnoreSysPreReqs -ignorePrereq  \
oracle.install.option=INSTALL_DB_SWONLY \
DECLINE_SECURITY_UPDATES=true \
UNIX_GROUP_NAME=oinstall \
INVENTORY_LOCATION=/u01/app/oraInventory \
SELECTED_LANGUAGES=en \
ORACLE_HOME=/u01/app/oracle/product/11.2.0/dbhome_1 \
ORACLE_BASE=/u01/app/oracle \
oracle.install.db.InstallEdition=EE \
oracle.install.db.isCustomInstall=false \
oracle.install.db.DBA_GROUP=dba \
oracle.install.db.OPER_GROUP=dba \
oracle.install.db.isRACOneInstall=false \
oracle.install.db.config.starterdb.type=GENERAL_PURPOSE \
SECURITY_UPDATES_VIA_MYORACLESUPPORT=false \
oracle.installer.autoupdates.option=SKIP_UPDATES
日志位置:/u01/app/oraInventory/logs/installActions2024-01-25_06-51-35AM.log
执行脚本
博客上写的2个脚本,此次部署只显示第二个脚本
root用户执行
/u01/app/oraInventory/orainstRoot.sh
/u01/app/oracle/product/11.2.0/dbhome_1/root.sh
问题处理
执行sqlplus /as sysdba会报错:ORA-12547:TNS:lost contact
ls -l $ORACLE_HOME/rdbms/lib/config.o
ls -l $ORACLE_HOME/bin/oracle
mv $ORACLE_HOME/rdbms/lib/config.o $ORACLE_HOME/rdbms/lib/config.o.bad

-- 此时执行sqlplus / as sysdba会报错:ORA-12547: TNS:lost contact
-- 解决
sed -i 's/^\(\s*\$(MK_EMAGENT_NMECTL)\)\s*$/\1 -lnnz11/g' $ORACLE_HOME/sysman/lib/ins_emagent.mk
sed -i "s/KFOD_LINKLINE=\$(LINK) \$(S0MAIN)/& -Wl,--no-as-needed/g"  $ORACLE_HOME/rdbms/lib/env_rdbms.mk
sed -i "s/AMDU_LINKLINE=\$(LINK) \$(S0MAIN)/& -Wl,--no-as-needed/g"  $ORACLE_HOME/rdbms/lib/env_rdbms.mk
sed -i "s/\$LD \$LD_RUNTIME \$LD_OPT/& -Wl,--no-as-needed/g"  $ORACLE_HOME/bin/genorasdksh
sed -i "s/KFNDG_LINKLINE=\$(LINK) \$(S0MAIN)/& -Wl,--no-as-needed/g"  $ORACLE_HOME/rdbms/lib/env_rdbms.mk
sed -i 's/^\(\$LD \$LD_RUNTIME\) \(\$LD_OPT\)/\1 -Wl,--no-as-needed \2/g' $ORACLE_HOME/bin/genorasdksh
sed -i 's/^\(\s*\)\(\$(OCRLIBS_DEFAULT)\)/\1 -Wl,--no-as-needed \2/g' $ORACLE_HOME/srvm/lib/ins_srvm.mk
sed -i 's/^\(TNSLSNR_LINKLINE.*\$(TNSLSNR_OFILES)\) \(\$(LINKTTLIBS)\)/\1 -Wl,--no-as-needed \2/g' $ORACLE_HOME/network/lib/env_network.mk
sed -i 's/^\(ORACLE_LINKLINE.*\$(ORACLE_LINKER)\) \(\$(PL_FLAGS)\)/\1 -Wl,--no-as-needed \2/g' $ORACLE_HOME/rdbms/lib/env_rdbms.mk

-- 重新编译,编译完成后sqlplus正常
cd $ORACLE_HOME/rdbms/lib
relink all
relink log位置 /u01/app/oracle/product/11.2.0/dbhome_1/install/relink.log


-- 调试安装
cd /opt/database
./runInstaller -debug -logLevel finest  输入Y
strace ./runInstaller
静默建库
--静默建库
dbca -silent -createDatabase -templateName General_Purpose.dbc -responseFile NO_VALUE \
-gdbname dhh  -sid dhh \
-sysPassword oracle -systemPassword oracle \
-datafileDestination '/u01/app/oracle/oradata' \
-recoveryAreaDestination '/u01/app/oracle/flash_recovery_area' \
-redoLogFileSize 50 \
-storageType FS \
-characterset AL32UTF8 -nationalCharacterSet AL16UTF16 \
-sampleSchema true \
-totalMemory 512 \
-databaseType OLTP  \
-emConfiguration NONE

--静默删库(补充)
dbca -silent -deleteDatabase -sourceDB dhh

日志:/u01/app/oracle/cfgtoollogs/dbca/dhh/dhh.log
报错:ORA-29516: Aurora assertion failure: Assertion failure at joez.c:3422,可以忽略
在76%时卡住,其实数据库已经创建完了!!!(我安装过程中未遇到该报错)可以直接执行如下的SQL:
--创建spfile并启库
此次我安装过程中未进行该操作,静默建库后库已经启动
create spfile from memory;
startup force

--查看数据库状态
oracle@ubuntu:/opt/database$ sqlplus / as sysdba

SQL*Plus: Release 11.2.0.4.0 Production on Thu Jan 25 07:11:59 2024

Copyright (c) 1982, 2013, Oracle.  All rights reserved.


Connected to:
Oracle Database 11g Enterprise Edition Release 11.2.0.4.0 - 64bit Production
With the Partitioning, OLAP, Data Mining and Real Application Testing options

SQL> select status from v$instance;

STATUS
------------
OPEN
创建spfile并启库(可选)
我安装过程中未进行该操作,静默建库后库已经启动
create spfile from memory;
startup force
启动监听
--启动监听
su - oracle
lsnrctl start

--查看监听
root@ubuntu:/opt/database# su - oracle
-su: ulimit: max user processes: cannot modify limit: Operation not permitted
oracle@ubuntu:~$ lsnrctl start

LSNRCTL for Linux: Version 11.2.0.4.0 - Production on 25-JAN-2024 07:15:38

Copyright (c) 1991, 2013, Oracle.  All rights reserved.

Starting /u01/app/oracle/product/11.2.0/dbhome_1/bin/tnslsnr: please wait...

TNSLSNR for Linux: Version 11.2.0.4.0 - Production
Log messages written to /u01/app/oracle/diag/tnslsnr/ubuntu/listener/alert/log.xml
Listening on: (DESCRIPTION=(ADDRESS=(PROTOCOL=tcp)(HOST=ubuntu)(PORT=1521)))

Connecting to (ADDRESS=(PROTOCOL=tcp)(HOST=)(PORT=1521))
STATUS of the LISTENER
------------------------
Alias                     LISTENER
Version                   TNSLSNR for Linux: Version 11.2.0.4.0 - Production
Start Date                25-JAN-2024 07:15:39
Uptime                    0 days 0 hr. 0 min. 1 sec
Trace Level               off
Security                  ON: Local OS Authentication
SNMP                      OFF
Listener Log File         /u01/app/oracle/diag/tnslsnr/ubuntu/listener/alert/log.xml
Listening Endpoints Summary...
  (DESCRIPTION=(ADDRESS=(PROTOCOL=tcp)(HOST=ubuntu)(PORT=1521)))
The listener supports no services
The command completed successfully
oracle@ubuntu:~$ lsnrctl start

LSNRCTL for Linux: Version 11.2.0.4.0 - Production on 25-JAN-2024 07:16:24

Copyright (c) 1991, 2013, Oracle.  All rights reserved.

TNS-01106: Listener using listener name LISTENER has already been started
oracle@ubuntu:~$ lsnrctl status

LSNRCTL for Linux: Version 11.2.0.4.0 - Production on 25-JAN-2024 07:16:28

Copyright (c) 1991, 2013, Oracle.  All rights reserved.

Connecting to (ADDRESS=(PROTOCOL=tcp)(HOST=)(PORT=1521))
STATUS of the LISTENER
------------------------
Alias                     LISTENER
Version                   TNSLSNR for Linux: Version 11.2.0.4.0 - Production
Start Date                25-JAN-2024 07:15:39
Uptime                    0 days 0 hr. 0 min. 49 sec
Trace Level               off
Security                  ON: Local OS Authentication
SNMP                      OFF
Listener Log File         /u01/app/oracle/diag/tnslsnr/ubuntu/listener/alert/log.xml
Listening Endpoints Summary...
  (DESCRIPTION=(ADDRESS=(PROTOCOL=tcp)(HOST=ubuntu)(PORT=1521)))
Services Summary...
Service "DBUA0340793" has 1 instance(s).
  Instance "DBUA0340793", status BLOCKED, has 1 handler(s) for this service...
Service "dhh" has 1 instance(s).
  Instance "dhh", status READY, has 1 handler(s) for this service...
Service "dhhXDB" has 1 instance(s).
  Instance "dhh", status READY, has 1 handler(s) for this service...
The command completed successfully
oracle@ubuntu:~$
至此安装完成。
总结:服务器不能访问外网的场景下安装依赖包过程会比较曲折,如果Centos不能用还想用免费的非国产操作系统建议使用OEL,下载链接:https://yum.oracle.com/oracle-linux-isos.html。建议6.x版本,兼容oracle11g最好。
https://www.nakivo.com/blog/how-to-install-oracle-on-ubuntu-linux-waltkhrough/
