


一、背景
看过之前文章的同学都知道,Netty 是一个异步事件驱动的网络应用程序框架,用于快速开发可维护的高性能协议服务器和客户端。
上一篇文章主要把Reactor的实现EventLoop详细的讲了一遍,今天我们从启动类开始,好好的梳理一下整个流程,
对Reactor不熟悉的,可以看看之前的文章:
本文以Netty服务端为主, 客户端稍微提一下,其实服务端与客户端是相通的,搞清楚服务端,再去看客户端也就会很简单。
耐心看完,你一定会有所收获,话不多说,开搞。。。
二、Netty主流程
先上个服务端的demo,Netty源码中example包的EchoServer
// 创建两个EventLoop线程池EventLoopGroup bossGroup = new NioEventLoopGroup(1);EventLoopGroup workerGroup = new NioEventLoopGroup();// 自定义Handler,本例中handler的功能就是简单的echofinal EchoServerHandler serverHandler = new EchoServerHandler();try {// 正式流程开始// #1:创建ServerBootstrap:启动netty服务端的辅助类ServerBootstrap b = new ServerBootstrap();// #2:绑定EventLoopGroup:netty的Reactor线程池b.group(bossGroup, workerGroup)// #3:初始化channel:我们需要创建NioServerSocketChannel对象、同步创建了ChannelPipeline.channel(NioServerSocketChannel.class)// 参数配置先略过.option(ChannelOption.SO_BACKLOG, 100)// #4:服务端收到新的请求的时候处理,用来处理 ServerSocketChannel 实例.handler(new LoggingHandler(LogLevel.INFO))// #5:给新创建的连接用的,服务端 ServerSocketChannel 在 accept 一个连接以后,需要创建 SocketChannel 的实例.childHandler(new ChannelInitializer<SocketChannel>() {@Overridepublic void initChannel(SocketChannel ch) throws Exception {// #6:添加ChannelHandler,串行的加入ChannelPipeline中,有顺序ChannelPipeline p = ch.pipeline();p.addLast(new LoggingHandler(LogLevel.INFO));p.addLast(serverHandler);}});// #7:绑定监听端口、启动服务端ChannelFuture f = b.bind(PORT).sync();// 阻塞等到channel关闭f.channel().closeFuture().sync();} finally {// 关闭两个EventLoop线程池bossGroup.shutdownGracefully();workerGroup.shutdownGracefully();}
简单总结一下:
创建 ServerBootstrap:启动 Netty 服务端的辅助类
绑定 EventLoopGroup:Netty 的 Reactor 线程池
初始化 Channel: 我们需要创建 NioServerSocketChannel 对象、同步创建了 ChannelPipeline
添加 ChannelHandler, 串行的加入 ChannelPipeline 中
绑定监听端口、启动服务端
Selector轮训、由EventLoop调度和执行对应操作
网络连接请求时,联通Channel,由EventLoop执行ChannelPipeline
依次执行ChannelHandler
三、详细解析
1、辅助类
辅助类其实是有两个, ServerBootstrap 用于创建服务端实例,还有一个 Bootstrap 用于创建客户端实例,两者都继承于 AbstractBootstrap,主要就方便用户实现 Netty 服务端或者客户端。
2、Reactor 线程池
主要是处理 Channel 的 IO事件 和任务,上一篇文章详细讲解了,这里不再赘述,直通车:Netty线程模型详解,看看Netty是如何实现Reactor的
3、Channel
Channel 在 Netty 中是做为一个关键的通道而存在的,它是各种传输的异步和事件驱动抽象, 先看看以 NIO 为主的 Channel 类图:
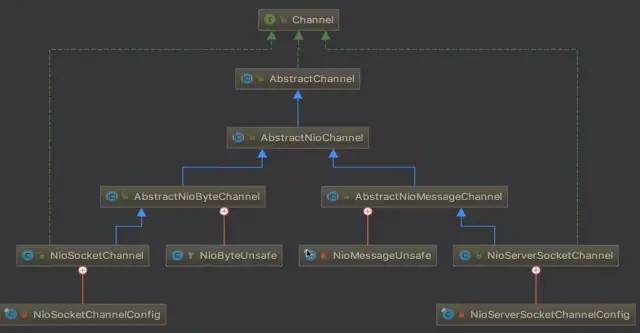
Channel 是一个抽象接口,看一下它的实现 AbstractChannel 的主要属性:
// SocketChannel 的 parent 是 ServerSocketChannelprivate final Channel parent;// 唯一标识private final ChannelId id;// Netty 内部使用private final Unsafe unsafe;// pipeline 下面会讲private final DefaultChannelPipeline pipeline;// 绑定的线程private volatile EventLoop eventLoop;
核心接口 read、write、connect、bind 都委托给了 pipeline 处理,pipeline下文再讲。
现在对 Channel 应该有个大概的了解,那我们先看看是如何使用的,从channel() 方法入手:
// AbstractBootstrap#channel()public B channel(Class<? extends C> channelClass) {// 设置 channelFactory 为 ReflectiveChannelFactory实例return channelFactory(new ReflectiveChannelFactory<C>(ObjectUtil.checkNotNull(channelClass, "channelClass")));}// ReflectiveChannelFactory// 工厂模式,通过反射拿到构造函数,再创建一个无参数的Channel实例public ReflectiveChannelFactory(Class<? extends T> clazz) {ObjectUtil.checkNotNull(clazz, "clazz");try {this.constructor = clazz.getConstructor();} catch (NoSuchMethodException e) {throw new IllegalArgumentException("Class " + StringUtil.simpleClassName(clazz) +" does not have a public non-arg constructor", e);}}@Overridepublic T newChannel() {try {return constructor.newInstance();} catch (Throwable t) {throw new ChannelException("Unable to create Channel from class " + constructor.getDeclaringClass(), t);}}
demo中传递的参数是 NioServerSocketChannel 类,如果是客户端的话,传递进来的就是NioSocketChannel。
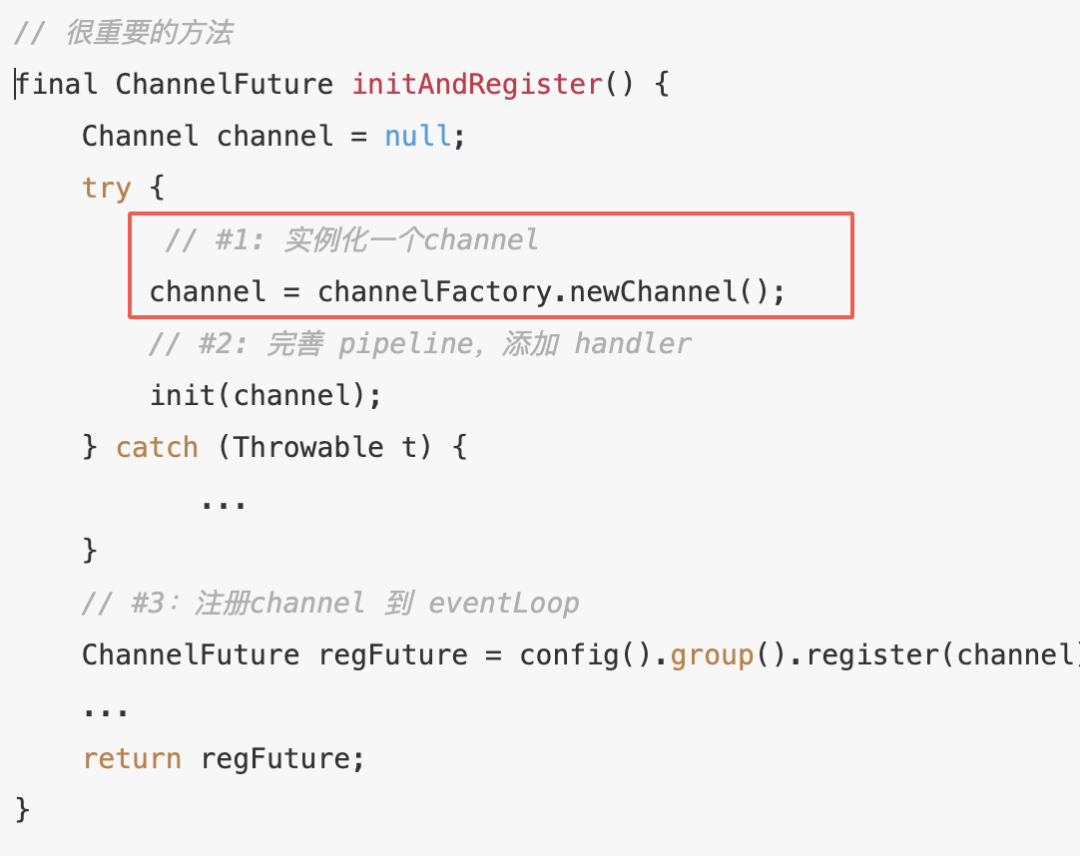
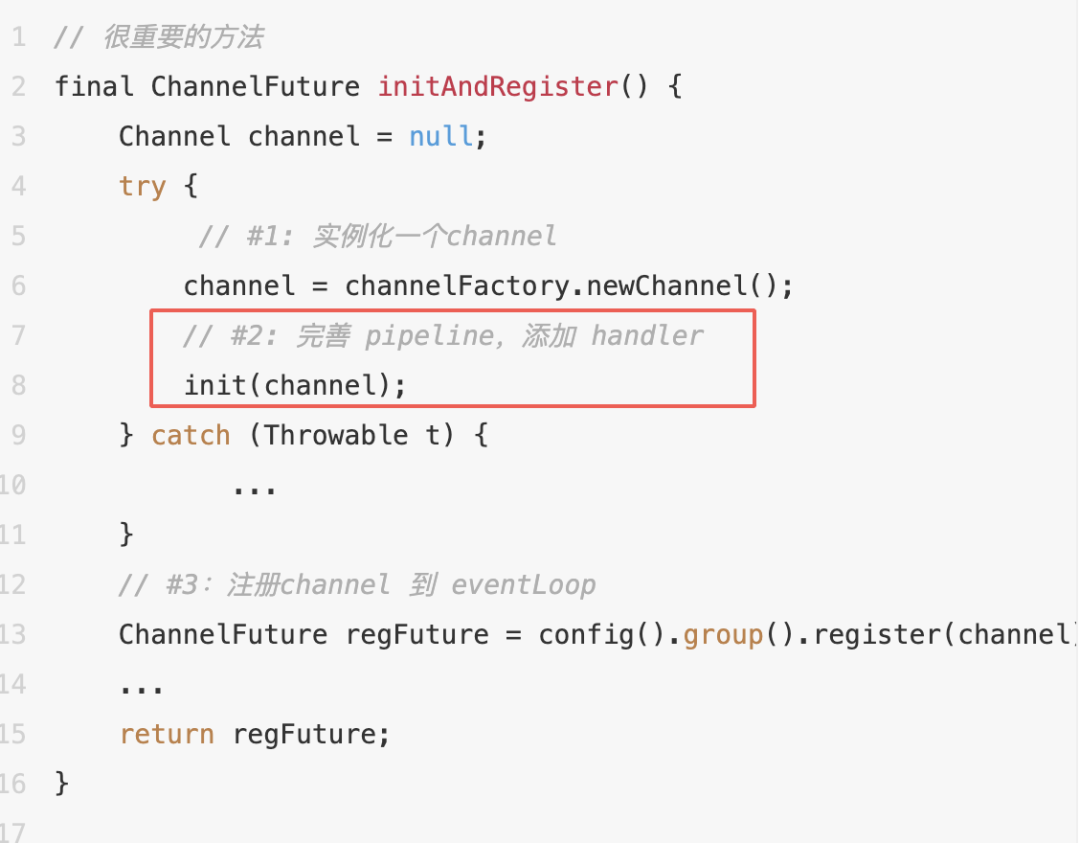
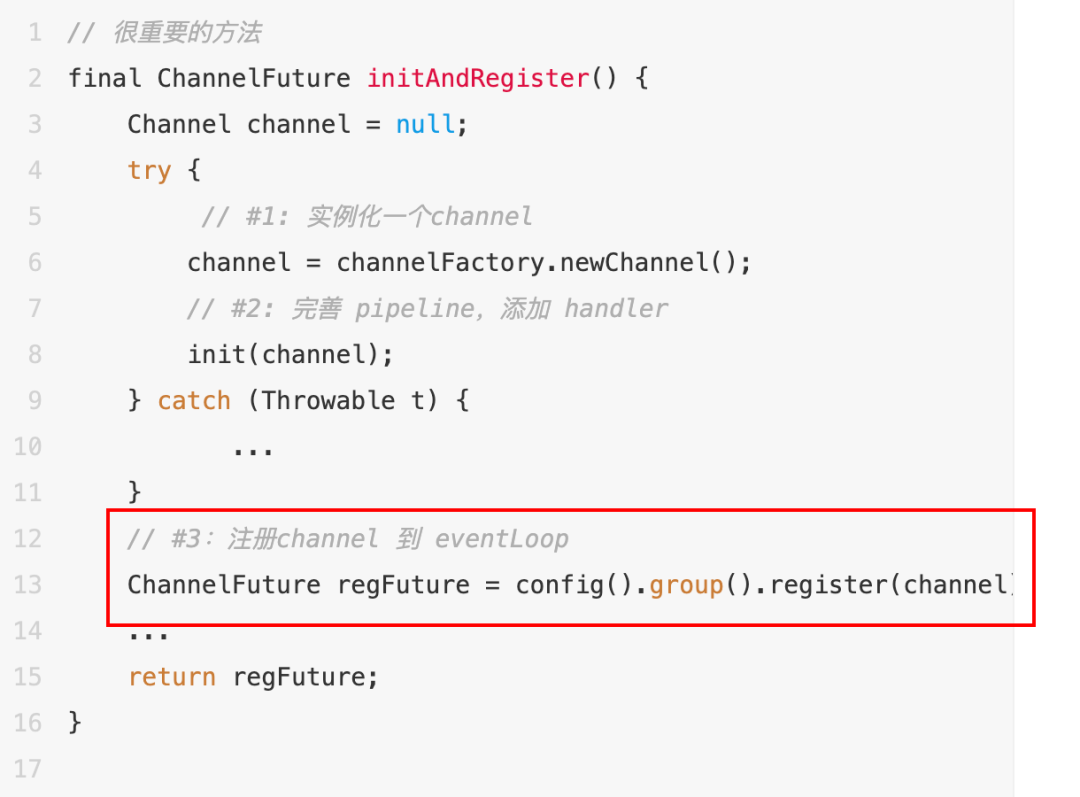
接下来我们去看看什么地方调用了 newChannel 方法,原来是 AbstractBootstrap#initAndRegister 方法
// 很重要的方法final ChannelFuture initAndRegister() {Channel channel = null;try {// #1: 实例化一个channelchannel = channelFactory.newChannel();// #2: 完善 pipeline,添加 handlerinit(channel);} catch (Throwable t) {...}// #3:注册channel 到 eventLoopChannelFuture regFuture = config().group().register(channel);...return regFuture;}// 本小节只讲 channel 相关的 #1, #2、#3 下面再详细讲
再往上找一路找,找到我们首先的地方,终于梳理了一条完整的链路:
AbstractBootstrap#initAndRegister()AbstractBootstrap#doBind()AbstractBootstrap#bind()// 绑定监听端口、启动服务端ChannelFuture f = b.bind(PORT).sync();
原来是创建服务端绑定端口的时候,会去调用initAndReigster方法
下面我们详细的来看看是如何实例化一个 Channel,即#1:
实例化一个 Channel,从上面的分析我们知道这里是一个工厂方法,通过反射创建了一个 NioServerSocketChannel 实例,我们去看看这个 NioServerSocketChannel 无参数的构造方法
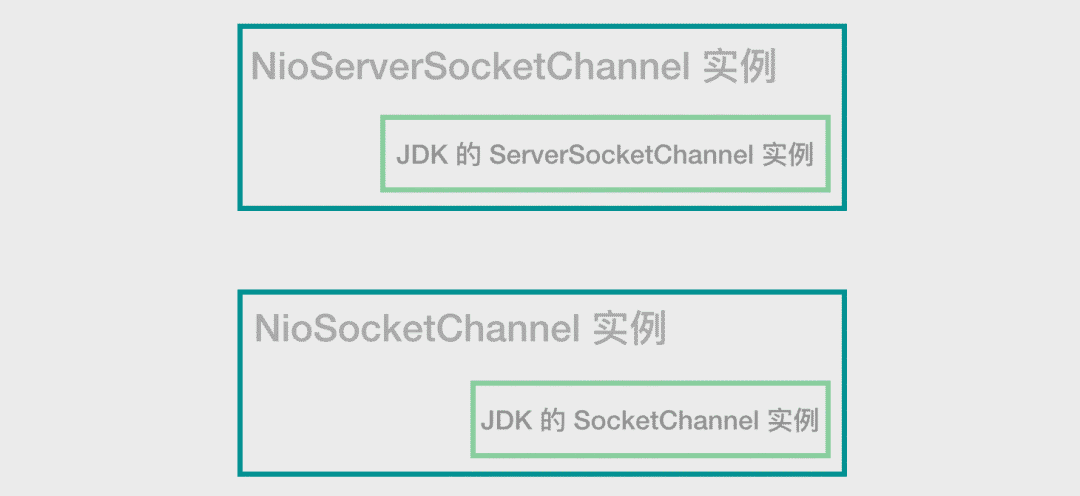
// 无参数构造方法public NioServerSocketChannel() {// newSocket(provider) 方法会创建 JDK 的 ServerSocketChannelthis(newSocket(DEFAULT_SELECTOR_PROVIDER));}// newSocket 方法private static ServerSocketChannel newSocket(SelectorProvider provider) {try {// 创建一个 JDK 的 ServerSocketChannelreturn provider.openServerSocketChannel();} catch (IOException e) {throw new ChannelException("Failed to open a server socket.", e);}}
到这里我们了解了 Netty 是封装了JDK 的ServerSocketChannel的,如下图:
我们继续往下,看看 NioServerSocketChannel 父类 又干了些啥
public NioServerSocketChannel(ServerSocketChannel channel) {// 服务端监听的的是 OP_ACCEPT事件,在这里设置了super(null, channel, SelectionKey.OP_ACCEPT);// 初始化一个Channel 的配置信息config = new NioServerSocketChannelConfig(this, javaChannel().socket());}
继续往下看,这个没啥操作
protected AbstractNioMessageChannel(Channel parent, SelectableChannel ch, int readInterestOp) {// 结合上面得知,NioServerSocketChannel 的parent 为nullsuper(parent, ch, readInterestOp);}
再往下看
protected AbstractNioChannel(Channel parent, SelectableChannel ch, int readInterestOp) {super(parent);this.ch = ch;this.readInterestOp = readInterestOp;try {// 设置channel为非阻塞ch.configureBlocking(false);} catch (IOException e) {...}
终于到最下层 AbstractChannel了
protected AbstractChannel(Channel parent) {this.parent = parent;// 初始化一个唯一IDid = newId();// 初始化一个 unsafe 实例unsafe = newUnsafe();// 初始化一个pipeline 实例pipeline = newChannelPipeline();}
对比一下上面的核心属性

前面四个都初始化了,EventLoop没有初始化,这个其实上一篇讲EventLoop时讲过了,不过关注的重点不同,后续也会把这个步骤提一下。
到这里,Channel终于讲完了,下面看看pipeline
4、Pipeline
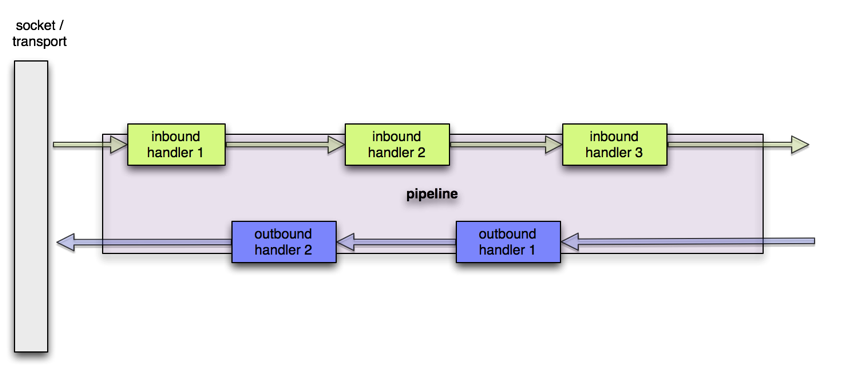
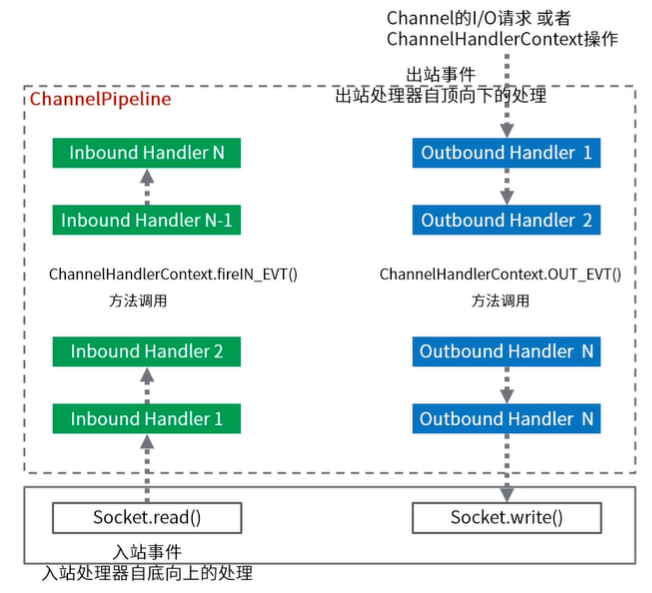
从字面意思理解pipeline就是流水线,从上面的 Channel 类也知道,每一个Channel 内部都有一个 pipeline,pipeline 主要是用于承载 handler,把多个handler 有序的串联起来,和工厂流水线一样, 每个handler就是一个工位,代表一道工序,上下游 handler 通过 ChannelHandlerContext 传递信息。
如下图:
再对比一下数据结构(默认构造函数DefaultChannelPipeline):
protected DefaultChannelPipeline(Channel channel) {this.channel = ObjectUtil.checkNotNull(channel, "channel");succeededFuture = new SucceededChannelFuture(channel, null);voidPromise = new VoidChannelPromise(channel, true);tail = new TailContext(this);head = new HeadContext(this);head.next = tail;tail.prev = head;}
可以看出来,pipeline 里的 handler 是一个双向链表,handler分为两类:
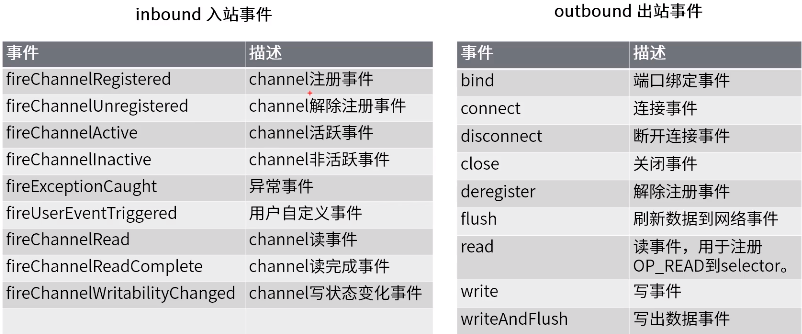
Inbound 和 Outbound,也就是在 netty 中,IO 事件被分为 Inbound 事件和 Outbound 事件。
看一下详细的出入站事件:
具体 hadler 我们下一小节再详细展开,这里先看看 handler 是如何加入到 pipeline 中的,也就是上面讲到的第二步,如下图:
进入方法看看:
void init(Channel channel) throws Exception {......// 拿到 channel 内部的 pipeline 实例ChannelPipeline p = channel.pipeline();...// 开始往 pipeline 中添加一个 handler,这个 handler 是 ChannelInitializer 的实例p.addLast(new ChannelInitializer<Channel>() {// initChannel 方法, 这里其实是可以自己实现一个ChannelInitializer,重新initChannel方法的@Overridepublic void initChannel(final Channel ch) throws Exception {final ChannelPipeline pipeline = ch.pipeline();// 这个方法返回我们最开始指定的 LoggingHandler 实例ChannelHandler handler = config.handler();if (handler != null) {// 添加 LoggingHandlerpipeline.addLast(handler);}// eventLoop 执行ch.eventLoop().execute(new Runnable() {@Overridepublic void run() {// 添加一个 handler 到 pipeline 中:ServerBootstrapAcceptor,用于接收客户端请求pipeline.addLast(new ServerBootstrapAcceptor(ch, currentChildGroup, currentChildHandler, currentChildOptions, currentChildAttrs));}});}});}
上面涉及到 pipeline 中的辅助类 ChannelInitializer 用来辅助将其他的 handler 加入到 pipeline 中的,比如第5步,添加childHandler就是采用这种方式,如下图:

这里稍微补充一下,handler() 方法添加的 hadler 是提供给NioServerSocketChannel 使用的,主要处理IO接入, 主要是 bossGroup 这个 eventLoop 线程池处理;而 childHandler() 方法添加的 handler 是提供给NioSocketChannel 使用的,主要的业务逻辑都在里面, 由workGroup 这个eventLoop 线程池处理。
5、Handler
下面我们来了解一下 handler ,从上面 pipeline 介绍我们了解到 handler 分为两类:Inbound 和 Outbound
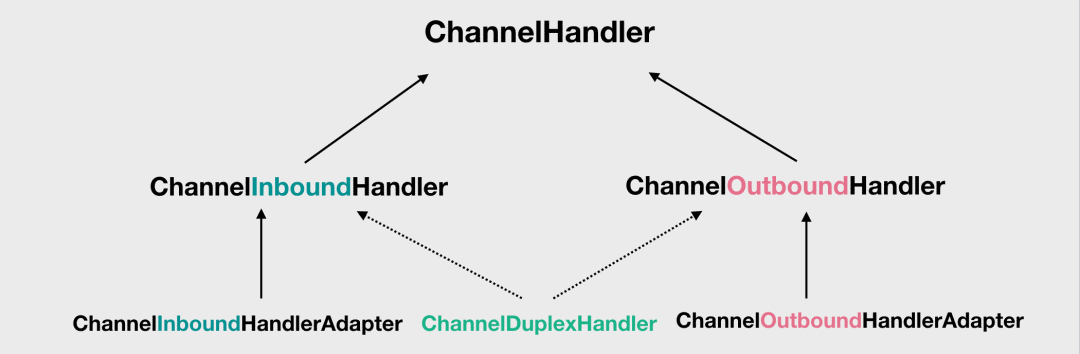
定义处理 Inbound 事件的 handler 需要实现 ChannelInboundHandler,定义处理 Outbound 事件的 handler 需要实现 ChannelOutboundHandler。
最下面的三个类,是 Netty 提供的适配器,特别的,如果我们希望定义一个 handler 能同时处理 Inbound 和 Outbound 事件,可以通过继承中间的 ChannelDuplexHandler 的方式,比如 LoggingHandler 这种既可以用来处理 Inbound 也可以用来处理 Outbound 事件的 handler。
这里需要注意的是,handler 的执行顺序, 在 pipeline 中, inboundHandler 是正序执行的,outBoundHandler 是逆序的,对于初学者算是一个不那么友好的设计。
其实如果对设计模式熟悉的话,就可以看出来这个是一个很典型的责任链。
责任链模式(Chain of Responsibility Pattern) 为请求创建了一个处理对象的链。一个请求过来后,就交给一个责任链进行调用。在责任链里面定义很多的handler,具体请求这个程序的handler,请求者不关心,多少个步骤,只负责发送到责任链上,请求传递的细节不关心。
pipeline 可以添加或者删除一个 handler,并不是一开始就注册好就不能动的,pipeline 中有定义好的API,使用也比较方便。
说起来 netty 也封装了很多 handler, 比如上面的 LoggingHandler 就是典型的一个封装好的打印日志的 handler。handler 这一块是我们处理业务时主要使用的,后续写专门的文章来分析,这里先不赘述。
5、注册绑定流程
现在第二步完成了,pipeline 也已经完善好了,走到了第三步注册绑定流程了
一路追踪,找到处理的地方AbstractChannel#AbstractUnsafe
// ChannelPromise 先不用管,知道是异步编程获取结果的一直方式就行public final void register(EventLoop eventLoop, final ChannelPromise promise) {...// 将这个 eventLoop 实例设置给这个 channel,从此这个 channel 就是有 eventLoop 的了// 我觉得这一步其实挺关键的,因为后续该 channel 中的所有异步操作,都要提交给这个 eventLoop 来执行AbstractChannel.this.eventLoop = eventLoop;// 如果发起 register 动作的线程就是 eventLoop 实例中的线程,那么直接调用 register0(promise)// 基本不会进入到这个分支,除非是先 unregister,然后再 register 的,后面再仔细看if (eventLoop.inEventLoop()) {register0(promise);} else {try {// 否则,提交任务给 eventLoop,eventLoop 中的线程会负责调用 register0(promise)eventLoop.execute(new Runnable() {@Overridepublic void run() {register0(promise);}});} catch (Throwable t) {...}}}
然后再看看 register0() 方法
private void register0(ChannelPromise promise) {try {...boolean firstRegistration = neverRegistered;// 进行 JDK 底层的操作:Channel 注册到 SelectordoRegister();neverRegistered = false;registered = true;// 这一步也很关键,因为这涉及到了 ChannelInitializer 的 init(channel)// 我们之前说过,init 方法会将 ChannelInitializer 内部添加的 handlers 添加到 pipeline 中pipeline.invokeHandlerAddedIfNeeded();// 设置当前 promise 的状态为 success// 因为当前 register 方法是在 eventLoop 中的线程中执行的,需要通知提交 register 操作的线程safeSetSuccess(promise);// 当前的 register 操作已经成功,该事件应该被 pipeline 上// 所有关心 register 事件的 handler 感知到,往 pipeline 中扔一个事件pipeline.fireChannelRegistered();// 这里 active 指的是 channel 已经打开if (isActive()) {// 如果该 channel 是第一次执行 register,那么 fire ChannelActive 事件if (firstRegistration) {pipeline.fireChannelActive();} else if (config().isAutoRead()) {// 该 channel 之前已经 register 过了,// 这里让该 channel 立马去监听通道中的 OP_READ 事件beginRead();}}} catch (Throwable t) {...}}
到这里,channel 如果是第一次执行 register, 那么 fire ChannelActive 事件,不然的话,监听通道中的 OP_READ 事件了,进入数据交互流程。
到此,服务启动完毕,剩下的交给 Selector 去轮训 和 EventLoop 去处理了,这一块上一篇讲过了,没看过的可以去看看:Netty线程模型详解,看看Netty是如何实现Reactor的
四、总结
本文把 Netty 服务端创建的整个流程结合代码分析了一遍, 客户端大部分步骤相通,就不再讲述了,有兴趣可以自己去看看源码。
这一块的代码,使用了许多的设计模式,比如pipeline 责任链、适配器、模版方法、工厂方法等等,在我们自己 coding 时,也可以灵活使用这些设计模式。
文章没有详细讲 handler 是如何处理的,后续会 专门开一章讲解,把常用的一下handler拿出来仔细分析。
参考:
https://segmentfault.com/a/1190000007403937
https://www.javadoop.com/post/netty-part-9
https://cloud.tencent.com/developer/article/1761377
另外文中有错误的地方,请帮忙指正,多谢!
