


嫖OBCP考试券系列
活动链接见:https://ask.oceanbase.com/t/topic/35600926
课程要求
练习目的
本次练习目的是通过 OceanBase Docker 容器,快速的体验 OceanBase 的 自动化部署过程,以及了解 OceanBase 集群安装成功后的目录特点和使用方法。
练习条件
1.有笔记本或服务器,内存至少12G 。
2.操作系统不限,能安装 Docker 环境即可。
练习内容
请记录并分享下列内容:
1.(必选)下载Docker 镜像:OceanBase 官方社区版镜像 。
2.(必选)使用 OBD 命令完成后续的 OceanBase 集群部署。
3.(必选)创建一个业务租户、一个业务数据库,以及一些表等。
Mac下安装docker
下载最新版docker 4.28.0
https://docs.docker.com/desktop/release-notes/
下载最新版4.28.0,根据自己电脑型号下载对应的版本。我这里下载的是Mac with Intel chip
安装Docker
Mac安装就简单了,直接双击,拖到应用程序里面即可。
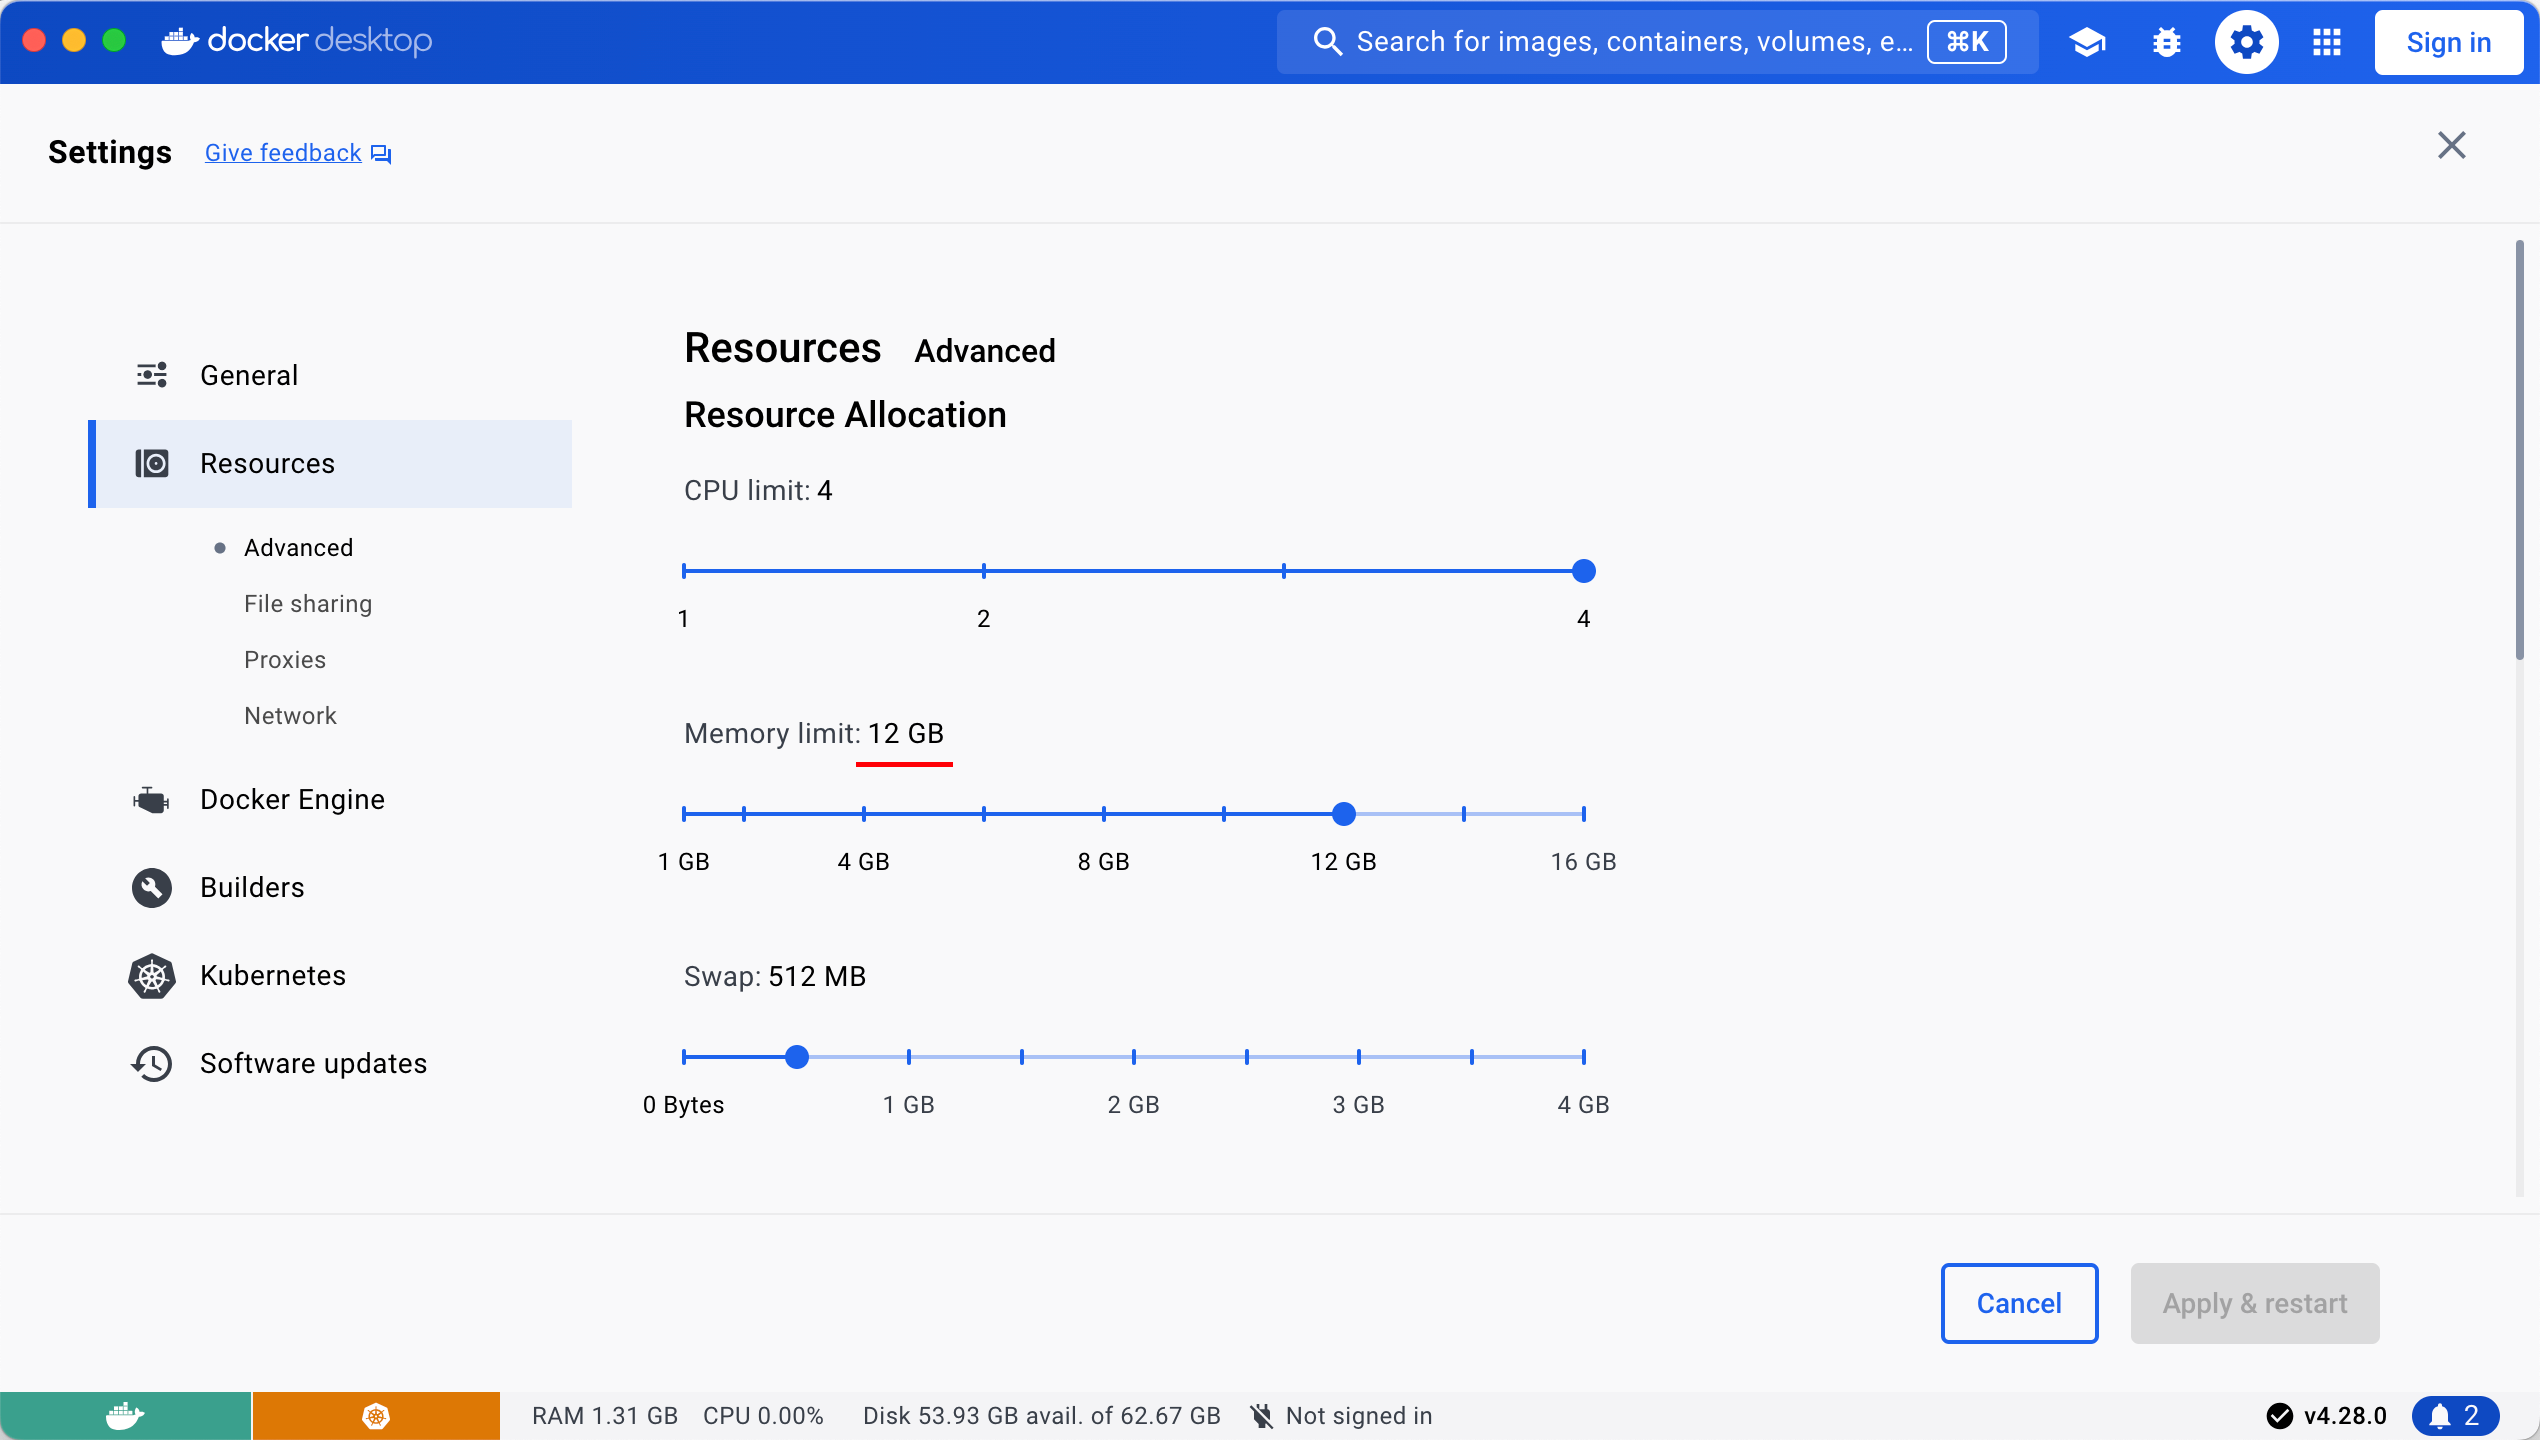
配置Docker
根据官方要求,内存设置要大于10G,这里设置12G
【失败】使用Docker部署 OB–使用官方镜像
此处参考官方快速体验OceanBase数据库 方案三:部署 OceanBase 容器环境。
步骤一:拉取 OceanBase 数据库镜像
docker search oceanbase
docker pull oceanbase/oceanbase-ce
~$ docker --version
Docker version 25.0.3, build 4debf41
~$
~$ docker search oceanbase
NAME                                DESCRIPTION                                      STARS     OFFICIAL
oceanbase/oceanbase-ce              OceanBase is an open-source, distributed HTA…   24
oceanbasedev/ob-operator            test repository for [ob-operator](https://gi…   0
oceanbasedev/oceanbase-cn                                                            0
oceanbasedev/obagent                                                                 0
oceanbase/obce-mini                 obce-mini is a mini standalone test image fo…   5
oceanbase/oceanbase-xe              OceanBase Database 2.2 Express Edition           4
oceanbase/ob-operator                                                                0
oceanbase/miniob                    miniob database competition                      2
oceanbase/obagent                                                                    0
oceanbase/obce-operator             obce-operator                                    1
oceanbasedev/oceanbase-chart                                                         0
oceanbase/obproxy-ce                                                                 0
oceanbase/oceanbase-cloud-native                                                     0
oceanbasedev/obproxy-ce                                                              0
oceanbasedev/sealer-ob                                                               0
oceanbase/ocp-ce                    OceanBase Cloud Platform (OCP) Community Edi…   0
oceanbase/odc                       ODC is an open-source, enterprise-grade data…   0
oceanbase/centos7                                                                    0
oceanbase/kube-rbac-proxy                                                            0
obpilot/oceanbase-ce                3 steps to run an OceanBase-CE docker in you…   4
apecloud/oceanbase                                                                   0
oceanbase/cert-manager-webhook                                                       0
oceanbase/cert-manager-cainjector                                                    0
oceanbase/ob-configserver                                                            0
oceanbase/cert-manager-controller                                                    0
~$ docker pull oceanbase/oceanbase-ce
Using default tag: latest
latest: Pulling from oceanbase/oceanbase-ce
bf5ec1942180: Pull complete
e4adbb3c0159: Pull complete
8cd8b592c1a9: Pull complete
b2b53d02ed2d: Pull complete
3c52e3b5bf21: Pull complete
996389242088: Pull complete
4f4fb700ef54: Pull complete
Digest: sha256:a6ac2588038b89a3eab5c7ab705cd55c82cc3b448d964becd149e1f371a35ac3
Status: Downloaded newer image for oceanbase/oceanbase-ce:latest
docker.io/oceanbase/oceanbase-ce:latest

What's Next?
  View a summary of image vulnerabilities and recommendations → docker scout quickview oceanbase/oceanbase-ce
步骤二:启动 OceanBase 数据库实例
根据当前容器部署最大规格实例
docker run -p 2881:2881 --name obstandalone -e MINI_MODE=0 -d oceanbase/oceanbase-ce
部署 mini 的独立实例
docker run -p 2881:2881 --name obstandalone -e MINI_MODE=1 -d oceanbase/oceanbase-ce
检查日志,执行以下命令,如果返回 boot success!,则表示启动成功。
docker logs obstandalone | tail -1
部署mini实例【失败】
~$ docker ps
CONTAINER ID   IMAGE                    COMMAND              CREATED         STATUS         PORTS                    NAMES
4c4266bdac21   oceanbase/oceanbase-ce   "/bin/sh -c _boot"   6 seconds ago   Up 4 seconds   0.0.0.0:2881->2881/tcp   obstandalone
~$ docker logs obstandalone | tail -1
Package obagent-4.2.2-100000042024011120.el7 is available.
...
~$ docker ps
CONTAINER ID   IMAGE                    COMMAND              CREATED              STATUS              PORTS                    NAMES
4c4266bdac21   oceanbase/oceanbase-ce   "/bin/sh -c _boot"   About a minute ago   Up About a minute   0.0.0.0:2881->2881/tcp   obstandalone
~$ docker logs obstandalone | tail -1
deploy failed!
~$
~$ docker ps
CONTAINER ID   IMAGE     COMMAND   CREATED   STATUS    PORTS     NAMES
部署失败:OBD-2002: Failed to start 127.0.0.1 observer
部署失败了,查看docker日志:
///////////////////////         STEP 1: Config Generation         ///////////////////////
oceanbase-ce docker in mini mode
/////////////////////// phase end: 0.233 s ///////////////////////
///////////////////////         STEP 2: Ob-deploy mirror clone         ///////////////////////
name: jq
version: 1.6
release:14.an8
arch: x86_64
md5: aced79b4fa3df5b2ba6e060984732011024b2173
add /root/pkg/jq-1.6-14.an8.x86_64.rpm to local mirror
name: ob-configserver
version: 1.0.0
release:2.el7
arch: x86_64
md5: feca6b9c76e26ac49464f34bfa0780b5a8d3f4a0
add /root/pkg/ob-configserver-1.0.0-2.el7.x86_64.rpm to local mirror
name: obagent
version: 4.2.2
release:100000042024011120.el7
arch: x86_64
md5: 19739a07a12eab736aff86ecf357b1ae660b554e
add /root/pkg/obagent-4.2.2-100000042024011120.el7.x86_64.rpm to local mirror
name: oceanbase-ce
version: 4.2.2.0
release:100010012024022719.el7
arch: x86_64
md5: 60fe842818ef64631dd3bb6f90bf4cab0e737195
add /root/pkg/oceanbase-ce-4.2.2.0-100010012024022719.el7.x86_64.rpm to local mirror
name: oceanbase-ce-libs
version: 4.2.2.0
release:100010012024022719.el7
arch: x86_64
md5: 756bc0a7949701b0a6c707a29cf623f7fb966bb7
add /root/pkg/oceanbase-ce-libs-4.2.2.0-100010012024022719.el7.x86_64.rpm to local mirror
name: oniguruma
version: 6.8.2
release:3.0.1.an8
arch: x86_64
md5: 777ef3bb1a900f4019b44be1f588f6f8d28f4add
add /root/pkg/oniguruma-6.8.2-3.0.1.an8.x86_64.rpm to local mirror
Trace ID: fa0fd606-de04-11ee-a105-0242ac110002
If you want to view detailed obd logs, please run: obd display-trace fa0fd606-de04-11ee-a105-0242ac110002
+----------------------------------------------------------------------------------------------------------+
|                                            local Package List                                            |
+-------------------+---------+------------------------+--------+------------------------------------------+
| name              | version | release                | arch   | md5                                      |
+-------------------+---------+------------------------+--------+------------------------------------------+
| jq                | 1.6     | 14.an8                 | x86_64 | aced79b4fa3df5b2ba6e060984732011024b2173 |
| ob-configserver   | 1.0.0   | 2.el7                  | x86_64 | feca6b9c76e26ac49464f34bfa0780b5a8d3f4a0 |
| obagent           | 4.2.2   | 100000042024011120.el7 | x86_64 | 19739a07a12eab736aff86ecf357b1ae660b554e |
| oceanbase-ce      | 4.2.2.0 | 100010012024022719.el7 | x86_64 | 60fe842818ef64631dd3bb6f90bf4cab0e737195 |
| oceanbase-ce-libs | 4.2.2.0 | 100010012024022719.el7 | x86_64 | 756bc0a7949701b0a6c707a29cf623f7fb966bb7 |
| oniguruma         | 6.8.2   | 3.0.1.an8              | x86_64 | 777ef3bb1a900f4019b44be1f588f6f8d28f4add |
+-------------------+---------+------------------------+--------+------------------------------------------+
Trace ID: fb369f2e-de04-11ee-bcef-0242ac110002
If you want to view detailed obd logs, please run: obd display-trace fb369f2e-de04-11ee-bcef-0242ac110002
/////////////////////// phase end: 4.376 s ///////////////////////
///////////////////////         STEP 3: Ob-deploy deploy         ///////////////////////
Local deploy is empty
Trace ID: fcd7b73c-de04-11ee-9c89-0242ac110002
If you want to view detailed obd logs, please run: obd display-trace fcd7b73c-de04-11ee-9c89-0242ac110002
///////////////////////         STEP 4: Ob-deploy autodeploy         ///////////////////////
Dev Mode: ON
Trace ID: fdc49034-de04-11ee-a80d-0242ac110002
If you want to view detailed obd logs, please run: obd display-trace fdc49034-de04-11ee-a80d-0242ac110002
[WARN] Use centos 7 remote mirror repository for anolis 8.8
Package oceanbase-ce-4.2.2.0-100010012024022719.el7 is available.
[WARN] Use centos 7 remote mirror repository for anolis 8.8
Package obagent-4.2.2-100000042024011120.el7 is available.
install oceanbase-ce-4.2.2.0 for local ok
install obagent-4.2.2 for local ok
Cluster param config check ok
Open ssh connection ok
Generate observer configuration ok
Generate obagent configuration ok
[WARN] Use centos 7 remote mirror repository for anolis 8.8
[WARN] Use centos 7 remote mirror repository for anolis 8.8
+--------------------------------------------------------------------------------------------+
|                                          Packages                                          |
+--------------+---------+------------------------+------------------------------------------+
| Repository   | Version | Release                | Md5                                      |
+--------------+---------+------------------------+------------------------------------------+
| oceanbase-ce | 4.2.2.0 | 100010012024022719.el7 | 60fe842818ef64631dd3bb6f90bf4cab0e737195 |
| obagent      | 4.2.2   | 100000042024011120.el7 | 19739a07a12eab736aff86ecf357b1ae660b554e |
+--------------+---------+------------------------+------------------------------------------+
Repository integrity check ok
Parameter check ok
Cluster status check ok
Initializes observer work home ok
Initializes obagent work home ok
Remote oceanbase-ce-4.2.2.0-100010012024022719.el7-60fe842818ef64631dd3bb6f90bf4cab0e737195 repository install ok
Remote oceanbase-ce-4.2.2.0-100010012024022719.el7-60fe842818ef64631dd3bb6f90bf4cab0e737195 repository lib check !!
Remote obagent-4.2.2-100000042024011120.el7-19739a07a12eab736aff86ecf357b1ae660b554e repository install ok
Remote obagent-4.2.2-100000042024011120.el7-19739a07a12eab736aff86ecf357b1ae660b554e repository lib check ok
Try to get lib-repository
[WARN] Use centos 7 remote mirror repository for anolis 8.8
Package oceanbase-ce-libs-4.2.2.0-100010012024022719.el7 is available.
install oceanbase-ce-libs-4.2.2.0 for local ok
Remote oceanbase-ce-libs-4.2.2.0-100010012024022719.el7-756bc0a7949701b0a6c707a29cf623f7fb966bb7 repository install ok
Remote oceanbase-ce-4.2.2.0-100010012024022719.el7-60fe842818ef64631dd3bb6f90bf4cab0e737195 repository lib check ok
obcluster deployed
Get local repositories ok
Search plugins ok
Load cluster param plugin ok
Open ssh connection ok
Check before start observer ok
[WARN] OBD-1011: (127.0.0.1) The recommended value of fs.aio-max-nr is 1048576 (Current value: 65536)
[WARN] OBD-1007: (127.0.0.1) The recommended number of core file size is unlimited (Current value: 0)
[WARN] OBD-1007: (127.0.0.1) The recommended number of stack size is unlimited (Current value: 8192)
[WARN] OBD-1017: (127.0.0.1) The value of the "vm.max_map_count" must be within [327600, 1310720] (Current value: 262144, Recommended value: 655360)
[WARN] OBD-1017: (127.0.0.1) The value of the "vm.overcommit_memory" must be 0 (Current value: 1, Recommended value: 0)
[WARN] OBD-1017: (127.0.0.1) The value of the "fs.file-max" must be greater than 6573688 (Current value: 1224212, Recommended value: 6573688)
[WARN] OBD-1012: (127.0.0.1) clog and data use the same disk (/)

Check before start obagent ok
Start observer ok
observer program health check x
[WARN] OBD-2002: Failed to start 127.0.0.1 observer
[ERROR] oceanbase-ce start failed
See https://www.oceanbase.com/product/ob-deployer/error-codes .
Trace ID: fe7d0d8a-de04-11ee-8c7b-0242ac110002
If you want to view detailed obd logs, please run: obd display-trace fe7d0d8a-de04-11ee-8c7b-0242ac110002
/////////////////////// phase end: 91.304 s ///////////////////////
///////////////////////         STEP 5: Ob-deploy Create Tenant         ///////////////////////
Deploy "obcluster" is deployed
See https://www.oceanbase.com/product/ob-deployer/error-codes .
Trace ID: 35692cb6-de05-11ee-b8fb-0242ac110002
If you want to view detailed obd logs, please run: obd display-trace 35692cb6-de05-11ee-b8fb-0242ac110002
deploy failed!
根据提示,查看对应的错误码。
https://www.oceanbase.com/product/ob-deployer/error-codes
OBD-2002:failed to start x.x.x.x observer
错误原因:出现该报错的原因有很多,常见的原因有以下两种。
- memory_limit小于 8G。
- system_memory太大或太小。通常情况下 memory_limt/3 ≤ system_memory ≤ memory_limt/2。
解决方法: - 若排查后发现该报错为上述两条原因造成,根据对应原因进行调整即可;
- 若排查后发现不是由上述两条原因引起的报错,您可到官网 问答区 进行提问,会有专业人员为您解答。
容器的不知道怎么指定,重试几次以失败告终。
换成obce-mini镜像也失败
Using default tag: latest
Error response from daemon: manifest for oceanbase/obce-mini:latest not found: manifest unknown: manifest unknown
~$
步骤三:连接 OceanBase 数据库实例
oceanbase-ce 镜像安装了 OceanBase 数据库客户端 OBClient,并提供了默认连接脚本 ob-mysql。
使用 root 用户登录集群的 sys 租户
docker exec -it obstandalone ob-mysql sys
使用 root 用户登录集群的 test 租户
docker exec -it obstandalone ob-mysql root
使用 test 用户登录集群的 test 租户
docker exec -it obstandalone ob-mysql test
【成功】使用Docker部署 OB–使用课程镜像
使用老师课程上使用的镜像。
主要命令:
docker pull obpilot/oceanbase-ce
docker run -itd  -m 10G --name oceanbase-ce -d obpilot/oceanbase-ce
# 进入容器
docker exec -it oceanbase-ce bash
# 查看集群列表
obd cluster list
# 启动集群
 obd cluster start obdemo
创建容器
$ docker pull obpilot/oceanbase-ce
Using default tag: latest
latest: Pulling from obpilot/oceanbase-ce
a1d0c7532777: Pull complete
42e2faadf654: Pull complete
b888a9404e21: Pull complete
426c12926548: Pull complete
a66beb305b92: Pull complete
2d1899456ae1: Pull complete
Digest: sha256:4c2d16106cdc4bd610baf155e43e048d896de4d6bfc777534e75bfa0497bff49
Status: Downloaded newer image for obpilot/oceanbase-ce:latest
docker.io/obpilot/oceanbase-ce:latest

What's Next?
  View a summary of image vulnerabilities and recommendations → docker scout quickview obpilot/oceanbase-ce
~$ docker run -itd  -m 10G --name oceanbase-ce -d obpilot/oceanbase-ce
d535dda2ad5ee32b4ff1a66722b60463535dca0d15c65d96149ea8647c003901
~$ docker ps
CONTAINER ID   IMAGE                  COMMAND       CREATED         STATUS         PORTS                                    NAMES
d535dda2ad5e   obpilot/oceanbase-ce   "/bin/bash"   6 seconds ago   Up 4 seconds   2881/tcp, 2883/tcp, 3000/tcp, 9090/tcp   oceanbase-ce
~$
启动OB集群
先进入docker容器里面再操作。
~$ docker exec -it oceanbase-ce bash
[admin@d535dda2ad5e ~]$
[admin@d535dda2ad5e ~]$
[admin@d535dda2ad5e ~]$ df -h
Filesystem      Size  Used Avail Use% Mounted on
overlay          59G  7.6G   48G  14% /
tmpfs            64M     0   64M   0% /dev
shm              64M     0   64M   0% /dev/shm
/dev/vda1        59G  7.6G   48G  14% /etc/hosts
tmpfs           6.9G     0  6.9G   0% /proc/acpi
tmpfs           6.9G     0  6.9G   0% /sys/firmware
[admin@d535dda2ad5e ~]$
[admin@d535dda2ad5e ~]$ obd cluster list
+------------------------------------------------------------+
|                        Cluster List                        |
+--------+---------------------------------+-----------------+
| Name   | Configuration Path              | Status (Cached) |
+--------+---------------------------------+-----------------+
| obdemo | /home/admin/.obd/cluster/obdemo | deployed        |
+--------+---------------------------------+-----------------+
[admin@d535dda2ad5e ~]$ obd cluster start obdemo
Get local repositories ok
Search plugins ok
Open ssh connection ok
Load cluster param plugin ok
Check before start observer ok
[WARN] (127.0.0.1) The recommended value of fs.aio-max-nr is 1048576 (Current value: 65536)
[WARN] (127.0.0.1) clog and data use the same disk (/)

Check before start obproxy ok
Start observer ok
observer program health check ok
Connect to observer ok
Initialize cluster ok
Start obproxy ok
obproxy program health check ok
Connect to obproxy ok
Initialize cluster ok
Wait for observer init ok
+---------------------------------------------+
|                   observer                  |
+-----------+---------+------+-------+--------+
| ip        | version | port | zone  | status |
+-----------+---------+------+-------+--------+
| 127.0.0.1 | 4.0.0.0 | 2881 | zone1 | ACTIVE |
+-----------+---------+------+-------+--------+
obclient -h127.0.0.1 -P2881 -uroot -prootPWD123 -Doceanbase

+---------------------------------------------+
|                   obproxy                   |
+-----------+------+-----------------+--------+
| ip        | port | prometheus_port | status |
+-----------+------+-----------------+--------+
| 127.0.0.1 | 2883 | 2884            | active |
+-----------+------+-----------------+--------+
obclient -h127.0.0.1 -P2883 -uroot -prootPWD123 -Doceanbase
obdemo running
[admin@d535dda2ad5e ~]$ obd cluster list
+------------------------------------------------------------+
|                        Cluster List                        |
+--------+---------------------------------+-----------------+
| Name   | Configuration Path              | Status (Cached) |
+--------+---------------------------------+-----------------+
| obdemo | /home/admin/.obd/cluster/obdemo | running         |
+--------+---------------------------------+-----------------+
[admin@d535dda2ad5e ~]$
连接OB
集群启动成功后也给出了数据库的连接方式
# 直连observer
obclient -h127.0.0.1 -P2881 -uroot -prootPWD123 -Doceanbase
# 连接obproxy端口
obclient -h127.0.0.1 -P2883 -uroot -prootPWD123 -Doceanbase
连接数据库看看默认的数据库,看看OB版本。
[admin@d535dda2ad5e ~]$ obclient -h127.0.0.1 -P2881 -uroot -prootPWD123 -Doceanbase -A -c
Welcome to the OceanBase.  Commands end with ; or \g.
Your OceanBase connection id is 3221487618
Server version: OceanBase_CE 4.0.0.0 (r100000272022110114-6af7f9ae79cd0ecbafd4b1b88e2886ccdba0c3be) (Built Nov  1 2022 14:56:31)

Copyright (c) 2000, 2018, OB Corporation Ab and others.

Type 'help;' or '\h' for help. Type '\c' to clear the current input statement.

obclient [oceanbase]> show databases;
+--------------------+
| Database           |
+--------------------+
| information_schema |
| LBACSYS            |
| mysql              |
| oceanbase          |
| ORAAUDITOR         |
| SYS                |
| test               |
+--------------------+
7 rows in set (0.017 sec)
obclient [oceanbase]> select version();
+------------------------------+
| version()                    |
+------------------------------+
| 5.7.25-OceanBase_CE-v4.0.0.0 |
+------------------------------+
1 row in set (0.001 sec)
可以看到OB版本4.0,OB默认数据库,相比MySQL多了oceanbase、LBACSYS、ORAAUDITOR几个库。
了解OB部署目录
OBD工作目录
~/.obd
[admin@d535dda2ad5e ~]$ pwd
/home/admin
[admin@d535dda2ad5e ~]$ tree .obd/ -L 1
.obd/
|-- cluster
|-- config_parser
|-- lock
|-- log
|-- mirror
|-- optimize
|-- plugins
|-- repository
`-- version
OB默认使用admin用户管理。
软件部署目录
/home/admin/oceanbase-ce

[admin@d535dda2ad5e oceanbase-ce]$ pwd
/home/admin/oceanbase-ce
[admin@d535dda2ad5e oceanbase-ce]$ tree -L 1
.
|-- admin
|-- audit
|-- bin
|-- etc
|-- etc2
|-- etc3
|-- lib
|-- log
|-- run
`-- store -> /data/1
配置文件目录
/home/admin/oceanbase-ce/etc
日志目录
/home/admin/oceanbase-ce/log
[admin@d535dda2ad5e log]$ ls -lth
total 224K
-rw-r--r-- 1 admin admin 220K Mar  9 13:55 observer.log
-rw-r--r-- 1 admin admin 1020 Mar  9 13:02 rootservice.log
-rw-r--r-- 1 admin admin    0 Mar  9 13:00 election.log
-rw-r--r-- 1 admin admin    0 Mar  9 13:00 election.log.wf
-rw-r--r-- 1 admin admin    0 Mar  9 13:00 observer.log.wf
-rw-r--r-- 1 admin admin    0 Mar  9 13:00 rootservice.log.wf
-rw-r--r-- 1 admin admin    0 Mar  9 13:00 trace.log
数据文件目录
/home/admin/oceanbase-ce/store
事务日志目录
/home/admin/oceanbase-ce/store/clog
/home/admin/oceanbase-ce/store/slog
[admin@d535dda2ad5e store]$ pwd
/home/admin/oceanbase-ce/store
[admin@d535dda2ad5e store]$ tree
.
|-- clog -> /data/log1/clog
|-- slog
|   |-- server
|   |   `-- 1
|   `-- tenant_1
|       `-- 1
`-- sstable
    `-- block_file

5 directories, 3 files
创建MySQL业务租户
前面启动集群的时候连接的是sys租户。实际使用过程中是不会把业务表建在sys租户下的。
创建租户的流程
创建资源规格–》创建资源池–》创建租户
步骤一:创建资源规格
使用 root 用户登录到集群的 sys 租户。
obclient -h127.0.0.1 -P2883 -uroot@sys#obdemo -prootPWD123 -Doceanbase -A -c
通过 DBA_OB_UNIT_CONFIGS 视图,获取已有的资源规格信息。
obclient [oceanbase]> SELECT * FROM oceanbase.DBA_OB_UNIT_CONFIGS;
+----------------+-----------------+----------------------------+----------------------------+---------+---------+-------------+---------------+----------+----------+-------------+
| UNIT_CONFIG_ID | NAME            | CREATE_TIME                | MODIFY_TIME                | MAX_CPU | MIN_CPU | MEMORY_SIZE | LOG_DISK_SIZE | MAX_IOPS | MIN_IOPS | IOPS_WEIGHT |
+----------------+-----------------+----------------------------+----------------------------+---------+---------+-------------+---------------+----------+----------+-------------+
|              1 | sys_unit_config | 2024-03-09 21:02:25.493682 | 2024-03-09 21:02:25.493682 |       1 |       1 |  2147483648 |    2147483648 |    10000 |    10000 |           1 |
+----------------+-----------------+----------------------------+----------------------------+---------+---------+-------------+---------------+----------+----------+-------------+
1 row in set (0.019 sec)
通过 CREATE RESOURCE UNIT 语句,创建资源规格。
CREATE RESOURCE UNIT S1
                MEMORY_SIZE = '2G',
                MAX_CPU = 1, MIN_CPU = 1,
                LOG_DISK_SIZE = '2G',
                MAX_IOPS = 10000, MIN_IOPS = 10000, IOPS_WEIGHT=1;
obclient [oceanbase]> CREATE RESOURCE UNIT S1
    ->                 MEMORY_SIZE = '2G',
    ->                 MAX_CPU = 1, MIN_CPU = 1,
    ->                 LOG_DISK_SIZE = '2G',
    ->                 MAX_IOPS = 10000, MIN_IOPS = 10000, IOPS_WEIGHT=1;
Query OK, 0 rows affected (0.056 sec)

obclient [oceanbase]> SELECT * FROM oceanbase.DBA_OB_UNIT_CONFIGS where name='s1';
+----------------+------+----------------------------+----------------------------+---------+---------+-------------+---------------+----------+----------+-------------+
| UNIT_CONFIG_ID | NAME | CREATE_TIME                | MODIFY_TIME                | MAX_CPU | MIN_CPU | MEMORY_SIZE | LOG_DISK_SIZE | MAX_IOPS | MIN_IOPS | IOPS_WEIGHT |
+----------------+------+----------------------------+----------------------------+---------+---------+-------------+---------------+----------+----------+-------------+
|           1004 | S1   | 2024-03-09 22:10:38.027140 | 2024-03-09 22:10:38.027140 |       1 |       1 |  2147483648 |    2147483648 |    10000 |    10000 |           1 |
+----------------+------+----------------------------+----------------------------+---------+---------+-------------+---------------+----------+----------+-------------+
1 row in set (0.017 sec)
步骤二:创建资源池
CREATE RESOURCE POOL pool_01
                UNIT='S1',
                UNIT_NUM=1,
                ZONE_LIST=('zone1');

SELECT * FROM DBA_OB_RESOURCE_POOLS;
obclient [oceanbase]> CREATE RESOURCE POOL pool_01
    ->                 UNIT='S1',
    ->                 UNIT_NUM=1,
    ->                 ZONE_LIST=('zone1');
Query OK, 0 rows affected (0.073 sec)
obclient [oceanbase]> SELECT * FROM DBA_OB_RESOURCE_POOLS;
+------------------+----------+-----------+----------------------------+----------------------------+------------+----------------+-----------+--------------+
| RESOURCE_POOL_ID | NAME     | TENANT_ID | CREATE_TIME                | MODIFY_TIME                | UNIT_COUNT | UNIT_CONFIG_ID | ZONE_LIST | REPLICA_TYPE |
+------------------+----------+-----------+----------------------------+----------------------------+------------+----------------+-----------+--------------+
|                1 | sys_pool |         1 | 2024-03-09 21:02:25.510646 | 2024-03-09 21:02:25.533198 |          1 |              1 | zone1     | FULL         |
|             1003 | pool_01  |      NULL | 2024-03-09 22:10:44.287416 | 2024-03-09 22:10:44.287416 |          1 |           1004 | zone1     | FULL         |
+------------------+----------+-----------+----------------------------+----------------------------+------------+----------------+-----------+--------------+
2 rows in set (0.006 sec)
步骤三:创建租户
CREATE TENANT IF NOT EXISTS ob_mysql
                PRIMARY_ZONE='zone1',
                RESOURCE_POOL_LIST=('pool_01')
                set OB_TCP_INVITED_NODES='%';
obclient [oceanbase]> CREATE TENANT IF NOT EXISTS ob_mysql
    ->                 PRIMARY_ZONE='zone1',
    ->                 RESOURCE_POOL_LIST=('pool_01')
    ->                 set OB_TCP_INVITED_NODES='%';
Query OK, 0 rows affected (40.883 sec)

obclient [oceanbase]> SELECT * FROM oceanbase.DBA_OB_TENANTS;
+-----------+-------------+-------------+----------------------------+----------------------------+--------------+---------------+-------------------+--------------------+--------+---------------+--------+
| TENANT_ID | TENANT_NAME | TENANT_TYPE | CREATE_TIME                | MODIFY_TIME                | PRIMARY_ZONE | LOCALITY      | PREVIOUS_LOCALITY | COMPATIBILITY_MODE | STATUS | IN_RECYCLEBIN | LOCKED |
+-----------+-------------+-------------+----------------------------+----------------------------+--------------+---------------+-------------------+--------------------+--------+---------------+--------+
|         1 | sys         | SYS         | 2024-03-09 21:02:25.555968 | 2024-03-09 21:02:25.555968 | RANDOM       | FULL{1}@zone1 | NULL              | MYSQL              | NORMAL | NO            | NO     |
|      1001 | META$1002   | META        | 2024-03-09 22:14:38.080221 | 2024-03-09 22:15:16.381755 | zone1        | FULL{1}@zone1 | NULL              | MYSQL              | NORMAL | NO            | NO     |
|      1002 | ob_mysql    | USER        | 2024-03-09 22:14:38.100556 | 2024-03-09 22:15:16.473995 | zone1        | FULL{1}@zone1 | NULL              | MYSQL              | NORMAL | NO            | NO     |
+-----------+-------------+-------------+----------------------------+----------------------------+--------------+---------------+-------------------+--------------------+--------+---------------+--------+
3 rows in set (0.003 sec)
租户创建成功。还会自动创建一个META${TENANT_ID}的元数据租户。
连接业务租户
租户创建成功后,可以尝试登录租户进行使用。
默认管理员用户(MySQL 模式为 root,Oracle 模式为 sys)的密码为空。
注意:连接用户名的地方跟MySQL的差别root@ob_mysql#obdemo
格式:用户名@租户名#集群名
[admin@d535dda2ad5e store]$ obclient -h127.0.0.1 -P2883 -uroot@ob_mysql#obdemo -p -Doceanbase -A -c
Enter password:
Welcome to the OceanBase.  Commands end with ; or \g.
Your OceanBase connection id is 9
Server version: OceanBase_CE 4.0.0.0 (r100000272022110114-6af7f9ae79cd0ecbafd4b1b88e2886ccdba0c3be) (Built Nov  1 2022 14:56:31)

Copyright (c) 2000, 2018, OB Corporation Ab and others.

Type 'help;' or '\h' for help. Type '\c' to clear the current input statement.

obclient [oceanbase]> show databases;
+--------------------+
| Database           |
+--------------------+
| information_schema |
| mysql              |
| oceanbase          |
| test               |
+--------------------+
4 rows in set (0.037 sec)

obclient [oceanbase]> ALTER USER root IDENTIFIED BY 'rootPWD123';
Query OK, 0 rows affected (0.105 sec)
接下来就可以像使用MySQL一样使用OB拉。
