


原文出处:android源码解
析
作者:qq_23547831
本系列文章经作者授权在
看云整理发布,未经作者
允许,请勿转载!
android源码解析
主要用于解析android
framework层源码,干货满
满;


PS一句:最终还是选择
CSDN来整理发表这几年的
知识点,该文章平行迁移到
CSDN。因为CSDN也支持
MarkDown语法了,牛逼
啊!
【工匠若
水 http://blog.csdn.net/yanbob
er】
Notice:阅读完该篇之后如
果想继续深入阅读Android触
摸屏事件派发机制详解与源
码分析下一篇请点击
《Android触摸屏事件派发机
(ViewGroup篇)》查看。
1
背景
最近在简书和微博还有Q群
看见很多人说Android自定义
控件(Vie w/Vie wGroup)如
何学习?为啥那么难?其实
答案很简单:“基础不牢,
地动山摇。 ”
不扯蛋了,进入正题。就算
你不自定义控件,你也必须
要了解Android控件的触摸屏
事件传递机制(之所以说触
摸屏是因为该系列以触摸屏
的事件机制分析为主,对于
类似TV设备等的物理事件机
制的分析雷同但有区别。哈
哈,谁让我之前是做Android
TV BOX的,悲催!),只
有这样才能将你的控件事件
运用的如鱼得水。接下来的
控件触摸屏事件传递机制分
析依据Android 5.1.1源码
(
API 22)。
2
基础实例现象
2
-1 例子
从一个例子分析说起吧。如
下是一个很简单不过的
Android实例:
<
"
<
?xml version="1.0" encoding=
utf-8"?>
LinearLayout xmlns:android="
http://schemas.android.com/ap
k/res/android"
android:orientation="vert
ical"
android:gravity="center"

android:layout_width="fil
l_parent"
android:layout_height="fi
ll_parent"
android:id="@+id/mylayout
"
>
<
Button
android:id="@+id/my_b
tn"
android:layout_width=
match_parent"
android:layout_height
"wrap_content"
android:text="click t
"
=
est"/>
</LinearLayout>
public class ListenerActivity
extends Activity implements
View.OnTouchListener, View.On
ClickListener {


private LinearLayout mLay
private Button mButton;
out;
@
Override
public void onCreate(Bund
le savedInstanceState) {
super.onCreate(savedI
nstanceState);
setContentView(R.layo
ut.main);
mLayout = (LinearLayo
ut) this.findViewById(R.id.my
layout);
mButton = (Button) th
is.findViewById(R.id.my_btn);
mLayout.setOnTouchLis
tener(this);
mButton.setOnTouchLis

tener(this);
mLayout.setOnClickLis
tener(this);
mButton.setOnClickLis
tener(this);
}
@
Override
public boolean onTouch(Vi
ew v, MotionEvent event) {
Log.i(null, "OnTouchL
istener--onTouch-- action="+e
vent.getAction()+" --"+v);
return false;
}
@
Override
public void onClick(View
v) {
Log.i(null, "OnClickL
istener--onClick--"+v);

}
}
2
-2 现象
如上代码很简单,但凡学过
几天Android的人都能看懂
吧。Ac tivity中有一个
LinearLayout(Vie wGroup的
子类,Vie wGroup是Vie w的
子类)布局,布局中包含一
个按钮(Vie w的子类);然
后分别对这两个控件设置了
Touch与Clic k的监听事件,
具体运行结果如下:

1
2
. 当稳稳的点击Button时打
印如下:
. 当稳稳的点击除过Button
以外的其他地方时打印如
下:
3
. 当收指点击Button时按在
Button上晃动了一下松开
后的打印如下:
机智的你看完这个结果指定
知道为啥吧?
我们看下onTouch和
onClick,从参数都能看出来
onTouch比onClick强大灵
活,毕竟多了一个event参
数。这样onTouch里就可以
处理ACTION_DOWN 、
ACTION_UP、
ACTION_MOVE等等的各种
触摸。现在来分析下上面的
打印结果;在1中,当我们
点击Button时会先触发
onTouch事件(之所以打印
action为0,1各一次是因为按
下抬起两个触摸动作被触
发)然后才触发onClick事
件;在2中也同理类似1;在
中会发现onTouch被多次调
3
运后才调运onClick,是因为
手指晃动了,所以触发了
ACTION_DOWN-
>
>
ACTION_MOVE…-
ACTION_UP。
如果你眼睛比较尖你会看见
onTouch会有一个返回值,
而且在上面返回了false。你
可能会疑惑这个返回值有啥
效果?那就验证一下吧,我
们将上面的onTouch返回值
改为ture。如下:
@
Override
public boolean onTouch(Vi
ew v, MotionEvent event) {
Log.i(null, "OnTouchL
istener--onTouch-- action="+e
vent.getAction()+" --"+v);
return true;
}
再次点击Button结果如下:
看见了吧,如果onTouch返
回true则onClick不会被调运

了。
-3 总结结论
2
好了,经过这个简单的实例
验证你可以总结发现:
1
. Android控件的Listener事
件触发顺序是先触发
onTouch,其次onClick。
. 如果控件的onTouch返回
true将会阻止事件继续传
递,返回false事件会继续
传递。
2
对于伸手党码农来说其实到
这足矣应付常规的App事件
监听处理使用开发了,但是
对于复杂的事件监听处理或
者想自定义控件的码农来说
这才是刚刚开始,只是个热
身。既然这样那就继续
喽。。。
3
Android 5.1.1(API 22)
View触摸屏事件传递
源码分析
3-1 写在前面的话
其实Android源码无论哪个版
本对于触摸屏事件的传递机
制都类似,这里只是选用了
目前最新版本的源码来分析
而已。分析Android Vie w事
件传递机制之前有必要先看
下源码的一些关系,如下是
几个继承关系图:
怎么样?看了官方这个继承
图是不是明白了上面例子中
说的LinearLayout 是
Vie wGroup的子类,
Vie wGroup是Vie w的子类,
Button是Vie w的子类关系
呢?其实,在Android中所有
的控件无非都是Vie wGroup
或者Vie w的子类,说高尚点
就是所有控件都是Vie w的子
类。
这里通过继承关系是说明一
切控件都是Vie w,同时Vie w
与Vie wGroup又存在一些区
别,所以该模块才只单单先
分析Vie w触摸屏事件传递机
制。
-2 从Vie w的
3
dispatchTouchEvent方法说起
在Android中你只要触摸控件
首先都会触发控件的
dispatchTouchEvent方法(其
实这个方法一般都没在具体
的控件类中,而在他的父类
Vie w中),所以我们先来看
下Vie w的dispatchTouchEvent
方法,如下:
public boolean dispatchTouchE

vent(MotionEvent event) {
/ If the event shoul
/
d be handled by accessibility
focus first.
if (event.isTargetAcc
essibilityFocus()) {
/
/ We don't have
focus or no virtual descendan
t has it, do not handle the e
vent.
if (!isAccessibil
ityFocusedViewOrHost()) {
return false;
}
/
/ We have focus
and got the event, then use n
ormal event dispatch.
event.setTargetAc
cessibilityFocus(false);
}
boolean result = fals

e;
if (mInputEventConsis
tencyVerifier != null) {
mInputEventConsis
tencyVerifier.onTouchEvent(ev
ent, 0);
}
final int actionMaske
d = event.getActionMasked();
if (actionMasked == M
otionEvent.ACTION_DOWN) {
/
/ Defensive clea
nup for new gesture
stopNestedScroll(
)
;
}
if (onFilterTouchEven
tForSecurity(event)) {
/noinspection Si
/

mplifiableIfStatement
ListenerInfo li =
mListenerInfo;
if (li != null &&
li.mOnTouchListener != null
& (mView
&
Flags & ENABLED_MASK) == ENAB
LED
&
& li.mOn
TouchListener.onTouch(this, e
vent)) {
result = true
;
}
if (!result && on
TouchEvent(event)) {
result = true
;
}
}

if (!result && mInput
EventConsistencyVerifier != n
ull) {
mInputEventConsis
tencyVerifier.onUnhandledEven
t(event, 0);
}
/
/ Clean up after nes
ted scrolls if this is the en
d of a gesture;
/
/ also cancel it if
we tried an ACTION_DOWN but w
e didn't want the rest
/
/ of the gesture.
if (actionMasked == M
otionEvent.ACTION_UP ||
actionMasked
= MotionEvent.ACTION_CANCEL
|
=
|
(actionMasked
=
= MotionEvent.ACTION_DOWN &

&
)
!result)) {
stopNestedScroll(
;
}
return result;
}
dispatchTouchEvent的代码有
点长,咱们看重点就可以。
前面都是设置一些标记和处
理input与手势等传递,到24
行的
if (onFilterTouchEventFor
语句判断当前Vie w是否没被
遮住等,接着26行定义


ListenerInfo局部变量,
ListenerInfo是Vie w的静态
内部类,用来定义一堆关于
Vie w的XXXListener等方
法;接着
if (li != null && li.mOnT
ENABLED && li.mOnTouchLis
语句就是重点,首先li对象
自然不会为null,
li. mOnTouc hListe ne r呢?你
会发现ListenerInfo
的mOnTouchListener成员是


在哪儿赋值的呢?怎么确认
他是不是null呢?通过在
Vie w类里搜索可以看到:
/
**
*
Register a callback to
be invoked when a touch even
t is sent to this view.
*
@param l the touch lis
tener to attach to this view
*
/
public void setOnTouchLis
tener(OnTouchListener l) {
getListenerInfo().mOn
TouchListener = l;
}
li. mOnTouc hListe ne r是不是

null取决于控件(Vie w)是
否设置setOnTouchListener 监
听,在上面的实例中我们是
设置过Button 的
setOnTouchListener方法的,
所以也不为null;接着通过
位与运算确定控件(Vie w)
是不是ENABLED 的,默认
控件都是ENABLED 的;
接着判断onTouch的返回值
是不是true。通过如上判断
之后如果都为true则设置默
认为false的result为true,那
么接下来的
if (!result && onTouchEve
就不会执行,最终
dispatchTouchEvent也会返回
true。而如果
if (li != null && li.mOnT
语句有一个为false则
if (!result && onTouchEve
就会执行,如果
onTouchEvent(event)返回false
则dispatchTouchEvent返回


false,
否则返回true。
这下再看前面的实例部分明
白了吧?控件触摸就会调运
dispatchTouchEvent方法,而
在dispatchTouchEvent中先执
行的是onTouch方法,所以
验证了实例结论总结中的
onTouch优先于onClick执行
道理。如果控件是ENABLE
且在onTouch方法里返回了
true则dispatchTouchEvent 方
法也返回true,不会再继续
往下执行;反之,onTouch
返回false则会继续向下执行
onTouchEvent方法,且
dispatchTouchEvent的返回值
与onTouchEvent返回值相
同。
所以依据这个结论和上面实
例打印结果你指定已经大胆
猜测认为onClick一定与
onTouchEvent有关系?是不
是呢?先告诉你,是的。下
面我们会分析。
3-2-1 总结结论
在Vie w的触摸屏传递机制中
通过分析dispatchTouchEvent
方法源码我们会得出如下基
本结论:
1
. 触摸控件(Vie w)首先执
行dispatchTouchEvent 方
法。
2
. 在dispatchTouchEvent方法
中先执行onTouch方法,
后执行onClick方法
(onClick方法在
onTouchEvent中执行,下
面会分析)。
3
. 如果控件(Vie w)的
onTouch返回false或者
mOnTouchListener为
null(控件没有设置
setOnTouchListener方法)
或者控件不是enable的情
况下会调运
onTouchEvent,
dispatchTouchEvent返回值
与onTouchEvent返回一
样。
4
. 如果控件不是enable的设
置了onTouch方法也不会
执行,只能通过重写控件
的onTouchEvent方法处理
(上面已经处理分析
了),dispatchTouchEvent
返回值与onTouchEvent返
回一样。
5
. 如果控件(Vie w)是
enable且onTouch返回true
情况下,
dispatchTouchEvent直接返
回true,不会调用
onTouchEvent方法。
上面说了onClick一定与
onTouchEvent有关系,那么
接下来就分析分析
dispatchTouchEvent方法中的
onTouchEvent方法。
3
-3 继续说说Vie w的
dispatchTouchEvent方法中调
运的onTouchEvent方法
上面说了dispatchTouchEvent
方法中如果onTouch返回false
或者mOnTouchListener 为
null(控件没有设置
setOnTouchListener方法)或
者控件不是enable的情况下
会调运onTouchEvent,所以
接着看就知道了,如下:
public boolean onTouchEvent(M
otionEvent event) {
final float x = event
.
.
getX();
getY();
final float y = event
final int viewFlags =
mViewFlags;
if ((viewFlags & ENAB
LED_MASK) == DISABLED) {
if (event.getActi

on() == MotionEvent.ACTION_UP
& (mPrivateFlags & PFLAG_PR
&
ESSED) != 0) {
setPressed(fa
lse);
}
/
/ A disabled vie
w that is clickable still con
sumes the touch
/
/ events, it jus
t doesn't respond to them.
return (((viewFla
gs & CLICKABLE) == CLICKABLE
|
|
(viewFlag
s & LONG_CLICKABLE) == LONG_C
LICKABLE));
}
if (mTouchDelegate !=
null) {
if (mTouchDelegat

e.onTouchEvent(event)) {
return true;
}
}
if (((viewFlags & CLI
CKABLE) == CLICKABLE ||
(viewFlags &
LONG_CLICKABLE) == LONG_CLICK
ABLE)) {
switch (event.get
Action()) {
case MotionEv
ent.ACTION_UP:
boolean p
repressed = (mPrivateFlags &
PFLAG_PREPRESSED) != 0;
if ((mPri
vateFlags & PFLAG_PRESSED) !=
0
|| prepressed) {
/
/ ta
ke focus if we don't have it

already and we should in
uch mode.
/
/ to
boole
if (i
an focusTaken = false;
sFocusable() && isFocusableIn
TouchMode() && !isFocused())
{
f
ocusTaken = requestFocus();
}
if (p
repressed) {
/
The button is being release
d before we actually
/
/
/
showed it as pressed. Make
it show the pressed
/

/
state now (before schedulin
g the click) to ensure
/
s
/
the user sees it.
etPressed(true, x, y);
}
if (!
mHasPerformedLongPress) {
/
r
/
/
This is a tap, so remove th
e longpress check
emoveLongPressCallback();
/
Only perform take click act
ions if we were in the presse
d state
i
f (!focusTaken) {

/
/ Use a Runnable and post
this rather than calling
/
/ performClick directly.
This lets other visual state
/
/ of the view update befo
re click actions start.
if (mPerformClick == null)
{
mPerformClick = new Pe
rformClick();
}
if (!post(mPerformClick))
{
performClick();

}
}
}
if (m
UnsetPressedState == null) {
m
UnsetPressedState = new Unset
PressedState();
}
if (p
repressed) {
p
ostDelayed(mUnsetPressedState
,
ViewConfiguration.getP
ressedStateDuration());
}
els
e if (!post(mUnsetPressedStat

e)) {
/
/
If the post failed, unpress
right now
m
UnsetPressedState.run();
}
remov
eTapCallback();
}
break;
case MotionEv
ent.ACTION_DOWN:
mHasPerfo
rmedLongPress = false;
if (perfo
rmButtonActionOnTouchDown(eve
nt)) {
break

;
}
/
/ Walk u
p the hierarchy to determine
if we're inside a scrolling c
ontainer.
boolean i
sInScrollingContainer = isInS
crollingContainer();
/
/ For vi
ews inside a scrolling contai
ner, delay the pressed feedba
ck for
/
/ a shor
t period in case this is a sc
roll.
if (isInS
crollingContainer) {
mPriv
ateFlags |= PFLAG_PREPRESSED;

if (m
PendingCheckForTap == null) {
m
PendingCheckForTap = new Chec
kForTap();
}
mPend
ingCheckForTap.x = event.getX
();
mPend
ingCheckForTap.y = event.getY
();
postD
elayed(mPendingCheckForTap, V
iewConfiguration.getTapTimeou
t());
}
else {
/ No
/
t inside a scrolling containe
r, so show the feedback right
away
setPr

essed(true, x, y);
ForLongClick(0);
check
}
break;
case MotionEv
ent.ACTION_CANCEL:
setPresse
removeTap
removeLon
break;
d(false);
Callback();
gPressCallback();
case MotionEv
ent.ACTION_MOVE:
drawableH
otspotChanged(x, y);
/
/ Be len

ient about moving outside of
buttons
if (!poin
tInView(x, y, mTouchSlop)) {
/
/ Ou
tside button
remov
eTapCallback();
if ((
mPrivateFlags & PFLAG_PRESSED
)
!= 0) {
/
/
Remove any future long pres
s/tap checks
r
s
emoveLongPressCallback();
etPressed(false);
}
}
break;

}
return true;
}
return false;
}
我勒个去!一个方法比一个
方法代码多。好吧,那咱们
继续只挑重点来说明呗。
首先地6到14行可以看出,
如果控件(Vie w)是
disenable状态,同时是可以
clickable的则onTouchEvent直
接消费事件返回true,反之

如果控件(Vie w)是
disenable状态,同时是
disc lic ka ble的则onTouchEvent
直接false。多说一句,关于
控件的enable或者clickable属
性可以通过java或者xml直接
设置,每个vie w都有这些属
性。
接着22行可以看见,如果一
个控件是enable且disc lic ka ble
则onTouchEvent直接返回
false了;反之,如果一个控
件是enable且clickable则继续
进入过于一个event的switch
判断中,然后最终
onTouchEvent都返回了true。
switch的ACTION_DOWN与
ACTION_MOVE都进行了一
些必要的设置与置位,接着
到手抬起来ACTION_UP时
你会发现,首先判断了是否
按下过,同时是不是可以得
到焦点,然后尝试获取焦
点,然后判断如果不是
longPressed则通过post在UI
Thread中执行一个
PerformClick的Runnable,也
就是performClick方法。具体
如下:
public boolean performClick()
{
final boolean result;
final ListenerInfo li
=
mListenerInfo;
if (li != null && li.
mOnClickListener != null) {
playSoundEffect(S
oundEffectConstants.CLICK);
li.mOnClickListen
er.onClick(this);
result = true;
}
}
else {
result = false;

sendAccessibilityEven
t(AccessibilityEvent.TYPE_VIE
W_CLICKED);
return result;
}
这个方法也是先定义一个
ListenerInfo的变量然后赋
值,接着判断
li.mOnClickListener是不是为
null,决定执行不执行
onClick。你指定现在已经很
机智了,和onTouch一样,
搜一下mOnClickListener在哪
赋值的呗,结果发现:

public void setOnClickListene
r(OnClickListener l) {
if (!isClickable()) {
setClickable(true
)
;
}
getListenerInfo().mOn
ClickListener = l;
}
看见了吧!控件只要监听了
onClick方法则
mOnClickListener就不为
null,而且有意思的是如果
调运setOnClickListener方法
设置监听且控件是

disc lic ka ble的情况下默认会
帮设置为clickable。
我勒个去!!!惊讶
吧!!!猜的没错onClick就
在onTouchEvent中执行的,
而且是在onTouchEvent的
ACTION_UP事件中执行
的。
3-3-1 总结结论
1
. onTouchEvent方法中会在
ACTION_UP分支中触发
onClick的监听。
2
. 当dispatchTouchEvent在进
行事件分发的时候,只有
前一个action返回true,才
会触发下一个action。
到此上面例子中关于Button
点击的各种打印的真实原因
都找到了可靠的证据,也就
是说Vie w的触摸屏事件传递
机制其实也就这么回事。
4
透过源码继续进阶实
例验证
其实上面分析完Vie w的触摸
传递机制之后已经足够用
了。如下的实例验证可以说
是加深阅读源码的理解,还
有一个主要作用就是为将来
自定义控件打下坚实基础。
因为自定义控件中时常会与
这几个方法打交道。
4-1 例子
我们自定义一个
Button(Button实质继承自
Vie w),如下:
public class TestButton exten

ds Button {
public TestButton(Context
context, AttributeSet attrs)
{
super(context, attrs)
;
}
@
Override
public boolean dispatchTo
uchEvent(MotionEvent event) {
Log.i(null, "dispatch
TouchEvent-- action=" + event
.
getAction());
return super.dispatch
TouchEvent(event);
}
@
Override
public boolean onTouchEve
nt(MotionEvent event) {

Log.i(null, "onTouchE
vent-- action="+event.getActi
on());
return super.onTouchE
vent(event);
}
}
其他代码如下:
<
"
<
?xml version="1.0" encoding=
utf-8"?>
LinearLayout xmlns:android="
http://schemas.android.com/ap
k/res/android"
android:orientation="vert
ical"
android:gravity="center"
android:layout_width="fil
l_parent"


android:layout_height="fi
ll_parent"
android:id="@+id/mylayout
"
>
<
com.zzci.light.TestButto
android:id="@+id/my_b
android:layout_width=
n
tn"
"
=
match_parent"
android:layout_height
"wrap_content"
android:text="click t
est"/>
<
/LinearLayout>
public class ListenerActivity
extends Activity implements
View.OnTouchListener, View.On
ClickListener {
private LinearLayout mLay


out;
n;
private TestButton mButto
@
Override
public void onCreate(Bund
le savedInstanceState) {
super.onCreate(savedI
nstanceState);
setContentView(R.layo
ut.main);
mLayout = (LinearLayo
ut) this.findViewById(R.id.my
layout);
mButton = (TestButton
)
this.findViewById(R.id.my_b
tn);
mLayout.setOnTouchLis
tener(this);

mButton.setOnTouchLis
tener(this);
mLayout.setOnClickLis
tener(this);
mButton.setOnClickLis
tener(this);
}
@
Override
public boolean onTouch(Vi
ew v, MotionEvent event) {
Log.i(null, "OnTouchL
istener--onTouch-- action="+e
vent.getAction()+" --"+v);
return false;
}
@
Override
public void onClick(View
v) {
Log.i(null, "OnClickL

istener--onClick--"+v);
}
}
其实这段代码只是对上面例
子中的Button换为了自定义
Button而已。
4-2 现象分析
4-2-1 点击Button(手抽筋了
一下)
可以发现,如上打印完全符
合源码分析结果,
dispatchTouchEvent方法先派

发down事件,完事调运
onTouch,完事调运
onTouchEvent返回true,同时
dispatchTouchEvent返回
true,然后
dispatchTouchEvent继续派发
move或者up事件,循环,直
到onTouchEvent处理up事件
时调运onClick事件,完事返
回true,同时
dispatchTouchEvent返回
true;一次完整的Vie w事件
派发流程结束。
4-2-2 简单修改onTouchEvent
返回值为true
将TestButton类的
onTouchEvent方法修改如
下,其他和基础代码保持不
变:
@
Override
public boolean onTouchEve
nt(MotionEvent event) {
Log.i(null, "onTouchE
vent-- action="+event.getActi
on());
return true;
}

点击Button打印如下:
可以发现,当自定义了控件
(Vie w)的onTouchEvent直
接返回true而不调运super方
法时,事件派发机制如同
4.2.1类似,只是最后up事件
没有触发onClick而已(因为
没有调用super)。
所以可想而知,如果
TestButton类的onTouchEvent
修改为如下:
@
Override

public boolean onTouchEve
nt(MotionEvent event) {
Log.i(null, "onTouchE
vent-- action="+event.getActi
on());
super.onTouchEvent(ev
ent);
return true;
}
点击Button如下:
整个派发机制和4.2.1完全类
似。
4
-2-3 简单修改onTouchEvent
返回值为false
将TestButton类的
onTouchEvent方法修改如
下,其他和基础代码保持不
变:
@
Override
public boolean onTouchEve
nt(MotionEvent event) {
Log.i(null, "onTouchE
vent-- action="+event.getActi
on());
return false;
}
点击Button如下:

你会发现如果onTouchEvent
返回false(也即
dispatchTouchEvent一旦返回
false将不再继续派发其他
action,立即停止派发),这
里只派发了down事件。至于
后面触发了LinearLayout的
touch与click事件我们这里不
做关注,下一篇博客会详细
解释为啥(其实你可以想下
的,LinearLayout 是
Vie wGroup的子类,你懂
的),这里你只用知道Vie w
的onTouchEvent返回false会
阻止继续派发事件。
同理修改如下:
@
Override
public boolean onTouchEve
nt(MotionEvent event) {
Log.i(null, "onTouchE
vent-- action="+event.getActi
on());
super.onTouchEvent(ev
ent);
return false;
}
点击Button如下:

4-2-4 简单修改
dispatchTouchEvent返回值为
true
将TestButton类的
dispatchTouchEvent方法修改
如下,其他和基础代码保持
不变:
@
Override
public boolean dispatchTo
uchEvent(MotionEvent event) {
Log.i(null, "dispatch
TouchEvent-- action=" + event
.
getAction());
return true;
}

点击Button如下:
你会发现如果
dispatchTouchEvent直接返回
true且不调运super任何事件
都得不到触发。
继续修改如下呢?
将TestButton类的
dispatchTouchEvent方法修改
如下,其他和基础代码保持
不变:
@
Override
public boolean dispatchTo
uchEvent(MotionEvent event) {

Log.i(null, "dispatch
TouchEvent-- action=" + event
.
getAction());
super.dispatchTouchEv
ent(event);
return true;
}
点击Button如下:
可以发现所有事件都可以得
到正常派发,和4.2.1类似。
4-2-5 简单修改
dispatchTouchEvent返回值为
false
将TestButton类的

dispatchTouchEvent方法修改
如下,其他和基础代码保持
不变:
@
Override
public boolean dispatchTo
uchEvent(MotionEvent event) {
Log.i(null, "dispatch
TouchEvent-- action=" + event
.
getAction());
return false;
}
点击Button如下:
你会发现事件不进行任何继
续触发,关于点击Button触
发了LinearLayout的事件暂时
不用关注,下篇详解。
继续修改如下呢?
将TestButton类的
dispatchTouchEvent方法修改
如下,其他和基础代码保持
不变:
@
Override
public boolean dispatchTo
uchEvent(MotionEvent event) {
Log.i(null, "dispatch
TouchEvent-- action=" + event
.
getAction());
super.dispatchTouchEv
ent(event);

return false;
}
点击Button如下:
你会发现结果和4.2.3的第二
部分结果一样,也就是说如
果dispatchTouchEvent返回
false事件将不再继续派发下
一次。
4-2-6 简单修改
dispatchTouchEvent与

onTouchEvent返回值
修改dispatchTouchEvent返回
值为true,onTouchEvent为
false:
将TestButton类的
dispatchTouchEvent方法和
onTouchEvent方法修改如
下,其他和基础代码保持不
变:
@
Override
public boolean dispatchTo
uchEvent(MotionEvent event) {
Log.i(null, "dispatch

TouchEvent-- action=" + event
getAction());
super.dispatchTouchEv
ent(event);
return true;
.
}
@
Override
public boolean onTouchEve
nt(MotionEvent event) {
Log.i(null, "onTouchE
vent-- action=" + event.getAc
tion());
super.onTouchEvent(ev
ent);
return false;
}
点击Button如下:
修改dispatchTouchEvent返回

值为false,onTouchEvent为
true:
将TestButton类的
dispatchTouchEvent方法和
onTouchEvent方法修改如
下,其他和基础代码保持不
变:
@
Override
public boolean dispatchTo
uchEvent(MotionEvent event) {
Log.i(null, "dispatch
TouchEvent-- action=" + event
.
getAction());
super.dispatchTouchEv
ent(event);

return false;
}
@
Override
public boolean onTouchEve
nt(MotionEvent event) {
Log.i(null, "onTouchE
vent-- action=" + event.getAc
tion());
super.onTouchEvent(ev
ent);
return true;
}
点击Button如下:
由此对比得出结论,
dispatchTouchEvent事件派发
是传递的,如果返回值为

false将停止下次事件派发,
如果返回true将继续下次派
发。譬如,当前派发down事
件,如果返回true则继续派
发up,如果返回false派发完
down就停止了。
4
-1 总结
这个例子组合了很多种情况
的值去验证上面源码的分
析,同时也为自定义控件打
下了基础。仔细理解这个例
子对于Vie w的事件传递就差
不多了。
5
总结View触摸屏事件
传递机制
上面例子也测试了,源码也
分析了,总得有个最终结论
方便平时写代码作为参考依
据呀,不能每次都再去分析
一遍源码,那得多蛋疼呢!
综合得出Android Vie w的触
摸屏事件传递机制有如下特
征:
1
2
. 触摸控件(Vie w)首先执
行dispatchTouchEvent 方
法。
. 在dispatchTouchEvent方法
中先执行onTouch方法,
后执行onClick方法
(onClick方法在
onTouchEvent中执行,下
面会分析)。
3
. 如果控件(Vie w)的
onTouch返回false或者
mOnTouchListener为
null(控件没有设置
setOnTouchListener方法)
或者控件不是enable的情
况下会调运
onTouchEvent,
dispatchTouchEvent返回值
与onTouchEvent返回一
样。
4
. 如果控件不是enable的设
置了onTouch方法也不会
执行,只能通过重写控件
的onTouchEvent方法处理
(上面已经处理分析
了),dispatchTouchEvent
返回值与onTouchEvent返
回一样。
5
. 如果控件(Vie w)是
enable且onTouch返回true
情况下,
dispatchTouchEvent直接返
回true,不会调用
onTouchEvent方法。
. 当dispatchTouchEvent在进
行事件分发的时候,只有
前一个action返回true,才
会触发下一个action(也
就是说dispatchTouchEvent
6
返回true才会进行下一次
action派发)。
【工匠若
水 http://blog.csdn.net/yanbob
er】
关于上面的疑惑还有
Vie wGroup事件派发机制你
可以继续阅读下一篇博客
《
Android触摸屏事件派发机
(ViewGroup篇)》,以便继续
分析Vie w之外的Vie wGroup
事件传递机制。
PS一句:最终还是选择
CSDN来整理发表这几年的
知识点,该文章平行迁移到
CSDN。因为CSDN也支持
MarkDown语法了,牛逼
啊!
【工匠若
水 http://blog.csdn.net/yanbob
er】
该篇承接上一篇《Android触
码分析一(View篇)》,阅读
本篇之前建议先阅读。当
然,阅读完这一篇之后可以
阅读继续进阶的下一篇
《
Android触摸屏事件派发机
篇)》。
1
背景
还记得前一篇《Android触摸
分析一(View篇)》中关于透
过源码继续进阶实例验证模
块中存在的点击Button却触
发了LinearLayout的事件疑惑
吗?当时说了,在那一篇咱
们只讨论Vie w的触摸事件派
发机制,这个疑惑留在了这
一篇解释,也就是
Vie wGroup的事件派发机
制。
PS:阅读本篇前建议先查看
前一篇《Android触摸屏事件
(View篇)》,这一篇承接上
一篇。
关于Vie w与Vie wGroup的区
别在前一篇的Android
5
.1.1(API 22) Vie w触摸屏事
件传递源码分析部分的写在
前面的话里面有详细介绍。
其实你只要记住类似Button
这种控件都是Vie w的子类,
类似布局这种控件都是
Vie wGroup的子类,而
Vie wGroup又是Vie w的子类
而已。具体查阅《Android触
码分析一(View篇)》。
2
基础实例现象
2
-1 例子
这个例子布局等还和上一篇
的例子相似,只是重写了
Button和LinearLayout而已,
所以效果图不在提供,具体
参见上一篇。
首先我们简单的自定义一个
Button(Vie w的子类),再
自定义一个
LinearLayout(Vie wGroup的
子类),其实没有自定义任
何属性,只是重写部分方法
(添加了打印,方便查看)
而已,如下:
public class TestButton exten
ds Button {
public TestButton(Context
context, AttributeSet attrs)
{
super(context, attrs)
;
}
@
Override
public boolean dispatchTo
uchEvent(MotionEvent event) {
Log.i(null, "TestButt
on dispatchTouchEvent-- actio
n=" + event.getAction());

return super.dispatch
TouchEvent(event);
}
@
Override
public boolean onTouchEve
nt(MotionEvent event) {
Log.i(null, "TestButt
on onTouchEvent-- action=" +
event.getAction());
return super.onTouchE
vent(event);
}
}
public class TestLinearLayout
extends LinearLayout {
public TestLinearLayout(C
ontext context, AttributeSet
attrs) {
super(context, attrs)


;
}
@
Override
public boolean onIntercep
tTouchEvent(MotionEvent ev) {
Log.i(null, "TestLine
arLayout onInterceptTouchEven
t-- action=" + ev.getAction()
)
;
return super.onInterc
eptTouchEvent(ev);
}
@
Override
public boolean dispatchTo
uchEvent(MotionEvent event) {
Log.i(null, "TestLine
arLayout dispatchTouchEvent--
action=" + event.getAction()
)
;
return super.dispatch

TouchEvent(event);
}
@
Override
public boolean onTouchEve
nt(MotionEvent event) {
Log.i(null, "TestLine
arLayout onTouchEvent-- actio
n=" + event.getAction());
return super.onTouchE
vent(event);
}
}
如上两个控件很简单吧,不
解释,继续看其他代码:
<
"
<
?xml version="1.0" encoding=
utf-8"?>
com.zzci.light.TestLinearLay


out xmlns:android="http://sch
emas.android.com/apk/res/andr
oid"
android:orientation="vert
ical"
android:gravity="center"
android:layout_width="fil
l_parent"
android:layout_height="fi
ll_parent"
android:id="@+id/mylayout
"
n
>
<
com.zzci.light.TestButto
android:id="@+id/my_b
android:layout_width=
tn"
"
=
match_parent"
android:layout_height
"wrap_content"
android:text="click t
est"/>

<
/com.zzci.light.TestLinearLa
yout>
public class ListenerActivity
extends Activity implements
View.OnTouchListener, View.On
ClickListener {
private TestLinearLayout
mLayout;
private TestButton mButto
n;
@
Override
public void onCreate(Bund
le savedInstanceState) {
super.onCreate(savedI
nstanceState);
setContentView(R.layo
ut.main);


mLayout = (TestLinear
Layout) this.findViewById(R.i
d.mylayout);
mButton = (TestButton
)
this.findViewById(R.id.my_b
tn);
mLayout.setOnTouchLis
tener(this);
mButton.setOnTouchLis
tener(this);
mLayout.setOnClickLis
tener(this);
mButton.setOnClickLis
tener(this);
}
@
Override
public boolean onTouch(Vi
ew v, MotionEvent event) {
Log.i(null, "OnTouchL

istener--onTouch-- action="+e
vent.getAction()+" --"+v);
return false;
}
@
Override
public void onClick(View
v) {
Log.i(null, "OnClickL
istener--onClick--"+v);
}
}
到此基础示例的代码编写完
成。没有啥难度,很简单易
懂,不多解释了。
2-2 运行现象

当直接点击Button时打印现
象如下:
TestLinearLayout dispatchTouc
hEvent-- action=0
TestLinearLayout onInterceptT
ouchEvent-- action=0
TestButton dispatchTouchEvent
-
- action=0
OnTouchListener--onTouch-- ac
tion=0 --com.zzci.light.TestB
utton
TestButton onTouchEvent-- act
ion=0
TestLinearLayout dispatchTouc
hEvent-- action=1
TestLinearLayout onInterceptT
ouchEvent-- action=1
TestButton dispatchTouchEvent
-
- action=1

OnTouchListener--onTouch-- ac
tion=1 --com.zzci.light.TestB
utton
TestButton onTouchEvent-- act
ion=1
OnClickListener--onClick--com
.
zzci.light.TestButton
分析:你会发现这个结果好
惊讶吧,点击了Button却先
执行了
TestLinearLayout(Vie wGrou
p)的dispatchTouchEvent ,
接着执行
TestLinearLayout(Vie wGrou
p)的

onInterceptTouchEvent,接着
执行
TestButton(TestLinearLayout
包含的成员Vie w)的
dispatchTouchEvent
,
接着就是Vie w触摸事件的
分发流程,上一篇已经讲过
了。也就是说当点击Vie w时
事件派发每一个down,up的
action顺序是先触发最父级控
件
(
这里为LinearLayout)的
dispatchTouchEvent-
onInterceptTouchEvent->然
>
后向前一级传递(这里就是
传递到Button Vie w)。
那么继续看,当直接点击除
Button以外的其他部分时打
印如下:
TestLinearLayout dispatchTouc
hEvent-- action=0
TestLinearLayout onInterceptT
ouchEvent-- action=0
OnTouchListener--onTouch-- ac
tion=0 --com.zzci.light.TestL
inearLayout
TestLinearLayout onTouchEvent

-
- action=0
TestLinearLayout dispatchTouc
hEvent-- action=1
OnTouchListener--onTouch-- ac
tion=1 --com.zzci.light.TestL
inearLayout
TestLinearLayout onTouchEvent
-
- action=1
OnClickListener--onClick--com
zzci.light.TestLinearLayout
.
分析:你会发现一个奇怪的
现象,派发
ACTION_DOWN(action=0
)
事件时顺序为
dispatchTouchEvent-
onInterceptTouchEvent-
>

>
onTouch
-
>onTouchEvent,而接着派
发ACTION_UP(action=1)
事件时与上面顺序不同的时
竟然没触发
onInterceptTouchEvent方法。
这是为啥呢?
我也纳闷,那就留着下面分
析源码再找答案吧,先记住
这个问题。
有了上面这个例子你是不是
发现包含Vie wGroup与Vie w
的事件触发有些相似又有很
大差异吧(PS:在Android中
继承Vie w实现的控件已经是
最小单位了,也即在XML布
局等操作中不能再包含子项
了,而继承Vie wGroup实现
的控件通常不是最小单位,
可以包含不确定数目的子
项)。具体差异是啥呢?咱
们类似上篇一样,带着这个
实例疑惑去看源码找答案
吧。
3
Android 5.1.1(API 22)
ViewGrou p触摸屏事件
传递源码分析
通过上面例子的打印我们可
以确定分析源码的顺序,那
就开始分析呗。
3-1 从Vie wGroup的
dispatchTouchEvent方法说起
前一篇的3-2小节说在
Android中你只要触摸控件首
先都会触发控件的
dispatchTouchEvent方法(其
实这个方法一般都没在具体
的控件类中,而在他的父类
Vie w中)。这其实是思维单
单局限在Vie w的角度去看待
的,这里通过上面的例子你
是否发现触摸控件会先从他
的父级dispatchTouchEvent 方
法开始派发呢?是的,所以
咱们先从Vie wGroup的
dispatchTouchEvent方法说
起,如下:
public boolean dispatchTouchE
vent(MotionEvent ev) {
if (mInputEventConsis
tencyVerifier != null) {

mInputEventConsis
tencyVerifier.onTouchEvent(ev
,
1);
}
/
/ If the event targe
ts the accessibility focused
view and this is it, start
/
/ normal event dispa
tch. Maybe a descendant is wh
at will handle the click.
if (ev.isTargetAccess
ibilityFocus() && isAccessibi
lityFocusedViewOrHost()) {
ev.setTargetAcces
sibilityFocus(false);
}
boolean handled = fal
se;
if (onFilterTouchEven
tForSecurity(ev)) {

final int action
ev.getAction();
final int actionM
=
asked = action & MotionEvent.
ACTION_MASK;
/
/ Handle an init
ial down.
if (actionMasked
= MotionEvent.ACTION_DOWN) {
/ Throw away
all previous state when star
ting a new touch gesture.
=
/
/
/ The framew
ork may have dropped the up o
r cancel event for the previo
us gesture
/
/ due to an
app switch, ANR, or some othe
r state change.
cancelAndClea
rTouchTargets(ev);

resetTouchSta
te();
}
/
/ Check for inte
rception.
ercepted;
final boolean int
if (actionMasked
=
= MotionEvent.ACTION_DOWN
| mFirst
TouchTarget != null) {
final boolean
|
disallowIntercept = (mGroupF
lags & FLAG_DISALLOW_INTERCEP
T) != 0;
if (!disallow
Intercept) {
intercept
ed = onInterceptTouchEvent(ev
)
;
ev.setAct

ion(action); // restore actio
n in case it was changed
}
else {
intercept
ed = false;
}
}
else {
/ There are
/
no touch targets and this act
ion is not an initial down
/
/ so this vi
ew group continues to interce
pt touches.
intercepted =
true;
}
/
/ If intercepted
,
.
start normal event dispatch
Also if there is already
/
/ a view that is
handling the gesture, do nor

mal event dispatch.
if (intercepted |
mFirstTouchTarget != null)
|
{
ev.setTargetA
ccessibilityFocus(false);
}
/
/ Check for canc
elation.
final boolean can
celed = resetCancelNextUpFlag
(this)
|
| action
Masked == MotionEvent.ACTION_
CANCEL;
/
/ Update list of
touch targets for pointer do
wn, if needed.
final boolean spl
it = (mGroupFlags & FLAG_SPLI

T_MOTION_EVENTS) != 0;
TouchTarget newTo
uchTarget = null;
boolean alreadyDi
spatchedToNewTouchTarget = fa
lse;
if (!canceled &&
!
intercepted) {
/
/ If the eve
nt is targeting accessiiblity
focus we give it to the
/
/ view that
has accessibility focus and i
f it does not handle it
/
/ we clear t
he flag and dispatch the even
t to all children as usual.
/
/ We are loo
king up the accessibility foc
used host to avoid keeping
/
/ state sinc

e these events are very rare.
View childWit
hAccessibilityFocus = ev.isTa
rgetAccessibilityFocus()
?
fin
dChildWithAccessibilityFocus(
: null;
)
if (actionMas
ked == MotionEvent.ACTION_DOW
N
|
| (s
plit && actionMasked == Motio
nEvent.ACTION_POINTER_DOWN)
|
| ac
tionMasked == MotionEvent.ACT
ION_HOVER_MOVE) {
final int
actionIndex = ev.getActionIn
dex(); // always 0 for down
final int
idBitsToAssign = split ? 1 <

<
)
ev.getPointerId(actionIndex
:
TouchTarget.ALL_POINTER_IDS;
/
/ Clean
up earlier touch targets for
this pointer id in case they
/
/ have b
ecome out of sync.
removePoi
ntersFromTouchTargets(idBitsT
oAssign);
final int
childrenCount = mChildrenCou
nt;
if (newTo
uchTarget == null && children
Count != 0) {
final
float x = ev.getX(actionInde

x);
final
float y = ev.getY(actionInde
x);
/
/ Fi
nd a child that can receive t
he event.
/
/ Sc
an children from front to bac
k.
final
ArrayList<View> preorderedLi
st = buildOrderedChildList();
final
boolean customOrder = preord
eredList == null
&
& isChildrenDrawingOrderE
nabled();
final
View[] children = mChildren;
for (

int i = childrenCount - 1; i
>= 0; i--) {
f
inal int childIndex = customO
rder
?
getChildDrawingOrder
(childrenCount, i) : i;
f
inal View child = (preordered
List == null)
?
children[childIndex]
preorderedList.get(childIn
dex);
:
/
/
If there is a view that has
accessibility focus we want
it
/
/
to get the event first and

if not handled we will perfor
m a
/
/
normal dispatch. We may do
a double iteration but this i
s
/
/
safer given the timeframe.
i
f (childWithAccessibilityFocu
s != null) {
if (childWithAccessibility
Focus != child) {
continue;
}
childWithAccessibilityFocu
s = null;

i = childrenCount - 1;
}
i
f (!canViewReceivePointerEven
ts(child)
|
| !isTransformedTouch
PointInView(x, y, child, null
) {
)
ev.setTargetAccessibilityF
ocus(false);
continue;
}
n
ewTouchTarget = getTouchTarge
t(child);
i
f (newTouchTarget != null) {

/
/ Child is already receiv
ing touch within its bounds.
/
/ Give it the new pointer
in addition to the ones it i
s handling.
newTouchTarget.pointerIdBi
ts |= idBitsToAssign;
break;
}
r
esetCancelNextUpFlag(child);
i
f (dispatchTransformedTouchEv
ent(ev, false, child, idBitsT
oAssign)) {
/
/ Child wants to receive

touch within its bounds.
mLastTouchDownTime = ev.ge
tDownTime();
if (preorderedList != null
)
{
/
/ childIndex points i
nto presorted list, find orig
inal index
for (int j = 0; j < ch
ildrenCount; j++) {
if (children[child
Index] == mChildren[j]) {
mLastTouchDown
Index = j;
break;

}
}
}
else {
mLastTouchDownIndex =
childIndex;
}
mLastTouchDownX = ev.getX(
mLastTouchDownY = ev.getY(
newTouchTarget = addTouchT
)
)
;
;
arget(child, idBitsToAssign);
alreadyDispatchedToNewTouc

hTarget = true;
break;
}
/
/
The accessibility focus did
n't handle the event, so clea
r
/
the flag and do a normal di
spatch to all children.
/
e
v.setTargetAccessibilityFocus
(false);
}
if (p
reorderedList != null) preord
eredList.clear();
}
if (newTo

uchTarget == null && mFirstTo
uchTarget != null) {
/
/ Di
d not find a child to receive
the event.
/
/ As
sign the pointer to the least
recently added target.
newTo
uchTarget = mFirstTouchTarget
;
while
(newTouchTarget.next != null
)
{
n
ewTouchTarget = newTouchTarge
t.next;
}
newTo
uchTarget.pointerIdBits |= id
BitsToAssign;
}

}
}
/
/ Dispatch to to
uch targets.
if (mFirstTouchTa
rget == null) {
/
/ No touch t
argets so treat this as an or
dinary view.
handled = dis
patchTransformedTouchEvent(ev
,
canceled, null,
Touch
Target.ALL_POINTER_IDS);
else {
/ Dispatch t
}
/
o touch targets, excluding th
e new touch target if we alre
ady
/
/ dispatched
to it. Cancel touch targets

if necessary.
TouchTarget p
redecessor = null;
TouchTarget t
arget = mFirstTouchTarget;
while (target
!
= null) {
final Tou
chTarget next = target.next;
if (alrea
dyDispatchedToNewTouchTarget
&
{
& target == newTouchTarget)
handl
ed = true;
}
else {
final
boolean cancelChild = resetC
ancelNextUpFlag(target.child)
|
| intercepted;
if (d

ispatchTransformedTouchEvent(
ev, cancelChild,
target.child, target.point
erIdBits)) {
h
andled = true;
}
if (c
ancelChild) {
i
f (predecessor == null) {
mFirstTouchTarget = next;
}
else {
predecessor.next = next;
}
t
arget.recycle();
t

arget = next;
ontinue;
c
}
}
predecess
target =
or = target;
next;
}
}
/
/ Update list of
touch targets for pointer up
or cancel, if needed.
if (canceled
|
| action
Masked == MotionEvent.ACTION_
UP
|
| action
Masked == MotionEvent.ACTION_
HOVER_MOVE) {

resetTouchSta
else if (split
te();
}
&
& actionMasked == MotionEven
t.ACTION_POINTER_UP) {
final int act
ionIndex = ev.getActionIndex(
)
;
final int idB
itsToRemove = 1 << ev.getPoin
terId(actionIndex);
removePointer
sFromTouchTargets(idBitsToRem
ove);
}
}
if (!handled && mInpu
tEventConsistencyVerifier !=
null) {
mInputEventConsis
tencyVerifier.onUnhandledEven

t(ev, 1);
}
return handled;
}
我勒个去!!!这比Vie w的
dispatchTouchEvent方法长很
多啊,那就只关注重点分析
吧。
第一步,17-24行,对
ACTION_DOWN进行处理。
因为ACTION_DOWN是一系
列事件的开端,当是
ACTION_DOWN时进行一些

初始化操作,从上面源码中
注释也可以看出来,清除以
往的Touch状态然后开始新
的手势。在这里你会发现
cancelAndClearTouchTargets(
ev)方法中有一个非常重要的
操作就是将
mFirstTouc hTa rge t设置为了
null(刚开始分析大眼瞄一
眼没留意,结果越往下看越
迷糊,所以这个是分析
Vie wGroup 的
dispatchTouchEvent方法第一
步中重点要记住的一个地
方),接着在
resetTouchState()方法中重置
Touch状态标识。
第二步,26-47行,检查是否
要拦截。
在
dispatchTouchEvent(MotionEv
ent ev)这段代码中使用变量
intercepted来标记Vie wGroup
是否拦截Touch事件的传
递,该变量类似第一步的
mFirstTouc hTa rge t变量,在
后续代码中起着很重要的作
用。
if (actionMasked == Motio
这一条判断语句说明当事件
为ACTION_DOWN或者
mFirstTouc hTa rge t不为null(即
已经找到能够接收touch事件
的目标组件)时if成立,否则if
不成立,然后将intercepted
设置为true,也即拦截事
件。当当事件为
ACTION_DOWN或者
mFirstTouc hTa rge t不为null时

判断disallowIntercept(禁止拦
截)标志位,而这个标记在
Vie wGroup中提供了public的
设置方法,如下:
public void requestDisallowIn
terceptTouchEvent(boolean dis
allowIntercept) {
if (disallowIntercept
=
= ((mGroupFlags & FLAG_DISA
LLOW_INTERCEPT) != 0)) {
/
/ We're already
in this state, assume our anc
estors are too
return;
}
if (disallowIntercept

)
{
mGroupFlags |= FL
AG_DISALLOW_INTERCEPT;
else {
mGroupFlags &= ~F
}
LAG_DISALLOW_INTERCEPT;
}
/
/ Pass it up to our
parent
{
if (mParent != null)
mParent.requestDi
sallowInterceptTouchEvent(dis
allowIntercept);
}
}
所以你可以在其他地方调用
requestDisallowInterceptTouc

hEvent(boolean
disallowIntercept)方法,从而
禁止执行是否需要拦截的判
断。
当disallowIntercept为true(禁
止拦截判断)时则
intercepted直接设置为false,
否则调用
onInterceptTouchEvent(ev)方
法,然后将结果赋值给
intercepted。那就来看下
Vie wGroup与众不同与Vie w
特有的onInterceptTouchEvent
方法,如下:
public boolean onInterceptTou
chEvent(MotionEvent ev) {
return false;
}
看见了吧,默认的
onInterceptTouchEvent方法只
是返回了一个false,也即
intercepted=false。所以可以
说明上面例子的部分打印
(
>
dispatchTouchEvent-
onInterceptTouchEvent-

>
onTouchEvent),这里很明
显表明在Vie wGroup的
dispatchTouchEvent()中默认
(不在其他地方调运
requestDisallowInterceptTouc
hEvent方法设置禁止拦截标
记)首先调用了
onInterceptTouchEvent()方
法。
第三步,49-51行,检查
cancel。
通过标记和action检查
cancel,然后将结果赋值给
局部boolean变量canceled。
第四步,53-函数结束,事件
分发。
5
4行首先可以看见获取一个
boolean变量标记split来标
记,默认是true,作用是是
否把事件分发给多个子
Vie w,这个同样在
Vie wGroup中提供了public的
方法设置,如下:
public void setMotionEventSpl

ittingEnabled(boolean split)
{
/
/ TODO Applications
really shouldn't change this
setting mid-touch event,
/
/ but perhaps this s
hould handle that case and se
nd ACTION_CANCELs to any chil
d views
/
/ with gestures in p
rogress when this is changed.
if (split) {
mGroupFlags |= FL
AG_SPLIT_MOTION_EVENTS;
}
else {
mGroupFlags &= ~F
LAG_SPLIT_MOTION_EVENTS;
}
}
接着57 行

if (!canceled && !interce
判断表明,事件不是
ACTION_CANCEL并且
Vie wGroup的拦截标志位
intercepted为false(不拦截)则
会进入
其中。事件分发步骤中关于
ACTION_DOWN的特殊处理
接着67行这个很大的if语句
if (actionMasked == Motio
actionMasked == MotionEve
处理ACTION_DOWN事件,


这个环节比较繁琐,也比较
重要,如下具体分析。
在79行判断了childrenCount
个数是否不为0,然后接着
在84行拿到了子Vie w的list集
合preorderedList;接着在88
行通过一个for循环i从
childrenCount - 1开始遍历到
0,倒序遍历所有的子vie w,
这是因为preorderedList中的
顺序是按照addView或者
XML布局文件中的顺序来
的,后addView添加的子
Vie w,会因为Android的UI后
刷新机制显示在上层;假如
点击的地方有两个子Vie w都
包含的点击的坐标,那么后
被添加到布局中的那个子
vie w会先响应事件;这样其
实也是符合人的思维方式
的,因为后被添加的子vie w
会浮在上层,所以我们去点
击的时候一般都会希望点击
最上层的那个组件先去响应
事件。
接着在106到112行通过
ge tTouc hTa rge t去查找当前子
Vie w是否在
mFirstTouc hTa rge t. ne xt这条
target链中的某一个targe中,
如果在则返回这个target,否
则返回null。在这段代码的if
判断通过说明找到了接收
Touch事件的子Vie w,即
newTouchTarget,那么,既
然已经找到了,所以执行
break跳出for循环。如果没有
break则继续向下执行走到
115行开始到134行,这里你
可以看见一段if判断的代码
if (dispatchTransformedTo
,这个被if的大括弧括起来
的一段代码很重要,具体解
释如下:
调用方法
dispatchTransformedTouchEv
ent()将Touch事件传递给特定
的子Vie w。该方法十分重
要,在该方法中为一个递归
调用,会递归调用
dispatchTouchEvent()方法。
在dispatchTouchEvent()中如

果子Vie w为Vie wGroup并且
Touch没有被拦截那么递归
调用dispatchTouchEvent() ,
如果子Vie w为Vie w那么就会
调用其onTouchEvent() 。
dispatchTransformedTouchEv
ent方法如果返回true则表示
子Vie w消费掉该事件,同时
进入
该if判断。满足if语句后重要
的操作有:
给newTouchTarget赋值;

给
alreadyDispatchedToNewT
ouchTarget赋值为true;
执行break,因为该for循
环遍历子Vie w判断哪个子
Vie w接受Touch事件,既
然已经找到了就跳出该外
层for循环;
如果115行if判断中的
dispatchTransformedTouchEv
ent()方法返回false,即子
Vie w的onTouchEvent返回
false(即Touch事件未被消


费),那么就不满足该if条
件,也就无法执行
addTouchTarget(),从而导致
mFirstTouc hTa rge t为null(没
法对mFirstTouc hTa rge t赋
值,因为上面分析了
mFirstTouc hTa rge t一进来是
ACTION_DOWN就置位为
null了),那么该子Vie w就
无法继续处理
ACTION_MOVE事件和
ACTION_UP事件(28行的
判断为false,也即
intercepted=true了,所以之
后一系列判断无法通过)。
如果115行if判断中的
dispatchTransformedTouchEv
ent()方法返回true,即子
Vie w的onTouchEvent返回
true(即Touch事件被消费),
那么就满足该if条件,从而
mFirstTouc hTa rge t不为null。
继续看143行的判断
if (newTouchTarget == nul
。该if表示经过前面的for循
环没有找到子Vie w接收

Touch事件并且之前的
mFirstTouc hTa rge t不为空则
为真,然后newTouchTarget
指向了最初的Touc hTa rge t。
通过上面67到157行关于事
件分发步骤中
ACTION_DOWN的特殊处理
可以发现,对于此处
ACTION_DOWN的处理具体
体现在
dispatchTransformedTouchEv
ent()方法,该方法返回值具
备如下特征:
re turn de scription set
事件被消
费
true
mFi r stTouchTa
mFi r stTouchTa
事件未被
消费
false
因为在
dispatchTransformedTouchEv
ent()会调用递归调用
dispatchTouchEvent()和
onTouchEvent(),所以
dispatchTransformedTouchEv
ent()的返回值实际上是由
onTouchEvent()决定的。简

单地说onTouchEvent()是否
消费了Touch事件的返回值
决定了
dispatchTransformedTouchEv
ent()的返回值,从而决定
mFirstTouc hTa rge t是否为
null,进一步决定了
Vie wGroup是否处理Touch事
件,这一点在160行开始的
代码中有体现。如下分析事
件分发步骤中关于
ACTION_DOWN处理之后的
其他处理逻辑,也即160行
开始剩余的逻辑。
事件分发步骤中关于
ACTION_DOWN处理之后的
其他处理逻辑
可以看到,如果派发的事件
不是ACTION_DOWN就不会
经过上面的流程,而是直接
从此处开始执行。上面说
了,经过上面对于
ACTION_DOWN的处理后
mFirstTouc hTa rge t可能为null
或者不为null。所以可以看
见161行代码
if (mFirstTouchTarget ==
判断了mFirstTouc hTa rge t值
是否为null的情况,完全符
合如上分析。那我们分情况
继续分析一下:
当161行if判断的
mFirstTouc hTa rge t为null时,
也就是说Touch事件未被消
费,即没有找到能够消费
touch事件的子组件或Touch
事件被拦截了,则调用
Vie wGroup 的

dispatchTransformedTouchEv
ent()方法处理Touch事件(和
普通Vie w一样),即子Vie w
没有消费Touch事件,那么
子Vie w的上层Vie wGroup才
会调用其onTouchEvent()处
理Touch事件。具体就是在
调用
dispatchTransformedTouchEv
ent()时第三个参数为null,关
于
dispatchTransformedTouchEv
ent方法下面会分析,暂时先
记住就行。
这下再回想上面例子,点击
Button时为啥触发了Button的
一系列touch方法而没有触发
父级LinearLayout的touch方
法的疑惑?明白了吧?
子vie w对于Touch事件处理返
回true那么其上层的
Vie wGroup就无法处理Touch
事件了,子vie w对于Touch事
件处理返回false那么其上层
的Vie wGroup才可以处理
Touch事件。
当161行if判断的
mFirstTouc hTa rge t不为null
时,也就是说找到了可以消
费Touch事件的子Vie w且后
续Touch事件可以传递到该
子Vie w。可以看见在源码的
else中对于非
ACTION_DOWN事件继续传
递给目标子组件进行处理,
依然是递归调用
dispatchTransformedTouchEv
ent()方法来实现的处理。
到此Vie wGroup 的
dispatchTouchEvent方法分析
完毕。
上面说了Vie wGroup的
dispatchTouchEvent方法详细
情况,也知道在其中可能会
执行onInterceptTouchEvent 方
法,所以接下来咱们先简单
分析一下这个方法。
3
-2 说说Vie wGroup的
dispatchTouchEvent中可能执
行的onInterceptTouchEvent 方
法
如下系统源码:
public boolean onInterceptTou
chEvent(MotionEvent ev) {
return false;
}
看到了吧,这个方法算是
Vie wGroup不同于Vie w特有
的一个事件派发调运方法。
在源码中可以看到这个方法
实现很简单,但是有一堆注
释。其实上面

分析了,如果Vie wGroup的
onInterceptTouchEvent返回
false就不阻止事件继续传递
派发,否则阻止传递派发。
对了,还记得在
dispatchTouchEvent方法中除
过可能执行的
onInterceptTouchEvent以外在
后面派发事件时执行的
dispatchTransformedTouchEv
ent方法吗?上面分析
dispatchTouchEvent时说了下
面会仔细分析,那么现在就
来继续看看这个方法吧。
-3 继续说说Vie wGroup的
3
dispatchTouchEvent中执行的
dispatchTransformedTouchEv
ent方法
Vie wGroup 的
dispatchTransformedTouchEv
ent方法系统源码如下:
private boolean dispatchTrans
formedTouchEvent(MotionEvent
event, boolean cancel,
View child, int d
esiredPointerIdBits) {
final boolean handled

;
/
/ Canceling motions
is a special case. We don't
need to perform any transform
ations
/
/ or filtering. The
important part is the action
not the contents.
,
final int oldAction =
event.getAction();
if (cancel || oldActi
on == MotionEvent.ACTION_CANC
EL) {
event.setAction(M
otionEvent.ACTION_CANCEL);
if (child == null
)
{
handled = sup
er.dispatchTouchEvent(event);
else {
handled = chi
}

ld.dispatchTouchEvent(event);
}
event.setAction(o
ldAction);
return handled;
}
/
/ Calculate the numb
er of pointers to deliver.
final int oldPointerI
dBits = event.getPointerIdBit
s();
final int newPointerI
dBits = oldPointerIdBits & de
siredPointerIdBits;
/
/ If for some reason
we ended up in an inconsiste
nt state where it looks like
we
/
/ might produce a mo
tion event with no pointers i

n it, then drop the event.
if (newPointerIdBits
=
= 0) {
return false;
}
/
/ If the number of p
ointers is the same and we do
n't need to perform any fancy
/
/ irreversible trans
formations, then we can reuse
the motion event for this
/
/ dispatch as long a
s we are careful to revert an
y changes we make.
/
/ Otherwise we need
to make a copy.
final MotionEvent tra
nsformedEvent;
if (newPointerIdBits
= oldPointerIdBits) {
if (child == null
=

|
| child.hasIdentityMatrix()
)
{
if (child ==
null) {
handled =
super.dispatchTouchEvent(eve
nt);
}
else {
final flo
at offsetX = mScrollX - child
mLeft;
.
final flo
at offsetY = mScrollY - child
mTop;
.
event.off
setLocation(offsetX, offsetY)
;
handled =
child.dispatchTouchEvent(eve
nt);

event.off
setLocation(-offsetX, -offset
Y);
}
return handle
d;
}
transformedEvent
=
MotionEvent.obtain(event);
else {
transformedEvent
event.split(newPointerIdBit
}
=
s);
}
/
/ Perform any necess
ary transformations and dispa
tch.
if (child == null) {
handled = super.d
ispatchTouchEvent(transformed
Event);

}
else {
final float offse
tX = mScrollX - child.mLeft;
final float offse
tY = mScrollY - child.mTop;
transformedEvent.
offsetLocation(offsetX, offse
tY);
if (! child.hasId
entityMatrix()) {
transformedEv
ent.transform(child.getInvers
eMatrix());
}
handled = child.d
ispatchTouchEvent(transformed
Event);
}
/
/ Done.
transformedEvent.recy

cle();
}
return handled;
看到了吧,这个方法也算是
Vie wGroup不同于Vie w特有
的一个事件派发调运方法,
而且奇葩的就是这个方法也
很长。那也继续分析
吧。。。
上面分析了,在
dispatchTouchEvent()中调用
dispatchTransformedTouchEv
ent()将事件分发给子Vie w处

理。在此我们需要重点分析
该方法的第三个参数(Vie w
c hild)。在
dispatchTouchEvent()中多次
调用了
dispatchTransformedTouchEv
ent()方法,而且有时候第三
个参数为null,有时又不
是,他们到底有啥区别呢?
这段源码中很明显展示了结
果。在
dispatchTransformedTouchEv
ent()源码中可以发现多次对
于c hild是否为null的判断,并
且均做出如下类似的操作。
其中,当c hild == null时会将
Touch事件传递给该
Vie wGroup自身的
dispatchTouchEvent()处理,
即
super.dispatchTouchEvent(eve
nt)(也就是Vie w的这个方
法,因为Vie wGroup的父类
是Vie w);当c hild != null时
会调用该子view(当然该vie w
可能是一个Vie w也可能是一
个ViewGroup)的
dispatchTouchEvent(event)处
理,即
child.dispatchTouchEvent(eve
nt)。别的代码几乎没啥需要
具体注意分析的。
所以,到此你也会发现
Vie wGroup没有重写Vie w的
onTouchEvent(MotionEvent
event) 方法,也就是说接下
来的调运关系就是上一篇分
析的流程了,这里不在多
说。
好了,到此你是不是即明白
了上面实例演示的代码结
果,也明白了上一篇最后升
级实例验证模块留下的点击
Button触发了LinearLayout的
一些疑惑呢?答案自然是必
须的!
4
Android 5.1.1(API 22)
ViewGrou p触摸屏事件
传递总结
如上就是所有Vie wGroup关
于触摸屏事件的传递机制源
码分析与实例演示。具体总
结如下:
1
. Android事件派发是先传递
到最顶级的Vie wGroup,
再由Vie wGroup递归传递
到Vie w的。
2
. 在Vie wGroup中可以通过
onInterceptTouchEvent方法
对事件传递进行拦截,
onInterceptTouchEvent方法
返回true代表不允许事件
继续向子Vie w传递,返回
false代表不对事件进行拦
截,默认返回false。
3
. 子Vie w中如果将传递的事
件消费掉,Vie wGroup中
将无法接收到任何事件。
【工匠若
水 http://blog.csdn.net/yanbob
er】
好了,至此整个Vie w与
Vie wGroup的触摸屏事件派
发机制分析完毕。关于他们
的事件是哪派发来的可以继
续进阶的阅读下一篇
《Android触摸屏事件派发机
篇)》
PS一句:最终还是选择
CSDN来整理发表这几年的
知识点,该文章平行迁移到
CSDN。因为CSDN也支持
MarkDown语法了,牛逼
啊!
【工匠若
水 http://blog.csdn.net/yanbob
er】
该篇承接上一篇《Android触
码分析二(ViewGroup篇)》,
阅读本篇之前建议先阅读。
1
背景
还记得前面两篇从Android的
基础最小元素控件(Vie w)
到Vie wGroup控件的触摸屏
事件分发机制分析吗?你可
能看完会有疑惑,Vie w的事
件是Vie wGroup派发的,那
Vie wGroup的事件呢?他包
含在Ac tivity上,是不是
Ac tivity也有类似的事件派发
方法呢?带着这些疑惑咱们
继续实例验证加源码分析
吧。
PS:阅读本篇前建议先查看
前一篇《Android触摸屏事件
(ViewGroup篇)》与
《
Android触摸屏事件派发机
篇)》,这一篇承接上一篇。
2
实例验证
2
-1 代码
如下实例与前面实例相同,
一个Button在LinearLayout
里,只不过我们这次重写了
Ac tivity的一些方法而已。具
体如下:
自定义的Button与
LinearLayout:
public class TestButton exten
ds Button {
public TestButton(Context
context, AttributeSet attrs)
{
super(context, attrs)
;
}

@
Override
public boolean dispatchTo
uchEvent(MotionEvent event) {
Log.i(null, "TestButt
on--dispatchTouchEvent--actio
n="+event.getAction());
return super.dispatch
TouchEvent(event);
}
@
Override
public boolean onTouchEve
nt(MotionEvent event) {
Log.i(null, "TestButt
on--onTouchEvent--action="+ev
ent.getAction());
return super.onTouchE
vent(event);
}
}


public class TestLinearLayout
extends LinearLayout {
public TestLinearLayout(C
ontext context, AttributeSet
attrs) {
super(context, attrs)
;
}
@
Override
public boolean onIntercep
tTouchEvent(MotionEvent ev) {
Log.i(null, "TestLine
arLayout--onInterceptTouchEve
nt--action="+ev.getAction());
return super.onInterc
eptTouchEvent(ev);
}
@
Override
public boolean dispatchTo

uchEvent(MotionEvent event) {
Log.i(null, "TestLine
arLayout--dispatchTouchEvent-
-
)
action=" + event.getAction()
;
return super.dispatch
TouchEvent(event);
}
@
Override
public boolean onTouchEve
nt(MotionEvent event) {
Log.i(null, "TestLine
arLayout--onTouchEvent--actio
n="+event.getAction());
return super.onTouchE
vent(event);
}
}
整个界面的布局文件:

<
com.example.yanbo.myapplicat
ion.TestLinearLayout
xmlns:android="http://sch
emas.android.com/apk/res/andr
oid"
android:layout_width="mat
ch_parent"
android:layout_height="ma
tch_parent"
android:id="@+id/layout">
<
com.example.yanbo.myappl
ication.TestButton
android:text="click t
est"
android:layout_width=
android:layout_height
"
match_parent"
=
"wrap_content"
android:id="@+id/butt
on"/>
<
/com.example.yanbo.myapplica

tion.TestLinearLayout>
整个界面Ac tivity,重写了
Ac tivity的一些关于触摸派发
的方法(三个):
public class MainActivity ext
ends Activity implements View
.
OnClickListener, View.OnTouc
hListener {
private TestButton mButto
n;
private TestLinearLayout
mLayout;
@
Override
protected void onCreate(B
undle savedInstanceState) {
super.onCreate(savedI


nstanceState);
setContentView(R.layo
ut.activity_main);
mButton = (TestButton
)
this.findViewById(R.id.butt
on);
mLayout = (TestLinear
Layout) this.findViewById(R.i
d.layout);
mButton.setOnClickLis
tener(this);
mLayout.setOnClickLis
tener(this);
mButton.setOnTouchLis
tener(this);
mLayout.setOnTouchLis
tener(this);
}

@
Override
public void onClick(View
v) {
Log.i(null, "onClick-
}
-
--v=" + v);
@
Override
public boolean onTouch(Vi
ew v, MotionEvent event) {
Log.i(null, "onTouch-
-
-
action="+event.getAction()+"
-v="+v);
return false;
}
@
Override
public boolean dispatchTo
uchEvent(MotionEvent ev) {
Log.i(null, "MainActi
vity--dispatchTouchEvent--act
ion=" + ev.getAction());

return super.dispatch
TouchEvent(ev);
}
@
Override
public void onUserInterac
tion() {
Log.i(null, "MainActi
vity--onUserInteraction");
super.onUserInteracti
on();
}
@
Override
public boolean onTouchEve
nt(MotionEvent event) {
Log.i(null, "MainActi
vity--onTouchEvent--action="+
event.getAction());
return super.onTouchE
vent(event);
}

}
如上就是实例测试代码,非
常简单,没必要分析,直接
看结果吧。
2-2 结果分析
直接点击Button按钮打印如
下:
MainActivity--dispatchTouchEv
ent--action=0
MainActivity--onUserInteracti
on
TestLinearLayout--dispatchTou
chEvent--action=0
TestLinearLayout--onIntercept


TouchEvent--action=0
TestButton--dispatchTouchEven
t--action=0
onTouch--action=0--v=com.exam
ple.yanbo.myapplication.TestB
utton
TestButton--onTouchEvent--act
ion=0
MainActivity--dispatchTouchEv
ent--action=1
TestLinearLayout--dispatchTou
chEvent--action=1
TestLinearLayout--onIntercept
TouchEvent--action=1
TestButton--dispatchTouchEven
t--action=1
onTouch--action=1--v=com.exam
ple.yanbo.myapplication.TestB
utton
TestButton--onTouchEvent--act
ion=1
onClick----v=com.example.yanb

o.myapplication.TestButton
分析可以发现,当点击
Button时除过派发Ac tivity的
几个新方法之外其他完全符
合前面两篇分析的Vie w与
Vie wGroup的触摸事件派发
机制。对于Ac tivity
来说,ACTION_DOWN事件
首先触发
dispatchTouchEvent,然后触
发onUserInteraction,再次
onTouchEvent,接着的

ACTION_UP事件触发
dispatchTouchEvent后触发了
onTouchEvent,也就是说
ACTION_UP事件时不会触
发onUserInteraction(待会可
查看源代码分析原因)。
直接点击Button以外的其他
区域:
MainActivity--dispatchTouchEv
ent--action=0
MainActivity--onUserInteracti
on
TestLinearLayout--dispatchTou
chEvent--action=0

TestLinearLayout--onIntercept
TouchEvent--action=0
onTouch--action=0--v=com.exam
ple.yanbo.myapplication.TestL
inearLayout
TestLinearLayout--onTouchEven
t--action=0
MainActivity--dispatchTouchEv
ent--action=1
TestLinearLayout--dispatchTou
chEvent--action=1
onTouch--action=1--v=com.exam
ple.yanbo.myapplication.TestL
inearLayout
TestLinearLayout--onTouchEven
t--action=1
onClick----v=com.example.yanb
o.myapplication.TestLinearLay
out
怎么样?完全符合上面点击

Button结果分析的猜想。
那接下来还是要看看Ac tivity
里关于这几个方法的源码
了。
3
Android 5.1.1(API 22)
Activity触摸屏事件传
递源码分析
通过上面例子的打印我们可
以确定分析源码的顺序,那
就开始分析呗。
3-1 从Ac tivity的
dispatchTouchEvent方法说起
-1-1 开始分析
先上源码,如下:
3
/
**
*
Called to process touc
h screen events. You can ove
rride this to
*
intercept all touch sc
reen events before they are d
ispatched to the
*
window. Be sure to ca
ll this implementation for to
uch screen events
*
that should be handled
normally.
*
*
@param ev The touch sc

reen event.
*
*
@return boolean Return
true if this event was consu
med.
*
/
public boolean dispatchTo
uchEvent(MotionEvent ev) {
if (ev.getAction() ==
MotionEvent.ACTION_DOWN) {
onUserInteraction
();
}
if (getWindow().super
DispatchTouchEvent(ev)) {
return true;
}
return onTouchEvent(e
v);
}

哎呦!这次看着代码好少的
样子,不过别高兴,浓缩才
是精华,这里代码虽少,涉
及的问题点还是很多的,那
么咱们就来一点一点分析
吧。
12到14行看见了吧?上面例
子咱们看见只有
ACTION_DOWN事件派发时
调运了onUserInteraction 方
法,当时还在疑惑呢,这下
明白了吧,不多解释,咱们
直接跳进去可以看见是一个
空方法,具体下面会分析。
好了,自己分析15到17行,
看着简单吧,我勒个去,我
怎么有点懵,这是哪的方
法?咱们分析分析吧。
首先分析Ac tivity的attach方
法可以发现getWindow()返回
的就是PhoneWindow对象
(
PhoneWindow为抽象
Window的实现子类),那就
简单了,也就相当于
PhoneWindow类的方法,而
PhoneWindow类实现于
Window抽象类,所以先看下
Window类中抽象方法的定
义,如下:
/
,
**
*
Used by custom windows
such as Dialog, to pass the
touch screen event
*
further down the view
hierarchy. Application develo
pers should
*
not need to implement
or call this.
*
*
/
public abstract boolean s
uperDispatchTouchEvent(Motion
Event event);

看见注释没有?用户不需要
重写实现的方法,实质也不
能,在Ac tivity中没有提供重
写的机会,因为Window是以
组合模式与Ac tivity建立关系
的。好了
,看完了抽象的Window方
法,那就去PhoneWindow里
看下Window抽象方法的实现
吧,如下:
@
Override
public boolean superDispa


tchTouchEvent(MotionEvent eve
nt) {
return mDecor.superDi
spatchTouchEvent(event);
}
又是看着好简单的样子哦,
实际又是一堆问题,继续分
析。你会发现在
PhoneWindow的
superDispatchTouchEvent方
法里又直接返回了另一个
mDecor
对象的
superDispatchTouchEvent方
法,mDecor是啥?继续分析
吧。
在PhoneWindow类里发现,
mDecor是DecorView类的实
例,同时DecorView是
PhoneWindow的内部类。最
惊人的发现是DecorView
extends FrameLayout
implements
RootViewSurfaceTaker,看见
没有?它是一个真正Ac tivity
的root vie w,它继承了
FrameLayout。怎么验证他一
定是root vie w呢?很简单,
不知道大家是不是熟悉
Android App开发技巧中关于
UI布局优化使用的SDK工具
Hierarchy Viewer。咱们通过
他来看下上面刚刚展示的那
个例子的Hierarchy Viewer你
就明白了,如下我在Ubuntu
上截图的Hierarchy Viewer分
析结果:
看见没有,我们上面例子中
Ac tivity中setContentView时放
入的xml layout是一个
LinearLayout,其中包含一个
Button,上图展示了我们放
置的LinearLayout被放置在一
个id为content的FrameLayout
的布局中,这也就是为啥
Ac tivity的setContentView方法
叫set content vie w了,就是
把我们的xml放入了这个id为
content的FrameLayout中。
赶快回过头,你是不是发现
上面PhoneWindow 的
superDispatchTouchEvent直
接返回了DecorView的
superDispatchTouchEvent,
而DecorView又是
FrameLayout的子类,
FrameLayout又是Vie wGroup
的子类。机智的你想到了啥
木有?
没想到就继续看下
DecorView类的
superDispatchTouchEvent方
法吧,如下:
public boolean superDispatchT
ouchEvent(MotionEvent event)
{
return super.disp

atchTouchEvent(event);
}
这回你一定恍然大悟了吧,
不然就得脑补前面两篇博客
的内容了。。。
搞半天Ac tivity的
dispatchTouchEvent方法的15
行
if (getWindow().superDisp
本质执行的是一个
Vie wGroup 的
dispatchTouchEvent方法(这
个Vie wGroup是Ac tivity特有

的root vie w,也就是id为
content的FrameLayout布
局),接下来就不用多说了
吧,完全是前面两篇分析的
执行过程。
接下来依据派发事件返回值
决定是否触发Ac tivity的
onTouchEvent方法。
3
-1-2 小总结一下
在Ac tivity的触摸屏事件派发
中:
1. 首先会触发Ac tivity的
dispatchTouchEvent方法。
. dispatchTouchEvent方法中
如果是ACTION_DOWN的
情况下会接着触发
2
onUserInteraction方法。
. 接着在dispatchTouchEvent
方法中会通过Ac tivity的
root Vie w(id为content的
FrameLayout),实质是
Vie wGroup,通过
3
super.dispatchTouchEvent
把touchevent派发给各个
a c tivity的子vie w,也就是
我们再Ac tivity. onCre a t方
法中setContentView时设置
的vie w 。
4
. 若Ac tivity下面的子vie w拦
截了touchevent事件(返回
true)则
Ac tivity. onTouc hEve nt方法
就不会执行。
3
-2 继续Activity的
dispatchTouchEvent方
法中调运的
onUserInteraction方法
如下源码:
/
**
*
Called whenever a key,
touch, or trackball event is
dispatched to the
*
activity. Implement t
his method if you wish to kno
w that the user has
*
interacted with the de
vice in some way while your a
ctivity is running.
*
This callback and {@li
nk #onUserLeaveHint} are inte
nded to help
*
activities manage stat
us bar notifications intellig
ently; specifically,
*
for helping activities
determine the proper time to
cancel a notfication.

*
*
<p>All calls to your a
ctivity's {@link #onUserLeave
Hint} callback will
*
be accompanied by call
s to {@link #onUserInteractio
n}. This
*
ensures that your acti
vity will be told of relevant
user activity such
*
as pulling down the no
tification pane and touching
an item there.
*
*
<p>Note that this call
back will be invoked for the
touch down action
*
that begins a touch ge
sture, but may not be invoked
for the touch-moved
*
and touch-up actions t
hat follow.

*
*
@see #onUserLeaveHint(
)
*
/
public void onUserInterac
tion() {
}
搞了半天就像上面说的,这
是一个空方法,那它的作用
是啥呢?
此方法是a c tivity的方法,当
此a c tivity在栈顶时,触屏点
击按home,back,menu键等
都会触发此方法。下拉
statubar、旋转屏幕、锁屏不

会触发此方法。所以它会用
在屏保应用上,因为当你触
屏机器 就会立马触发一个事
件,而这个事件又不太明确
是什么,正好屏保满足此需
求;或者对于一个Ac tivity,
控制多长时间没有用户点响
应的时候,自己消失等。
这个方法也分析完了,那就
剩下onTouchEvent方法了,
如下继续分析。
3-3 继续Ac tivity的
dispatchTouchEvent方法中调
运的onTouchEvent方法
如下源码:
/
**
*
Called when a touch sc
reen event was not handled by
any of the views
*
under it. This is mos
t useful to process touch eve
nts that happen
*
outside of your window
bounds, where there is no vi
ew to receive it.
*
*
@param event The touch
screen event being processed
.
*

*
@return Return true if
you have consumed the event,
false if you haven't.
*
The default implementa
tion always returns false.
*
/
public boolean onTouchEve
nt(MotionEvent event) {
if (mWindow.shouldClo
seOnTouch(this, event)) {
finish();
return true;
}
return false;
}
看见没有,这个方法看起来
好简单的样子。

如果一个屏幕触摸事件没有
被这个Ac tivity下的任何Vie w
所处理,Ac tivity的
onTouchEvent将会调用。这
对于处理window边界之外的
Touch事件非常有用,因为
通常是没有Vie w会接收到它
们的。返回值为true表明你
已经消费了这个事件,false
则表示没有消费,默认实现
中返回false 。
继续分析吧,重点就一句,
mWindow. shouldClose OnTouc
h(this, event)中的mWindow实
际就是上面分析
dispatchTouchEvent方法里的
getWindow()对象,所以直接
到Window抽象类和
PhoneWindow子类查看吧,
发现PhoneWindow没有重写
Window的
shouldCloseOnTouch方法,
所以看下Window类的
shouldCloseOnTouch实现
吧,如下:
/
** @hide */

public boolean shouldClos
eOnTouch(Context context, Mot
ionEvent event) {
if (mCloseOnTouchOuts
ide && event.getAction() == M
otionEvent.ACTION_DOWN
&
& isOutOfBou
nds(context, event) && peekDe
corView() != null) {
return true;
}
return false;
}
这其实就是一个判断,判断
mCloseOnTouchOutside标记
及是否为ACTION_DOWN事
件,同时判断event的x、y坐
标是不是超出Bounds,然后
检查
FrameLayout的content的id的
DecorView是否为空。其实
没啥太重要的,这只是对于
处理window边界之外的
Touch事件有判断价值而
已。
所以,到此Ac tivity的
onTouchEvent分析完毕。
4
Android触摸事件综
合总结
到此整个Android的Ac tivity-
ViewGroup->View的触摸屏
>
事件分发机制完全分析完
毕。这时候你可以回过头看
这三篇文章的例子,你会完
全明白那些打印的含义与原
理。
当然,了解这些源码机制不
仅对你写普通代码时有帮
助,最重要的是对你想自定
义装逼控件时有不可磨灭的
基础性指导作用与技巧提示
作用。
【
工匠若
水 http://blog.csdn.net/yanbob
er 转载烦请注明出处,尊重
分享成果】
1
背景
其实之所以要说这个话题有
几个原因:
1
. 理解xml等控件是咋被显
示的原理,通常大家写代
码都是直接在onCreate里
setContentView就完事,没
怎么关注其实现原理。
2
. 前面分析《Android触摸屏
分析三( Ac tivity篇)》时提
到了一些关于布局嵌套的
问题,当时没有深入解
释。
所以接下来主要分析的就是
Vie w或者Vie wGroup对象是
如何添加至应用程序界面
(窗口)显示的。我们准备
从Ac tivity的setContentView方
法开始来说(因为默认
Ac tivity中放入我们的xml或
者Java控件是通过
setContentView方法来操作
的,当调运了setContentView
所有的控件就得到了显
示)。
【
工匠若
水 http://blog.csdn.net/yanbob
er 转载烦请注明出处,尊重
分享成果】
2
2
Android5.1.1(API
2)从Activity 的
setContentView方法说
起
2-1 Ac tivity的setContentView
方法解析
Ac tivity的源码中提供了三个
重载的setContentView方法,
如下:
public void setContentView(in
t layoutResID) {
getWindow().setConten
tView(layoutResID);
initWindowDecorAction
Bar();
}
public void setContentVie

w(View view) {
getWindow().setConten
tView(view);
initWindowDecorAction
Bar();
}
public void setContentVie
w(View view, ViewGroup.Layout
Params params) {
getWindow().setConten
tView(view, params);
initWindowDecorAction
Bar();
}
可以看见他们都先调运了
getWindow()的
setContentView方法,然后调

运Ac tivity 的
initWindowDecorActionBar方
法,关于
initWindowDecorActionBar方
法后面准备写一篇关于
Android ActionBar原理解析
的文章,所以暂时跳过不解
释。
2-2 关于窗口Window类的一
些关系
在开始分析Ac tivity组合对象
Window的setContentView方
法之前请先明确如下关系
前面分析《Android触摸屏
(
析三( Ac tivity篇)》时也有说
过)。
看见上面图没?Ac tivity中有
一个成员为Window,其实例
化对象为PhoneWindow,
PhoneWindow为抽象Window
类的实现类。
这里先简要说明下这些类的
职责:
1
2
. Window是一个抽象类,提
供了绘制窗口的一组通用
API。
. PhoneWindow是Window的
具体继承实现类。而且该
类内部包含了一个
DecorView对象,该
DectorView对象是所有应
用窗口( Ac tivity界面)的根
Vie w 。
3
. DecorView是
PhoneWindow的内部类,
是FrameLayout的子类,
是对FrameLayout进行功
能的修饰(所以叫
DecorXXX),是所有应
用窗口的根Vie w 。
依据面向对象从抽象到具体
我们可以类比上面关系就像
如下:
Window是一块电子屏,
PhoneWindow是一块手机电
子屏,DecorView就是电子
屏要显示的内容,Ac tivity就
是手机电子屏安装位置。
-3 窗口PhoneWindow类的
2
setContentView方法
我们可以看见Window类的
setContentView方法都是抽象
的。所以我们直接先看
PhoneWindow类的
setContentView(int
layoutResID)方法源码,如
下:
public void setContentView(in
t layoutResID) {
/
/ Note: FEATURE_CONT

ENT_TRANSITIONS may be set in
the process of installing th
e window
/
/ decor, when theme
attributes and the like are c
rystalized. Do not check the
feature
/
/ before this happen
s.
null) {
if (mContentParent ==
installDecor();
}
else if (!hasFeatur
e(FEATURE_CONTENT_TRANSITIONS
) {
)
mContentParent.re
moveAllViews();
}
if (hasFeature(FEATUR
E_CONTENT_TRANSITIONS)) {
final Scene newSc

ene = Scene.getSceneForLayout
(mContentParent, layoutResID,
getContex
t());
transitionTo(newS
cene);
}
else {
mLayoutInflater.i
nflate(layoutResID, mContentP
arent);
}
final Callback cb = g
etCallback();
if (cb != null && !is
Destroyed()) {
cb.onContentChang
ed();
}
}
可以看见,第五行首先判断

mContentParent是否为null,
也就是第一次调运);如果
是第一次调用,则调用
installDecor()方法,否则判
断是否设置
FEATURE_CONTENT_TRA
NSITIONS Window属性(默
认false),如果没有就移除
该mContentParent内所有的
所有子Vie w;接着16行
mLayoutInflater.inflate(l
将我们的资源文件通过
LayoutInflater对象转换为

Vie w树,并且添加至
mContentParent视图中
(
其中mLayoutInflater是在
PhoneWindow的构造函数中
得到实例对象的
LayoutInflater.from(conte
)。
再来看下PhoneWindow类的
se tConte ntVie w(Vie w view)方
法和se tConte ntVie w(Vie w
vie w,
ViewGroup.LayoutParams
params)方法源码,如下:

@
Override
public void setContentVie
w(View view) {
setContentView(view,
new ViewGroup.LayoutParams(MA
TCH_PARENT, MATCH_PARENT));
}
@
Override
public void setContentVie
w(View view, ViewGroup.Layout
Params params) {
/
/ Note: FEATURE_CONT
ENT_TRANSITIONS may be set in
the process of installing th
e window
/
/ decor, when theme
attributes and the like are c
rystalized. Do not check the
feature
/
/ before this happen

s.
null) {
if (mContentParent ==
installDecor();
}
else if (!hasFeatur
e(FEATURE_CONTENT_TRANSITIONS
) {
)
mContentParent.re
moveAllViews();
}
if (hasFeature(FEATUR
E_CONTENT_TRANSITIONS)) {
view.setLayoutPar
ams(params);
final Scene newSc
ene = new Scene(mContentParen
t, view);
transitionTo(newS
cene);
}
else {
mContentParent.ad

dView(view, params);
}
final Callback cb = g
etCallback();
if (cb != null && !is
Destroyed()) {
cb.onContentChang
ed();
}
}
看见没有,我们其实只用分
析se tConte ntVie w(Vie w vie w,
ViewGroup.LayoutParams
params)方法即可,如果你在
Ac tivity中调运
se tConte ntVie w(Vie w view)方

法,实质也是调运
se tConte ntVie w(Vie w vie w,
ViewGroup.LayoutParams
params),只是LayoutParams
设置为了
MATCH_PARENT而已。
所以直接分析
se tConte ntVie w(Vie w vie w,
ViewGroup.LayoutParams
params)方法就行,可以看见
该方法与setContentView(int
layoutResID)类似,只是少了
LayoutInflater将xml文件解析
装换为Vie w而已,这里直接
使用Vie w的addView方法追
加道了当前mContentParent
而已。
所以说在我们的应用程序里
可以多次调用
setContentView()来显示界
面,因为会
re move AllVie ws。
2-4 窗口PhoneWindow类的
installDecor方法
回过头,我们继续看上面
PhoneWindow类
setContentView方法的第6行
installDecor();代码,在
PhoneWindow中查看
installDecor源码如下:
private void installDecor() {
if (mDecor == null) {
mDecor = generate
Decor();
mDecor.setDescend
antFocusability(ViewGroup.FOC
US_AFTER_DESCENDANTS);
mDecor.setIsRootN
amespace(true);
if (!mInvalidateP
anelMenuPosted && mInvalidate

PanelMenuFeatures != 0) {
mDecor.postOn
Animation(mInvalidatePanelMen
uRunnable);
}
}
if (mContentParent ==
null) {
/
/根据窗口的风格修饰
选择对应的修饰布局文件,并且将id
,
为content的FrameLayout赋值给mCo
ntentParent
mContentParent =
generateLayout(mDecor);
/
/
/......
/初始化一堆属性值
}
}
我勒个去!又是一个死长的

方法,抓重点分析吧。第 2
到9行可以看出,首先判断
mDecor对象是否为空,如果
为空则调用generateDecor()
创建一个
DecorView(该类
是 FrameLayout子类,即一
个Vie wGroup视图),然后设
置一些属性,我们看下
PhoneWindow的
generateDecor方法,如下:
protected DecorView generateD
ecor() {

return new DecorView(
getContext(), -1);
}
可以看见generateDecor方法
仅仅是new一个DecorView的
实例。
回到installDecor方法继续往
下看,第10行开始到方法结
束都需要一个
if (mContentParent == nul
判断为真才会执行,当
mContentParent对象不为空
则调用generateLayout()方法

去创建mContentParent 对
象。所以我们看下
generateLayout方法源码,如
下:
protected ViewGroup generateL
ayout(DecorView decor) {
/
/ Apply data from cu
rrent theme.
TypedArray a = getWin
dowStyle();
/
/
/......
/依据主题style设置一堆
值进行设置
/
/ Inflate the window
decor.

int layoutResource;
int features = getLoc
alFeatures();
/......
/根据设定好的features
/
/
值选择不同的窗口修饰布局文件,得到la
youtResource 值
/
/把选中的窗口修饰布局文
件添加到DecorView对象里,并且指定
contentParent 值
View in = mLayoutInfl
ater.inflate(layoutResource,
null);
decor.addView(in, new
ViewGroup.LayoutParams(MATCH
_
PARENT, MATCH_PARENT));
mContentRoot = (ViewG
roup) in;
ViewGroup contentPare

nt = (ViewGroup)findViewById(
ID_ANDROID_CONTENT);
if (contentParent ==
null) {
throw new Runtime
Exception("Window couldn't fi
nd content container view");
}
/
/
/......
/继续一堆属性设置,完事
返回contentParent
return contentParent;
}
可以看见上面方法主要作用
就是根据窗口的风格修饰类
型为该窗口选择不同的窗口
根布局文件。mDecor做为根

视图将该窗口根布局添加进
去,然后获
取id为content的FrameLayout
返回给mContentParent 对
象。所以installDecor方法实
质就是产生mDecor和
mContentParent对象。
在这里顺带提一下:还记得
我们平时写应用Ac tivity时设
置的theme或者feature吗(全
屏啥的,NoTitle等)?我们
一般是不是通过XML的
android:theme属性或者java的
requestFeature()方法来设置
的呢?譬如:
通过java文件设置:
requestWindowFeature(Window.F
EATURE_NO_TITLE);
通过xml文件设置:
android:theme="@android:style
/
Theme.NoTitleBar"
对的,其实我们平时
requestWindowFeature()设置
的值就是在这里通过

getLocalFeature()获取的;而
android:theme属性也是通过
这里的
getWindowStyle()获取的。所
以这下你应该就明白在ja va
文件设置Ac tivity的属性时必
须在setContentView方法之前
调用requestFeature()方法的
原因了吧。
我们继续关注一下
generateLayout方法的
layoutResource变量赋值情
况。因为它最终通过
View in = mLayoutInflater
和
decor.addView(in, new Vie
将in添加到PhoneWindow的
mDecor对象。为例验证这一
段代码分析我们用一个实例
来进行说明,如下是一个简
单的App主要代码:
AndroidManifest.xml文件
<
"
<
:
?xml version="1.0" encoding=
utf-8"?>
manifest xmlns:android="http
//schemas.android.com/apk/re


s/android"
package="com.yanbober.mya
pplication" >
<
application
.
/
.....
/看重点,我们将主题设置
为NoTitleBar
android:theme="@andro
id:style/Theme.Black.NoTitleB
ar" >
.
.....
<
/application>
<
/manifest>
主界面布局文件:
<
=
RelativeLayout xmlns:android
"http://schemas.android.com/


apk/res/android"
android:layout_width="mat
ch_parent"
android:layout_height="ma
tch_parent">
<
TextView android:text="@
string/hello_world"
android:layout_width=
wrap_content"
android:layout_height
"wrap_content" />
"
=
<
/RelativeLayout>
APP运行界面:
看见没有,上面我们将主题
设置为NoTitleBar,所以在

generateLayout方法中的
layoutResource变量值为
R.layout.screen_simple
,所以我们看下系统这个
screen_simple.xml布局文
件,如下:
<
LinearLayout xmlns:android="
http://schemas.android.com/ap
k/res/android"
android:layout_width="mat
ch_parent"
android:layout_height="ma
tch_parent"
android:fitsSystemWindows
=
"true"
android:orientation="vert
ical">


<
ViewStub android:id="@+i
d/action_mode_bar_stub"
android:inflate
dId="@+id/action_mode_bar"
android:layout=
"
@layout/action_mode_bar"
android:layout_
width="match_parent"
android:layout_
height="wrap_content"
android:theme="
attr/actionBarTheme" />
FrameLayout
android:id="@android
id/content"
android:layout_width
"match_parent"
android:layout_heigh
t="match_parent"
android:foregroundIn
sidePadding="false"
android:foregroundGr
?
<
:
=

avity="fill_horizontal|top"
android:foreground="
?
android:attr/windowContentOv
erlay" />
/LinearLayout>
<
布局中,一般会包含
ActionBar,Title,和一个id
为content的FrameLayout,这
个布局是NoTitle的。
再来看下上面这个App的
hierarchyviewer图谱,如
下:
看见了吧,通过这个App的

hierarchyviewer和系统
screen_simple.xml文件比较
就验证了上面我们分析的结
论,不再做过多解释。
然后回过头可以看见上面
PhoneWindow类的
setContentView方法最后通过
调运
mLayoutInflater.inflate(l
或者
mContentParent.addView(vi
语句将我们的xml或者ja va
Vie w插入到了


mContentParent(id为content
的FrameLayout对象)
Vie wGroup中。最后
setContentView还会调用一个
Callback接口的成员函数
onContentChanged来通知对
应的Ac tivity组件视图内容发
生了变化。
2-5 Window类内部接口
Callback的onContentChanged
方法
上面刚刚说了PhoneWindow
类的setContentView方法中最
后调运了onContentChanged
方法。我们这里看下
setContentView这段代码,如
下:
public void setContentView(in
t layoutResID) {
.
.....
final Callback cb = g
etCallback();
if (cb != null && !is
Destroyed()) {
cb.onContentChang
ed();
}
}

看着没有,首先通过
getCallback获取对象cb(回
调接口),PhoneWindow没
有重写Window的这个方法,
所以到抽象类Window中可以
看到:
/
**
*
Return the current Cal
lback interface for this wind
ow.
*
/
public final Callback get
Callback() {
return mCallback;
}

这个mCallback在哪赋值的
呢,继续看Window类发现有
一个方法,如下:
public void setCallback(Callb
ack callback) {
mCallback = callback;
}
Window中的mCallback是通
过这个方法赋值的,那就回
想一下,Window又是Ac tivity
的组合成员,那就是Ac tivity
一定调运这个方法了,回到
Ac tivity

发现在Ac tivity的attach方法
中进行了设置,如下:
final void attach(Context con
text, ActivityThread aThread,
.
.....
mWindow.setCallback(t
his);
}
.
.....
也就是说Ac tivity类实现了
Window的Callback接口。那
就是看下Ac tivity实现的
onContentChanged方法。如
下:


public void onContentChanged(
)
{
}
咦?onContentChanged是个
空方法。那就说明当Ac tivity
的布局改动时,即
setContentView()或者
addContentView()方法执行完
毕时就会调用该方法。
所以当我们写App时,
Ac tivity的各种Vie w的
findViewById()方法等都可以
放到该方法中,系统会帮忙
回调。
-6 setContentView源码分析
2
总结
可以看出来setContentView整
个过程主要是如何把Ac tivity
的布局文件或者java的Vie w
添加至窗口里,上面的过程
可以重点概括为:
1
. 创建一个DecorView的对
象mDecor,该mDecor对
象将作为整个应用窗口的
根视图。
2
. 依据Feature等style theme
创建不同的窗口修饰布局
文件,并且通过
findViewById获取Ac tivity
布局文件该存放的地方
(窗口修饰布局文件中id
为content 的
FrameLayout)。
3. 将Ac tivity的布局文件添加
至id为content的
FrameLayout内。
至此整个setContentView的主
要流程就分析完毕。你可能
这时会疑惑,这么设置完一
堆Vie w关系后系统是怎么知
道该显示了呢?下面我们就
初探一下关于Ac tivity的
setContentView在onCreate中
如何显示的(声明一下,这
里有些会暂时直接给出结
论,该系列文章后面会详细
分析的)。
2
-7 setContentView完以后
Ac tivity显示界面初探
这一小部分已经不属于
sentContentView的分析范畴
了,只是简单说明
setContentView之后怎么被显
示出来的(注意:Ac tivity调
运setContentView方法自身不
会显示布局的)。
记得前面有一篇文章
《Android异步消息处理机制
详解及源码分析》的3-1-2小
节说过,一个Ac tivity的开始
实际是Ac tivityThre a d的ma in
方法(至于为什么后面会写
文章分析,这里站在应用层
角度先有这个概念就行)。
那在这一篇我们再直接说一
个知识点(至于为什么后面
会写文章分析,这里站在应
用层角度先有这个概念就
行)。
当启动Ac tivity调运完
Ac tivityThre a d的main方法之
后,接着调用Ac tivityThre a d
类performLaunchActivity来创
建要启动的Ac tivity组件,在
创建Ac tivity组件的过程中,
还会为该Ac tivity组件创建窗
口对象和视图对象;接着
Ac tivity组件创建完成之后,
通过调用Ac tivityThre a d类的
ha ndle Re sume Ac tivity将它激
活。
所以我们先看下
ha ndle Re sume Ac tivity方法一
个重点,如下:
final void handleResumeActivi
ty(IBinder token,
boolean clearHide
,
boolean isForward, boolean

reallyResume) {
/
/ If we are getting
ready to gc after going to th
e background, well
/
/ we are back active
so skip it.
.
/
.....
/ TODO Push resumeAr
gs into the activity for cons
ideration
ActivityClientRecord
r = performResumeActivity(tok
en, clearHide);
if (r != null) {
.
/
.....
/ If the window
hasn't yet been added to the
window manager,
/
/ and this guy d
idn't finish itself or start
another activity,

/
/ then go ahead
and add the window.
.
/
.....
/ If the window
has already been added, but d
uring resume
/
/ we started ano
ther activity, then don't yet
make the
/
/ window visible
.
.
/
.....
/ The window is
now visible if it has been ad
ded, we are not
/
/ simply finishi
ng, and we are not starting a
nother activity.
if (!r.activity.m
Finished && willBeVisible
&
& r.acti
vity.mDecor != null && !r.hid

eForNow) {
.
.....
if (r.activit
y.mVisibleFromClient) {
r.activit
y.makeVisible();
}
}
.
.....
else {
/ If an exceptio
}
/
n was thrown when trying to r
esume, then
/
/ just end this
activity.
.
.....
}
}
看见
r.activity.makeVisible();


语句没?调用Ac tivity的
ma ke Visible方法显示我们上
面通过setContentView创建的
mDecor视图族。所以我们看
下
Ac tivity的ma ke Visible方法,
如下:
void makeVisible() {
if (!mWindowAdded) {
ViewManager wm =
getWindowManager();
wm.addView(mDecor
,
)
getWindow().getAttributes()
;
mWindowAdded = tr

ue;
}
mDecor.setVisibility(
View.VISIBLE);
}
看见没有,通过
DecorView(FrameLayout,
也即Vie w)的se tVisibility方
法将Vie w设置为VISIBLE,
至此显示出来。
到此setContentView的完整流
程分析完毕。
【工匠若

水 http://blog.csdn.net/yanbob
er 转载烦请注明出处,尊重
分享成果】
3
2
Android5.1.1(API
2)看看LayoutInflater
机制原理
上面在分析setContentView过
程中可以看见,在
PhoneWindow的
setContentView中调运了
mLayoutInflater.inflate(l
,
在PhoneWindow 的

generateLayout中调运了
View in = mLayoutInflater
,当时我们没有详细分析,
只是告诉通过xml得到Vie w
对象。现在我们就来分析分
析这一问题。
3-1 通过实例引出问题
在开始之前我们先来做一个
测试,我们平时最常见的就
是ListVie w的Adapter中使用
LayoutInflater加载xml的ite m
布局文件,所以咱们就以
ListVie w为例,如下:

省略掉Ac tivity代码等,首先
给出Ac tivity的布局文件,如
下:
<
LinearLayout xmlns:android="
http://schemas.android.com/ap
k/res/android"
android:layout_width="mat
ch_parent"
android:layout_height="ma
tch_parent"
android:orientation="vert
ical">
<
ListView
android:id="@+id/list
view"
android:dividerHeight
android:layout_width=
=
"5dp"

"
=
<
match_parent"
android:layout_height
"match_parent"></ListView>
/LinearLayout>
给出两种不同的ListVie w的
item布局文件。
te xtvie w_la yout. xml文件:
<
"
<
:
?xml version="1.0" encoding=
utf-8"?>
TextView xmlns:android="http
//schemas.android.com/apk/re
s/android"
android:layout_width="100
dp"
android:layout_height="40

dp"
android:text="Text Test"
android:background="#ffa0
a00c"/>
textview_layout_parent.xml文
件:
<
"
<
?xml version="1.0" encoding=
utf-8"?>
LinearLayout
android:layout_height="wr
ap_content"
android:layout_width="wra
p_content"
xmlns:android="http://sch
emas.android.com/apk/res/andr
oid">
<
TextView xmlns:android="


http://schemas.android.com/ap
k/res/android"
android:layout_width=
"
=
100dp"
"40dp"
android:layout_height
android:text="Text Te
android:background="#
st"
ffa0a00c"/>
<
/LinearLayout>
ListVie w的自定义Adapter文
件:
public class InflateAdapter e
xtends BaseAdapter {
private LayoutInflater mI
nflater = null;


public InflateAdapter(Con
text context) {
mInflater = LayoutInf
later.from(context);
}
@
Override
public int getCount() {
return 8;
}
@
Override
public Object getItem(int
position) {
return null;
}
@
Override
public long getItemId(int
position) {
return 0;

}
@
Override
public View getView(int p
osition, View convertView, Vi
ewGroup parent) {
/
/说明:这里是测试inflat
e方法参数代码,不再考虑性能优化等TA
G处理
return getXmlToView(c
onvertView, position, parent)
;
}
private View getXmlToView
(View convertView, int positi
on, ViewGroup parent) {
View[] viewList = {
mInflater.inf
late(R.layout.textview_layout
,
/
null),
/
mInflater.i

nflate(R.layout.textview_layo
ut, parent),
mInflater.inf
late(R.layout.textview_layout
,
/
parent, false),
/
mInflater.i
nflate(R.layout.textview_layo
ut, parent, true),
mInflater.inf
late(R.layout.textview_layout
,
null, true),
mInflater.inf
late(R.layout.textview_layout
null, false),
,
mInflater.inf
late(R.layout.textview_layout
_
/
parent, null),
/
mInflater.i
nflate(R.layout.textview_layo
ut_parent, parent),
mInflater.inf

late(R.layout.textview_layout
_
/
parent, parent, false),
/
mInflater.i
nflate(R.layout.textview_layo
ut_parent, parent, true),
mInflater.inf
late(R.layout.textview_layout
_
parent, null, true),
mInflater.inf
late(R.layout.textview_layout
parent, null, false),
_
}
;
convertView = viewLis
t[position];
return convertView;
}
}
当前代码运行结果:

PS:当打开上面vie w List数组
中任意一行注释都会抛出异
常
(java.lang.UnsupportedOpera
tionException: a ddVie w(Vie w,
LayoutParams) is not
supported in
AdapterView)。
你指定有些蒙圈了,而且比
较郁闷,同时想弄明白
inflate的这些参数都是啥意
思。运行结果为何有这么大
差异呢?
那我告诉你,你现在先别多
想,记住这回事,咱们先看
源码,下面会告诉你为啥。
3-2 从LayoutInflater源码实例
化说起
我们先看一下源码中
LayoutInflater实例化获取的
方法:
public static LayoutInflater
from(Context context) {
LayoutInflater Layout
Inflater =
(LayoutInflat
er) context.getSystemService(

Context.LAYOUT_INFLATER_SERVI
CE);
if (LayoutInflater ==
null) {
throw new Asserti
onError("LayoutInflater not f
ound.");
}
return LayoutInflater
;
}
看见没有?是否很熟悉?我
们平时写应用获取
LayoutInflater实例时不也就
两种写法吗,如下:
LayoutInflater lif = LayoutIn


flater.from(Context context);
LayoutInflater lif = (Lay
outInflater) context.getSyste
mService(Context.LAYOUT_INFLA
TER_SERVICE);
可以看见from方法仅仅是对
getSystemService的一个安全
封装而已。
3-3 LayoutInflater源码的Vie w
inflate(…)方法族剖析
得到LayoutInflater对象之后
我们就是传递xml然后解析
得到Vie w,如下方法:

public View inflate(int resou
rce, ViewGroup root) {
return inflate(resour
ce, root, root != null);
}
继续看inflate(int resource,
Vie wGroup root, boolean
attachToRoot)方法,如下:
public View inflate(int resou
rce, ViewGroup root, boolean
attachToRoot) {
final Resources res =
getContext().getResources();
if (DEBUG) {
Log.d(TAG, "INFLA
TING from resource: \"" + res


.
"
getResourceName(resource) +
\" ("
+
Integer
.
;
toHexString(resource) + ")")
}
final XmlResourcePars
er parser = res.getLayout(res
ource);
try {
return inflate(pa
rser, root, attachToRoot);
}
finally {
parser.close();
}
}
这个方法的第8行获取到
XmlResourceParser接口的实

例(Android默认实现类为
P ull解析XmlPullParser)。接
着看第10 行
inflate(parser, root, att
,你会发现无论哪个inflate
重载方法最后都调运了
inflate(XmlPullParser par
方法,如下:
public View inflate(XmlPullPa
rser parser, ViewGroup root,
boolean attachToRoot) {
synchronized (mConstr
uctorArgs) {
Trace.traceBegin(
Trace.TRACE_TAG_VIEW, "inflat


e");
final AttributeSe
t attrs = Xml.asAttributeSet(
parser);
Context lastConte
xt = (Context)mConstructorArg
s[0];
mConstructorArgs[
0
] = mContext;
/定义返回值,初始化
为传入的形参root
View result = roo
/
t;
try {
/
/ Look for t
he root node.
int type;
while ((type
=
parser.next()) != XmlPullPa
rser.START_TAG &&

type
!
)
= XmlPullParser.END_DOCUMENT
{
/
/ Empty
}
/
/如果一开始就
是END_DOCUMENT,那说明xml文件有
问题
if (type != X
mlPullParser.START_TAG) {
throw new
InflateException(parser.getP
ositionDescription()
+
"
: No start tag found!");
}
/
/有了上面判断
说明这里type一定是START_TAG,也就
是xml文件里的root node
final String
name = parser.getName();

if (DEBUG) {
System.ou
t.println("******************
*
*******");
System.ou
t.println("Creating root view
:
"
+
name);
System.ou
t.println("******************
*
*******");
}
if (TAG_MERGE
.
equals(name)) {
/
/处理merge t
ag的情况(merge,你懂的,APP的xml
性能优化)
/
/root必
须非空且attachToRoot为true,否则
抛异常结束(APP使用merge时要注意的

地方,
/
/因为mer
ge的xml并不代表某个具体的view,只
是将它包起来的其他xml的内容加到某个
上层
/
/ViewGro
up中。)
if (root
= null || !attachToRoot) {
=
throw
new InflateException("<merge
/
> can be used only with a v
alid "
+
"ViewGroup root and atta
chToRoot=true");
}
/
/递归inf
late方法调运
rInflate(
parser, root, attrs, false, f
alse);

}
else {
/ Temp i
/
s the root view that was foun
d in the xml
/
/xml文件
中的root view,根据tag节点创建vi
ew对象
final Vie
w temp = createViewFromTag(ro
ot, name, attrs, false);
ViewGroup
.
!
LayoutParams params = null;
if (root
= null) {
if (D
EBUG) {
S
ystem.out.println("Creating p
arams from root: " +

root);
}
/
/ Cr
eate layout params that match
root, if supplied
/
/根
据root生成合适的LayoutParams实例
param
s = root.generateLayoutParams
(attrs);
if (!
attachToRoot) {
/
/
Set the layout params for t
emp if we are not
/
/
/
attaching. (If we are, we u
se addView, below)
/如果attachToRoot=false就调用vi
ew的setLayoutParams方法
t

emp.setLayoutParams(params);
}
}
if (DEBUG
)
{
Syste
m.out.println("-----> start i
nflating children");
}
/
/ Inflat
e all children under temp
/
/递归inf
late剩下的children
rInflate(
parser, temp, attrs, true, tr
ue);
if (DEBUG
)
{
Syste
m.out.println("-----> done in
flating children");

}
/
/ We are
supposed to attach all the v
iews we found (int temp)
/
/ to roo
t. Do that now.
if (root
= null && attachToRoot) {
/roo
!
/
t非空且attachToRoot=true则将xml
文件的root view加到形参提供的root
里
root.
addView(temp, params);
}
/
/ Decide
whether to return the root t
hat was passed in or the
/
/ top vi
ew found in xml.

if (root
=
= null || !attachToRoot) {
/
/返
回xml里解析的root view
resul
t = temp;
}
}
}
catch (XmlPullP
arserException e) {
InflateExcept
ion ex = new InflateException
(e.getMessage());
ex.initCause(
e);
throw ex;
}
catch (IOExcept
ion e) {
InflateExcept
ion ex = new InflateException
(

parse
r.getPositionDescription()
+
":
"
+ e.getMessage());
ex.initCause(
e);
throw ex;
finally {
}
/
/ Don't reta
in static reference on contex
t.
mConstructorA
rgs[0] = lastContext;
mConstructorA
rgs[1] = null;
}
Trace.traceEnd(Tr
ace.TRACE_TAG_VIEW);
/
/返回参数root或xml
文件里的root view
return result;

}
}
从上面的源码分析我们可以
看出inflate方法的参数含
义:
inflate(xmlId, null); 只创建
temp的Vie w,然后直接返
回temp 。
inflate(xmlId, parent); 创建
temp的Vie w,然后执行
root.addView(temp,
params);最后返回root。


inflate(xmlId, parent, false);
创建temp的Vie w,然后执
行
temp.setLayoutParams(para
ms);然后再返回temp。
inflate(xmlId, parent, true);
创建temp的Vie w,然后执
行root.addView(temp,
params);最后返回root。
inflate(xmlId, null, false);
只创建temp的Vie w,然后
直接返回temp。


inflate(xmlId, null, true); 只
创建temp的Vie w,然后直
接返回temp。
到此其实已经可以说明我们
上面示例部分执行效果差异
的原因了(在此先强调一个
Android的概念,下一篇文章
我们会对这段话作一解释:
我们经常使用Vie w的
layout_width和layout_height
来设置Vie w的大小,而且一
般都可以正常工作,所以有
人时常认为这两个属性就是

设置Vie w的真实大小一样;
然而实际上这些属性是用于
设置Vie w在Vie wGroup布局
中的大小的;这就是为什么
Google的工程师在变量命名
上将这种属性叫作
layout_width和
layout_height,而不是width
和height的原因了。),如
下:
mInflater.inflate(R.lay
不能正确处理我们设置的
宽和高是因为


layout_width,
layout_height是相对了父
级设置的,而此temp的
getLayoutParams为null。
mInflater.inflate(R.lay
能正确显示我们设置的宽
高是因为我们的Vie w在设
置setLayoutParams 时
params = root.generateL
不为空。
Inflate(resId , parent,false )
可以正确处理,因为
temp.setLayoutParams(para


ms);这个params正是
root.generateLayoutParams
(attrs);得到的。
mInflater.inflate(R.lay
不能正确处理我们设置的
宽和高是因为
layout_width,
layout_height是相对了父
级设置的,而此temp的
getLayoutParams为null。
textview_layout_parent.xml
作为item可以正确显示的
原因是因为Te xtVie w具备


上级Vie wGroup,上级
Vie wGroup 的
layout_width,
layout_height会失效,当
前的Te xtVie w会有效而
已。
上面例子中说放开那些注
释运行会报错
java.lang.UnsupportedOper
ationException:
a ddVie w(Vie w,
LayoutParams) is not
supported是因为

AdapterView源码中调用了
root.addView(temp,
params);而此时的root是我
们的ListVie w,ListVie w为
AdapterView的子类,所以
我们看下AdapterView抽象
类中addView源码即可明
白为啥了,如下:
/
**
*
This method is not sup
ported and throws an Unsuppor
tedOperationException when ca
lled.
*
*
*
@param child Ignored.

*
@throws UnsupportedOpe
rationException Every time th
is method is invoked.
*
/
@
Override
public void addView(View
child) {
throw new Unsupported
OperationException("addView(V
iew) is not supported in Adap
terView");
}
这里不再做过多解释。
咦?别急,到这里指定机智
的人会问,我们在写App时
Ac tivity中指定布局文件的时
候,xml布局文件或者我们


用java编写的Vie w最外层的
那个布局是可以指定大小的
啊?他们最外层的
layout_width和layout_height
都是有作用的啊?
是这样的,还记得我们上面
的分析吗?我们自己的xml
布局通过setContentView()方
法放置到哪去了呢?记不记
得id为content的FrameLayout
呢?所以我们xml或者java的
Vie w的最外层布局的
layout_width和layout_height
属性才会有效果,就是这么
回事而已。
3
-4 LayoutInflater源码
inflate(…)方法中调运的一些
非public方法剖析
看下inflate方法中被调运的
rInflate方法,源码如下:
void rInflate(XmlPullParser p
arser, View parent, final Att
ributeSet attrs,
boolean finishInf
late, boolean inheritContext)
throws XmlPullParserExceptio
n,
IOException {

final int depth = par
ser.getDepth();
int type;
/XmlPullParser解析器
的标准解析模式
while (((type = parse
/
r.next()) != XmlPullParser.EN
D_TAG ||
parser.getDep
th() > depth) && type != XmlP
ullParser.END_DOCUMENT) {
/
/找到START_TAG节
点程序才继续执行这个判断语句之后的逻
辑
if (type != XmlPu
llParser.START_TAG) {
continue;
}
/
/获取Name标记
final String name
parser.getName();
=

/
/处理REQUEST_FOC
US的标记
if (TAG_REQUEST_F
OCUS.equals(name)) {
parseRequestF
ocus(parser, parent);
}
else if (TAG_TA
G.equals(name)) {
/
/处理tag标记
parseViewTag(
parser, parent, attrs);
else if (TAG_IN
CLUDE.equals(name)) {
}
/
/处理include
标记
if (parser.ge
tDepth() == 0) {
/
/include
节点如果是根节点就抛异常
throw new
InflateException("<include /
cannot be the root element"
>

)
;
}
parseInclude(
parser, parent, attrs, inheri
tContext);
}
else if (TAG_ME
RGE.equals(name)) {
/
/merge节点必
须是xml文件里的根节点(这里不该再出
现merge节点)
throw new Inf
lateException("<merge /> must
be the root element");
}
else {
/
/其他自定义节
点
final View vi
ew = createViewFromTag(parent
,
)
name, attrs, inheritContext
;
final ViewGro
up viewGroup = (ViewGroup) pa

rent;
final ViewGro
up.LayoutParams params = view
Group.generateLayoutParams(at
trs);
rInflate(pars
er, view, attrs, true, true);
viewGroup.add
View(view, params);
}
}
/
/parent的所有子节点都i
nflate完毕的时候回onFinishInfla
te方法
if (finishInflate) pa
rent.onFinishInflate();
}
可以看见,上面方法主要就
是循环递归解析xml文件,

解析结束回调Vie w类的
onFinishInflate方法,所以
Vie w类的onFinishInflate方法
是一个空方法,如下:
/
**
*
Finalize inflating a v
iew from XML. This is called
as the last phase
*
of inflation, after al
l child views have been added
.
*
*
<p>Even if the subclas
s overrides onFinishInflate,
they should always be
*
sure to call the super
method, so that we get calle
d.

*
/
protected void onFinishIn
flate() {
}
可以看见,当我们自定义
Vie w时在构造函数inflate一
个xml后可以实现
onFinishInflate这个方法一些
自定义的逻辑。
至此LayoutInflater的源码核
心部分已经分析完毕。
4
从LayoutInflater 与
setContentView来说说

应用布局文件的优化
技巧
通过上面的源码分析可以发
现,xml文件解析实质是递
归控件,解析属性的过程。
所以说嵌套过深不仅效率低
下还可能引起调运栈溢出。
同时在解析那些tag时也有一
些特殊处理,从源码看编写
xml还是有很多要注意的地
方的。所以说对于Android的
xml来说是有一些优化技巧
的(PS:布局优化可以通过
hierarchyviewer来查看,通
过lint也可以自动检查出来一
些),如下:
尽量使用相对布局,减少不
必要层级结构。不用解释
吧?递归解析的原因。
使用merge属性。使用它可
以有效的将某些符合条件的
多余的层级优化掉。使用
merge的场合主要有两处:
自定义Vie w中使用,父元素
尽量是FrameLayout,当然如
果父元素是其他布局,而且
不是太复杂的情况下也是可
以使用的;Ac tivity中的整体
布局,根元素需要是
FrameLayout。但是使用
merge标签还是有一些限制
的,具体是:merge只能用
在布局XML文件的根元素;
使用merge来inflate一个布局
时,必须指定一个
Vie wGroup作为其父元素,
并且要设置inflate的
attachToRoot参数为true。
参照inflate(int, Vie wGroup,
(
boolean)方法);不能在
Vie wStub中使用merge标签;
最直观的一个原因就是
Vie wStub的inflate方法中根本
没有attachToRoot的设置。
使用Vie wStub。一个轻量级
的页面,我们通常使用它来
做预加载处理,来改善页面
加载速度和提高流畅性,
Vie wStub本身不会占用层
级,它最终会被它指定的层
级取代。Vie wStub也是有一
些缺点,譬如:Vie wStub只
能Inflate一次,之后Vie wStub
对象会被置为空。按句话
说,某个被Vie wStub指定的
布局被Inflate后,就不能够
再通过Vie wStub来控制它
了。所以它不适用 于需要按
需显示隐藏的情况;
Vie wStub只能用来Inflate一个
布局文件,而不是某个具体
的Vie w,当然也可以把Vie w
写在某个布局文件中。如果
想操作一个具体的vie w,还
是使用visibility属性吧;
VIewStub中不能嵌套merge
标签。
使用include。这个标签是为
了布局重用。
控件设置widget以后对于
layout_hORw-xxx设置0dp。
减少系统运算次数。
如上就是一些APP布局文件
基础的优化技巧。
5
总结
至此整个Ac tivity的
setContentView与Android的
LayoutInflater相关原理都已
经分析完毕。关于本篇中有
些地方直接给出结论的知识
点后面的文章中会做一说
明。
setContentView整个过程主要
是如何把Ac tivity的布局文件
或者java的Vie w添加至窗口
里,重点概括为:
1
. 创建一个DecorView的对
象mDecor,该mDecor对
象将作为整个应用窗口的
根视图。
2
. 依据Feature等style theme
创建不同的窗口修饰布局
文件,并且通过
findViewById获取Ac tivity
布局文件该存放的地方
(窗口修饰布局文件中id
为content 的
FrameLayout)。
3. 将Ac tivity的布局文件添加
至id为content的
FrameLayout内。
4
. 当setContentView设置显示
OK以后会回调Ac tivity的
onContentChanged方法。
Ac tivity的各种Vie w的
findViewById()方法等都可
以放到该方法中,系统会
帮忙回调。
如下就是整个Ac tivity的分析
简单关系图:
LayoutInflater的使用中重点
关注inflate方法的参数含
义:
inflate(xmlId, null); 只创建
temp的Vie w,然后直接返
回temp 。
inflate(xmlId, parent); 创建
temp的Vie w,然后执行
root.addView(temp,
params);最后返回root。
inflate(xmlId, parent, false);
创建temp的Vie w,然后执


行
temp.setLayoutParams(para
ms);然后再返回temp。
inflate(xmlId, parent, true);
创建temp的Vie w,然后执
行root.addView(temp,
params);最后返回root。
inflate(xmlId, null, false);
只创建temp的Vie w,然后
直接返回temp。
inflate(xmlId, null, true); 只
创建temp的Vie w,然后直


接返回temp。
当我们自定义Vie w时在构造
函数inflate一个xml后可以实
现onFinishInflate这个方法一
些自定义的逻辑。
【工匠若
水 http://blog.csdn.net/yanbob
er 转载烦请注明出处,尊重
分享成果】
【
工匠若
水 http://blog.csdn.net/yanbob
er 转载烦请注明出处,尊重
分享成果】
1
背景
今天突然想起之前在上家公
司(做TV与BOX盒子)时
有好几个人问过我关于
Android的Context到底是啥的
问题,所以就马上要诞生这
篇文章。我们平时在开发
App应用程序时一直都在使
用Context(别说你没用过,
访问当前应用的资源、启动
一个a c tivity等都用到了
Context),但是很少有人关
注过这玩意到底是啥,也很
少有人知道getApplication与
getApplicationContext方法有
啥区别,以及一个App到底
有多少个Context等等的细
节。
更为致命的是Context使用不
当还会造成内存泄漏。所以
说完全有必要拿出来单独分
析分析(基于Android 5.1.1
(
API 22)源码分析)。
【
工匠若
水 http://blog.csdn.net/yanbob
er 转载烦请注明出处,尊重
分享成果】
2
Context基本信息
2
-1 Context概念
先看下源码Context类基本情
况,如下:
/
**

*
Interface to global inform
ation about an application en
vironment. This is
*
an abstract class whose im
plementation is provided by
*
*
the Android system. It
allows access to applicati
on-specific resources and cla
sses, as well as
*
up-calls for application-l
evel operations such as launc
hing activities,
*
broadcasting and receiving
intents, etc.
*
/
public abstract class Context
{
.
.....
}
从源码注释可以看见,

Context提供了关于应用环境
全局信息的接口。它是一个
抽象类,它的执行被Android
系统所提供。它允许获取以
应用为特征的
资源和类型,是一个统领一
些资源(应用程序环境变量
等)的上下文。
看见上面的Class OverView了
吗?翻译就是说,它描述一
个应用程序环境的信息(即
上下文);是一个抽象类,
Android提供了该抽象类的具
体实现类;通过它我们可以
获取应用程序的资源和类
(包括应用级别操作,如启
动Ac tivity,发广播,接受
Intent等)。
既然上面Context是一个抽象
类,那么肯定有他的实现类
咯,我们在Context的源码中
通过IDE可以查看到他的子
类如下:
吓尿了,737个子类,经过
粗略浏览这些子类名字和查
阅资料发现,这些子类无非
就下面一些主要的继承关
系。这737个类都是如下关
系图的直接或者间接子类而
已。如下是主要的继承关
系:
从这里可以发现,Service和
Application的类继承类似,
Ac tivity继承
ContextThemeWrapper。这
是因为Ac tivity有主题
(
Ac tivity提供UI显示,所以
需要主题),而Service是没
有界面的服务。
所以说,我们从这张主要关
系图入手来分析Context相关
源码。
2-2 Context之间关系源码概
述
有了上述通过IDE查看的大
致关系和图谱之后我们在源
码中来仔细看下这些继承关
系。
先来看下Context类源码注
释:
/
**
*
Interface to global inform
ation about an application en
vironment. This is
*
an abstract class whose im
plementation is provided by
*
*
the Android system. It
allows access to applicati
on-specific resources and cla
sses, as well as
*
up-calls for application-l
evel operations such as launc
hing activities,
*
broadcasting and receiving
intents, etc.
*
/
public abstract class Context
{
.
.....

}
看见没有,抽象类Context ,
提供了一组通用的API。
再来看看Context的实现类
ContextImpl源码注释:
/
**
*
Common implementation of C
ontext API, which provides th
e base
*
context object for Activit
y and other application compo
nents.
*
/
class ContextImpl extends Con
text {
private Context mOuterCon


text;
.
.....
}
该类实现了Context类的所有
功能。
再来看看Context的包装类
ContextWrapper源码注释:
/
**
*
Proxying implementation of
Context that simply delegate
s all of its calls to
another Context. Can be s
*
ubclassed to modify behavior
without changing
*
*
the original Context.
/


public class ContextWrapper e
xtends Context {
Context mBase;
public ContextWrapper(Con
text base) {
mBase = base;
}
/
**
*
Set the base context f
or this ContextWrapper. All
calls will then be
*
delegated to the base
context. Throws
*
IllegalStateException
if a base context has already
been set.
*
*
@param base The new ba
se context for this wrapper.
*
/

protected void attachBase
Context(Context base) {
if (mBase != null) {
throw new Illegal
StateException("Base context
already set");
}
mBase = base;
}
.
.....
}
该类的构造函数包含了一个
真正的Context引用
(
ContextImpl对象),然后
就变成了ContextImpl的装饰
着模式。

再来看看ContextWrapper的
子类ContextThemeWrapper
源码注释:
/
**
*
A ContextWrapper that allo
ws you to modify the theme fr
om what is in the
*
*
wrapped context.
/
public class ContextThemeWrap
per extends ContextWrapper {
.
.....
}
该类内部包含了主题Theme
相关的接口,即

android:theme属性指定的。
再来看看Ac tivity、Service、
Application类的继承关系源
码:
public class Activity extends
ContextThemeWrapper
implements LayoutInfl
ater.Factory2,
Window.Callback, KeyE
vent.Callback,
OnCreateContextMenuLi
stener, ComponentCallbacks2,
Window.OnWindowDismis
sedCallback {
.
.....
}


public abstract class Service
extends ContextWrapper imple
ments ComponentCallbacks2 {
.
.....
}
public class Application exte
nds ContextWrapper implements
ComponentCallbacks2 {
.
.....
}
看见没有?他们完全符合上
面我们绘制的结构图与概
述。
2
-3 解决应用Context个数疑


惑
有了上面的Context继承关系
验证与分析之后我们来看下
一个应用程序到底有多个
Context?
Android应用程序只有四大组
件,而其中两大组件都继承
自Context,另外每个应用程
序还有一个全局的
Application对象。所以在我
们了解了上面继承关系之后
我们就可以计算出来Context
总数,如下:
APP Context总数 = Application
数(1) + Activity数(Customer)
+
Service数(Customer);
到此,我们也明确了Context
用中Context个数是多少的问
题。接下来就有必要继续深
入分析这些Context都是怎么
来的。
【工匠若
水 http://blog.csdn.net/yanbob

er 转载烦请注明出处,尊重
分享成果】
3
各种Context 在
ActivityThread中实例
化过程源码分析
在开始分析之前还是和
《Android异步消息处理机制
详解及源码分析》的3-1-2小
节及《Android应用
setContentView与
LayoutInflater加载解析机制
源码分析》的2-6小节一样直
接先给出关于Ac tivity启动的
一些概念,后面会写文章分
析这一过程。
Context的实现是
ContextImpl,Ac tivity与
Application和Service的创建
都是在Ac tivityThre a d中完成
的,至于在Ac tivityThre a d何
时、怎样调运的关系后面会
写文章分析,这里先直接给
出结论,因为我们分析的重
点是Context过程。
3-1 Ac tivity中ContextImpl实
例化源码分析
通过sta r tAc tivity启动一个新
的Ac tivity时系统会回调
Ac tivityThre a d的
handleLaunchActivity()方法,
该方法内部会调用
performLaunchActivity()方法
去创建一个Ac tivity实例,然
后回调Ac tivity的onCreate()等
方法。所以Ac tivity的
ContextImpl实例化是在
Ac tivityThre a d类的
performLaunchActivity方法
中,如下:
private Activity performLaunc
hActivity(ActivityClientRecor
d r, Intent customIntent) {
.
.....
/
/已经创建好新的act
ivity实例
if (activity != n
ull) {
/
/创建一个Cont
ext对象
Context appCo
ntext = createBaseContextForA
ctivity(r, activity);
.
/
.....
/将上面创建的a
ppContext传入到activity的attac
h方法

activity.atta
ch(appContext, this, getInstr
umentation(), r.token,
r.ide
nt, app, r.intent, r.activity
Info, title, r.parent,
r.emb
eddedID, r.lastNonConfigurati
onInstances, config,
r.ref
errer, r.voiceInteractor);
.
.....
}
.
.....
return activity;
}
看见上面
performLaunchActivity的核心
代码了吗?通过

createBaseContextForActiv
创建appContext,然后通过
activity.attach设置值。
具体我们先看下
createBaseContextForActivity
方法源码,如下:
private Context createBaseCon
textForActivity(ActivityClien
tRecord r,
final Activity ac
tivity) {
/
/实质就是new一个Contex
tImpl对象,调运ContextImpl的有参
构造初始化一些参数
ContextImpl appContex
t = ContextImpl.createActivit


yContext(this, r.packageInfo,
r.token);
/
/
/特别特别留意这里!!!
/ContextImpl中有一个C
ontext的成员叫mOuterContext,通
过这条语句就可将当前新Activity对象
赋值到创建的ContextImpl的成员mOu
terContext(也就是让ContextImpl
内部持有Activity)。
appContext.setOuterCo
ntext(activity);
/
/创建返回值并且赋值
Context baseContext =
appContext;
.....
/返回ContextImpl对象
return baseContext;
.
/
}
再来看看activity.attach,也

就是Ac tivity中的attach方
法,如下:
final void attach(Context con
text, ActivityThread aThread,
Instrumentation i
nstr, IBinder token, int iden
t,
Application appli
cation, Intent intent, Activi
tyInfo info,
CharSequence titl
e, Activity parent, String id
,
NonConfigurationI
nstances lastNonConfiguration
Instances,
Configuration con
fig, String referrer, IVoiceI
nteractor voiceInteractor) {

/
/
/特别特别留意这里!!!
/与上面createBaseCont
extForActivity方法中setOuterCo
ntext语句类似,不同的在于:
/
/通过ContextThemeWra
pper类的attachBaseContext方法,
将createBaseContextForActivit
y中实例化的ContextImpl对象传入到C
ontextWrapper类的mBase变量,这
样ContextWrapper(Context子类)
类的成员mBase就被实例化为Context
的实现类ContextImpl
attachBaseContext(con
text);
.
.....
}
通过上面Ac tivity的Context实
例化分析再结合上面Context
继承关系可以看出:

Ac tivity通过ContextWrapper
的成员mBase来引用了一个
ContextImpl对象,这样,
Ac tivity组件以后就可以通过
这个ContextImpl对象来执行
一些具体的操作(启动
Service等);同时
ContextImpl类又通过自己的
成员mOuterContext引用了与
它关联的Ac tivity,这样
ContextImpl类也可以操作
Ac tivity。
SO,由此说明一个Ac tivity就
有一个Context,而且生命周
期和Ac tivity类相同(记住这
句话,写应用就可以避免一
些低级的内存泄漏问题)。
3-2 Service中ContextImpl实
例化源码分析
写APP时我们通过
startService或者bindService方
法创建一个新Service时就会
回调Ac tivityThre a d类的
handleCreateService()方法完
成相关数据操作(具体关于
Ac tivityThre a d调运
handleCreateService时机等细
节分析与上面Ac tivity雷同,
后边文章会做分析)。具体
handleCreateService方法代码
如下:
private void handleCreateServ
ice(CreateServiceData data) {
.
/
.....
/类似上面Activity的创
建,这里创建service对象实例
Service service = nul
l;
try {
java.lang.ClassLo
ader cl = packageInfo.getClas
sLoader();

service = (Servic
e) cl.loadClass(data.info.nam
e).newInstance();
}
catch (Exception e)
{
.
.....
}
try {
.
/
.....
/不做过多解释,创建
一个Context对象
ContextImpl conte
xt = ContextImpl.createAppCon
text(this, packageInfo);
/
/特别特别留意这里!
!
!
/
/ContextImpl中有
一个Context的成员叫mOuterContex
t,通过这条语句就可将当前新Service
对象赋值到创建的ContextImpl的成员
mOuterContext(也就是让ContextI

mpl内部持有Service)。
context.setOuterC
ontext(service);
Application app =
packageInfo.makeApplication(
false, mInstrumentation);
/
/将上面创建的conte
xt传入到service的attach方法
service.attach(co
ntext, this, data.info.name,
data.token, app,
ActivityM
anagerNative.getDefault());
service.onCreate(
)
;
.
.....
}
}
catch (Exception e)
{
.
.....
}

再来看看service.attach,也
就是Service中的attach方法,
如下:
public final void attach(
Context context,
ActivityThread th
read, String className, IBind
er token,
Application appli
cation, Object activityManage
r) {
/
/特别特别留意这里!
!
!
/
/与上面handleCrea
teService方法中setOuterContext
语句类似,不同的在于:
/
/通过ContextWrap
per类的attachBaseContext方法,


将handleCreateService中实例化的
ContextImpl对象传入到ContextWra
pper类的mBase变量,这样ContextW
rapper(Context子类)类的成员mBa
se就被实例化为Context的实现类Cont
extImpl
attachBaseContext(con
text);
.
.....
}
可以看出步骤流程和Ac tivity
的类似,只是实现细节略有
不同而已。
SO,由此说明一个Service就
有一个Context,而且生命周
期和Service类相同(记住这

句话,写应用就可以避免一
些低级的内存泄漏问题)。
3-3 Application中ContextImpl
实例化源码分析
当我们写好一个APP以后每
次重新启动时都会首先创建
Application对象(每个APP都
有一个唯一的全局
Application对象,与整个APP
的生命周期相同)。创建
Application的过程也在
Ac tivityThre a d类的
handleBindApplication()方法
完成相关数据操作(具体关
于Ac tivityThre a d调运
handleBindApplication时机等
细节分析与上面Ac tivity雷
同,后边文章会做分析)。
而ContextImpl的创建是在该
方法中调运LoadedApk类的
makeApplication方法中实
现,LoadedApk类的
makeApplication()方法中源
代码如下:
public Application makeApplic

ation(boolean forceDefaultApp
Class,
Instrumentation i
nstrumentation) {
/
/只有新创建的APP才会走i
f代码块之后的剩余逻辑
if (mApplication != n
ull) {
return mApplicati
on;
}
/
/即将创建的Application
对象
Application app = nul
l;
String appClass = mAp
plicationInfo.className;
if (forceDefaultAppCl
ass || (appClass == null)) {
appClass = "andro
id.app.Application";

}
try {
java.lang.ClassLo
ader cl = getClassLoader();
if (!mPackageName
.
equals("android")) {
initializeJav
aContextClassLoader();
}
/
/不做过多解释,创建
一个Context对象
ContextImpl appCo
ntext = ContextImpl.createApp
Context(mActivityThread, this
)
;
/
/将Context传入Ins
trumentation类的newApplicatio
n方法
app = mActivityTh
read.mInstrumentation.newAppl
ication(

cl, appCl
ass, appContext);
/
/特别特别留意这里!
!!
/
/ContextImpl中有
一个Context的成员叫mOuterContex
t,通过这条语句就可将当前新Applica
tion对象赋值到创建的ContextImpl
的成员mOuterContext(也就是让Con
textImpl内部持有Application)。
appContext.setOut
erContext(app);
}
catch (Exception e)
.....
.....
{
.
}
.
return app;
}
接着看看

Instrumentation.newApplicatio
n方法。如下源码:
public Application newApplica
tion(ClassLoader cl, String c
lassName, Context context)
throws Instantiat
ionException, IllegalAccessEx
ception,
ClassNotFoundExce
ption {
return newApplication
(cl.loadClass(className), con
text);
}
继续看重载两个参数的
newApplication方法,如下:


static public Application new
Application(Class<?> clazz, C
ontext context)
throws Instantiat
ionException, IllegalAccessEx
ception,
ClassNotFoundExce
ption {
.
/
.....
/继续传递context
app.attach(context);
return app;
}
继续看下Application类的
attach方法,如下:
final void attach(Context con
text) {


/
/
/特别特别留意这里!!!
/与上面makeApplicatio
n方法中setOuterContext语句类似,
不同的在于:
/
/通过ContextWrapper类
的attachBaseContext方法,将make
Application中实例化的ContextImp
l对象传入到ContextWrapper类的mB
ase变量,这样ContextWrapper(Co
ntext子类)类的成员mBase就被实例
化为Application的实现类ContextI
mpl
attachBaseContext(con
text);
.
.....
}
可以看出步骤流程和Ac tivity
的类似,只是实现细节略有
不同而已。

SO,由此说明一个
Application就有一个
Context,而且生命周期和
Application类相同(然而一
个App只有一个Application,
而且与应用生命周期相
同)。
4
应用程序APP各种
Context访问资源的唯
一性分析
你可能会有疑问,这么多
Context都是不同实例,那么
我们平时写App时通过
context.getResources得到资
源是不是就不是同一份呢?
下面我们从源码来分析下,
如下:
class ContextImpl extends Con
text {
.
.....
private final ResourcesMa
nager mResourcesManager;
private final Resources m
Resources;
.
@
.....
Override
public Resources getResou
rces() {
return mResources;

}
.
.....
}
看见没,有了上面分析我们
可以很确定平时写的App中
context.getResources方法获
得的Resources对象就是上面
ContextImpl的成员变量
mResources。
那我们追踪可以发现
mResources的赋值操作如
下:
private ContextImpl(ContextIm


pl container, ActivityThread
mainThread,
LoadedApk package
Info, IBinder activityToken,
UserHandle user, boolean rest
ricted,
Display display,
Configuration overrideConfigu
ration) {
.
/
.....
/单例模式获取Resources
Manager对象
mResourcesManager = R
esourcesManager.getInstance()
;
.
/
.....
/packageInfo对于一个A
PP来说只有一个,所以resources 是
同一份
Resources resources =
packageInfo.getResources(mai
nThread);

if (resources != null
if (activityToken
)
{
!
= null
|
| displa
yId != Display.DEFAULT_DISPLA
Y
|
| overri
deConfiguration != null
|
tInfo != null && compatInfo.a
pplicationScale
| (compa
!
=
resources.getCompatibilityI
nfo().applicationScale)) {
/
anager是单例,所以resources是同
一份
/mResourcesM
resources = m
ResourcesManager.getTopLevelR
esources(packageInfo.getResDi
r(),

packa
geInfo.getSplitResDirs(), pac
kageInfo.getOverlayDirs(),
packa
geInfo.getApplicationInfo().s
haredLibraryFiles, displayId,
overr
ideConfiguration, compatInfo,
activityToken);
}
/把resources赋值给mRe
mResources = resource
.....
}
/
sources
s;
.
}
由此可以看出在设备其他因
素不变的情况下我们通过不

同的Context实例得到的
Resources是同一套资源。
PS一句,同样的分析方法也
可以发现Context类的
packageInfo对于一个应用来
说也只有一份。感兴趣可以
自行分析。
5
应用程序APP各种
Context使用区分源码
分析
5-1 先来解决getApplication和
getApplicationContext的区别
很多人一直区分不开这两个
方法的区别,这里从源码来
分析一下,如下:
首先来看getApplication方
法,你会发现Application与
Context都没有提供该方法,
这个方法是哪提供的呢?我
们看下Ac tivity与Service中的
代码,可以发下如下:
public class Activity extends
ContextThemeWrapper
implements LayoutInfl

ater.Factory2,
Window.Callback, KeyE
vent.Callback,
OnCreateContextMenuLi
stener, ComponentCallbacks2,
Window.OnWindowDismis
sedCallback {
.
.....
public final Application
getApplication() {
return mApplication;
}
.
.....
}
public abstract class Service
extends ContextWrapper imple
ments ComponentCallbacks2 {
.
.....
public final Application
getApplication() {


return mApplication;
.....
}
.
}
Ac tivity和Service提供了
getApplication,而且返回类
型都是Application。这个
mApplication都是在各自类的
attach方法参数出入的,也就
是说这个
mApplication都是在
Ac tivityThre a d中各自实例化
时获取的makeApplication方
法返回值。

所以不同的Ac tivity和Service
返回的Application均为同一
个全局对象。
再来看看
getApplicationContext方法,
如下:
class ContextImpl extends Con
text {
.
@
.....
Override
public Context getApplica
tionContext() {
return (mPackageInfo
= null) ?
!
mPackageInfo.

getApplication() : mMainThrea
d.getApplication();
}
.
.....
}
可以看到
getApplicationContext方法是
Context的方法,而且返回值
是Context类型,返回对象和
上面通过Service或者Ac tivity
的getApplication返回
的是一个对象。所以说对于
客户化的第三方应用来说两
个方法返回值一样,只是返

回值类型不同,还有就是依
附的对象不同而已。
5-2 各种获取Context方法的
差异及开发要点提示
可以看出来,Application的
Context生命周期与应用程序
完全相同。
Ac tivity或者Service的Context
与他们各自类生命周期相
同。
所以说对于Context使用不当
会引起内存泄漏。
譬如一个单例模式的自定义
数据库管理工具类需要传入
一个Context,而这个数据库
管理对象又需要在Ac tivity中
使用,如果我们传递Ac tivity
的Context就可能造成内存泄
漏,所以需要传递
Application的Context。
6
Context分析总结
到此整个Android应用的
Context疑惑就完全解开了,
同时也依据源码分析结果给
出了平时开发APP中该注意
的内存泄漏问题提示与解决
方案。相信通过这一篇你在
开发APP时对于Context的使
用将不再迷惑。
【工匠若
水 http://blog.csdn.net/yanbob
er 转载烦请注明出处,尊重
分享成果】
PS一句:最终还是选择
CSDN来整理发表这几年的
知识点,该文章平行迁移到
CSDN。因为CSDN也支持
MarkDown语法了,牛逼
啊!
【
工匠若
水 http://blog.csdn.net/yanbob
er 转载烦请注明出处,尊重
分享成果】
最近相对来说比较闲,加上
养病,所以没事干就撸些自
己之前的知识点为博客,方
便自己也方便别人。
1
背景
之所以选择这个知识点来分
析有以下几个原因:
1
. 逛GitHub时发现关注的
isuss中有人不停的在讨论
Android中的Looper ,
Handler , Message有什么
关系。
2
. 其实这个知识点对于
Android初学者来说很常
用,但是初学者可能前期
一直处于会用不知其原理
的阶段。
3
. 这个知识点也是Android面
试中一个高频问题。
基于以上几点也得拿出来分
析分析,该篇博客从实例到
源码完全进行了剖析(包含
Handler、Message、
MessageQueue、Looper、
HandlerThread等源码),不
同于网上很多只是分析局部
的博客。
你可能在刚开始接触Android
开发时就会知道如下问题:
Android的UI时线程不安全
的,如果在线程中更新UI会
出现异常,导致程序崩溃;
同时如果UI中做耗时操作又
会导致臭名昭著的ANR异
常。
为了解决如上这些问题,我
们怎办呢?很简单,通常最
经典常用的做法就是使用
Android的异步消息机制实现
即可(创建一个Message对
象,使用Handler发送出去,
然后在Handler 的
handleMessage()方法中获得
刚才发送的Message对象,
然后在这里进行UI操作)。
所以说还是很有必要了解异
步消息机制的Looper ,
Handler , Message等原理
的。
如下开始一个示例使用,然
后通过源码分析吧。
2
示例展示
如下示例展示了UI Thread与
Child Thread之间互相发送消
息,同时在UI Thread与Child
Thread中分别定义Handler。
这样如果没有mCount的判
断,这段程序会一直死循环
打印下去。
public class MainActivity ext
ends ActionBarActivity {
private int mCount = 0;
private Handler mHandlerT
hr = null;
private Handler mHandler

=
new Handler() {
Override
public void handleMes
sage(Message msg) {
super.handleMessa
@
ge(msg);
Log.d(null, ">>>>
>>>>>>>>UI# mHandler--handle
>
Message--msg.what="+msg.what)
;
/
/接收发送到UI线程的
消息,然后向线程中的Handler发送ms
g 1。
mHandlerThr.sendE
mptyMessage(1);
mCount++;
if (mCount >= 3)
{
/
/由于mHandle
rThr是在Child Thread创建,Loope
r手动死循环阻塞,所以需要quit。
mHandlerThr.g

etLooper().quit();
}
}
}
@
;
Override
protected void onCreate(B
undle savedInstanceState) {
super.onCreate(savedI
nstanceState);
setContentView(R.layo
ut.activity_main);
initData();
}
@
Override
protected void onStop() {
super.onStop();
/
/删除所有call与msg
mHandler.removeCallba
cksAndMessages(null);

}
private void initData() {
Log.d(null, ">>>>>>>>
>>>>UI# begin start thread!!
");
>
!
new Thread() {
@
Override
public void run()
{
super.run();
Looper.prepar
e();
new Handler() {
mHandlerThr =
@
Override
public vo
id handleMessage(Message msg)
{
super
.
handleMessage(msg);
Log.d

(null, ">>>>>>>>>>>>>Child# m
HandlerThr--handleMessage--ms
g.what=" + msg.what);
/
/接
收发送到子线程的消息,然后向UI线程
中的Handler发送msg 0。
mHand
ler.sendEmptyMessage(0);
}
}
;
Log.d(null, "
>
>>>>>>>>>>>>Child# begin sta
rt send msg!!!");
/
/Activity中
启动Thread,在Thread结束前发送ms
g 0到UI Thread。
mHandler.send
EmptyMessage(0);
Looper.loop()
;
//不能在这个后面添加代码,程序是

无法运行到这行之后的。
}
}
.start();
}
}
运行结果展示如下:
>
>>>>>>>>>>>>UI# begin start
thread!!!
>>>>>>>>>>>>Child# begin sta
rt send msg!!!
>>>>>>>>>>>>UI# mHandler--ha
ndleMessage--msg.what=0
>>>>>>>>>>>>Child# mHandlerT
hr--handleMessage--msg.what=1
>>>>>>>>>>>>UI# mHandler--ha
ndleMessage--msg.what=0
>>>>>>>>>>>>Child# mHandlerT
hr--handleMessage--msg.what=1
>
>
>
>
>


>
>>>>>>>>>>>>UI# mHandler--ha
ndleMessage--msg.what=0
怎么样,这和你平时用的
Handler一样吧,对于
Handler异步处理的简单基础
示例先说到这,接下来依据
上面示例的写法分析原因与
源代码原理。
3
5
分析Android
.1.1(API 22)异步
消息机制源码
3
-1 看看Handler的实例化过

程源码
-1-1 Handler实例化源码
3
从哪着手分析呢?当然是实
例化构造函数呀,所以我们
先从Handler的默认构造函数
开始分析,如下:
/
**
*
Default constructor as
sociates this handler with th
e {@link Looper} for the
*
*
*
current thread.
If this thread does no
t have a looper, this handler
won't be able to receive mes

sages
own.
*
*
so an exception is thr
/
public Handler() {
this(null, false);
}
通过注释也能看到,默认构
造函数没有参数,而且调运
了带有两个参数的其他构造
函数,第一个参数传递为
null,第二个传递为false。
这个构造函数得到的Handler
默认属于当前线程,而且如
果当前线程如果没有Looper

则通过这个默认构造实例化
Handler时会抛出异常,至于
是啥异常还有为啥咱们继续
往下分析,this(null, false)的
实现如下:
public Handler(Callback callb
ack, boolean async) {
if (FIND_POTENTIAL_LE
AKS) {
final Class<? ext
ends Handler> klass = getClas
s();
if ((klass.isAnon
ymousClass() || klass.isMembe
rClass() || klass.isLocalClas
s()) &&
(klass.ge

tModifiers() & Modifier.STATI
C) == 0) {
Log.w(TAG, "T
he following Handler class sh
ould be static or leaks might
occur: " +
klass.get
CanonicalName());
}
}
mLooper = Looper.myLo
oper();
if (mLooper == null)
{
throw new Runtime
Exception(
"
Can't create
handler inside thread that h
as not called Looper.prepare(
)
");
}

mQueue = mLooper.mQue
ue;
;
mCallback = callback;
mAsynchronous = async
}
可以看到,在第11行调用了
mLooper = Looper.myLooper
语句,然后获取了一个
Looper对象mLooper ,如果
mLooper实例为空,则会抛
出一个运行
时异常(Can’t create handler
inside thread that has not


called
Looper.prepare()!)。
3-1-2 Looper实例化源码
好奇的你指定在想什么时候
mLooper 对象才可能为空
呢?很简单,跳进去看下
吧,Looper类的静态方法
myLooper如下:
/
**
*
Return the Looper obje
ct associated with the curren
t thread. Returns
*
null if the calling th
read is not associated with a
Looper.
*
/
public static Looper myLo
oper() {
return sThreadLocal.g
et();
}
咦?这里好简单。单单就是
从sThreadLocal对象中get了
一个Looper对象返回。跟踪
了一下sThreadLocal对象,
发现他定义在Looper中,是
一个static
fina l类型的
ThreadLocal<Looper> 对象


(
在Java中,一般情况下,
通过ThreadLocal.set() 到线
程中的对象是该线程自己使
用的对象,其他线程是不需
要
访问的,也访问不到的,各
个线程中访问的是不同的对
象。)。所以可以看出,如
果sThreadLocal中有Looper存
在就返回Looper,没有
Looper存在
自然就返回null了。
这时候你一定有疑惑,既然
这里是通过sThreadLocal的
get获得Looper,那指定有地
方对sThreadLocal进行set操
作吧?是的,我们在Looper
类中跟踪发现如下:
private static void prepare(b
oolean quitAllowed) {
if (sThreadLocal.get(
)
!= null) {
throw new Runtime
Exception("Only one Looper ma
y be created per thread");
}
sThreadLocal.set(new
Looper(quitAllowed));
}

看着这个Looper的static方法
prepare没有?这段代码首先
判断sThreadLocal中是否已
经存在Looper了,如果还没
有则创建一个新的Looper设
置进去。
那就看下Looper的实例化,
如下:
private Looper(boolean quitAl
lowed) {
mQueue = new MessageQ
ueue(quitAllowed);
mThread = Thread.curr


entThread();
}
可以看见Looper构造函数无
非就是创建了一个
MessageQueue(它是一个消
息队列,用于将所有收到的
消息以队列的形式进行排
列,并提供入队和出
队的方法。)和货到当前
Thread实例引用而已。通过
这里可以发现,一个Looper
只能对应了一个
MessageQueue。
你可能会说上面的例子在子
线程中明明先调运的是
Looper.prepare();方法,这里
怎么有参数了?那就继续看
吧,如下:
public static void prepare()
{
prepare(true);
}
可以看见,prepare()仅仅是
对prepare(boolean
quitAllowed) 的封装而已,
默认传入了true,也就是将

MessageQueue对象中的
quitAllowed标记标
记为true而已,至于
MessageQueue后面会分析。
稀奇古怪的事情来了!如果
你足够留意上面的例子,你
会发现我们在UI Thread中创
建Handler时没有调用
Looper.prepare();,而在
initData方法中创建的Child
Thread中首先就调运了
Looper.prepare();。你指定很
奇怪吧?UI Thread为啥不需
要呢?上面源码分析明明需
要先保证mLooper对象不为
null呀?
这是由于在UI线程(Ac tivity
等)启动的时候系统已经帮
我们自动调用了
Looper.prepare()方法。
那么在哪启动的呢?这个涉
及Android系统架构问题比较
多,后面文章会分析Ac tivity
的启动流程。这里你只要知
道,以前一直都说Ac tivity的
人口是onCreate方法,其实
android上一个应用的入口应
该是Ac tivityThre a d类的ma in
方法就行了。
所以为了解开UI Thread为何
不需要创建Looper对象的原
因,我们看下Ac tivityThre a d
的main方法,如下:
public static void main(Strin
g[] args) {
SamplingProfilerInteg
ration.start();

/
/ CloseGuard default
s to true and can be quite sp
ammy. We
/
/ disable it here, b
ut selectively enable it late
r (via
/
/ StrictMode) on deb
ug builds, but using DropBox,
not logs.
CloseGuard.setEnabled
(false);
Environment.initForCu
rrentUser();
/
/ Set the reporter f
or event logging in libcore
EventLogger.setReport
er(new EventLoggingReporter()
)
;
Security.addProvider(

new AndroidKeyStoreProvider()
)
;
/
/ Make sure TrustedC
ertificateStore looks in the
right place for CA certificat
es
final File configDir
=
Environment.getUserConfigDi
rectory(UserHandle.myUserId()
)
;
TrustedCertificateSto
re.setDefaultUserDirectory(co
nfigDir);
Process.setArgV0("<pr
e-initialized>");
Looper.prepareMainLoo
per();
ActivityThread thread

=
new ActivityThread();
thread.attach(false);
if (sMainThreadHandle
r == null) {
sMainThreadHandle
r = thread.getHandler();
}
if (false) {
Looper.myLooper()
setMessageLogging(new
LogPrinte
r(Log.DEBUG, "ActivityThread"
);
.
)
}
Looper.loop();
throw new RuntimeExce
ption("Main thread loop unexp
ectedly exited");

}
看见22行没?没说错吧?
Looper.prepareMainLooper(
,
我们跳到Looper看下
prepareMainLooper方法,如
下:
public static void prepareMai
nLooper() {
prepare(false);
synchronized (Looper.
class) {
if (sMainLooper !
=
null) {
throw new Ill
egalStateException("The main
Looper has already been prepa


red.");
}
sMainLooper = myL
ooper();
}
}
可以看到,UI线程中会始终
存在一个Looper对象
(
sMainLooper 保存在
Looper类中,UI线程通过
getMainLooper方法获取UI线
程的Looper对象),
从而不需要再手动去调用
Looper.prepare()方法了。如

下Looper类提供的get方法:
public static Looper getMainL
ooper() {
synchronized (Looper.
class) {
return sMainLoope
r;
}
}
看见没有,到这里整个
Handler实例化与为何子线程
在实例化Handler之前需要先
调运Looper.prepare();语句的
原理分析完毕。

3-1-3 Handler与Looper实例
化总结
到此先初步总结下上面关于
Handler实例化的一些关键信
息,具体如下:
1
. 在主线程中可以直接创建
Handler对象,而在子线程
中需要先调用
Looper.prepare()才能创建
Handler对象,否则运行抛
出”Can’t create handler
inside thread that has not
called Looper.prepare()”异
常信息。
2
. 每个线程中最多只能有一
个Looper对象,否则抛出
异常。
3. 可以通过
Looper.myLooper()获取当
前线程的Looper实例,通
过Looper.getMainLooper()
获取主(UI)线程的
Looper实例。
4. 一个Looper只能对应了一
个MessageQueue 。
5. 一个线程中只有一个
Looper实例,一个
MessageQueue实例,可以
有多个Handler实例。
Handler对象也创建好了,接
下来就该用了吧,所以下面
咱们从Handler的收发消息角
度来分析分析源码。
3-2 继续看看Handler消息收
发机制源码
3
-2-1 通过Handler发消息到
消息队列
还记得上面的例子吗?我们
在Child Thread的最后通过主
线程的Handler对象调运
sendEmptyMessage方法发送
出去了一条消息。
当然,其实Handler类提供了
许发送消息的方法,我们这
个例子只是用了最简单的发
送一个empty消息而已,有
时候我们会先定义一个
Message,然后通过Handler
提供的其他方法进行发送。
通过分析Handler源码发现
Handler中提供的很多个发送
消息方法中除了
sendMessageAtFrontOfQueue
()方法之外,其它的发送消
息方法最终都调用了
sendMessageAtTime()方法。
所以,咱们先来看下这个
sendMessageAtTime方法,如
下:
public boolean sendMessageAtT
ime(Message msg, long uptimeM
illis) {

MessageQueue queue =
mQueue;
if (queue == null) {
RuntimeException
e = new RuntimeException(
this + "
sendMessageAtTime() called wi
th no mQueue");
Log.w("Looper", e
.
getMessage(), e);
return false;
}
return enqueueMessage
(queue, msg, uptimeMillis);
}
再看下Handler中和其他发送
方法不同的
sendMessageAtFrontOfQueue

方法,如下:
public final boolean sendMess
ageAtFrontOfQueue(Message msg
)
{
MessageQueue queue =
mQueue;
if (queue == null) {
RuntimeException
e = new RuntimeException(
this + " send
MessageAtTime() called with n
o mQueue");
Log.w("Looper", e
.
getMessage(), e);
return false;
}
return enqueueMessage
(queue, msg, 0);
}

对比上面两个方法可以发
现,表面上说Handler的
sendMessageAtFrontOfQueue
方法和其他发送方法不同,
其实实质是相同的,仅仅是
sendMessageAtFrontOfQueue
方法是sendMessageAtTime 方
法的一个特例而已
(sendMessageAtTime最后一
个参数传递0就变为了
sendMessageAtFrontOfQueue
方法)。所以咱们现在继续
分析sendMessageAtTime 方
法,如下分析:
sendMessageAtTime(Message
msg, long uptimeMillis)方法有
两个参数;msg是我们发送
的Message对象,uptimeMillis
表示发送消息的时间,
uptimeMillis的值等于从系统
开机到当前时间的毫秒数再
加上延迟时间。
在该方法的第二行可以看到
queue = mQueue,而mQueue
是在Handler实例化时构造函
数中实例化的。在Handler的
构造函数中可以看见mQueue
=
mLooper.mQueue;,而
Looper的mQueue对象上面分
析过了,是在Looper的构造
函数中创建的一个
MessageQueue。
接着第9行可以看到,上面
说的两个参数和刚刚得到的
queue对象都传递到了
enqueueMessage(queue, msg,
uptimeMillis)方法中,那就看
下这个方法吧,如下:
private boolean enqueueMessag
e(MessageQueue queue, Message
msg, long uptimeMillis) {
msg.target = this;
if (mAsynchronous) {
msg.setAsynchrono
us(true);
}
return queue.enqueueM
essage(msg, uptimeMillis);
}
这个方法首先将我们要发送
的消息Message的target属性
设置为当前Handler对象(进
行关联);接着将msg与

uptimeMillis这两个参数都传
递到
MessageQueue(消息队列)
的enqueueMessage()方法
中,所以接下来我们就继续
分析MessageQueue类的
enqueueMessage方法,如
下:
boolean enqueueMessage(Messag
e msg, long when) {
if (msg.target == nul
l) {
throw new Illegal
ArgumentException("Message mu
st have a target.");

}
if (msg.isInUse()) {
throw new Illegal
StateException(msg + " This m
essage is already in use.");
}
synchronized (this) {
if (mQuitting) {
IllegalStateE
xception e = new IllegalState
Exception(
msg.t
arget + " sending message to
a Handler on a dead thread");
Log.w("Messag
eQueue", e.getMessage(), e);
msg.recycle()
;
return false;
}

msg.markInUse();
msg.when = when;
Message p = mMess
ages;
boolean needWake;
if (p == null ||
when == 0 || when < p.when) {
/
/ New head,
wake up the event queue if bl
ocked.
msg.next = p;
mMessages = m
sg;
needWake = mB
locked;
}
else {
/ Inserted w
ithin the middle of the queue
/
.
Usually we don't have to w
ake
/
/ up the eve
nt queue unless there is a ba

rrier at the head of the queu
e
/
/ and the me
ssage is the earliest asynchr
onous message in the queue.
needWake = mB
locked && p.target == null &&
msg.isAsynchronous();
Message prev;
for (;;) {
prev = p;
p = p.nex
t;
if (p ==
null || when < p.when) {
break
;
}
if (needW
ake && p.isAsynchronous()) {
needW
ake = false;

}
}
msg.next = p;
/ invariant: p == prev.next
prev.next = m
/
sg;
}
/
/ We can assume
mPtr != 0 because mQuitting i
s false.
if (needWake) {
nativeWake(mP
tr);
}
}
return true;
}
通过这个方法名可以看出来

通过Handler发送消息实质就
是把消息Message添加到
MessageQueue消息队列中的
过程而已。
通过上面遍历等next操作可
以看出来,MessageQueue消
息队列对于消息排队是通过
类似c语言的链表来存储这
些有序的消息的。其中的
mMessages对象表示当前待
处理的消息;然后18到49行
可以看出,消息插入队列的
实质就是将所有的消息按时
间(uptimeMillis参数,上面
有介绍)进行排序。所以还
记得上面
sendMessageAtFrontOfQueue
方法吗?它的实质就是把消
息添加到MessageQueue消息
队列的头部(uptimeMillis为
0,上面有分析)。
到此Handler的发送消息及发
送的消息如何存入到
MessageQueue消息队列的逻
辑分析完成。
那么问题来了!既然消息都
存入到了MessageQueue消息
队列,当然要取出来消息
吧,不然存半天有啥意义
呢?我们知道MessageQueue
的对象在Looper构造函数中
实例化的;一个Looper对应
一个MessageQueue,所以说
Handler发送消息是通过
Handler构造函数里拿到的
Looper对象的成员
MessageQueue的
enqueueMessage方法将消息
插入队列,也就是说出队列
一定也与Handler和Looper和
MessageQueue有关系。
还记不记得上面实例部分中
Child Thread最后调运的
Looper.loop();方法呢?这个
方法其实就是取出
MessageQueue消息队列里的
消息方法。具体在下面分
析。
3-2-2 通过Handler接收发送
的消息
先来看下上面例子中
Looper.loop();这行代码调运
的方法,如下:
/
**
*
Run the message queue
in this thread. Be sure to ca
ll
*
{@link #quit()} to end
the loop.
*
/
public static void loop()
{
final Looper me = myL
ooper();
if (me == null) {
throw new Runtime
Exception("No Looper; Looper.
prepare() wasn't called on th
is thread.");

}
final MessageQueue qu
eue = me.mQueue;
/
/ Make sure the iden
tity of this thread is that o
f the local process,
/
/ and keep track of
what that identity token actu
ally is.
Binder.clearCallingId
entity();
final long ident = Bi
nder.clearCallingIdentity();
for (;;) {
Message msg = que
ue.next(); // might block
if (msg == null)
{
/
/ No message
indicates that the message q

ueue is quitting.
return;
}
/
/ This must be i
n a local variable, in case a
UI event sets the logger
Printer logging =
me.mLogging;
if (logging != nu
ll) {
logging.print
ln(">>>>> Dispatching to " +
msg.target + " " +
msg.c
allback + ": " + msg.what);
}
msg.target.dispat
chMessage(msg);
if (logging != nu

ll) {
logging.print
ln("<<<<< Finished to " + msg
.
;
target + " " + msg.callback)
}
/
/ Make sure that
during the course of dispatc
hing the
/
/ identity of th
e thread wasn't corrupted.
final long newIde
nt = Binder.clearCallingIdent
ity();
if (ident != newI
dent) {
Log.wtf(TAG,
"
Thread identity changed from
0x"
+
Lon
g.toHexString(ident) + " to 0

x"
+
Lon
g.toHexString(newIdent) + " w
hile dispatching to "
+
msg
.
+
target.getClass().getName()
" "
+
msg
.
callback + " what=" + msg.wh
at);
}
msg.recycleUnchec
ked();
}
}
可以看到,第6行首先得到
了当前线程的Looper对象
me,接着第10行通过当前

Looper对象得到与Looper对
象一一对应的MessageQueue
消息队列
也就类似上面发送消息部
分,Handler通过myLoop方
法得到Looper对象,然后获
取Looper的MessageQueue消
息队列对象)。17行进入一
个死循环
,18行不断地调用
MessageQueue的next()方
法,进入MessageQueue这个
类查看next方法,如下:
Message next() {
/
/ Return here if the
message loop has already qui
t and been disposed.
/
/ This can happen if
the application tries to res
tart a looper after quit
/
/ which is not suppo
rted.
;
final long ptr = mPtr
if (ptr == 0) {
return null;
}
int pendingIdleHandle
rCount = -1; // -1 only durin
g first iteration
int nextPollTimeoutMi

llis = 0;
for (;;) {
if (nextPollTimeo
utMillis != 0) {
Binder.flushP
endingCommands();
}
nativePollOnce(pt
r, nextPollTimeoutMillis);
synchronized (thi
s) {
/
/ Try to ret
rieve the next message. Retu
rn if found.
final long no
w = SystemClock.uptimeMillis(
)
;
Message prevM
Message msg =
sg = null;

mMessages;
if (msg != nu
ll && msg.target == null) {
/
/ Stalle
d by a barrier. Find the nex
t asynchronous message in the
queue.
do {
prevM
sg = msg;
msg =
while (
msg.next;
}
msg != null && !msg.isAsynchr
onous());
}
if (msg != nu
ll) {
if (now <
msg.when) {
/
/ Ne
xt message is not ready. Set

a timeout to wake up when it
is ready.
nextP
ollTimeoutMillis = (int) Math
.
min(msg.when - now, Integer.
MAX_VALUE);
}
else {
/
/ Go
t a message.
mBloc
if (p
p
ked = false;
revMsg != null) {
revMsg.next = msg.next;
e {
}
els
m
Messages = msg.next;
}
msg.n
ext = null;

if (f
alse) Log.v("MessageQueue", "
Returning message: " + msg);
retur
n msg;
}
else {
}
/
/ No mor
e messages.
nextPollT
imeoutMillis = -1;
}
/
/ Process th
e quit message now that all p
ending messages have been han
dled.
if (mQuitting
)
;
{
dispose()
return nu

ll;
}
/
/ If first t
ime idle, then get the number
of idlers to run.
/
/ Idle handl
es only run if the queue is e
mpty or if the first message
/
/ in the que
ue (possibly a barrier) is du
e to be handled in the future
.
if (pendingId
leHandlerCount < 0
&
& (m
Messages == null || now < mMe
ssages.when)) {
pendingId
leHandlerCount = mIdleHandler
s.size();
}

if (pendingId
leHandlerCount <= 0) {
/ No idl
/
e handlers to run. Loop and
wait some more.
mBlocked
=
true;
continue;
}
if (mPendingI
dleHandlers == null) {
mPendingI
dleHandlers = new IdleHandler
Math.max(pendingIdleHandlerC
ount, 4)];
[
}
mPendingIdleH
andlers = mIdleHandlers.toArr
ay(mPendingIdleHandlers);
}

/
/
/ Run the idle h
/ We only ever r
andlers.
each this code block during t
he first iteration.
for (int i = 0; i
<
pendingIdleHandlerCount; i
+
+) {
final IdleHan
dler idler = mPendingIdleHand
lers[i];
mPendingIdleH
andlers[i] = null; // release
the reference to the handler
boolean keep
=
false;
try {
keep = id
ler.queueIdle();
wable t) {
}
catch (Thro

Log.wtf("
MessageQueue", "IdleHandler t
hrew exception", t);
}
if (!keep) {
synchroni
zed (this) {
mIdle
Handlers.remove(idler);
}
}
}
/
/ Reset the idle
handler count to 0 so we do
not run them again.
pendingIdleHandle
rCount = 0;
/
/ While calling
an idle handler, a new messag

e could have been delivered
/ so go back and
/
look again for a pending mes
sage without waiting.
nextPollTimeoutMi
llis = 0;
}
}
可以看出来,这个next方法
就是消息队列的出队方法
(与上面分析的
MessageQueue消息队列的
enqueueMessage方法对
比)。可以看见上面代码就
是如果当前MessageQueue中

存在待处理的消息
mMessages就将这个消息出
队,然后让下一条消息成为
mMessages,否则就进入一
个阻塞状态(在
上面Looper类的loop方法上
面也有英文注释,明确说到
了阻塞特性),一直等到有
新的消息入队。
继续看loop()方法的第30行
(msg.target.dispatchMessage
(msg);),每当有一个消息
出队就将它传递到msg.target
的dispatchMessage()方法
中。其中这个msg.target其实
就是上面分析Handler发送消
息代码部分Handler的
enqueueMessage方法中的
msg.target = this;语句,也就
是当前Handler对象。所以接
下来的重点自然就是回到
Handler类看看我们熟悉的
dispatchMessage()方法,如
下:
/
**

*
here.
*
Handle system messages
/
public void dispatchMessa
ge(Message msg) {
if (msg.callback != n
ull) {
handleCallback(ms
g);
}
else {
if (mCallback !=
null) {
if (mCallback
handleMessage(msg)) {
return;
.
)
}
}
handleMessage(msg
;
}
}

可以看见dispatchMessage方
法中的逻辑比较简单,具体
就是如果mCallback不为空,
则调用mCallback 的
handleMessage()方法,否则
直接调用
Handler的handleMessage()方
法,并将消息对象作为参数
传递过去。
这样我相信大家就都明白了
为什么handleMessage()方法
中可以获取到之前发送的消
息了吧!
对了,既然上面说了获取消
息在MessageQueue消息队列
中是一个死循环的阻塞等
待,所以Looper的quit方法也
很重要,这样在不需要时可
以退出这个死循环,如上面
实例部分使用所示。
3-2-3 结束MessageQueue消
息队列阻塞死循环源码分析
如下展示了Looper类的quit方
法源码:

public void quit() {
mQueue.quit(false);
}
看见没有,quit方法实质就
是调运了MessageQueue消息
队列的quit,如下:
void quit(boolean safe) {
if (!mQuitAllowed) {
throw new Illegal
StateException("Main thread n
ot allowed to quit.");
}
synchronized (this) {
if (mQuitting) {
return;


}
mQuitting = true;
if (safe) {
removeAllFutu
reMessagesLocked();
else {
removeAllMess
}
agesLocked();
}
/
/ We can assume
mPtr != 0 because mQuitting w
as previously false.
nativeWake(mPtr);
}
}
看见上面2到4行代码没有,
通过判断标记mQuitAllowed

来决定该消息队列是否可以
退出,然而当mQuitAllowed
为fasle时抛出的异常竟然是”
Ma in thread not allowed to
quit.”,Ma in Thread,所以
可以说明Ma in Thread关联的
Looper一一对应的
MessageQueue消息队列是不
能通过该方法退出的。
你可能会疑惑这个
mQuitAllowed在哪设置的?
其实他是MessageQueue构造
函数传递参数传入的,而
MessageQueue对象的实例化
是在Looper的构造函数实现
的,所以不难发现
mQuitAllowed参数实质是从
Looper的构函数传入的。上
面实例化Handler模块源码分
析时说过,Looper实例化是
在Looper的静态方法
prepare(boolean quitAllowed)
中处理的,也就是说
mQuitAllowed是由
Looper.prpeare(boolean
quitAllowed)参数传入的。追
根到底说明mQuitAllowed就
是Looper.prpeare的参数,我
们默认调运的
Looper.prpeare();其中对
mQuitAllowed设置为了true,
所以可以通过quit方法退
出,而主线程Ac tivityThre a d
的main中使用的是
Looper.prepareMainLooper();
,这个方法里对
mQuitAllowed设置为false,
所以才会有上面说的”Main
thread not allowed to quit.”。
回到quit方法继续看,可以
发现实质就是对mQuitting标
记置位,这个mQuitting标记
在MessageQueue的阻塞等待
next方法中用做了判断条
件,所以可以通过quit方法
退出整个当前线程的loop循
环。
到此整个Android的一次完整
异步消息机制分析使用流程
结束。接下来进行一些总结
提升与拓展。
-3 简单小结下Handler整个
3
使用过程与原理
通过上面的源码分析原理我
们可以总结出整个异步消息
处理流程的关系图如下:
这幅图很明显的表达出了
Handler异步机制的来龙去
脉,不做过多解释。
上面实例部分我们只是演示
了Handler的局部方法,具体
Handler还有很多方法,下面
详细介绍。
-4 再来看看Handler源码的
3
其他常用方法
在上面例子中我们只是演示
了发送消息的
sendEmptyMessage(int what)
方法,其实Handler有如下一
些发送方式:
sendMessage(Message msg);
sendEmptyMessage(int what


sendEmptyMessageDelayed(i
sendMessageDelayed(Messag
sendMessageAtFrontOfQueue
方法。
这些方法不再做过多解释,
用法雷同,顶一个Message
决定啥时发送到target去。
post(Runnable r);
postDelayed(Runnable r, l
等post系列方法。
该方法实质源码其实就是如


下:
public final boolean postDela
yed(Runnable r, long delayMil
lis)
{
return sendMessageDel
ayed(getPostMessage(r), delay
Millis);
}
额,原来post方法的实质也
是调运sendMessageDelayed()
方法去处理的额,看见
getPostMessage(r)方法没?
如下源码:

private static Message getPos
tMessage(Runnable r) {
Message m = Message.o
btain();
m.callback = r;
return m;
}
如上方法仅仅是将消息的
callback字段指定为传入的
Runnable对象r。其实这个
Message对象的m.callback就
是上面分析Handler接收消息
回调处理
dispatchMessage()方法中调

运的。在Handler的
dispatchMessage方法中首先
判断如果Message的callback
等于null才会去调用
handleMessage()方法
,否则就调用
handleCallback()方法。那就
再看下Handler 的
handleCallback()方法源码,
如下:
private static void handleCal
lback(Message message) {
message.callback.run(
)
;

}
额,这里竟然直接执行了
Runnable对象的run()方法。
所以说我们在Runnable对象
的run()方法里更新UI的效果
完全和在handleMessage()方
法中更新UI
相同,特别强调这个
Runnable的run方法还在当前
线程中阻塞执行,没有创建
新的线程(很多人以为是
Runnable就创建了新线
程)。
Activity.runOnUiThread(Ru
方法。
首先看下Ac tivity的
runOnUiThread方法源码:
public final void runOnUiThre
ad(Runnable action) {
if (Thread.currentThr
ead() != mUiThread) {
mHandler.post(act
ion);
}
}
else {
action.run();
}


看见没有,实质还是在UI线
程中执行了Runnable的run方
法。不做过多解释。
View.post(Runnable);和Vie
方法。
首先看下Vie w的postDelayed
方法源码:
public boolean postDelayed(R
unnable action, long delayMil
lis) {
final AttachInfo atta
chInfo = mAttachInfo;
if (attachInfo != nul
l) {
return attachInfo


.
mHandler.postDelayed(action,
delayMillis);
}
/
/ Assume that post w
ill succeed later
ViewRootImpl.getRunQu
eue().postDelayed(action, del
ayMillis);
return true;
}
看见没有,实质还是在UI线
程中执行了Runnable的run方
法。不做过多解释。
到此基本上关于Handler的所
有发送消息方式都被解释明
白了。既然会用了基本的那

就得提高下,接下来看看关
于Message的一点优化技
巧。
3-5 关于Handler发送消息的
一点优化分析
还记得我们说过,当发送一
个消息时我们首先会new一
个Message对象,然后再发
送吗?你是不是觉得每次
new Message很浪费呢?那
么我们就来分析一下这个问
题。
如下是我们正常发送消息的
代码局部片段:
Message message = new Message
();
message.arg1 = 110;
message.arg2 = 119;
message.what = 0x120;
message.obj = "Test Messa
ge Content!";
mHandler.sendMessage(mess
age);
相信很多初学者都是这么发
送消息的吧?当有大量多次
发送时如上写法会不太高

效。不卖关子,先直接看达
到同样效果的优化写法,如
下:
mHandler.sendMessage(mHandler
.
9
"
obtainMessage(0x120, 110, 11
, "\"Test Message Content!\"
));
咦?怎么send时没实例化
Message?这是咋回事?我
们看下
mHandler.obtainMessage(0x
这一段代码,
obtainMessage是Handler提供


的一个方法,看下源码:
public final Message obtainMe
ssage(int what, int arg1, int
arg2, Object obj)
{
return Message.obtain
(this, what, arg1, arg2, obj)
;
}
这方法竟然直接调运了
Message类的静态方法
obtain,我们再去看看obtain
的源码,如下:
public static Message obtain(


Handler h, int what,
int arg1, int arg
, Object obj) {
2
Message m = obtain();
m.target = h;
m.what = what;
m.arg1 = arg1;
m.arg2 = arg2;
m.obj = obj;
return m;
}
看见没有?首先又调运一个
无参的obtain方法,然后设
置Message各种参数后返
回。我们继续看下这个无参
方法,如下:


/
**
*
Return a new Message i
nstance from the global pool.
Allows us to
*
avoid allocating new o
bjects in many cases.
*
/
public static Message obt
ain() {
synchronized (sPoolSy
if (sPool != null
Message m = s
nc) {
)
{
Pool;
t;
sPool = m.nex
m.next = null
;
m.flags = 0;
/
/ clear in-use flag

sPoolSize--;
return m;
}
}
return new Message();
}
真相大白了!看见注释没
有?从整个Messge池中返回
一个新的Message实例,在
许多情况下使用它,因为它
能避免分配新的对象。
所以看见这两种获取
Message写法的优缺点没有
呢?明显可以看见通过调用

Handler的obtainMessage方法
获取Message对象就能避免
创建对象,从而减少内存的
开销了。所以推荐这种写
法!!!
3-6 关于Handler导致内存泄
露的分析与解决方法
正如上面我们实例部分的代
码,使用Android Lint会提示
我们这样一个Wa rning,如
下:
In Android, Handler classes s

hould be static or leaks migh
t occur.
意思是说在Android中
Handler类应该是静态的否则
可能发生泄漏。
啥是内存泄漏呢?
Java通过GC自动检查内存中
的对象,如果GC发现一个或
一组对象为不可到达状态,
则将该对象从内存中回收。
也就是说,一个对象不被任
何引用所指向,则该对象会

在被GC发现的时候被回收;
另外,如果一组对象中只包
含互相的引用,而没有来自
它们外部的引用(例如有两
个对象A和B互相持有引用,
但没有任何外部对象持有指
向A或B的引用),这仍然属
于不可到达,同样会被GC回
收。本该被回收的对象没被
回收就是内存泄漏。
Handler中怎么泄漏的呢?
当使用内部类(包括匿名
类)来创建Handler的时候,
Handler对象会隐式地持有一
个外部类对象(通常是一个
Ac tivity)的引用。而Handler
通常会伴随着一个耗时的后
台线程一起出现,这个后台
线程在任务执行完毕之后,
通过消息机制通知Handler,
然后Handler把消息发送到UI
线程。然而,如果用户在耗
时线程执行过程中关闭了
Ac tivity(正常情况下Ac tivity
不再被使用,它就有可能在
GC检查时被回收掉),由于
这时线程尚未执行完,而该
线程持有Handler的引用,这
个Handler又持有Ac tivity的引
用,就导致该Ac tivity暂时无
法被回收(即内存泄露)。
Handler内存泄漏解决方案
呢?
方案一:通过程序逻辑来进
行保护
1. 在关闭Ac tivity的时候停掉
你的后台线程。线程停掉
了,就相当于切断了
Handler和外部连接的线,
Ac tivity自然会在合适的时
候被回收。
2
. 如果你的Handler是被
delay的Message持有了引
用,那么使用相应的
Handler的
removeCallbacks()方法,
把消息对象从消息队列移
除就行了(如上面的例子
部分的onStop中代码)。
方案二:将Handler声明为静
态类
静态类不持有外部类的对
象,所以你的Ac tivity可以随
意被回收。代码如下:
static class TestHandler exte
nds Handler {
@
Override
public void handleMessage
(Message msg) {
mImageView.setImageBi
tmap(mBitmap);
}
}

这时你会发现,由于Handler
不再持有外部类对象的引
用,导致程序不允许你在
Handler中操作Ac tivity中的对
象了。所以你需要在Handler
中增加一个
对Ac tivity的弱引用
(WeakReference),如下:
static class TestHandler exte
nds Handler {
WeakReference<Activity >
mActivityReference;
TestHandler(Activity acti
vity) {

mActivityReference= n
ew WeakReference<Activity>(ac
tivity);
}
@
Override
public void handleMessage
(Message msg) {
final Activity activi
ty = mActivityReference.get()
;
if (activity != null)
{
mImageView.setIma
geBitmap(mBitmap);
}
}
}
如上就是关于Handler内存泄

漏的分析及解决方案。
可能在你会用了Handler之后
见过HandlerThread这个关键
字,那我们接下来就看看
HandlerThread吧。
4
关于Android异步消
息处理机制进阶的
HandlerThread源码分
析
4
-1 Android 5.1.1(API 22)
HandlerThread源码
很多人在会使用Handler以后
会发现有些代码里出现了
HandlerThread,然后就分不
清HandlerThread与Handler啥
关系,咋回事之类的。这里
就来分析分析HandlerThread
的源码。如下:
public class HandlerThread ex
tends Thread {
/
/线程的优先级
int mPriority;
/线程的id
int mTid = -1;
/一个与Handler关联的Looper
/
/
对象
Looper mLooper;

public HandlerThread(Stri
ng name) {
super(name);
/设置优先级为默认线程
/
mPriority = android.o
s.Process.THREAD_PRIORITY_DEF
AULT;
}
public HandlerThread(Stri
ng name, int priority) {
super(name);
mPriority = priority;
}
/
/可重写方法,Looper.loop之
前在线程中需要处理的其他逻辑在这里实
现
protected void onLooperPr
epared() {
}
/
/HandlerThread线程的run方

法
@
Override
public void run() {
/获取当前线程的id
mTid = Process.myTid(
/
)
;
/
/
/创建Looper对象
/这就是为什么我们要在调
用线程的start()方法后才能得到Loop
er(Looper.myLooper不为Null)
Looper.prepare();
/
/同步代码块,当获得mLoo
per对象后,唤醒所有线程
synchronized (this) {
mLooper = Looper.
myLooper();
notifyAll();
}
/
/设置线程优先级
Process.setThreadPrio
rity(mPriority);
/Looper.loop之前在线程
/

中需要处理的其他逻辑
onLooperPrepared();
/建立了消息循环
Looper.loop();
/
/
/一般执行不到这句,除非q
uit消息队列
mTid = -1;
}
public Looper getLooper()
{
if (!isAlive()) {
/
/线程死了
return null;
}
/
/同步代码块,正好和上面r
un方法中同步块对应
/
/只要线程活着并且mLoope
r为null,则一直等待
/
/ If the thread has
been started, wait until the

looper has been created.
synchronized (this) {
while (isAlive()
&
& mLooper == null) {
try {
wait();
catch (Inte
}
rruptedException e) {
}
}
}
return mLooper;
}
public boolean quit() {
Looper looper = getLo
oper();
if (looper != null) {
/
/退出消息循环
looper.quit();
return true;
}

return false;
}
public boolean quitSafely
Looper looper = getLo
() {
oper();
if (looper != null) {
/退出消息循环
/
looper.quitSafely
();
return true;
}
return false;
}
public int getThreadId()
{
}
/
/返回线程id
return mTid;
}

看见没有,这就是
HandlerThread的系统源码,
整个HandlerThread类很简
单。如上对重点都进行了注
释。
现在可以很负责的告诉你
Handler到底与HandlerThread
啥关系,其实HandlerThread
就是Thread、Looper和
Handler的组合实现,
Android系统这么封装体现了
Android系统组件的思想,同

时也方便了开发者开发。
上面源码可以看到,
HandlerThread主要是对
Looper进行初始化,并提供
一个Looper对象给新创建的
Handler对象,使得Handler
处理消息事件在子线程中处
理。这样就发挥了Handler的
优势,同时又可以很好的和
线程结合到一起。
到此HandlerThread源码原理
也分析完了,那么就差实战
了,如下继续。
-2 Android HandlerThread实
4
战
上面分析了关于
HandlerThread源码,下面就
来演示一个实例,如下:
public class ListenerActivity
extends Activity {
private HandlerThread mHa
ndlerThread = null;
private Handler mThreadHa
ndler = null;
private Handler mUiHandle
r = null;

@
Override
public void onCreate(Bund
le savedInstanceState) {
super.onCreate(savedI
nstanceState);
setContentView(R.layo
ut.main);
initData();
}
private void initData() {
Log.i(null, "Main Thr
ead id="+Thread.currentThread
().getId());
mHandlerThread = new
HandlerThread("HandlerWorkThr
ead");
/
/必须在实例化mThreadHa
ndler之前调运start方法,原因上面

源码已经分析了
mHandlerThread.start(
)
;
/
/将当前mHandlerThread
子线程的Looper传入mThreadHandle
r,使得
/
/mThreadHandler的消息
队列依赖于子线程(在子线程中执行)
mThreadHandler = new
Handler(mHandlerThread.getLoo
per()) {
@
Override
public void handl
eMessage(Message msg) {
super.handleM
essage(msg);
Log.i(null, "
在子线程中处理!id="+Thread.curr
entThread().getId());
/
/从子线程往主
线程发送消息
mUiHandler.se

ndEmptyMessage(0);
}
}
;
mUiHandler = new Hand
ler() {
@
Override
public void handl
eMessage(Message msg) {
super.handleM
essage(msg);
Log.i(null, "
在UI主线程中处理!id="+Thread.cu
rrentThread().getId());
}
}
/
;
/从主线程往子线程发送消
息
mThreadHandler.sendEm
ptyMessage(1);
}
}

运行结果如下:
Main Thread id=1
在子线程中处理!id=113
在UI主线程中处理!id=1
好了,不做过多解释了,很
简单的。
5
关于Android异步消
息处理机制总结
到此整个Android的异步处理
机制Handler与HandlerThread
等分析完成(关于Android的


另一种异步处理机制
AsyncTask后面有时间再分
析)。相信通过这一篇文章
你对Android的Handler使用
还是原理都会有一个质的飞
跃。
【工匠若
水 http://blog.csdn.net/yanbob
er 转载烦请注明出处,尊重
分享成果】
【
工匠若
水 http://blog.csdn.net/yanbob
er 转载烦请注明出处,尊重
劳动成果】
1
背景
之所以写这一篇博客的原因
是因为之前有写过一篇
《
Android应用
setContentView与
LayoutInflater加载解析机制
源码分析》,然后有人在文
章下面评论和微博私信中问
我关于Android应用Ac tivity、
Dia log、PopWindow加载显
示机制是咋回事,所以我就
写一篇文章来分析分析吧
(
2
本文以Android5.1.1 (API
2)源码为基础分析),以
便大家在应用层开发时不再
迷糊。
PS一句:不仅有人微博私信
我这个问题,还有人问博客
插图这些是用啥画的,这里
告诉大家。就是我,快来猛
戳我
还记得之前《Android应用
setContentView与
LayoutInflater加载解析机制
源码分析》这篇文章的最后
分析结果吗?就是如下这幅
图:
在那篇文章里我们当时重点
是Ac tivity的Vie w加载解析
xml机制分析,当时说到了
Window的东西,但只是皮毛
的分析了Ac tivity相关的一些
逻辑。(PS:看到这不清楚
上面啥意思的建议先移步到
《
Android应用
setContentView与
LayoutInflater加载解析机制
源码分析》,完事再回头继
续看这篇文章。)当时给大
家承诺过我们要从应用控件
析,所以现在开始深入,但
是本篇的深入也只是仅限
Window相关的东东,之后文
章还会继续慢慢深入。
【工匠若
水 http://blog.csdn.net/yanbob
er 转载烦请注明出处,尊重
劳动成果】
2
浅析Window 与
WindowManager相关
关系及源码
通过上面那幅图可以很直观
的看见,Android屏幕显示的
就是Window和各种Vie w,
Ac tivity在其中的作用主要是
管理生命周期、建立窗口
等。也就是说Window相关的
东西对于Android屏幕来说是
至关重要的(虽然前面分析
Ac tivity的setContentView等原
理时说过一点Window,但那
只是皮毛。),所以有必要
在分析Android应用Ac tivity、
Dia log、PopWindow加载显
示机制前再看看Window相关
的一些东西。
2
-1 Window 与
WindowManager基础关系
在分析Window 与
WindowManager之前我们先
看一张图:
接下来看一点代码,如下:
/
** Interface to let you add
and remove child views to an
Activity. To get an instance
*
of this class, call {@lin
k android.content.Context#get
SystemService(java.lang.Strin
g) Context.getSystemService()
}
.
*
/
public interface ViewManager
{
public void addView(View
view, ViewGroup.LayoutParams
params);
public void updateViewLay
out(View view, ViewGroup.Layo
utParams params);

public void removeView(Vi
ew view);
}
可以看见,ViewManager接
口定义了一组规则,也就是
add、update、remove的操作
Vie w接口。也就是说
ViewManager是用来添加和
移除a c tivity
中Vie w的接口。继续往下
看:
public interface WindowManage
r extends ViewManager {


.
.....
public Display getDefault
Display();
public void removeViewImm
ediate(View view);
.
.....
public static class Layou
tParams extends ViewGroup.Lay
outParams
implements Parcel
able {
.
.....
}
}
看见没有,WindowManager
继承自ViewManager,然后
自己还是一个接口,同时又
定义了一个静态内部类

LayoutParams(这个类比较
重要,后面
会分析。提前透漏下,如果
你在APP做过类似360助手屏
幕的那个悬浮窗或者做过那
种类似IOS的小白圆点,点
击展开菜单功能,你或多或
少就能猜到
这个类的重要性。)。
WindowManager用来在应用
与Window之间的接口、窗口
顺序、消息等的管理。继续
看下ViewManager的另一个
实现子类
Vie wGroup,如下:
public abstract class ViewGro
up extends View implements Vi
ewParent, ViewManager {
/
/protected ViewParent mP
arent;
/
/这个成员是View定义的,View
Group继承自View,所以也可以拥有。
/
/这个变量就是前面我们一系列文
章分析View向上传递的父节点,类似于
一个链表Node的next一样
/
.
/最终指向了ViewRoot
.....
public void addView(View
child, LayoutParams params) {
addView(child, -1, pa

rams);
}
.
.....
public void addView(View
child, int index, LayoutParam
s params) {
.
/
.....
/ addViewInner() wil
l call child.requestLayout()
when setting the new LayoutPa
rams
/
/ therefore, we call
requestLayout() on ourselves
before, so that the child's
request
/
/ will be blocked at
our level
requestLayout();
invalidate(true);
addViewInner(child, i

ndex, params, false);
}
.
.....
}
这下理解上面那幅图了吧,
所以说Vie w通过Vie wGroup
的addView方法添加到
层层嵌套到最顶级都会显示
在在一个窗
口Window中(正如上面背景
介绍中《Android应用
setContentView与
LayoutInflater加载解析机制

源码分析》的示意图一
样),其中每个Vie w都有
一个ViewParent类型的父节
点mParent,最顶上的节点也
是一个vie wGroup,也即前面
文章分析的Window的内部类
DecorView(从《Android应
用setContentView与
源码分析》的总结部分或者
《
Android应用层Vie w绘制流
程与源码分析》的5-1小节都
可以验证
这个结论)对象。同时通过
上面背景中那幅图可以看出
来,对于一个Ac tivity只有一
个
DecorView(Vie wRoot),
也只有一个Window。
2-2 Ac tivity窗口添加流程拓
展
前面文章说过,
Ac tivityThre a d类的
performLaunchActivity方法中
调运了activity.attach(…)方法
进行初始化。如下是Ac tivity
的attach方法源码:
final void attach(Context con
text, ActivityThread aThread,
Instrumentation i
nstr, IBinder token, int iden
t,
Application appli
cation, Intent intent, Activi
tyInfo info,
CharSequence titl
e, Activity parent, String id
,
NonConfigurationI
nstances lastNonConfiguration
Instances,
Configuration con
fig, String referrer, IVoiceI

nteractor voiceInteractor) {
.
/
.....
/创建Window类型的mWind
ow对象,实际为PhoneWindow类实现了
抽象Window 类
mWindow = PolicyManag
er.makeNewWindow(this);
.
/
.....
/通过抽象Window类的set
WindowManager方法给Window类的成
员变量WindowManager赋值实例化
mWindow.setWindowMana
ger(
(WindowManage
r)context.getSystemService(Co
ntext.WINDOW_SERVICE),
mToken, mComp
onent.flattenToString(),
(info.flags &
ActivityInfo.FLAG_HARDWARE_A
CCELERATED) != 0);
.
.....

/
/把抽象Window类相关的W
indowManager对象拿出来关联到Acti
vity的WindowManager类型成员变量
mWindowManager
mWindowManager = mWin
dow.getWindowManager();
.
.....
}
看见没有,Ac tivity类中的
attach方法又创建了Window
类型的新成员变量
mWindow(PhoneWindow实
现类)与Ac tivity相关联,接
着在Ac tivity 类
的attach方法最后又通过

mWindow. se tWindowMa na ge r
(…)方法创建了与Window相
关联的WindowManager 对
象,最后又通过
mWindow. ge tWindowMa na ge r
()将Window 的
WindowManager成员变量赋
值给Ac tivity 的
WindowManager成员变量
mWindowManager。
接下来我们看下上面代码中
的
mWindow. se tWindowMa na ge r
(…)方法源码
(
PhoneWindow没有重写抽
象Window的
setWindowManager方法,所
以直接看Window类的该方法
源码),如下:
public void setWindowManager(
WindowManager wm, IBinder app
Token, String appName,
boolean hardwareA
ccelerated) {
.
.....
if (wm == null) {
wm = (WindowManag
er)mContext.getSystemService(

Context.WINDOW_SERVICE);
}
/
/实例化Window类的Windo
wManager类型成员mWindowManager
mWindowManager = ((Wi
ndowManagerImpl)wm).createLoc
alWindowManager(this);
}
可以看见,Window的
setWindowManager方法中通
过WindowManagerImpl实例
的
createLocalWindowManager
方法获取了WindowManager
实

例,如下:
public final class WindowMana
gerImpl implements WindowMana
ger {
.
.....
private WindowManagerImpl
(Display display, Window pare
ntWindow) {
mDisplay = display;
mParentWindow = paren
tWindow;
}
.
.....
public WindowManagerImpl
createLocalWindowManager(Wind
ow parentWindow) {
return new WindowMana
gerImpl(mDisplay, parentWindo
w);
}

.
.....
}
看见没有?这样就把Ac tivity
的Window与WindowManager
关联起来了。Ac tivity类的
Window类型成员变量
mWindow及WindowManager
类型成
员变量mWindowManager 就
是这么来的。
回过头继续看上面刚刚贴的
Ac tivity的attach方法代码,

看见
mWindow. se tWindowMa na ge r
方法传递的第一个参数没?
有人会想
(WindowManager)context.get
SystemService(Context.WIND
OW_SERVICE)这行代码是
什么意思,现在告诉你。
《Android应用Context详解及
源码解析》一文中第三部分
曾经说过Ac tivityThre a d中创
建了Ac itivty(执行attach等
方法)等东东,在创建这个
Ac tivity之前得到了Context的
实例。记不记得当时说
Context的实现类就是
ContextImpl吗?下面我们看
下ContextImpl类的静态方法
块,如下:
class ContextImpl extends Con
text {
.
/
.....
/静态代码块,类加载时执行一次
static {
.
/
.....
/这里有一堆类似的XXX_SE
RVICE的注册
.
.....
registerService(WINDO
W_SERVICE, new ServiceFetcher

() {
Display mDefa
public Object
ultDisplay;
getService(ContextImpl ctx)
{
/
/搞一个Di
splay实例
Display d
isplay = ctx.mDisplay;
if (displ
ay == null) {
if (m
DefaultDisplay == null) {
D
isplayManager dm = (DisplayMa
nager)ctx.getOuterContext().
getSystemService(Conte
xt.DISPLAY_SERVICE);
m
DefaultDisplay = dm.getDispla

y(Display.DEFAULT_DISPLAY);
}
displ
ay = mDefaultDisplay;
}
/
/返回一个
WindowManagerImpl实例
return ne
w WindowManagerImpl(display);
}
});
.
.....
}
/
/这就是你在外面调运Context的
getSystemService获取到的Window
ManagerImpl实例
@
Override
public Object getSystemSe
rvice(String name) {
ServiceFetcher fetche
r = SYSTEM_SERVICE_MAP.get(na
me);
return fetcher == nul

l ? null : fetcher.getService
(this);
}
/
/上面static代码块创建Windo
wManagerImpl实例用到的方法
private static void regis
terService(String serviceName
,
ServiceFetcher fetcher) {
if (!(fetcher instanc
eof StaticServiceFetcher)) {
fetcher.mContextC
acheIndex = sNextPerContextSe
rviceCacheIndex++;
}
SYSTEM_SERVICE_MAP.pu
t(serviceName, fetcher);
}
}
看见没有,我们都知道Java

的静态代码块是类加载是执
行一次的,也就相当于一个
全局的,这样就相当于每个
Application只有一个
WindowManagerImpl(display)
实例。
还记不记得《Android应用
setContentView与
LayoutInflater加载解析机制
源码分析》一文2-6小节中说
的,setContentView的实质显
示是触发了Ac tivity的resume
状态,也就是触发了
ma ke Visible方法,那我们再
来看下这个方法,如下:
void makeVisible() {
if (!mWindowAdded) {
/
/也就是获取Activit
y的mWindowManager
/
/这个mWindowMana
ger是在Activity的attach中通过mW
indow.getWindowManager()获得
ViewManager wm =
getWindowManager();
/
/调运的实质就是Vie
wManager接口的addView方法,传入
的是mDecorView
wm.addView(mDecor
,
)
getWindow().getAttributes()
;
mWindowAdded = tr

ue;
}
mDecor.setVisibility(
View.VISIBLE);
}
特别注意,看见ma ke Visible
方法的wm变量没,这个变
量就是Window类中通过调运
WindowManagerImpl的
createLocalWindowManager
创建的
实例,也就是说每一个
Ac tivity都会新创建这么一个
WindowManager实例来显示

Ac tivity的界面的,有点和上
面分析的ContextImpl中static
块创建
的WindowManager不太一样
的地方就在于Context的
WindowManager对每个APP
来说是一个全局单例的,而
Ac tivity的WindowManager是
每个Ac tivity都会新创建一个
的(其实你从上面分析的两
个实例化
WindowManagerImpl的构造
函数参数传递就可以看出
来,Ac tivity中Window
的WindowManager成员在构
造实例化时传入给
WindowManagerImpl中
mParentWindow成员的是当
前Window对象,而
ContextImpl的static块
中单例实例化
WindowManagerImpl时传入
给WindowManagerImpl中
mParentWindow成员的是null
值)。
继续看ma ke Visible中调运的
WindowManagerImpl的
addView方法如下:
public final class WindowMana
gerImpl implements WindowMana
ger {
/
/继承自Object的单例类
private final WindowManag
erGlobal mGlobal = WindowMana
gerGlobal.getInstance();
.
.....
public void addView(@NonN
ull View view, @NonNull ViewG
roup.LayoutParams params) {
applyDefaultToken(par
ams);

/
/mParentWindow是上面
分析的在Activity中获取WindowMan
agerImpl实例化时传入的当前Window
/
/view是Activity中最顶
层的mDecor
mGlobal.addView(view,
params, mDisplay, mParentWin
dow);
}
.
.....
}
这里当前传入的vie w是
mDecor,LayoutParams呢?
可以看见是
getWindow().getAttributes(),
那我们进去看看Window类的
这个属性,如下:

/
/ The current window attribu
tes.
private final WindowManag
er.LayoutParams mWindowAttrib
utes = new WindowManager.Layo
utParams();
原来是WindowManager的静
态内部类LayoutParams的默
认构造函数:
public LayoutParams() {
super(LayoutParams.MATCH_
PARENT, LayoutParams.MATCH_PA
RENT);
type = TYPE_APPLICATION;
format = PixelFormat.OPAQ
UE;


}
看见没有,Ac tivity窗体的
WindowManager.LayoutPara
ms类型是
TYPE_APPLICATION的。
继续回到
WindowManagerImpl的
addView方法,分析可以看
见WindowManagerImpl中有
一个单例模式的
WindowMa na ge rGloba l成员
mGloba l,addView最终调运

了WindowMa na ge rGloba l的
addView,源码如下:
public final class WindowMana
gerGlobal {
.
.....
private final ArrayList<V
iew> mViews = new ArrayList<V
iew>();
private final ArrayList<V
iewRootImpl> mRoots = new Arr
ayList<ViewRootImpl>();
private final ArrayList<W
indowManager.LayoutParams> mP
arams =
new ArrayList<Win
dowManager.LayoutParams>();
private final ArraySet<Vi
ew> mDyingViews = new ArraySe
t<View>();

.
.....
public void addView(View
view, ViewGroup.LayoutParams
params,
Display display,
Window parentWindow) {
.
/
.....
/获取Activity的Window
的getWindow().getAttributes()
的LayoutParams
final WindowManager.L
ayoutParams wparams = (Window
Manager.LayoutParams)params;
/
/如果是Activity中调运
的,parentWindow=Window,如果不
是Activity的,譬如是Context的静
态代码块的实例化则parentWindow为n
ull
if (parentWindow != n
ull) {
/
/依据当前Activity

的Window调节sub Window的Layout
Params
parentWindow.adju
stLayoutParamsForSubWindow(wp
arams);
}
else {
.
.....
}
ViewRootImpl root;
.....
synchronized (mLock)
.
{
.
/
.....
/为当前Window创建V
iewRoot
root = new ViewRo
otImpl(view.getContext(), dis
play);
view.setLayoutPar
ams(wparams);
/
/把当前Window相关

的东西存入各自的List中,在remove
中会删掉
mViews.add(view);
mRoots.add(root);
mParams.add(wpara
ms);
}
/
/ do this last becau
se it fires off messages to s
tart doing things
try {
/
/把View和ViewRoo
t关联起来,很重要!!!
root.setView(view
wparams, panelParentView);
catch (RuntimeExcep
,
}
tion e) {
.
.....
}
.....
}
.

}
可以看见,在addView方法
中会利用LayoutParams获得
Window的属性,然后为每个
Window创建ViewRootImpl,
最后通过ViewRootImpl的
setView方法通过mSession向
WindowManagerService发送
添加窗口请求把窗口添加到
WindowManager中,并且由
WindowManager来管理窗口
的vie w、事件、消息收集处

理等(ViewRootImpl的这一
添加过程后面会写文章分
析,这里先记住这个概念即
可)。
至此我们对上面背景中那幅
图,也就是《Android应用
setContentView与
LayoutInflater加载解析机制
源码分析》这篇文章总结部
分的那幅图又进行了更深入
的一点分析,其目的也就是
为了下面分析Android应用
Dia log、PopWindow、Toast
加载显示机制做铺垫准备。
-3 继续顺藤摸瓜
2
WindowManager.LayoutPara
ms类的源码
上面2-1分析Window与
WindowManager基础关系时
提到了WindowManager有一
个静态内部类
LayoutParams,它继承于
ViewGroup.LayoutParams,
用于向WindowManager描述
Window的管理策略。现在我
们来看下这个类(PS:在
AD上也可以看见,自备梯子
点我看AD的),如下:
public static class LayoutPar
ams extends ViewGroup.LayoutP
arams
implements Parcel
able {
/
/窗口的绝对XY位置,需要
考虑gravity属性
public int x;
public int y;
/在横纵方向上为相关的Vie
/
w预留多少扩展像素,如果是0则此view
不能被拉伸,其他情况下扩展像素被wid
get均分
public float horizont
alWeight;
public float vertical

Weight;
/
/
/
/窗口类型
/有3种主要类型如下:
/ApplicationWindows
取值在FIRST_APPLICATION_WINDOW
与LAST_APPLICATION_WINDOW之间
,
是常用的顶层应用程序窗口,须将tok
en设置成Activity的token;
/
/SubWindows取值在FIRS
T_SUB_WINDOW和LAST_SUB_WINDOW
之间,与顶层窗口相关联,需将token设
置成它所附着宿主窗口的token;
/
/SystemWindows取值在F
IRST_SYSTEM_WINDOW和LAST_SYST
EM_WINDOW之间,不能用于应用程序,
使用时需要有特殊权限,它是特定的系统
功能才能使用;
public int type;
/
/WindowType:开始应用
程序窗口
public static final i

nt FIRST_APPLICATION_WINDOW =
1
;
/
/WindowType:所有程序
窗口的base窗口,其他应用程序窗口都
显示在它上面
public static final i
nt TYPE_BASE_APPLICATION =
1
;
/
/WindowType:普通应用
程序窗口,token必须设置为Activity
的token来指定窗口属于谁
public static final i
nt TYPE_APPLICATION
=
2
;
/
/WindowType:应用程序
启动时所显示的窗口,应用自己不要使用
这种类型,它被系统用来显示一些信息,
直到应用程序可以开启自己的窗口为止
public static final i
nt TYPE_APPLICATION_STARTING
=
3;
/
/WindowType:结束应用

程序窗口
public static final i
nt LAST_APPLICATION_WINDOW =
9;
9
/
/WindowType:SubWind
ows子窗口,子窗口的Z序和坐标空间都
依赖于他们的宿主窗口
public static final i
nt FIRST_SUB_WINDOW
1000;
=
//WindowType: 面板窗口
,显示于宿主窗口的上层
public static final i
nt TYPE_APPLICATION_PANEL =
FIRST_SUB_WINDOW;
/
/WindowType:媒体窗口
(例如视频),显示于宿主窗口下层
public static final i
nt TYPE_APPLICATION_MEDIA =
FIRST_SUB_WINDOW+1;
/
/WindowType:应用程序

窗口的子面板,显示于所有面板窗口的上
层
public static final i
nt TYPE_APPLICATION_SUB_PANEL
=
FIRST_SUB_WINDOW+2;
/WindowType:对话框,
/
类似于面板窗口,绘制类似于顶层窗口,
而不是宿主的子窗口
public static final i
nt TYPE_APPLICATION_ATTACHED_
DIALOG = FIRST_SUB_WINDOW+3;
/
/WindowType:媒体信息
显示在媒体层和程序窗口之间,需要实
现半透明效果
public static final i
,
nt TYPE_APPLICATION_MEDIA_OVE
RLAY = FIRST_SUB_WINDOW+4;
/
/WindowType:子窗口结
束
public static final i
nt LAST_SUB_WINDOW
999;
=
1

/
/WindowType:系统窗口
非应用程序创建
public static final i
,
nt FIRST_SYSTEM_WINDOW
2000;
=
/
/WindowType:状态栏,
只能有一个状态栏,位于屏幕顶端,其他
窗口都位于它下方
public static final i
nt TYPE_STATUS_BAR
=
FIRST_SYSTEM_WINDOW;
/
/WindowType:搜索栏,
只能有一个搜索栏,位于屏幕上方
public static final i
nt TYPE_SEARCH_BAR
=
FIRST_SYSTEM_WINDOW+1;
/
/WindowType:电话窗口
它用于电话交互(特别是呼入),置于
所有应用程序之上,状态栏之下
public static final i
nt TYPE_PHONE
,
=

FIRST_SYSTEM_WINDOW+2;
//WindowType:系统提示
出现在应用程序窗口之上
,
public static final i
nt TYPE_SYSTEM_ALERT
=
FIRST_SYSTEM_WINDOW+3;
/
/WindowType:锁屏窗口
public static final i
nt TYPE_KEYGUARD
FIRST_SYSTEM_WINDOW+4;
/WindowType:信息窗口
用于显示Toast
public static final i
=
/
,
nt TYPE_TOAST
=
FIRST_SYSTEM_WINDOW+5;
/
/WindowType:系统顶层
窗口,显示在其他一切内容之上,此窗口
不能获得输入焦点,否则影响锁屏
public static final i
nt TYPE_SYSTEM_OVERLAY
FIRST_SYSTEM_WINDOW+6;
=
/
/WindowType:电话优先

,
当锁屏时显示,此窗口不能获得输入焦
点,否则影响锁屏
public static final i
nt TYPE_PRIORITY_PHONE
FIRST_SYSTEM_WINDOW+7;
=
/
/WindowType:系统对话
框
public static final i
nt TYPE_SYSTEM_DIALOG
FIRST_SYSTEM_WINDOW+8;
=
/
/WindowType:锁屏时显
示的对话框
public static final i
nt TYPE_KEYGUARD_DIALOG
FIRST_SYSTEM_WINDOW+9;
=
/
/WindowType:系统内部
错误提示,显示于所有内容之上
public static final i
nt TYPE_SYSTEM_ERROR
=
FIRST_SYSTEM_WINDOW+10;
/
/WindowType:内部输入
法窗口,显示于普通UI之上,应用程序

可重新布局以免被此窗口覆盖
public static final i
nt TYPE_INPUT_METHOD
=
FIRST_SYSTEM_WINDOW+11;
/
/WindowType:内部输入
法对话框,显示于当前输入法窗口之上
public static final i
nt TYPE_INPUT_METHOD_DIALOG=
FIRST_SYSTEM_WINDOW+12;
/
/WindowType:墙纸窗口
public static final i
nt TYPE_WALLPAPER
FIRST_SYSTEM_WINDOW+13;
/WindowType:状态栏的
=
/
滑动面板
public static final i
nt TYPE_STATUS_BAR_PANEL =
FIRST_SYSTEM_WINDOW+14;
/
/WindowType:安全系统
覆盖窗口,这些窗户必须不带输入焦点,
否则会干扰键盘
public static final i

nt TYPE_SECURE_SYSTEM_OVERLAY
FIRST_SYSTEM_WINDOW+15;
/WindowType:拖放伪窗
=
/
口,只有一个阻力层(最多),它被放置
在所有其他窗口上面
public static final i
nt TYPE_DRAG
=
FIRST_SYSTEM_WINDOW+16;
/
/WindowType:状态栏下
拉面板
public static final i
nt TYPE_STATUS_BAR_SUB_PANEL
FIRST_SYSTEM_WINDOW+17;
/WindowType:鼠标指针
public static final i
=
/
nt TYPE_POINTER = FIRST_SYSTE
M_WINDOW+18;
/
/WindowType:导航栏(有
别于状态栏时)
public static final i
nt TYPE_NAVIGATION_BAR = FIRS
T_SYSTEM_WINDOW+19;

/
/WindowType:音量级别
的覆盖对话框,显示当用户更改系统音量
大小
public static final i
nt TYPE_VOLUME_OVERLAY = FIRS
T_SYSTEM_WINDOW+20;
/
/WindowType:起机进度
框,在一切之上
public static final i
nt TYPE_BOOT_PROGRESS = FIRST
SYSTEM_WINDOW+21;
/WindowType:假窗,消
费导航栏隐藏时触摸事件
public static final i
_
/
nt TYPE_HIDDEN_NAV_CONSUMER =
FIRST_SYSTEM_WINDOW+22;
/
/WindowType:梦想(屏保
窗口,略高于键盘
public static final i
)
nt TYPE_DREAM = FIRST_SYSTEM_
WINDOW+23;
/
/WindowType:导航栏面

板(不同于状态栏的导航栏)
public static final i
nt TYPE_NAVIGATION_BAR_PANEL
FIRST_SYSTEM_WINDOW+24;
/WindowType:univers
e背后真正的窗户
public static final i
=
/
nt TYPE_UNIVERSE_BACKGROUND =
FIRST_SYSTEM_WINDOW+25;
/
/WindowType:显示窗口
覆盖,用于模拟辅助显示设备
public static final i
nt TYPE_DISPLAY_OVERLAY = FIR
ST_SYSTEM_WINDOW+26;
/
/WindowType:放大窗口
覆盖,用于突出显示的放大部分可访问性
放大时启用
public static final i
nt TYPE_MAGNIFICATION_OVERLAY
=
FIRST_SYSTEM_WINDOW+27;
/WindowType:......
public static final i
/

nt TYPE_KEYGUARD_SCRIM
FIRST_SYSTEM_WINDOW+29;
public static final i
nt TYPE_PRIVATE_PRESENTATION
=
=
FIRST_SYSTEM_WINDOW+30;
public static final i
nt TYPE_VOICE_INTERACTION = F
IRST_SYSTEM_WINDOW+31;
public static final i
nt TYPE_ACCESSIBILITY_OVERLAY
=
FIRST_SYSTEM_WINDOW+32;
/WindowType:系统窗口
/
结束
public static final i
nt LAST_SYSTEM_WINDOW
2999;
=
/
/MemoryType:窗口缓冲
位于主内存
public static final i
nt MEMORY_TYPE_NORMAL = 0;
/MemoryType:窗口缓冲
/

位于可以被DMA访问,或者硬件加速的内
存区域
public static final i
nt MEMORY_TYPE_HARDWARE = 1;
/
/MemoryType:窗口缓冲
位于可被图形加速器访问的区域
public static final i
nt MEMORY_TYPE_GPU = 2;
/
/MemoryType:窗口缓冲
不拥有自己的缓冲区,不能被锁定,缓冲
区由本地方法提供
public static final i
nt MEMORY_TYPE_PUSH_BUFFERS =
3
;
/
/指出窗口所使用的内存缓
冲类型,默认为NORMAL
public int memoryType
;
/
/Flag:当该window对用
户可见的时候,允许锁屏

public static final i
nt FLAG_ALLOW_LOCK_WHILE_SCRE
EN_ON
= 0x00000001;
//Flag:让该window后所
有的东西都成暗淡
public static final i
nt FLAG_DIM_BEHIND
x00000002;
= 0
/
/Flag:让该window后所
有东西都模糊(4.0以上已经放弃这种毛
玻璃效果)
public static final i
nt FLAG_BLUR_BEHIND
x00000004;
/Flag:让window不能获
=
0
/
得焦点,这样用户快就不能向该window
发送按键事
public static final i
nt FLAG_NOT_FOCUSABLE
x00000008;
/Flag:让该window不接
受触摸屏事件
=
0
/

public static final i
nt FLAG_NOT_TOUCHABLE
x00000010;
/Flag:即使在该window
=
0
/
在可获得焦点情况下,依旧把该window
之外的任何event发送到该window之后
的其他window
public static final i
nt FLAG_NOT_TOUCH_MODAL
x00000020;
/Flag:当手机处于睡眠状
=
0
/
态时,如果屏幕被按下,那么该window
将第一个收到
public static final i
nt FLAG_TOUCHABLE_WHEN_WAKING
=
0x00000040;
/Flag:当该window对用
/
户可见时,让设备屏幕处于高亮(brigh
t)状态
public static final i
nt FLAG_KEEP_SCREEN_ON
0x00000080;
=

/
/Flag:让window占满整
个手机屏幕,不留任何边界
public static final i
nt FLAG_LAYOUT_IN_SCREEN =
x00000100;
/Flag:window大小不再
0
/
不受手机屏幕大小限制,即window可能
超出屏幕之外
public static final i
nt FLAG_LAYOUT_NO_LIMITS =
0
x00000200;
/
/Flag:window全屏显示
public static final i
nt FLAG_FULLSCREEN
0000400;
= 0x0
/
/Flag:恢复window非全
屏显示
public static final i
nt FLAG_FORCE_NOT_FULLSCREEN
=
0x00000800;
/Flag:开启抖动(dithe
/
ring )

public static final i
nt FLAG_DITHER
x00001000;
/Flag:当该window在进
行显示的时候,不允许截屏
public static final i
nt FLAG_SECURE
x00002000;
/Flag:一个特殊模式的布
=
0
/
=
0
/
局参数用于执行扩展表面合成时到屏幕上
public static final i
nt FLAG_SCALED
x00004000;
/Flag:用于windows时,
=
0
/
经常会使用屏幕用户持有反对他们的脸,
它将积极过滤事件流,以防止意外按在这
种情况下,可能不需要为特定的窗口,在
检测到这样一个事件流时,应用程序将接
收取消运动事件表明,这样应用程序可以
处理这相应地采取任何行动的事件,直到
手指释放
public static final i

nt FLAG_IGNORE_CHEEK_PRESSES
0x00008000;
/Flag:一个特殊的选项只
用于结合FLAG_LAYOUT_IN_SC
public static final i
nt FLAG_LAYOUT_INSET_DECOR =
x00010000;
/Flag:转化的状态FLAG_
=
/
0
/
NOT_FOCUSABLE对这个窗口当前如何进
行交互的方法
public static final i
nt FLAG_ALT_FOCUSABLE_IM = 0x
0
0020000;
/
/Flag:如果你设置了该fl
ag,那么在你FLAG_NOT_TOUNCH_MOD
AL的情况下,即使触摸屏事件发送在该w
indow之外,其事件被发送到了后面的w
indow,那么该window仍然将以Motio
nEvent.ACTION_OUTSIDE形式收到该
触摸屏事件
public static final i
nt FLAG_WATCH_OUTSIDE_TOUCH =

0
x00040000;
/Flag:当锁屏的时候,显
示该window
public static final i
nt FLAG_SHOW_WHEN_LOCKED = 0x
/
0
0080000;
/
/Flag:在该window后显
示系统的墙纸
public static final i
nt FLAG_SHOW_WALLPAPER = 0x00
00000;
1
/
/Flag:当window被显示
的时候,系统将把它当做一个用户活动事
件,以点亮手机屏幕
public static final i
nt FLAG_TURN_SCREEN_ON = 0x00
2
00000;
/
/Flag:消失键盘
public static final i
nt FLAG_DISMISS_KEYGUARD = 0x
0
0400000;
/
/Flag:当该window在可

以接受触摸屏情况下,让因在该window
之外,而发送到后面的window的触摸屏
可以支持split touch
public static final i
nt FLAG_SPLIT_TOUCH = 0x00800
0
00;
/
/Flag:对该window进行
硬件加速,该flag必须在Activity或D
ialog的Content View之前进行设置
public static final i
nt FLAG_HARDWARE_ACCELERATED
=
0x01000000;
/Flag:让window占满整
个手机屏幕,不留任何边界
public static final i
nt FLAG_LAYOUT_IN_OVERSCAN =
x02000000;
/Flag:请求一个半透明的
/
0
/
状态栏背景以最小的系统提供保护
public static final i
nt FLAG_TRANSLUCENT_STATUS =
0
x04000000;

/
/Flag:请求一个半透明的
导航栏背景以最小的系统提供保护
public static final i
nt FLAG_TRANSLUCENT_NAVIGATIO
N = 0x08000000;
/
/Flag:......
public static final i
nt FLAG_LOCAL_FOCUS_MODE = 0x
1
0000000;
public static final i
nt FLAG_SLIPPERY = 0x20000000
;
public static final i
nt FLAG_LAYOUT_ATTACHED_IN_DE
COR = 0x40000000;
public static final i
nt FLAG_DRAWS_SYSTEM_BAR_BACK
GROUNDS = 0x80000000;
/
/行为选项标记
public int flags;

/
/PrivateFlags:.....
.
public static final i
nt PRIVATE_FLAG_FAKE_HARDWARE
_
ACCELERATED = 0x00000001;
public static final i
nt PRIVATE_FLAG_FORCE_HARDWAR
E_ACCELERATED = 0x00000002;
public static final i
nt PRIVATE_FLAG_WANTS_OFFSET_
NOTIFICATIONS = 0x00000004;
public static final i
nt PRIVATE_FLAG_SHOW_FOR_ALL_
USERS = 0x00000010;
public static final i
nt PRIVATE_FLAG_NO_MOVE_ANIMA
TION = 0x00000040;
public static final i
nt PRIVATE_FLAG_COMPATIBLE_WI
NDOW = 0x00000080;
public static final i
nt PRIVATE_FLAG_SYSTEM_ERROR

=
0x00000100;
public static final i
nt PRIVATE_FLAG_INHERIT_TRANS
LUCENT_DECOR = 0x00000200;
public static final i
nt PRIVATE_FLAG_KEYGUARD = 0x
0
0000400;
public static final i
nt PRIVATE_FLAG_DISABLE_WALLP
APER_TOUCH_EVENTS = 0x0000080
0
;
/
/私有的行为选项标记
public int privateFla
gs;
public static final i
nt NEEDS_MENU_UNSET = 0;
public static final i
nt NEEDS_MENU_SET_TRUE = 1;
public static final i
nt NEEDS_MENU_SET_FALSE = 2;

public int needsMenuK
ey = NEEDS_MENU_UNSET;
public static boolean
mayUseInputMethod(int flags)
{
.
.....
}
/
/SOFT_INPUT:用于描述
软键盘显示规则的bite的mask
public static final i
nt SOFT_INPUT_MASK_STATE = 0x
f;
0
/
/SOFT_INPUT:没有软键
盘显示的约定规则
public static final i
nt SOFT_INPUT_STATE_UNSPECIFI
ED = 0;
/
/SOFT_INPUT:可见性状
态softInputMode,请不要改变软输入
区域的状态

public static final i
nt SOFT_INPUT_STATE_UNCHANGED
=
1;
/
/SOFT_INPUT:用户导航
(
navigate)到你的窗口时隐藏软键盘
public static final i
nt SOFT_INPUT_STATE_HIDDEN =
2
;
/
/SOFT_INPUT:总是隐藏
软键盘
public static final i
nt SOFT_INPUT_STATE_ALWAYS_HI
DDEN = 3;
/
/SOFT_INPUT:用户导航
(
navigate)到你的窗口时显示软键盘
public static final i
nt SOFT_INPUT_STATE_VISIBLE =
4
;
/
/SOFT_INPUT:总是显示
软键盘
public static final i
nt SOFT_INPUT_STATE_ALWAYS_VI

SIBLE = 5;
/
/SOFT_INPUT:显示软键
盘时用于表示window调整方式的bite
的mask
public static final i
nt SOFT_INPUT_MASK_ADJUST = 0
xf0;
/
/SOFT_INPUT:不指定显
示软件盘时,window的调整方式
public static final i
nt SOFT_INPUT_ADJUST_UNSPECIF
IED = 0x00;
/
/SOFT_INPUT:当显示软
键盘时,调整window内的控件大小以便
显示软键盘
public static final i
nt SOFT_INPUT_ADJUST_RESIZE =
0
x10;
/
/SOFT_INPUT:当显示软
键盘时,调整window的空白区域来显示
软键盘,即使调整空白区域,软键盘还是
有可能遮挡一些有内容区域,这时用户就

只有退出软键盘才能看到这些被遮挡区域
并进行
public static final i
nt SOFT_INPUT_ADJUST_PAN = 0x
2
0;
/
/SOFT_INPUT:当显示软
键盘时,不调整window的布局
public static final i
nt SOFT_INPUT_ADJUST_NOTHING
=
0x30;
/
/SOFT_INPUT:用户导航
navigate)到了你的window
public static final i
(
nt SOFT_INPUT_IS_FORWARD_NAVI
GATION = 0x100;
/
/软输入法模式选项
public int softInputM
ode;
/
/窗口如何停靠
public int gravity;

/
/水平边距,容器与widget
之间的距离,占容器宽度的百分率
public float horizont
alMargin;
/
/纵向边距
public float vertical
Margin;
/
/积极的insets绘图表面和
窗口之间的内容
public final Rect sur
faceInsets = new Rect();
/期望的位图格式,默认为
/
不透明,参考android.graphics.Pi
xelFormat
public int format;
/
/窗口所使用的动画设置,
它必须是一个系统资源而不是应用程序资
源,因为窗口管理器不能访问应用程序
public int windowAnim
ations;
/
/整个窗口的半透明值,1.0
表示不透明,0.0表示全透明

public float alpha =
/当FLAG_DIM_BEHIND设
1
.0f;
/
置后生效,该变量指示后面的窗口变暗的
程度,1.0表示完全不透明,0.0表示没
有变暗
public float dimAmoun
t = 1.0f;
public static final f
loat BRIGHTNESS_OVERRIDE_NONE
=
-1.0f;
public static final f
loat BRIGHTNESS_OVERRIDE_OFF
0.0f;
=
public static final f
loat BRIGHTNESS_OVERRIDE_FULL
1.0f;
=
public float screenBr
ightness = BRIGHTNESS_OVERRID
E_NONE;
/
/用来覆盖用户设置的屏幕

亮度,表示应用用户设置的屏幕亮度,从
到1调整亮度从暗到最亮发生变化
0
public float buttonBr
ightness = BRIGHTNESS_OVERRID
E_NONE;
public static final i
nt ROTATION_ANIMATION_ROTATE
=
0;
public static final i
nt ROTATION_ANIMATION_CROSSFA
DE = 1;
public static final i
nt ROTATION_ANIMATION_JUMPCUT
=
2;
/
/定义出入境动画在这个窗
口旋转设备时使用
public int rotationAn
imation = ROTATION_ANIMATION_
ROTATE;
/
/窗口的标示符

public IBinder token
=
null;
/
/此窗口所在的包名
public String package
Name = null;
/
/屏幕方向
public int screenOrie
ntation = ActivityInfo.SCREEN
_
ORIENTATION_UNSPECIFIED;
/首选的刷新率的窗口
public float preferre
dRefreshRate;
/
/
/控制status bar是否显
示
public int systemUiVi
sibility;
/
/ui能见度所请求的视图层
次结构
public int subtreeSys
temUiVisibility;
/得到关于系统ui能见度变
/
化的回调

public boolean hasSys
temUiListeners;
public static final i
nt INPUT_FEATURE_DISABLE_POIN
TER_GESTURES = 0x00000001;
public static final i
nt INPUT_FEATURE_NO_INPUT_CHA
NNEL = 0x00000002;
public static final i
nt INPUT_FEATURE_DISABLE_USER
_
ACTIVITY = 0x00000004;
public int inputFeatu
res;
public long userActiv
ityTimeout = -1;
.
.....
public final int copy
From(LayoutParams o) {
.....
.
}

.
.....
public void scale(flo
at scale) {
}
.
.....
.
.....
}
看见没有,从上面类可以看
出,Android窗口类型主要分
成了三大类:
1
. 应用程序窗口。一般应用
程序的窗口,比如我们应
用程序的Ac tivity的窗口。

2
3
. 子窗口。一般在Ac tivity里
面的窗口,比如对话框
等。
. 系统窗口。系统的窗口,
比如输入法,Toa st,墙纸
等。
同时还可以看见,
WindowManager.LayoutPara
ms里面窗口的type类型值定
义是一个递增保留的连续增
大数值,从注释可以看出来
其实就是窗口的Z-ORDER序
列(值越大显示的位置越在
上面,你需要将屏幕想成三
维坐标模式)。创建不同类
型的窗口需要设置不同的
type值,譬如上面拓展
Ac tivity窗口加载时分析的
ma ke Visible方法中的Window
默认属性的
type=TYPE_APPLICATION
。
既然说这个类很重要,那总
得感性的体验一下重要性
吧,所以我们先来看几个实
例。
2
-4 通过上面
WindowManager.LayoutPara
ms分析引出的应用层开发常
用经典实例
有了上面分析相信你一定觉
得
WindowManager.LayoutPara
ms还是蛮熟悉的,不信我们
来看下。
Part1:开发APP时设置
Ac tivity全屏常亮的一种办法
(设置Ac tivity也就是Ac tivity
的Window):
public class MainActivity ext
ends ActionBarActivity {
@
Override
protected void onCreate(B
undle savedInstanceState) {
super.onCreate(savedI
nstanceState);
/
/设置Activity的Window
为全屏,当然也可以在xml中设置
Window window = getWi
ndow();
WindowManager.LayoutP
arams windowAttributes = wind
ow.getAttributes();
windowAttributes.flag
s = WindowManager.LayoutParam
s.FLAG_FULLSCREEN | windowAtt
ributes.flags;
window.setAttributes(

windowAttributes);
//设置Activity的Window
为保持屏幕亮
window.addFlags(Windo
wManager.LayoutParams.FLAG_KE
EP_SCREEN_ON);
setContentView(R.layo
ut.activity_main);
}
}
这是运行结果:
Part2:App开发中弹出软键
盘时下面的输入框被软件盘
挡住问题的解决办法:
在Ac tivity中的onCreate中

setContentView之前写如下代
码:
//你也可以在xml文件中设置,一样的效
果
getWindow().setSoftInputMode(
WindowManager.LayoutParams.SO
FT_INPUT_ADJUST_RESIZE|Window
Manager.LayoutParams.SOFT_INP
UT_STATE_HIDDEN);
Part3:创建悬浮窗口(仿
IPhone的小圆点或者魅族的
小白点或者360手机卫士的
小浮标),退出当前Ac tivity
依旧可见的一种实现方法:

省略了Ac tivity的start与stop
Service的按钮代码,直接给
出了核心代码如下:
/
**
*
Author
Time
: yanbo
: 14:47
*
*
Description : 手机屏幕悬浮
窗,仿IPhone小圆点
* (未完全实现,
只提供思路,如需请自行实现)
*
Notice : <uses-permi
ssion android:name="android.p
ermission.SYSTEM_ALERT_WINDOW
"
/>
/
*
public class WindowService ex
tends Service {
private WindowManager mWi
ndowManager;

private ImageView mImageV
iew;
@
Override
public IBinder onBind(Int
ent intent) {
return null;
}
@
Override
public void onCreate() {
super.onCreate();
/
/创建悬浮窗
createFloatWindow();
}
private void createFloatW
indow() {
/
/这里的参数设置上面刚刚
讲过,不再说明
WindowManager.LayoutP
arams layoutParams = new Wind

owManager.LayoutParams();
mWindowManager = (Win
dowManager) getApplication().
getSystemService(Context.WIND
OW_SERVICE);
/
/设置window的type
layoutParams.type = W
indowManager.LayoutParams.TYP
E_PHONE;
/
/设置效果为背景透明
layoutParams.format =
PixelFormat.RGBA_8888;
/设置浮动窗口不可聚焦
/
layoutParams.flags =
WindowManager.LayoutParams.FL
AG_NOT_FOCUSABLE;
layoutParams.gravity
=
Gravity.BOTTOM | Gravity.RI
GHT;
layoutParams.width =
WindowManager.LayoutParams.WR
AP_CONTENT;

layoutParams.height =
WindowManager.LayoutParams.W
RAP_CONTENT;
layoutParams.x = -50;
layoutParams.y = -50;
mImageView = new Imag
eView(this);
mImageView.setImageRe
source(android.R.drawable.ic_
menu_add);
/
/添加到Window
mWindowManager.addVie
w(mImageView, layoutParams);
/
/设置监听
mImageView.setOnTouch
Listener(touchListener);
}
@
Override
public void onDestroy() {
super.onDestroy();

if (mImageView != nul
/讲WindowManager
l) {
/
时说过,add,remove成对出现,所以
需要remove
mWindowManager.re
moveView(mImageView);
}
}
private View.OnTouchListe
ner touchListener = new View.
OnTouchListener() {
@
Override
public boolean onTouc
h(View v, MotionEvent event)
{
/
/模拟触摸触发的事件
Intent intent = n
ew Intent(Intent.ACTION_VIEW)
;
intent.addFlags(I

ntent.FLAG_ACTIVITY_NEW_TASK)
;
startActivity(int
ent);
return false;
}
}
;
}
如下是运行过程模拟,特别
留意屏幕右下角的变化:
怎么样,通过最后这个例子
你是不是就能体会到
WindowManager.LayoutPara
ms的Z-ORDER序列类型,
值越大显示的位置越在上

面。
2-5 总结Ac tivity的窗口添加
机制
有了上面这么多分析和前几
篇的分析,我们对Ac tivity的
窗口加载再次深入分析总结
如下:
可以看见Context的
WindowManager对每个APP
来说是一个全局单例的,而
Ac tivity的WindowManager是
每个Ac tivity都会新创建一个
的(其实你从上面分析的两
个实例化
WindowManagerImpl的构造
函数参数传递就可以看出
来,Ac tivity中Window的
WindowManager成员在构造
实例化时传入给
WindowManagerImpl中
mParentWindow成员的是当
前Window对象,而
ContextImpl的static块中单例
实例化WindowManagerImpl
时传入给
WindowManagerImpl中
mParentWindow成员的是null
值),所以上面模拟苹果浮
动小图标使用了Application
的WindowManager而不是
Ac tivity的,原因就在于这
里;使用Ac tivity的
WindowManager时当Ac tivity
结束时WindowManager就无
效了,所以使用Ac tivity的
getSysytemService(WINDOW
_SERVICE)获取的是Loc a l的
WindowManager。同时可以
看出来Ac tivity中的
WindowManager.LayoutPara
ms的type 为
TYPE_APPLICATION。
好了,上面也说了不少了,
有了上面这些知识点以后我
们就来开始分析Android应用
Ac tivity、Dia log、
PopWindow窗口显示机制。
【工匠若
水 http://blog.csdn.net/yanbob
er 转载烦请注明出处,尊重
劳动成果】
3
Android应用Dialog窗
口添加显示机制源码
3
-1 Dia log窗口源码分析
写过APP都知道,Dia log是
一系列XXXDialog的基类,
我们可以new任意Dia log或者
通过Ac tivity提供的
onCreateDialog(……)、
onPrepareDialog(……)和
showDialog(……)等方法来管
理我们的Dia log,但是究其
实质都是来源于Dia log基
类,所以我们对于各种
XXXDialog来说只用分析
Dia log的窗口加载就可以
了。
如下从Dia log的构造函数开
始分析:
public class Dialog implement
s DialogInterface, Window.Cal
lback,
KeyEvent.Callback, On
CreateContextMenuListener, Wi
ndow.OnWindowDismissedCallbac
k {
.
.....

public Dialog(Context con
text) {
this(context, 0, true
)
;
}
/
/构造函数最终都调运了这个默认
的构造函数
Dialog(Context context, i
nt theme, boolean createConte
xtThemeWrapper) {
/
/默认构造函数的createC
ontextThemeWrapper为true
if (createContextThem
eWrapper) {
/
/默认构造函数的the
me为0
if (theme == 0) {
TypedValue ou
tValue = new TypedValue();
context.getTh
eme().resolveAttribute(com.an
droid.internal.R.attr.dialogT

heme,
outVa
lue, true);
theme = outVa
lue.resourceId;
}
mContext = new Co
ntextThemeWrapper(context, th
eme);
}
else {
mContext = contex
t;
}
/
/mContext已经从外部传
入的context对象获得值(一般是个Ac
tivity)!!!非常重要,先记住!!
!
/
/获取WindowManager对
象
mWindowManager = (Win
dowManager)context.getSystemS

ervice(Context.WINDOW_SERVICE
)
;
/
/为Dialog创建新的Windo
w
Window w = PolicyMana
ger.makeNewWindow(mContext);
mWindow = w;
/
/Dialog能够接受到按键事
件的原因
w.setCallback(this);
w.setOnWindowDismisse
dCallback(this);
/
/关联WindowManager与
新Window,特别注意第二个参数token
为null,也就是说Dialog没有自己的t
oken
/
/一个Window属于Dialog
的话,那么该Window的mAppToken对
象是null
w.setWindowManager(mW
indowManager, null, null);
w.setGravity(Gravity.

CENTER);
mListenersHandler = n
ew ListenersHandler(this);
}
.
.....
}
可以看到,Dia log构造函数
首先把外部传入的参数
context对象赋值给了当前类
的成员(我们的Dia log一般
都是在Ac tivity中启动的,所
以这个
context一般是个Ac tivity),
然后调用

context.getSystemService(Con
text.WINDOW_SERVICE)获
取WindowManager,这个
WindowManager
是哪来的呢?先按照上面说
的context一般是个Ac tivity来
看待,可以发现这句实质就
是Ac tivity的ge tSyste mSe rvic e
方法,我们看下源码,如
下:
@
Override
public Object getSystemSe
rvice(@ServiceName @NonNull S
tring name) {

if (getBaseContext()
= null) {
=
throw new Illegal
StateException(
"
System s
ervices not available to Acti
vities before onCreate()");
}
/
/我们Dialog中获得的Win
dowManager对象就是这个分支
if (WINDOW_SERVICE.eq
uals(name)) {
/
/Activity的Windo
wManager
return mWindowMan
ager;
}
else if (SEARCH_SER
VICE.equals(name)) {
ensureSearchManag
er();
return mSearchMan
ager;

}
return super.getSyste
mService(name);
}
看见没有,Dia log中的
WindowManager成员实质和
Ac tivity里面是一样的,也就
是共用了一个
WindowManager。
回到Dia log的构造函数继续
分析,在得到了
WindowManager之后,程序
又新建了一个Window对象
(类型是PhoneWindow类

型,和Ac tivity的Window新建
过程类似);接着通过
w. setCallback(this)设置Dia log
为当前window的回调接口,
这样Dia log就能够接收事件
处理了;接着把从Ac tivity拿
到的WindowManager对象关
联到新创建的Window中。
至此Dia log的创建过程
Window处理已经完毕,很简
单,所以接下来我们继续看
看Dia log的show与cancel方
法,如下:
public void show() {
.....
if (!mCreated) {
.
/
/回调Dialog的onCr
eate方法
dispatchOnCreate(
null);
}
/
/回调Dialog的onStart
方法
onStart();
/类似于Activity,获取
/
当前新Window的DecorView对象,所
以有一种自定义Dialog布局的方式就是
重写Dialog的onCreate方法,使用se
tContentView传入布局,就像前面文
章分析Activity类似
mDecor = mWindow.getD
ecorView();
.
/
.....
/获取新Window的Window

Manager.LayoutParams参数,和上
面分析的Activity一样type为TYPE_
APPLICATION
WindowManager.LayoutP
arams l = mWindow.getAttribut
es();
.
.....
try {
/
/把一个View添加到A
ctivity共用的windowManager里面
去
mWindowManager.ad
dView(mDecor, l);
.
.....
}
}
finally {
}
可以看见Dia log的新Window
与Ac tivity的Window的type同

样都为
TYPE_APPLICATION,上面
介绍
WindowManager.LayoutPara
ms时
TYPE_APPLICATION的注释
明确说过,普通应用程序窗
口TYPE_APPLICATION的
token必须设置为Ac tivity的
token来指定窗口属于谁。
所以可以看见,既然Dia log
和Ac tivity共享同一个
WindowManager(也就是上
面分析的
WindowManagerImpl),而
WindowManagerImpl里
面有个Window类型的
mParentWindow变量,这个
变量在Ac tivity的attach中创
建WindowManagerImpl时传
入的为当前Ac tivity的
Window,
而当前Ac tivity的Window里面
的mAppToken值又为当前
Ac tivity的token,所以Ac tivity
与Dia log共享了同一个
mAppToken值,只是Dia log
和
Ac tivity的Window对象不同。
3
-2 Dia log窗口加载总结
通过上面分析Dia log的窗口
加载原理,我们总结如下
图:
从图中可以看出,Ac tivity和
Dia log共用了一个Token对
象,Dia log必须依赖于
Ac tivity而显示(通过别的
context搞完之后token都为
null,最终会在ViewRootImpl
的setView方法中加载时因为
token为null抛出异常),所
以Dia log的Context传入参数
一般是一个存在的Ac tivity,
如果Dia log弹出来之前
Ac tivity已经被销毁了,则这
个Dia log在弹出的时候就会
抛出异常,因为token不可用
了。在Dia log的构造函数中
我们关联了新Window的
callback事件监听处理,所以
当Dia log显示时Ac tivity无法
消费当前的事件。
到此Dia log的窗口加载机制
就分析完毕了,接下来我们
说说应用开发中常见的一个
诡异问题。
3-3 从Dia log窗口加载分析引
出的应用开发问题
有了上面的分析我们接下来
看下平时开发App初学者容
易犯的几个错误。
实现在一个Ac tivity中显示一
个Dia log,如下代码:
public class MainActivity ext
ends AppCompatActivity {
@
Override
protected void onCreate(B
undle savedInstanceState) {
setContentView(R.layo
ut.activity_main);
/
/重点关注构造函数的参数
创建一个Dialog然后显示出来
Dialog dialog = new P
rogressDialog(this);
dialog.setTitle("Test
DialogContext");
dialog.show();
,
}
}

分析:使用了Ac tivity为
context,也即和Ac tivity共用
token,符合上面的分析,所
以不会报错,正常执行。
实现在一个Ac tivity中显示一
个Dia log,如下代码:
public class MainActivity ext
ends AppCompatActivity {
@
Override
protected void onCreate(B
undle savedInstanceState) {
setContentView(R.layo
ut.activity_main);
/
/重点关注构造函数的参数


,
创建一个Dialog然后显示出来
Dialog dialog = new P
rogressDialog(getApplicationC
ontext());
dialog.setTitle("Test
DialogContext");
dialog.show();
}
}
分析:传入的是Application
的Context,导致
TYPE_APPLICATION类型
Dia log的token为null,所以抛
出如下异常,无法显示对话
框。

Caused by: android.view.Windo
wManager$BadTokenException: U
nable to add window -- token
null is not for an applicatio
n
at android.view.V
iewRootImpl.setView(ViewRootI
mpl.java:566)
at android.view.W
indowManagerGlobal.addView(Wi
ndowManagerGlobal.java:272)
at android.view.W
indowManagerImpl.addView(Wind
owManagerImpl.java:69)
at android.app.Di
alog.show(Dialog.java:298)
实现在一个Service中显示一
个Dia log,如下代码:


public class WindowService ex
tends Service {
@
Override
public IBinder onBind(Int
ent intent) {
return null;
}
@
Override
public void onCreate() {
super.onCreate();
/
/重点关注构造函数的参数
Dialog dialog = new P
rogressDialog(this);
dialog.setTitle("Test
DialogContext");
dialog.show();
}
}

分析:传入的Context是一个
Service,类似上面传入
ApplicationContext一样的后
果,一样的原因,抛出如下
异常:
Caused by: android.view.Windo
wManager$BadTokenException: U
nable to add window -- token
null is not for an applicatio
n
at android.view.V
iewRootImpl.setView(ViewRootI
mpl.java:566)
at android.view.W
indowManagerGlobal.addView(Wi
ndowManagerGlobal.java:272)
at android.view.W

indowManagerImpl.addView(Wind
owManagerImpl.java:69)
at android.app.Di
alog.show(Dialog.java:298)
至此通过我们平时使用最多
的Dia log也验证了Dia log成功
显示的必要条件,同时也让
大家避免了再次使用Dia log
不当出现异常的情况,或者
出现类似
异常后知道真实的背后原因
是什么的问题。
可以看见,Dia log的实质无

非也是使用WindowManager
的addView、
updateViewLayout、
removeView进行一些操作展
示。
【工匠若
水 http://blog.csdn.net/yanbob
er 转载烦请注明出处,尊重
劳动成果】
4
Android应用
PopWindow窗口添加
显示机制源码
PopWindow实质就是弹出式
菜单,它与Dia la g不同的地
方是不会使依赖的Ac tivity组
件失去焦点(PopupWindow
弹出后可以继续与依赖的
Ac tivity进行交互),Dia log
却不能这样。同时
PopupWindow与Dia log另一
个不同点是PopupWindow是
一个阻塞的对话框,如果你
直接在Ac tivity的onCreate等
方法中显示它则会报错,所
以PopupWindow必须在某个
事件中显示地或者是开启一
个新线程去调用。
说这么多还是直接看代码
吧。
4-1 PopWindow窗口源码分
析
依据PopWindow的使用,我
们选择最常用的方式来分
析,如下先看其中常用的一
种构造函数:
public class PopupWindow {
.
.....

/
/我们只分析最常用的一种构造函
数
public PopupWindow(View c
ontentView, int width, int he
ight, boolean focusable) {
if (contentView != nu
ll) {
/
/获取mContext,co
ntentView实质是View,View的mCon
text都是构造函数传入的,View又层级
传递,所以最终这个mContext实质是A
ctivity!!!很重要
mContext = conten
tView.getContext();
/
/获取Activity的ge
tSystemService的WindowManager
mWindowManager =
(WindowManager) mContext.getS
ystemService(Context.WINDOW_S
ERVICE);
}
/
/进行一些Window类的成员

变量初始化赋值操作
setContentView(conten
tView);
setWidth(width);
setHeight(height);
setFocusable(focusabl
e);
}
.
.....
}
可以看见,构造函数只是初
始化了一些变量,看完构造
函数继续看下PopWindow的
展示函数,如下:
public void showAsDropDown(Vi
ew anchor, int xoff, int yoff


,
int gravity) {
.
/
.....
/anchor是Activity中P
opWindow准备依附的View,这个View
的token实质也是Activity的Window
中的token,也即Activity的token
/
/第一步
Manager.LayoutParams
WindowManager.LayoutP
初始化Window
arams p = createPopupLayout(a
nchor.getWindowToken());
/
/第二步
preparePopup(p);
.
/
.....
/第三步
invokePopup(p);
}
可以看见,当我们想将
PopWindow展示在anchor的

下方向(Z轴是在anchor的上
面)旁边时经理了上面三
步,我们一步一步来分析,
先看第一步,
源码如下:
private WindowManager.Layout
Params createPopupLayout(IBin
der token) {
/
/实例化一个默认的Window
Manager.LayoutParams,其中type
TYPE_APPLICATION
WindowManager.LayoutP
=
arams p = new WindowManager.L
ayoutParams();
/
/设置Gravity
p.gravity = Gravity.S
TART | Gravity.TOP;

/
/设置宽高
p.width = mLastWidth
mWidth;
p.height = mLastHeigh
t = mHeight;
=
/
/依据背景设置format
if (mBackground != nu
ll) {
p.format = mBackg
round.getOpacity();
else {
p.format = PixelF
}
ormat.TRANSLUCENT;
}
/
/设置flags
p.flags = computeFlag
s(p.flags);
/修改type=WindowMana
/
ger.LayoutParams.TYPE_APPLICA
TION_PANEL,mWindowLayoutType
有初始值,type类型为子窗口
p.type = mWindowLayou

tType;
/
/设置token为Activity
的token
p.token = token;
.....
return p;
.
}
接着回到showAsDropDown
方法看看第二步,如下源
码:
private void preparePopup(Win
dowManager.LayoutParams p) {
.
/
.....
/有无设置PopWindow的ba
ckground区别
if (mBackground != nu
ll) {


.
/
.....
/如果有背景则创建一
个PopupViewContainer对象的View
Group
PopupViewContaine
r popupViewContainer = new Po
pupViewContainer(mContext);
PopupViewContaine
r.LayoutParams listParams = n
ew PopupViewContainer.LayoutP
arams(
ViewGroup
.
LayoutParams.MATCH_PARENT, h
eight
)
/
;
/把背景设置给Popup
ViewContainer的ViewGroup
popupViewContaine
r.setBackground(mBackground);
/把我们构造函数传入
的View添加到这个ViewGroup
popupViewContaine
/

r.addView(mContentView, listP
arams);
/
/返回这个ViewGrou
p
mPopupView = popu
pViewContainer;
else {
/如果没有通过PopWi
}
/
ndow的setBackgroundDrawable设
置背景则直接赋值当前传入的View为Po
pWindow的View
mPopupView = mCon
tentView;
}
.
.....
}
可以看见preparePopup方法
的作用就是判断设置Vie w,
如果有背景则会在传入的

contentView外面包一层
PopupViewContainer(实质
是一个重写
了事件处理的FrameLayout)
之后作为mP opupView,如果
没有背景则直接用
contentView作为
mP opupView。我们再来看下
这里的
PopupViewContainer类,如
下源码:
private class PopupViewConta

iner extends FrameLayout {
.
@
.....
Override
protected int[] onCre
ateDrawableState(int extraSpa
ce) {
.
.....
}
@
Override
public boolean dispat
chKeyEvent(KeyEvent event) {
.
.....
}
@
Override
public boolean dispat
chTouchEvent(MotionEvent ev)
{
if (mTouchInterce
ptor != null && mTouchInterce
ptor.onTouch(this, ev)) {

return true;
}
return super.disp
atchTouchEvent(ev);
}
@
Override
public boolean onTouc
hEvent(MotionEvent event) {
.
.....
if(xxx) {
dismiss();
}
.
.....
}
@
Override
public void sendAcces
sibilityEvent(int eventType)
{
.
.....
}

}
可以看见,这个
PopupViewContainer是一个
PopWindow的内部私有类,
它继承了FrameLayout,在其
中重写了Key和Touch事件的
分发处理逻辑。
同时查阅P opupView可以发
现,P opupView类自身没有
重写Key和Touch事件的处
理,所以如果没有将传入的
Vie w对象放入封装的

Vie wGroup中,
则点击Back键或者
PopWindow以外的区域
PopWindow是不会消失的
(其实PopWindow中没有向
Ac tivity及Dia log一样new新的
Window,
所以不会有新的callback设
置,也就没法处理事件消费
了)。
接着继续回到
showAsDropDown方法看看
第三步,如下源码:
private void invokePopup(Wind
owManager.LayoutParams p) {
if (mContext != null)
{
p.packageName = m
Context.getPackageName();
}
mPopupView.setFitsSys
temWindows(mLayoutInsetDecor)
;
setLayoutDirectionFro
mAnchor();
mWindowManager.addVie
w(mPopupView, p);
}
可以看见,这里使用了

Ac tivity的WindowManager将
我们的PopWindow进行了显
示。
到此可以发现,PopWindow
的实质无非也是使用
WindowManager的
addView、
updateViewLayout、
removeView进行一些操作展
示。与Dia log不同的地方是
没有新new Window而已(也
就没法设置callback,无法消
费事件,也就是前面说的
PopupWindow弹出后可以继
续与依赖的Ac tivity进行交互
的原因)。
到此P opWindw的窗口加载显
示机制就分析完毕了,接下
来进行总结与应用开发技巧
提示。
4-2 PopWindow窗口源码分
析总结及应用开发技巧提示
通过上面分析可以发现总结
如下图:
可以看见,PopWindow完全
使用了Ac tivity的Window与
WindowManager,相对来说
比较简单容易记理解。
再来看一个开发技巧:
如果设置了PopupWindow的
background,则点击Back键
或者点击PopupWindow以外
的区域时PopupWindow就会
dismiss;如果不设置
PopupWindow的
background,则点击Back键
或者点击PopupWindow以外
的区域PopupWindow不会消
失。
【
工匠若
水 http://blog.csdn.net/yanbob
er 转载烦请注明出处,尊重
劳动成果】
5
Android应用Toa st窗
口添加显示机制源码
5-1 基础知识准备
在开始分析这几个窗口之前
需要脑补一点东东,我们从
应用层开发来直观脑补,这
样下面分析源码时就不蛋疼
了。如下是一个我们写的两
个应用实现Service跨进程调
用服务ADIL的例子,客户端
调运远程Service的start与stop
方法控制远程Service的操
作。
Android系统中的应用程序都
运行在各自的进程中,进程
之间是无法直接交换数据
的,但是Android为开发者提
供了AIDL跨进程调用Service
的功能。其实AIDL就相当于
双方约定的一个规则而已。
先看下在Android Studio中
AIDL开发的工程目录结构,
如下:
由于AIDL文件中不能出现访
问修饰符(如public),同时
AIDL文件在两个项目中要完
全一致而且只支持基本类
型,所以我们定义的AIDL文
件如下:
ITestService.aidl

package io.github.yanbober.my
application;
interface ITestService {
void start(int id);
void stop(int id);
}
再来看下依据a idl文件自动生
成的ITestService.java文件
吧,如下:
/
*
*
This file is auto-generate
d. DO NOT MODIFY.
*
/
package io.github.yanbober.my
application;


public interface ITestService
extends android.os.IInterfac
e
{
/
/Stub类是ITestService接口
的内部静态抽象类,该类继承了Binder
类
public static abstract cl
ass Stub extends android.os.B
inder implements io.github.ya
nbober.myapplication.ITestSer
vice
{
.
/
.....
/这是抽象静态Stub类中的
asInterface方法,该方法负责将ser
vice返回至client的对象转换为ITes
tService.Stub
/
/把远程Service的Binde
r对象传递进去,得到的是远程服务的本
地代理
public static io.gith

ub.yanbober.myapplication.ITe
stService asInterface(android
.
os.IBinder obj)
{
.
.....
}
.
/
.....
/远程服务的本地代理,也
会继承自ITestService
private static class
Proxy implements io.github.ya
nbober.myapplication.ITestSer
vice
{
.
@
.....
Override
public void start
(int id) throws android.os.Re
moteException
{
.
.....
}

@
Override
public void stop(
int id) throws android.os.Rem
oteException
{
.
.....
}
}
.
.....
}
/
/两个方法是aidl文件中定义的
方法
public void start(int id)
throws android.os.RemoteExce
ption;
public void stop(int id)
throws android.os.RemoteExcep
tion;
}

这就是自动生成的java文
件,接下来我们看看服务端
的Service源码,如下:
/
/记得在AndroidManifet.xml中注
册Service的<action android:na
me="io.github.yanbober.myappl
ication.aidl" />
public class TestService exte
nds Service {
private TestBinder mTestB
inder;
/
/该类继承ITestService.Stu
b类而不是Binder类,因为ITestServ
ice.Stub是Binder的子类
/
/进程内的Service定义TestBi
nder内部类是继承Binder类
public class TestBinder e

xtends ITestService.Stub {
Override
@
public void start(int
id) throws RemoteException {
Log.i(null, "Serv
er Service is start!");
}
@
Override
public void stop(int
id) throws RemoteException {
Log.i(null, "Serv
er Service is stop!");
}
}
@
Override
public IBinder onBind(Int
ent intent) {
/返回Binder
return mTestBinder;
/

}
@
Override
public void onCreate() {
super.onCreate();
/
/实例化Binder
mTestBinder = new Tes
tBinder();
}
}
现在服务端App的代码已经
OK,我们来看下客户端的
代码。客户端首先也要像上
面的工程结构一样,把AIDL
文件放好,接着在客户端使
用远程服务端

的Service代码如下:
public class MainActivity ext
ends Activity {
private static final Stri
ng REMOT_SERVICE_ACTION = "io
.
github.yanbober.myapplicatio
n.aidl";
private Button mStart, mS
top;
der;
private ITestService mBin
private ServiceConnection
connection = new ServiceConn
ection() {
@
Override
public void onService
Connected(ComponentName name,

IBinder service) {
/
/获得另一个进程中的
Service传递过来的IBinder对象
/
/用IMyService.St
ub.asInterface方法转换该对象
mBinder = ITestSe
rvice.Stub.asInterface(servic
e);
}
@
Override
public void onService
Disconnected(ComponentName na
me) {
}
}
;
@
Override
protected void onCreate(B
undle savedInstanceState) {
super.onCreate(savedI
nstanceState);

setContentView(R.layo
ut.activity_main);
mStart = (Button) thi
s.findViewById(R.id.start);
mStop = (Button) this
.
findViewById(R.id.stop);
mStart.setOnClickList
ener(clickListener);
mStop.setOnClickListe
ner(clickListener);
/
/绑定远程跨进程Service
bindService(new Inten
t(REMOT_SERVICE_ACTION), conn
ection, BIND_AUTO_CREATE);
}
@
Override
protected void onDestroy(
)
{
super.onDestroy();

/
/取消绑定远程跨进程Serv
ice
unbindService(connect
ion);
}
private View.OnClickListe
ner clickListener = new View.
OnClickListener() {
@
Override
public void onClick(V
iew v) {
/
///调用远程Servic
e中的start与stop方法
switch (v.getId()
)
{
case R.id.sta
rt:
try {
mBind
er.start(0x110);
}
catch (

RemoteException e) {
ntStackTrace();
e.pri
}
break;
case R.id.sto
p:
try {
mBind
er.stop(0x120);
}
catch (
e.pri
RemoteException e) {
ntStackTrace();
}
break;
}
}
}
;
}

到此你对应用层通过AIDL使
用远程Service的形式已经很
熟悉了,至于实质的通信使
用Binder的机制我们后面会
写文章一步一步往下分析。
到此的准备
知识已经足够用来理解下面
我们的源码分析了。
5
-2 Toa st窗口源码分析
我们常用的Toa st窗口其实和
前面分析的Ac tivity、
Dia log、PopWindow都是不
同的,因为它和输入法、墙
纸类似,都是系统窗口。
我们还是按照最常用的方式
来分析源码吧。
我们先看下Toa st的静态
makeText方法吧,如下:
public static Toast makeText(
Context context, CharSequence
text, @Duration int duration
)
{
/
/new一个Toast对象
Toast result = new To
ast(context);
/
/获取前面有篇文章分析的L
ayoutInflater

LayoutInflater inflat
e = (LayoutInflater)
context.getSy
stemService(Context.LAYOUT_IN
FLATER_SERVICE);
/
/加载解析Toast的布局,
实质transient_notification.xm
l是一个LinearLayout中套了一个@an
droid:id/message的TextView而已
View v = inflate.infl
ate(com.android.internal.R.la
yout.transient_notification,
null);
/
/取出布局中的TextView
TextView tv = (TextVi
ew)v.findViewById(com.android
.
internal.R.id.message);
/把我们的文字设置到Text
/
View 上
tv.setText(text);
/设置一些属性
result.mNextView = v;
/

result.mDuration = du
ration;
}
/
/返回新建的Toast
return result;
可以看见,这个方法构造了
一个Toa st,然后把要显示的
文本放到这个Vie w的
Te xtVie w中,然后初始化相
关属性后返回这个新的Toast
对象。
当我们有了这个Toa st对象之
后,可以通过show方法来显
示出来,如下看下show方法

源码:
public void show() {
.
/
.....
/通过AIDL(Binder)通
信拿到NotificationManagerServi
ce的服务访问接口,当前Toast类相当
于上面例子的客户端!!!相当重要!!
!
INotificationManager
service = getService();
String pkg = mContext
.
getOpPackageName();
TN tn = mTN;
tn.mNextView = mNextV
iew;
try {
/
/把TN对象和一些参数
传递到远程NotificationManagerSe
rvice中去

service.enqueueTo
ast(pkg, tn, mDuration);
}
catch (RemoteExcept
ion e) {
}
/
/ Empty
}
我们看看show方法中调运的
getService方法,如下:
/
/远程NotificationManagerServ
ice的服务访问接口
private static INotificat
ionManager sService;
static private INotificat
ionManager getService() {
/
/单例模式
if (sService != null)


{
return sService;
}
/
/通过AIDL(Binder)通
信拿到NotificationManagerServi
ce的服务访问接口
sService = INotificat
ionManager.Stub.asInterface(S
erviceManager.getService("not
ification"));
return sService;
}
通过上面我们的基础脑补实
例你也能看懂这个getService
方法了吧。那接着我们来看
mTN吧,好像mTN在Toa st的
构造函数里见过一眼,我们

来看
看,如下:
public Toast(Context context)
{
mContext = context;
mTN = new TN();
mTN.mY = context.getR
esources().getDimensionPixelS
ize(
com.android.i
nternal.R.dimen.toast_y_offse
t);
mTN.mGravity = contex
t.getResources().getInteger(
com.android.i
nternal.R.integer.config_toas
tDefaultGravity);
}

可以看见mTN确实是在构造
函数中实例化的,那我们就
来看看这个TN类,如下:
/
/类似于上面例子的服务端实例化的Ser
vice内部类Binder
private static class TN e
xtends ITransientNotification
Stub {
.
.
/
.....
/实现了AIDL的show与hid
e方法
@
Override
public void show() {
if (localLOGV) Lo
g.v(TAG, "SHOW: " + this);
mHandler.post(mSh
ow);
}

@
Override
public void hide() {
if (localLOGV) Lo
g.v(TAG, "HIDE: " + this);
mHandler.post(mHi
de);
}
.
.....
}
看见没有,TN是Toa st内部
的一个私有静态类,继承自
ITransientNotification.Stub。
你这时指定好奇
ITransientNotification.Stub是
个啥玩意,

对吧?其实你在上面的脑补
实例中见过它的,他出现在
服务端实现的Service中,就
是一个Binder对象,也就是
对一个a idl文件的实现而已,
我们看下这个
ITransientNotification.aidl文
件,如下:
package android.app;
/
** @hide */
oneway interface ITransientNo
tification {
void show();
void hide();

}
看见没有,和我们上面的例
子很类似吧。
再回到上面分析的show()方
法中可以看到,我们的Toast
是传给远程的
NotificationManagerService管
理的,为了
NotificationManagerService回
到我们的应用程序(回
调),我们需要告诉
NotificationManagerService我

们当前程序的Binder引用是
什么(也就是TN)。是不是
觉得和上面例子有些不同,
这里感觉Toa st又充当客户
端,又充当服务端的样子,
实质就是一个回调过程而
已。
继续来看Toa st中的show方法
的service.enqueueToast(pkg,
tn, mDuration);语句,service
实质是远程的
NotificationManagerService,
所以enqueueToast方法就是
NotificationManagerService类
的,如下:
private final IBinder mServic
e = new INotificationManager.
Stub() {
/
/
/ Toasts
/ ==================
=
=
============================
============================
@
Override
public void enqueueTo
ast(String pkg, ITransientNot
ification callback, int durat
ion)
{
.
.....
synchronized (mTo
astQueue) {

int callingPi
d = Binder.getCallingPid();
long callingI
d = Binder.clearCallingIdenti
ty();
try {
ToastReco
rd record;
/
/查看该To
ast是否已经在队列当中
int index
indexOfToastLocked(pkg, ca
llback);
=
/
/ If it'
s already in the queue, we up
date it in place, we don't
/
/ move i
t to the end of the queue.
/
/注释说了
,
已经存在则直接取出update
if (index
>
= 0) {

recor
d = mToastQueue.get(index);
recor
d.update(duration);
}
else {
/
/ Li
mit the number of toasts that
any given package except the
android
/
/ pa
ckage can enqueue. Prevents
DOS attacks and deals with le
aks.
.
....
.
/
/将T
oast封装成ToastRecord对象,放入m
ToastQueue 中
recor
d = new ToastRecord(callingPi
d, pkg, callback, duration);
/
/把

他添加到ToastQueue队列中
mToas
index
tQueue.add(record);
=
mToastQueue.size() - 1;
/将
当前Toast所在的进程设置为前台进程
keepP
/
rocessAliveLocked(callingPid)
;
}
/
/如果ind
ex为0,说明当前入队的Toast在队头,
需要调用showNextToastLocked方法
直接显示
if (index
=
= 0) {
showN
extToastLocked();
}
}
finally {
Binder.re

storeCallingIdentity(callingI
d);
}
}
}
}
继续看下该方法中调运的
showNextToastLocked方法,
如下:
void showNextToastLocked() {
/
/取出ToastQueue中队列
最前面的ToastRecord
ToastRecord record =
mToastQueue.get(0);
while (record != null
)
{
try {


/
/Toast类中实
现的ITransientNotification.St
ub的Binder接口TN,调运了那个类的s
how方法
record.callba
ck.show();
scheduleTimeo
utLocked(record);
return;
}
catch (RemoteEx
ception e) {
.
.....
}
}
}
继续先看下该方法中调运的
scheduleTimeoutLocked方
法,如下:


private void scheduleTimeoutL
ocked(ToastRecord r)
{
/
/移除上一条消息
mHandler.removeCallba
cksAndMessages(r);
/依据Toast传入的durati
/
on参数LENGTH_LONG=1来判断决定多
久发送消息
Message m = Message.o
btain(mHandler, MESSAGE_TIMEO
UT, r);
long delay = r.durati
on == Toast.LENGTH_LONG ? LON
G_DELAY : SHORT_DELAY;
/
/依据设置的MESSAGE_TIM
EOUT后发送消息
mHandler.sendMessageD
elayed(m, delay);
}

可以看见这里先回调了Toast
的TN的show,下面timeout
可能就是hide了。接着还在
该类的mHandler处理了这条
消息,然后调运了如下处理
方法:
private void handleTimeout(To
astRecord record)
{
.
.....
synchronized (mToastQ
ueue) {
int index = index
OfToastLocked(record.pkg, rec
ord.callback);
if (index >= 0) {
cancelToastLo

cked(index);
}
}
}
我们继续看
cancelToastLocked方法,如
下:
void cancelToastLocked(int in
dex) {
ToastRecord record =
mToastQueue.get(index);
try {
/
/回调Toast的TN中实
现的hide方法
record.callback.h
ide();
}
catch (RemoteExcept


ion e) {
.
.....
}
/
/从队列移除当前显示的Toa
st
mToastQueue.remove(in
dex);
keepProcessAliveLocke
d(record.pid);
if (mToastQueue.size(
)
> 0) {
/
/如果当前的Toast显
示完毕队列里还有其他的Toast则显示其
他的Toast
showNextToastLock
ed();
}
}
到此可以发现,Toa st的远程

管理
NotificationManagerService类
的处理实质是通过Handler发
送延时消息显示取消Toast
的,而且在远程
NotificationManagerService类
中又远程回调了Toa st的TN
类实现的show与hide方法。
现在我们就回到Toa st的TN
类再看看这个show与hide方
法,如下:
private static class TN exten

ds ITransientNotification.Stu
b {
.
/
.....
/仅仅是实例化了一个Hand
ler,非常重要!!!!!!!!
final Handler mHandle
r = new Handler();
.
.....
final Runnable mShow
new Runnable() {
Override
=
@
public void run()
{
handleShow();
}
}
;
final Runnable mHide
new Runnable() {
Override
public void run()
=
@
{

handleHide();
/ Don't do t
/
his in handleHide() because i
t is also invoked by handleSh
ow()
mNextView = n
ull;
}
}
.
/
;
.....
/实现了AIDL的show与hid
e方法
@
Override
public void show() {
if (localLOGV) Lo
g.v(TAG, "SHOW: " + this);
mHandler.post(mSh
ow);
}
@
Override
public void hide() {

if (localLOGV) Lo
g.v(TAG, "HIDE: " + this);
mHandler.post(mHi
de);
}
.
.....
}
可以看见,这里实现a idl接口
的方法实质是通过handler的
post来执行的一个方法,而
这个Handler仅仅只是new了
一下,也就是说,如果我们
写
APP时使用Toa st在子线程中
则需要自行准备Looper对

象,只有主线程Ac tivity创建
时帮忙准备了Looper(关于
Handler与Looper如果整不明
白请
阅读《Android异步消息处理
机制详解及源码分析》)。
那我们重点关注一下
handleShow与handleHide方
法,如下:
public void handleShow() {
if (localLOGV) Lo
g.v(TAG, "HANDLE SHOW: " + th
is + " mView=" + mView

+
" mNext
View=" + mNextView);
if (mView != mNex
tView) {
/
/ remove the
old view if necessary
/
通过WindowManager的remove删掉旧
的
/如果有必要就
handleHide();
mView = mNext
View;
Context conte
xt = mView.getContext().getAp
plicationContext();
String packag
eName = mView.getContext().ge
tOpPackageName();
if (context =
=
null) {
context =
mView.getContext();

}
/
/通过得到的con
text(一般是ContextImpl的contex
t)获取WindowManager对象(上一篇
文章分析的单例的WindowManager)
mWM = (Window
Manager)context.getSystemServ
ice(Context.WINDOW_SERVICE);
.
/
.....
/在把Toast的V
iew添加之前发现Toast的View已经被
添加过(有partent)则删掉
if (mView.get
Parent() != null) {
.
.....
mWM.remov
eView(mView);
}
.
/
.....
/把Toast的Vi
ew添加到窗口,其中mParams.type在
构造函数中赋值为TYPE_TOAST!!!

!!!特别重要
mWM.addView(m
View, mParams);
.
.....
}
}
public void handleHide() {
if (mView != null
)
{
/
/ note: chec
king parent() just to make su
re the view has
/
/ been added
.. i have seen cases where
we get here when
.
/
/ the view i
sn't yet added, so let's try
not to crash.
/
/注释说得很清
楚了,不解释,就是remove


if (mView.get
Parent() != null) {
mWM.remov
eView(mView);
}
mView = null;
}
}
到此Toa st的窗口添加原理就
分析完毕了,接下来我们进
行总结。
5-3 Toa st窗口源码分析总结
及应用开发技巧
经过上面的分析我们总结如
下:

通过上面分析及上图直观描
述可以发现,之所以Toa st的
显示交由远程的
NotificationManagerService管
理是因为Toa st是每个应用程
序都会弹出的,而且位置和
UI风格都差不多,所以如果
我们不统一管理就会出现覆
盖叠加现象,同时导致不好
控制,所以Google把Toa st设
计成为了系统级的窗口类
型,由
NotificationManagerService统
一队列管理。
在我们开发应用程序时使用
Toa st注意事项:
1
. 通过分析TN类的handler可
以发现,如果想在非UI线
程使用Toa st需要自行声明
Looper,否则运行会抛出
Looper相关的异常;UI线
程不需要,因为系统已经
帮忙声明。
2. 在使用Toa st时context参数
尽量使用
getApplicationContext(),
可以有效的防止静态引用
导致的内存泄漏。
3
. 有时候我们会发现Toa st弹
出过多就会延迟显示,因
为上面源码分析可以看见
Toast.makeText是一个静
态工厂方法,每次调用这
个方法都会产生一个新的
Toa st对象,当我们在这个
新new的对象上调用show
方法就会使这个对象加入
到
NotificationManagerService
管理的mToastQueue消息
显示队列里排队等候显
示;所以如果我们不每次
都产生一个新的Toa st对象
(使用单例来处理)就不
需要排队,也就能及时更
新了。
6
Android应用
Activity、Dialog、
PopWindow、Toa st窗
口显示机制总结
可以看见上面无论Ac itivty、
Dia log、PopWindow、Toast
的实质其实都是如下接口提
供的方法操作:
public interface ViewManager
{
public void addView(View
view, ViewGroup.LayoutParams
params);
public void updateViewLay
out(View view, ViewGroup.Layo
utParams params);
public void removeView(Vi
ew view);
}
整个应用各种窗口的显示都

离不开这三个方法而已,只
是token及type与Window是否
共用的问题。
【
工匠若
水 http://blog.csdn.net/yanbob
er 转载烦请注明出处,尊重
劳动成果】
转载请注明出
处:http://blog.csdn.net/guolin
_
blog/article/details/44996879
在Android所有常用的原生控
件当中,用法最复杂的应该
就是ListVie w了,它专门用
于处理那种内容元素很多,
手机屏幕无法展示出所有内
容的情况。ListVie w可以使
用列表的形式来展示内容,
超出屏幕部分的内容只需要
通过手指滑动就可以移动到
屏幕内了。
另外ListVie w还有一个非常
神奇的功能,我相信大家应
该都体验过,即使在
ListVie w中加载非常非常多
的数据,比如达到成百上千
条甚至更多,ListVie w都不
会发生OOM或者崩溃,而且
随着我们手指滑动来浏览更
多数据时,程序所占用的内
存竟然都不会跟着增长。那
么ListVie w是怎么实现这么
神奇的功能的呢?当初我就
抱着学习的心态花了很长时
间把ListVie w的源码通读了
一遍,基本了解了它的工作
原理,在感叹Google大神能
够写出如此精妙代码的同时
我也有所敬畏,因为
ListVie w的代码量比较大,
复杂度也很高,很难用文字
表达清楚,于是我就放弃了
把它写成一篇博客的想法。
那么现在回想起来这件事我
已经肠子都悔青了,因为没
过几个月时间我就把当初梳
理清晰的源码又忘的一干二
净。于是现在我又重新定下
心来再次把ListVie w的源码
重读了一遍,那么这次我一
定要把它写成一篇博客,分
享给大家的同时也当成我自
己的笔记吧。
首先我们先来看一下
ListVie w的继承结构,如下
图所示:
可以看到,ListVie w的继承
结构还是相当复杂的,它是
直接继承自的AbsListVie w,
而AbsListVie w有两个子实现
类,一个是ListVie w,另一
个就是Gr idVie w,因此我们
从这一点就可以猜出来,
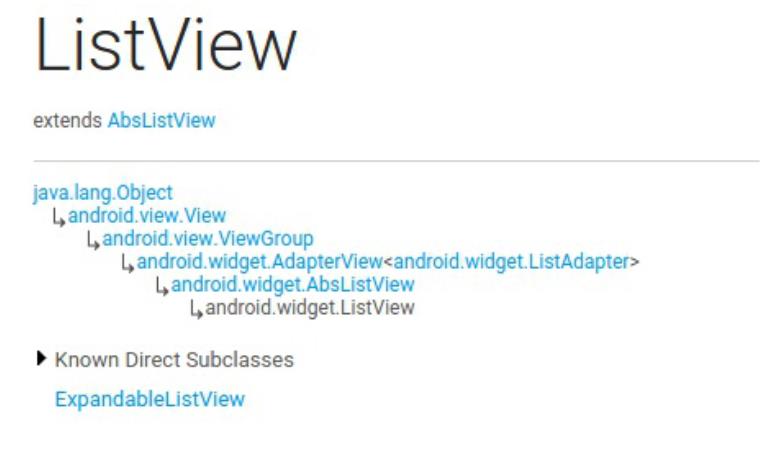
ListVie w和Gr idVie w在工作原
理和实现上都是有很多共同
点的。然后AbsListVie w又继
承自AdapterView ,
AdapterView继承自
Vie wGroup,后面就是我们
所熟知的了。先把ListVie w
的继承结构了解一下,待会
儿有助于我们更加清晰地分
析代码。
Adapter的作用
Adapter相信大家都不会陌
生,我们平时使用ListVie w
的时候一定都会用到它。那
么话说回来大家有没有仔细
想过,为什么需要Adapter这
个东西呢?总感觉正因为有
了Adapter,ListVie w的使用
变得要比其它控件复杂得
多。那么这里我们就先来学
习一下Adapter到底起到了什
么样的一个作用。
其实说到底,控件就是为了
交互和展示数据用的,只不
过ListVie w更加特殊,它是
为了展示很多很多数据用
的,但是ListVie w只承担交
互和展示工作而已,至于这
些数据来自哪里,ListVie w
是不关心的。因此,我们能
设想到的最基本的ListVie w
工作模式就是要有一个
ListVie w控件和一个数据
源。
不过如果真的让ListVie w和
数据源直接打交道的话,那
ListVie w所要做的适配工作
就非常繁杂了。因为数据源
这个概念太模糊了,我们只
知道它包含了很多数据而
已,至于这个数据源到底是
什么样类型,并没有严格的
定义,有可能是数组,也有
可能是集合,甚至有可能是
数据库表中查询出来的游
标。所以说如果ListVie w真
的去为每一种数据源都进行
适配操作的话,一是扩展性
会比较差,内置了几种适配
就只有几种适配,不能动态
进行添加。二是超出了它本
身应该负责的工作范围,不
再是仅仅承担交互和展示工
作就可以了,这样ListVie w
就会变得比较臃肿。
那么显然Android开发团队是
不会允许这种事情发生的,
于是就有了Adapter这样一个
机制的出现。顾名思义,
Adapter是适配器的意思,它
在ListVie w和数据源之间起
到了一个桥梁的作用,
ListVie w并不会直接和数据
源打交道,而是会借助
Adapter这个桥梁来去访问真
正的数据源,与之前不同的
是,Adapter的接口都是统一
的,因此ListVie w不用再去
担心任何适配方面的问题。
而Adapter又是一个接口
(interface),它可以去实现各
种各样的子类,每个子类都
能通过自己的逻辑来去完成
特定的功能,以及与特定数
据源的适配操作,比如说
ArrayAdapter可以用于数组
和List类型的数据源适配,
SimpleCursorAdapter可以用
于游标类型的数据源适配,
这样就非常巧妙地把数据源
适配困难的问题解决掉了,
并且还拥有相当不错的扩展
性。简单的原理示意图如下
所示:
当然Adapter的作用不仅仅只
有数据源适配这一点,还有
一个非常非常重要的方法也
需要我们在Adapter当中去重
写,就是getView()方法,这
个在下面的文章中还会详细
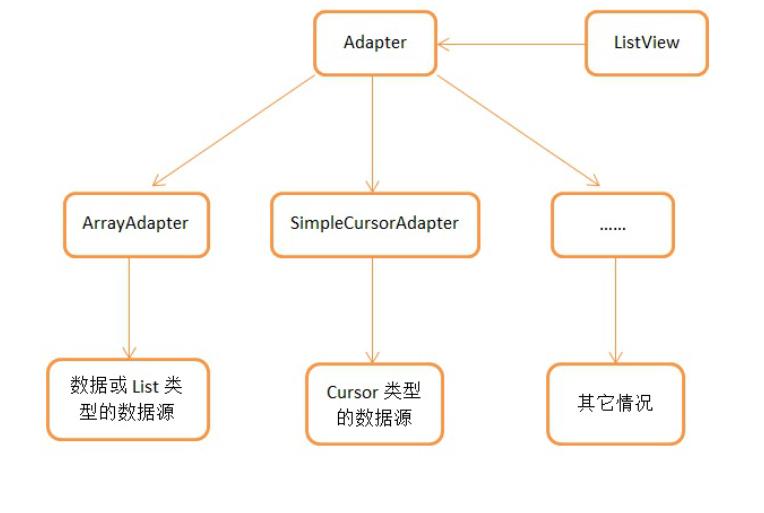
讲到。
RecycleBin机制
那么在开始分析ListVie w的
源码之前,还有一个东西是
我们提前需要了解的,就是
RecycleBin机制,这个机制
也是ListVie w能够实现成百
上千条数据都不会OOM最重
要的一个原因。其实
RecycleBin的代码并不多,
只有300行左右,它是写在
AbsListVie w中的一个内部
类,所以所有继承自
AbsListVie w的子类,也就是
ListVie w和Gr idVie w,都可以
使用这个机制。那我们来看
一下RecycleBin中的主要代
码,如下所示:
/
**
*
The RecycleBin facilitates
reuse of views across layout
s. The RecycleBin
has two levels of storage:
*
ActiveViews and ScrapViews.
ActiveViews are
*
those views which were ons
creen at the start of a layou
t. By
*
construction, they are dis

playing current information.
At the end of
*
layout, all views in Activ
eViews are demoted to ScrapVi
ews. ScrapViews
*
are old views that could p
otentially be used by the ada
pter to avoid
*
allocating views unnecessa
rily.
*
*
@see android.widget.AbsLis
tView#setRecyclerListener(and
roid.widget.AbsListView.Recyc
lerListener)
*
@see android.widget.AbsLis
tView.RecyclerListener
*
/
class RecycleBin {
private RecyclerListener
mRecyclerListener;

/
**
*
The position of the fi
rst view stored in mActiveVie
ws.
*
/
private int mFirstActiveP
osition;
/
**
*
Views that were on scr
een at the start of layout. T
his array is
*
populated at the start
of layout, and at the end of
layout all view
*
in mActiveViews are mo
ved to mScrapViews. Views in
mActiveViews
*
represent a contiguous
range of Views, with positio
n of the first
*
view store in mFirstAc

tivePosition.
*
/
private View[] mActiveVie
ws = new View[0];
/
**
*
Unsorted views that ca
n be used by the adapter as a
convert view.
*
/
private ArrayList<View>[]
mScrapViews;
private int mViewTypeCoun
private ArrayList<View> m
t;
CurrentScrap;
/
**
*
Fill ActiveViews with
all of the children of the Ab

sListView.
*
*
*
@param childCount
The minimum
number of views mActiveViews
should hold
*
@param firstActivePosi
tion
*
The positio
n of the first view that will
be stored in
*
mActiveView
s
*
/
void fillActiveViews(int
childCount, int firstActivePo
sition) {
if (mActiveViews.leng
th < childCount) {
mActiveViews = ne
w View[childCount];
}

mFirstActivePosition
firstActivePosition;
final View[] activeVi
ews = mActiveViews;
for (int i = 0; i < c
hildCount; i++) {
View child = getC
=
hildAt(i);
AbsListView.Layou
tParams lp = (AbsListView.Lay
outParams) child.getLayoutPar
ams();
/
/ Don't put head
er or footer views into the s
crap heap
if (lp != null &&
lp.viewType != ITEM_VIEW_TYP
E_HEADER_OR_FOOTER) {
/
/ Note: We d
o place AdapterView.ITEM_VIEW
TYPE_IGNORE in
_
/
/ active vie

ws.
/
/ However, w
e will NOT place them into sc
rap views.
activeViews[i
]
= child;
}
}
}
/
**
*
Get the view correspon
ding to the specified positio
n. The view will
*
be removed from mActiv
eViews if it is found.
*
*
*
@param position
The positio
n to look up in mActiveViews
@return The view if it
is found, null otherwise
*

*
/
View getActiveView(int po
sition) {
int index = position
mFirstActivePosition;
final View[] activeVi
ews = mActiveViews;
if (index >= 0 && ind
-
ex < activeViews.length) {
final View match
=
activeViews[index];
activeViews[index
]
= null;
return match;
}
return null;
}
/
**
*
Put a view into the Sc
apViews list. These views are
unordered.

*
*
*
@param scrap
The view to
add
*
/
void addScrapView(View sc
rap) {
AbsListView.LayoutPar
ams lp = (AbsListView.LayoutP
arams) scrap.getLayoutParams(
)
;
if (lp == null) {
return;
}
/
/ Don't put header o
r footer views or views that
should be ignored
/
/ into the scrap hea
p
int viewType = lp.vie
if (!shouldRecycleVie
wType;

wType(viewType)) {
if (viewType != I
TEM_VIEW_TYPE_HEADER_OR_FOOTE
R) {
removeDetache
dView(scrap, false);
}
return;
}
if (mViewTypeCount ==
1
) {
dispatchFinishTem
poraryDetach(scrap);
mCurrentScrap.add
(scrap);
}
else {
dispatchFinishTem
poraryDetach(scrap);
mScrapViews[viewT
ype].add(scrap);
}

if (mRecyclerListener
= null) {
!
mRecyclerListener
.
onMovedToScrapHeap(scrap);
}
}
/
**
*
@return A view from th
e ScrapViews collection. Thes
e are unordered.
*
/
View getScrapView(int pos
ition) {
ArrayList<View> scrap
if (mViewTypeCount ==
scrapViews = mCur
Views;
1
) {
rentScrap;
int size = scrapV
iews.size();

if (size > 0) {
return scrapV
iews.remove(size - 1);
else {
return null;
}
}
}
else {
int whichScrap =
mAdapter.getItemViewType(posi
tion);
if (whichScrap >=
0
&& whichScrap < mScrapView
s.length) {
scrapViews =
mScrapViews[whichScrap];
int size = sc
rapViews.size();
if (size > 0)
return sc
{
rapViews.remove(size - 1);

}
}
}
return null;
}
public void setViewTypeCo
unt(int viewTypeCount) {
if (viewTypeCount < 1
)
{
throw new Illegal
ArgumentException("Can't have
a viewTypeCount < 1");
}
/
/ noinspection unche
cked
ArrayList<View>[] scr
apViews = new ArrayList[viewT
ypeCount];
for (int i = 0; i < v
iewTypeCount; i++) {
scrapViews[i] = n

ew ArrayList<View>();
}
mViewTypeCount = view
TypeCount;
mCurrentScrap = scrap
Views[0];
mScrapViews = scrapVi
ews;
}
}
这里的RecycleBin代码并不
全,我只是把最主要的几个
方法提了出来。那么我们先
来对这几个方法进行简单解
读,这对后面分析ListVie w
的工作原理将会有很大的帮

助。
fillActiveViews() 这个方
法接收两个参数,第一个
参数表示要存储的vie w的
数量,第二个参数表示
ListVie w中第一个可见元
素的position值。
RecycleBin当中使用
mAc tive Vie ws这个数组来
存储Vie w,调用这个方法
后就会根据传入的参数来
将ListVie w中的指定元素
存储到mAc tive Vie ws数组

当中。
getActiveView() 这个方法
和fillAc tive Vie ws( )是对应
的,用于从mAc tive Vie ws
数组当中获取数据。该方
法接收一个position参数,
表示元素在ListVie w当中
的位置,方法内部会自动
将position值转换成
mAc tive Vie ws数组对应的
下标值。需要注意的是,
mAc tive Vie ws当中所存储
的Vie w,一旦被获取了之

后就会从mAc tive Vie ws当
中移除,下次获取同样位
置的Vie w将会返回null,
也就是说mAc tive Vie ws不
能被重复利用。
addSc rapVi e w() 用于将一
个废弃的Vie w进行缓存,
该方法接收一个Vie w参
数,当有某个Vie w确定要
废弃掉的时候(比如滚动出
了屏幕),就应该调用这个
方法来对Vie w进行缓存,
RecycleBin当中使用

mScrapViews和
mCurrentScrap这两个List
来存储废弃Vie w。
getScrapVi ew 用于从废弃
缓存中取出一个Vie w,这
些废弃缓存中的Vie w是没
有顺序可言的,因此
getScrapView()方法中的算
法也非常简单,就是直接
从mCurrentScrap当中获取
尾部的一个scrap vie w进行
返回。
setViewTypeCount() 我们


都知道Adapter当中可以重
写一个
getViewTypeCount()来表
示ListVie w中有几种类型
的数据项,而
setViewTypeCount()方法的
作用就是为每种类型的数
据项都单独启用一个
RecycleBin缓存机制。实
际上,
getViewTypeCount()方法
通常情况下使用的并不是
很多,所以我们只要知道
RecycleBin当中有这样一
个功能就行了。
了解了RecycleBin中的主要
方法以及它们的用处之后,
下面就可以开始来分析
ListVie w的工作原理了,这
里我将还是按照以前分析源
码的方式来进行,即跟着主
线执行流程来逐步阅读并点
到即止,不然的话要是把
ListVie w所有的代码都贴出
来,那么本篇文章将会很长
很长了。
第一次Layout
不管怎么说,ListVie w即使
再特殊最终还是继承自Vie w
的,因此它的执行流程还将
会按照Vie w的规则来执行,
对于这方面不太熟悉的朋友
可以参考我之前写
的 An droi d视图绘制流程完
了解Vi ew(二) 。
Vie w的执行流程无非就分为
三步,onMeasure()用于测量
Vie w的大小,onLayout()用
于确定Vie w的布局,
onDraw()用于将Vie w绘制到
界面上。而在ListVie w当
中,onMeasure()并没有什么
特殊的地方,因为它终归是
一个Vie w,占用的空间最多
并且通常也就是整个屏幕。
onDraw()在ListVie w当中也
没有什么意义,因为
ListVie w本身并不负责绘
制,而是由ListVie w当中的
子元素来进行绘制的。那么
ListVie w大部分的神奇功能
其实都是在onLayout()方法
中进行的了,因此我们本篇
文章也是主要分析的这个方
法里的内容。
如果你到ListVie w源码中去
找一找,你会发现ListVie w
中是没有onLayout()这个方
法的,这是因为这个方法是
在ListVie w的父类
AbsListVie w中实现的,代码
如下所示:
/
**
*
Subclasses should NOT over
ride this method but {@link #
layoutChildren()}
*
*
instead.
/
@
Override
protected void onLayout(boole
an changed, int l, int t, int
r, int b) {
super.onLayout(changed, l
,
t, r, b);
mInLayout = true;
if (changed) {
int childCount = getC
hildCount();
for (int i = 0; i < c
hildCount; i++) {
getChildAt(i).for
ceLayout();
}

mRecycler.markChildre
nDirty();
}
layoutChildren();
mInLayout = false;
}
可以看到,onLayout()方法
中并没有做什么复杂的逻辑
操作,主要就是一个判断,
如果ListVie w的大小或者位
置发生了变化,那么changed
变量就会变成true,此时会
要求所有的子布局都强制进
行重绘。除此之外倒没有什
么难理解的地方了,不过我

们注意到,在第16行调用了
layoutChildren()这个方法,
从方法名上我们就可以猜出
这个方法是用来进行子元素
布局的,不过进入到这个方
法当中你会发现这是个空方
法,没有一行代码。这当然
是可以理解的了,因为子元
素的布局应该是由具体的实
现类来负责完成的,而不是
由父类完成。那么进入
ListVie w的layoutChildren()方
法,代码如下所示:

@
Override
protected void layoutChildren
() {
final boolean blockLayout
Requests = mBlockLayoutReques
ts;
if (!blockLayoutRequests)
{
mBlockLayoutRequests
=
)
true;
}
else {
return;
}
try {
super.layoutChildren(
;
{
invalidate();
if (mAdapter == null)
resetList();
invokeOnItemScrol
lListener();

return;
}
int childrenTop = mLi
stPadding.top;
int childrenBottom =
getBottom() - getTop() - mLis
tPadding.bottom;
int childCount = getC
hildCount();
int index = 0;
int delta = 0;
View sel;
View oldSel = null;
View oldFirst = null;
View newSel = null;
View focusLayoutResto
reView = null;
/
/ Remember stuff we
will need down below
switch (mLayoutMode)
{

case LAYOUT_SET_SELEC
index = mNextSele
TION:
ctedPosition - mFirstPosition
;
if (index >= 0 &&
index < childCount) {
newSel = getC
hildAt(index);
}
break;
case LAYOUT_FORCE_TOP
:
case LAYOUT_FORCE_BOT
TOM:
case LAYOUT_SPECIFIC:
case LAYOUT_SYNC:
break;
case LAYOUT_MOVE_SELE
CTION:
default:

/
/ Remember the p
reviously selected view
index = mSelected
Position - mFirstPosition;
if (index >= 0 &&
index < childCount) {
oldSel = getC
hildAt(index);
}
/
/ Remember the p
revious first child
oldFirst = getChi
ldAt(0);
if (mNextSelected
Position >= 0) {
delta = mNext
SelectedPosition - mSelectedP
osition;
}
/
/ Caution: newSe
l might be null
newSel = getChild

At(index + delta);
}
boolean dataChanged =
mDataChanged;
if (dataChanged) {
handleDataChanged
();
}
/
/ Handle the empty s
et by removing all views that
are visible
/
/ and calling it a d
ay
{
if (mItemCount == 0)
resetList();
invokeOnItemScrol
lListener();
return;
else if (mItemCount
}
!
= mAdapter.getCount()) {
throw new Illegal

StateException("The content o
f the adapter has changed but
"
+
"ListVi
ew did not receive a notifica
tion. Make sure the content o
f "
+
"your a
dapter is not modified from a
background thread, but only
"
+
"from t
he UI thread. [in ListView("
getId() + ", " + getClass()
+
+
") with
Adapter(" + mAdapter.getClas
s() + ")]");
}
setSelectedPositionIn
t(mNextSelectedPosition);
/ Pull all children
/

into the RecycleBin.
/
/ These views will b
e reused if possible
final int firstPositi
on = mFirstPosition;
final RecycleBin recy
cleBin = mRecycler;
/
/ reset the focus re
storation
View focusLayoutResto
reDirectChild = null;
/
/ Don't put header o
r footer views into the Recyc
ler. Those are
/
/ already cached in
mHeaderViews;
if (dataChanged) {
for (int i = 0; i
childCount; i++) {
recycleBin.ad
<
dScrapView(getChildAt(i));
if (ViewDebug

.
.
TRACE_RECYCLER) {
ViewDebug
trace(getChildAt(i),
V
iewDebug.RecyclerTraceType.MO
VE_TO_SCRAP_HEAP, index, i);
}
}
else {
recycleBin.fillAc
}
tiveViews(childCount, firstPo
sition);
}
/
/ take focus back to
us temporarily to avoid the
eventual
/
/ call to clear focu
s when removing the focused c
hild below
/
/ from messing thing
s up when ViewRoot assigns fo

cus back
/
/ to someone else
final View focusedChi
ld = getFocusedChild();
if (focusedChild != n
ull) {
/
/ TODO: in some
cases focusedChild.getParent(
== null
)
/
/ we can remembe
r the focused view to restore
after relayout if the
/
/ data hasn't ch
anged, or if the focused posi
tion is a header or footer
if (!dataChanged
|
| isDirectChildHeaderOrFoote
r(focusedChild)) {
focusLayoutRe
storeDirectChild = focusedChi
ld;
/
/ remember t

he specific view that had foc
us
focusLayoutRe
storeView = findFocus();
if (focusLayo
utRestoreView != null) {
/
/ tell i
t we are going to mess with i
t
focusLayo
utRestoreView.onStartTemporar
yDetach();
}
}
requestFocus();
}
/
/ Clear out old view
s
detachAllViewsFromPar
switch (mLayoutMode)
ent();
{

case LAYOUT_SET_SELEC
if (newSel != nul
sel = fillFro
TION:
l) {
mSelection(newSel.getTop(), c
hildrenTop, childrenBottom);
}
else {
sel = fillFro
mMiddle(childrenTop, children
Bottom);
}
break;
case LAYOUT_SYNC:
sel = fillSpecifi
c(mSyncPosition, mSpecificTop
)
;
break;
case LAYOUT_FORCE_BOT
TOM:
sel = fillUp(mIte

mCount - 1, childrenBottom);
adjustViewsUpOrDo
wn();
break;
case LAYOUT_FORCE_TOP
:
mFirstPosition =
0
;
sel = fillFromTop
(childrenTop);
adjustViewsUpOrDo
wn();
break;
case LAYOUT_SPECIFIC:
sel = fillSpecifi
c(reconcileSelectedPosition()
,
mSpecificTop);
break;
case LAYOUT_MOVE_SELE
CTION:

sel = moveSelecti
on(oldSel, newSel, delta, chi
ldrenTop, childrenBottom);
break;
default:
if (childCount ==
0
) {
if (!mStackFr
final int
omBottom) {
position = lookForSelectable
Position(0, true);
setSelect
edPositionInt(position);
sel = fil
lFromTop(childrenTop);
}
else {
final int
position = lookForSelectable
Position(mItemCount - 1, fals
e);
setSelect

edPositionInt(position);
sel = fil
lUp(mItemCount - 1, childrenB
ottom);
}
}
else {
if (mSelected
Position >= 0 && mSelectedPos
ition < mItemCount) {
sel = fil
lSpecific(mSelectedPosition,
o
ldSel == null ? childrenTop :
oldSel.getTop());
}
else if (mF
irstPosition < mItemCount) {
sel = fil
lSpecific(mFirstPosition,
o
ldFirst == null ? childrenTop

:
oldFirst.getTop());
else {
sel = fil
}
lSpecific(0, childrenTop);
}
}
break;
}
/
/ Flush any cached v
iews that did not get reused
above
recycleBin.scrapActiv
eViews();
if (sel != null) {
/
/ the current se
lected item should get focus
if items
/
/ are focusable
if (mItemsCanFocu
s && hasFocus() && !sel.hasFo
cus()) {

final boolean
focusWasTaken = (sel == focu
sLayoutRestoreDirectChild &&
focus
LayoutRestoreView.requestFocu
s()) || sel.requestFocus();
if (!focusWas
Taken) {
/
/ select
ed item didn't take focus, fi
ne, but still want
/
/ to mak
e sure something else outside
of the selected view
/
/ has fo
cus
final Vie
w focused = getFocusedChild()
;
if (focus
ed != null) {

focus
ed.clearFocus();
elector(sel);
}
positionS
}
}
else {
sel.setSe
mSelector
lected(false);
Rect.setEmpty();
}
else {
positionSelec
tor(sel);
}
mSelectedTop = se
l.getTop();
}
else {
if (mTouchMode >
TOUCH_MODE_DOWN && mTouchMode
TOUCH_MODE_SCROLL) {
View child =
<

getChildAt(mMotionPosition -
mFirstPosition);
if (child !=
null) positionSelector(child)
;
}
else {
mSelectedTop
=
.
0;
mSelectorRect
setEmpty();
}
/
/ even if there
is not selected position, we
may need to restore
/
/ focus (i.e. so
mething focusable in touch mo
de)
if (hasFocus() &&
focusLayoutRestoreView != nu
ll) {
focusLayoutRe
storeView.requestFocus();

}
}
/
/ tell focus view we
are done mucking with it, if
it is still in
/
/ our view hierarchy
.
if (focusLayoutRestor
eView != null
&
& focusLayou
tRestoreView.getWindowToken()
= null) {
!
focusLayoutRestor
eView.onFinishTemporaryDetach
();
}
mLayoutMode = LAYOUT_
NORMAL;
mDataChanged = false;
mNeedSync = false;
setNextSelectedPositi

onInt(mSelectedPosition);
updateScrollIndicator
s();
if (mItemCount > 0) {
checkSelectionCha
nged();
}
invokeOnItemScrollLis
tener();
}
finally {
if (!blockLayoutReque
sts) {
mBlockLayoutReque
sts = false;
}
}
}
这段代码比较长,我们挑重

点的看。首先可以确定的
是,ListVie w当中目前还没
有任何子Vie w,数据都还是
由Adapter管理的,并没有展
示到界面上,因此第19行
getChildCount()方法得到的值
肯定是0。接着在第81行会
根据dataChanged这个布尔型
的值来判断执行逻辑,
dataChanged只有在数据源发
生改变的情况下才会变成
true,其它情况都是false,因
此这里会进入到第90行的执
行逻辑,调用RecycleBin的
fillAc tive Vie ws( )方法。按理
来说,调用fillAc tive Vie w s( )
方法是为了将ListVie w的子
Vie w进行缓存的,可是目前
ListVie w中还没有任何的子
Vie w,因此这一行暂时还起
不了任何作用。
接下来在第114行会根据
mLayoutMode的值来决定布
局模式,默认情况下都是普
通模式
LAYOUT_NORMAL,因此
会进入到第140行的default语
句当中。而下面又会紧接着
进行两次if判断,childCount
目前是等于0的,并且默认
的布局顺序是从上往下,因
此会进入到第145行的
fillFr omTop( )方法,我们跟进
去瞧一瞧:
/
**
*
Fills the list from top to
bottom, starting with mFirst
Position
*
*
@param nextTop The locatio
n where the top of the first
item should be

*
*
*
drawn
@return The view that is c
urrently selected
*
/
private View fillFromTop(int
nextTop) {
mFirstPosition = Math.min
(mFirstPosition, mSelectedPos
ition);
mFirstPosition = Math.min
(mFirstPosition, mItemCount -
1
);
if (mFirstPosition < 0) {
mFirstPosition = 0;
}
return fillDown(mFirstPos
ition, nextTop);
}

从这个方法的注释中可以看
出,它所负责的主要任务就
是从mFirstPosition开始,自
顶至底去填充ListVie w。而
这个方法本身并没有什么逻
辑,就是判断了一下
mFirstPosition值的合法性,
然后调用fillDown()方法,那
么我们就有理由可以猜测,
填充ListVie w的操作是在
fillDown()方法中完成的。进
入fillDown()方法,代码如下
所示:

/
**
*
Fills the list from pos do
wn to the end of the list vie
w.
*
*
@param pos The first posit
ion to put in the list
*
*
@param nextTop The locatio
n where the top of the item a
ssociated with pos
*
*
*
should be drawn
@return The view that is c
urrently selected, if it happ
ens to be in the
*
range that we draw
.
*
/
private View fillDown(int pos
,
int nextTop) {
View selectedView = null;

int end = (getBottom() -
getTop()) - mListPadding.bott
om;
while (nextTop < end && p
os < mItemCount) {
/
/ is this the select
ed item?
boolean selected = po
s == mSelectedPosition;
View child = makeAndA
ddView(pos, nextTop, true, mL
istPadding.left, selected);
nextTop = child.getBo
ttom() + mDividerHeight;
if (selected) {
selectedView = ch
ild;
}
pos++;
}
return selectedView;

}
可以看到,这里使用了一个
while循环来执行重复逻辑,
一开始nextTop的值是第一个
子元素顶部距离整个
ListVie w顶部的像素值,pos
则是刚刚传入的
mFirstPosition的值,而end是
ListVie w底部减去顶部所得
的像素值,mItemCount则是
Adapter中的元素数量。因此
一开始的情况下nextTop必定
是小于end值的,并且pos也

是小于mItemCount值的。那
么每执行一次while循环,
pos的值都会加1,并且
nextTop也会增加,当
nextTop大于等于end时,也
就是子元素已经超出当前屏
幕了,或者pos大于等于
mItemCount时,也就是所有
Adapter中的元素都被遍历结
束了,就会跳出while循环。
那么while循环当中又做了什
么事情呢?值得让人留意的
就是第18行调用的
makeAndAddView()方法,进
入到这个方法当中,代码如
下所示:
/
**
*
Obtain the view and add it
to our list of children. The
view can be made
*
fresh, converted from an u
nused view, or used as is if
it was in the
*
*
*
recycle bin.
@param position Logical po
sition in the list
@param y Top or bottom edg
e of the view to add
@param flow If flow is tru
*
*
e, align top edge to y. If fa
lse, align bottom

*
*
edge to y.
@param childrenLeft Left e
dge where children should be
positioned
*
@param selected Is this po
sition selected?
*
@return View that was adde
d
*
/
private View makeAndAddView(i
nt position, int y, boolean f
low, int childrenLeft,
boolean selected) {
View child;
if (!mDataChanged) {
/
/ Try to use an exsi
ting view for this position
child = mRecycler.get
ActiveView(position);
if (child != null) {
/
/ Found it -- we

'
re using an existing child
/ This just need
s to be positioned
setupChild(child,
/
position, y, flow, childrenL
eft, selected, true);
return child;
}
}
/
/ Make a new view for th
is position, or convert an un
used view if possible
child = obtainView(positi
on, mIsScrap);
/
/ This needs to be posit
ioned and measured
setupChild(child, positio
n, y, flow, childrenLeft, sel
ected, mIsScrap[0]);
return child;
}

这里在第19行尝试从
RecycleBin当中快速获取一
个active vie w,不过很遗憾的
是目前RecycleBin当中还没
有缓存任何的Vie w,所以这
里得到的值肯定是null。那
么取得了null之后就会继续
向下运行,到第28行会调用
obtainView()方法来再次尝试
获取一个Vie w,这次的
obtainView()方法是可以保证
一定返回一个Vie w的,于是
下面立刻将获取到的Vie w传
入到了setupChild()方法当
中。那么obtainView()内部到
底是怎么工作的呢?我们先
进入到这个方法里面看一
下:
/
**
*
Get a view and have it sho
w the data associated with th
e specified
*
position. This is called w
hen we have already discovere
d that the view is
*
not available for reuse in
the recycle bin. The only ch
oices left are
*
converting an old view or
making a new one.

*
*
*
@param position
The position to
display
*
*
@param isScrap
Array of at lea
st 1 boolean, the first entry
will become true
*
if the returned
view was taken from the scra
p heap, false if
*
*
*
otherwise.
@return A view displaying
the data associated with the
specified position
*
/
View obtainView(int position,
boolean[] isScrap) {
isScrap[0] = false;
View scrapView;
scrapView = mRecycler.get

ScrapView(position);
View child;
if (scrapView != null) {
child = mAdapter.getV
iew(position, scrapView, this
)
;
if (child != scrapVie
mRecycler.addScra
w) {
pView(scrapView);
if (mCacheColorHi
nt != 0) {
child.setDraw
ingCacheBackgroundColor(mCach
eColorHint);
}
}
else {
isScrap[0] = true
;
dispatchFinishTem
poraryDetach(child);

}
}
else {
child = mAdapter.getV
iew(position, null, this);
if (mCacheColorHint !
=
0) {
child.setDrawingC
acheBackgroundColor(mCacheCol
orHint);
}
}
return child;
}
obtainView()方法中的代码并
不多,但却包含了非常非常
重要的逻辑,不夸张的说,
整个ListVie w中最重要的内

容可能就在这个方法里了。
那么我们还是按照执行流程
来看,在第19行代码中调用
了RecycleBin的
getScrapView()方法来尝试获
取一个废弃缓存中的Vie w,
同样的道理,这里肯定是获
取不到的,getScrapView()方
法会返回一个null。这时该
怎么办呢?没有关系,代码
会执行到第33行,调用
mAdapter的getView()方法来
去获取一个Vie w。那么
mAdapter是什么呢?当然就
是当前ListVie w关联的适配
器了。而getView()方法又是
什么呢?还用说吗,这个就
是我们平时使用ListVie w时
最最经常重写的一个方法
了,这里getView()方法中传
入了三个参数,分别是
position,null和this。
那么我们平时写ListVie w的
Adapter时,getView()方法通
常会怎么写呢?这里我举个
简单的例子:
@
Override
public View getView(int posit
ion, View convertView, ViewGr
oup parent) {
Fruit fruit = getItem(pos
ition);
View view;
if (convertView == null)
{
view = LayoutInflater
.
from(getContext()).inflate(r
esourceId, null);
}
}
else {
view = convertView;
ImageView fruitImage = (I
mageView) view.findViewById(R
.
id.fruit_image);
TextView fruitName = (Tex
tView) view.findViewById(R.id
.fruit_name);

fruitImage.setImageResour
ce(fruit.getImageId());
fruitName.setText(fruit.g
etName());
return view;
}
getView()方法接受的三个参
数,第一个参数position代表
当前子元素的的位置,我们
可以通过具体的位置来获取
与其相关的数据。第二个参
数convertView,刚才传入的
是null,说明没有
convertView可以利用,因此
我们会调用LayoutInflater的

inflate()方法来去加载一个布
局。接下来会对这个vie w进
行一些属性和值的设定,最
后将vie w返回。
那么这个Vie w也会作为
obtainView()的结果进行返
回,并最终传入到
setupChild()方法当中。其实
也就是说,第一次layout过
程当中,所有的子Vie w都是
调用LayoutInflater的inflate()
方法加载出来的,这样就会
相对比较耗时,但是不用担
心,后面就不会再有这种情
况了,那么我们继续往下
看:
/
**
*
Add a view as a child and
make sure it is measured (if
necessary) and
*
*
positioned properly.
*
@param child The view to a
dd
*
@param position The positi
on of this child
@param y The y position re
*
lative to which this view wil
l be positioned
*
@param flowDown If true, a
lign top edge to y. If false,
align bottom

*
*
edge to y.
@param childrenLeft Left e
dge where children should be
positioned
*
@param selected Is this po
sition selected?
@param recycled Has this v
*
iew been pulled from the recy
cle bin? If so it
*
does not need to be
remeasured.
*
/
private void setupChild(View
child, int position, int y, b
oolean flowDown, int children
Left,
boolean selected, boo
lean recycled) {
final boolean isSelected
=
selected && shouldShowSelec
tor();
final boolean updateChild

Selected = isSelected != chil
d.isSelected();
final int mode = mTouchMo
de;
final boolean isPressed =
mode > TOUCH_MODE_DOWN && mo
de < TOUCH_MODE_SCROLL &&
mMotionPosition =
=
position;
final boolean updateChild
Pressed = isPressed != child.
isPressed();
final boolean needToMeasu
re = !recycled || updateChild
Selected || child.isLayoutReq
uested();
/
/ Respect layout params
that are already in the view.
Otherwise make some up...
/
/ noinspection unchecked
AbsListView.LayoutParams

p = (AbsListView.LayoutParams
)
child.getLayoutParams();
if (p == null) {
p = new AbsListView.L
ayoutParams(ViewGroup.LayoutP
arams.MATCH_PARENT,
ViewGroup.Lay
outParams.WRAP_CONTENT, 0);
}
p.viewType = mAdapter.get
ItemViewType(position);
if ((recycled && !p.force
Add) || (p.recycledHeaderFoot
er &&
p.viewType == Ada
pterView.ITEM_VIEW_TYPE_HEADE
R_OR_FOOTER)) {
attachViewToParent(ch
ild, flowDown ? -1 : 0, p);
}
else {
p.forceAdd = false;
if (p.viewType == Ada

pterView.ITEM_VIEW_TYPE_HEADE
R_OR_FOOTER) {
p.recycledHeaderF
ooter = true;
}
addViewInLayout(child
,
;
flowDown ? -1 : 0, p, true)
}
if (updateChildSelected)
{
child.setSelected(isS
elected);
}
if (updateChildPressed) {
child.setPressed(isPr
essed);
}
if (needToMeasure) {
int childWidthSpec =
ViewGroup.getChildMeasureSpec

(mWidthMeasureSpec,
mListPadding.
left + mListPadding.right, p.
width);
int lpHeight = p.heig
ht;
int childHeightSpec;
if (lpHeight > 0) {
childHeightSpec =
MeasureSpec.makeMeasureSpec(
lpHeight, MeasureSpec.EXACTLY
)
;
}
else {
childHeightSpec =
MeasureSpec.makeMeasureSpec(
, MeasureSpec.UNSPECIFIED);
0
}
child.measure(childWi
dthSpec, childHeightSpec);
else {
}

cleanupLayoutState(ch
ild);
}
final int w = child.getMe
asuredWidth();
final int h = child.getMe
asuredHeight();
final int childTop = flow
Down ? y : y - h;
if (needToMeasure) {
final int childRight
=
childrenLeft + w;
final int childBottom
childTop + h;
child.layout(children
=
Left, childTop, childRight, c
hildBottom);
}
else {
child.offsetLeftAndRi
ght(childrenLeft - child.getL
eft());
child.offsetTopAndBot

tom(childTop - child.getTop()
)
;
}
if (mCachingStarted && !c
hild.isDrawingCacheEnabled())
{
child.setDrawingCache
Enabled(true);
}
}
setupChild()方法当中的代码
虽然比较多,但是我们只看
核心代码的话就非常简单
了,刚才调用obtainView()方
法获取到的子元素Vie w,这
里在第40行调用了

addViewInLayout()方法将它
添加到了ListVie w当中。那
么根据fillDown()方法中的
while循环,会让子元素Vie w
将整个ListVie w控件填满然
后就跳出,也就是说即使我
们的Adapter中有一千条数
据,ListVie w也只会加载第
一屏的数据,剩下的数据反
正目前在屏幕上也看不到,
所以不会去做多余的加载工
作,这样就可以保证
ListVie w中的内容能够迅速
展示到屏幕上。
那么到此为止,第一次
Layout过程结束。
第二次Layout
虽然我在源码中并没有找出
具体的原因,但如果你自己
做一下实验的话就会发现,
即使是一个再简单的Vie w,
在展示到界面上之前都会经
历至少两次onMeasure()和两
次onLayout()的过程。其实
这只是一个很小的细节,平
时对我们影响并不大,因为
不管是onMeasure()或者
onLayout()几次,反正都是
执行的相同的逻辑,我们并
不需要进行过多关心。但是
在ListVie w中情况就不一样
了,因为这就意味着
layoutChildren()过程会执行
两次,而这个过程当中涉及
到向ListVie w中添加子元
素,如果相同的逻辑执行两
遍的话,那么ListVie w中就
会存在一份重复的数据了。
因此ListVie w在
layoutChildren()过程当中做
了第二次Layout的逻辑处
理,非常巧妙地解决了这个
问题,下面我们就来分析一
下第二次Layout的过程。
其实第二次Layout和第一次
Layout的基本流程是差不多
的,那么我们还是从
layoutChildren()方法开始看
起:
@
Override
protected void layoutChildren

() {
final boolean blockLayout
Requests = mBlockLayoutReques
ts;
if (!blockLayoutRequests)
{
mBlockLayoutRequests
=
)
true;
}
else {
return;
}
try {
super.layoutChildren(
;
{
invalidate();
if (mAdapter == null)
resetList();
invokeOnItemScrol
lListener();
}
return;

int childrenTop = mLi
stPadding.top;
int childrenBottom =
getBottom() - getTop() - mLis
tPadding.bottom;
int childCount = getC
hildCount();
int index = 0;
int delta = 0;
View sel;
View oldSel = null;
View oldFirst = null;
View newSel = null;
View focusLayoutResto
reView = null;
/
/ Remember stuff we
will need down below
switch (mLayoutMode)
{
case LAYOUT_SET_SELEC
TION:

index = mNextSele
ctedPosition - mFirstPosition
;
if (index >= 0 &&
index < childCount) {
newSel = getC
hildAt(index);
}
break;
case LAYOUT_FORCE_TOP
:
case LAYOUT_FORCE_BOT
TOM:
case LAYOUT_SPECIFIC:
case LAYOUT_SYNC:
break;
case LAYOUT_MOVE_SELE
CTION:
default:
/
/ Remember the p
reviously selected view

index = mSelected
Position - mFirstPosition;
if (index >= 0 &&
index < childCount) {
oldSel = getC
hildAt(index);
}
/
/ Remember the p
revious first child
oldFirst = getChi
ldAt(0);
if (mNextSelected
Position >= 0) {
delta = mNext
SelectedPosition - mSelectedP
osition;
}
/
/ Caution: newSe
l might be null
newSel = getChild
At(index + delta);
}

boolean dataChanged =
mDataChanged;
if (dataChanged) {
handleDataChanged
();
}
/
/ Handle the empty s
et by removing all views that
are visible
/
/ and calling it a d
ay
{
if (mItemCount == 0)
resetList();
invokeOnItemScrol
lListener();
return;
else if (mItemCount
}
!
= mAdapter.getCount()) {
throw new Illegal
StateException("The content o
f the adapter has changed but

"
+
"ListVi
ew did not receive a notifica
tion. Make sure the content o
f "
+
"your a
dapter is not modified from a
background thread, but only
"
+
"from t
he UI thread. [in ListView("
getId() + ", " + getClass()
+
+
") with
Adapter(" + mAdapter.getClas
s() + ")]");
}
setSelectedPositionIn
t(mNextSelectedPosition);
/ Pull all children
into the RecycleBin.
/ These views will b
/
/

e reused if possible
final int firstPositi
on = mFirstPosition;
final RecycleBin recy
cleBin = mRecycler;
/
/ reset the focus re
storation
View focusLayoutResto
reDirectChild = null;
/
/ Don't put header o
r footer views into the Recyc
ler. Those are
/
/ already cached in
mHeaderViews;
if (dataChanged) {
for (int i = 0; i
childCount; i++) {
recycleBin.ad
<
dScrapView(getChildAt(i));
if (ViewDebug
.
TRACE_RECYCLER) {
ViewDebug

.
trace(getChildAt(i),
V
iewDebug.RecyclerTraceType.MO
VE_TO_SCRAP_HEAP, index, i);
}
}
else {
recycleBin.fillAc
}
tiveViews(childCount, firstPo
sition);
}
/
/ take focus back to
us temporarily to avoid the
eventual
/
/ call to clear focu
s when removing the focused c
hild below
/
/ from messing thing
s up when ViewRoot assigns fo
cus back
/
/ to someone else

final View focusedChi
ld = getFocusedChild();
if (focusedChild != n
ull) {
/
/ TODO: in some
cases focusedChild.getParent(
== null
)
/
/ we can remembe
r the focused view to restore
after relayout if the
/
/ data hasn't ch
anged, or if the focused posi
tion is a header or footer
if (!dataChanged
|
| isDirectChildHeaderOrFoote
r(focusedChild)) {
focusLayoutRe
storeDirectChild = focusedChi
ld;
/
/ remember t
he specific view that had foc
us

focusLayoutRe
storeView = findFocus();
if (focusLayo
utRestoreView != null) {
/ tell i
/
t we are going to mess with i
t
focusLayo
utRestoreView.onStartTemporar
yDetach();
}
}
requestFocus();
}
/
/ Clear out old view
s
detachAllViewsFromPar
switch (mLayoutMode)
case LAYOUT_SET_SELEC
ent();
{
TION:

if (newSel != nul
sel = fillFro
l) {
mSelection(newSel.getTop(), c
hildrenTop, childrenBottom);
}
else {
sel = fillFro
mMiddle(childrenTop, children
Bottom);
}
break;
case LAYOUT_SYNC:
sel = fillSpecifi
c(mSyncPosition, mSpecificTop
)
;
break;
case LAYOUT_FORCE_BOT
TOM:
sel = fillUp(mIte
mCount - 1, childrenBottom);

adjustViewsUpOrDo
wn();
:
break;
case LAYOUT_FORCE_TOP
mFirstPosition =
0
;
sel = fillFromTop
(childrenTop);
adjustViewsUpOrDo
wn();
break;
case LAYOUT_SPECIFIC:
sel = fillSpecifi
c(reconcileSelectedPosition()
,
mSpecificTop);
break;
case LAYOUT_MOVE_SELE
CTION:
sel = moveSelecti
on(oldSel, newSel, delta, chi

ldrenTop, childrenBottom);
break;
default:
if (childCount ==
0
) {
if (!mStackFr
omBottom) {
final int
position = lookForSelectable
Position(0, true);
setSelect
edPositionInt(position);
sel = fil
lFromTop(childrenTop);
}
else {
final int
position = lookForSelectable
Position(mItemCount - 1, fals
e);
setSelect
edPositionInt(position);
sel = fil

lUp(mItemCount - 1, childrenB
ottom);
}
}
else {
if (mSelected
Position >= 0 && mSelectedPos
ition < mItemCount) {
sel = fil
lSpecific(mSelectedPosition,
o
ldSel == null ? childrenTop :
oldSel.getTop());
}
else if (mF
irstPosition < mItemCount) {
sel = fil
lSpecific(mFirstPosition,
o
ldFirst == null ? childrenTop
:
oldFirst.getTop());
else {
}

sel = fil
lSpecific(0, childrenTop);
}
}
break;
}
/
/ Flush any cached v
iews that did not get reused
above
recycleBin.scrapActiv
eViews();
if (sel != null) {
/
/ the current se
lected item should get focus
if items
/
/ are focusable
if (mItemsCanFocu
s && hasFocus() && !sel.hasFo
cus()) {
final boolean
focusWasTaken = (sel == focu

sLayoutRestoreDirectChild &&
focus
LayoutRestoreView.requestFocu
s()) || sel.requestFocus();
if (!focusWas
Taken) {
/
/ select
ed item didn't take focus, fi
ne, but still want
/
/ to mak
e sure something else outside
of the selected view
/
/ has fo
cus
final Vie
w focused = getFocusedChild()
;
if (focus
ed != null) {
focus
ed.clearFocus();

}
positionS
elector(sel);
}
}
else {
sel.setSe
lected(false);
mSelector
Rect.setEmpty();
}
else {
positionSelec
tor(sel);
}
mSelectedTop = se
l.getTop();
}
else {
if (mTouchMode >
TOUCH_MODE_DOWN && mTouchMode
TOUCH_MODE_SCROLL) {
View child =
<
getChildAt(mMotionPosition -
mFirstPosition);

if (child !=
null) positionSelector(child)
;
}
else {
mSelectedTop
=
.
0;
mSelectorRect
setEmpty();
}
/
/ even if there
is not selected position, we
may need to restore
/
/ focus (i.e. so
mething focusable in touch mo
de)
if (hasFocus() &&
focusLayoutRestoreView != nu
ll) {
focusLayoutRe
storeView.requestFocus();
}
}

/
/ tell focus view we
are done mucking with it, if
it is still in
/
/ our view hierarchy
.
if (focusLayoutRestor
eView != null
&
& focusLayou
tRestoreView.getWindowToken()
= null) {
!
focusLayoutRestor
eView.onFinishTemporaryDetach
();
}
mLayoutMode = LAYOUT_
NORMAL;
mDataChanged = false;
mNeedSync = false;
setNextSelectedPositi
onInt(mSelectedPosition);
updateScrollIndicator

s();
if (mItemCount > 0) {
checkSelectionCha
nged();
}
invokeOnItemScrollLis
tener();
}
finally {
if (!blockLayoutReque
sts) {
mBlockLayoutReque
sts = false;
}
}
}
同样还是在第19行,调用
getChildCount()方法来获取子
Vie w的数量,只不过现在得

到的值不会再是0了,而是
ListVie w中一屏可以显示的
子Vie w数量,因为我们刚刚
在第一次Layout过程当中向
ListVie w添加了这么多的子
Vie w。下面在第90行调用了
RecycleBin的fillAc tive Vie w s( )
方法,这次效果可就不一样
了,因为目前ListVie w中已
经有子Vie w了,这样所有的
子Vie w都会被缓存到
RecycleBin的mAc tive Vie ws数
组当中,后面将会用到它
们。
接下来将会是非常非常重要
的一个操作,在第113行调
用了
detachAllViewsFromParent()
方法。这个方法会将所有
ListVie w当中的子Vie w全部
清除掉,从而保证第二次
Layout过程不会产生一份重
复的数据。那有的朋友可能
会问了,这样把已经加载好
的Vie w又清除掉,待会还要
再重新加载一遍,这不是严
重影响效率吗?不用担心,
还记得我们刚刚调用了
RecycleBin的fillAc tive Vie w s( )
方法来缓存子Vie w吗,待会
儿将会直接使用这些缓存好
的Vie w来进行加载,而并不
会重新执行一遍inflate过
程,因此效率方面并不会有
什么明显的影响。
那么我们接着看,在第141
行的判断逻辑当中,由于不
再等于0了,因此会进入到
else语句当中。而else语句中
又有三个逻辑判断,第一个
逻辑判断不成立,因为默认
情况下我们没有选中任何子
元素,mSelectedPosition应该
等于-1。第二个逻辑判断通
常是成立的,因为
mFirstPosition的值一开始是
等于0的,只要adapter中的
数据大于0条件就成立。那
么进入到fillSpe c ific ( )方法当
中,代码如下所示:
/
**
*
Put a specific item at a s
pecific location on the scree

n and then build
*
*
*
up and down from there.
@param position The refere
nce view to use as the starti
ng point
*
@param top Pixel offset fr
om the top of this view to th
e top of the
*
*
*
reference view.
@return The selected view,
or null if the selected view
is outside the
*
*
visible area.
/
private View fillSpecific(int
position, int top) {
boolean tempIsSelected =
position == mSelectedPosition
;
View temp = makeAndAddVie

w(position, top, true, mListP
adding.left, tempIsSelected);
/
/ Possibly changed again
in fillUp if we add rows abo
ve this one.
mFirstPosition = position
;
View above;
View below;
final int dividerHeight =
mDividerHeight;
if (!mStackFromBottom) {
above = fillUp(positi
on - 1, temp.getTop() - divid
erHeight);
/
/ This will correct
for the top of the first view
not touching the top of the
list
adjustViewsUpOrDown()

;
below = fillDown(posi
tion + 1, temp.getBottom() +
dividerHeight);
int childCount = getC
hildCount();
if (childCount > 0) {
correctTooHigh(ch
ildCount);
}
}
else {
below = fillDown(posi
tion + 1, temp.getBottom() +
dividerHeight);
/
/ This will correct
for the bottom of the last vi
ew not touching the bottom of
the list
adjustViewsUpOrDown()
;
above = fillUp(positi

on - 1, temp.getTop() - divid
erHeight);
int childCount = getC
hildCount();
if (childCount > 0) {
correctTooLow(ch
ildCount);
}
}
if (tempIsSelected) {
return temp;
}
else if (above != null)
{
return above;
else {
}
}
return below;
}
fillSpe c ific ( )这算是一个新方

法了,不过其实它和
fillUp( )、fillDown()方法功能
也是差不多的,主要的区别
在于,fillSpe c ific ( )方法会优
先将指定位置的子Vie w先加
载到屏幕上,然后再加载该
子Vie w往上以及往下的其它
子Vie w。那么由于这里我们
传入的position就是第一个子
Vie w的位置,于是
fillSpe c ific ( )方法的作用就基
本上和fillDown()方法是差不
多的了,这里我们就不去关
注太多它的细节,而是将精
力放在makeAndAddView() 方
法上面。再次回到
makeAndAddView()方法,代
码如下所示:
/
**
*
Obtain the view and add it
to our list of children. The
view can be made
*
fresh, converted from an u
nused view, or used as is if
it was in the
*
*
*
recycle bin.
@param position Logical po
sition in the list
*
@param y Top or bottom edg

e of the view to add
@param flow If flow is tru
*
e, align top edge to y. If fa
lse, align bottom
*
*
edge to y.
@param childrenLeft Left e
dge where children should be
positioned
*
@param selected Is this po
sition selected?
*
*
@return View that was adde
d
/
private View makeAndAddView(i
nt position, int y, boolean f
low, int childrenLeft,
boolean selected) {
View child;
if (!mDataChanged) {
/
/ Try to use an exsi
ting view for this position
child = mRecycler.get

ActiveView(position);
if (child != null) {
/
/ Found it -- we
re using an existing child
/ This just need
s to be positioned
setupChild(child,
'
/
position, y, flow, childrenL
eft, selected, true);
return child;
}
}
/
/ Make a new view for th
is position, or convert an un
used view if possible
child = obtainView(positi
on, mIsScrap);
/
/ This needs to be posit
ioned and measured
setupChild(child, positio
n, y, flow, childrenLeft, sel

ected, mIsScrap[0]);
return child;
}
仍然还是在第19行尝试从
RecycleBin当中获取Ac tive
Vie w,然而这次就一定可以
获取到了,因为前面我们调
用了RecycleBin 的
fillAc tive Vie ws( )方法来缓存
子Vie w。那么既然如此,就
不会再进入到第28行的
obtainView()方法,而是会直
接进入setupChild()方法当
中,这样也省去了很多时

间,因为如果在obtainView()
方法中又要去infalte布局的
话,那么ListVie w的初始加
载效率就大大降低了。
注意在第23行,setupChild()
方法的最后一个参数传入的
是true,这个参数表明当前
的Vie w是之前被回收过的,
那么我们再次回到
setupChild()方法当中:
/
**
*
Add a view as a child and
make sure it is measured (if
necessary) and

*
*
positioned properly.
*
@param child The view to a
dd
*
@param position The positi
on of this child
*
@param y The y position re
lative to which this view wil
l be positioned
*
@param flowDown If true, a
lign top edge to y. If false,
align bottom
*
*
edge to y.
@param childrenLeft Left e
dge where children should be
positioned
*
@param selected Is this po
sition selected?
@param recycled Has this v
*
iew been pulled from the recy
cle bin? If so it
*
does not need to be

remeasured.
*
/
private void setupChild(View
child, int position, int y, b
oolean flowDown, int children
Left,
boolean selected, boo
lean recycled) {
final boolean isSelected
=
selected && shouldShowSelec
tor();
final boolean updateChild
Selected = isSelected != chil
d.isSelected();
final int mode = mTouchMo
de;
final boolean isPressed =
mode > TOUCH_MODE_DOWN && mo
de < TOUCH_MODE_SCROLL &&
mMotionPosition =
=
position;
final boolean updateChild

Pressed = isPressed != child.
isPressed();
final boolean needToMeasu
re = !recycled || updateChild
Selected || child.isLayoutReq
uested();
/
/ Respect layout params
that are already in the view.
Otherwise make some up...
/
/ noinspection unchecked
AbsListView.LayoutParams
p = (AbsListView.LayoutParams
)
child.getLayoutParams();
if (p == null) {
p = new AbsListView.L
ayoutParams(ViewGroup.LayoutP
arams.MATCH_PARENT,
ViewGroup.Lay
outParams.WRAP_CONTENT, 0);
}
p.viewType = mAdapter.get

ItemViewType(position);
if ((recycled && !p.force
Add) || (p.recycledHeaderFoot
er &&
p.viewType == Ada
pterView.ITEM_VIEW_TYPE_HEADE
R_OR_FOOTER)) {
attachViewToParent(ch
ild, flowDown ? -1 : 0, p);
}
else {
p.forceAdd = false;
if (p.viewType == Ada
pterView.ITEM_VIEW_TYPE_HEADE
R_OR_FOOTER) {
p.recycledHeaderF
ooter = true;
}
addViewInLayout(child
,
;
flowDown ? -1 : 0, p, true)
}
if (updateChildSelected)

{
child.setSelected(isS
elected);
}
if (updateChildPressed) {
child.setPressed(isPr
essed);
}
if (needToMeasure) {
int childWidthSpec =
ViewGroup.getChildMeasureSpec
(mWidthMeasureSpec,
mListPadding.
left + mListPadding.right, p.
width);
int lpHeight = p.heig
ht;
int childHeightSpec;
if (lpHeight > 0) {
childHeightSpec =

MeasureSpec.makeMeasureSpec(
lpHeight, MeasureSpec.EXACTLY
)
;
}
else {
childHeightSpec =
MeasureSpec.makeMeasureSpec(
, MeasureSpec.UNSPECIFIED);
0
}
child.measure(childWi
dthSpec, childHeightSpec);
}
else {
cleanupLayoutState(ch
ild);
}
final int w = child.getMe
asuredWidth();
final int h = child.getMe
asuredHeight();
final int childTop = flow
Down ? y : y - h;
if (needToMeasure) {

final int childRight
childrenLeft + w;
final int childBottom
childTop + h;
child.layout(children
=
=
Left, childTop, childRight, c
hildBottom);
}
else {
child.offsetLeftAndRi
ght(childrenLeft - child.getL
eft());
child.offsetTopAndBot
tom(childTop - child.getTop()
)
;
}
if (mCachingStarted && !c
hild.isDrawingCacheEnabled())
{
child.setDrawingCache
Enabled(true);
}
}

可以看到,setupChild()方法
的最后一个参数是recycled,
然后在第32行会对这个变量
进行判断,由于recycled现在
是true,所以会执行
attachViewToParent()方法,
而第一次Layout过程则是执
行的else语句中的
addViewInLayout()方法。这
两个方法最大的区别在于,
如果我们需要向Vie wGroup
中添加一个新的子Vie w,应
该调用addViewInLayout() 方

法,而如果是想要将一个之
前detach的Vie w重新attach到
Vie wGroup上,就应该调用
attachViewToParent()方法。
那么由于前面在
layoutChildren()方法当中调
用了
detachAllViewsFromParent()
方法,这样ListVie w中所有
的子Vie w都是处于detach状
态的,所以这里
attachViewToParent()方法是
正确的选择。
经历了这样一个detach又
attach的过程,ListVie w中所
有的子Vie w又都可以正常显
示出来了,那么第二次
Layout过程结束。
滑动加载更多数据
经历了两次Layout过程,虽
说我们已经可以在ListVie w
中看到内容了,然而关于
ListVie w最神奇的部分我们
却还没有接触到,因为目前
ListVie w中只是加载并显示
了第一屏的数据而已。比如
说我们的Adapter当中有1000
条数据,但是第一屏只显示
了10条,ListVie w中也只有
10个子Vie w而已,那么剩下
的990是怎样工作并显示到
界面上的呢?这就要看一下
ListVie w滑动部分的源码
了,因为我们是通过手指滑
动来显示更多数据的。
由于滑动部分的机制是属于
通用型的,即ListVie w和
Gr idVie w都会使用同样的机
制,因此这部分代码就肯定
是写在AbsListVie w当中的
了。那么监听触控事件是在
onTouchEvent()方法当中进
行的,我们就来看一下
AbsListVie w中的这个方法:
@
Override
public boolean onTouchEvent(M
otionEvent ev) {
if (!isEnabled()) {
/
/ A disabled view th
at is clickable still consume
s the touch
/
/ events, it just do
esn't respond to them.
return isClickable()
| isLongClickable();
|

}
final int action = ev.get
Action();
View v;
int deltaY;
if (mVelocityTracker == n
ull) {
mVelocityTracker = Ve
locityTracker.obtain();
}
mVelocityTracker.addMovem
ent(ev);
switch (action & MotionEv
ent.ACTION_MASK) {
case MotionEvent.ACTION_D
OWN: {
mActivePointerId = ev
.
getPointerId(0);
final int x = (int) e
v.getX();
final int y = (int) e
v.getY();

int motionPosition =
pointToPosition(x, y);
if (!mDataChanged) {
if ((mTouchMode !
=
TOUCH_MODE_FLING) && (motio
nPosition >= 0)
&
& (getAd
apter().isEnabled(motionPosit
ion))) {
/
/ User click
ed on an actual view (and was
not stopping a
/
/ fling). It
might be a
/
/ click or a
scroll. Assume it is a click
until proven
/
/ otherwise
mTouchMode =
TOUCH_MODE_DOWN;

/
/ FIXME Debo
unce
if (mPendingC
heckForTap == null) {
mPendingC
heckForTap = new CheckForTap(
)
;
}
postDelayed(m
PendingCheckForTap, ViewConfi
guration.getTapTimeout());
}
else {
if (ev.getEdg
eFlags() != 0 && motionPositi
on < 0) {
/
/ If we
couldn't find a view to click
on, but the down
/
/ event
was touching
/
/ the ed
ge, we will bail out and try

again. This allows
ge correcting
/
/
/ the ed
/ code i
n ViewRoot to try to find a n
earby view to
/
/ select
return fa
lse;
}
if (mTouchMod
e == TOUCH_MODE_FLING) {
/
/ Stoppe
d a fling. It is a scroll.
createScr
ollingCache();
mTouchMod
e = TOUCH_MODE_SCROLL;
mMotionCo
rrection = 0;

motionPos
ition = findMotionRow(y);
reportScr
ollStateChange(OnScrollListen
er.SCROLL_STATE_TOUCH_SCROLL)
;
}
}
}
if (motionPosition >=
0
) {
/
/ Remember where
the motion event started
v = getChildAt(mo
tionPosition - mFirstPosition
)
;
mMotionViewOrigin
alTop = v.getTop();
}
mMotionX = x;
mMotionY = y;
mMotionPosition = mot

ionPosition;
mLastY = Integer.MIN_
VALUE;
break;
}
case MotionEvent.ACTION_M
OVE: {
final int pointerInde
x = ev.findPointerIndex(mActi
vePointerId);
final int y = (int) e
v.getY(pointerIndex);
deltaY = y - mMotionY
;
switch (mTouchMode) {
case TOUCH_MODE_DOWN:
case TOUCH_MODE_TAP:
case TOUCH_MODE_DONE_
WAITING:

/
/ Check if we ha
ve moved far enough that it l
ooks more like a
/
/ scroll than a
tap
startScrollIfNeed
ed(deltaY);
break;
case TOUCH_MODE_SCROL
if (PROFILE_SCROL
if (!mScrollP
L:
LING) {
rofilingStarted) {
Debug.sta
rtMethodTracing("AbsListViewS
croll");
mScrollPr
ofilingStarted = true;
}
}
if (y != mLastY)

{
deltaY -= mMo
int increment
tionCorrection;
alDeltaY = mLastY != Integer.
MIN_VALUE ? y - mLastY : delt
aY;
/
/ No need to
do all this work if we're no
t going to move
/
/ anyway
boolean atEdg
if (increment
atEdge =
e = false;
alDeltaY != 0) {
trackMotionScroll(deltaY, inc
rementalDeltaY);
}
/
/ Check to s
ee if we have bumped into the
scroll limit

if (atEdge &&
getChildCount() > 0) {
/ Treat
/
this like we're starting a ne
w scroll from the
/
/ curren
t
/
/ positi
on. This will let the user st
art scrolling back
/
/
/ into
/ conten
t immediately rather than nee
ding to scroll
/
/ back t
o the
/
/ point
where they hit the limit firs
t.
int motio
nPosition = findMotionRow(y);

if (motio
final
nPosition >= 0) {
View motionView = getChildAt
(motionPosition - mFirstPosit
ion);
mMoti
onViewOriginalTop = motionVie
w.getTop();
}
mMotionY
=
y;
mMotionPo
sition = motionPosition;
invalidat
e();
}
mLastY = y;
}
break;
}
break;

}
case MotionEvent.ACTION_U
P: {
switch (mTouchMode) {
case TOUCH_MODE_DOWN:
case TOUCH_MODE_TAP:
case TOUCH_MODE_DONE_
WAITING:
final int motionP
osition = mMotionPosition;
final View child
=
getChildAt(motionPosition -
mFirstPosition);
if (child != null
&
& !child.hasFocusable()) {
if (mTouchMod
e != TOUCH_MODE_DOWN) {
child.set

Pressed(false);
lick == null) {
}
if (mPerformC
mPerformC
lick = new PerformClick();
}
final AbsList
View.PerformClick performClic
k = mPerformClick;
performClick.
mChild = child;
performClick.
mClickMotionPosition = motion
Position;
performClick.
rememberWindowAttachCount();
mResurrectToP
osition = motionPosition;
if (mTouchMod
e == TOUCH_MODE_DOWN || mTouc

hMode == TOUCH_MODE_TAP) {
final Han
dler handler = getHandler();
if (handl
er != null) {
handl
er.removeCallbacks(mTouchMode
=
= TOUCH_MODE_DOWN ? mPendin
gCheckForTap
:
mPendingCheckForLongPres
s);
}
mLayoutMo
de = LAYOUT_NORMAL;
if (!mDat
aChanged && mAdapter.isEnable
d(motionPosition)) {
mTouc
hMode = TOUCH_MODE_TAP;
setSe

lectedPositionInt(mMotionPosi
tion);
layou
tChildren();
child
.
setPressed(true);
posit
setPr
if (m
D
ionSelector(child);
essed(true);
Selector != null) {
rawable d = mSelector.getCurr
ent();
i
f (d != null && d instanceof
TransitionDrawable) {
((TransitionDrawable) d).r
esetTransition();
}

}
postD
elayed(new Runnable() {
ublic void run() {
p
child.setPressed(false);
setPressed(false);
if (!mDataChanged) {
post(performClick);
}
mTouchMode = TOUCH_MODE_RE
}
ST;
}
, Vi

ewConfiguration.getPressedSta
teDuration());
}
else {
mTouc
hMode = TOUCH_MODE_REST;
}
return tr
ue;
}
else if (!m
DataChanged && mAdapter.isEna
bled(motionPosition)) {
post(perf
ormClick);
}
}
mTouchMode = TOUC
H_MODE_REST;
break;
case TOUCH_MODE_SCROL
L:
final int childCo

unt = getChildCount();
if (childCount >
0
) {
if (mFirstPos
ition == 0
&
& ge
tChildAt(0).getTop() >= mList
Padding.top
&
& mF
irstPosition + childCount < m
ItemCount
&
& ge
tChildAt(childCount - 1).getB
ottom() <= getHeight()
-
mListPadding.bottom) {
mTouchMod
e = TOUCH_MODE_REST;
reportScr
ollStateChange(OnScrollListen
er.SCROLL_STATE_IDLE);
}
else {

final Vel
ocityTracker velocityTracker
=
mVelocityTracker;
velocityT
racker.computeCurrentVelocity
(1000, mMaximumVelocity);
final int
initialVelocity = (int) velo
cityTracker
.
getYVelocity(mActivePointerId
)
;
if (Math.
abs(initialVelocity) > mMinim
umVelocity) {
if (m
FlingRunnable == null) {
m
FlingRunnable = new FlingRunn
able();
}
repor

tScrollStateChange(OnScrollLi
stener.SCROLL_STATE_FLING);
mFlin
gRunnable.start(-initialVeloc
ity);
}
else {
mTouc
hMode = TOUCH_MODE_REST;
repor
tScrollStateChange(OnScrollLi
stener.SCROLL_STATE_IDLE);
}
}
else {
}
mTouchMode =
TOUCH_MODE_REST;
reportScrollS
tateChange(OnScrollListener.S
CROLL_STATE_IDLE);
}
break;

}
setPressed(false);
/
/ Need to redraw sin
ce we probably aren't drawing
the selector
/
/ anymore
invalidate();
final Handler handler
=
getHandler();
if (handler != null)
{
handler.removeCal
lbacks(mPendingCheckForLongPr
ess);
}
if (mVelocityTracker
!
= null) {
recycle();
null;
mVelocityTracker.
mVelocityTracker
=
}

mActivePointerId = IN
VALID_POINTER;
if (PROFILE_SCROLLING
)
{
if (mScrollProfil
ingStarted) {
hodTracing();
Debug.stopMet
mScrollProfil
ingStarted = false;
}
}
break;
}
case MotionEvent.ACTION_C
ANCEL: {
mTouchMode = TOUCH_MO
DE_REST;
setPressed(false);
View motionView = thi
s.getChildAt(mMotionPosition
-
mFirstPosition);

if (motionView != nul
motionView.setPre
l) {
ssed(false);
}
clearScrollingCache()
;
final Handler handler
getHandler();
=
if (handler != null)
{
handler.removeCal
lbacks(mPendingCheckForLongPr
ess);
}
if (mVelocityTracker
!
= null) {
recycle();
null;
mVelocityTracker.
mVelocityTracker
=
}

mActivePointerId = IN
VALID_POINTER;
break;
}
case MotionEvent.ACTION_P
OINTER_UP: {
onSecondaryPointerUp(
final int x = mMotion
final int y = mMotion
final int motionPosit
ev);
X;
Y;
ion = pointToPosition(x, y);
if (motionPosition >=
0
) {
/
/ Remember where
the motion event started
v = getChildAt(mo
tionPosition - mFirstPosition
)
;

mMotionViewOrigin
alTop = v.getTop();
mMotionPosition =
motionPosition;
}
mLastY = y;
break;
}
}
return true;
}
这个方法中的代码就非常多
了,因为它所处理的逻辑也
非常多,要监听各种各样的
触屏事件。但是我们目前所
关心的就只有手指在屏幕上
滑动这一个事件而已,对应

的是ACTION_MOVE这个动
作,那么我们就只看这部分
代码就可以了。
可以看到,ACTION_MOVE
这个case里面又嵌套了一个
switch语句,是根据当前的
TouchMode来选择的。那这
里我可以直接告诉大家,当
手指在屏幕上滑动时,
TouchMode是等于
TOUCH_MODE_SCROLL这
个值的,至于为什么那又要
牵扯到另外的好几个方法,
这里限于篇幅原因就不再展
开讲解了,喜欢寻根究底的
朋友们可以自己去源码里找
一找原因。
这样的话,代码就应该会走
到第78行的这个case里面去
了,在这个case当中并没有
什么太多需要注意的东西,
唯一一点非常重要的就是第
92行调用的
trackMotionScroll()方法,相
当于我们手指只要在屏幕上
稍微有一点点移动,这个方
法就会被调用,而如果是正
常在屏幕上滑动的话,那么
这个方法就会被调用很多
次。那么我们进入到这个方
法中瞧一瞧,代码如下所
示:
boolean trackMotionScroll(int
deltaY, int incrementalDelta
Y) {
final int childCount = ge
tChildCount();
if (childCount == 0) {
return true;
}
final int firstTop = getC
hildAt(0).getTop();
final int lastBottom = ge

tChildAt(childCount - 1).getB
ottom();
final Rect listPadding =
mListPadding;
final int spaceAbove = li
stPadding.top - firstTop;
final int end = getHeight
() - listPadding.bottom;
final int spaceBelow = la
stBottom - end;
final int height = getHei
ght() - getPaddingBottom() -
getPaddingTop();
if (deltaY < 0) {
deltaY = Math.max(-(h
eight - 1), deltaY);
}
else {
deltaY = Math.min(hei
ght - 1, deltaY);
}
if (incrementalDeltaY < 0
)
{

incrementalDeltaY = M
ath.max(-(height - 1), increm
entalDeltaY);
}
else {
incrementalDeltaY = M
ath.min(height - 1, increment
alDeltaY);
}
final int firstPosition =
mFirstPosition;
if (firstPosition == 0 &&
firstTop >= listPadding.top
&
& deltaY >= 0) {
/
/ Don't need to move
views down if the top of the
first position
/
/ is already visible
return true;
}
if (firstPosition + child
Count == mItemCount && lastBo

ttom <= end && deltaY <= 0) {
/ Don't need to move
/
views up if the bottom of th
e last position
/
/ is already visible
return true;
}
final boolean down = incr
ementalDeltaY < 0;
final boolean inTouchMode
=
isInTouchMode();
if (inTouchMode) {
hideSelector();
}
final int headerViewsCoun
t = getHeaderViewsCount();
final int footerViewsStar
t = mItemCount - getFooterVie
wsCount();
int start = 0;

int count = 0;
if (down) {
final int top = listP
adding.top - incrementalDelta
Y;
for (int i = 0; i < c
hildCount; i++) {
final View child
=
getChildAt(i);
if (child.getBott
om() >= top) {
break;
else {
}
count++;
int position
=
>
firstPosition + i;
if (position
= headerViewsCount && positi
on < footerViewsStart) {
mRecycler
addScrapView(child);
.
}

}
}
}
else {
final int bottom = ge
tHeight() - listPadding.botto
m - incrementalDeltaY;
for (int i = childCou
nt - 1; i >= 0; i--) {
final View child
=
getChildAt(i);
if (child.getTop(
)
<= bottom) {
break;
else {
}
start = i;
count++;
int position
=
>
firstPosition + i;
if (position
= headerViewsCount && positi
on < footerViewsStart) {
mRecycler

.
addScrapView(child);
}
}
}
}
mMotionViewNewTop = mMoti
onViewOriginalTop + deltaY;
mBlockLayoutRequests = tr
ue;
if (count > 0) {
detachViewsFromParent
(start, count);
}
offsetChildrenTopAndBotto
m(incrementalDeltaY);
if (down) {
mFirstPosition += cou
nt;
}
invalidate();
final int absIncrementalD
eltaY = Math.abs(incrementalD

eltaY);
if (spaceAbove < absIncre
mentalDeltaY || spaceBelow <
absIncrementalDeltaY) {
fillGap(down);
}
if (!inTouchMode && mSele
ctedPosition != INVALID_POSIT
ION) {
final int childIndex
=
mSelectedPosition - mFirstP
osition;
if (childIndex >= 0 &
childIndex < getChildCount(
) {
&
)
positionSelector(
getChildAt(childIndex));
}
}
mBlockLayoutRequests = fa
lse;
invokeOnItemScrollListene

r();
}
awakenScrollBars();
return false;
这个方法接收两个参数,
deltaY表示从手指按下时的
位置到当前手指位置的距
离,incrementalDeltaY则表
示据上次触发event事件手指
在Y方向上位置的改变量,
那么其实我们就可以通过
incrementalDeltaY的正负值
情况来判断用户是向上还是
向下滑动的了。如第34行代

码所示,如果
incrementalDeltaY小于0,说
明是向下滑动,否则就是向
上滑动。
下面将会进行一个边界值检
测的过程,可以看到,从第
4
3行开始,当ListVie w向下
滑动的时候,就会进入一个
for循环当中,从上往下依次
获取子Vie w,第47行当中,
如果该子Vie w的bottom值已
经小于top值了,就说明这个
子Vie w已经移出屏幕了,所
以会调用RecycleBin的
addScrapView()方法将这个
Vie w加入到废弃缓存当中,
并将count计数器加1,计数
器用于记录有多少个子Vie w
被移出了屏幕。那么如果是
ListVie w向上滑动的话,其
实过程是基本相同的,只不
过变成了从下往上依次获取
子Vie w,然后判断该子Vie w
的top值是不是大于bottom值
了,如果大于的话说明子
Vie w已经移出了屏幕,同样
把它加入到废弃缓存中,并
将计数器加1。
接下来在第76行,会根据当
前计数器的值来进行一个
detach操作,它的作用就是
把所有移出屏幕的子Vie w全
部detach掉,在ListVie w的概
念当中,所有看不到的Vie w
就没有必要为它进行保存,
因为屏幕外还有成百上千条
数据等着显示呢,一个好的
回收策略才能保证ListVie w
的高性能和高效率。紧接着
在第78行调用了
offsetChildrenTopAndBottom(
)
方法,并将
incrementalDeltaY作为参数
传入,这个方法的作用是让
ListVie w中所有的子Vie w都
按照传入的参数值进行相应
的偏移,这样就实现了随着
手指的拖动,ListVie w的内
容也会随着滚动的效果。
然后在第84行会进行判断,
如果ListVie w中最后一个
Vie w的底部已经移入了屏
幕,或者ListVie w中第一个
Vie w的顶部移入了屏幕,就
会调用fillGa p( )方法,那么因
此我们就可以猜出fillGa p( )方
法是用来加载屏幕外数据
的,进入到这个方法中瞧一
瞧,如下所示:
/
**
*
Fills the gap left open by
a touch-scroll. During a tou
ch scroll,
*
children that remain on sc
reen are shifted and the othe
r ones are
*
discarded. The role of thi
s method is to fill the gap t

hus created by
performing a partial layou
*
t in the empty space.
*
*
*
@param down
true if the scr
oll is going down, false if i
t is going up
*
/
abstract void fillGap(boolean
down);
down参数用于表示ListVie w
是向下滑动还是向上滑动
的,可以看到,如果是向下
滑动的话就会调用fillDown()
方法,而如果是向上滑动的
话就会调用fillUp( )方法。那

么这两个方法我们都已经非
常熟悉了,内部都是通过一
个循环来去对ListVie w进行
填充,所以这两个方法我们
就不看了,但是填充
ListVie w会通过调用
makeAndAddView()方法来完
成,又是makeAndAddView()
方法,但这次的逻辑再次不
同了,所以我们还是回到这
个方法瞧一瞧:
void fillGap(boolean down) {
final int count = getChil

dCount();
if (down) {
final int startOffset
count > 0 ? getChildAt(cou
=
nt - 1).getBottom() + mDivide
rHeight :
getListPaddin
gTop();
fillDown(mFirstPositi
on + count, startOffset);
correctTooHigh(getChi
ldCount());
}
else {
final int startOffset
count > 0 ? getChildAt(0).
=
getTop() - mDividerHeight :
getHeight() -
getListPaddingBottom();
fillUp(mFirstPosition
-
1, startOffset);
correctTooLow(getChil
dCount());

}
}
不管怎么说,这里首先仍然
是会尝试调用RecycleBin的
getActiveView()方法来获取
子布局,只不过肯定是获取
不到的了,因为在第二次
Layout过程中我们已经从
mAc tive Vie ws中获取过了数
据,而根据RecycleBin的机
制,mAc tive Vie ws是不能够
重复利用的,因此这里返回
的值肯定是null。

既然getActiveView()方法返
回的值是null,那么就还是
会走到第28行的obtainView()
方法当中,代码如下所示:
/
**
*
Obtain the view and add it
to our list of children. The
view can be made
*
fresh, converted from an u
nused view, or used as is if
it was in the
*
*
*
recycle bin.
@param position Logical po
sition in the list
@param y Top or bottom edg
e of the view to add
@param flow If flow is tru
*
*

e, align top edge to y. If fa
lse, align bottom
*
*
edge to y.
@param childrenLeft Left e
dge where children should be
positioned
*
@param selected Is this po
sition selected?
*
*
@return View that was adde
d
/
private View makeAndAddView(i
nt position, int y, boolean f
low, int childrenLeft,
boolean selected) {
View child;
if (!mDataChanged) {
/
/ Try to use an exsi
ting view for this position
child = mRecycler.get
ActiveView(position);
if (child != null) {

/
/ Found it -- we
re using an existing child
/ This just need
s to be positioned
setupChild(child,
'
/
position, y, flow, childrenL
eft, selected, true);
return child;
}
}
/
/ Make a new view for th
is position, or convert an un
used view if possible
child = obtainView(positi
on, mIsScrap);
/
/ This needs to be posit
ioned and measured
setupChild(child, positio
n, y, flow, childrenLeft, sel
ected, mIsScrap[0]);
return child;

}
这里在第19行会调用
RecyleBin的getScrapView()方
法来尝试从废弃缓存中获取
一个Vie w,那么废弃缓存有
没有Vie w呢?当然有,因为
刚才在trackMotionScroll() 方
法中我们就已经看到了,一
旦有任何子Vie w被移出了屏
幕,就会将它加入到废弃缓
存中,而从obtainView()方法
中的逻辑来看,一旦有新的
数据需要显示到屏幕上,就

会尝试从废弃缓存中获取
Vie w。所以它们之间就形成
了一个生产者和消费者的模
式,那么ListVie w神奇的地
方也就在这里体现出来了,
不管你有任意多条数据需要
显示,ListVie w中的子Vie w
其实来来回回就那么几个,
移出屏幕的子Vie w会很快被
移入屏幕的数据重新利用起
来,因而不管我们加载多少
数据都不会出现OOM的情
况,甚至内存都不会有所增
加。
那么另外还有一点是需要大
家留意的,这里获取到了一
个scrapView,然后我们在第
2
2行将它作为第二个参数传
入到了Adapter的getView()方
法当中。那么第二个参数是
什么意思呢?我们再次看一
下一个简单的getView()方法
示例:
/
**
*
Get a view and have it sho
w the data associated with th
e specified

*
position. This is called w
hen we have already discovere
d that the view is
*
not available for reuse in
the recycle bin. The only ch
oices left are
*
converting an old view or
making a new one.
*
*
*
@param position
The position to
display
*
*
@param isScrap
Array of at lea
st 1 boolean, the first entry
will become true
*
if the returned
view was taken from the scra
p heap, false if
*
*
*
otherwise.
@return A view displaying

the data associated with the
specified position
*
/
View obtainView(int position,
boolean[] isScrap) {
isScrap[0] = false;
View scrapView;
scrapView = mRecycler.get
ScrapView(position);
View child;
if (scrapView != null) {
child = mAdapter.getV
iew(position, scrapView, this
)
;
if (child != scrapVie
w) {
mRecycler.addScra
pView(scrapView);
if (mCacheColorHi
nt != 0) {
child.setDraw

ingCacheBackgroundColor(mCach
eColorHint);
}
}
else {
isScrap[0] = true
;
dispatchFinishTem
poraryDetach(child);
}
}
else {
child = mAdapter.getV
iew(position, null, this);
if (mCacheColorHint !
=
0) {
child.setDrawingC
acheBackgroundColor(mCacheCol
orHint);
}
}
return child;
}

第二个参数就是我们最熟悉
的convertView呀,难怪平时
我们在写getView()方法是要
判断一下convertView是不是
等于null,如果等于null才调
用inflate()方法来加载布局,
不等于null就可以直接利用
convertView,因为
convertView就是我们之间利
用过的Vie w,只不过被移出
屏幕后进入到了废弃缓存
中,现在又重新拿出来使用
而已。然后我们只需要把
convertView中的数据更新成
当前位置上应该显示的数
据,那么看起来就好像是全
新加载出来的一个布局一
样,这背后的道理你是不是
已经完全搞明白了?
之后的代码又都是我们熟悉
的流程了,从缓存中拿到子
Vie w之后再调用setupChild()
方法将它重新attach到
ListVie w当中,因为缓存中
的Vie w也是之前从ListVie w
中detach掉的,这部分代码
就不再重复进行分析了。
为了方便大家理解,这里我
再附上一张图解说明:
那么到目前为止,我们就把
ListVie w的整个工作流程代
码基本分析结束了,文章比
较长,希望大家可以理解清
楚,下篇文章中会讲解我们
平时使用ListVie w时遇到的
问题,敬请期待。
第一时间获得博客更新提
醒,以及更多技术信息分
享,欢迎关注我的微信公
众号,扫一扫下方二维码
或搜索微信号guolin_blog,
即可关注。
[
]
()

http://blog.csdn.net/zhaokaiqia
ng1992/article/details/4942828
7
It’s right time to learn
Andr oid’s Framework !


SystemServer是什么有什
是什么
ActivityManagerService是
什么作用
Launcher是什么什么时候
启动的
Instrumentation是什么和
Ac tivityThre a d是什么关系
如何理解AMS和
Binder通信


AMS接收到客户端的请求
Ac tivity
不要使用
RESULT_OK
一个App的程序入口到底
是什么
整个App的主线程的消息
循环是在哪里创建的
Application是在什么时候


创建的onCreate什么时候
调用的
ActivityThreadInstrumentati
onAMS
前言
一个App是怎么启动起来


的?
App的程序入口到底是哪
里?
Launcher到底是什么神奇
的东西?
听说还有个AMS的东西,
它是做什么的?
Binder是什么?他是如何
进行IPC通信的?
Ac tivity生命周期到底是什
么时候调用的?被谁调用
的?
等等…


你是不是还有很多类似的疑
问一直没有解决?没关系,
这篇文章将结合源码以及大
量的优秀文章,站在巨人的
肩膀上,更加通俗的来试着
解释一些问题。但是毕竟源
码繁多、经验有限,文中不
免会出现一些纰漏甚至是错
误,还恳请大家指出,互相
学习。
学习目标
1
. 了解从手机开机第一个
zygote进程创建,到点击
桌面上的图标,进入一个
App的完整流程,并且从
源码的角度了解到一个
Ac tivity的生命周期是怎么
回事
2
. 了解到
ActivityManagerServices(即
AMS)、Ac tivitySta c k、
Ac tivityThre a d、
Instrumentation等Android
framework中非常重要的
基础类的作用,及相互间
的关系
3
4
. 了解AMS与Ac tivityThre a d
之间利用Binder进行IPC通
信的过程,了解AMS和
Ac tivityThre a d在控制
Ac tivity生命周期起到的作
用和相互之间的配合
. 了解与Ac tivity相关的
framework层的其他琐碎
问题
写作方式
这篇文章我决定采用一问一
答的方式进行。
其实在这之前,我试过把每
个流程的代码调用过程,用
粘贴源代码的方式写在文章
里,但是写完一部分之后,
发现由于代码量太大,整篇
文章和老太太的裹脚布一样
—
—又臭又长,虽然每个重
要的操作可以显示出详细调
用过程,但是太关注于细节
反而导致从整体上不能很好
的把握。所以在原来的基础
之上进行了修改,对关键的
几个步骤进行重点介绍,力
求语言简洁,重点突出,从
而让大家在更高的层次上对
framework层有个认识,然后
结合后面我给出的参考资
料,大家就可以更加快速,
更加高效的了解这一块的整
体架构。
主要对象功能介绍
我们下面的文章将围绕着这
几个类进行介绍。可能你第
一次看的时候,印象不深,
不过没关系,当你跟随者我
读完这篇文章的时候,我会
在最后再次列出这些对象的
功能,相信那时候你会对这
些类更加的熟悉和深刻。
ActivityManagerServices,
简称AMS,服务端对象,
负责系统中所有Ac tivity的
生命周期
Ac tivityThre a d,App的真
正入口。当开启App之
后,会调用main()开始运
行,开启消息循环队列,


这就是传说中的UI线程或
者叫主线程。与
ActivityManagerServices配
合,一起完成Ac tivity的管
理工作
ApplicationThread,用来
实现
ActivityManagerService与
Ac tivityThre a d之间的交
互。在
ActivityManagerService需
要管理相关Application中
的Ac tivity的生命周期时,

通过ApplicationThread 的
代理对象与Ac tivityThre a d
通讯。
ApplicationThreadProxy,
是ApplicationThread在服
务器端的代理,负责和客
户端的ApplicationThread
通讯。AMS就是通过该代
理与Ac tivityThre a d进行通
信的。
Instrumentation,每一个应
用程序只有一个
Instrumentation对象,每个


Ac tivity内都有一个对该对
象的引用。Instrumentation
可以理解为应用进程的管
家,Ac tivityThre a d要创建
或暂停某个Ac tivity时,都
需要通过Instrumentation来
进行具体的操作。
Ac tivitySta c k,Ac tivity在
AMS的栈管理,用来记录
已经启动的Ac tivity的先后
关系,状态信息等。通过
Ac tivitySta c k决定是否需要
启动新的进程。

Ac tivityRe c ord,
Ac tivitySta c k的管理对象,
每个Ac tivity在AMS对应一
个Ac tivityRe c ord,来记录
Ac tivity的状态以及其他的
管理信息。其实就是服务
器端的Ac tivity对象的映
像。
TaskRecord,AMS抽象出
来的一个“任务”的概念,
是记录Ac tivityRe c ord的
栈,一个“Task”包含若干
个Ac tivityRe c ord。AMS用


TaskRecord确保Ac tivity启
动和退出的顺序。如果你
清楚Ac tivity的4种
launchMode,那么对这个
概念应该不陌生。
主要流程介绍
下面将按照App启动过程的
先后顺序,一问一答,来解
释一些事情。
让我们开始吧!
zygote是什么?有什么
作用?
首先,你觉得这个单词眼熟
不?当你的程序Crash的时
候,打印的红色log下面通常
带有这一个单词。
zygote意为“受精卵“。
Android是基于Linux系统
的,而在Linux中,所有的进
程都是由init进程直接或者是
间接fork出来的,zygote进程
也不例外。
在Android系统里面,zygote
是一个进程的名字。Android
是基于Linux System的,当
你的手机开机的时候,Linux
的内核加载完成之后就会启
动一个叫“ init“的进程。在
Linux System里面,所有的
进程都是由init进程fork出来
的,我们的zygote进程也不
例外。
我们都知道,每一个App其
实都是
一个单独的da lvik虚拟机

一个单独的进程
所以当系统里面的第一个
zygote进程运行之后,在这
之后再开启App,就相当于
开启一个新的进程。而为了
实现资源共用和更快的启动
速度,Android系统开启新进
程的方式,是通过fork第一
个zygote进程实现的。所以
说,除了第一个zygote进
程,其他应用所在的进程都
是zygote的子进程,这下你
明白为什么这个进程叫“受

精卵”了吧?因为就像是一
个受精卵一样,它能快速的
分裂,并且产生遗传物质一
样的细胞!
SystemServer是什么?
有什么作用?它与
zygote的关系是什么?
首先我要告诉你的是,
SystemServer也是一个进
程,而且是由zygote进程fork
出来的。
知道了SystemServer的本
质,我们对它就不算太陌生
了,这个进程是Android
Framework里面两大非常重
要的进程之一——另外一个
进程就是上面的zygote进
程。
为什么说SystemServer非常
重要呢?因为系统里面重要
的服务都是在这个进程里面
开启的,比如
ActivityManagerService、
PackageManagerService、
WindowManagerService等
等,看着是不是都挺眼熟
的?
那么这些系统服务是怎么开
启起来的呢?
在zygote开启的时候,会调
用ZygoteInit.main()进行初始
化
public static void main(Strin
g argv[]) {
.
..ignore some code...
/
/在加载首个zygote的时候,会

传入初始化参数,使得startSystemSe
rver = true
boolean startSystemServe
r = false;
for (int i = 1; i < argv
.
length; i++) {
if ("start-sy
stem-server".equals(argv[i]))
{
startSyst
emServer = true;
}
else if (ar
gv[i].startsWith(ABI_LIST_ARG
) {
)
abiList =
argv[i].substring(ABI_LIST_A
RG.length());
}
else if (ar
gv[i].startsWith(SOCKET_NAME_
ARG)) {
socketNam
e = argv[i].substring(SOCKET_

NAME_ARG.length());
else {
throw new
}
RuntimeException("Unknown co
mmand line argument: " + argv
[
i]);
}
}
.
..ignore some co
de...
/
/开始fork我们的System
Server进程
if (startSystemServer) {
startSystemSe
rver(abiList, socketName);
}
.
..ignore some code...
}

我们看下startSystemServer()
做了些什么
/**留着这个注释,就是为了说明Syste
mServer确实是被fork出来的
*
Prepare the arguments
and fork for the system serve
r process.
*
/
private static boolean st
artSystemServer(String abiLis
t, String socketName)
throws MethodAndA
rgsCaller, RuntimeException {
.
..ignore some code.
.
.
/
/留着这段注释,就是为了


说明上面ZygoteInit.main(String
argv[])里面的argv就是通过这种方
式传递进来的
/
* Hardcoded command
line to start the system serv
er */
String args[] = {
"
"
"
--setuid=1000",
--setgid=1000",
--setgroups=1001
,
7
0
1002,1003,1004,1005,1006,100
,1008,1009,1010,1018,1032,30
1,3002,3003,3006,3007",
"
--capabilities="
+
capabilities + "," + capab
ilities,
"
"
--runtime-init",
--nice-name=syst
em_server",
"
com.android.serv
er.SystemServer",
}
;

int pid;
try {
parsedArgs = new
ZygoteConnection.Arguments(ar
gs);
ZygoteConnection.
applyDebuggerSystemProperty(p
arsedArgs);
ZygoteConnection.
applyInvokeWithSystemProperty
(parsedArgs);
/
/确实是fuck出来的吧,我
没骗你吧~不对,是fork出来的 -_-||
|
/
* Request to for
k the system server process *
/
pid = Zygote.fork
SystemServer(
parsedArg

s.uid, parsedArgs.gid,
parsedArg
s.gids,
parsedArg
s.debugFlags,
null,
parsedArg
s.permittedCapabilities,
parsedArg
s.effectiveCapabilities);
catch (IllegalArgum
entException ex) {
throw new Runtime
}
Exception(ex);
}
/
* For child process
*
/
if (pid == 0) {
if (hasSecondZygo
te(abiList)) {
waitForSecond

aryZygote(socketName);
}
handleSystemServe
rProcess(parsedArgs);
}
return true;
}
ActivityManagerService是什
么?什么时候初始化的?有
什么作用?
ActivityManagerService,简
称AMS,服务端对象,负责
系统中所有Ac tivity的生命周

期。
ActivityManagerService进行
初始化的时机很明确,就是
在SystemServer进程开启的
时候,就会初始化
ActivityManagerService。从
下面的代码中可以看到
public final class SystemServ
er {
/
/zygote的主入口
public static void main(S
tring[] args) {
new SystemServer().ru
n();

}
public SystemServer() {
/
/ Check for factory
test mode.
mFactoryTestMode = Fa
ctoryTest.getMode();
}
private void run() {
.
/
..ignore some code..
.
/加载本地系统服务库,并
进行初始化
System.loadLibrary("a
ndroid_servers");
nativeInit();
/
/ 创建系统上下文
createSystemContext()

;
/
/初始化SystemServiceM
anager对象,下面的系统服务开启都需
要调用SystemServiceManager.sta
rtService(Class<T>),这个方法通
过反射来启动对应的服务
mSystemServiceManager
=
new SystemServiceManager(m
SystemContext);
/
/开启服务
try {
startBootstrapSer
vices();
();
startCoreServices
startOtherService
catch (Throwable ex
Slog.e("System",
s();
}
)
{

"
*
****************************
*************");
Slog.e("System",
"
************ Failure startin
g system services", ex);
throw ex;
}
.
..ignore some code..
.
}
/
/初始化系统上下文对象mSystem
Context,并设置默认的主题,mSyste
mContext实际上是一个ContextImpl
对象。调用ActivityThread.system
Main()的时候,会调用ActivityThr
ead.attach(true),而在attach()
里面,则创建了Application对象,并
调用了Application.onCreate()。
private void createSystem

Context() {
ActivityThread activi
tyThread = ActivityThread.sys
temMain();
mSystemContext = acti
vityThread.getSystemContext()
;
mSystemContext.setThe
me(android.R.style.Theme_Devi
ceDefault_Light_DarkActionBar
)
;
}
/
/在这里开启了几个核心的服务,
因为这些服务之间相互依赖,所以都放在
了这个方法里面。
private void startBootstr
apServices() {
.
..ignore some code..
.

/
/初始化ActivityManage
rService
mActivityManagerServi
ce = mSystemServiceManager.st
artService(
ActivityManag
erService.Lifecycle.class).ge
tService();
mActivityManagerServi
ce.setSystemServiceManager(mS
ystemServiceManager);
/
/初始化PowerManagerSe
rvice,因为其他服务需要依赖这个Ser
vice,因此需要尽快的初始化
mPowerManagerService
=
mSystemServiceManager.start
Service(PowerManagerService.c
lass);
/
/ 现在电源管理已经开启,
ActivityManagerService负责电源

管理功能
mActivityManagerServi
ce.initPowerManagement();
/
/ 初始化DisplayManage
rService
mDisplayManagerServic
e = mSystemServiceManager.sta
rtService(DisplayManagerServi
ce.class);
/
/初始化PackageManagerServ
ice
mPackageManagerService =
PackageManagerService.main(mS
ystemContext, mInstaller,
mFactoryTestMode != Fa
ctoryTest.FACTORY_TEST_OFF, m
OnlyCore);
.
..ignore some code...

}
}
经过上面这些步骤,我们的
ActivityManagerService对象
已经创建好了,并且完成了
成员变量初始化。而且在这
之前,调用
createSystemContext()创
建系统上下文的时候,也已
经完成了mSystemContext和
Ac tivityThre a d的创建。注
意,这是系统进程开启时的

流程,在这之后,会开启系
统的
Launcher程序,完成系统界
面的加载与显示。你是否会
好奇,我为什么说AMS是服
务端对象?下面我给你介绍
下Android系统里面的服务器
和客户端的概念。
其实服务器客户端的概念不
仅仅存在于Web开发中,在
Android的框架设计中,使用
的也是这一种模式。服务器
端指的就是所有App共用的
系统服务,比如我们这里提
到的
ActivityManagerService,和
前面提到的
PackageManagerService、
WindowManagerService等
等,这些基础的系统服务是
被所有的App公用的,当某
个App想实现某个操作的时
候,要告诉这些系统服务,
比如你想打开一个App,那
么我们知道了包名和
Ma inAc tivity类名之后就可以
打开
Intent intent = new Intent(In
tent.ACTION_MAIN);
intent.addCategory(Intent.CAT
EGORY_LAUNCHER);
ComponentName cn = new Compon
entName(packageName, classNam
e);
intent.setComponent(cn);
startActivity(intent);
但是,我们的App通过调用
sta rtAc tivity()并不能直接打
开另外一个App,这个方法

会通过一系列的调用,最后
还是告诉AMS说:“我要打
开这个App ,
我知道他的住址和名字,你
帮我打开吧!”所以是AMS
来通知zygote进程来fork一个
新进程,来开启我们的目标
App的。这就像是浏览器想
要打开一
个超链接一样,浏览器把网
页地址发送给服务器,然后
还是服务器把需要的资源文
件发送给客户端的。知道了
Android Framework的客户端
服务器架构之后,我们还需
要了解一件事情,那就是我
们的App 和
AMS(SystemServer进程)还有
zygote进程分属于三个独立
的进程,他们之间如何通信
呢?
App与AMS通过Binder进行
IPC通信,
AMS(SystemServer进程)与
zygote通过Socket进行IPC通
信。
那么AMS有什么用呢?在前
面我们知道了,如果想打开
一个App的话,需要AMS去
通知zygote进程,除此之
外,其实所有的Ac tivity的开
启、暂停、关闭都需要AMS
来控制,所以我们说,AMS
负责系统中所有Ac tivity的生
命周期。
在Android系统中,任何一个
Ac tivity的启动都是由AMS和
应用程序进程(主要是
Ac tivityThre a d)相互配合来
完成的。AMS服务统一调度
系统中所有进程的Ac tivity启
动,而每个Ac tivity的启动过
程则由其所属的进程具体来
完成。
这样说你可能还是觉得比较
抽象,没关系,下面有一部
分是专门来介绍AMS与
Ac tivityThre a d如何一起合作
控制Ac tivity的生命周期的。
Launcher是什么?什么
时候启动的?
当我们点击手机桌面上的图
标的时候,App就由
Launcher开始启动了。但
是,你有没有思考过
Launcher到底是一个什么东
西?
Launcher本质上也是一个应
用程序,和我们的App一
样,也是继承自Ac tivity
packages/apps/Launcher2/src/
com/android/launcher2/Launc
her.java
public final class Launcher e
xtends Activity
implements View.OnCli
ckListener, OnLongClickListen
er, LauncherModel.Callbacks,
View.OnTou
chListener {
}
Launcher实现了点击、长按
等回调接口,来接收用户的
输入。既然是普通的App,
那么我们的开发经验在这里
就仍然适用,比如,我们点

击图标的时候
是怎么开启的应用呢?如
,
果让你,你怎么做这个功能
呢?捕捉图标点击事件,然
后sta rtAc tivity()发送对应的
Intent请求呗!是的,
Launcher也是这么
做的,就是这么easy!
那么到底是处理的哪个对象
的点击事件呢?既然
Launcher是App,并且有界
面,那么肯定有布局文件
呀,是的,我找到了布局文
件launcher.xml
<
FrameLayout
xmlns:android="http://sch
emas.android.com/apk/res/andr
oid"
xmlns:launcher="http://sc
hemas.android.com/apk/res/com
.
android.launcher"
android:id="@+id/launcher
>
"
<
com.android.launcher2.Dr
agLayer
android:id="@+id/drag
android:layout_width=
match_parent"
android:layout_height
_
"
layer"

=
"match_parent"
android:fitsSystemWin
dows="true">
<
!-- Keep these behin
d the workspace so that they
are not visible when
we go into AllAp
ps -->
<
include
android:id="@+id/
dock_divider"
layout="@layout/w
orkspace_divider"
android:layout_ma
rginBottom="@dimen/button_bar
height"
_
android:layout_gr
avity="bottom" />
<
include
android:id="@+id/

paged_view_indicator"
layout="@layout/s
croll_indicator"
android:layout_gr
avity="bottom"
android:layout_ma
rginBottom="@dimen/button_bar
height" />
_
<
!-- The workspace co
ntains 5 screens of cells -->
com.android.launcher
.Workspace
<
2
android:id="@+id/
workspace"
android:layout_wi
dth="match_parent"
android:layout_he
ight="match_parent"
android:paddingSt
art="@dimen/workspace_left_pa
dding"

android:paddingEn
d="@dimen/workspace_right_pad
ding"
android:paddingTo
p="@dimen/workspace_top_paddi
ng"
android:paddingBo
ttom="@dimen/workspace_bottom
_
padding"
launcher:defaultS
creen="2"
launcher:cellCoun
tX="@integer/cell_count_x"
launcher:cellCoun
tY="@integer/cell_count_y"
launcher:pageSpac
ing="@dimen/workspace_page_sp
acing"
launcher:scrollIn
dicatorPaddingLeft="@dimen/wo
rkspace_divider_padding_left"
launcher:scrollIn

dicatorPaddingRight="@dimen/w
orkspace_divider_padding_righ
t">
<
include android:
id="@+id/cell1" layout="@layo
ut/workspace_screen" />
<
include android:
id="@+id/cell2" layout="@layo
ut/workspace_screen" />
<
include android:
id="@+id/cell3" layout="@layo
ut/workspace_screen" />
<
include android:
id="@+id/cell4" layout="@layo
ut/workspace_screen" />
<
include android:
id="@+id/cell5" layout="@layo
ut/workspace_screen" />
<
/com.android.launche
r2.Workspace>

.
<
..ignore some code...
/com.android.launcher2.D
ragLayer>
</FrameLayout>
为了方便查看,我删除了很
多代码,从上面这些我们应
该可以看出一些东西来:
Launcher大量使用标签来实
现界面的复用,而且定义了
很多的自定义控
件实现界面效果,
dock_divider从布局的参数声
明上可以猜出,是底部操作

栏和上面图标布局的分割
线,而paged_view_indicator
则是页面指示器,
和App首次进入的引导页下
面的界面引导是一样的道
理。当然,我们最关心的是
Workspace这个布局,因为
注释里面说在这里面包含了
5
个屏幕的单元
格,想必你也猜到了,这个
就是在首页存放我们图标的
那五个界面(不同的ROM会
做不同的DIY,数量不固
定)。
接下来,我们应该打开
workspace_screen布局,看
看里面有什么东东。
workspace_screen.xml
<
com.android.launcher2.CellLa
yout
xmlns:android="http://sch
emas.android.com/apk/res/andr
oid"
xmlns:launcher="http://sc
hemas.android.com/apk/res/com
.
android.launcher"
android:layout_width="wra

p_content"
android:layout_height="wr
ap_content"
android:paddingStart="@di
men/cell_layout_left_padding"
android:paddingEnd="@dime
n/cell_layout_right_padding"
android:paddingTop="@dime
n/cell_layout_top_padding"
android:paddingBottom="@d
imen/cell_layout_bottom_paddi
ng"
android:hapticFeedbackEna
bled="false"
launcher:cellWidth="@dime
n/workspace_cell_width"
launcher:cellHeight="@dim
en/workspace_cell_height"
launcher:widthGap="@dimen
/
workspace_width_gap"
launcher:heightGap="@dime
n/workspace_height_gap"

launcher:maxGap="@dimen/w
orkspace_max_gap" />
里面就一个CellLayout,也是
一个自定义布局,那么我们
就可以猜到了,既然可以存
放图标,那么这个自定义的
布局很有可能是继承自
Vie wGroup或者
是其子类,实际上,
CellLayout确实是继承自
Vie wGroup。在CellLayout里
面,只放了一个子Vie w,那
就是

ShortcutAndWidgetContainer
。从名字也
可以看出来,
ShortcutAndWidgetContainer
这个类就是用来存放快捷图
标和Widge t小部件的,那么
里面放的是什么对象呢?
在桌面上的图标,使用的是
Bubble Te xtVie w对象,这个
对象在Te xtVie w的基础之
上,添加了一些特效,比如
你长按移动图标的时候,图
标位置会出现一个背景(不同
版本的效果不同),所以我们
找到Bubble Te xtVie w对象的
点击事件,就可以找到
Launcher如何开启一个App
了。
除了在桌面上有图标之外,
在程序列表中点击图标,也
可以开启对应的程序。这里
的图标使用的不是
Bubble Te xtVie w对象,而是
PagedViewIcon对象,我们如
果找到它的点击事件,就也
可以找到Launcher如何开启
一个App 。
其实说这么多,和今天的主
题隔着十万八千里,上面这
些东西,你有兴趣就看,没
兴趣就直接跳过,不知道不
影响这篇文章阅读。
Bubble Te xtVie w的点击事件
在哪里呢?我来告诉你:在
Launcher. onClick(View v)里
面。
/
**

*
Launches the intent re
ferred by the clicked shortcu
t
*
/
public void onClick(View
v) {
.
..ignore some code
.
..
Object tag = v.getTa
if (tag instanceof Sh
g();
ortcutInfo) {
/
/ Open shortcut
final Intent inte
nt = ((ShortcutInfo) tag).int
ent;
int[] pos = new i
nt[2];
v.getLocationOnSc
reen(pos);

intent.setSourceB
ounds(new Rect(pos[0], pos[1]
,
pos[0] +
v.getWidth(), pos[1] + v.getH
eight()));
/
/开始开启Activity咯~
boolean success =
startActivitySafely(v, inten
t, tag);
if (success && v
instanceof BubbleTextView) {
mWaitingForRe
sume = (BubbleTextView) v;
mWaitingForRe
sume.setStayPressed(true);
}
}
else if (tag instan
ceof FolderInfo) {
//如果点击的是图标文
件夹,就打开文件夹

if (v instanceof
FolderIcon) {
FolderIcon fi
(FolderIcon) v;
handleFolderC
=
lick(fi);
}
}
else if (v == mAllA
ppsButton) {
.
}
..ignore some code..
.
}
从上面的代码我们可以看
到,在桌面上点击快捷图标
的时候,会调用
startActivitySafely(v, intent


,
tag);
那么从程序列表界面,点击
图标的时候会发生什么呢?
实际上,程序列表界面使用
的是
AppsCustomizePagedView对
象,所以我在这个类里面找
到了
onClic k(Vie w v)。
com.android.launcher2.AppsC
ustomizeP agedView.java
/
**
*
The Apps/Customize page th
at displays all the applicati
ons, widgets, and shortcuts.
*
/
public class AppsCustomizePag
edView extends PagedViewWithD
raggableItems implements
View.OnClickListener,
View.OnKeyListener, DragSour
ce,
PagedViewIcon.Pressed
Callback, PagedViewWidget.Sho
rtPressListener,
LauncherTransitionabl
e {
@
Override
public void onClick(View
v) {

.
..ignore some code.
.
.
if (v instanceof Page
dViewIcon) {
mLauncher.updateW
allpaperVisibility(true);
mLauncher.startAc
tivitySafely(v, appInfo.inten
t, appInfo);
}
else if (v instance
of PagedViewWidget) {
..ignore so
.
me code..
}
}
}
可以看到,调用的是

mLauncher.startActivitySafely
(v, appInfo.intent, appInfo);
和上面一样!这叫什么?这
叫殊途同归!
所以咱们现在又明白了一件
事情:不管从哪里点击图
标,调用的都是
Launcher. startActivitySafely()
。
下面我们就可以一步步的
来看一下
La unc he r. sta rtAc tivitySa fe ly


()到底做了什么事情。
boolean startActivitySafely(V
iew v, Intent intent, Object
tag) {
boolean success = fal
se;
try {
success = startAc
tivity(v, intent, tag);
}
catch (ActivityNotF
oundException e) {
Toast.makeText(th
is, R.string.activity_not_fou
nd, Toast.LENGTH_SHORT).show(
)
;
Log.e(TAG, "Unabl
e to launch. tag=" + tag + "
intent=" + intent, e);
}
return success;

}
调用了startActivity(v,
intent, tag)
boolean startActivity(View v,
Intent intent, Object tag) {
intent.addFlags(Inten
t.FLAG_ACTIVITY_NEW_TASK);
try {
boolean useLaunch
Animation = (v != null) &&
!
intent.h
asExtra(INTENT_EXTRA_IGNORE_L
AUNCH_ANIMATION);
if (useLaunchAnim
ation) {
if (user == n


ull || user.equals(android.os
.
Process.myUserHandle())) {
startActi
vity(intent, opts.toBundle())
;
}
else {
launcherA
pps.startMainActivity(intent.
getComponent(), user,
i
ntent.getSourceBounds(),
o
pts.toBundle());
}
}
else {
if (user == n
ull || user.equals(android.os
.
Process.myUserHandle())) {
startActi
vity(intent);
}
else {
launcherA

pps.startMainActivity(intent.
getComponent(), user,
i
ntent.getSourceBounds(), null
)
;
}
}
return true;
}
catch (SecurityExce
ption e) {
.
}
..
return false;
}
这里会调用
Ac tivity. sta r tAc tivity( inte nt,
opts.toBundle()),这个方
法熟悉吗?这就是我们经


常用到的
Ac tivity. sta r tAc tivity( Inte nt)
的重载函数。
而且由于设置了
intent.addFlags(Intent.FLAG_
ACTIVITY_NEW_TASK);
所以这个Ac tivity会添加到
一个新的Task栈中,而
且,sta rtAc tivity()调用的
其实是
startActivityForResult()这
个方法。


@
Override
public void startActivity
(Intent intent, @Nullable Bun
dle options) {
if (options != null)
{
startActivityForR
esult(intent, -1, options);
}
else {
/
/ Note we want t
o go through this call for co
mpatibility with
/
/ applications t
hat may have overridden the m
ethod.
startActivityForR
esult(intent, -1);
}
}
所以我们现在明确了,


Launcher中开启一个
App,其实和我们在
Ac tivity中直接
sta rtAc tivity()基本一样,
都是调用了
Ac tivity. sta r tAc tivityFor Re s
ult()。
Instrumentation是什
么?和ActivityThread
是什么关系?
还记得前面说过的
Instrumentation对象吗?每个
Ac tivity都持有Instrumentation
对象的一个引用,但是整个
进程只会存在一个
Instrumentation对象。当
startActivityForResult()调用之
后,实际上还是调用了
mInstrumentation.execStartAc
tivity( )
public void startActivityForR
esult(Intent intent, int requ
estCode, @Nullable Bundle opt
ions) {
if (mParent == null)
{
Instrumentation.A
ctivityResult ar =

mInstrumentat
ion.execStartActivity(
this, mMa
inThread.getApplicationThread
(), mToken, this,
intent, r
equestCode, options);
if (ar != null) {
mMainThread.s
endActivityResult(
mToken, m
EmbeddedID, requestCode, ar.g
etResultCode(),
ar.getRes
ultData());
}
.
..ignore some co
de...
ll) {
}
else {
if (options != nu
/
/当现在的Act

ivity有父Activity的时候会调用,但
是在startActivityFromChild()内
部实际还是调用的mInstrumentation
.
execStartActivity()
mParent.start
ActivityFromChild(this, inten
t, requestCode, options);
}
else {
mParent.start
ActivityFromChild(this, inten
t, requestCode);
}
}
.
..ignore some code.
.
.
}
下面是
mInstrumentation.execStartAc
tivity( )的实现

public ActivityResult execSta
rtActivity(
Context who, IBin
der contextThread, IBinder to
ken, Activity target,
Intent intent, in
t requestCode, Bundle options
)
{
IApplicationThread wh
oThread = (IApplicationThread
)
contextThread;
.
..ignore some co
de...
try {
intent.migrateExt
raStreamToClipData();
intent.prepareToL
eaveProcess();
int result = Acti
vityManagerNative.getDefault(
)

.
startActivit
y(whoThread, who.getBasePacka
geName(), intent,
inten
t.resolveTypeIfNeeded(who.get
ContentResolver()),
token
,
target != null ? target.mEm
beddedID : null,
reque
stCode, 0, null, options);
checkStartActivit
yResult(result, intent);
}
catch (RemoteExcept
ion e) {
}
}
return null;
所以当我们在程序中调用

sta rtAc tivity()的 时候,实际
上调用的是Instrumentation的
相关的方法。
Instrumentation意为“仪器”,
我们先看一下这个类里面包
含哪些方法吧
我们可以看到,这个类里面
的方法大多数和Application
和Ac tivity有关,是的,这个
类就是完成对Application和
Ac tivity初始化和生命周期的
工具类。比如说,我单独挑
一个callActivityOnCreate() 让
你看看
public void callActivityOnCre
ate(Activity activity, Bundle
icicle) {
prePerformCreate(acti
vity);
activity.performCreat
e(icicle);
postPerformCreate(act
ivity);
}
对
activity.performCreate(icicle);
这一行代码熟悉吗?这一行

里面就调用了传说中的
Ac tivity的入口函数
onCreate(),不信?接着往下
看
Activity.performCreate()
final void performCreate(Bund
le icicle) {
onCreate(icicle);
mActivityTransitionSt
ate.readState(icicle);
performCreateCommon()
;
}
没骗你吧,onCreate在这里

调用了吧。但是有一件事情
必须说清楚,那就是这个
Instrumentation类这么重要,
为啥我在开发的过程中,没
有发现他的踪迹呢?
是的,Instrumentation这个类
很重要,对Ac tivity生命周期
方法的调用根本就离不开
他,他可以说是一个大管
家,但是,这个大管家比较
害羞,是一个女的,管内不
管外,是老板娘 ~
那么你可能要问了,老板是
谁呀?
老板当然是大名鼎鼎的
Ac tivityThre a d了!
Ac tivityThre a d你都没听说
过?那你肯定听说过传说中
的UI线程吧?是的,这就是
UI线程。我们前面说过,
App和AMS是通过Binder传
递信息的,那么
Ac tivityThre a d就是专门与
AMS的外交工作的。
AMS说:“ActivityThread,
你给我暂停一个Ac tivity!”
Ac tivityThre a d就说:“没问
题!”然后转身和
Instrumentation说:“老婆,
AMS让暂停一个Ac tivity,我
这里忙着呢,你快去帮我把
这事办了把~”
于是,Instrumentation就去把
事儿搞定了。
所以说,AMS是董事会,负
责指挥和调度的,
Ac tivityThre a d是老板,虽然
说家里的事自己说了算,但
是需要听从AMS的指挥,而
Instrumentation则是老板娘,
负责家里的大事小事,但是
一般不抛头露面,听一家之
主Ac tivityThre a d的安排。
如何理解AMS和
ActivityThread之间的
Binder通信?
前面我们说到,在调用
sta rtAc tivity()的时候,实际
上调用的是
mInstrumentation.execStartAct
ivity()
但是到这里还没完呢!里面
又调用了下面的方法
ActivityManagerNative.getDefa
ult()
.
startActivity
这里的
ActivityManagerNative.getDef
ault返回的就是
ActivityManagerService的远

程接口,即
ActivityManagerP roxy。
怎么知道的呢?往下看
public abstract class Activit
yManagerNative extends Binder
implements IActivityManager
{
/
/从类声明上,我们可以看到Activit
yManagerNative是Binder的一个子
类,而且实现了IActivityManager接
口
static public IActivityManag
er getDefault() {
return gDefault.get()
;
}

/
/通过单例模式获取一个IActivityM
anager对象,这个对象通过asInterf
ace(b)获得
private static final Singlet
on<IActivityManager> gDefault
=
new Singleton<IActivityMan
ager>() {
protected IActivityMa
nager create() {
IBinder b = Servi
ceManager.getService("activit
y");
if (false) {
Log.v("Activi
tyManager", "default service
binder = " + b);
}
IActivityManager
am = asInterface(b);
if (false) {
Log.v("Activi
tyManager", "default service

=
" + am);
}
}
return am;
}
;
}
/
/最终返回的还是一个ActivityMana
gerProxy对象
static public IActivityManage
r asInterface(IBinder obj) {
if (obj == null) {
return null;
}
IActivityManager in =
(IActivityManager
)
obj.queryLocalInterface(desc
riptor);
if (in != null) {
return in;
}

/
/这里面的Binder类型的obj参
数会作为ActivityManagerProxy的
成员变量保存为mRemote成员变量,负
责进行IPC通信
return new ActivityMa
nagerProxy(obj);
}
}
再看
ActivityManagerP roxy.startAct
ivity( ),在这里面做的事情就
是IPC通信,利用Binder对
象,调用transact(),把所有
需要的参数封装成Parcel对
象

,向AMS发送数据进行通
信。
public int startActivity(IApp
licationThread caller, String
callingPackage, Intent inten
t,
String resolvedTy
pe, IBinder resultTo, String
resultWho, int requestCode,
int startFlags, P
rofilerInfo profilerInfo, Bun
dle options) throws RemoteExc
eption {
Parcel data = Parcel.
obtain();
Parcel reply = Parcel
.
obtain();
data.writeInterfaceTo
ken(IActivityManager.descript

or);
data.writeStrongBinde
r(caller != null ? caller.asB
inder() : null);
data.writeString(call
ingPackage);
intent.writeToParcel(
data, 0);
data.writeString(reso
lvedType);
data.writeStrongBinde
r(resultTo);
data.writeString(resu
ltWho);
data.writeInt(request
Code);
data.writeInt(startFl
ags);
if (profilerInfo != n
ull) {
data.writeInt(1);
profilerInfo.writ

eToParcel(data, Parcelable.PA
RCELABLE_WRITE_RETURN_VALUE);
}
else {
data.writeInt(0);
}
if (options != null)
{
data.writeInt(1);
options.writeToPa
rcel(data, 0);
}
else {
data.writeInt(0);
}
mRemote.transact(STAR
T_ACTIVITY_TRANSACTION, data,
reply, 0);
reply.readException()
;
int result = reply.re
adInt();
reply.recycle();
data.recycle();

return result;
}
Binder本质上只是一种底层
通信方式,和具体服务没有
关系。为了提供具体服务,
Server必须提供一套接口函
数以便Client通过远程访问使
用各种服务。
这时通常采用Proxy设计模
式:将接口函数定义在一个
抽象类中,Server和Client都
会以该抽象类为基类实现所
有接口函数,所不同的是

Server端是真正
的功能实现,而Client端是对
这些函数远程调用请求的包
装。
为了更方便的说明客户端和
服务器之间的Binder通信,
下面以
ActivityManagerServices和他
在客户端的代理类
ActivityManagerP roxy为例。
ActivityManagerServices和
ActivityManagerP roxy都实现
了同一个接口——
IAc tivityMa na ge r。
class ActivityManagerProxy im
plements IActivityManager{}
public final class ActivityMa
nagerService extends Activity
ManagerNative{}
public abstract class Activit
yManagerNative extends Binder
implements IActivityManager{}
虽然都实现了同一个接口,
但是代理对象
ActivityManagerP roxy并不会
对这些方法进行真正地实
现,ActivityManagerP roxy只
是通过这种方式对方法
的参数进行打包(因为都实现
了相同接口,所以可以保证
同一个方法有相同的参数,
即对要传输给服务器的数据
进行打包),真正实现的是
ActivityManagerService。
但是这个地方并不是直接由
客户端传递给服务器,而是
通过Binder驱动进行中转。
其实我对Binder驱动并不熟
悉,我们就把他当做一个中
转站就OK,客户端调用
ActivityManagerP roxy接口里
面的方法,把数据传送给
Binder驱动,然后Binder驱动
就会把这些东西转发给服务
器的
ActivityManagerServices,由
ActivityManagerServices去真
正的实施具体的操作。
但是Binder只能传递数据,
并不知道是要调用
ActivityManagerServices的哪
个方法,所以在数据中会添
加方法的唯一标识码,比如
前面的sta rtAc tivity()方法:
public int startActivity(IApp
licationThread caller, String
callingPackage, Intent inten
t,
String resolvedTy
pe, IBinder resultTo, String
resultWho, int requestCode,
int startFlags, P
rofilerInfo profilerInfo, Bun
dle options) throws RemoteExc
eption {
Parcel data = Parcel.
obtain();
Parcel reply = Parcel

.
.
obtain();
.
..ignore some code..
mRemote.transact(STAR
T_ACTIVITY_TRANSACTION, data,
reply, 0);
reply.readException()
;
int result = reply.re
adInt();
reply.recycle();
data.recycle();
return result;
}
上面的
START_ACTIVITY_TRANS
ACTION就是方法标示,data

是要传输给Binder驱动的数
据,reply则接受操作的返回
值。
即
客户端:
ActivityManagerP roxy
=
====>Binder驱动=====>
ActivityManagerService:服
务器
而且由于继承了同样的公共
接口类,
ActivityManagerP roxy提供了
与ActivityManagerService一
样的函数原型,使用户感觉
不出Server是运行在本地还
是远端,从而可以更加方便
的调用这些重要的系统服
务。
但是!这里Binder通信是单
方向的,即从
ActivityManagerP roxy指向
ActivityManagerService的,
如果AMS想要通知
Ac tivityThre a d做一些事情,
应该咋办呢?
还是通过Binder通信,不过
是换了另外一对,换成了
ApplicationThread和
ApplicationThreadProxy。
客户端:ApplicationThread
<
=====Binder驱动<=====
ApplicationThreadProxy:服
务器
他们也都实现了相同的接口
IApplicationThread
private class ApplicationThre
ad extends ApplicationThreadN
ative {}
public abstract class Appli
cationThreadNative extends Bi
nder implements IApplicationT
hread{}
class ApplicationThreadProx
y implements IApplicationThre
ad {}
剩下的就不必多说了吧,和
前面一样。
AMS接收到客户端的
请求之后,会如何开
启一个Activity ?

OK,至此,点击桌面图标
调用sta rtAc tivity(),终于把
数据和要开启Ac tivity的请求
发送到了AMS了。说了这么
多,其实这些都在一瞬间完
成了,下面咱们研究下AMS
到底做了什么。
注:前方有高能的方法调用
链,如果你现在累了,请先
喝杯咖啡或者是上趟厕所休
息下
AMS收到sta r tAc tivity的请求
之后,会按照如下的方法链
进行调用
调用sta rtAc tivity()
@
Override
public final int startAct
ivity(IApplicationThread call
er, String callingPackage,
Intent intent, St
ring resolvedType, IBinder re
sultTo, String resultWho, int
requestCode,
int startFlags, P
rofilerInfo profilerInfo, Bun
dle options) {
return startActivityA
sUser(caller, callingPackage,
intent, resolvedType, result
To,

resultWho, reques
tCode, startFlags, profilerIn
fo, options,
UserHandle.getCal
lingUserId());
}
调用sta rtAc tivityAsUse r()
@
Override
public final int startAct
ivityAsUser(IApplicationThrea
d caller, String callingPacka
ge,
Intent intent, St
ring resolvedType, IBinder re
sultTo, String resultWho, int
requestCode,
int startFlags, P
rofilerInfo profilerInfo, Bun


dle options, int userId) {
..ignore some co
.
de...
return mStackSupervis
or.startActivityMayWait(calle
r, -1, callingPackage, intent
,
resolvedType,
null, null, resultTo, result
Who, requestCode, startFlags,
profilerInfo,
null, null, options, userId,
null, null);
}
在这里又出现了一个新对象
Ac tivitySta c kSupe rvisor,通
过这个类可以实现对

Ac tivitySta c k的部分操作。
final int startActivityMayWai
t(IApplicationThread caller,
int callingUid,
String callingPac
kage, Intent intent, String r
esolvedType,
IVoiceInteraction
Session voiceSession, IVoiceI
nteractor voiceInteractor,
IBinder resultTo,
String resultWho, int reques
tCode, int startFlags,
ProfilerInfo prof
ilerInfo, WaitResult outResul
t, Configuration config,
Bundle options, i
nt userId, IActivityContainer
iContainer, TaskRecord inTas
k) {

.
..ignore some co
int res = start
de...
ActivityLocked(caller, intent
resolvedType, aInfo,
voiceSess
,
ion, voiceInteractor, resultT
o, resultWho,
requestCo
de, callingPid, callingUid, c
allingPackage,
realCalli
ngPid, realCallingUid, startF
lags, options,
component
Specified, null, container, i
nTask);
.
..ignore some co
de...

}
继续调用
startActivityLocked()
final int startActivityLocked
(IApplicationThread caller,
Intent intent, St
ring resolvedType, ActivityIn
fo aInfo,
IVoiceInteraction
Session voiceSession, IVoiceI
nteractor voiceInteractor,
IBinder resultTo,
String resultWho, int reques
tCode,
int callingPid, i
nt callingUid, String calling
Package,


int realCallingPi
d, int realCallingUid, int st
artFlags, Bundle options,
boolean component
Specified, ActivityRecord[] o
utActivity, ActivityContainer
container,
TaskRecord inTask
)
{
err = startActi
vityUncheckedLocked(r, source
Record, voiceSession, voiceIn
teractor,
startFlags, tru
e, options, inTask);
if (err < 0) {
notifyActivityDra
wnForKeyguard();
}
return err;
}

调用
startActivityUncheckedLocked
(),此时要启动的Ac tivity已经
通过检验,被认为是一个正
当的启动请求。
终于,在这里调用到了
Ac tivitySta c k的
sta rtAc tivityLoc ke d(Ac tivityRe
cord r, boolean
newTask,boolean doResume,
boolean keepCurTransition,
Bundle options) 。

Ac tivityRe c ord代表的就是要
开启的Ac tivity对象,里面分
装了很多信息,比如所在的
Ac tivityTa sk等,如果这是首
次打开应用,那么这个
Ac tivity会被放到Ac tivityTa sk
的栈顶,
final int startActivityUnchec
kedLocked(ActivityRecord r, A
ctivityRecord sourceRecord,
IVoiceInteraction
Session voiceSession, IVoiceI
nteractor voiceInteractor, in
t startFlags,
boolean doResume,
Bundle options, TaskRecord i

nTask) {
de...
.
..ignore some co
targetStack.start
ActivityLocked(r, newTask, do
Resume, keepCurTransition, op
tions);
.
..ignore some co
de...
return ActivityM
anager.START_SUCCESS;
}
调用的是
Ac tivitySta c k. sta rtAc tivityLoc k
ed()

final void startActivityLocke
d(ActivityRecord r, boolean n
ewTask,
boolean doResume,
boolean keepCurTransition, B
undle options) {
/
/ActivityRecord中存储
的TaskRecord信息
TaskRecord rTask = r.
task;
.
..ignore some code.
.
.
/
/如果不是在新的Activit
yTask(也就是TaskRecord)中的话,
就找出要运行在的TaskRecord对象
TaskRecord task = null;
if (!newTask) {
boolean startIt =

true;
for (int taskNdx
mTaskHistory.size() - 1; ta
skNdx >= 0; --taskNdx) {
task = mTaskH
istory.get(taskNdx);
if (task.getT
opActivity() == null) {
=
/
/ task中
的所有Activity都结束了
continue;
}
if (task == r
.
task) {
/
/ 找到了
if (!star
tIt) {
task.
addActivityToTop(r);
InHistory();
r.put
mWind

owManager.addAppToken(task.mA
ctivities.indexOf(r), r.appTo
ken,
r.task.taskId, mStackId, r
.
info.screenOrientation, r.fu
llscreen,
(r.info.flags & ActivityIn
fo.FLAG_SHOW_ON_LOCK_SCREEN)
= 0,
!
r.userId, r.info.configCha
nges, task.voiceSession != nu
ll,
r.mLaunchTaskBehind);
if (V
ALIDATE_TOKENS) {
v
alidateAppTokensLocked();
}

Activ
ityOptions.abort(options);
retur
n;
}
break;
}
else if (ta
sk.numFullscreen > 0) {
startIt =
false;
}
}
}
.
..ignore some code...
/ Place a new activi
/
ty at top of stack, so it is
next to interact
/
/ with the user.
task = r.task;
task.addActivityToTop

(r);
;
task.setFrontOfTask()
.
..ignore some code..
.
if (doResume) {
mStackSupervisor.
resumeTopActivitiesLocked(thi
s, r, options);
}
}
靠!这来回折腾什么呢!从
Ac tivitySta c kSupe rvisor到
Ac tivitySta c k,又调回
Ac tivitySta c kSupe rvisor,这

到底是在折腾什么玩意
啊!!!
淡定…淡定…我知道你也在
心里骂娘,世界如此美妙,
你却如此暴躁,这样不好,
不好 …
来来来,咱们继续哈,刚才
说到哪里了?哦,对,咱们
一起看下
StackSupervisor. resumeTopAc
tivitie sLoc ke d( this, r, options)
boolean resumeTopActivitiesLo

cked(ActivityStack targetStac
k, ActivityRecord target,
Bundle targetOpti
ons) {
if (targetStack == nu
ll) {
targetStack = get
FocusedStack();
}
/
/ Do targetStack fir
st.
e;
boolean result = fals
if (isFrontStack(targ
etStack)) {
result = targetSt
ack.resumeTopActivityLocked(t
arget, targetOptions);
}
.
..ignore some code
.
..

return result;
}
我…已无力吐槽了,又调回
Ac tivitySta c k去了…
Ac tivitySta c k. re sume TopAc tivi
tyLocked()
final boolean resumeTopActivi
tyLocked(ActivityRecord prev,
Bundle options) {
if (inResumeTopActivi
ty) {
/
/ Don't even sta
rt recursing.
return false;
}


boolean result = fals
try {
e;
/
/ Protect agains
t recursion.
ty = true;
inResumeTopActivi
result = resumeTo
pActivityInnerLocked(prev, op
tions);
}
finally {
inResumeTopActivi
ty = false;
}
return result;
}
咱们坚持住,看一下
Ac tivitySta c k. re sume TopAc tivi

tyInnerLocked()到底进行了
什么操作
final boolean resumeTopActivi
tyInnerLocked(ActivityRecord
prev, Bundle options) {
.
..ignore some code
.
..
/
/找出还没结束的首个Activi
tyRecord
ActivityRecord next = to
pRunningActivityLocked(null);
/
/如果一个没结束的Activity都
没有,就开启Launcher程序
if (next == null) {
ActivityOptions.a
bort(options);
if (DEBUG_STATES)

Slog.d(TAG, "resumeTopActivi
tyLocked: No more activities
go home");
if (DEBUG_STACK)
mStackSupervisor.validateTopA
ctivitiesLocked();
/
/ Only resume ho
me if on home display
final int returnT
askType = prevTask == null ||
!
prevTask.isOverHomeStack()
?
HOME_ACTI
VITY_TYPE : prevTask.getTaskT
oReturnTo();
return isOnHomeDi
splay() &&
mStackSup
ervisor.resumeHomeStackTask(r
eturnTaskType, prev);
}

/
/先需要暂停当前的Activi
ty。因为我们是在Lancher中启动main
Activity,所以当前mResumedActiv
ity!=null,调用startPausingLo
cked()使得Launcher进入Pausing状
态
if (mResumedActivit
y != null) {
pausing |= startP
ausingLocked(userLeaving, fal
se, true, dontWaitForPause);
if (DEBUG_STATES)
Slog.d(TAG, "resumeTopActivi
tyLocked: Pausing " + mResume
dActivity);
}
}
在这个方法里,prev.app为记

录启动Lancher进程的
ProcessRecord,
prev.app.thread为Lancher进
程的远程调用接口
IApplicationThead,所以可以
调用
prev.app.thread.schedulePause
Ac tivity,到Lancher进程暂停
指定Ac tivity 。
final boolean startPausingLoc
ked(boolean userLeaving, bool
ean uiSleeping, boolean resum
ing,
boolean dontWait)

{
if (mPausingActivity
= null) {
!
completePauseLock
ed(false);
}
.
..ignore some code...
if (prev.app != null
&
& prev.app.thread != null)
try {
mService.upda
teUsageStats(prev, false);
prev.app.thre
ad.schedulePauseActivity(prev
.
appToken, prev.finishing,
userL
eaving, prev.configChangeFlag
s, dontWait);
}
catch (Exceptio

n e) {
mPausingActiv
mLastPausedAc
mLastNoHistor
ity = null;
tivity = null;
yActivity = null;
}
}
else {
mPausingActivity
=
null;
mLastPausedActivi
mLastNoHistoryAct
ty = null;
ivity = null;
}
.
..ignore some code...
}

在Lancher进程中消息传递,
调用
ActivityThread.handlePauseAc
tivity( ),最终调用
ActivityThread.performPause
Ac tivity( )暂停指定Ac tivity。
接着通
过前面所说的Binder通信,
通知AMS已经完成暂停的操
作。
ActivityManagerNative.getDefa
ult().activityPaused(token).

上面这些调用过程非常复
杂,源码中各种条件判断让
人眼花缭乱,所以说如果你
没记住也没关系,你只要记
住这个流程,理解了Android
在控制Ac tivity
生命周期时是如何操作,以
及是通过哪几个关键的类进
行操作的就可以了,以后遇
到相关的问题之道从哪块下
手即可,这些过程我虽然也
是撸了一遍,但
还是记不清。最后来一张高
清无码大图,方便大家记
忆:
请戳这里(图片3.3M,请用
电脑观看 )
送给你们的彩蛋
不要使用
startActivityForResult(i
ntent,RESULT _ OK)
这是因为sta rtAc tivity()是这
样实现的
public void startActivity(Int
ent intent, @Nullable Bundle
options) {
if (options != null)
{
startActivityForR
esult(intent, -1, options);
}
else {
/
/ Note we want t
o go through this call for co
mpatibility with
/
/ applications t
hat may have overridden the m
ethod.
startActivityForR
esult(intent, -1);
}
}

而
public static final int RESUL
T_OK = -1;
所以
startActivityForResult(intent
,RESULT_OK) = startActivity()
你不可能从onAc tivityRe sult( )
里面收到任何回调。而这个
问题是相当难以被发现的,
就是因为这个坑,我工作一
年多来第一次加班到9点


(ˇˍˇ)
一个App的程序入口到
底是什么?
是ActivityThread.main()。
整个App的主线程的消
息循环是在哪里创建
的?
是在Ac tivityThre a d初始化的
时候,就已经创建消息循环
了,所以在主线程里面创建
Handler不需要指定Looper,
而如果在其他线程使用
Handler,则需要单独使用
Looper.prepare()和
Looper.loop()创建消息循
环。
public static void main(Strin
g[] args) {
.
..ignore some code
.
..
Looper.prepareMainLoope
ActivityThread thread
r();
=
new ActivityThread();

thread.attach(false);
if (sMainThreadHandle
r == null) {
sMainThreadHandle
r = thread.getHandler();
}
AsyncTask.init();
if (false) {
Looper.myLooper()
.
setMessageLogging(new
LogPrinte
r(Log.DEBUG, "ActivityThread"
)
);
}
Looper.loop();
.
..ignore some code
.
..

}
Application是在什么时候创
建的?onCreate()什么时候调
用的?
也是在ActivityThread. main()
的时候,再具体点呢,就是
在thread.attach(false)的时
候。
看你的表情,不信是吧!凯
子哥带你溜溜 ~
我们先看一下

ActivityThread.attach()
private void attach(boolean s
ystem) {
sCurrentActivityThrea
d = this;
mSystemThread = syste
m;
/
/普通App进这里
if (!system) {
.
..ignore some co
de...
RuntimeInit.setAp
plicationObject(mAppThread.as
Binder());
final IActivityMa
nager mgr = ActivityManagerNa
tive.getDefault();
try {

mgr.attachApp
lication(mAppThread);
}
catch (RemoteEx
ception ex) {
/
/ Ignore
}
}
else {
/这个分支在System
Server加载的时候会进入,通过调用
/ private void
createSystemContext() {
ActivityTh
/
/
/
/
read activityThread = Activit
yThread.systemMain() ;
/
/}
/
/ public static
ActivityThread systemMain()
{
/
/
if (!Activi
tyManager.isHighEndGfx()) {
Hardwar
/
/

eRenderer.disable(true);
/
/
/
/
} else {
Hardwar
eRenderer.enableForegroundTri
mming();
/
/
/
/
}
ActivityThr
ead thread = new ActivityThre
ad();
/
/
/
/
thread.atta
ch(true);
/
return thre
ad;
/
}
}
}
这里需要关注的就是
mgr.attachApplication(mAppT
hread),这个就会通过Binder

调用到AMS里面对应的方法
@
Override
public final void attachA
pplication(IApplicationThread
thread) {
synchronized (this) {
int callingPid =
Binder.getCallingPid();
final long origId
=
Binder.clearCallingIdentit
y();
attachApplication
Locked(thread, callingPid);
Binder.restoreCal
lingIdentity(origId);
}
}
然后就是

private final boolean attachA
pplicationLocked(IApplication
Thread thread,
int pid) {
thread.bindAppli
cation(processName, appInfo,
providers, app.instrumentatio
nClass,
profilerI
nfo, app.instrumentationArgum
ents, app.instrumentationWatc
her,
app.instr
umentationUiAutomationConnect
ion, testMode, enableOpenGlTr
ace,
isRestric
tedBackupMode || !normalMode,
app.persistent,
new Confi

guration(mConfiguration), app
compat, getCommonServicesLoc
ked(),
.
mCoreSett
ingsObserver.getCoreSettingsL
ocked());
}
thread是IApplicationThread ,
实际上就是
ApplicationThread在服务端
的代理类
ApplicationThreadProxy,然
后又通过IPC就会调用到
ApplicationThread的对应方

法
private class ApplicationThre
ad extends ApplicationThreadN
ative {
public final void bindAppli
cation(String processName, Ap
plicationInfo appInfo,
List<Provider
Info> providers, ComponentNam
e instrumentationName,
ProfilerInfo
profilerInfo, Bundle instrume
ntationArgs,
IInstrumentat
ionWatcher instrumentationWat
cher,
IUiAutomation
Connection instrumentationUiC
onnection, int debugMode,

boolean enabl
eOpenGlTrace, boolean isRestr
ictedBackupMode, boolean pers
istent,
Configuration
config, CompatibilityInfo co
mpatInfo, Map<String, IBinder
>
services,
Bundle coreSe
ttings) {
.
..ignore so
me code...
AppBindData data
data.processName
=
new AppBindData();
=
processName;
data.appInfo = ap
pInfo;
data.providers =
providers;

data.instrumentat
ionName = instrumentationName
;
data.instrumentat
ionArgs = instrumentationArgs
;
data.instrumentat
ionWatcher = instrumentationW
atcher;
data.instrumentat
ionUiAutomationConnection = i
nstrumentationUiConnection;
data.debugMode =
debugMode;
data.enableOpenGl
Trace = enableOpenGlTrace;
data.restrictedBa
ckupMode = isRestrictedBackup
Mode;
data.persistent =
persistent;
data.config = con

fig;
compatInfo;
data.compatInfo =
data.initProfiler
Info = profilerInfo;
sendMessage(H.BIN
D_APPLICATION, data);
}
}
我们需要关注的其实就是最
后的sendMessage(),里面有
函数的编号
H.BIND_APPLICATION,然
后这个Messge会被H这个
Handler处理

private class H extends Handl
er {
.
..ignore some code...
public static final int
BIND_APPLICATION = 110
;
.
..ignore some code...
public void handleMessag
e(Message msg) {
switch (msg.what) {
.
..ignore some code..
case BIND_APPLICATIO
Trace.tra
.
N:
ceBegin(Trace.TRACE_TAG_ACTIV
ITY_MANAGER, "bindApplication

"
);
AppBindDa
ta data = (AppBindData)msg.ob
j;
handleBin
dApplication(data);
Trace.tra
ceEnd(Trace.TRACE_TAG_ACTIVIT
Y_MANAGER);
break;
.
}
..ignore some code..
.
}
最后就在下面这个方法中,
完成了实例化,拨那个企鹅
通过
mInstrumentation.callApplicati

onOnCreate实现了onCreate()
的调用。
private void handleBindApplic
ation(AppBindData data) {
try {
.
..ignore some cod
Application app =
e...
data.info.makeApplication(da
ta.restrictedBackupMode, null
)
;
mInitialApplicati
..ignore some cod
on = app;
e...
.

try {
mInstrumentat
ion.onCreate(data.instrumenta
tionArgs);
}
catch (Exception
e) {
}
try {
mInstrumentat
ion.callApplicationOnCreate(a
pp);
}
catch (Exceptio
}
n e) {
}
finally {
StrictMode.setThr
eadPolicy(savedPolicy);
}
}

data.info是一个LoadeApk对
象。
LoadeApk.data.info.makeAppl
ication()
public Application makeApplic
ation(boolean forceDefaultApp
Class,
Instrumentation i
nstrumentation) {
if (mApplication != n
ull) {
return mApplicati
on;
}
Application app = nul
l;

String appClass = mAp
plicationInfo.className;
if (forceDefaultAppCl
ass || (appClass == null)) {
appClass = "andro
id.app.Application";
}
try {
java.lang.ClassLo
ader cl = getClassLoader();
if (!mPackageName
.
equals("android")) {
initializeJav
aContextClassLoader();
}
ContextImpl appCo
ntext = ContextImpl.createApp
Context(mActivityThread, this
)
;
app = mActivityTh

read.mInstrumentation.newAppl
ication(
cl, appCl
ass, appContext);
appContext.setOut
erContext(app);
}
catch (Exception e)
}
{
mActivityThread.mAllA
pplications.add(app);
mApplication = app;
/
/传进来的是null,所以这里不
会执行,onCreate在上一层执行
if (instrumentation !
=
null) {
try {
instrumentati
on.callApplicationOnCreate(ap
p);
}
catch (Exceptio
n e) {

}
}
.
..ignore some code..
.
}
return app;
}
所以最后还是通过
Instrumentation.makeApplicati
on()实例化的,这个老板娘
真的很厉害呀!
static public Application new
Application(Class<?> clazz, C


ontext context)
throws Instantiat
ionException, IllegalAccessEx
ception,
ClassNotFoundExce
ption {
Application app = (Ap
plication)clazz.newInstance()
;
app.attach(context);
return app;
}
而且通过反射拿到
Application对象之后,直接
调用attach(),所以attach()调
用是在onCreate()之前的。
参考文章
下面的这些文章都是这方面
比较精品的,希望你抽出时
间研究,这可能需要花费很
长时间,但是如果你想进阶
必须的。
再次感谢下面这些文章的作
者的分享精神。
Binder
Android Bander设计与实

现 - 设计篇
zygote
Android系统进程Zygote启
动过程的源代码分析
Android 之 zygote 与进程
ActivityThread、
Instrumentation、AMS
Android
Ac tivity. sta r tAc tivity流程简


介
Android应用程序进程启动
过程的源代码分析
框架层理解Ac tivity生命周
期(APP启动过程)
Android应用程序窗口设计
框架介绍
ActivityManagerService分
析一:AMS的启动
Android应用程序窗口设计
框架介绍
Launcher


Android 4.0 Launcher源码
分析系列(一)
Android Launcher分析和修
流程
结语
OK,到这里,这篇文章算
是告一段落了,我们再回头
看看一开始的几个问题,你
还困惑吗?
一个App是怎么启动起来


的?
App的程序入口到底是哪
里?
Launcher到底是什么神奇
的东西?
听说还有个AMS的东西,
它是做什么的?
Binder是什么?他是如何
进行IPC通信的?
Ac tivity生命周期到底是什
么时候调用的?被谁调用
的?
再回过头来看看这些类,你


还迷惑吗?
ActivityManagerServices,
简称AMS,服务端对象,
负责系统中所有Ac tivity的
生命周期
Ac tivityThre a d,App的真
正入口。当开启App之
后,会调用main()开始运
行,开启消息循环队列,
这就是传说中的UI线程或
者叫主线程。与
ActivityManagerServices配
合,一起完成Ac tivity的管


理工作
ApplicationThread,用来
实现
ActivityManagerService与
Ac tivityThre a d之间的交
互。在
ActivityManagerService需
要管理相关Application中
的Ac tivity的生命周期时,
通过ApplicationThread 的
代理对象与Ac tivityThre a d
通讯。
ApplicationThreadProxy,


是ApplicationThread在服
务器端的代理,负责和客
户端的ApplicationThread
通讯。AMS就是通过该代
理与Ac tivityThre a d进行通
信的。
Instrumentation,每一个应
用程序只有一个
Instrumentation对象,每个
Ac tivity内都有一个对该对
象的引用。Instrumentation
可以理解为应用进程的管
家,Ac tivityThre a d要创建

或暂停某个Ac tivity时,都
需要通过Instrumentation来
进行具体的操作。
Ac tivitySta c k,Ac tivity在
AMS的栈管理,用来记录
已经启动的Ac tivity的先后
关系,状态信息等。通过
Ac tivitySta c k决定是否需要
启动新的进程。
Ac tivityRe c ord,
Ac tivitySta c k的管理对象,
每个Ac tivity在AMS对应一
个Ac tivityRe c ord,来记录


Ac tivity的状态以及其他的
管理信息。其实就是服务
器端的Ac tivity对象的映
像。
TaskRecord,AMS抽象出
来的一个“任务”的概念,
是记录Ac tivityRe c ord的
栈,一个“Task”包含若干
个Ac tivityRe c ord。AMS用
TaskRecord确保Ac tivity启
动和退出的顺序。如果你
清楚Ac tivity的4种
launchMode,那么对这个

概念应该不陌生。
如果你还感到迷惑的话,就
把这篇文章多读几遍吧,信
息量可能比较多,需要慢慢
消化 ~
尊重原创,转载请注明:
From 凯子哥
(
http://blog.csdn.net/zhaokai
qiang1992) 侵权必究!
关注我的微博,可以获得更
多精彩内容

【
工匠若
水 http://blog.csdn.net/yanbob
er 转载烦请注明出处,尊重
分享成果】
1
背景
是Android的一个核心,也是
应用工程师面试的一个知识
点。前面我们分析了Handler
异步机制原理(不了解的可
以阅读我的《Android异步消
息处理机制详解及源码分
析》文章),这里继续分析
Android的另一个异步机制
AsyncTask的原理。
当使用线程和Handler组合实
现异步处理时,当每次执行
耗时操作都创建一条新线程
进行处理,性能开销会比较
大。为了提高性能我们使用
AsyncTask实现异步处理(其
实也是线程和handler组合实
现),因为其内部使用了
java提供的线程池技术,有
效的降低了线程创建数量及
限定了同时运行的线程数,
还有一些针对性的对池的优
化操作。所以说AsyncTask是
Android为我们提供的方便编
写异步任务的工具类。
【
工匠若
水 http://blog.csdn.net/yanbob
er 转载烦请注明出处,尊重
分享成果】
2
实例演示
先看下使用AsyncTask模拟下
载的效果图:
看下代码,如下:
public class MainActivity ext
ends Activity {
@
Override
protected void onCreate(B
undle savedInstanceState) {
super.onCreate(savedI
nstanceState);
setContentView(R.layo
ut.activity_main);
new TestAsyncTask(thi
s).execute();
}
static final class TestAs
yncTask extends AsyncTask<Voi
d, Integer, Boolean> {
/
/如上三个泛型参数从左到

右含义依次为:
/
/1. 在执行AsyncTask时
需要传入的参数,可用于在后台任务中使
用。
/
/2. 后台任务执行时,如果
需要在界面上显示当前的进度,则使用这
个。
/
/3. 当任务执行完毕后,如
果需要对结果进行返回,则使用这个。
private Context mCont
ext = null;
private ProgressDialo
g mDialog = null;
private int mCount =
0
;
public TestAsyncTask(
Context context) {
mContext = contex
t;
}

/
/在后台任务开始执行之间
调用,用于进行一些界面上的初始化操作
protected void onPreE
xecute() {
super.onPreExecut
e();
mDialog = new Pro
gressDialog(mContext);
mDialog.setMax(10
0
);
mDialog.setProgre
ssStyle(ProgressDialog.STYLE_
HORIZONTAL);
mDialog.show();
}
/
/这个方法中的所有代码都
会在子线程中运行,我们应该在这里去处
理所有的耗时任务
protected Boolean doI
nBackground(Void... params) {
while (mCount < 1

0
0) {
publishProgre
ss(mCount);
mCount += 20;
try {
Thread.sl
eep(1000);
}
catch (Inte
rruptedException e) {
e.printSt
ackTrace();
}
}
return true;
}
/
/当在后台任务中调用了pub
lishProgress(Progress...)方法
后,这个方法就很快会被调用
protected void onProg
ressUpdate(Integer... values)
{

super.onProgressU
pdate(values);
mDialog.setProgre
ss(values[0]);
}
/
/当后台任务执行完毕并通
过return语句进行返回时,这个方法就
很快会被调用
protected void onPost
Execute(Boolean aBoolean) {
super.onPostExecu
te(aBoolean);
if (aBoolean && m
Dialog != null && mDialog.isS
howing()) {
mDialog.dismi
ss();
}
}
}
}

可以看见Android帮我们封装
好的AsyncTask还是很方便使
用的,咱们不做过多说明。
接下来直接分析源码。
【
工匠若
水 http://blog.csdn.net/yanbob
er 转载烦请注明出处,尊重
分享成果】
3
2
Android5.1.1(API
2)AsyncTa sk源码分
析

通过源码可以发现AsyncTask
是一个抽象类,所以我们在
在上面使用时需要实现它。
那怎么下手分析呢?很简
单,我们就依据上面示例的
流程来分析源码,具体如
下。
3-1 AsyncTask实例化源码分
析
/
**
*
Creates a new asynchro
nous task. This constructor m
ust be invoked on the UI thre

ad.
*
/
public AsyncTask() {
mWorker = new WorkerR
unnable<Params, Result>() {
public Result cal
l() throws Exception {
mTaskInvoked.
set(true);
Process.setTh
readPriority(Process.THREAD_P
RIORITY_BACKGROUND);
/
/noinspectio
n unchecked
return postRe
sult(doInBackground(mParams))
;
}
}
;
mFuture = new FutureT

ask<Result>(mWorker) {
Override
@
protected void do
ne() {
try {
postResul
tIfNotInvoked(get());
}
catch (Inte
rruptedException e) {
android.u
til.Log.w(LOG_TAG, e);
}
catch (Exec
utionException e) {
throw new
RuntimeException("An error o
ccured while executing doInBa
ckground()",
e
.
getCause());
}
catch (Canc
ellationException e) {
postResul

tIfNotInvoked(null);
}
}
}
;
}
看见注释没有,AsyncTask的
实例化只能在UI线程中。然
后整个构造函数就只初始化
了两个AsyncTask类的成员变
量(mWorker和mFuture)。
mWorker
为匿名内部类的实例对象
WorkerRunnable(实现了
Ca lla ble接口),mFuture为

匿名内部类的实例对象
FutureTask,传入了mWorker
作为形参(重写了
FutureTask类的done方
法)。
3-2 AsyncTask的execute方法
源码分析
正如上面实例一样,得到
AsyncTask实例化对象之后就
执行了execute方法,所以看
下execute方法的源码,如
下:

public final AsyncTask<Params
Progress, Result> execute(P
arams... params) {
return executeOnExecu
,
tor(sDefaultExecutor, params)
;
}
可以看见,execute调运了
executeOnExecutor方法,
executeOnExecutor方法除过
传入了params形参以外,还
传入了一个static的
SerialExecutor对象
(
SerialExecutor实现了
Executor接口)。继续看下

executeOnExecutor源码,如
下:
public final AsyncTask<Params
,
Progress, Result> executeOn
Executor(Executor exec,
Params... params)
{
if (mStatus != Status
PENDING) {
.
{
switch (mStatus)
case RUNNING:
throw new
IllegalStateException("Canno
t execute task:"
+
"
the task is already runnin
g.");
case FINISHED

:
throw new
IllegalStateException("Canno
t execute task:"
+
"
the task has already been
executed "
+
"
(a task can be executed onl
y once)");
}
}
mStatus = Status.RUNN
ING;
onPreExecute();
mWorker.mParams = par
exec.execute(mFuture)
ams;
;

return this;
}
首先判断AsyncTask异步任务
的状态,当处于RUNNING
和FINISHED时就报
IllegalStateException非法状态
异常。由此可以看见一个
AsyncTask的
execute方法只能被调运一
次。接着看见17行
onPreExecute();没有?看下
这个方法源码,如下:


/
**
*
Runs on the UI thread
before {@link #doInBackground
}
.
*
*
*
*
@see #onPostExecute
@see #doInBackground
/
protected void onPreExecu
te() {
}
空方法,而且通过注释也能
看见,这不就是我们
AsyncTask中第一个执行的方
法吗?是的。
回过头继续往下看,看见20

行exec.execute(mFuture);代
码没?exec就是形参出入的
上面定义的static
SerialExecutor对象
(
SerialExecutor实现了
Executor接口),所以
execute就是SerialExecutor静
态内部类的方法喽,在执行
execute方法时还传入了
AsyncTask构造函数中实例化
的第二个成员变量mFuture。
我们来看下SerialExecutor静
态内部类的代码,如下:

private static class SerialEx
ecutor implements Executor {
final ArrayDeque<Runn
able> mTasks = new ArrayDeque
<
Runnable>();
Runnable mActive;
public synchronized v
oid execute(final Runnable r)
{
mTasks.offer(new
Runnable() {
public void r
un() {
try {
r.run
();
}
}
finally
sched
{
uleNext();

}
}
);
if (mActive == nu
ll) {
scheduleNext(
}
)
;
}
protected synchronize
d void scheduleNext() {
if ((mActive = mT
asks.poll()) != null) {
THREAD_POOL_E
XECUTOR.execute(mActive);
}
}
}
在源码中可以看见,

SerialExecutor在AsyncTask中
是以常量的形式被使用的,
所以在整个应用程序中的所
有AsyncTask实例都会共用同
一个
SerialExecutor对象。接着可
以看见,SerialExecutor是使
用ArrayDeque这个队列来管
理Runnable对象的,如果我
们一次性启动了很多个任
务,首先在第一次运行
execute()方法的时候会调用
ArrayDeque的offer()方法将
传入的Runnable对象添加到
队列的最后,然后判断
mAc tive对象是不是等于
null,第一次运行是null,然
后调用scheduleNext()方法,
在这个方法中会从队列的头
部取值,并赋值给mAc tive对
象,然后调用
THREAD_POOL_EXECUTO
R去执行取出的取出的
Runnable对象。之后如果再
有新的任务被执行时就等待
上一个任务执行完毕后才会
得到执行,所以说同一时刻
只会有一个线程正在执行,
其余的均处于等待状态,这
就是SerialExecutor类的核心
作用。
我们再来看看上面用到的
THREAD_POOL_EXECUTO
R与execute,如下:
public abstract class AsyncTa
sk<Params, Progress, Result>
{
.
.....
private static final int
CPU_COUNT = Runtime.getRuntim
e().availableProcessors();

private static final int
CORE_POOL_SIZE = CPU_COUNT +
1
;
private static final int
MAXIMUM_POOL_SIZE = CPU_COUNT
*
2 + 1;
private static final int
KEEP_ALIVE = 1;
private static final Thre
adFactory sThreadFactory = ne
w ThreadFactory() {
private final AtomicI
nteger mCount = new AtomicInt
eger(1);
public Thread newThre
ad(Runnable r) {
return new Thread
(r, "AsyncTask #" + mCount.ge
tAndIncrement());
}

}
;
private static final Bloc
kingQueue<Runnable> sPoolWork
Queue =
new LinkedBlockin
gQueue<Runnable>(128);
/
**
*
An {@link Executor} th
at can be used to execute tas
ks in parallel.
*
/
public static final Execu
tor THREAD_POOL_EXECUTOR
=
new ThreadPoolE
xecutor(CORE_POOL_SIZE, MAXIM
UM_POOL_SIZE, KEEP_ALIVE,
TimeUnit.
SECONDS, sPoolWorkQueue, sThr
eadFactory);
.
.....

}
看见没有,实质就是在一个
线程池中执行,这个
THREAD_POOL_EXECUTO
R线程池是一个常量,也就
是说整个App中不论有多少
AsyncTask都只有这
一个线程池。也就是说上面
SerialExecutor类中execute()
方法的所有逻辑就是在子线
程中执行,注意
SerialExecutor的execute方法

有一个Runnable参数
这个参数就是mFuture对
,
象,所以我们看下
FutureTask类的run()方法,
如下源码:
public void run() {
if (state != NEW ||
!
UNSAFE.compareAn
dSwapObject(this, runnerOffse
t,
null, Thread.curr
entThread()))
return;
try {
Callable<V> c = c
allable;

if (c != null &&
state == NEW) {
V result;
boolean ran;
try {
result =
c.call();
e;
ran = tru
}
catch (Thro
result =
wable ex) {
null;
ran = fal
setExcept
se;
ion(ex);
}
if (ran)
set(resul
t);
}

}
finally {
/ runner must be
/
non-null until state is sett
led to
/
/ prevent concur
rent calls to run()
runner = null;
/ state must be
/
re-read after nulling runner
to prevent
/
/ leaked interru
pts
int s = state;
if (s >= INTERRUP
TING)
handlePossibl
eCancellationInterrupt(s);
}
}
看见没有?第7行的c =

callable;其实就是AsyncTask
构造函数中实例化
FutureTask对象时传入的参
数mWorker。12行看见
result = c.call(); 没
有?
其实就是调运
WorkerRunnable类的c all方
法,所以我们回到AsyncTask
构造函数的WorkerRunnable
匿名内部内中可以看见如
下:

mWorker = new WorkerRunnable<
Params, Result>() {
public Result cal
l() throws Exception {
mTaskInvoked.
set(true);
Process.setTh
readPriority(Process.THREAD_P
RIORITY_BACKGROUND);
/
/noinspectio
n unchecked
return postRe
sult(doInBackground(mParams))
;
}
}
;
看见没有?在postResult()方

法的参数里面,我们可以看
见doInBackground()方法。所
以这验证了我们上面例子中
使用的AsyncTask,首先在主
线程执
行onPreExecute方法,接着
在子线程执行
doInBackground方法,所以
这也就是为什么我们可以在
doInBackground()方法中去处
理耗时操作的原因了
,接着等待doInBackground
方法耗时操作执行完毕以后
将返回值传递给了
postResult()方法。所以我们
来看下postResult这个方法的
源码,如下:
private Result postResult(Res
ult result) {
@
SuppressWarnings("un
checked")
Message message = get
Handler().obtainMessage(MESSA
GE_POST_RESULT,
new AsyncTask
Result<Result>(this, result))
;
message.sendToTarget(
)
;

return result;
}
先看下这个getHandler拿到的
是哪个Handler吧,如下:
private static class Internal
Handler extends Handler {
public InternalHandle
r() {
super(Looper.getM
ainLooper());
}
@
SuppressWarnings({"u
nchecked", "RawUseOfParameter
izedType"})
@
Override
public void handleMes
sage(Message msg) {


AsyncTaskResult<?
result = (AsyncTaskResult<?
) msg.obj;
>
>
switch (msg.what)
{
case MESSAGE_
POST_RESULT:
/
/ There
is only one result
result.mT
ask.finish(result.mData[0]);
break;
case MESSAGE_
POST_PROGRESS:
result.mT
ask.onProgressUpdate(result.m
Data);
break;
}
}
}

看见没有,拿到的是
MainLooper,也就是说在在
UI线程中的Handler(不清楚
的请阅读《Android异步消息
处理机制详解及源码分析》
文章)。所以
上面的方法其实就是将子线
程的数据发送到了UI来处
理,也就是通过
MESSAGE_P OST_RESULT
在handleMessage来处理。所
以我们继续看
handleMessage中的
result.mTask.finish(result.mDa
ta[0]);就会发现finish的代码
如下:
private void finish(Result re
sult) {
if (isCancelled()) {
onCancelled(resul
t);
}
else {
onPostExecute(res
ult);
}
mStatus = Status.FINI
SHED;
}

看见没有?依据返回值true
与false回调AsyncTask的
onPostExecute或者
onCancelled方法。
到此是不是会好奇
onProgressUpdate方法啥时候
调运的呢?继续往下看可以
发现handleMessage方法中的
MESSAGE_POST_PROGRES
S不就是回调我们UI Thread
中的onProgressUpdate方法
吗?那怎么样才能让他回调
呢?追踪
MESSAGE_POST_PROGRES
S消息你会发现如下:
protected final void publishP
rogress(Progress... values) {
if (!isCancelled()) {
getHandler().obta
inMessage(MESSAGE_POST_PROGRE
SS,
new Async
TaskResult<Progress>(this, va
lues)).sendToTarget();
}
}
额,没意思了。这不就是我
们上面例子中的在子线程的
doInBackground耗时操作中

调运通知回调
onProgressUpdate的方法么。
看见没有,AsyncTa sk的实质
就是Handler异步消息处理机
制(不清楚的请阅读
《Android异步消息处理机制
详解及源码分析》文章),
只是对线程做了优化处理和
封装而已。
【工匠若
水 http://blog.csdn.net/yanbob
er 转载烦请注明出处,尊重
分享成果】
4
为当年低版本
AsyncTa sk的臭名正身
接触Android比较久的可能都
知道,在Android 3.0之前是
并没有SerialExecutor这个类
的(上面有分析)。那些版
本的代码是直接创建了指定
大小的线程池常量来执行
task的。其中
MAXIMUM_POOL_SIZE =
128;,所以那时候如果我们
应用中一个界面需要同时创
建的Async Task线程大于
128(批量获取数据,譬如
照片浏览瀑布流一次加载)
程序直接就挂了。所以当时
的AsyncTask因为这个原因臭
名昭著。
回过头来看看现在高版本的
AsyncTa sk,是不是没有这个
问题了吧?因为现在是顺序
执行的。而且更劲爆的是现
在的Async Task还直接提供了
客户化实现Executor接口功
能,使用如下方法执行
Async Task即可使用自定义
Executor,如下:
public final AsyncTask<Params
,
Progress, Result> executeOn
Executor(Executor exec,
Params... params)
{
.
.....
return this;
}
可以看出,在3.0以上版中
Async Task已经不存在那个臭
名昭著的Bug了,所以可以
放心使用了,妈妈再也不用

担心我的AsyncTa sk出Bug
了。
【工匠若
水 http://blog.csdn.net/yanbob
er 转载烦请注明出处,尊重
分享成果】
5
AsyncTa sk与Handler
异步机制对比
前面文章也分析过Handler
了,这里也分析了
AsyncTa sk,现在把他们两拽
一起来比较比较。具体如
下:
1. Async Task是对Handler与
Thread的封装。
2
. Async Task在代码上比
Handler要轻量级别,但实
际上比Handler更耗资源,
因为AsyncTask底层是一
个线程池,而Handler仅仅
就是发送了一个消息队
列。但是,如果异步任务
的数据特别庞大,
Async Task线程池比
Handler节省开销,因为
Handler需要不停的new
Thread执行。
3
. AsyncTa sk的实例化只能
在主线程,Handler可以随
意,只和Looper有关系。
6
AsyncTa sk总结
到此整个Android的
AsyncTa sk已经分析完毕,相
信你现在对于AsyncTask会有
一个很深入的理解与认识
了。
【工匠若
水 http://blog.csdn.net/yanbob
er 转载烦请注明出处,尊重
分享成果】
版权声明:本文为博主原创
文章,未经博主允许不得转
载。
http://www.tuicool.com/article
s/22iMZj
说说 PendingIntent 的内部机
制
侯 亮
1
概述
在Android中,我们常常使用
PendingIntent来表达一种“留
待日后处理”的意思。从这
个角度来说,PendingIntent
可以被理解为一种特殊的异
步处理机制。不过,单就命
名而言,PendingIntent其实
具有一定误导性,因为它既
不继承于Intent,也不包含
Intent,它的核心可以粗略地
汇总成四个字——“异步激
发”。
很明显,这种异步激发常常
是要跨进程执行的。比如说
A进程作为发起端,它可以
从系统“获取”一个
PendingIntent,然后A进程可
以将PendingIntent对象通过
binder机制“传递”给B进程,
再由B进程在未来某个合适
时机,“回调”PendingIntent
对象的send()动作,完成激
发。
在Android系统中,最适合做
集中性管理的组件就是
AMS(Ac tivity Manager
Service)啦,所以它义不容
辞地承担起管理所有
PendingIntent的职责。这样
我们就可以画出如下示意
图:
注意其中的第4步“递送相应
的intent”。这一步递送的
intent是从何而来的呢?简单
地说,当发起端获取
PendingIntent时,其实是需
要同时提供若干intent的。这
些intent和PendingIntent只是
配套的关系,而不是聚合的
关系,它们会被缓存在AMS
中。日后,一旦处理端将
PendingIntent的“激发”语义
传递到AMS,AMS就会尝试
找到与这个PendingIntent对
应的若干intent,并递送出
去。
当然,以上说的只是大概情
况,实际的技术细节会更复
杂一点儿。下面我们就来谈
谈细节。
2
PendingIntent的技术
细节
2
.1 发起端获取PendingIntent
我们先要理解,所谓的“发
起端获取PendingIntent”到底
指的是什么。难道只是简单
new一个PendingIntent对象
吗?当然不是。此处的“获
取”动作其实还含有向
AMS“注册”intent的语义。
在P endingIntent.java文件中,
我们可以看到有如下几个比
较常见的静态函数:
public static
PendingIntent getActivity (
Context context, int
requestCode, Intent intent,

int flags)
public static
PendingIntent getBroadcast
(Context context, int
requestCode, Intent intent,
int flags)
public static
PendingIntent getService (
Context context, int
requestCode, Intent intent,
int flags)
public static
PendingIntent getActivities


(Context context, int
requestCode, Intent[]
intents, int flags)
public static
PendingIntent getActivities
(Context context, int
requestCode, Intent[]
intents, int flags, Bundle
options)
它们就是我们常用的获取
PendingIntent的动作了。
坦白说,这几个函数的命名

可真不怎么样,所以我们简
单解释一下。上面的
ge tAc tivity( )的意思其实是,
获取一个PendingIntent对
象,而且该对象日后激发时
所做的事情是启动一个新
a c tivity。也就是说,当它异
步激发时,会执行类似
Context.startActivity()那样的
动作。相应地,
getBroadcast()和getService()
所获取的PendingIntent对象
在激发时,会分别执行类似
Context..sendBroadcast()和
Context.startService()这样的
动作。至于最后两个
ge tAc tivitie s(),用得比较
少,激发时可以启动几个
a c tivity。
我们以ge tAc tivity( )的代码来
说明问题:
public static PendingIntent g
etActivity(Context context, i
nt requestCode,
Intent intent, int
flags, Bundle options)
{

String packageName = cont
ext.getPackageName();
String resolvedType = int
ent != null ?
int
ent.resolveTypeIfNeeded(conte
xt.getContentResolver()) : nu
ll;
try
{
intent.setAllowFds(fa
lse);
IIntentSender target
=
ActivityManagerNative.getDe
fault().getIntentSender(
ActivityManager.INTENT
_
,
SENDER_ACTIVITY, packageName
null, null, requestCod
e, new Intent[] { intent },

resolvedType != null ?
new String[] { resolvedType
: null,
}
:
flags, options);
return target != null
?
new PendingIntent(target)
null;
}
catch (RemoteException e)
{
}
return null;
}
其中那句new
PendingIntent(target)创建了
PendingIntent对象,其重要

性自不待言。然而,这个对
象的内部核心其实是由上面
那个getIntentSender()函数得
来的。而这个IIntentSender核
心才是我们真正需要关心的
东西。
说穿了,此处的IIntentSender
对象是个binder代理,它对
应的binder实体是AMS中的
PendingIntentRecord对象。
PendingIntent对象构造之
时,IIntentSender代理作为参
数传进来,并记录在
PendingIntent的mTa rge t域。
日后,当PendingIntent执行
异步激发时,其内部就是靠
这个mTa rge t域向AMS传递语
义的。
我们前文说过,
PendingIntent常常会经由
binder机制,传递到另一个
进程去。而binder机制可以
保证,目标进程得到的
PendingIntent的mTa rge t域也
是合法的IIntentSender代理,
而且和发起端的IIntentSender
代理对应着同一个
PendingIntentRecord实体。
示意图如下:
2
.2 AMS里的
PendingIntentRecord
那么PendingIntentRecord 里
又有什么信息呢?它的定义
截选如下:
class PendingIntentRecord ext
ends IIntentSender.Stub
{
final ActivityManagerServ
ice owner;
final Key key; // 最关键

的key 域
final int uid;
final WeakReference<Pendi
ngIntentRecord> ref;
boolean sent = false;
boolean canceled = false;
String stringName;
.
. . . . .
}
请注意其中那个key域。这
里的Key是个
PendingIntentRecord的内嵌
类,其定义截选如下:
final static class Key
{
final int type;


final String packageName;
final ActivityRecord acti
vity;
final String who;
final int requestCode;
final Intent requestInten
// 注意!
t;
final String requestResol
vedType;
final Bundle options;
Intent[] allIntents;
注意!记录了当初获取PendingInte
/
/
nt时,用户所指定的所有intent
String[] allResolvedTypes
;
final int flags;
final int hashCode;
.
.
. . . . .
. . . . .
}

请注意其中的allIntents[]数组
域以及requestIntent域。前者
记录了当初获取
PendingIntent时,用户所指
定的所有intent(虽然一般情
况下只会指定一个intent,但
类似ge tAc tivitie s()这样的函
数还是可以指定多个intent
的),而后者可以粗浅地理
解为用户所指定的那个intent
数组中的最后一个intent。现
在大家应该清楚异步激发时
用到的intent都存在哪里了
吧。
Key的构造函数截选如下:
Key(int _t, String _p, Activi
tyRecord _a, String _w,
int _r, Intent[] _i, Stri
ng[] _it, int _f, Bundle _o)
{
type = _t;
packageName = _p;
activity = _a;
who = _w;
requestCode = _r;
requestIntent = _i != nul
l ? _i[_i.length-1] : null;
/
/ intent数组中的最后一个
requestResolvedType = _it
!
= null ? _it[_it.length-1]
null;
:
allIntents = _i;
// 所

有intent
allResolvedTypes = _it;
flags = _f;
options = _o;
.
. . . . .
}
Key不光承担着记录信息的
作用,它还承担“键值”的作
用。
2.3 AMS中的
PendingIntentRecord总表
在AMS中,管理着系统中所
有的PendingIntentRecord 节
点,所以需要把这些节点组

织成一张表:
final HashMap<PendingIntentRe
cord.Key, WeakReference<Pendi
ngIntentRecord>>
m
IntentSenderRecords
这张哈希映射表的键值类型
就是刚才所说的
PendingIntentRecord.Key。
以后每当我们要获取
PendingIntent对象时,
PendingIntent里的mTa rge t是

这样得到的:AMS会先查
mIntentSenderRecords表,如
果能找到符合的
PendingIntentRecord节点,
则返回之。如果找不到,就
创建一个新的
PendingIntentRecord节点。
因为PendingIntentRecord 是
个binder实体,所以经过
binder机制传递后,客户进
程拿到的就是个合法的
binder代理。如此一来,前
文的示意图可以进一步修改
成下图:
.4 AMS里的
2
getIntentSender()函数
现在,我们回过头继续说前
文的ge tAc tivity( ),以及其调
用的getIntentSender()。我们
先列一遍ge tAc tivity( )的原
型:
public static PendingIntent g
etActivity(Context context, i
nt requestCode,
Intent intent, int
flags, Bundle options)
context参数是调用方的上
下文。
requestCode是个简单的整
数,起区分作用。
intent是异步激发时将发出
的intent 。
flags可以包含一些既有的
标识,比如
FLAG_ONE_SHOT、
FLAG_NO_CREATE、
FLAG_CANCEL_CURREN
T、
FLAG_UP DATE_CURREN


T等等。不少同学对这个
域不是很清楚,我们后文
会细说。
options可以携带一些额外
的数据。
ge tAc tivity( )的代码很简单,
其参数基本上都传给了
getIntentSender()。
IIntentSender target = Activi
tyManagerNative.getDefault().
getIntentSender(. . . . . .)
getIntentSender()的原型大体


是这样的:
public IIntentSender getInten
tSender(int type,
String packageNam
e, IBinder token, String resu
ltWho,
int requestCode,
Intent[] intents, String[] re
solvedTypes,
int flags, Bundle
options) throws RemoteExcept
ion;
其参数比ge tAc tivity( )要多一
些,我们逐个说明。
type参数表明PendingIntent的

类型。ge tAc tivity( )和
ge tAc tivitie s()动作里指定的
类型值是
INTENT_SENDER_ACTIVIT
Y,getBroadcast() 和
getService()和动作里指定的
类型值分别是
INTENT_SENDER_BROAD
CAST和
INTENT_SENDER_SERVIC
E。另外,在Ac tivity. ja va文
件中,我们还看到一个
createPendingResult()函数,
这个函数表达了发起方的
a c tivity日后希望得到result回
馈的意思,所以其内部调用
getIntentSender()时指定的类
型值为
INTENT_SENDER_ACTIVIT
Y_RESULT。
packageName参数表示发起
端所属的包名。
token参数是个指代回馈目标
方的代理。这是什么意思
呢?我们常用的
ge tAc tivity( )、getBroadcast()
和getService()中,只是把这
个参数简单地指定为null,
表示这个PendingIntent激发
时,是不需要发回什么回馈
的。不过当我们希望获取类
型为
INTENT_SENDER_ACTIVIT
Y_RESULT的PendingIntent
时,就需要指定token参数
了。具体可参考
createPendingResult()的代
码:

public PendingIntent createPe
ndingResult(int requestCode,
Intent data, int flags)
{
String packageName = getP
ackageName();
try
{
data.setAllowFds(fals
e);
IIntentSender target
=
ActivityManagerNative.getDe
fault().getIntentSender(
ActivityManager.INTENT
_
SENDER_ACTIVITY_RESULT,
packageName,
mParent == null ? mTok
en : mParent.mToken,

mEmbeddedID, requestCo
de, new Intent[] { data },
null, flags, null);
return target != null
?
new PendingIntent(target)
null;
:
}
catch (RemoteException
e) {
/
/ Empty
}
return null;
}
看到了吗?传入的token为
Ac tivity的mToken或者其
mParent.mToken。说得简单
点儿,AMS内部可以根据这

个token找到其对应的
Ac tivityRe c ord,日后当
PendingIntent激发时,AMS
可以根据这个Ac tivityRe c ord
确定出该向哪个目标进程的
哪个Ac tivity发出result语义。
resultWho参数和token参数息
息相关,一般也是null啦。
在createPendingResult()中,
其值为Ac tivity的
mEmbeddedID字符串。
requestCode参数是个简单的
整数,可以在获取
PendingIntent时由用户指
定,它可以起区分的作用。
intents数组参数是异步激发
时希望发出的intent。对于
ge tAc tivity( )、getBroadcast()
和getService()来说,都只会
指定一个intent而已。只有
ge tAc tivitie s()会尝试一次传
入若干intent 。
resolvedTypes参数基本上和
intent是相关的。一般是这样
得到的:
String resolvedType = intent
!
= null ? intent.resolveTypeI
fNeeded(
context.getCo
ntentResolver()) : null;
这个值常常和intent内部的
mData URI有关系,比如最
终的值可能是URI对应的
MIME类型。
flags参数可以指定
PendingIntent的一些行为特
点。它的取值是一些既有的

比特标识的组合。目前可用
的标识有:
FLAG_ONE_SHOT、
FLAG_NO_CREATE、
FLAG_CANCEL_CURRENT
、
FLAG_UP DATE_CURRENT
等等。有时候,flags中还可
以附带若干FILL_IN_XXX标
识。我们把常见的标识定义
列举如下:
【PendingIntent中】
public static final int FLAG_
ONE_SHOT = 1<<30;
public static final int FLAG_
NO_CREATE = 1<<29;
public static final int FLAG_
CANCEL_CURRENT = 1<<28;
public static final int FLAG_
UPDATE_CURRENT = 1<<27;
【
Intent中】
public static final int FILL_
IN_ACTION = 1<<0;
public static final int FILL_
IN_DATA = 1<<1;
public static final int FILL_
IN_CATEGORIES = 1<<2;
public static final int FILL_
IN_COMPONENT = 1<<3;
public static final int FILL_


IN_PACKAGE = 1<<4;
public static final int FILL_
IN_SOURCE_BOUNDS = 1<<5;
public static final int FILL_
IN_SELECTOR = 1<<6;
public static final int FILL_
IN_CLIP_DATA = 1<<7;
这些以FILL_IN_打头的标志
位,主要是在intent对象的
fillIn()函数里起作用:
public int fillIn(Intent othe
r, int flags)
我们以FILL_IN_ACTION 为
例来说明,当一个当我们执


行类似
srcIntent.fillIn(otherIntent, ...)
的句子时,如果otherIntent的
mAction域不是null值,那么
fillIn()会在以下两种情况
下,用otherIntent的mAction
域值为srcIntent的mAction域
赋值:
1
) 当srcIntent的mAction域
值为null时;
) 如果fillIn的flags参数里携
2
带了FILL_IN_ACTION标志
位,那么即便srcIntent的
mAction已经有值了,此时也
会用otherIntent的mAction域
值强行替换掉srcIntent的
mAction域值。
其他FILL_IN_标志位和
FILL_IN_ACTION的处理方
式类似,我们不再赘述。
options参数可以携带一
些额外数据。
2
.4.1 getIntentSender()
函数
getIntentSender()函数摘
录如下:
public IIntentSender getInten
tSender(int type, String pack
ageName,
IBinder token, String
resultWho,
int requestCode, Inte
nt[] intents,
String[] resolvedType
s,
int flags, Bundle opt
ions)
{
.
. . . . .

/
/ 先判断intents数组,可以用
伪代码checkIntents(intents)来表
示
/
.
/ checkIntents(intents);
. . . . .
int callingUid = Binder.g
etCallingUid();
. . . . .
.
if (callingUid != 0 && ca
llingUid != Process.SYSTEM_UI
D)
{
int uid = AppGlobals.
getPackageManager().getPackag
eUid(packageName,
UserId.getUserId(calling
Uid));
if (!UserId.isSameApp
(callingUid, uid))
{

.
. . . . .
throw new Securit
yException(msg);
}
}
.
. . . . .
return getIntentSenderLoc
ked(type, packageName, Binder
.
getOrigCallingUid(),
token, resultWho,
requestCode, intents, resolv
edTypes, flags, options);
. . . . .
.
}
getIntentSender()函数中有一
段逐条判断intents[]的代码,
我用伪代码
checkIntents(intents)来表示,

这部分对应的实际代码如
下:
for (int i=0; i<intents.lengt
h; i++)
{
Intent intent = intents[i
]
;
if (intent != null)
{
if (intent.hasFileDes
criptors())
{
throw new Illegal
ArgumentException("File descr
iptors passed in Intent");
}
if (type == ActivityM
anager.INTENT_SENDER_BROADCAS
T &&

(intent.getFlags(
)
&Intent.FLAG_RECEIVER_BOOT_U
PGRADE) != 0)
{
throw new Illegal
ArgumentException("Can't use
FLAG_RECEIVER_BOOT_UPGRADE he
re");
}
intents[i] = new Inte
nt(intent);
}
}
这段代码说明在获取
PendingIntent对象时,intent
中是不能携带文件描述符
的。而且如果这个

PendingIntent是那种要发出
广播的PendingIntent,那么
intent中也不能携带
FLAG_RECEIVER_BOOT_U
P GRADE标识
符。“BOOT_UPGRADE” 应
该是“启动并升级”的意思,
它不能使用PendingIntent。
getIntentSender()中最核
心的一句应该是调用
getIntentSenderLocked()的那
句。
2
.4.2
getIntentSenderLocked()
函数
getIntentSenderLocked()
的代码截选如下:
【frameworks/base/services/ja
va/com/android/server/am/Acti
vityManagerService.java】
IIntentSender getIntentSender
Locked(int type, String packa
geName, int callingUid,
IBinder token, String

resultWho,
int requestCode, Inten
t[] intents,
String[] resolvedTypes
int flags,
,
{
Bundle options)
.
/
. . . . .
/ 如果是INTENT_SENDER_ACT
IVITY_RESULT类型,那么要判断toke
n所
/
/ 代表的activity是否还在ac
tivity栈中
.
/
. . . . .
/ 整理flags中的信息
.
. . . . .
PendingIntentRecord.Key k

ey = new PendingIntentRecord.
Key(type, packageName,
activity, resultWho,
requestCode, intents,
resolvedTypes, flags, opt
ions);
/
/ 尽力从哈希映射表中查找key
对应的PendingIntentRecord,如果
找不到就创建一个新的节点。
WeakReference<PendingInte
ntRecord> ref;
ref = mIntentSenderRecord
s.get(key);
PendingIntentRecord rec =
ref != null ? ref.get() : nu
ll;

if (rec != null)
{
/
/ 找到了匹配的PendingI
ntent,现在考虑要不要更新它,或者取
消它。
if (!cancelCurrent)
{
if (updateCurrent
)
{
/
/ 如果明确指定
了FLAG_UPDATE_CURRENT,那么更新
找到的节点
if (rec.key.r
equestIntent != null) {
rec.key.r
equestIntent.replaceExtras(in
tents != null ?
i
ntents[intents.length - 1] :
null);
}

if (intents !
intents[i
=
null) {
ntents.length-1] = rec.key.re
questIntent;
rec.key.a
llIntents = intents;
rec.key.a
llResolvedTypes = resolvedTyp
es;
}
else {
rec.key.a
llIntents = null;
rec.key.a
llResolvedTypes = null;
}
}
/
/ 凡是能找到对应的
节点,而且又不取消该节点的,那么就r
eturn这个节点
return rec;
}

/
/ 如果PendingIntent的
标志中带有FLAG_CANCEL_CURRENT,
则从哈希映射表中删除之
rec.canceled = true;
mIntentSenderRecords.
remove(key);
}
if (noCreate)
{
/
/ 如果明确表示了不创建新
节点,也就是说标志中带有FLAG_NO_C
REATE ,
/
/ 那么不管是不是Cancel
了PendingIntent,此时一概直接返回
。
return rec;
}
/
/ 从哈希映射表中找不到,而且
又没有写明FLAG_NO_CREATE,此时创
建一个新节点
rec = new PendingIntentRe

cord(this, key, callingUid);
mIntentSenderRecords.put(
key, rec.ref);
if (type == ActivityManag
er.INTENT_SENDER_ACTIVITY_RES
ULT)
{
/
/ 如果intent需要返回结
果,那么修改token对应的ActivityR
ecord
/
/ 的pendingResults域
。
if (activity.pendingR
esults == null)
{
activity.pendingR
esults = new HashSet<WeakRefe
rence<PendingIntentRecord>>()
;
}
activity.pendingResul
ts.add(rec.ref);

}
return rec;
}
上面这段代码主要做的事情
有:
1) 将传进来的多个参数信
息整理成一个
PendingIntentRecord.Key对象
(key);
) 尝试从
2
mIntentSenderRecords总表中
查找和key相符的
PendingIntentRecord节点;

3) 根据flags参数所含有的
意义,对得到的
PendingIntentRecord进行加
工。有时候修改之,有时候
删除之。
4
) 如果在总表中没有找到
对应的PendingIntentRecord
节点,或者根据flags的语义
删除了刚找到的节点,那么
此时的默认行为是创建一个
新的PendingIntentRecord 节
点,并插入总表。除非flags
中明确指定了
FLAG_NO_CREATE,此时
不会创建新节点。
2
.4.3 说说flags
从getIntentSenderLocked()的
代码中,我们终于搞明白了
flags中那些特定比特值的意
义了。我们现在总结一下。
应该说这些flags比特值基本
上都是在围绕着
mIntentSenderRecords总表说
事的。其中,
FLAG_CANCEL_CURRENT
的意思是,当我们获取
PendingIntent时,如果可以
从总表中查到一个相符的已
存在的PendingIntentRecord
节点的话,那么需要把这个
节点从总表中清理出去。而
在没有指定
FLAG_CANCEL_CURRENT
的大前提下,如果用户指定
了
FLAG_UP DATE_CURRENT
标识,那么会用新的intents
参数替掉刚查到的
PendingIntentRecord中的旧
intents。
而不管是刚清理了已存在的
PendingIntentRecord,还是
压根儿就没有找到符合的
PendingIntentRecord,只要
用户没有明确指定
FLAG_NO_CREATE标识,
系统就会尽力创建一个新的
PendingIntentRecord节点,
并插入总表。
至于FLAG_ONE_SHOT标识
嘛,它并没有在
getIntentSenderLocked()中露
脸儿。它的名字
是“FLAG_ONE_SHOT”,也
就是“只打一枪”的意思,那
么很明显,这个标识起作用
的地方应该是在“激发”函数
里。在最终的激发函数
(sendInner())里,我们可
以看到下面的代码:
【frameworks/base/services/ja
va/com/android/server/am/Pen
dingIntentRecord. java】
int sendInner(int code, Inten
t intent, String resolvedType
,
IIntentReceiver finis
hedReceiver, String requiredP
ermission,
IBinder resultTo, Str
ing resultWho, int requestCod
e,
int flagsMask, int fl
agsValues, Bundle options)
{
synchronized(owner) {
if (!canceled)
{
sent = true;
if ((key.flags &
PendingIntent.FLAG_ONE_SHOT)
!
= 0) {
owner.cancelI
ntentSenderLocked(this, true)

;
canceled = tr
ue;
}
.
.
. . . . .
. . . . .
}
}
return ActivityManager.ST
ART_CANCELED;
}
意思很简单,一进行激发就
把相应的
PendingIntentRecord节点从
总表中清理出去,而且把
PendingIntentRecord的
canceled域设为true。这样,

以后即便外界再调用send()
动作都没用了,因为再也无
法进入if (!canceled)判断了。
2
.4.4 将
PendingIntentRecord节
点插入总表
接下来
getIntentSenderLocked()函数
new了一个
PendingIntentRecord节点,
并将之插入
mIntentSenderRecords总表
中。
2
.5 PendingIntent的激
发动作
下面我们来看PendingIntent
的激发动作。在前文我们已
经说过,当需要激发
PendingIntent之时,主要是
通过调用PendingIntent的
send()函数来完成激发动作
的。PendingIntent提供了多
个形式的send()函数,然而
这些函数的内部其实调用的
是同一个send(),其函数原
型如下:
public void send(Context cont
ext, int code, Intent intent,
OnFinishe
d onFinished, Handler handler
,
String requiredPermission)
throws Ca
nceledException
该函数内部最关键的一句
是:
int res = mTarget.send(code,
intent, resolvedType,
onFinishe
d != null ? new FinishedDispa


tcher(this, onFinished, handl
er) : null,
requiredP
ermission);
我们前文已经介绍过这个
mTa rge t域了,它对应着AMS
中的某个
PendingIntentRecord。
所以我们要看一下
PendingIntentRecord一侧的
send()函数,其代码如下:
public int send(int code, Int
ent intent, String resolvedTy
pe,

IIntentRec
eiver finishedReceiver, Strin
g requiredPermission)
{
return sendInner(code, in
tent, resolvedType, finishedR
eceiver,
requiredPermi
ssion, null, null, 0, 0, 0, n
ull);
}
其中sendInner()才是真正做
激发动作的函数。
sendInner()完成的主要逻辑
动作有:
1) 如果当前

PendingIntentRecord节点已
经处于canceled域为true的状
态,那么说明这个节点已经
被取消掉了,此时
sendInner()不会做任何实质
上的激发动作,只是简单地
return
Ac tivityMa na ge r. START_CAN
CELED而已。
2) 如果当初在创建这个节
点时,使用者已经指定了
FLAG_ONE_SHOT标志位的
话,那么此时sendInner()会
把这个PendingIntentRecord
节点从AMS中的总表中摘
除,并且把canceled域设为
true。而后的操作和普通激
发时的动作是一致的,也就
是说也会走下面的第3)
步。
3) 关于普通激发时应执行
的逻辑动作是,根据当初创
建PendingIntentRecord节点
时,用户指定的type类型,
进行不同的处理。这个type
其实就是我们前文所说的
INTENT_SENDER_ACTIVIT
Y、
INTENT_SENDER_BROAD
CAST、
INTENT_SENDER_SERVIC
E等类型啦,大家如有兴
趣,可自己参考本文一开始
所说的ge tAc tivity( )、
getBroadcast()、getService()
等函数的实现代码。
现在还有一个问题是,既然
我们在当初获取
PendingIntent时,已经指定
了日后激发时需要递送的
intent(或intent数组),那
么为什么send()动作里还有
一个intent参数呢?它们的关
系又是什么呢?我猜想,
PendingIntent机制的设计者
是希望给激发端一个修
改“待激发的intent”的机会。
比如当初我们获取
PendingIntent对象时,如果
在flags里设置了
FILL_IN_ACTION标志位,
那么就说明我们允许日后在
某个激发点,用新的intent的
mAction域值,替换掉我们最
初给的intent的mAction域
值。如果一开始没有设置
FILL_IN_ACTION标志位,
而且在最初的intent里已经有
了非空的mAction域值的话,
那么即使在激发端又传入了
新intent,它也不可能修改用
新intent的mAction域值替换
旧intent的mAction域值。
细心的读者一定记得,当初
获取PendingIntent对象时,
我们可是向AMS端传递了一
个intent数组噢,虽然一般情
况下这个数组里只有一个
intent元素,但有时候我们也
是有可能一次性传递多个
intent的。比如ge tAc tivitie s( )
函数就可以一次传递多个
intent。可是现在激发动作
send()却只能传递一个intent
参数,这该如何处理呢?答
案很简单,所传入的intent只
能影响已有的intent数组的最
后一个intent元素。大家可以
看看sendInner 里
allIntents[allIntents.length-1] =
finalIntent;一句。
Ok,intent说完了,下面就
该做具体的激发了。我们以
简单的
INTENT_SENDER_BROAD
CAST型PendingIntentRecord
来说明,此时的激发动作就
是发送一个广播:
owner.broadcastIntentInPackag
e(key.packageName, uid, final
Intent, resolvedType,

finishedReceiver, code, nul
l, null,
requiredPermission, (finish
edReceiver != null),
false, UserId.getUserId(uid
)
);
至于其他类型的
PendingIntentRecord的激发
动作,大家可以自行查阅代
码,它们的基本代码格局都
是差不多的。
3
小结

本文是基于我早先的一点儿
笔记整理而成的。当时为了
搞清楚PendingIntent的机
理,也查阅了一些网上的相
关文章,只是都不大满足我
的要求,后来只好自己看代
码,终于得了些自己的浅
见。现在把我过去的一点儿
认识整理出来,希望能对学
习PendingIntent的同学有点
儿帮助。
1
1
. 基本概念
.1 Instrumentation是什
么?
顾名思义,仪器仪表,用于
在应用程序中进行“测
量”和“管理”工作。一个应用
程序中只有一个
Instrumentation实例对象,且
每个Ac tivity都有此对象的引
用。Instrumentation将在任何
应用程序运行前初始化,可

以通过它监测系统与应用程
序之间的所有交互,即类似
于在系统与应用程序之间安
装了个“窃听器”。
当Ac tivityThre a d 创建
(callActivityOnCreate)、暂
停、恢复某个Ac tivity时,通
过调用此对象的方法来实
现,如:
1
) 创
建: c a llAc tivityOnCre a te
2
) 暂
停: c a llAc tivityOnP a use
) 恢
3
复: c a llAc tivityOnRe sume
Instrumentation和
Ac tivityThre a d的关系,类似
于老板与经理的关系,老板
负责对外交流(如与Ac tivity
Manager Service),
Instrumentation负责管理并完
成老板交待的任务。
它通过以下两个成员变量来
对当前应用进程中的Ac tivity
进行管理:
private List<ActivityWaiter>
mWaitingActivities;
private List<ActivityMonitor
>
mActivityMonitors;
其功能函数下表所示:
功能
函数
addMonito
removeMo
monitor)
增加删除
Monitor
newApplic
Context co
newActivit

classNam
callActivity
Bundle ici
callActivity
callActivity
callActivity
callActivity
activity)
Application与
Activity生命周
期控制
callActivity
callActivity
onCreate(
start()
onStart()
finish(int r
onDestroy
Instrumentation
生命周期控制

sendChar
sendPoint
sendTrack
event)
sendTrack
event)
发送用户操控
信息到当前窗
口
startActivi
用Context
runOnMai
waitForIdl
同步操作
2
. Android应用程序启
动过程(MainActivity)
即Ma inAc tivity的启动过程,

在此过程中,将创建一个新
的进程来执行此
Ma inAc tivity 。
Android应用程序从Launcher
启动流程如下所示:
/
***************************
*
*
****************************
********
*
Launcher通过Binder告诉Acti
vityManagerService ,
*
*
它将要启动一个新的Activity;
**************************
*
*
****************************
*******/
Launcher.startActivitySafely
>
-
Launcher.startActivity->

/
/
/要求在新的Task中启动此Activi
ty
/intent.addFlags(Intent.FL
AG_ACTIVITY_NEW_TASK)
Activity.startActivity->
Activity.startActivityForRe
sult->
Instrumentation.execStartAc
tivity->
/
/ ActivityManagerNative.g
etDefault()返回AMS Proxy接口
ActivityManagerNative.getD
efault().startActivity->
ActivityManagerProxy.start
Activity->
ActivityManagerService.st
artActivity-> (AMS)
ActivityManagerService.st
artActivityAsUser->

ActivityStack.startActiv
ityMayWait->
ActivityStack.resolveAct
ivity(获取ActivityInfo)
/
/aInfo.name为main Act
ivity,如:com.my.test.MainAct
ivity
/
/aInfo.applicationInf
o.packageName为包名,如com.my.t
est
ActivityStack.startActiv
ityLocked->
/
/ProcessRecord caller
App; 调用者即Launcher信息
/
/ActivityRecord sourc
eRecord; Launcher Activity相
关信息
/
/ActivityRecord r=new
ActivityRecord(...),将要创建
的Activity相关信息
ActivityStack.startActiv

ityUncheckedLocked->
/
/Activity启动方式:Activ
ityInfo.LAUNCH_MULTIPLE/LAUNC
H_SINGLE_INSTANCE/
/
/
Activity
Info.LAUNCH_SINGLE_TASK/LAUNC
H_SINGLE_TOP)
/
/ 创建一个新的task,即Tas
kRecord,并保存在ActivityRecord
task 中
.
/
/r.setTask(new TaskRec
ord(mService.mCurTask, r.info
,
intent), null, true)
/
/ 把新创建的Activity放在
栈顶
ActivityStack.startActi
vityLocked->
ActivityStack.resumeTop
ActivityLocked->
ActivityStack.startPaus
ingLocked (使Launcher进入Pause
d状态)->

/
**********************
*
*
****************************
*************
*
AMS通过Binder通知Laun
cher进入Paused状态
*
*********************
*
*
****************************
************/
ApplicationThreadProxy
schedulePauseActivity->
.
/
/private class Applic
ationThread extends Applicati
onThreadNative
ApplicationThread.sche
dulePauseActivity->
ActivityThread.queueO
rSendMessage->
/
/ 调用Activity.onUse
rLeaveHint

/
/
/ 调用Activity.onPau
/ 通知activity manag
se
er我进入了pause状态
ActivityThread.handle
PauseActivity->
/
********************
*
*
****************************
***************
*
Launcher通过Binder
告诉AMS,它已经进入Paused状态
*******************
*
*
*
****************************
**************/
ActivityManagerProxy.
activityPaused->
ActivityManagerServic
e.activityPaused->
ActivityStack.activit
yPaused->(把Activity状态修改为P
AUSED)

ActivityStack.complet
ePauseLocked->
/
/ 参数为代表Launcher这
个Activity的ActivityRecord
/
/ 使用栈顶的Activity进
入RESUME状态
ActivityStack.resumeT
opActivityLokced->
/
/topRunningActivit
yLocked将刚创建的放于栈顶的activi
ty取回来
/
/ 即在ActivityStac
k.startActivityUncheckedLocke
d中创建的
/
********************
*
*
****************************
***************
*
AMS创建一个新的进程,
用来启动一个ActivityThread实例,

*
即将要启动的Activity
就是在这个ActivityThread实例中运
行
*
*******************
*
*
****************************
**************/
ActivityStack.startSp
ecificActivityLocked->
/
/ 创建对应的ProcessRe
cord
ActivityManagerServi
ce.startProcessLocked->
/
/ 启动一个新的进程
/
/ 新的进程会导入andr
oid.app.ActivityThread类,并且
执行它的main函数,
/
/ 即实例化ActivityT
hread, 每个应用有且仅有一个Activi

tyThread实例
Process.start("andr
oid.app.ActivityThread",...)-
>
/
/ 通过zygote机制创建
一个新的进程
Process.startViaZyg
ote->
/
/ 这个函数在进程中创建
一个ActivityThread实例,然后调用
/
/ 它的attach函数,接
着就进入消息循环
ActivityThread.main
-
>
/
******************
*
*
****************************
*****************
*
ActivityThread通

过Binder将一个ApplicationThrea
d类的Binder对象
*
传递给AMS,以便AMS
通过此Binder对象来控制Activity整
个生命周期
*
*****************
*
*
****************************
****************/
ActivityThread.atta
ch->
IActivityManager.at
tachApplication(mAppThread)->
ActivityManagerProx
y.attachApplication->
ActivityManagerServ
ice.attachApplication->
/
/ 把在ActivityMana
gerService.startProcessLocked
中创建的ProcessRecord取出来
ActivityManagerServ

ice.attachApplicationLocked->
/
******************
*
*
****************************
*****************
*
AMS通过Binder通知
ActivityThread一切准备OK,它可以
真正启动新的Activity了
*
*****************
*
*
****************************
****************/
/
/ 真正启动Activity
ActivityStack.realS
tartActivityLocked->
ApplicationThreadPr
oxy.scheduleLaunchActivity->
ApplicationThread.s
cheduleLaunchActivity->

ActivityThread.hand
leLaunchActivity->
/ 加载新的Activit
y类,并执行它的onCreate
ActivityThread.pe
rformLaunchActivity
/
/
*1) Instrumenta
tion.newActivity: 加载新类,即
创建Activity对象;
2
) ActivityCli
entRecord.packageInfo.makeApp
lication:创建Application对象;
<
LoadedApk.
makeApplication>
3
) Activity.at
tach(Context context, Activit
yThread aThread,
Instrume
ntation instr, IBinder token,
int ident,
Applicat

ion application, Intent inten
t, ActivityInfo info,
CharSequ
ence title, Activity parent,
String id,
NonConfi
gurationInstances lastNonConf
igurationInstances,
Configur
ation config):把Application
attach到Activity, 即把Activtiy
相关信息设置到新
创建的Activity中
4
) Instrumenta
tion.callActivityOnCreate:调
用onCreate;*/
/
/ 使用Activity进
入RESUMED状态,并调用onResume

ActivityThread.ha
ndleResumeActivity
3
.
ActivityManagerService
3
.1 类中关键信息
public final class ActivityM
anagerService extends Activit
yManagerNative
implements Watchdog.
Monitor, BatteryStatsImpl.Bat
teryCallback {
.
/
..
/ Maximum number of rec
ent tasks that we can remembe
r.


static final int MAX_REC
ENT_TASKS = 20;
public ActivityStack mMa
inStack; // 管理Activity堆栈
/
/ Whether we should sho
w our dialogs (ANR, crash, et
c) or just perform their
/
/ default actuion autom
atically. Important for devi
ces without direct input
/
/ devices.
private boolean mShowDia
logs = true;
/
**
*
Description of a requ
est to start a new activity,
which has been held
*
due to app switches b
eing disabled.

*
/
static class PendingActi
vityLaunch {
ActivityRecord r;
ActivityRecord sourc
eRecord;
}
int startFlags;
/
**
*
Activity we have told
the window manager to have k
ey focus.
*
/
ActivityRecord mFocusedA
ctivity = null;
/
**
*
List of intents that
were used to start the most r
ecent tasks.

*
/
final ArrayList<TaskReco
rd> mRecentTasks = new ArrayL
ist<TaskRecord>();
/
**
*
Process management.
*
/
final ProcessList mProce
ssList = new ProcessList();
/
**
*
All of the applicatio
ns we currently have running
organized by name.
*
The keys are strings
of the application package na
me (as
*
returned by the packa
ge manager), and the keys are
ApplicationRecord
*
objects.

*
/
final ProcessMap<Process
Record> mProcessNames = new P
rocessMap<ProcessRecord>();
/
**
*
The currently running
isolated processes.
*
/
final SparseArray<Proces
sRecord> mIsolatedProcesses =
new SparseArray<ProcessRecor
d>();
.
..
public static final Cont
ext main(int factoryTest) { /
/
main入口函数
AThread thr = new AT
hread();
thr.start();

synchronized (thr) {
while (thr.mServ
ice == null) {
try {
thr.wait
();
}
catch (Int
erruptedException e) {
}
}
}
ActivityManagerServi
ce m = thr.mService;
mSelf = m;
ActivityThread at =
ActivityThread.systemMain();
mSystemThread = at;
Context context = at

.
getSystemContext();
context.setTheme(and
roid.R.style.Theme_Holo);
m.mContext = context
;
m.mFactoryTest = fac
toryTest;
m.mMainStack = new A
ctivityStack(m, context, true
)
; // 创建ActivityStack
m.mBatteryStatsServi
ce.publish(context);
m.mUsageStatsService
publish(context);
.
synchronized (thr) {
thr.mReady = tru
thr.notifyAll();
e;

}
m.startRunning(null,
null, null, null);
return context;
}
}
3
.2 家族图谱

4
. ActivityStack-真正做
事的家伙
ActivityManagerService使用
它来管理系统中所有的
Ac tivitie s的状态,Ac tivitie s使
用stack的方式进行管理。它
是真正负责做事的家伙,很
勤快的,但外界无人知道!
4
.1 类中关键信息
/
**
*
State and management of a


single stack of activities.
*
/
final class ActivityStack {
final ActivityManagerSer
vice mService;
final boolean mMainStack
;
final Context mContext;
enum ActivityState {
INITIALIZING,
RESUMED,
PAUSING,
PAUSED,
STOPPING,
STOPPED,
FINISHING,
DESTROYING,
DESTROYED
}

/
**
*
The back history of a
ll previous (and possibly sti
ll
*
running) activities.
It contains HistoryRecord ob
jects.
*
/
final ArrayList<Activity
Record> mHistory = new ArrayL
ist<ActivityRecord>();
/
**
*
Used for validating a
pp tokens with window manager
.
*
/
final ArrayList<IBinder>
mValidateAppTokens = new Arr
ayList<IBinder>();

/
**
*
List of running activ
ities, sorted by recent usage
.
*
The first entry in th
e list is the least recently
used.
*
It contains HistoryRe
cord objects.
*
/
final ArrayList<Activity
Record> mLRUActivities = new
ArrayList<ActivityRecord>();
/
**
*
List of activities th
at are waiting for a new acti
vity
*
to become visible bef
ore completing whatever opera
tion they are

*
*
supposed to do.
/
final ArrayList<Activity
Record> mWaitingVisibleActivi
ties
=
new ArrayList<
ActivityRecord>();
/
**
*
List of activities th
at are ready to be stopped, b
ut waiting
*
for the next activity
to settle down before doing
so. It contains
*
HistoryRecord objects
.
*
/
final ArrayList<Activity
Record> mStoppingActivities
new ArrayList<
ActivityRecord>();
=

/
**
*
List of activities th
at are in the process of goin
g to sleep.
*
/
final ArrayList<Activity
Record> mGoingToSleepActiviti
es
=
new ArrayList<
ActivityRecord>();
/
**
*
When we are in the pr
ocess of pausing an activity,
before starting the
*
next one, this variab
le holds the activity that is
currently being paused.
*
/
ActivityRecord mPausingA
ctivity = null;

/
**
*
This is the last acti
vity that we put into the pau
sed state. This is
*
used to determine if
we need to do an activity tra
nsition while sleeping,
*
when we normally hold
the top activity paused.
*
/
ActivityRecord mLastPaus
edActivity = null;
/
**
*
Current activity that
is resumed, or null if there
is none.
*
/
ActivityRecord mResumedA
ctivity = null;
/
**

*
This is the last acti
vity that has been started.
It is only used to
*
identify when multipl
e activities are started at o
nce so that the user
*
can be warned they ma
y not be in the activity they
think they are.
*
/
ActivityRecord mLastStar
tedActivity = null;
/
*
**
Set to indicate whethe
r to issue an onUserLeaving c
allback when a
*
newly launched activi
ty is being brought in front
of us.
*
/
boolean mUserLeaving = f

alse;
ActivityStack(ActivityMa
nagerService service, Context
context, boolean mainStack)
{
mService = service;
mContext = context;
mMainStack = mainSta
ck;
.
..
}
.
..
}
4
.2 家族图谱

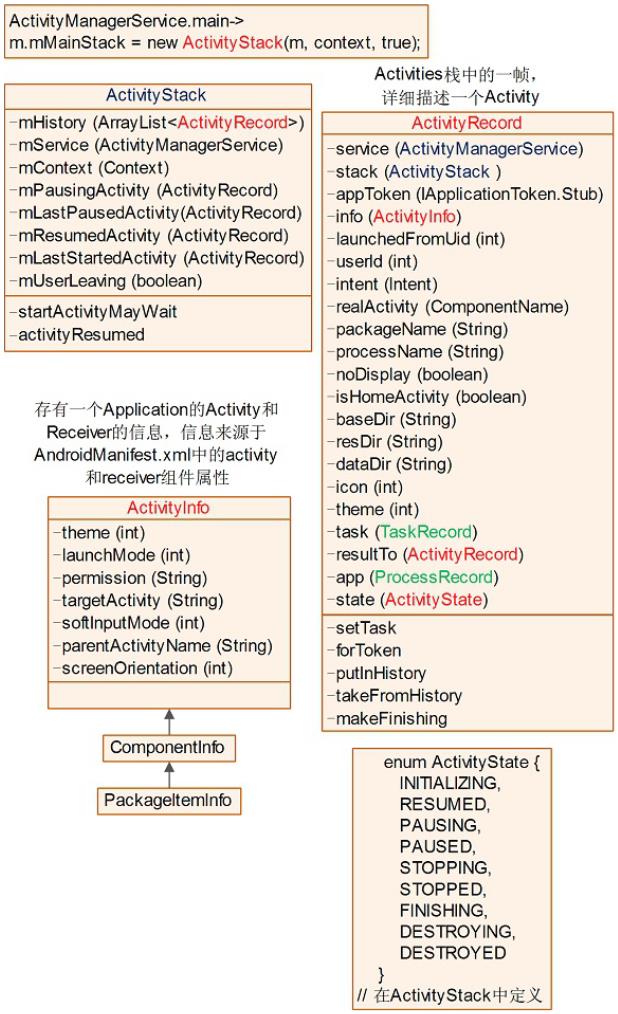
5
. ProcessRecord
记录了一个进程的相关信
息。
5
.1 类中关键信息
/
**
*
Full information about a
particular process that
*
*
is currently running.
/
class ProcessRecord {
final ApplicationInfo in
fo; // all about the first ap
p in the process
final boolean isolated;


/
/ true if this is a spec
ial isolated process
final int uid;
/
/ uid of process; may be
different from 'info' if iso
lated
final int userId;
/
/ user of process.
final String processName
;
// name of the process
IApplicationThread threa
d; // the actual proc... ma
y be null only if
/
/ 'persistent' is true (
in which case we
/
/ are in the process of
launching the app)
/
/ 是ApplicationThread对象

的远程接口,
// 通过此接口通知Activity进
入对应的状态
int pid;
/ The process of this ap
plication; 0 if none
/
ApplicationInfo instrume
ntationInfo; // the applicati
on being instrumented
BroadcastRecord curRecei
ver;// receiver currently run
ning in the app
/
/ contains HistoryRecor
d objects
final ArrayList<Activity
Record> activities = new Arra

yList<ActivityRecord>();
/
/ all ServiceRecord run
ning in this process
final HashSet<ServiceRec
ord> services = new HashSet<S
erviceRecord>();
/
/ services that are cur
rently executing code (need t
o remain foreground).
final HashSet<ServiceRec
ord> executingServices
=
new HashSet<S
erviceRecord>();
/
/ All ConnectionRecord
this process holds
final HashSet<ConnectionR
ecord> connections
=
new HashSet<Co
nnectionRecord>();

/
/ all IIntentReceivers
that are registered from this
process.
final HashSet<ReceiverLi
st> receivers = new HashSet<R
eceiverList>();
/
/ class (String) -> Con
tentProviderRecord
final HashMap<String, Co
ntentProviderRecord> pubProvi
ders
=
new HashMap<St
ring, ContentProviderRecord>(
)
;
/
/ All ContentProviderRe
cord process is using
final ArrayList<ContentP
roviderConnection> conProvide
rs

=
new ArrayList<
ContentProviderConnection>();
boolean persistent;
/
/ always keep this appli
cation running?
boolean crashing;
/ are we in the process
of crashing?
Dialog crashDialog;
/ dialog being displayed
due to crash.
boolean notResponding;
/ does the app have a no
/
/
/
t responding dialog?
Dialog anrDialog;
/
/ dialog being displayed
due to app not resp.
boolean removed;
/
/ has app package been r
emoved from device?

boolean debugging;
/
/ was app launched for d
ebugging?
boolean waitedForDebugge
r; // has process show wait
for debugger dialog?
Dialog waitDialog;
/
/ current wait for debug
ger dialog
ProcessRecord(BatterySta
tsImpl.Uid.Proc _batteryStats
,
IApplicationThread _thread,
ApplicationInfo
_
info, String _processName, i
nt _uid) {
batteryStats = _batt
eryStats;
info = _info;
isolated = _info.uid
!
= _uid;

uid = _uid;
userId = UserHandle.
getUserId(_uid);
processName = _proce
ssName;
pkgList.add(_info.pa
ckageName);
thread = _thread;
maxAdj = ProcessList
HIDDEN_APP_MAX_ADJ;
hiddenAdj = clientHid
.
denAdj = emptyAdj = ProcessLi
st.HIDDEN_APP_MIN_ADJ;
curRawAdj = setRawAd
j = -100;
curAdj = setAdj = -1
0
0;
persistent = false;
removed = false;
}
.
..

}
5
. 2 家族图谱

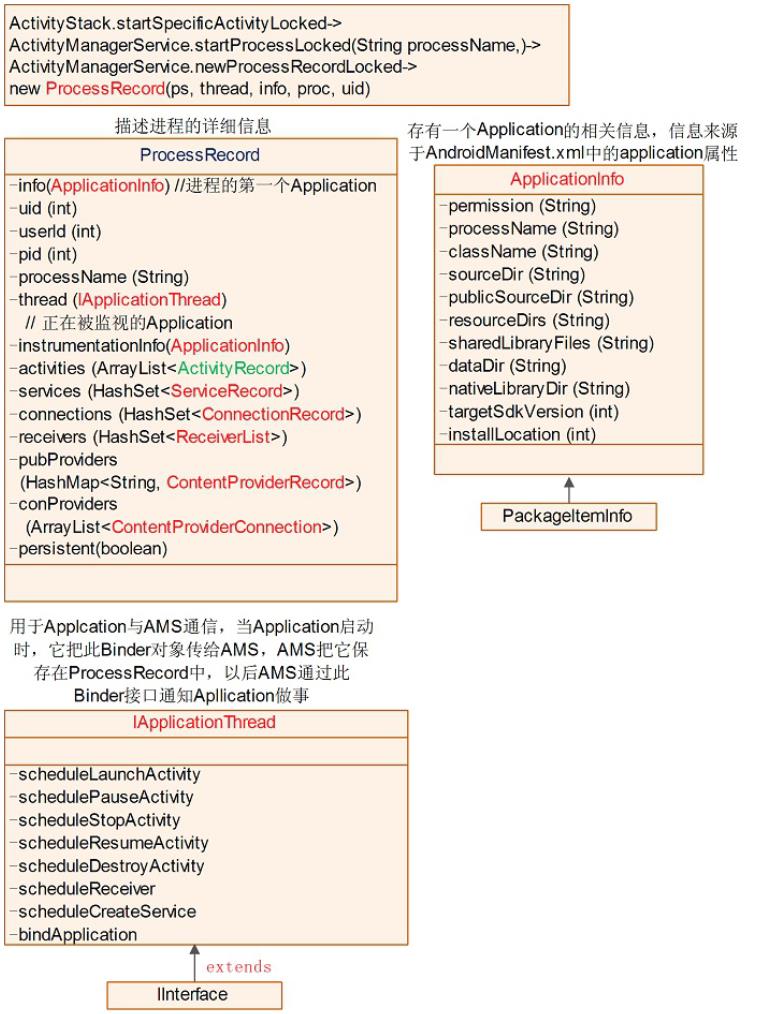
6
. IApplicationThread接
口AMS->Application
IApplicationThread为AMS作
为客户端访问Application服
务器端的Binder接口。当创
建Application时,将把此
Binder对象传递给AMS,然
后AMS把它保存在
mProcessNames.ProcessReco
rd.thread中。当需要通知
Application工作时,则调用
IApplicationThread中对应的

接口函数。
其相互关系如下图所示:
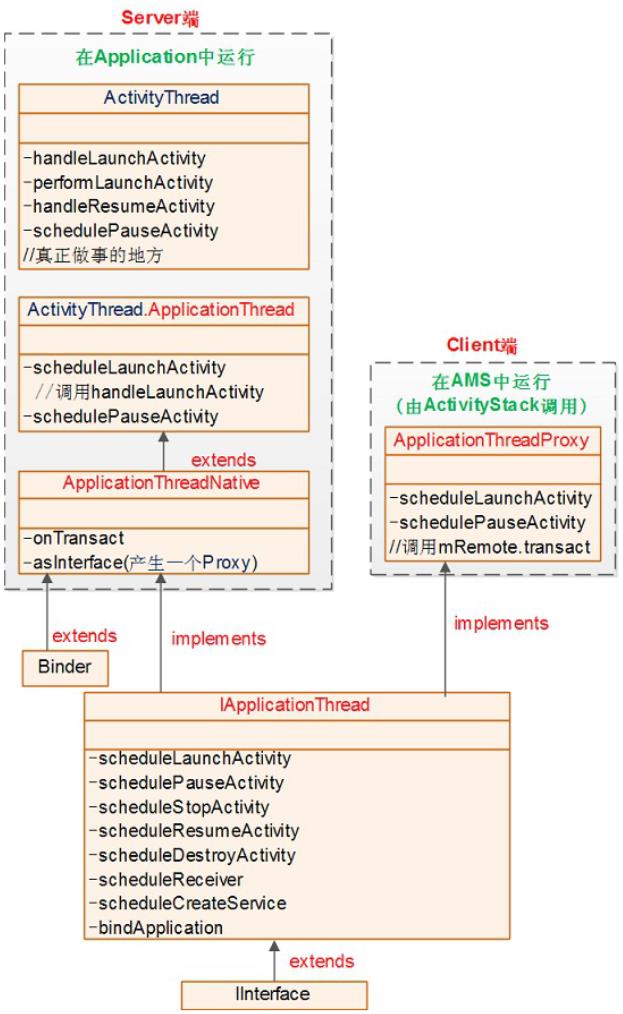
前几天凯子哥写的
Framework层的解析文章
《
Ac tivity启动过程全解
析》,反响还不错,这说
明“写让大家都能看懂的
Framework解析文章”的思
想是基本正确的。
我个人觉得,深入分析的
文章必不可少,但是对于
更多的Android开发者——
即只想做应用层开发,不
想了解底层实现细节——
来说,“整体上把握,重要

环节深入“是更好的学习方
式。因为这样既可以有完
整的知识体系,又不会在
浩瀚的源码世界里迷失兴
趣和方向。
所以呢,今天凯子哥又带
来一篇文章,接着上一篇
的结尾,重点介绍Ac tivity
开启之后,Android系统对
界面的一些操作及相关知
识。


onCreate中的
setContentView到底做了什
setContentView之后设置某
些Window属性标志
Ac tivity中的findVie w ById
本质上是在做什么
Window和PhoneWindow是
是做什么的


Ac tivity中Window类型的
时候初始化的
PhoneWindowsetContentVi
ew到底发生了什么
置的界面为什么在
onResume之后才对用户可
见呢
ViewManagerWindowMana
ge rWindowMa na ge rImplWi
ndowManagerGlobal到底


都是些什么玩意
ViewRootImpl是什么有什
与WMS通信
从什么时候开始绘制整个
Ac tivity的Vie w树的
一种
为什么使用PopWindow的
发事件
在Ac tivity中使用Dia log的


时候为什么有时候会报错
Una ble to add window
token is not va lid is your
a c tivity running
为什么Toa st需要由系统统
不能显示Toast
本期关键字
Window


PhoneWindow
WindowManager
WindowManagerImpl
WindowManagerGlobal
RootViewImpl
DecorView
Dia log
PopWindow
Toast
学习目标
了解Android中Ac tivity界面
显示的流程,涉及到的关


键类,以及关键流程
解决在开发中经常遇到的
问题,并在源码的角度弄
清楚其原因
了解Framework层与
Window相关的一些概念和
细节
写作方式
老样子,咱们还是和上次一
样,采用一问一答的方式进
行学习,毕竟“带着问题学
习”才是比较高效的学习方


式。
进入正题
话说,在上次的文章中,我
们解析到了从手机开机第一
个zygote进程开启,到App的
第一个Ac tivity的onCreate()结
束,那么我们这里就接着上
次留下的茬,从第一个
Ac tivity的onCreate()开始说
起。
onCreate()中的

setContentView()到底
做了什么?为什么不
能在setContentView()
之后设置某些Window
属性标志?
一个最简单的onCreate()如
下:
@
Override
public void onCreate(Bund
le savedInstanceState) {
super.onCreate(savedI
nstanceState);
setContentView(R.layo
ut.activity_main);
}
通过上面几行简单的代码,
我们的App就可以显示在
a c tivity_ma in. xml文件中设计
的界面了,那么这一切到底
是怎么做到的呢?
我们跟踪一下源码,然后就
在Ac tivity的源码中找到了3
个setContentView()的重载函
数:
public void setContentView(in
t layoutResID) {


getWindow().setConten
tView(layoutResID);
initWindowDecorAction
Bar();
}
public void setContentVie
w(View view) {
getWindow().setConten
tView(view);
initWindowDecorAction
Bar();
}
public void setContentVie
w(View view, ViewGroup.Layout
Params params) {
getWindow().setConten
tView(view, params);
initWindowDecorAction
Bar();
}

我们上面用到的就是第一个
方法。虽然setContentView()
的重载函数有3种,但是我
们可以发现,内部做的事情
都是基本一样的。首先是调
用
getWindow()获取到一个对
象,然后调用了这个对象的
相关方法。咱们先来看一
下,getWindow()到底获取到
了什么对象。
private Window mWindow;


public Window getWindow() {
return mWindow;
}
喔,原来是一个Window对
象,你现在可能不知道
Window到底是个什么玩意,
但是没关系,你只要能猜到
它肯定和咱们的界面现实有
关系就得了,毕
竟叫“Window”么,Windows
系统的桌面不是
叫“Windows”桌面么,差不
多的东西,反正是用来显示
界面的就得了。
那么
initWindowDecorActionBar()
函数是做什么的呢?
写了这么多程序,看名字也
应该能猜出八九不离十了,
init是初始化,Window是窗
口,Decor是装饰,
ActionBar就更不用说了,所
以这个方法应该就是”初始
化装饰在窗口上的
ActionBar”,来,咱们看一
下代码实现:
/
**
*
Creates a new ActionBa
r, locates the inflated Actio
nBarView,
*
initializes the Action
Bar with the view, and sets m
ActionBar.
*
/
private void initWindowDe
corActionBar() {
Window window = getWi
ndow();
/
/ Initializing the w
indow decor can change window
feature flags.
/
/ Make sure that we
have the correct set before p
erforming the test below.

window.getDecorView()
if (isChild() || !win
;
dow.hasFeature(Window.FEATURE
_
ACTION_BAR) || mActionBar !=
null) {
return;
}
mActionBar = new Wind
owDecorActionBar(this);
mActionBar.setDefault
DisplayHomeAsUpEnabled(mEnabl
eDefaultActionBarUp);
mWindow.setDefaultIco
n(mActivityInfo.getIconResour
ce());
mWindow.setDefaultLog
o(mActivityInfo.getLogoResour
ce());

}
哟,没想到这里第一行代码
就又调用了getWindow(),接
着往下调用了
window.getDecorView(),从
注释中我们知道,在调用这
个方法之后,Window
的特征标志就被初始化了,
还记得如何让Ac tivity全屏
吗?
@
Override
public void onCreate(Bund


le savedInstanceState) {
super.onCreate(savedIn
stanceState);
requestWindowFeature(Wind
ow.FEATURE_NO_TITLE);
getWindow().setFlags(Wind
owManager.LayoutParams.FILL_P
ARENT,
Windo
wManager.LayoutParams.FILL_PA
RENT);
setContentView(R.layout.a
ctivity_main);
}
而且这两行代码必须在
setContentView()之前调用,
知道为啥了吧?因为在这里

就把Window的相关特征标志
给初始化了,在
setContentView()之后调
用就不起作用了!
如果你还不确定的话,我们
可以再看下
window.getDecorView()的部
分注释
/
**
*
Note that calling this
function for the first time
locks in"
"
*
various window charact
eristics as described in

*
{@link #setContentView
(View, android.view.ViewGroup
LayoutParams)}
.
*
/
public abstract View getD
ecorView();
“
注意,这个方法第一次调
用的时候,会锁定在
setContentView()中描述的
各种Window特征”
所以说,这也同样解释了为
什么在setContentView()之后
设置Window的一些特征标
志,会不起作用。如果以后

遇到类似问题,可以往这方
面想一下。
Activity中的
findViewById()本质上
是在做什么?
在上一个问题里面,咱们提
到了一个很重要的类——
Window,下面先简单看一下
这个类的几个方法:
public abstract class Window
{

public abstract void setC
ontentView(int layoutResID);
public abstract void setC
ontentView(View view);
public abstract void setC
ontentView(View view, ViewGro
up.LayoutParams params);
public View findViewById(
int id) {
return getDecorView()
.
}
findViewById(id);
}
哇塞,有个好眼熟的方法,
findViewById()!

是的,你每次在Ac tivity中用
的这个方法,其实间接调用
了Window类里面的方法!
public View findViewById(int
id) {
return getWindow().fi
ndViewById(id);
}
不过,findViewById()的最终
实现是在Vie w及其子类里面
的,所以getDecorView()获
取到的肯定是一个Vie w对象
或者是Vie w的子类对象:


public abstract View getDecor
View();
Ac tivity、Window中的
findViewById()最终调用的,
其实是Vie w的
findViewById()。
public class View implements
Drawable.Callback, KeyEvent.C
allback,
AccessibilityEventSou
rce {
public final View findVie
wById(int id) {
if (id < 0) {
return null;


}
return findViewTr
aversal(id);
}
protected View findVi
ewTraversal(int id) {
if (id == mID) {
return this;
}
return null;
}
}
但是,很显然,最终调用的
肯定不是Vie w类里面的
findViewTraversal(),因为这
个方法只会返回自身。

而且,findViewById()是final
修饰的,不可被重写,所以
说,肯定是调用的被子类重
写的findViewTraversal(),再
联想到,我们的界面上有很
多的Vie w,那么既能作为
Vie w的容器,又是Vie w的子
类的类是什么呢?很显然,
是Vie wGroup !
public abstract class ViewGro
up extends View implements Vi
ewParent, ViewManager {
@
Override
protected View findViewTr

aversal(int id) {
if (id == mID) {
return this;
}
final View[] where =
mChildren;
final int len = mChil
drenCount;
for (int i = 0; i < l
en; i++) {
View v = where[i]
;
if ((v.mPrivateFl
ags & PFLAG_IS_ROOT_NAMESPACE
== 0) {
)
v = v.findVie
wById(id);
if (v != null

)
}
{
return v;
}
}
}
return null;
}
所以说,在onCreate()中调用
findViewById()对控件进行绑
定的操作,实质上是通过在
某个Vie w中查找子Vie w实现
的,这里你先记住,这个
Vie w叫做

DecorView,而且它位于用
户窗口的最下面一层。
Window和
PhoneWindow是什么关
系?WindowManager
是做什么的?
话说,咱们前面介绍Window
的时候,只是简单的介绍了
下findViewById(),还没有详
细的介绍下这个类,下面咱
们一起学习一下。
前面提到过,Window是一个
抽象类,抽象类肯定是不能
实例化的,所以咱们需要使
用的是它的实现类,Window
的实现类有哪些呢?咱们从
Dash中看下Window类的文档
Window只有一个实现类,就
是PhoneWindow!所以说这
里扯出了PhoneWindow这个
类。
而且文档还说,这个类的一
个实例,也就是
PhoneWindow,应该被添加
到Window Manager中,作为
顶层的Vie w,所以,这里又
扯出了一个WindowManager
的概念。
除此之外,还说这个类提供
了标准的UI策略,比如背
景,标题区域,和默认的按
键处理等等,所以说,咱们
还知道了Window和
PhoneWindow这两个类的作
用!
所以说,看文档多重要呀!
OK,现在咱们已经知道了
Window和唯一的实现类
PhoneWindow,以及他们的
作用。而且我们还知道了
WindowManager,虽然不知
道干嘛的,但是从名字也可
以猜出是管理Window的,而
且还会把Window添加到里面
去,在下面的模块中,我会
详细的介绍WindowManager
这个类。
Activity中,Window类
型的成员变量
mWindow是什么时候
初始化的?
在每个Ac tivity中都有一个
Window类型的对象
mWindow,那么是什么时候
初始化的呢?
是在attach()的时候。
还记得attach()是什么时候调
用的吗?是在
ActivityThread.performLaunc
hAc tivity()的时候:
private Activity performLaunc
hActivity(ActivityClientRecor
d r, Intent customIntent) {
Activity activity = null
;
try {
java.lang.ClassLo
ader cl = r.packageInfo.getCl
assLoader();
activity = mInstr
umentation.newActivity(
cl, compo
nent.getClassName(), r.intent
)
;
}
catch (Exceptio
n e) {

.
..ignore some c
ode...
}
try {
.
..ignore some code..
.
activity.attach(appCo
ntext, this, getInstrumentati
on(), r.token,
r.ide
nt, app, r.intent, r.activity
Info, title, r.parent,
r.emb
eddedID, r.lastNonConfigurati
onInstances, config,
r.voi
ceInteractor);
.
..ignore some code..

.
}
}
}
catch (Exception e) {
return activity;
在attach()里面做了些什么
呢?
public class Activity extends
ContextThemeWrapper
implements LayoutInfl
ater.Factory2,
Window.Callback, KeyE
vent.Callback,
OnCreateContextMenuLi
stener, ComponentCallbacks2,
Window.OnWindowDismis


sedCallback {
private Window mWindow;
final void attach(Context
context, ActivityThread aThr
ead,
Instrumentation i
nstr, IBinder token, int iden
t,
Application appli
cation, Intent intent, Activi
tyInfo info,
CharSequence titl
e, Activity parent, String id
,
NonConfigurationI
nstances lastNonConfiguration
Instances,
Configuration con
fig, IVoiceInteractor voiceIn
teractor) {

.
/
..ignore some c
ode...
/就是在这里实例化
了Window对象
mWindow = Polic
yManager.makeNewWindow(this);
/设置各种回调
/
mWindow.setCallba
ck(this);
mWindow.setOnWind
owDismissedCallback(this);
mWindow.getLayout
Inflater().setPrivateFactory(
this);
/
/这就是传说中的UI
线程,也就是ActivityThread所在的
开启了消息循环机制的线程,所以在A
,
ctiivty所在线程中使用Handler不需
要使用Loop开启消息循环。

mUiThread = Thre
ad.currentThread();
.
..ignore some c
ode...
/
/终于见到了前面提到
的WindowManager,可以看到,Wind
owManager属于一种系统服务
mWindow.setWindow
Manager(
(WindowManage
r)context.getSystemService(Co
ntext.WINDOW_SERVICE),
mToken, mComp
onent.flattenToString(),
(info.flags &
ActivityInfo.FLAG_HARDWARE_A
CCELERATED) != 0);
if (mParent != null
)
{
mWindow.set

Container(mParent.getWindow()
)
;
}
mWindowManager
=
mWindow.getWindowManager();
}
}
attach()是Ac tivity实例化之
后,调用的第一个函数,在
这个时候,就实例化了
Window。那么这个
PolicyManager是什么玩意?
mWindow = PolicyManager.makeN
ewWindow(this);


来来来,咱们一起
RTFSC(Read The Fucking
Source Code) !
public final class PolicyMana
ger {
private static final Stri
ng POLICY_IMPL_CLASS_NAME =
"
com.android.internal
.
policy.impl.Policy";
private static final IPol
icy sPolicy;
static {
/
/ Pull in the actual
implementation of the policy
at run-time
try {


Class policyClass
=
Class.forName(POLICY_IMPL_
CLASS_NAME);
sPolicy = (IPolic
y)policyClass.newInstance();
catch (ClassNotFoun
dException ex) {
throw new Runtime
}
Exception(
POLICY_IM
PL_CLASS_NAME + " could not b
e loaded", ex);
}
catch (Instantiatio
nException ex) {
throw new Runtime
Exception(
POLICY_IM
PL_CLASS_NAME + " could not b
e instantiated", ex);
}
catch (IllegalAcces
sException ex) {
throw new Runtime

Exception(
POLICY_IM
PL_CLASS_NAME + " could not b
e instantiated", ex);
}
}
private PolicyManager() {
}
public static Window make
NewWindow(Context context) {
return sPolicy.makeNe
wWindow(context);
}
}
“Policy”是“策略”的意思,所
以就是一个策略管理器,采

用了策略设计模式。而
sP olic y是一个IP olic y类型,
IP olic y实际上是一个接口
public interface IPolicy {}
所以说,sP olic y的实际类型
是在静态代码块里面,利用
反射进行实例化的P olicy类
型。静态代码块中的代码在
类文件加载进类加载器之后
就会执行,
sP olic y就实现了实例化。

那我们看下在P olicy里面实
际上是做了什么
public class Policy implement
s IPolicy {
/
/看见PhoneWindow眼熟么?还
有DecorView,眼熟么?这就是前面所
说的那个位于最下面的View,findVie
wById()就是在它里面找的
private static final Stri
ng[] preload_classes = {
"
com.android.internal
policy.impl.PhoneLayoutInfla
ter",
.
"
com.android.internal
.
.
policy.impl.PhoneWindow",
"
com.android.internal
policy.impl.PhoneWindow$1",
com.android.internal
"

.
policy.impl.PhoneWindow$Dial
ogMenuCallback",
"
com.android.internal
.
policy.impl.PhoneWindow$Deco
rView",
"
com.android.internal
policy.impl.PhoneWindow$Pane
lFeatureState",
.
"
com.android.internal
.
policy.impl.PhoneWindow$Pane
lFeatureState$SavedState",
}
;
/
/由于性能方面的原因,在当前Po
licy类加载的时候,会预加载一些特定
的类
static {
for (String s : pr
eload_classes) {
try {
Class.forName
(s);

}
catch (ClassNot
FoundException ex) {
Log.e(TAG, "C
ould not preload class for ph
one policy: " + s);
}
}
}
/
/终于找到PhoneWindow了,我
没骗你吧,前面咱们所说的Window终于
可以换成PhoneWindow了~
public Window makeNewWind
ow(Context context) {
return new PhoneWindo
w(context);
}
}
P honeWindow. setContentView

()到底发生了什么?
上面说了这么多,实际上只
是追踪到了
P honeWindow. setContentView
(),下面看一下到底在这里
执行了什么:
@
Override
public void setContentVie
w(int layoutResID) {
if (mContentParent =
=
null) {
}
installDecor();
else if (!hasFeatur
e(FEATURE_CONTENT_TRANSITIONS
) {
)
mContentParent.re

moveAllViews();
}
if (hasFeature(FEATUR
E_CONTENT_TRANSITIONS)) {
final Scene newSc
ene = Scene.getSceneForLayout
(mContentParent, layoutResID,
getContex
t());
transitionTo(newS
cene);
}
else {
mLayoutInflater.i
nflate(layoutResID, mContentP
arent);
}
final Callback cb = g
etCallback();
if (cb != null && !is
Destroyed()) {
cb.onContentChang

ed();
}
}
@
Override
public void setContentVie
w(View view) {
setContentView(view,
new ViewGroup.LayoutParams(MA
TCH_PARENT, MATCH_PARENT));
}
@
Override
public void setContentVie
w(View view, ViewGroup.Layout
Params params) {
if (mContentParent ==
null) {
installDecor();
}
else if (!hasFeatur
e(FEATURE_CONTENT_TRANSITIONS

)
) {
mContentParent.re
moveAllViews();
}
if (hasFeature(FEATUR
E_CONTENT_TRANSITIONS)) {
view.setLayoutPar
ams(params);
final Scene newSc
ene = new Scene(mContentParen
t, view);
transitionTo(newS
cene);
}
else {
mContentParent.ad
dView(view, params);
}
final Callback cb = g
etCallback();
if (cb != null && !is
Destroyed()) {

cb.onContentChang
ed();
}
}
当我们第一次调用
serContentView()的时候,
mContentParent是没有进行
过初始化的,所以会调用
installDecor()。
为什么能确定
mContentParent是没有初始
化的呢?因为
mContentParent就是在
installDecor()里面赋值的

private void installDecor() {
if (mDecor == null) {
mDecor = generate
Decor();
.
..
}
if (mContentParent =
mContentParent =
=
null) {
generateLayout(mDecor);
}
}
在generateDecor()做了什
么?返回了一个DecorView

对象。
protected DecorView generate
Decor() {
return new DecorV
iew(getContext(), -1);
}
还记得前面推断出的,
DecorView是一个Vie wGroup
的结论吗?看下面,
DecorView继承自
FrameLayout,所以咱们的推
论是完全正确的。而且
DecorView是PhoneWindow

的私有内部类,这两个类关
系紧密!
public class PhoneWindow exte
nds Window implements MenuBui
lder.Callback {
private final class Decor
View extends FrameLayout impl
ements RootViewSurfaceTaker {
}
}
咱们再看一下在对
mContentParent赋值的
generateLayout(mDecor)做了
什么

protected ViewGroup generateL
ayout(DecorView decor) {
.
..判断并设置了一堆的标志位..
.
/
/这个是我们的界面将要采用的基
础布局xml文件的id
int layoutResource;
/
/根据标志位,给layoutResou
rce赋值
if ((features & (1 << FE
ATURE_SWIPE_TO_DISMISS)) != 0
)
{
layoutResource =
R.layout.screen_swipe_dismiss
;
}
..我们设置不同的主题以及样式
.

,
会采用不同的布局文件...
else {
/
/我们在下面代码验证的时
候,就会用到这个布局,记住它哦
layoutResource =
R.layout.screen_simple;
}
/
/要开始更改mDecor啦~
mDecor.startChanging(
)
;
/
/将xml文件解析成View对
象,至于LayoutInflater是如何将xm
l解析成View的,咱们后面再说
View in = mLayoutInfl
ater.inflate(layoutResource,
null);
/
/decor和mDecor实际上是
同一个对象,一个是形参,一个是成员变
量
decor.addView(in, new

ViewGroup.LayoutParams(MATCH
PARENT, MATCH_PARENT));
mContentRoot = (ViewG
_
roup) in;
/
/这里的常量ID_ANDROID_CON
TENT就是 public static final
int ID_ANDROID_CONTENT = com.
android.internal.R.id.content
;
/
/而且,由于是直接执行的find
ViewById(),所以本质上还是调用的m
Decor.findViewById()。而在上面
的decor.addView()执行之前,deco
r里面是空白的,所以我们可以断定,la
youtResource所指向的xml布局文件
内部,一定存在一个叫做“content”的
ViewGroup
ViewGroup contentPare
nt = (ViewGroup)findViewById(
ID_ANDROID_CONTENT);
if (contentParent ==
null) {

throw new Runtime
Exception("Window couldn't fi
nd content container view");
}
.
.....
mDecor.finishChanging
();
/
/最后把id为content的一
个ViewGroup返回了
return contentParent;
}
当上的代码执行之后,
mDecor和mContentParent就
初始化了,往下就会执行下
面的代码,利用

LayoutInflater把咱们传进来
的layoutResID转化成
Vie w对象,然后添加到id为
content的mContentParent中
mLayoutInflater.inflate(layou
tResID, mContentParent);
所以到目前为止,咱们已经
知道了以下几个事实,咱们
总结一下:
DecorView是
PhoneWindow的内部类,


继承自FrameLayout,是
最底层的界面
PhoneWindow是Window的
唯一子类,他们的作用就
是提供标准UI,标题,背
景和按键操作
在DecorView中会根据用
户选择的不同标志,选择
不同的xml文件,并且这
些布局会被添加到
DecorView中
在DecorView中,一定存
在一个叫做“content”的


Vie wGroup,而且我们在
xml文件中声明的布局文
件,会被添加进去
既然是事实,那么怎么才能
验证一下呢?
如何验证上一个问题
首先,说明一下运行条件:
/
/主题
name="AppTheme" parent="@andr
oid:style/Theme.Holo.Light.No
ActionBar"
/
/编译版本
android {

compileSdkVersion 19
buildToolsVersion '19.1.0
'
defaultConfig {
applicationId "com.so
cks.uitestapp"
minSdkVersion 15
targetSdkVersion 19
versionCode 1
versionName "1.0"
}
}
dependencies {
compile fileTree(include:
'*.jar'], dir: 'libs')
compile 'com.android.supp
[
ort:appcompat-v7:19.1.0'
}
/
/Activity代码

public class MainActivity ext
ends Activity {
@
Override
protected void onCreate(B
undle savedInstanceState) {
super.onCreate(savedI
nstanceState);
setContentView(R.layo
ut.activity_main);
}
}
/
<
"
<
:
/activity_main.xml
?xml version="1.0" encoding=
utf-8"?>
TextView xmlns:android="http
//schemas.android.com/apk/re
s/android"
android:layout_width="mat
ch_parent"
android:layout_height="ma

tch_parent"
android:gravity="center"
android:text="Hello World
!
"
android:textSize="20sp" />
OK,咱们的软件已经准备
好了,采用的是最简单的布
局,界面效果如下:
下面用Hierarchy看一下树状
结构:
第一层,就是上面的
DecorView,里面有一个线
性布局,上面的是
Vie wStub,下面就是id为
content的Vie wGroup,是一
个FrameLayout。而我们通过
setContentView()设置的布
局,就是Te xtVie w了。
能不能在源码里面找到源文
件呢?当然可以,这个布局
就是screen_simple.xml
frameworks/base/core/res/res/l
ayout/screen_simple.xml
<
LinearLayout xmlns:android="
http://schemas.android.com/ap
k/res/android"

android:layout_width="mat
ch_parent"
android:layout_height="ma
tch_parent"
android:fitsSystemWindows
"true"
android:orientation="vert
ical">
=
<
ViewStub android:id="@+i
d/action_mode_bar_stub"
android:inflate
dId="@+id/action_mode_bar"
android:layout=
"
@layout/action_mode_bar"
android:layout_
width="match_parent"
android:layout_
height="wrap_content"
android:theme="
attr/actionBarTheme" />
FrameLayout
android:id="@android
?
<

:
id/content"
android:layout_width
"match_parent"
android:layout_heigh
t="match_parent"
android:foregroundIn
sidePadding="false"
android:foregroundGr
=
avity="fill_horizontal|top"
android:foreground="
?
android:attr/windowContentOv
erlay" />
/LinearLayout>
<
所以,即使你不调用
setContentView(),在一个空
Ac tivity上面,也是有布局
的。而且肯定有一个

DecorView,一个id为content
的FrameLayout。
你可以采用下面的方式获取
到DecorView,但是你不能
获取到一个DecorView实
例,只能获取到
Vie wGroup 。
下面贴上这个图,你就可以
看明白了(转自 工匠若水)
ViewGroup view = (ViewGroup)
getWindow().getDecorView();

我们通过setContentView()设
置的界面,为什么在
onResume()之后才对用户可
见呢?
有开发经验的朋友应该知
道,我们的界面元素在
onResume()之后才对用户是
可见的,这是为啥呢?
那我们就追踪一下,
onResume()是什么时候调用
的,然后看看做了什么操作
就Ok了。
这一下,我们又要从
Ac tivityThre a d开始说起了,
不熟悉的快去看前一篇文章
《Ac tivity启动过程全解析》]
(http://blog.csdn.net/zhaokaiqi
ang1992/article/details/494282
87)。
话说,前文说到,我们想要
开启一个Ac tivity的时候,
Ac tivityThre a d的
handleLaunchActivity()会在
Handler中被调用
private void handleLaunchActi
vity(ActivityClientRecord r,
Intent customIntent) {
/
/就是在这里调用了Activity.a
ttach()呀,接着调用了Activity.o
nCreate()和Activity.onStart()
生命周期,但是由于只是初始化了mDeco
r,添加了布局文件,还没有把
/
/mDecor添加到负责UI显示的Ph
oneWindow中,所以这时候对用户来说
是不可见的
Activity a = performLaunc
hActivity(r, customIntent);
,
.
.....
if (a != null) {
/这里面执行了Activity.onRe
sume()
handleResumeActivity(r.to
/

ken, false, r.isForward,
!
ty.mFinished && !r.startsNotR
esumed);
r.activi
if (!r.activity.mFinished
&
& r.startsNotResumed) {
try {
r.activit
y.mCalled = false;
/
/执行Act
ivity.onPause()
mInstrume
ntation.callActivityOnPause(r
.
activity);
}
}
}
}
所以说,

ActivityThread.handleLaunch
Ac tivity执行完之后,Ac tivity
的生命周期已经执行了4个
(onCreate、onStart()、
onResume、onPause())。
下面咱们重点看下
handleResumeActivity()做了
什么
final void handleResumeActivi
ty(IBinder token,
boolean clearHide
,
boolean isForward, boolean
reallyResume) {
/
/这个时候,Activit

y.onResume()已经调用了,但是现在
界面还是不可见的
ActivityClientRec
ord r = performResumeActivity
(token, clearHide);
if (r != null) {
final Activit
y a = r.activity;
if (r.windo
w == null && !a.mFinished &&
willBeVisible) {
r.window = r.
activity.getWindow();
View decor =
r.window.getDecorView();
/
/decor对用户
不可见
decor.setVisi
bility(View.INVISIBLE);
ViewManager w
m = a.getWindowManager();

WindowManager
.
LayoutParams l = r.window.ge
tAttributes();
a.mDecor = de
/这里记住这个W
cor;
/
indowManager.LayoutParams的ty
pe为TYPE_BASE_APPLICATION,后
面介绍Window的时候会见到
l.type = Wind
owManager.LayoutParams.TYPE_B
ASE_APPLICATION;
if (a.mVisibl
eFromClient) {
a.mWindow
Added = true;
/
/终于被添
加进WindowManager了,但是这个时候
还是不可见的
,
wm.addVie
w(decor, l);

}
if (!r.activi
ty.mFinished && willBeVisible
&
& r.acti
vity.mDecor != null && !r.hid
eForNow) {
/
/在这里
,执行了重要的操作!
if (r.ac
tivity.mVisibleFromClient) {
r
.
activity.makeVisible();
}
}
}
从上面的分析中我们知道,
其实在onResume()执行之
后,界面还是不可见的,当

我们执行了
Ac tivity. ma ke Visible ()方法之
后,界面才对我们是可见的
if (!mWindowAdded) {
ViewManager wm =
getWindowManager();
wm.addView(mDecor
,
)
getWindow().getAttributes()
;
mWindowAdded = tr
ue;
}
mDecor.setVisibility(
View.VISIBLE);
OK,其实讲到了这里,关
于Ac tivity中的界面显示应该

算是告一段落了,我们知道
了Ac tivity的生命周期方法的
调用时机,还知道了一个最
简单的Ac tivity
的界面的构成,并了解了
Window、PhoneWindow、
DecorView、
WindowManager的存在。
但是我还是感觉不过瘾,因
为上面只是在流程上大体上
过了一遍,对于Window、
WindowManager的深入了解
还不够,所以下面就开始讲
解Window、WindowManager
等相关类的稍微高级点的知
识。
前面看累了的朋友,可以上
个厕所,泡个咖啡,休息下
继续往下看。
ViewMa na ger、
WindowManager、
WindowManagerImpl、
WindowManagerGlobal
到底都是些什么玩
意?
WindowManager其实是一个
接口,和Window一样,起作
用的是它的实现类
public interface WindowManage
r extends ViewManager {
/
/对这个异常熟悉么?当你往已
经销毁的Activity中添加Dialog的时
候,就会抛这个异常
public static class BadT
okenException extends Runtime
Exception {
public BadTokenEx
ception() {

}
public BadTokenExcept
ion(String name) {
super(name);
}
}
/
/其实WindowManager里面80
的代码是用来描述这个内部静态类的
%
public static class Lay
outParams extends ViewGroup.L
ayoutParams
implements Parcel
able {
}
}
WindowManager继承自
ViewManager这个接口,从

注释和方法我们可以知道,
这个就是用来描述可以对
Ac tivity中的子Vie w进行添加
和移除能力的接口。
/
** Interface to let you add
and remove child views to an
Activity. To get an instance
*
of this class, call {@lin
k android.content.Context#get
SystemService(java.lang.Strin
g) Context.getSystemService()
}
.
*
/
public interface ViewManager
{
public void addView(View
view, ViewGroup.LayoutParams
params);

public void updateVie
wLayout(View view, ViewGroup.
LayoutParams params);
public void removeVie
w(View view);
}
那么我们在使用
WindowManager的时候,到
底是在使用哪个类呢?
是WindowManagerImpl。
public final class WindowMana
gerImpl implements WindowMana
ger {}
怎么知道的呢?那我们还要


从Activity.attach()说起
话说,在attach()里面完成了
mWindowManager的初始化
final void attach(Context con
text, ActivityThread aThread,
Instrumentation i
nstr, IBinder token, int iden
t,
Application appli
cation, Intent intent, Activi
tyInfo info,
CharSequence titl
e, Activity parent, String id
,
NonConfigurationI
nstances lastNonConfiguration
Instances,
Configuration con

fig, IVoiceInteractor voiceIn
teractor) {
mWindow.setWindow
Manager(
(WindowManage
r)context.getSystemService(Co
ntext.WINDOW_SERVICE),
mToken, mComp
onent.flattenToString(),
(info.flags &
ActivityInfo.FLAG_HARDWARE_A
CCELERATED) != 0);
mWindowManager =
mWindow.getWindowManager();
}
那我们只好看下

(WindowManager)context.get
SystemService(Context.WIND
OW_SERVICE)是什么玩意
了。
这里要说明的是,context是
一个ContextImpl对象,这里
先记住就好,以后再细说。
class ContextImpl extends Con
text {
/
/静态代码块,完成各种系统服务的注
册
static {
.
.....

registerService(WINDOW_S
ERVICE, new ServiceFetcher()
{
Display mDefa
ultDisplay;
public Object
getService(ContextImpl ctx)
{
Display d
isplay = ctx.mDisplay;
if (displ
ay == null) {
if (m
DefaultDisplay == null) {
D
isplayManager dm = (DisplayMa
nager)ctx.getOuterContext().
getSystemService(Conte
xt.DISPLAY_SERVICE);
m

DefaultDisplay = dm.getDispla
y(Display.DEFAULT_DISPLAY);
}
displ
ay = mDefaultDisplay;
}
/
/没骗你吧
return ne
w WindowManagerImpl(display);
}
});
.
.....
}
@
Override
public Object getSystemSe
rvice(String name) {
ServiceFetcher fetche
r = SYSTEM_SERVICE_MAP.get(na
me);
return fetcher == nul
l ? null : fetcher.getService
(this);

}
}
要注意的是,这里返回的
WindowManagerImpl对象,
最终并不是和我们的Window
关联的,而且这个方法是有
可能返回null的,所以在
Window. setWindowManager()
的时候,进行了处理
public void setWindowManager
(WindowManager wm, IBinder ap
pToken, String appName,
boolean hardwareA
ccelerated) {


mAppToken = appToken;
mAppName = appName;
mHardwareAccelerated
=
hardwareAccelerated
| SystemProp
|
erties.getBoolean(PROPERTY_HA
RDWARE_UI, false);
/
/重试一遍
if (wm == null) {
wm = (WindowManag
er)mContext.getSystemService(
Context.WINDOW_SERVICE);
}
/
/设置parentWindow,创
建真正关联的WindowManagerImpl对
象
mWindowManager = ((Wi
ndowManagerImpl)wm).createLoc
alWindowManager(this);
}
public final class Window

ManagerImpl implements Window
Manager {
/
/最终调用的这个构造
private WindowManager
Impl(Display display, Window
parentWindow) {
mDisplay = displa
y;
mParentWindow = p
arentWindow;
}
public WindowManagerImpl
createLocalWindowManager(Wind
ow parentWindow) {
return new Window
ManagerImpl(mDisplay, parentW
indow);
}
}

所以说,每一个Ac tivity都有
一个PhoneWindow成员变
量,并且也都有一个
WindowManagerImpl,而
且,PhoneWindow 和
WindowManagerImpl
在Activity.attach()的时候进行
了关联。
插一张类图(转自工匠若
水)
知道了这些,那下面的操作
就可以直接看
WindowManagerImpl了。
其实WindowManagerImpl 这
个类也没有什么看头,为啥
这么说呢?因为他其实是代
理模式中的代理。是谁的代
理呢?是
WindowMa na ge rGloba l。
public final class WindowMana
gerImpl implements WindowMana
ger {
private final WindowManag
erGlobal mGlobal = WindowMana
gerGlobal.getInstance();
private final Display mDi
splay;

private final Window mPar
entWindow;
@
Override
public void addView(View
view, ViewGroup.LayoutParams
params) {
mGlobal.addView(view,
params, mDisplay, mParentWin
dow);
}
@
Override
public void updateViewLay
out(View view, ViewGroup.Layo
utParams params) {
mGlobal.updateViewLay
out(view, params);
}
@
Override
public void removeView(Vi

ew view) {
mGlobal.removeView(vi
ew, false);
}
@
Override
public void removeViewImm
ediate(View view) {
mGlobal.removeView(vi
ew, true);
}
}
从上面的代码中可以看出
来,WindowManagerImpl 里
面对ViewManager接口内方
法的实现,都是通过代理

WindowMa na ge rGloba l的方
法实现的,
所以重点转移到了
WindowMa na ge rGloba l这个
类。
还记得前面我们的
DecorView被添加到了
WindowManager吗?
wm.addView(decor, l);
其实最终调用的是
WindowManagerGlobal. addVi

ew();
public final class WindowMana
gerGlobal {
private static IWindowMan
ager sWindowManagerService;
private static IWindo
wSession sWindowSession;
private final ArrayList<V
iew> mViews = new ArrayList<V
iew>();
private final ArrayLi
st<ViewRootImpl> mRoots = new
ArrayList<ViewRootImpl>();
private final ArrayLi
st<WindowManager.LayoutParams
>
mParams =
new ArrayList<Win
dowManager.LayoutParams>();

/
例模式
/WindowManagerGlobal是单
private static WindowMana
gerGlobal sDefaultWindowManag
er;
public static WindowManag
erGlobal getInstance() {
synchronized (WindowM
anagerGlobal.class) {
if (sDefaultWindo
wManager == null) {
sDefaultWindo
wManager = new WindowManagerG
lobal();
}
return sDefaultWi
ndowManager;
}
}

public void addView(View
view, ViewGroup.LayoutParams
params,
Display display,
Window parentWindow) {
final WindowMan
ager.LayoutParams wparams = (
WindowManager.LayoutParams)pa
rams;
.
.....
synchronized
(mLock) {
root;
ViewRootImpl
root = new Vi
ewRootImpl(view.getContext(),
display);
view.setLayou
tParams(wparams);

mViews.add(view
mRoots.add(ro
mParams.add(w
)
;
ot);
params);
}
.
.....
try {
/注意下这个方法,
/
因为下面介绍ViewRootImpl的时候会
用到
root.setView(
view, wparams, panelParentVie
w);
}
}
}
catch (RuntimeEx
ception e) {

}
我们看到,
WindowMa na ge rGloba l是单
例模式,所以在一个App里
面只会有一个
WindowMa na ge rGloba l实
例。在
WindowMa na ge rGloba l里面
维
护了三个集合,分别存放添
加进来的Vie w(实际上就是
DecorView),布局参数

params,和刚刚实例化的
ViewRootImpl对象,
WindowMa na ge rGloba l到底
干嘛的呢?
其实,
WindowMa na ge rGloba l是和
WindowManagerService(即
WMS)通信的。
还记得在上一篇文章中我们
介绍Ac tivityThre a d和AMS之
间的IBinder通信的吗?是
的,这里也是IBinder通信。

public static IWindowSession
getWindowSession() {
synchronized (WindowM
anagerGlobal.class) {
if (sWindowSessio
n == null) {
try {
Input
MethodManager imm = InputMeth
odManager.getInstance();
IWind
owManager windowManager = get
WindowManagerService();
sWind
owSession = windowManager.ope
nSession(
.
.
....
}
catch

(RemoteException e) {
Log.e(TAG
"Failed to open window sess
,
ion", e);
}
}
return sWindowSes
sion;
}
}
public static IWindowManager
getWindowManagerService() {
synchronized (WindowM
anagerGlobal.class) {
if (sWindowManage
rService == null) {
/
/ServiceMa
nager是用来管理系统服务的,比如AMS
WMS等,这里就获取到了WMS的客户端
代理对象
、
sWindowManage

rService = IWindowManager.Stu
b.asInterface(
Servi
ceManager.getService("window"
)
);
}
return sWindowMan
agerService;
}
}
首先通过上面的方法获取到
IBinder对象,然后转化成了
WMS在本地的代理对象
IWindowManager,然后通过
openSession()初始化了
sWindowSession

对象。这个对象是干什么的
呢?
“
Session“是会话的意思,这
个类就是为了实现与WMS的
会话的,谁和WMS的对话
呢?WindowManagerGlobal
类内部并没有用这个类呀!
是ViewRootImpl与WMS的对
话。
ViewRootImpl是什么?
有什么作用?
ViewRootImpl如何与
WMS通信
你还记得么?在前面将
WindowManagerGlobal. addVi
ew()的时候,实例化了一个
ViewRootImpl,然后添加到
了一个集合里面,咱们先看
下ViewRootImpl的构造函数
吧
public final class ViewRootIm
pl implements ViewParent,
View.AttachInfo.Callb
acks, HardwareRenderer.Hardwa

reDrawCallbacks {
public ViewRootImpl(Co
ntext context, Display displa
y) {
mContext = contex
t;
/
/获取WindowSessi
on
mWindowSession =
WindowManagerGlobal.getWindow
Session();
mDisplay = displa
y;
.
.....
mWindow = new W(t
his);
/
/默认不可见
mViewVisibility =

View.GONE;
/
/这个数值就是屏幕宽
度的dp总数
mDensity = contex
t.getResources().getDisplayMe
trics().densityDpi;
mChoreographer =
Choreographer.getInstance();
mDisplayManager =
(DisplayManager)context.getS
ystemService(Context.DISPLAY_
SERVICE);
}
}
在这个构造方法里面,主要
是完成了各种参数的初始
化,并且最关键的,获取到

了前面介绍的
WindowSession,那么你可能
好奇了,这个ViewRootImpl
到底有什么作用呢?
ViewRootImpl负责管理视图
树和与WMS交互,与WMS
交互是通过WindowSession。
而且ViewRootImpl也负责UI
界面的布局与渲染,负责把
一些事件分发至Ac tivity,以
便Ac tivity可以截获事件。大
多数情况下,它管理Ac tivity
顶层视图DecorView,它相
当于MVC模型中的
Controller。
WindowSession是
ViewRootImpl获取之后,主
动和WMS通信的,但是我们
在前面的文章知道,客户端
和服务器需要互相持有对方
的代理引用,才能实现双向
通信,那么WMS是怎么得到
ViewRootImpl的通信代理的
呢?
是在Vie wRootImpl. se tVie w()
的时候。
还记得不?在上面介绍
WindowManagerGlobal. addVi
ew()的时候,我还重点说了
下,在这个方法的try代码块
中,调用了
Vie wRootImpl. se tVie w(),下
面咱们看下这个方法干嘛
了:
public void setView(View view
,
WindowManager.LayoutParams
attrs, View panelParentView)
{

synchronized (this) {
if (mView == nul
mView = view
l) {
;
int res;
requestLayou
t();
try {
res = mWi
ndowSession.addToDisplay(mWin
dow, mSeq, mWindowAttributes,
g
etHostVisibility(), mDisplay.
getDisplayId(),
m
AttachInfo.mContentInsets, mI
nputChannel);
}
catc
h (RemoteException e) {

throw new RuntimeExcepti
on("Adding window failed", e)
;
}
fin
ally {
}
}
}
}
为了突出重点,我简化了很
多代码,从上面可以看出
来,是
mWindowSession.addToDispla
y()这个方法把mWindow传递
给我WMS,WMS就持有了

当前Vie w Rootlmpl的代理,
就可以调用W对象让
Vie w Rootlmpl做一些事情
了。
这样,双方都有了对方的接
口,WMS中的Session注册到
WindowMa na ge rGloba l的成
员WindowSession中,
ViewRootImpl::W注册到
WindowState中的成员
mClient中。前者是为了App
改变Vie w结构时请求WMS为
其更新布局。后者代表了
App端的一个添加到WMS中
的Vie w,每一个像这样通过
WindowManager接口中
addView()添加的窗口都有一
个对应的ViewRootImpl,也
有一个相应的
ViewRootImpl::W。它可以理
解为是ViewRootImpl中暴露
给WMS的接口,这样WMS
可以通过这个接口和App端
通信。
另外源码中很多地方采用了
这种将接口隐藏为内部类的
方式,这样可以实现六大设
计原则之一——接口最小原
则。
从什么时候开始绘制
整个Activity的View树
的?
注意前面代码中的
requestLayout();因为这个方
法执行之后,我们的
ViewRootImpl才开始绘制整
个Vie w树!
@
Override
public void requestLayout
() {
if (!mHandlingLayoutI
nLayoutRequest) {
checkThread();
mLayoutRequested
=
true;
scheduleTraversal
s();
}
}
void scheduleTraversals() {
if (!mTraversalSchedu
led) {
mTraversalSchedul
ed = true;
/
/暂停UI线程消息队列


对同步消息的处理
mTraversalBarrier
mHandler.getLooper().postS
=
yncBarrier();
/
/向Choreographer
注册一个类型为CALLBACK_TRAVERSA
L的回调,用于处理UI绘制
mChoreographer.po
stCallback(
Choreogra
pher.CALLBACK_TRAVERSAL, mTra
versalRunnable, null);
if (!mUnbufferedI
nputDispatch) {
scheduleConsu
meBatchedInput();
}
notifyRendererOfFr
amePending();
}
}

“
Choreographer就是一个消
息处理器,根据vsync 信号 来
计算frame“
解释起来比较麻烦,我们暂
时不展开讨论,你只要知
道,当回调被触发之后,
mTraversalRunnable对象的
run()就会被调用
final class TraversalRunnable
implements Runnable {
@
Override
public void run() {
doTraversal();
}
}
doTraversal()中最关键的,就
是调用了
performTraversals(),然后就
开始mesure,layout,draw了,
这里面的具体逻辑本篇文章
不讲,因为重点是
Ac tivity的界面显示流程,这
一块属于Vie w的,找时间单
独拿出来说
void doTraversal() {
if (mTraversalSchedul
ed) {
mTraversalSchedul


ed = false;
mHandler.getLoope
r().removeSyncBarrier(mTraver
salBarrier);
if (mProfile) {
Debug.startMe
thodTracing("ViewAncestor");
}
Trace.traceBegin(
Trace.TRACE_TAG_VIEW, "perfor
mTraversals");
try {
performTraver
sals();
}
finally {
Trace.traceEn
d(Trace.TRACE_TAG_VIEW);
}
if (mProfile) {

Debug.stopMet
mProfile = fa
hodTracing();
lse;
}
}
}
来回倒腾了这么多,终于看
见界面了,让我哭会 T^T
Window的类型有几
种?分别在什么情况
下会使用到哪一种?
Window的类型是根据

WindowManager.LayoutPara
ms的type属性相关的,根据
类型可以分为三类:
取值在
FIRST_AP P LICATION_WI
NDOW与
LAST_AP P LICATION_WI
NDOW之间(1-99),是常
用的顶层应用程序窗口,
须将token设置成Ac tivity的
token,比如前面开启
Window的时候设置的类型
即为

TYPE_APPLICATION
在FIRST_SUB_WINDOW
和
LAST_SUB_WINDOW(10
00-1999)之间,与顶层窗
口相关联,需将token设置
成它所附着宿主窗口的
token,比如PopupWindow
就是
TYPE_APPLICATION_PA
NEL
取值在
FIRST_SYSTEM_WINDO


W和
LAST_SYSTEM_WINDO
W(2000-2999)之间,不能
用于应用程序,使用时需
要有特殊权限,它是特定
的系统功能才能使用,比
如Toa st就是
TYPE_TOAST=2005,所
以不需要特殊权限
下面是所有的Type说明
/
/WindowType:开始应用程序窗口
public static final i
nt FIRST_APPLICATION_WINDOW =
1
;

/
/WindowType:所有程序
窗口的base窗口,其他应用程序窗口都
显示在它上面
public static final i
nt TYPE_BASE_APPLICATION = 1
;
/
/WindowType:普通应用
程序窗口,token必须设置为Activity
的token来指定窗口属于谁
public static final i
nt TYPE_APPLICATION
=
2
;
/
/WindowType:应用程序
启动时所显示的窗口,应用自己不要使用
这种类型,它被系统用来显示一些信息,
直到应用程序可以开启自己的窗口为止
public static final i
nt TYPE_APPLICATION_STARTING
=
3;
/
/WindowType:结束应用
程序窗口
public static final i

nt LAST_APPLICATION_WINDOW =
99;
/
/WindowType:SubWind
ows子窗口,子窗口的Z序和坐标空间都
依赖于他们的宿主窗口
public static final i
nt FIRST_SUB_WINDOW
1000;
=
//WindowType: 面板窗口
,显示于宿主窗口的上层
public static final i
nt TYPE_APPLICATION_PANEL =
FIRST_SUB_WINDOW;
/
/WindowType:媒体窗口
(例如视频),显示于宿主窗口下层
public static final i
nt TYPE_APPLICATION_MEDIA =
FIRST_SUB_WINDOW+1;
/
/WindowType:应用程序
窗口的子面板,显示于所有面板窗口的上
层

public static final i
nt TYPE_APPLICATION_SUB_PANEL
=
FIRST_SUB_WINDOW+2;
/WindowType:对话框,
/
类似于面板窗口,绘制类似于顶层窗口,
而不是宿主的子窗口
public static final i
nt TYPE_APPLICATION_ATTACHED_
DIALOG = FIRST_SUB_WINDOW+3;
/
/WindowType:媒体信息
显示在媒体层和程序窗口之间,需要实
现半透明效果
public static final i
,
nt TYPE_APPLICATION_MEDIA_OVE
RLAY = FIRST_SUB_WINDOW+4;
/
/WindowType:子窗口结
束
public static final i
nt LAST_SUB_WINDOW = 1
99;
9
/
/WindowType:系统窗口

,
非应用程序创建
public static final i
nt FIRST_SYSTEM_WINDOW = 2
00;
0
/
/WindowType:状态栏,
只能有一个状态栏,位于屏幕顶端,其他
窗口都位于它下方
public static final i
nt TYPE_STATUS_BAR
IRST_SYSTEM_WINDOW;
= F
/
/WindowType:搜索栏,
只能有一个搜索栏,位于屏幕上方
public static final i
nt TYPE_SEARCH_BAR = F
IRST_SYSTEM_WINDOW+1;
/WindowType:电话窗口
它用于电话交互(特别是呼入),置于
所有应用程序之上,状态栏之下
public static final i
/
,
nt TYPE_PHONE
=
FIRST_SYSTEM_WINDOW+2;
/
/WindowType:系统提示

,出现在应用程序窗口之上
public static final i
nt TYPE_SYSTEM_ALERT
IRST_SYSTEM_WINDOW+3;
= F
/
/WindowType:锁屏窗口
public static final i
nt TYPE_KEYGUARD = F
IRST_SYSTEM_WINDOW+4;
/
/WindowType:信息窗口
,
用于显示Toast
public static final i
nt TYPE_TOAST
=
FIRST_SYSTEM_WINDOW+5;
/
/WindowType:系统顶层
窗口,显示在其他一切内容之上,此窗口
不能获得输入焦点,否则影响锁屏
public static final i
nt TYPE_SYSTEM_OVERLAY
IRST_SYSTEM_WINDOW+6;
= F
/
/WindowType:电话优先
当锁屏时显示,此窗口不能获得输入焦
点,否则影响锁屏
,

public static final i
nt TYPE_PRIORITY_PHONE = F
IRST_SYSTEM_WINDOW+7;
/WindowType:系统对话
/
框
public static final i
nt TYPE_SYSTEM_DIALOG
FIRST_SYSTEM_WINDOW+8;
=
/
/WindowType:锁屏时显
示的对话框
public static final i
nt TYPE_KEYGUARD_DIALOG
FIRST_SYSTEM_WINDOW+9;
=
/
/WindowType:系统内部
错误提示,显示于所有内容之上
public static final i
nt TYPE_SYSTEM_ERROR
= F
IRST_SYSTEM_WINDOW+10;
/
/WindowType:内部输入
法窗口,显示于普通UI之上,应用程序
可重新布局以免被此窗口覆盖
public static final i

nt TYPE_INPUT_METHOD
= F
IRST_SYSTEM_WINDOW+11;
/
/WindowType:内部输入
法对话框,显示于当前输入法窗口之上
public static final i
nt TYPE_INPUT_METHOD_DIALOG=
FIRST_SYSTEM_WINDOW+12;
/
/WindowType:墙纸窗口
public static final i
nt TYPE_WALLPAPER
FIRST_SYSTEM_WINDOW+13;
/WindowType:状态栏的
=
/
滑动面板
public static final i
nt TYPE_STATUS_BAR_PANEL = F
IRST_SYSTEM_WINDOW+14;
/
/WindowType:安全系统
覆盖窗口,这些窗户必须不带输入焦点,
否则会干扰键盘
public static final i
nt TYPE_SECURE_SYSTEM_OVERLAY
=
FIRST_SYSTEM_WINDOW+15;

/
/WindowType:拖放伪窗
口,只有一个阻力层(最多),它被放置
在所有其他窗口上面
public static final i
nt TYPE_DRAG
= F
IRST_SYSTEM_WINDOW+16;
/
/WindowType:状态栏下
拉面板
public static final i
nt TYPE_STATUS_BAR_SUB_PANEL
FIRST_SYSTEM_WINDOW+17;
/WindowType:鼠标指针
public static final i
=
/
nt TYPE_POINTER = FIRST_SYSTE
M_WINDOW+18;
/
/WindowType:导航栏(有
别于状态栏时)
public static final i
nt TYPE_NAVIGATION_BAR = FIRS
T_SYSTEM_WINDOW+19;
/
/WindowType:音量级别
的覆盖对话框,显示当用户更改系统音量

大小
public static final i
nt TYPE_VOLUME_OVERLAY = FIRS
T_SYSTEM_WINDOW+20;
/
/WindowType:起机进度
框,在一切之上
public static final i
nt TYPE_BOOT_PROGRESS = FIRST
SYSTEM_WINDOW+21;
/WindowType:假窗,消
费导航栏隐藏时触摸事件
public static final i
_
/
nt TYPE_HIDDEN_NAV_CONSUMER =
FIRST_SYSTEM_WINDOW+22;
/
/WindowType:梦想(屏保
窗口,略高于键盘
public static final i
)
nt TYPE_DREAM = FIRST_SYSTEM_
WINDOW+23;
/
/WindowType:导航栏面
板(不同于状态栏的导航栏)
public static final i

nt TYPE_NAVIGATION_BAR_PANEL
FIRST_SYSTEM_WINDOW+24;
/WindowType:univers
e背后真正的窗户
public static final i
=
/
nt TYPE_UNIVERSE_BACKGROUND =
FIRST_SYSTEM_WINDOW+25;
/
/WindowType:显示窗口
覆盖,用于模拟辅助显示设备
public static final i
nt TYPE_DISPLAY_OVERLAY = FIR
ST_SYSTEM_WINDOW+26;
/
/WindowType:放大窗口
覆盖,用于突出显示的放大部分可访问性
放大时启用
public static final i
nt TYPE_MAGNIFICATION_OVERLAY
=
FIRST_SYSTEM_WINDOW+27;
/WindowType:......
public static final i
nt TYPE_KEYGUARD_SCRIM
FIRST_SYSTEM_WINDOW+29;
/
=

public static final i
nt TYPE_PRIVATE_PRESENTATION
=
FIRST_SYSTEM_WINDOW+30;
public static final i
nt TYPE_VOICE_INTERACTION = F
IRST_SYSTEM_WINDOW+31;
public static final i
nt TYPE_ACCESSIBILITY_OVERLAY
=
FIRST_SYSTEM_WINDOW+32;
/WindowType:系统窗口
/
结束
public static final i
nt LAST_SYSTEM_WINDOW
999;
=
2
为什么使用PopWindow的时
候,不设置背景就不能触发
事件?

我们在使用PopupWindow的
时候,会发现如果不给
PopupWindow设置背景,那
么就不能触发点击返回事
件,有人认为这个是B UG,
其实并不是的。
我们以下面的方法为例,其
实所有的显示方法都有下面
的流程:
public void showAtLocation(IB
inder token, int gravity, int
x, int y) {
if (isShowing() || mC
ontentView == null) {

return;
}
mIsShowing = true;
mIsDropdown = false;
WindowManager.LayoutP
arams p = createPopupLayout(t
oken);
p.windowAnimations =
computeAnimationResource();
/
/在这里会根据不同的设置
,
配置不同的LayoutParams属性
preparePopup(p);
if (gravity == Gravit
y.NO_GRAVITY) {
gravity = Gravity
TOP | Gravity.START;
.
}
p.gravity = gravity;
p.x = x;

p.y = y;
if (mHeightMode < 0)
p.height = mLastHeight = mHei
ghtMode;
if (mWidthMode < 0) p
.
width = mLastWidth = mWidthM
ode;
invokePopup(p);
}
我们重点看下preparePopup()
private void preparePopup(Win
dowManager.LayoutParams p) {
/
/根据背景的设置情况进行
不同的配置
if (mBackground != nu
ll) {
final ViewGroup.L
ayoutParams layoutParams = mC


ontentView.getLayoutParams();
int height = View
Group.LayoutParams.MATCH_PARE
NT;
/
/如果设置了背景,就用
一个PopupViewContainer对象来包
裹之前的mContentView,并设置背景
后
PopupViewContaine
r popupViewContainer = new Po
pupViewContainer(mContext);
PopupViewContaine
r.LayoutParams listParams = n
ew PopupViewContainer.LayoutP
arams(
ViewGroup
.
LayoutParams.MATCH_PARENT, h
eight
)
;
popupViewContaine
r.setBackground(mBackground);

popupViewContaine
r.addView(mContentView, listP
arams);
mPopupView = popu
pViewContainer;
}
else {
mPopupView = mCon
tentView;
}
}
为啥包了一层
PopupViewContainer,就可
以处理按钮点击事件了?因
为PopupWindow没有相关事
件回调,也没有重写按键和
触摸方法,所以接收不

到对应的信号
public class PopupWindow {}
而PopupViewContainer则可
以,因为它重写了相关方法
private class PopupViewContai
ner extends FrameLayout {
@
Override
public boolean dispat
chKeyEvent(KeyEvent event) {
if (event.getKeyC
ode() == KeyEvent.KEYCODE_BAC
K) {
if (getKeyDis
patcherState() == null) {
return su


per.dispatchKeyEvent(event);
}
if (event.get
Action() == KeyEvent.ACTION_D
OWN
&
& ev
ent.getRepeatCount() == 0) {
KeyEvent.
DispatcherState state = getKe
yDispatcherState();
if (state
!
= null) {
state
.
startTracking(event, this);
}
return tr
ue;
}
else if (ev
ent.getAction() == KeyEvent.A
CTION_UP) {
/
/back键

消失
KeyEvent.
DispatcherState state = getKe
yDispatcherState();
if (state
!
= null && state.isTracking(
event) && !event.isCanceled()
)
{
dismi
retur
ss();
n true;
}
}
return super.
dispatchKeyEvent(event);
else {
return super.
}
dispatchKeyEvent(event);
}
}

@
Override
public boolean dispat
chTouchEvent(MotionEvent ev)
{
if (mTouchInterce
ptor != null && mTouchInterce
ptor.onTouch(this, ev)) {
return true;
}
return super.disp
atchTouchEvent(ev);
}
@
Override
public boolean onTouc
hEvent(MotionEvent event) {
final int x = (in
t) event.getX();
final int y = (in
t) event.getY();
/
/触摸在外面就消失
if ((event.getAct

ion() == MotionEvent.ACTION_D
OWN)
&
& ((x <
0
) || (x >= getWidth()) || (y
<
{
0) || (y >= getHeight())))
dismiss();
return true;
}
else if (event.
getAction() == MotionEvent.AC
TION_OUTSIDE) {
dismiss();
return true;
}
else {
return super.
onTouchEvent(event);
}
}
}
在Ac tivity中使用Dia log的时

候,为什么有时候会报
错“Unable to add window –
token is not va lid; is your
a c tivity running?” ?
这种情况一般发生在什么时
候?一般发生在Ac tivity进入
后台,Dia log没有主动
Dismiss掉,然后从后台再次
进入App的时候。
为什么会这样呢?
还记得前面说过吧,子窗口
类型的Window,比如
Dia log,想要显示的话,比
如保证appToken与Ac tivity保
持一致,而当Ac tivity销毁,
再次回来的时候,Dia log试
图重新创建,调用
ViewRootImp的setView()的
时候就会出问题,所以记得
在Ac tivity不可见的时候,主
动Dismiss掉Dia log。
if (res < WindowManagerGlobal
.
ADD_OKAY) {
switch (res) {
case
WindowManagerGlobal.ADD_BAD_A

PP_TOKEN:
case
WindowManagerGlobal.ADD_BAD_S
UBWINDOW_TOKEN:
t
hrow new WindowManager.BadTok
enException(
"
Unable to add window -- t
oken " + attrs.token
+
" is not valid; is your
activity running?");
case
WindowManagerGlobal.ADD_NOT_A
PP_TOKEN:
t
hrow new WindowManager.BadTok
enException(
"
Unable to add window -- t
oken " + attrs.token

+
" is not for an applicat
ion");
case
WindowManagerGlobal.ADD_APP_E
XITING:
t
hrow new WindowManager.BadTok
enException(
"
Unable to add window -- a
pp for token " + attrs.token
+
" is exiting");
case
WindowManagerGlobal.ADD_DUPLI
CATE_ADD:
t
hrow new WindowManager.BadTok
enException(
"
Unable to add window -- w

indow " + mWindow
" has already been added
case
+
"
);
WindowManagerGlobal.ADD_START
ING_NOT_NEEDED:
/
/
/
Silently ignore -- we would
have just removed it
/
right away, anyway.
r
eturn;
case
WindowManagerGlobal.ADD_MULTI
PLE_SINGLETON:
t
hrow new WindowManager.BadTok
enException(
"
Unable to add window " +

mWindow +
"
-- another window of thi
s type already exists");
case
WindowManagerGlobal.ADD_PERMI
SSION_DENIED:
t
hrow new WindowManager.BadTok
enException(
"
Unable to add window " +
mWindow +
"
-- permission denied for
this window type");
case
WindowManagerGlobal.ADD_INVAL
ID_DISPLAY:
t
hrow new WindowManager.Invali
dDisplayException(

"
Unable to add window " +
mWindow +
"
-- the specified display
can not be found");
}
throw new
RuntimeException(
"
Unab
le to add window -- unknown e
rror code " + res);
}
}
为什么Toa st需要由系统统一
控制,在子线程中为什么不
能显示Toa st?

首先Toa st也属于窗口系统,
但是并不是属于App的,是
由系统同一控制的。
关于这一块不想说太多,具
体实现机制请参考后面的文
章。
为了看下面的内容,你需要
知道以下几件事情:
1
. Toa st的显示是由系统Toast
服务控制的,与系统之间
的通信方式是Binder
2. 整个Toa st系统会维持最多
50个Toa st的队列,依次显
示
3
. 负责现实工作的是Toa st的
内部类TN,它负责最终的
显示与隐藏操作
4. 负责给系统Toa st服务发送
内容的是
INotificationManager的实
现类,它负责在
Toast.show()里面把TN对
象传递给系统消息服务,
service.enqueueToast(pkg,
tn, mDuration);这样Toast
服务就持有客户端的代
理,可以通过TN来控制每
个Toa st的显示与隐藏。
再来张图(转自工匠若水)
ok,现在假如你知道上面这
些啦,那么我们下面就看为
什么在子线程使用
Toast.show()会提示
"
No Looper; Looper.prepare()
wasn't called on this thread."
原因很简单,因为TN在操作
Toa st的时候,是通过Handler
做的
@
Override
public void show() {
if (localLOGV) Lo
g.v(TAG, "SHOW: " + this);
mHandler.post(mSh
ow);
}
@
Override
public void hide() {
if (localLOGV) Lo
g.v(TAG, "HIDE: " + this);
mHandler.post(mHi
de);
}

所以说,TN初始化的线程必
须为主线程,在子线程中使
用Handler,由于没有消息队
列,就会造成这个问题。
结语
上面写了这么多,你可能看
了前面忘了后面,下面,凯
子哥给你总结一下,这篇文
章到底讲了什么东西:
每个Ac tivity,都至少有一
个Window,这个Window


实际类型为
PhoneWindow,当Ac tivity
中有子窗口,比如Dia log
的时候,就会出现多个
Window。Ac tivity的
Window是我们控制的,状
态栏和导航栏的Window由
系统控制。
在DecorView的里面,一
定有一个id为content的
FraneLayout的布局容器,
咱们自己定义的xml布局
都放在这里面。

Ac tivity的Window里面有
一个DecorView,它使继
承自FrameLayout的一个
自定义控件,作为整个
Vie w层的容器,及Vie w树
的根节点。
Window是虚拟的概念,
DecorView才是看得见,
摸得着的东西,
Ac tivity. se tConte ntVie w()实
际调用的是
P hone Window. se tConte ntVi
ew(),在这里面实现了


DecorView的初始化和id为
content的FraneLayout的布
局容器的初始化,并且会
根据主题等配置,选择不
同的xml文件。而且在
Ac tivity. se tConte ntVie w()之
后,Window的一些特征位
将被锁定。
Ac tivity. findVie wById( )实
际上调用的是DecorView
的findvie wById(),这个方
法在Vie w中定义,但是是
fina l的,实际起作用的是

在Vie wGroup中被重写的
findViewTraversal()方法。
Ac tivity的mWindow成员变
量是在attach()的时候被初
始化的,attach()是Ac tivity
被通过反射手段实例化之
后调用的第一个方法,在
这之后生命周期方法才会
依次调用
在onResume()刚执行之
后,界面还是不可见的,
只有执行完
Ac tivity. ma ke Visible (),


DecorView才对用户可见
ViewManager这个接口里
面就三个接口,添加、移
除和更新,实现这个接口
的有WindowManager和
Vie wGroup,但是他们两
个面向的对象是不一样
的,WindowManager实现
的是对Window的操作,而
Vie wGroup则是对Vie w的
增、删、更新操作。
WindowManagerImpl是
WindowManager的实现


类,但是他就是一个代理
类,代理的是
WindowMa na ge rGloba l,
WindowMa na ge rGloba l一
个App里面就有一个,因
为它是单例的,它里面管
理了App中所有打开的
DecorView,Conte ntVie w
和PhoneWindow的布局参
数
WindowManager.LayoutPar
ams,而且
WindowMa na ge rGloba l这
个类是和WMS通信用的,
是通过IWindowSession对
象完成这个工作的,而
IWindowSession一个App只
有一个,但是每个
ViewRootImpl都持有对
IWindowSession的引用,
所以ViewRootImpl可以和
WMS喊话,但是WMS怎
么和ViewRootImpl喊话
呢?是通过
ViewRootImpl::W这个内部
类实现的,而且源码中很
多地方采用了这种将接口
隐藏为内部类的方式,这
样可以实现六大设计原则
之一——接口最小原则,
这样ViewRootImpl和WMS
就互相持有对方的代理,
就可以互相交流了
ViewRootImpl这个类每个
Ac tivity都有一个,它负责
和WMS通信,同时相应
WMS的指挥,还负责
Vie w界面的测量、布局和
绘制工作,所以当你调用

View. invalidate()和
View.requestLayout()的时
候,都会把事件传递到
ViewRootImpl,然后
ViewRootImpl计算出需要
重绘的区域,告诉WMS,
WMS再通知其他服务完成
绘制和动画等效果,当
然,这是后话,咱们以后
再说。
Window分为三种,子窗
口,应用窗口和系统窗
口,子窗口必须依附于一

个上下文,就是Ac tivity,
因为它需要Ac tivity的
appToken,子窗口和
Ac tivity的WindowManager
是一个的,都是根据
appToken获取的,描述一
个Window属于哪种类型,
是根据LayoutParam.type
决定的,不同类型有不同
的取值范围,系统类的的
Window需要特殊权限,当
然Toa st比较特殊,不需要
权限
PopupWindow使用的时
候,如果想触发按键和触
摸事件,需要添加一个背
景,代码中会根据是否设
置背景进行不同的逻辑判
断
Dia log在Ac tivity不可见的
时候,要主动dismiss掉,
否则会因为appToken为空
crash
Toa st属于系统窗口,由系
统服务
NotificationManagerService


统一调度,
NotificationManagerService
中维持着一个集合
ArrayList,最多存放50个
Toa st,但是
NotificationManagerService
只负责管理Toa st,具体的
现实工作由Toa st::TN来实
现
最后来一张Android的窗口管
理框架(转自ariesjzj)
OK,关于Ac tivity的界面显
示就说到这里吧,本篇文章
大部分的内容来自于阅读下
面参考文章之后的总结和思
考,想了解更详细的可以研
究下。
下次再见,拜拜 ~
参考文章
Android应用Ac tivity、
Dia log、PopWindow、
Toa st窗口添加机制及源码
分析


Android应用
setContentView与
LayoutInflater加载解析机
制源码分析
Android 4.4(KitKat)窗口管
理子系统- 体系框架
Android 之Window、
理
图解Android - Android GUI
系统(1) - 概论
尊重原创,转载请注明:
From 凯子哥


(
http://blog.csdn.net/zhaokai
qiang1992) 侵权必究!
关注我的微博,可以获得更
多精彩内容

http://m.blog.csdn.net/blog/yhc
13429826359/19977429
1
生命周期图

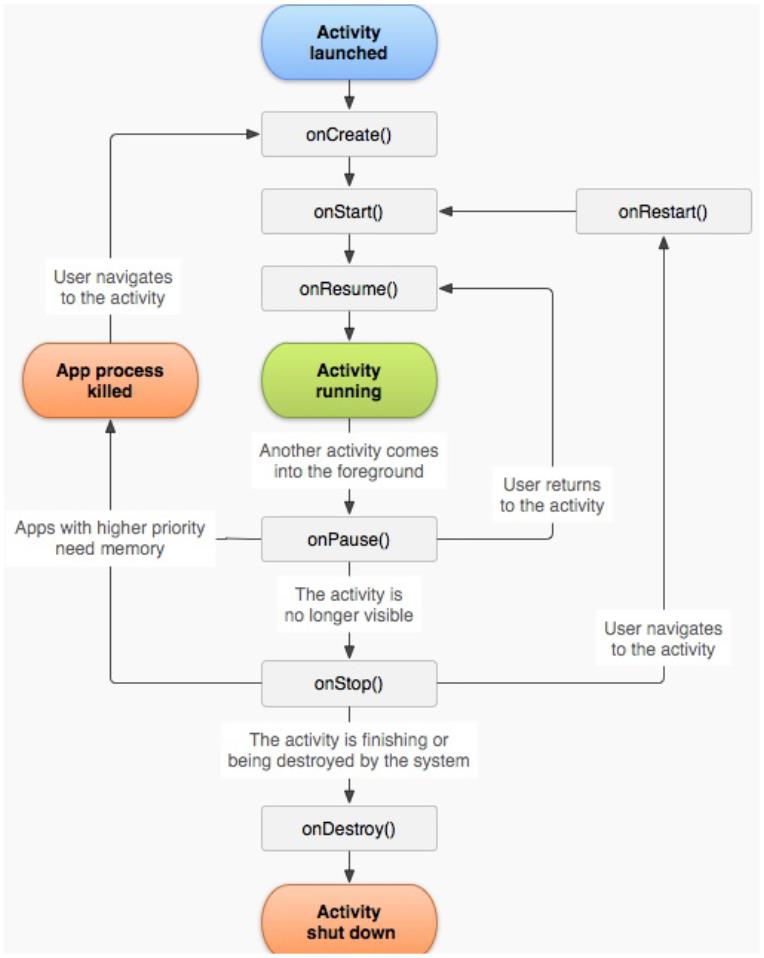
2
主要类图调用
上面类图关系中包含两个进
程,一个是应用程序进程,
另一个是AMS进程,所以会
涉及到进程间通信,android
进程间通信用的是Binder通

信。
2
.1客户进程
ØActivityThread
可以看到该类有一个main方
法,其实它是android一个应
用程序的入口,每启动一个
应用进程,都会创建
Ac tivityThre a d与之对应的实
例,是应用程序的UI线程,
Android进程启动时会建立消
息循环。负责管理应用程序
的生命周期,执行系统广播
及其ActivityManagerService
请求执行的操作。属于客户
端对象。
ØApplicationThread&Applicat
inThreadNative
ApplicationThread用来实现
ActivityManagerService与
Ac tivityThre a d之间的交互。
在ActivityManagerService需
要管理相关Application中的
Ac tivity的生命周期时,通过
ApplicationThread与
Ac tivityThre a d通讯,
ApplicationThreadNative是
ApplicationThread在客户端
的实现。
ØApplicationThreadProxy
ApplicationThreadProxy是
ApplicationThread在服务器
端的代理。负责和服务器端
的ApplicatingThreadNative通
讯。
AMS就是通过该代理与
Ac tivityThre a d进行通信的。
Ø Ac tivity& Intrumentation
Ac tivity是应用程序真正做事
情的类,每一个应用程序只
有一个Instrumentation对象,
每个Ac tivity内都有一个对该
对象的引用。Instrumentation
可以理解为应用进程的管
家,Ac tivityThre a d要创建或
暂停某个Ac tivity时,都需要
通过Instrumentation。通俗的
理解,Instrumentation与
Ac tivityThre a d的区别,前者
像是一个“家庭”里的“管
家”,后者是负责创建这
个“家庭”,并负责对外打交
道,比如接收AMS的通知
等。
2
.2 AMS进程
这里说的AMS进程,实际指
的是System_server进程,
System_server进程起来的时
候启动AMS服务,AMS实际
是ActivityManagerService的
缩写。
ØActivityManagerService
管理Ac tivity的生命周期
ØAc tivityMa na ge rNa tive
ActivityManagerService在服
务器端的实现,客户端的请
求调用ActivityManagerP roxy
后,通过IBinder,最终会在
ActivityManagerNative中实
现。ActivityManagerNative再
通过调用
ActivityManagerService的相
关功能,以完成客户端请
求。
ØActivityManagerP roxy
ActivityManagerService的在
客户端的代理。负责和服务
器端的Ac tivityMa na ge rNa tive
通讯。
ØAc tivitySta c k
Ac tivity在AMS的栈管理,用
来记录已经启动的Ac tivity的
先后关系,状态信息等。通
过Ac tivitySta c k决定是否需要
启动新的进程。
ØAc tivityRe c ord
Ac tivitySta c k的管理对象,每
个Ac tivity在AMS对应一个
Ac tivityRe c ord来记录Ac tivity
的状态以及其他的管理信
息。
ØTaskRecord
AMS抽象出来的一个“任
务”的概念,是记录
Ac tivityRe c ord的栈,一
个“Task”包含若干个
Ac tivityRe c ord。AMS用
TaskRecord确保Ac tivity启动
和退出的顺序。
ØProcessRecord
一个Apk文件运行时会对应
一个进程,ProcessRecord正
是记录一个进程中的相关信
息。
3
startActivity流程
在Android系统中,应用程序
是由Ac tivity组成的,因此,
应用程序的启动过程实际上
就是应用程序中的默认

Ac tivity的启动过程。启动
Android应用程序中的Ac tivity
的两种情景,第一,在
android设备屏幕中点击应用
程序图标的情景就会引发
Android应用程序中的默认
Ac tivity的启动,从而把应用
程序启动起来,这种启动方
式的特点是会启动一个新的
进程来加载相应的Ac tivity。
第二,应用程序内部启动非
默认Ac tivity的过程的源代
码,这种非默认Ac tivity一般
是在原来的进程和任务中启
动的。在Android的Ac tivity管
理机制中,当退出Ac tivity的
时候,在某些情况下并没有
立即把该Ac tivity杀死,而是
将其暂时保存起来,当第二
次调用sta r tAc tivity启动该
Ac tivity的时候,就不需要再
创建该Ac tivity的实例,直接
恢复Ac tivity即可。
3
.1调用流程图
对用户来讲,启动一个
Ac tivity有以下几种方式:
Ø在应用程序中调用
sta rtAc tivity()启动指定的
Ac tivity
Ø在Home程序中点击一个应
用图标,启动新的Ac tivity
Ø按“Back”键,结束当前
Ac tivity,自动启动上一个
Ac tivity
Ø长按“Home”键,显示当前
列表中,从中选则一个启动
对于AMS内部讲,启动一个
Ac tivity有三种方式,如上图
中的①②③分支:
①
目标Ac tivity的对象已经存
在,那么直接resume该
Ac tivity
②
目标Ac tivity所在的进程不
存在,那么需要创建进程,
并在新的进程中启动该
Ac tivity
③
目标Ac tivity所在进程已经
存在,那么直接在已存在进
程中启动该Ac tivity
3
.2在新的进程中启动
以在Home程序中点击一个
应用图标,启动Ma inAc tivity
为例子,介绍如下。
时序图如下图:
以上时序图包含35步骤调
用,下面逐一讲解:
3
.2.1(1~4),Launcher
中发送startActivity请
求
在Android系统中,应用程序
是由Launcher启动起来的,
其实,Launcher本身也是一
个应用程序,其它的应用程
序安装后,就会Launcher的
界面上出现一个相应的图
标,点击这个图标时,
Launcher就会对应的应用程
序启动起来。
Launcher继承与Ac tivity,
Ac tivity类的有个成员变量
mInstrumentation是,它的类
型是Intrumentation,它用来
监控应用程序和系统的交
互。
Instrumentation.execStartActiv
ity:
publicActivityResult execStartAc
Context who, IBinder contextThr
Activitytarget,
Intent intent, int requestCode,
IApplicationThread whoThread =
(IApplicationThread)contextThrea
……
try {
intent.setAllowFds(false);
intent.migrateExtraStreamToClip
int result = ActivityManagerNat
.
startActivity(whoThread, inten
intent.resolveTypeIfNeeded(who.g
token, target != null ? target.
requestCode, 0, null, null, opt
checkStartActivityResult(result
}
}
catch (RemoteException e) {
return null;
}
这里的
ActivityManagerNative.getDef
ault返回
ActivityManagerService的远
程接口,即
ActivityManagerP roxy接口。
3
.2.2(5-8) AMS接收客
户端startActivity请求
客户端通过Binder调用,最
终调用到
Ac tivitySta c k. sta rtAc tivityLoc k
ed:
final intstartActivityLocked(IAp
caller,
Intent intent, String resolvedT
aInfo, IBinderresultTo,
String resultWho, int requestCo
int callingPid, int callingUid,
Bundleoptions,
boolean componentSpecified, Act
outActivity){
ProcessRecord callerApp = null;
if (caller != null) {
callerApp = mService.getRecordF
if (callerApp != null) {
callingPid = callerApp.pid;
callingUid = callerApp.info.uid
}
…
}
else {
…
}
…
.
ActivityRecord sourceRecord = n
ActivityRecord resultRecord = n
….
int launchFlags = intent.getFla
….

if((launchFlags&Intent.FLAG_ACTI
0
&& sourceRecord != null){
// Transfer the result target f
activity to thenew
/ one being started, including
/
…
….
}
…
…
ActivityRecord r = new Activity
callerApp,callingUid,
intent, resolvedType, aInfo, mS
resultRecord, resultWho,
requestCode,componentSpecified);
if (outActivity != null) {
outActivity[0] = r;
}
…
…

err = startActivityUncheckedLoc
startFlags, true, options);
……
return err;
}
startActivityLock()主要做了
一下几件事:
①处理传进来的参数caller,
得到调用者的进程信息,并
保存在callerApp变量中,这
里就是Launcher应用程序的
进程信息了。
②处理

FLAG_ACTIVITY_FORWAR
D_RESULT标志。该标志的
特殊作用,就是能跨Ac tivity
传Result,比如A1->A2,A2
带该标志启动A3,那么A3调
用setResult,然后finish(),结
果将直接返回到A1
③创建一个临时的
Ac tivityRe c ord对象,该对象
只为了后面调用过程中的各
种对比,不一定会最终加入
到mHistory列表中。
④判断
mP e ndingAc tivityLa unc he s列
表是否有等待的Ac tivity要启
动,如果有先启动等待的
Ac tivity
⑤调用
startActivityUncheckedLocked
()方法。此时要启动的
Ac tivity已经通过检验,被人
认为是一个正当的启动请
求。
3
.2.3(9)创建新的Ta sk
调用
Ac tivitySta c k. sta rtAc tivityUnc
heckedLocked()处理Task问
题,因为这里我们是新启动
一个apk,所以将创建新的
Task,newTask=true,并调
用
Ac tivitySta c k. sta rtAc tivityLoa c
ked():
privatefinal void
startActivityLocked(ActivityReco
r, booleannewTask,
boolean doResume, boolean
keepCurTransition) {

……
if (!newTask) {
…….
}
}
/
/ Place a new activity at top
stack, so it is next tointeract
/ with the user.
/
if (addPos < 0) {
addPos = NH;
}
……
mHistory.add(addPos, r);
r.putInHistory();
r.frontOfTask = newTask;
……
if (doResume) {
resumeTopActivityLocked(null);

}
}
注意AtivitySta c k中有两个
startActivityLoacked()方法,
这里调用的是带四个参数
的,即
sta rtAc tivityLoc ke d(Ac tivityRe
cord r,
booleannewTask,boolean
doResume,
booleankeepCurTransition),
其中,r为将要启动的
Ac tivity,newTask=true,
doResume=true,在这个方法
中,将r放到mHistory的最后
面doResume=true,所以调用
re sume TopAc tivityLoc ke d(null
)。关于Task的概念比较复
杂,这里先不讲解。
3
.2.4:(10)运行mHistory
中最后一个
ActivityRecord
Ac tivitySta c k.
re sume TopAc tivityLoc ke d(null
)

finalboolean
resumeTopActivityLocked(Activity
// Find the first activity that
finishing.
ActivityRecord next = topRunnin
(null);
if (next == null) {
/
/ There are no more activities
startup the
/ Launcher...
/
if (mMainStack) {
return mService.startHomeActivi
}
}
next.delayedResume = false;
// If the top activity is the r
nothing todo.
if (mResumedActivity == next &&

ActivityState.RESUMED) {
/ Make sure we have executed a
transitions, sincethere
/ should be nothing left to do
/
/
mService.mWindowManager.executeA
mNoAnimActivities.clear();
return false;
}
/
/ If we are sleeping, and ther
activity, and thetop
/ activity is paused, well tha
/
we want.
if ((mService.mSleeping ||
mService.mShuttingDown)
&
& mLastPausedActivity == next&
=ActivityState.PAUSED) {
/ Make sure we have executed a
=
/

transitions, sincethere
// should be nothing left to do
mService.mWindowManager.executeA
mNoAnimActivities.clear();
returnfalse;
}
/
/ The activity may be waiting
that is nolonger
/ appropriate for it.
/
mStoppingActivities.remove(next
mGoingToSleepActivities.remove(
next.sleeping = false;
mWaitingVisibleActivities.remov
……
if (mPausingActivity != null) {
if (DEBUG_SWITCH) Slog.v(TAG, "
pausing=" +mPausingActivity);

return false;
}
…
..
/ We need to start pausing the
activity so the topone
/ can be resumed...
/
/
if (mResumedActivity != null) {
if (DEBUG_SWITCH) Slog.v(TAG, "
need to startpausing");
startPausingLocked(userLeaving,
return true;
}
…
}
…..
调用
re sume TopAc tivityLoc ke d(null
)
启动真正的Ac tivity。
①调用
topRunningActivityLocked()方
法取出当前正在运行的
Ac tivityRe c ord对象
②判断mHistory中是否有记
录,如果没有就意味着还没
有启动任何的Ac tivity,需要
首先调用
mService. startHomeActivityLo
cked()方法启动所谓的“主界
面程序”。当然我们这里
mHistroy已经有记录了。
③判断正在执行的Ac tivity是
否和目标Ac tivity一样,如果
一样,则直接返回。
④判断当前系统是否处于休
眠涨停,如果是,则返回。
这里继续往下执行。
⑤从mStoppingActivities、
mWa itingVisible Ac tivitie s和
mGoingToSle e pAc tivitie s中删
除目标对象,因为接下来将
要被启动。
⑥判断当前是否在暂停某个
Ac tivity,如果是则还不能运
行。这里
mP a usingAc tivity= null,所以
继续往下执行。
⑦判断当前是否有Ac tivity在
运行,如果有则先需要暂停
当前的Ac tivity。因为我们是
在Lancher中启动
ma inAc tivity,所以当前
mResumedActivity!=null,
所有调用
startPausingLocked(userLeavi
ng, false);
3
.2.5(11~16)暂停当前
运行Activity
①调用
ActivityStack.startPausingLoc
ked()暂停当前Ac tivity。
②判断运行当前Ac tivity的进
程是否存在。在这里if
(prev.app != null&&
prev.app.thread !=null)为真。
其中,prev.app为记录启动
Lancher进程的
ProcessRecord ,
prev.app.thread为Lancher进
程的远程调用接口
IApplicationThead,所以可以
调用
prev.app.thread.schedulePause
Ac tivity,到Lancher进程暂停
指定Ac tivity。
③在Lancher进程中消息传
递,调用
ActivityThread.handlePauseAc
tivity( ),最终调用
ActivityTHread.performPause
Ac tivity暂停指定Ac tivity。接
着通过Binder通信,通知
AMS已经完成暂停
ActivityManagerNative.getDef
ault().activityPaused(token).
3
.2.6(17~20) AMS处理
暂停Activity事情
在Launcher通过Binder进程
间通信机制通知AMS,它已
经准备就绪进入Paused状
态,在
ActivityStack.completePauseL
ocked()中完成暂停:
private final void
completePauseLocked(){
ActivityRecord prev =
mPausingActivity;
if (DEBUG_PAUSE) Slog.v(TAG,
"
Complete pause: " + prev);
if (prev != null) {
if (prev.finishing) {
prev =
finishCurrentActivityLoc
ked(prev,FINISH_AFTER_VISIBLE);
}
…
else if (prev.app != null) {
…
if (prev.configDestroy) {
destroyActivityLocked(prev,
true, false,"pause-config");
} else {
mStoppingActivities.add(prev);
if (mStoppingActivities.size()
3) {
>
/
/ If we already have a few
activities waiting to stop,
/ then give up on things
going idle and start clearing
/ them out.
/
/
if (DEBUG_PAUSE) Slog.v(TAG,
To many pending stops,
forcingidle");
"
scheduleIdleLocked();
}
checkReadyForSleepLocked();
else {
}
}
}
else {
if (DEBUG_PAUSE) Slog.v(TAG,
App died during pause, not
"

stopping:" + prev);
prev = null;
}
mPausingActivity = null;
}
if (!mService.isSleeping()) {
resumeTopActivityLocked(prev);
}
else {
checkReadyForSleepLocked();
}
…
}
…
①
给prev赋值
mP a usingAc tivity,即上一个
被执行的Ac tivity,即Launcer
②
如果prev的finishing为
true,说明上一个Ac tivity已
经完成,因此需要调用
finishCurrentActivityLocked()
执行相关操作。一般的流程
不会为true,这个条件似乎
只有内存回收的时候才会被
执行。
③将mP a usingAc tivity变量置
为空
④调用
re sume TopAc tivityLoc ke d方
法正式启动目标Ac tivity,即
Ma inAc tivity
3
.2.7:(21~23)正式启
动目标Activity
调用
Ac ivitySta c k. re sume TopAc tivit
yLocked:
final
booleanresumeTopActivityLocked(A
prev) {
ActivityRecord next =
topRunningActivityLocked(null);
……
if (mResumedActivity != null) {
if (DEBUG_SWITCH) Slog.v(TAG, "
need to startpausing");
startPausingLocked(userLeaving,
return true;
}
if (next.app != null &&next.app
null) {
…
}
…
startSpecificActivityLocked(nex
true);
}
return true;
}
①该方法在3.2.4步骤中调用
过,那时是因为
mRe sume dAc tivity != null,
有Ac tivity正在运行,所以去
执行了startPausingLocked暂
停Laucher去了。这时候,
mResumedActivity=null,所
以继续往下执行。
②判断讲要启动的Ac tivity的
客户进程是否存在,这里
next.app != null
&&next.app.thread != null为
false
③调用
ActivityStack.startSpecificActi
vityLoc ke d
private final voidstartSpecificA
ked(ActivityRecord r,
boolean andResume, boolean chec
// Is this activity's applicati
running?
ProcessRecord app
=
mService.getProcessRecordLocked
r.info.applicationInfo.uid);
……
if (app != null && app.thread !
……
realStartActivityLocked(r, app,
checkConfig);
return;
}
mService.startProcessLocked(r.p
r.info.applicationInfo,true, 0,
"
}
activity", r.intent.getCompone
④客户进程不存在,app!=
null && app.thread !=null为
false,所以调用
mService.startProcessLocked(
)
fork一个新的进程。
3
.2.8(24) fork一个新的
进程
①AMS通过Socket通信,向
Zygote发送一个创建进程请
求,Zygote创建新进程。
创建好进程后,调用
②
ActivityThread.main()。到
此,我们到了新了一个进程
中,也是程序的入口出。
③
调用ActivityThread.attach()
开始新的应用程序,接着同
过Binder通信通知AMS,新
的进程已经创建好了,可以
开始新的程序了。
3
.2.9(26~28) AMS准备
执行目标Activity
目标进程启动后,报告给
AMS,自己已经启动完毕可
以启动Ac tivity了,这里通过
IPC调用AMS的
attachApplication方法完成。
ActivityManagerService.attach
Application():
public final
voidattachApplication(IApplicati
thread) {
synchronized (this) {
int callingPid = Binder.getCall
final long origId =
Binder.clearCallingIdentity();
attachApplicationLocked(thread,c
Binder.restoreCallingIdentity(o
}
}
①
根据Binde r. ge tCa llingP id(),
或得客户进程pid,并调用
attachApplicationLocked(IApp
licationThreadthread,int pid)
②
在attachApplicationLocked
中,根据pid找到对应的
ProcessRecord对象,如果找
不到说明改pid客户进程是一
个没经过AMS允许的进程。
private final
booleanattachApplicationLocked(I
thread,
int pid) {
ProcessRecord app;
if (pid != MY_PID && pid>= 0) {
synchronized (mPidsSelfLocked)
app = mPidsSelfLocked.get(pid);
}
}
if (app == null) {
……
returnfalse;
}
/
/ If this application record i
to aprevious
/ process, clean it up now.
if (app.thread != null) {
/
handleAppDiedLocked(app, true,
}
……
app.thread = thread;
app.curAdj = app.setAdj = -100;
app.curSchedGroup =
Process.THREAD_GROUP_DEFAULT;
app.setSchedGroup
=
Process.THREAD_GROUP_BG_NONINTE
app.forcingToForeground = null;
app.foregroundServices = false;
app.hasShownUi = false;
app.debugging = false;
……
ensurePackageDexOpt(app.instrum
null
?
:
app.instrumentationInfo.packa
app.info.packageName);

……
// See if the top visible activ
run in thisprocess...
ActivityRecord hr
=
mMainStack.topRunningActivityLo
if (hr != null && normalMode){
if (hr.app == null && app.info.
hr.info.applicationInfo.uid
&processName.equals(hr.process
&
…
…
if (mMainStack.realStartActivit
true,true))
……
return true;
}
③为ProcessRecordapp对象
内部变量赋值

④确保目标程序(APK)文
件已经被转换为了odex文
件。Android中安装程序是
APK文件,实际上是一个zip
文件。
⑤调用
Ac tivitySta c k. re a lSta rtAc tivity
Locked通知客户进程运行指
定Ac tivity.
⑥调用
ApplicationThread.scheduleLa
unc hAc tivity,启动指定
Ac tivity。
3
.2.10:(29~35)客户进
程启动指定Activity
AMS通过IPC通行,通知客
户进程启动指定Ac tivity
①调用
ApplicationThread.scheduleLa
unc hAc tivity
②经过Handler消息传动,调
用
ActivityThread.handleLaunch
Ac tivity( )
调用
③
ActivityThread.performLaunc
hAc tivity()完成Ac tivity的加
载,并最终调用Ac tivity生命
周期的onCreate()方法
④performLaunchActivity返
回,继续调用
ActivityThread.handleResume
Ac tivity(),该方法内部又调用
ActivityThread.performResum
eActivity(),其内部仅仅调用
了目标Ac tivity的onResume()
方法。到此Ac tivity启动完
成。
⑤
添加一个IdleHandler对
象,因为在一般情况下,该
步骤执行完毕后,Ac tivity就
会进入空闲状态,所以就可
以进行内存回收。
3
.3在已有进程中启动
在已有的进程中启动
Ac tivity,也就是在一个应用
程序中启动内部Ac tivity,其
过程跟3.2小节大致一样,这
里我们不会像3.2小节详细分
析每一步骤,我们只看差别
的地方。这里以启动
subAc tivity为例子。时序图
如下:
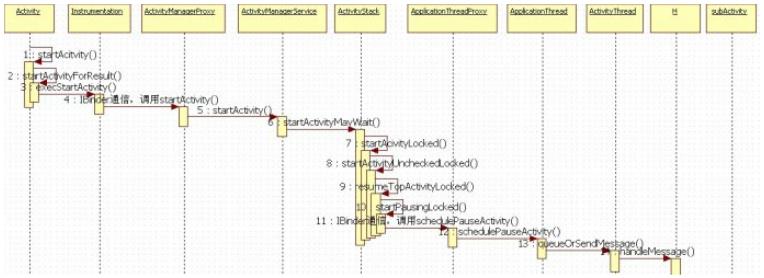
以上时序图包含29步骤调
用,下面逐一讲解:
3
.3.1(1~3)在
MainActivity启动
Activity
这一步跟3.2.1小节一样
3
.3.2(4~7) AMS接收客
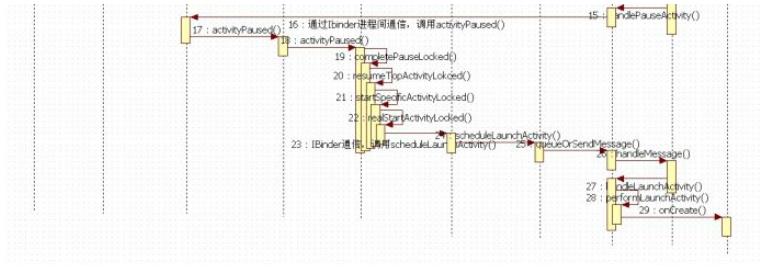
户端startActivity请求
这一步跟3.2.2小节一样
3
.3.3(8)不需要创建新
的Ta sk
调用
Ac tivitySta c k. sta rtAc tivityUnc
heckedLocked()处理Task问
题,因为这里我们是在已有
应用中sta r tAc tivity,也不设
置标志要在新的Task中启动
Ac tivity,所以不创建新的
Task,newTask=false,并调
用
Ac tivitySta c k. sta rtAc tivityLoa c
ked():
privatefinal void
startActivityLocked(ActivityReco
r, booleannewTask,
boolean doResume, boolean
keepCurTransition) {
……
if (!newTask) {
…….
}
}
// Place a new activity at top
stack, so it is next tointeract
// with the user.
if (addPos < 0) {
addPos = NH;
}
……
mHistory.add(addPos, r);
r.putInHistory();
r.frontOfTask = newTask;
…
if (doResume) {
…
resumeTopActivityLocked(null);
}
}
注意AtivitySta c k中有两个
startActivityLoacked()方法,
这里调用的是带四个参数

的,即
sta rtAc tivityLoc ke d(Ac tivityRe
cord r,
booleannewTask,boolean
doResume,
booleankeepCurTransition),
其中,r为将要启动的
Ac tivity,newTask=false,
doResume=true,在这个方法
中,将r放到mHistory的最后
面doResume=true,所以调用
re sume TopAc tivityLoc ke d(null
)
。
3
.3.4(9)准备启动
mHistory中最后一个
Activity
这一步跟3.2.4小节一样
3
.3.5(10~15)暂停
MainActivity
这一步跟3.2.5小节一样
3
.3.6(16~19) AMS处理
暂停MainActivity
这一步跟3.2.6小节一样
3
.3.7(20~22)正式启动
目标Activity
调用
Ac ivitySta c k. re sume TopAc tivit
yLocked:
final
booleanresumeTopActivityLocked(A
prev) {
ActivityRecord next =
topRunningActivityLocked(null);
……
if (mResumedActivity != null) {
if (DEBUG_SWITCH) Slog.v(TAG, "

need to startpausing");
startPausingLocked(userLeaving,
return true;
}
if (next.app != null &&next.app
null) {
…
}
…
startSpecificActivityLocked(nex
true);
}
return true;
}
①调用
startSpecificActivityLocked(ne
xt, true,true)


private final voidstartSpecificA
ked(ActivityRecord r,
boolean andResume, boolean chec
// Is this activity's applicati
running?
ProcessRecord app
=mService.getProcessRecordLocked
r.info.applicationInfo.uid);
……
if (app != null && app.thread !
……
realStartActivityLocked(r, app,
checkConfig);
return;
}
mService.startProcessLocked(r.p
r.info.applicationInfo,true, 0,
"
activity", r.intent.getCompone

}
②subAc tivity进程已经存
在,app != null&& app.thread
!=null为true,所以调用
re a lSta rtAc tivityLoc ke d。
finalboolean
realStartActivityLocked(Activity
r,
ProcessRecord app, boolean andR
booleancheckConfig)
throws RemoteException {
…
..
app.thread.scheduleLaunchActivi
Intent(r.intent),r.appToken,
System.identityHashCode(r), r.i
new
Configuration(mService.mConfigur
r.compat, r.icicle, results,
newIntents,!andResume,
mService.isNextTransitionForwar
profileFile,profileFd,
profileAutoStop);
……
return true;
}
③调用
ApplicationThread.scheduleLa
unc hAc tivity,启动指定
Ac tivity。
3
.3.8(23~29)客户进程
启动指定Activity
这一步跟3.2.10是一样的
3
.4在已有的
ActivityRecord中恢复
指定Activity
经过上面3.2和3.3小节,现
在对Ac tivity的启动流程应该
是比较清晰的了,这一节就
简单的讲下恢复Ac tivity的流
程。当Ac tivityRe c ord已经记
录有一个Ac tivity,如果再次
调用sta r tAc tivity,并没有标
志要创建Ac tivity新的实例,
那么就可以直接恢复该
Ac tivity。
①启动一个Ac tivity,跟前面
3.2节一样,都需要暂停当前
正在运行的Ac tivity,暂停流
程这里就不讲了,完成暂停
后,调用
Ac tivitySta c k. re sume TopAc tivi
tyLocked()。
②因为AMS和ActivityTHread
的IPC通信,
re sume TopAc tivityLoc ke d会
被反复调用几次,每次都会
根据一些变量值的差异,走
不同的流程。
finalboolean resumeTopActivityLo
prev) {
/
/ Find the first activity that
ActivityRecord next = topRunnin
(null);
……
if (mResumedActivity != null) {
if (DEBUG_SWITCH) Slog.v(TAG, "
startpausing");
startPausingLocked(userLeaving,
return true;

}
…
…
if (next.app != null &&next.app
if (DEBUG_SWITCH) Slog.v(TAG, "
next);
+
……
try {
……
next.app.thread.scheduleResumeAc
mService.isNextTransitionForwar
checkReadyForSleepLocked();
}
/
catch (Exception e) {
/ Whoops, need to restart this
…
startSpecificActivityLocked(nex
…
return true;
}

…
}
…
else {
…
…
return true;
}
③这里,mRe sume dAc tivity =
null,不走暂停流程。
④next.app != null
&&next.app.thread != null为
true,调用
ApplicationThead.scheduleRes
umeActivity(),到客户进程恢
复指定Ac tivity。
⑤经过消息传递,调用
ActivityTHread.handleResume
Ac tivity( )
⑥调用
ActivityTHread.performResu
me Ac tivity()正在恢复
Ac tivity,接着回调Ac tivity的
onResume()方法。
4
stop停止Activity
前面几节汇总,A启动到B
时,需要先暂停A,然后再

启动B。什么时候停止(stop)
或者销毁(Destory)呢?
4
.1从暂停到停止全过
程
4按Home键回到桌面
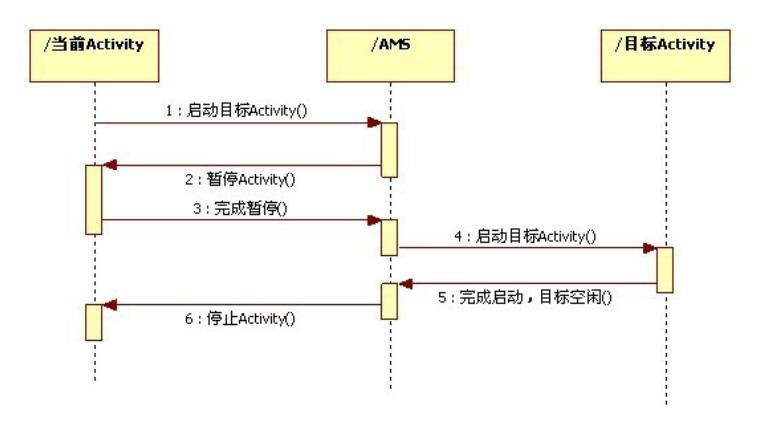
5
按Back键回到上一个
Ac tivity
6
长按Home键
应用程序包的安装是
androi d的特点
APK为AndroidPackage的缩
写
Android应用安装有如下四种
方式:
1.系统应用安装――开机时
完成,没有安装界面
2
.网络下载应用安装――通
过market应用完成,没有安
装界面
3.ADB工具安装――没有安
装界面。
4
.第三方应用安装――通过
SD卡里的APK文件安装,有
安装界面,由
packageinstaller.apk应用处理
安装及卸载过程的界面。
应用安装的流程及路径
应用安装涉及到如下几个目
录:
system/app ---------------系统
自带的应用程序,获得
adb root权限才能删除
data/app ---------------用户程
序安装的目录。安装时
把
apk文件复制到此目
录
data/data ---------------存放应
用程序的数据
data/dalvik-cache--------将apk
中的dex文件安装到da lvik-
cache目录下(dex文件是
da lvik虚拟机的可执行文件,
其大小约为原始apk文件大
小的四分之一 )
安装过程:
复制APK安装包到data/app目
录下,解压并扫描安装包,
把dex文件(Da lvik字节码)保
存到dalvik-cache目录,并
data/data目录下创建对应的
应用数据目录。
卸载过程:
删除安装过程中在上述三个
目录下创建的文件及目录。
安装应用的过程解析
一.开机安装
PackageManagerService处理
各种应用的安装,卸载,管
理等工作,开机时由
systemServer启动此服务
(源文件路径:
android\frameworks\base\servi
ces\java\com\android\server\P
ackageManagerService.java)
PackageManagerService服务
启动的流程:
1
.首先扫描安
装“system\framework”目录下
的jar包
/
/ Find base frameworks (res
ource packages without code).
mFrameworkInstall
Observer = new AppDirObserver
(
mFrameworkDir
.
getPath(), OBSERVER_EVENTS,
true);
mFrameworkInstall
Observer.startWatching();
scanDirLI(mFramew
orkDir, PackageParser.PARSE_I
S_SYSTEM
|
Package
Parser.PARSE_IS_SYSTEM_DIR,

scanMode
|
SCAN_NO_DEX, 0);
2.扫描安装系统system/app的
应用程序
/
/ Collect all system packag
es.
mSystemAppDir = ne
w File(Environment.getRootDir
ectory(), "app");
mSystemInstallObse
rver = new AppDirObserver(
mSystemAppDir.
getPath(), OBSERVER_EVENTS, t
rue);
mSystemInstallObse
rver.startWatching();
scanDirLI(mSystemA
ppDir, PackageParser.PARSE_IS


_
SYSTEM
|
PackageP
arser.PARSE_IS_SYSTEM_DIR, sc
anMode, 0);
3
.制造商的目录
下/vendor/app应用包
/
/ Collect all vendor packag
es.
mVendorAppDir = n
ew File("/vendor/app");
mVendorInstallObs
erver = new AppDirObserver(
mVendorAppDir
.
getPath(), OBSERVER_EVENTS,
true);
mVendorInstallObs
erver.startWatching();
scanDirLI(mVendor


AppDir, PackageParser.PARSE_I
S_SYSTEM
|
Package
Parser.PARSE_IS_SYSTEM_DIR, s
canMode, 0);
4.扫描“data\app”目录,即用
户安装的第三方应用
scanDirLI(mAppInstallDir, 0,
scanMode, 0);
5
.扫描" data\app-private"目
录,即安装DRM保护的APK
文件(一个受保护的歌曲或
受保 护的视频是使


用DRM 保护的文件)
scanDirLI(mDrmAppPrivateInst
allDir, PackageParser.PARSE_F
ORWARD_LOCK,
scanMode
,
0);
扫描方法的代码清单
private void scanDirLI(File
dir, int flags, int scanMode,
long currentTime) {
String[] files = dir
.
list();
if (files == null) {
Log.d(TAG, "No f
iles in app dir " + dir);


return;
}
if (false) {
Log.d(TAG, "Scan
ning app dir " + dir);
}
int i;
for (i=0; i<files.le
ngth; i++) {
File file = new
File(dir, files[i]);
if (!isPackageFi
lename(files[i])) {
/
/ Ignore en
tries which are not apk's
continue;
}
PackageParser.Pa
ckage pkg = scanPackageLI(fil
e,
flags|Pa
ckageParser.PARSE_MUST_BE_APK

,
scanMode, currentTime);
/ Don't mess ar
/
ound with apps in system part
ition.
if (pkg == null
&
& (flags & PackageParser.PAR
SE_IS_SYSTEM) == 0 &&
mLastSca
nError == PackageManager.INST
ALL_FAILED_INVALID_APK) {
/
/ Delete th
e apk
Slog.w(TAG,
"
Cleaning up failed install o
f " + file);
file.delete(
)
;
}
}
}

并且从该扫描方法中可以看
出调用了scanPackageLI()
priva te PackageParser.Packag
e scanPackageLI(File scanFile,
int parseFlags, int scanMode, l
ong currentTime)
跟踪scanPackageLI()方法
后发现,程序经过很多次的
if e lse 的筛选,最后判定可
以安装后调用
了mInsta lle r. insta ll
if (mInstaller != null) {
int ret
=
mInstaller.install(pkgName,
useEncryptedFSDir, pkg.appl
icationInfo.uid,pkg.applicati
onInfo.uid);
if(ret <
0
) {
/
/ E
rror from installer
mLas
PackageManage
r.INSTALL_FAILED_INSUFFICIENT
STORAGE;
tScanError =
_
retu
rn null;
}
}
mInstaller.install() 通过

LocalSocketAddress address
new LocalSocketAddress(
=
"
installd", L
ocalSocketAddress.Namespace.R
ESERVED);
指挥installd在C语言的文件
中完成工作
PackageManagerService小
节:1)从apk, xml中载入
pacakge信息, 存储到内部成
员变量中, 用于后面的查
找. 关键的方法是
scanPackageLI().

2
)各种查询操作, 包括
query Intent操作.
)install package和
3
delete package的操作. 还有
后面的关键方法是
installPackageLI().
二、从网络上下载应用:
下载完成后,会自动调用
Packagemanager的安装方法
installP ackage()
/
Called when a downloaded p
ackage installation has been c
onfirmed by the user /
由英文注释可见
PackageManagerService类的
installP ackage()函数为安
装程序入口。
public void installPackage(
final Uri package
URI, final IPackageInstallObs
erver observer, final int fla
gs,
final String inst
allerPackageName) {
mContext.enforceCalli
ngOrSelfPermission(
android.Manif
est.permission.INSTALL_PACKAG

ES, null);
Message msg = mHandle
r.obtainMessage(INIT_COPY);
msg.obj = new Install
Params(packageURI, observer,
flags,
installerPack
ageName);
mHandler.sendMessage(
msg);
}
其中是通过PackageHandler
的实例
mhandler.sendMessage(msg
)把信息发给继承Handler的
类HandleMessage()方法

class PackageHandler extends
Handler{
*
****************省略若干****
***************
public void handleM
*
essage(Message msg) {
try {
doHandleMess
age(msg);
}
finally {
Process.setT
hreadPriority(Process.THREAD_
PRIORITY_BACKGROUND);
}
}
*****************省略若干
*
*
*********************
}

把信息发给
doHandleMessage()方法,方法
中用switch()语句进行判
定传来Message
void doHandleMessage(Messag
e msg) {
switch (msg.what
)
{
case INIT_CO
if (DEBU
PY: {
G_SD_INSTALL) Log.i(TAG, "ini
t_copy");
HandlerP
arams params = (HandlerParams
)
msg.obj;
int idx

=
mPendingInstalls.size();
if (DEBU
G_SD_INSTALL) Log.i(TAG, "idx
" + idx);
=
/
/ If a
bind was already initiated we
dont really
/
/ need
to do anything. The pending i
nstall
/
/ will
be processed later on.
if (!mBo
und) {
/
/ I
f this is the only one pendin
g we might
/
/ h
ave to bind to the service ag
ain.
if (
!
connectToService()) {

Slog.e(TAG, "Failed to bind t
o media container service");
params.serviceError();
return;
}
el
se {
/
/ Once we bind to the servic
e, the first
/
/ pending request will be pr
ocessed.
mPendingInstalls.add(idx, par
ams);
}
else {
}

mPen
dingInstalls.add(idx, params)
;
/
/ A
lready bound to the service.
Just make
/
ure we trigger off processing
the first request.
if (
/ s
idx == 0) {
mHandler.sendEmptyMessage(MCS
_
BOUND);
}
}
break;
}
case MCS_BOU
ND: {
if (DEBU
G_SD_INSTALL) Log.i(TAG, "mcs

_
bound");
if (msg.
mCon
obj != null) {
tainerService = (IMediaContai
nerService) msg.obj;
}
if (mCon
tainerService == null) {
/
/ S
omething seriously wrong. Bai
l out
Slog
.
e(TAG, "Cannot bind to media
container service");
for
(HandlerParams params : mPend
ingInstalls) {
mPendingInstalls.remove(0);
/
/ Indicate service bind erro

r
params.serviceError();
}
mPen
dingInstalls.clear();
}
else i
f (mPendingInstalls.size() >
) {
0
Hand
lerParams params = mPendingIn
stalls.get(0);
if (
params != null) {
params.startCopy();
}
}
else {
/
/ S
hould never happen ideally.
Slog

.
w(TAG, "Empty queue");
}
break;
}
*
***************
省略若干**********************
}
}
public final boolean sendMess
age (Message msg)
public final boolean sendEmpt
yMessage (int what)
两者参数有别。
然后调用抽象类

HandlerParams中的一个
startCopy()方法
abstract class HandlerParams
{
final void startCopy() {
*
**************若干if语句判
定否这打回handler消息*******
handleReturnCode();
}
}
handleReturnCode()复写
了两次其中有一次是删除时

要调用的,只列出安装调用
的一个方法
@
Override
void handleReturnCode
() {
/
/ If mArgs is nu
ll, then MCS couldn't be reac
hed. When it
/
/ reconnects, it
will try again to install. A
t that point, this
/
/ will succeed.
if (mArgs != null
processPendin
)
{
gInstall(mArgs, mRet);
}
}

这时可以清楚的看
见processPendingInstall()
被调用。
其中run()方法如下
run(){
synchronized (mInstallLock)
{
*
***
*
*******省略*****************
inst
allPackageLI(args, true, res)
;
}
}
instaPacakgeLI()args,res参


数分析
//InstallArgs 是在
PackageService定义的
static abstract class InstallArgs
静态抽象类。
static abstract class Instal
lArgs {
*
***************************
*
*
****************************
***********
其中定义了flag标志,packageURL
,
创建文件,拷贝apk,修改包名称,
还有一些删
除文件的清理,释放存储函数。
*
***********************
*
****************************


*
***************
}
class PackageInstalledInfo
{
String name;
int uid;
PackageParser.Packag
e pkg;
int returnCode;
PackageRemovedInfo r
emovedInfo;
}
private void installPackageL
I(InstallArgs args,
boolean newInstall
,
PackageInstalledInfo res) {
int pFlags = args.flag
s;


String installerPackag
eName = args.installerPackage
Name;
File tmpPackageFile =
new File(args.getCodePath());
boolean forwardLocked
=
((pFlags & PackageManager.I
NSTALL_FORWARD_LOCK) != 0);
boolean onSd = ((pFlag
s & PackageManager.INSTALL_EX
TERNAL) != 0);
boolean replace = fals
e;
int scanMode = (onSd ?
0
: SCAN_MONITOR) | SCAN_FOR
CE_DEX | SCAN_UPDATE_SIGNATUR
E
|
(newInstall
SCAN_NEW_INSTALL : 0);
/ Result object to be
returned
?
/

res.returnCode = Packa
geManager.INSTALL_SUCCEEDED;
/
/ Retrieve PackageSet
tings and parse package
int parseFlags = Packa
geParser.PARSE_CHATTY |
(forwardLocked ? Packa
geParser.PARSE_FORWARD_LOCK :
) |
0
(onSd ? PackageParser.
PARSE_ON_SDCARD : 0);
parseFlags |= mDefPars
eFlags;
PackageParser pp = new
PackageParser(tmpPackageFile
getPath());
.
pp.setSeparateProcesse
s(mSeparateProcesses);
final PackageParser.Pa
ckage pkg = pp.parsePackage(t
mpPackageFile,

null, mMetrics
,
parseFlags);
if (pkg == null) {
res.returnCode = p
p.getParseError();
return;
}
String pkgName = res.n
ame = pkg.packageName;
if ((pkg.applicationIn
fo.flags&ApplicationInfo.FLAG
TEST_ONLY) != 0) {
if ((pFlags&Packag
eManager.INSTALL_ALLOW_TEST)
= 0) {
_
=
res.returnCode
PackageManager.INSTALL_FAI
=
LED_TEST_ONLY;
return;
}
}
if (GET_CERTIFICATES &

&
,
!pp.collectCertificates(pkg
parseFlags)) {
res.returnCode = p
p.getParseError();
return;
}
/
/ Get rid of all refe
rences to package scan path v
ia parser.
pp = null;
String oldCodePath = n
ull;
boolean systemApp = fa
lse;
synchronized (mPackage
s) {
/
/ Check if instal
ling already existing package
if ((pFlags&Packag
eManager.INSTALL_REPLACE_EXIS
TING) != 0) {

String oldName
=
mSettings.mRenamedPackages
.
get(pkgName);
if (pkg.mOrigi
nalPackages != null
&
& pkg
.
mOriginalPackages.contains(o
ldName)
&
& mPa
ckages.containsKey(oldName))
{
/
/ This pa
ckage is derived from an orig
inal package,
/
/ and thi
s device has been updating fr
om that original
/
/ name.
We must continue using the or
iginal name, so
/
/ rename
the new package here.

pkg.setPac
pkgName =
replace =
kageName(oldName);
pkg.packageName;
true;
}
else if (mPa
ckages.containsKey(pkgName))
{
/
/ This pa
ckage, under its official nam
e, already exists
/
/ on the
device; we should replace it.
replace =
true;
}
}
PackageSetting ps
=
mSettings.mPackages.get(pkg
Name);

if (ps != null) {
oldCodePath =
mSettings.mPackages.get(pkgNa
me).codePathString;
if (ps.pkg !=
null && ps.pkg.applicationInf
o != null) {
systemApp
=
(ps.pkg.applicationInfo.fla
gs &
Ap
plicationInfo.FLAG_SYSTEM) !=
0
;
}
}
}
if (systemApp && onSd)
{
/
/ Disable updates
to system apps on sdcard
Slog.w(TAG, "Canno
t install updates to system a

pps on sdcard");
res.returnCode = P
ackageManager.INSTALL_FAILED_
INVALID_INSTALL_LOCATION;
return;
}
if (!args.doRename(res
.
returnCode, pkgName, oldCode
Path)) {
res.returnCode = P
ackageManager.INSTALL_FAILED_
INSUFFICIENT_STORAGE;
return;
}
/
/ Set application obj
ects path explicitly after th
e rename
setApplicationInfoPath
s(pkg, args.getCodePath(), ar
gs.getResourcePath());
pkg.applicationInfo.na
tiveLibraryDir = args.getNati

veLibraryPath();
if (replace) {
replacePackageLI(p
kg, parseFlags, scanMode,
installerP
ackageName, res);
else {
installNewPackageL
}
I(pkg, parseFlags, scanMode,
installerP
ackageName,res);
}
}
最后判断如果以前不存在那
么调用
installNewPackageLI()

private void installNewPacka
geLI(PackageParser.Package pk
g,
int parseFlags,i
nt scanMode,
String installer
PackageName, PackageInstalled
Info res) {
*
**********************
省略若干**********************
*
**************************
PackageParser.Packag
e newPackage = scanPackageLI(
pkg, parseFlags, scanMode,
System.curren
tTimeMillis());
*
**********************
省略若干**********************
*
***************************
}

最后终于回到了和开机安装
一样的地方.与开机方式安装
调用统一方法。
三、从ADB工具安装
其入口函数源文件为pm. java
(源文件路径:
android\frameworks\base\cmd
s\pm\src\com\android\comman
ds\pm\pm.java)
其中
\system\framework\pm.jar 包

管理库
包管理脚
本\system\bin\pm 解析
showUsage就是使用方法
private static void showUsage
() {
System.err.println("u
sage: pm [list|path|install|u
ninstall]");
System.err.println("
pm list packages [-f]")
;
System.err.println("
pm list permission-grou
ps");
System.err.println("
pm list permissions [-g

]
[-f] [-d] [-u] [GROUP]");
System.err.println("
pm list instrumentation
-f] [TARGET-PACKAGE]");
System.err.println("
pm list features");
[
System.err.println("
pm path PACKAGE");
System.err.println("
pm install [-l] [-r] [-
t] [-i INSTALLER_PACKAGE_NAME
]
[-s] [-f] PATH");
System.err.println("
pm uninstall [-k] PACKA
GE");
System.err.println("
pm enable PACKAGE_OR_CO
MPONENT");
System.err.println("
pm disable PACKAGE_OR_C
OMPONENT");

System.err.println("
pm setInstallLocation [
0
/auto] [1/internal] [2/exter
nal]");
*
*********************
省略*************************
*
}
安装时候会调
用runInstall()方法
private void runInstall() {
int installFlags = 0;
String installerPackage
Name = null;
String opt;
while ((opt=nextOption(
)
) != null) {
if (opt.equals("-l"


)
) {
installFlags |=
PackageManager.INSTALL_FORWA
RD_LOCK;
}
else if (opt.equa
ls("-r")) {
installFlags |=
PackageManager.INSTALL_REPLA
CE_EXISTING;
}
else if (opt.equa
ls("-i")) {
installerPackag
eName = nextOptionData();
if (installerPa
ckageName == null) {
System.err.
println("Error: no value spec
ified for -i");
showUsage()
;
return;
}

}
else if (opt.equa
installFlags |=
ls("-t")) {
PackageManager.INSTALL_ALLOW
TEST;
_
}
else if (opt.equa
ls("-s")) {
/
/ Override if
-
s option is specified.
installFlags |=
PackageManager.INSTALL_EXTER
NAL;
}
else if (opt.equa
ls("-f")) {
/
/ Override if
-
s option is specified.
installFlags |=
PackageManager.INSTALL_INTER
NAL;
}
else {
System.err.prin
tln("Error: Unknown option: "

+
opt);
}
showUsage();
return;
}
String apkFilePath = ne
xtArg();
System.err.println("\tp
kg: " + apkFilePath);
if (apkFilePath == null
)
{
System.err.println(
"
)
Error: no package specified"
;
showUsage();
return;
}
PackageInstallObserver
obs = new PackageInstallObser
ver();
try {
mPm.installPackage(

Uri.fromFile(new File(apkFile
Path)), obs, installFlags,
installerPa
ckageName);
synchronized (obs)
{
while (!obs.fin
ished) {
try {
obs.wai
t();
}
catch (In
terruptedException e) {
}
}
if (obs.result
=
= PackageManager.INSTALL_SUC
CEEDED) {
System.out.
println("Success");
else {
System.err.
}

println("Failure ["
+
i
nstallFailureToString(obs.res
ult)
+
"
]
");
}
}
}
catch (RemoteExceptio
n e) {
System.err.println(
e.toString());
System.err.println(
PM_NOT_RUNNING_ERR);
}
}
其中的

PackageInstallObserver obs =
new PackageInstallObserver();
mPm.installPackage(U
ri.fromFile(new File (a pkFile P a
th)), obs, installFlags,
installerPackage
Name);
如果安装成功
obs.result == PackageManage
r. INSTALL_SUCCEEDED)
又因为有
IPackageManage mPm;
mPm = IpackageManage
r.Stub.asInterface(ServiceMan
ager.getService("package"));
Stub是接口IPackageManage
的静态抽象类,asInterface是
返回IPackageManager代理的
静态方法。
因为
class PackageManagerService
extends IPackageManager.Stu
b
所以mPm.installPackage 调
用
/
Called when a downloade
d package installation has bee
n confirmed by the user /
public vo id installP ackage(
final Uri packageURI,
final IPackageInstallObserver
observer, final int flags,final St
ring installerPackageName)
这样就是从网络下载安装的
入口了。
四,从SD卡安装
系统调用
P ackageInstallerActivity.java (
/home/zhongda/androidSRC/v
ortex-8inch-for-
hoperun/packages/apps/Packa
geInstaller/src/com/android/pa
ckageinstaller)
进入这个Ac tivity会判断信息
是否有错,然后调用
priva te vo id initiateInstall()
判断是否曾经有过同名包的
安装,或者包已经安装
通过后执行
priva te vo id startInstallConfirm
() 点击OK按钮后经过一系列
的安装信息的判断Intent跳转
到
public class InstallAppProgre
ss extends Activity implement
s View.OnClickListener, OnCan
celListener
public void onCreate(Bundl
e icicle) {
super.onCreate(icicle

)
;
Intent intent = getIn
mAppInfo = intent.get
tent();
ParcelableExtra(PackageUtil.I
NTENT_ATTR_APPLICATION_INFO);
mPackageURI = intent.
getData();
initView();
}
方法中调用了initVie w()方
法
public void initView() {
requestWindowFeature(W
indow.FEATURE_NO_TITLE);
setContentView(R.layou
t.op_progress);


int installFlags = 0;
PackageManager pm = ge
tPackageManager();
try {
PackageInfo pi = p
m.getPackageInfo(mAppInfo.pac
kageName,
PackageMan
ager.GET_UNINSTALLED_PACKAGES
)
;
if(pi != null) {
installFlags |
=
PackageManager.INSTALL_REPL
ACE_EXISTING;
}
}
catch (NameNotFoundE
xception e) {
}
if((installFlags & Pac
kageManager.INSTALL_REPLACE_E
XISTING )!= 0) {

Log.w(TAG, "Replac
ing package:" + mAppInfo.pack
ageName);
}
PackageUtil.AppSnippet
as = PackageUtil.getAppSnipp
et(this, mAppInfo,
mPackageURI);
mLabel = as.label;
PackageUtil.initSnippe
tForNewApp(this, as, R.id.app
_
snippet);
mStatusTextView = (Tex
tView)findViewById(R.id.cente
r_text);
mStatusTextView.setTex
t(R.string.installing);
mProgressBar = (Progre
ssBar) findViewById(R.id.prog
ress_bar);
mProgressBar.setIndete

rminate(true);
/
/ Hide button till pr
ogress is being displayed
mOkPanel = (View)findV
iewById(R.id.buttons_panel);
mDoneButton = (Button)
findViewById(R.id.done_button
)
;
mLaunchButton = (Butto
n)findViewById(R.id.launch_bu
tton);
mOkPanel.setVisibility
(View.INVISIBLE);
String installerPackag
eName = getIntent().getString
Extra(
Intent.EXTRA_I
NSTALLER_PACKAGE_NAME);
PackageInstallObserver
observer = new PackageInstal
lObserver();

pm.installPackage(mPac
kageURI, observer, installFla
gs, installerPackageName);
}
方法最后我们可以看到再次
调用安装接口完成安装。

Android的构建过程涉及到许
多工具和流程,并会产生一
系列中间件,最终生成一个
APK文件,可以根据官方提
供的流程图来具体了解构建
的过程。
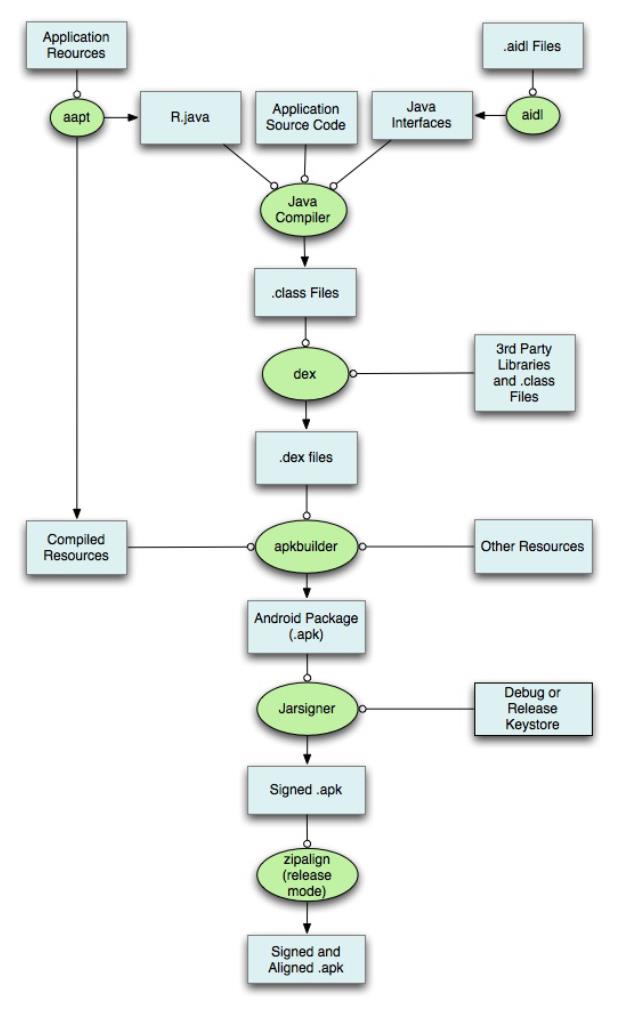
通常的构建过程就是如上图
所示,下面是具体描述:
1
.AAPT(Android Asset Packa
ging Tool)工具会打包应用中
的资源文件,如
AndroidManifest.xml、layout
布局中的xml等,并将xml文
件编译为二进制形式,当然
assets文件夹中的文件不会被
编译,图片及raw文件夹中
的资源也会保持原来的形
态,需要注意的是raw文件
夹中的资源也会生成资源
id。AAPT编译完成之后会生
成R.java文件。
2
.AIDL工具会将所有的a idl
接口转化为java接口。
3
.所有的java代码,包括
R.java与a idl文件都会被Java
编译器编译成.class文件。
4
.Dex工具会将上述产生
的.class文件及第三库及其
他.class文件编译成.dex文件
(
dex文件是Da lvik虚拟机可
以执行的格式),dex文件
最终会被打包进APK文件。
5
.ApkBuilder工具会将编译过
的资源及未编译过的资源
如图片等)以及.dex文件
打包成APK文件。
(
6
.生成APK文件后,需要对
其签名才可安装到设备,平
时测试时会使用
debug keystore,当正式发布
应用时必须使用release版的
keystore对应用进行签名。
7
.如果对APK正式签名,还
需要使用z ipa lign工具对APK
进行对齐操作,这样做的好
处是当应用运行时会减少内
存的开销。
在构建APK的过程中,当
APK过大,应用中的方法数
量超过65536限制的时候,
可能会报如下错误:
Una ble to execute dex: metho
d ID not in [0, 0xffff] : 65536
。一旦遇到上述错误,就需
要使用MultiDex方案来解
决,但官方的MultiDex方案
有一些限制,因此还得使用
各种策略填坑才行,具体可
参考网上不少较优秀的解决
方案。
参考文
档:https://de ve lope r. a ndroid.
build.html#detailed-build
版权声明:本文为博主原创
文章,未经博主允许不得转
载。
目录(?)[+]
【
工匠若
er 转载烦请注明出处,尊重
分享成果】
1
背景
还记得前面《Android应用
setContentView与
LayoutInflater加载解析机制
源码分析》这篇文章吗?我
们有分析到Ac tivity中界面加
载显示的基本流程原理,记
不记得最终分析结果就是下
面的关系:
看见没有,如上图中id为
content的内容就是整个Vie w
树的结构,所以对每个具体
Vie w对象的操作,其实就是
个递归的实现。
前面《Android触摸屏事件派
发机制详解与源码分析一
(View篇)》文章的3-1小节说
过Android中的任何一个布
局、任何一个控件其实都是
直接或间接继承自Vie w实现
的,当然也包括我们后面一
步一步引出的自定义控件也
不例外,所以说这些Vie w应
该都具有相同的绘制流程与
机制才能显示到屏幕上(因
为他们都具备相同的父类
Vie w,可能每个控件的具体
绘制逻辑有差异,但是主流
程都是一样的)。经过总结
发现每一个Vie w的绘制过程
都必须经历三个最主要的过
程,也就是measure、layout
和draw。
既然一个Vie w的绘制主要流
程是这三步,那一定有一个
开始地方呀,就像一个类从
main函数执行一样呀。对于
Vie w的绘制开始调运地方这
里先给出结论,本文后面会
反过来分析原因的,先往下
看就行。具体结论如下:
整个Vie w树的绘图流程是在
ViewRootImpl类的
performTraversals()方法(这
个方法巨长)开始的,该函
数做的执行过程主要是根据
之前设置的状态,判断是否
重新计算视图大小
(measure)、是否重新放置视
图的位置(layout)、以及是否
重绘(draw),其核心也就是
通过判断来选择顺序执行这
三个方法中的哪个,如下:
private void performTraversal

s() {
.
/
.....
/最外层的根视图的widthM
easureSpec和heightMeasureSpec
由来
/
/lp.width和lp.height
在创建ViewGroup实例时等于MATCH_P
ARENT
int childWidthMeasure
Spec = getRootMeasureSpec(mWi
dth, lp.width);
int childHeightMeasur
eSpec = getRootMeasureSpec(mH
eight, lp.height);
.
.....
mView.measure(childWi
dthMeasureSpec, childHeightMe
asureSpec);
.
.....
mView.layout(0, 0, mV
iew.getMeasuredWidth(), mView
.
getMeasuredHeight());

.
.....
mView.draw(canvas);
.....
.
}
/
**
*
Figures out the measur
e spec for the root view in a
window based on it's
*
*
*
*
layout params.
@param windowSize
The availab
le width or height of the win
dow
*
*
*
@param rootDimension
The layout
params for one dimension (wid
th or height) of the
*
window.


*
*
@return The measure sp
ec to use to measure the root
view.
*
/
private static int getRoo
tMeasureSpec(int windowSize,
int rootDimension) {
int measureSpec;
switch (rootDimension
)
{
case ViewGroup.Layout
Params.MATCH_PARENT:
/
/ Window can't r
esize. Force root view to be
windowSize.
measureSpec = Mea
sureSpec.makeMeasureSpec(wind
owSize, MeasureSpec.EXACTLY);
break;
.
.....

}
return measureSpec;
}
可以看见这个方法的注释说
是用来测Root Vie w的。上面
传入参数后这个函数走的是
MATCH_PARENT,使用
MeasureSpec.makeMeasureS
pec方法组
装一个MeasureSpec,
MeasureSpec的specMode等
于EXACTLY,specSize等于
windowSize,也就是为何根

视图总是全屏的原因。
其中的mVie w就是Vie w对
象。如下就是整个流程的大
致流程图:
如下我们就依据Vie w绘制的
这三个主要流程进行详细剖
析(基于Android5.1.1 API 22
源码进行分析)。
【
工匠若
水http://blog.csdn.net/yanbob
er 转载烦请注明出处,尊重
分享成果】
2
View绘制流程第一
步:递归measure源码
分析
整个Vie w树的源码measure
流程图如下:
2
-1 measure源码分析
先看下Vie w的measure方法
源码,如下:
/
**
*
*
<p>
This is called to find
out how big a view should be

.
The parent
supplies constraint in
*
formation in the width and he
ight parameters.
*
*
*
*
</p>
<p>
The actual measurement
work of a view is performed
in
*
{@link #onMeasure(int,
int)}, called by this method
Therefore, only
.
*
{@link #onMeasure(int,
int)} can and must be overri
dden by subclasses.
*
*
*
*
</p>
@param widthMeasureSpe
c Horizontal space requiremen
ts as imposed by the

*
*
parent
@param heightMeasureSp
ec Vertical space requirement
s as imposed by the
*
*
*
parent
@see #onMeasure(int, i
nt)
*
/
/
/final方法,子类不可重写
public final void measure
(int widthMeasureSpec, int he
ightMeasureSpec) {
.
/
.....
/回调onMeasure()方法
onMeasure(widthMeasur
eSpec, heightMeasureSpec);
.
.....
}
看见注释信息没有,他告诉

你了很多重要信息。为整个
Vie w树计算实际的大小,然
后设置实际的高和宽,每个
Vie w控件的实际宽高都是由
父视图和自身
决定的。实际的测量是在
onMeasure方法进行,所以
在Vie w的子类需要重写
onMeasure方法,这是因为
measure方法是fina l的,不允
许重载,所以
Vie w子类只能通过重载
onMeasure来实现自己的测
量逻辑。
这个方法的两个参数都是父
Vie w传递过来的,也就是代
表了父vie w的规格。他由两
部分组成,高16位表示
MODE,定义在MeasureSpec
类(Vie w的内部类)中,有
三种类型,
MeasureSpec.EXACTLY表示
确定大小,
MeasureSpec.AT_MOST表示
最大大小,
MeasureSpec.UNSPECIFIED
不确定。低16位表示size,
也就是父Vie w的大小。对于
系统Window类的DecorVIew
对象Mode一般都为
MeasureSpec.EXACTLY ,
而size分别对应屏幕宽高。
对于子Vie w来说大小是由父
Vie w和子Vie w共同决定的。
在这里可以看出measure方法
最终回调了Vie w的
onMeasure方法,我们来看
下Vie w的onMeasure源码,
如下:
/
**
*
*
<p>
Measure the view and i
ts content to determine the m
easured width and the
*
measured height. This
method is invoked by {@link #
measure(int, int)} and
*
should be overriden by
subclasses to provide accura
te and efficient
*
measurement of their c
ontents.
*
*
*
*
</p>
<p>
<strong>CONTRACT:</str
ong> When overriding this met
hod, you

*
<em>must</em> call {@l
ink #setMeasuredDimension(int
int)} to store the
measured width and hei
,
*
ght of this view. Failure to
do so will trigger an
*
<code>IllegalStateExce
ption</code>, thrown by
*
{@link #measure(int, i
nt)}. Calling the superclass'
*
{@link #onMeasure(int,
int)} is a valid use.
*
*
*
*
</p>
<p>
The base class impleme
ntation of measure defaults t
o the background size,
*
unless a larger size i
s allowed by the MeasureSpec.
Subclasses should
*
override {@link #onMea

sure(int, int)} to provide be
tter measurements of
*
*
*
*
*
their content.
</p>
<p>
If this method is over
ridden, it is the subclass's
responsibility to make
*
sure the measured heig
ht and width are at least the
view's minimum height
*
and width ({@link #get
SuggestedMinimumHeight()} and
{@link #getSuggestedMi
nimumWidth()}).
*
*
*
*
</p>
@param widthMeasureSpe
c horizontal space requiremen
ts as imposed by the parent.
*

The requirements are encode
d with
*
{
@link android.view.View.Me
asureSpec}.
*
@param heightMeasureSp
ec vertical space requirement
s as imposed by the parent.
*
The requirements are encode
d with
*
{
@link android.view.View.Me
asureSpec}.
*
*
*
*
@see #getMeasuredWidth
()
@see #getMeasuredHeigh
@see #setMeasuredDimen
t()
sion(int, int)
@see #getSuggestedMini
*

mumHeight()
*
@see #getSuggestedMini
mumWidth()
*
@see android.view.View
.
.
MeasureSpec#getMode(int)
*
@see android.view.View
MeasureSpec#getSize(int)
*
/
/
/View的onMeasure默认实现
方法
protected void onMeasure(
int widthMeasureSpec, int hei
ghtMeasureSpec) {
setMeasuredDimension(
getDefaultSize(getSuggestedMi
nimumWidth(), widthMeasureSpe
c),
getDefaultSiz
e(getSuggestedMinimumHeight()
,
heightMeasureSpec));
}

看见没有,其实注释已经很
详细了(自定义Vie w重写该
方法的指导操作注释都有说
明),不做过多解释。
对于非Vie wGroup的Vie w而
言,通过调用上面默认的
onMeasure即可完成Vie w的
测量,当然你也可以重载
onMeasure并调用
setMeasuredDimension来设置
任意大小的布局,但一般不
这么做,因为这种做法不太
好,至于为何不好,后面分
析完你就明白了。
我们可以看见onMeasure默
认的实现仅仅调用了
setMeasuredDimension,
setMeasuredDimension函数是
一个很关键的函数,它对
Vie w的成员变量
mMeasuredWidth和
mMeasuredHeight变量赋值,
measure的主要目的就是对
Vie w树中的每个Vie w的
mMeasuredWidth和
mMeasuredHeight进行赋值,
所以一旦这两个变量被赋值
意味着该Vie w的测量工作结
束。既然这样那我们就看看
设置的默认尺寸大小吧,可
以看见setMeasuredDimension
传入的参数都是通过
getDefaultSize返回的,所以
再来看下getDefaultSize方法
源码,如下:
public static int getDefaultS
ize(int size, int measureSpec
)
{
int result = size;
/通过MeasureSpec解析获
取mode与size
/

int specMode = Measur
eSpec.getMode(measureSpec);
int specSize = Measur
eSpec.getSize(measureSpec);
switch (specMode) {
case MeasureSpec.UNSP
ECIFIED:
result = size;
break;
case MeasureSpec.AT_M
OST:
case MeasureSpec.EXAC
TLY:
result = specSize
;
break;
}
return result;
}

看见没有,如果specMode等
于AT_MOST或EXACTLY就
返回specSize,这就是系统
默认的规格。
回过头继续看上面
onMeasure方法,其中
getDefaultSize参数的
widthMeasureSpec和
heightMeasureSpec都是由父
Vie w传递进来的。
getSuggestedMinimumWidth
与
getSuggestedMinimumHeight
都是Vie w的方法,具体如
下:
protected int getSuggestedMin
imumWidth() {
return (mBackground =
=
null) ? mMinWidth : max(mMi
nWidth, mBackground.getMinimu
mWidth());
}
protected int getSuggeste
dMinimumHeight() {
return (mBackground =
=
null) ? mMinHeight : max(mM
inHeight, mBackground.getMini
mumHeight());
}

看见没有,建议的最小宽度
和高度都是由Vie w的
Background尺寸与通过设置
Vie w的miniXXX属性共同决
定的。
到此一次最基础的元素Vie w
的measure过程就完成了。上
面说了Vie w实际是嵌套的,
而且measure是递归传递的,
所以每个Vie w都需要
measure。实际能够嵌套的
Vie w一般都是Vie wGroup的
子类,所以在Vie wGroup中
定义了measureChildren,
measureChild,
measureChildWithMargins方
法来对子视图进行测量,
measureChildren内部实质只
是循环调用measureChild,
measureChild和
measureChildWithMargins的
区别就是是否把margin和
padding也作为子视图的大
小。如下我们以Vie wGroup
中稍微复杂的
measureChildWithMargins方
法来分析:
/
**
*
Ask one of the childre
n of this view to measure its
elf, taking into
*
account both the Measu
reSpec requirements for this
view and its padding
*
and margins. The child
must have MarginLayoutParams
The heavy lifting is
*
done in getChildMeasur
@param child The child
eSpec.
*
*
to measure
*
@param parentWidthMeas
ureSpec The width requirement
s for this view
*
@param widthUsed Extra

space that has been used up
by the parent
*
horizontally (p
ossibly by other children of
the parent)
*
@param parentHeightMea
sureSpec The height requireme
nts for this view
*
@param heightUsed Extr
a space that has been used up
by the parent
*
vertically (pos
sibly by other children of th
e parent)
*
/
protected void measureChi
ldWithMargins(View child,
int parentWidthMe
asureSpec, int widthUsed,
int parentHeightM
easureSpec, int heightUsed) {
/
/获取子视图的LayoutPar

ams
final MarginLayoutPar
ams lp = (MarginLayoutParams)
child.getLayoutParams();
/
/
/调整MeasureSpec
/通过这两个参数以及子视
图本身的LayoutParams来共同决定子
视图的测量规格
final int childWidthM
easureSpec = getChildMeasureS
pec(parentWidthMeasureSpec,
mPaddingLeft
+
mPaddingRight + lp.leftMarg
in + lp.rightMargin
+
wid
thUsed, lp.width);
final int childHeight
MeasureSpec = getChildMeasure
Spec(parentHeightMeasureSpec,
mPaddingTop +
mPaddingBottom + lp.topMargi
n + lp.bottomMargin

+
hei
ghtUsed, lp.height);
/调运子View的measure方
/
法,子View的measure中会回调子Vie
w的onMeasure方法
child.measure(childWi
dthMeasureSpec, childHeightMe
asureSpec);
}
关于该方法的参数等说明注
释已经描述的够清楚了。该
方法就是对父视图提供的
measureSpec参数结合自身的
LayoutParams参数进行了调
整,然后再

来调用child.measure()方法,
具体通过方法
getChildMeasureSpec来进行
参数调整。所以我们继续看
下getChildMeasureSpec方法
代码,如下:
public static int getChildMea
sureSpec(int spec, int paddin
g, int childDimension) {
/
/获取当前Parent View的
Mode和Size
int specMode = Measur
eSpec.getMode(spec);
int specSize = Measur
eSpec.getSize(spec);
/
/获取Parent size与pad
ding差值(也就是Parent剩余大小)

,
若差值小于0直接返回0
int size = Math.max(0
specSize - padding);
/定义返回值存储变量
,
/
int resultSize = 0;
int resultMode = 0;
/
/依据当前Parent的Mode
进行switch分支逻辑
switch (specMode) {
/ Parent has imposed
an exact size on us
/
/
/默认Root View的Mode
就是EXACTLY
case MeasureSpec.EXAC
if (childDimensio
/如果child的l
TLY:
n >= 0) {
/
ayout_wOrh属性在xml或者java中给
予具体大于等于0的数值
/
/设置child的s
ize为真实layout_wOrh属性值,mod

e为EXACTLY
resultSize =
resultMode =
childDimension;
MeasureSpec.EXACTLY;
}
else if (childD
imension == LayoutParams.MATC
H_PARENT) {
/
/如果child的l
ayout_wOrh属性在xml或者java中给
予MATCH_PARENT
/
/ Child want
s to be our size. So be it.
/设置child的s
ize为size,mode为EXACTLY
resultSize =
/
size;
resultMode =
MeasureSpec.EXACTLY;
}
else if (childD
imension == LayoutParams.WRAP
_
CONTENT) {

/
/如果child的l
ayout_wOrh属性在xml或者java中给
予WRAP_CONTENT
/
/设置child的s
ize为size,mode为AT_MOST
/
s to determine its own size.
It can't be
/ Child want
/
/ bigger tha
n us.
size;
resultSize =
resultMode =
MeasureSpec.AT_MOST;
}
break;
.
/
}
/
.....
/其他Mode分支类似
/将mode与size通过Meas
ureSpec方法整合为32位整数返回
return MeasureSpec.ma

keMeasureSpec(resultSize, res
ultMode);
}
可以看见,
getChildMeasureSpec的逻辑
是通过其父Vie w提供的
MeasureSpec参数得到
specMode和specSize,然后
根据计算出来的specMode以
及
子Vie w的
childDimension(layout_width
或layout_height)来计算自身

的measureSpec,如果其本身
包含子视图,则计算出来的
measureSpec将作
为调用其子视图measure函数
的参数,同时也作为自身调
用setMeasuredDimension的参
数,如果其不包含子视图则
默认情况下最终会调用
onMeasure
的默认实现,并最终调用到
setMeasuredDimension。
所以可以看见onMeasure的
参数其实就是这么计算出来
的。同时从上面的分析可以
看出来,最终决定Vie w的
measure大小是Vie w的
setMeasuredDimension方法,
所以我们可以通过
setMeasuredDimension设定死
值来设置Vie w的
mMeasuredWidth和
mMeasuredHeight的大小,但
是一个好的自定义Vie w应该
会根据子视图的measureSpec
来设置mMeasuredWidth和
mMeasuredHeight的大小,这
样的灵活性更大,所以这也
就是上面分析onMeasure时
说Vie w的onMeasure最好不
要重写死值的原因。
可以看见当通过
setMeasuredDimension方法最
终设置完成Vie w的measure
之后Vie w的mMeasuredWidth
和mMeasuredHeight成员才会
有具体的数值,所以如果我
们自定义的Vie w或者使用现
成的Vie w想通过
getMeasuredWidth()和
getMeasuredHeight()方法来
获取Vie w测量的宽高,必须
保证这两个方法在
onMeasure流程之后被调用
才能返回有效值。
还记得前面《Android应用
setContentView与
LayoutInflater加载解析机制
源码分析》文章3-3小节探讨
的inflate方法加载一些布局
显示时指定的大小失效问题
吗?当时只给出了结论,现
在给出了详细原因分析,我
想不需要再做过多解释了
吧。
至此整个Vie w绘制流程的第
一步就分析完成了,可以看
见,相对来说还是比较复杂
的,接下来进行小结。
2
-2 measure原理总结
通过上面分析可以看出
measure过程主要就是从顶层
父Vie w向子Vie w递归调用
view.measure方法(measure
中又回调onMeasure方法)
的过程。具体measure核心主
要有如下几点:
MeasureSpec(Vie w的内
部类)测量规格为int型,
值由高16位规格模式
specMode和低16位具体尺
寸specSize组成。其中
specMode只有三种值:
MeasureSpec.EXACTLY //确定模式
,
父View希望子View的大小是确定的,
由specSize决定;
MeasureSpec.AT_MOST //最多模式
,
父View希望子View的大小最多是spe


cSize指定的值;
MeasureSpec.UNSPECIFIED //未
指定模式,父View完全依据子View的设
计值来决定;
Vie w的measure方法是final
的,不允许重载,Vie w子
类只能重载onMeasure来
完成自己的测量逻辑。
最顶层DecorView测量时
的MeasureSpec是由
ViewRootImpl中
getRootMeasureSpec方法
确定的(LayoutParams宽
高参数均为


MATCH_PARENT,
specMode是EXACTLY,
specSize为物理屏幕大
小)。
Vie wGroup类提供了
measureChild,
measureChild和
measureChildWithMargins
方法,简化了父子Vie w的
尺寸计算。
只要是Vie wGroup的子类
就必须要求LayoutParams


继承子
MarginLayoutParams,否
则无法使用layout_margin
参数。
Vie w的布局大小由父Vie w
和子Vie w共同决定。
使用Vie w的
getMeasuredWidth()和
getMeasuredHeight()方法
来获取Vie w测量的宽高,
必须保证这两个方法在
onMeasure流程之后被调


用才能返回有效值。
工匠若
【
水http://blog.csdn.net/yanbob
er 转载烦请注明出处,尊重
分享成果】
3
View绘制流程第二
步:递归layout源码分
析
在上面的背景介绍就说过,
当ViewRootImpl的
performTraversals中measure
执行完成以后会接着执行
mVie w. la yout,具体如下:
private void performTraversal
s() {
.
.....
mView.layout(0, 0, mView.
getMeasuredWidth(), mView.get
MeasuredHeight());
.
.....
}
可以看见layout方法接收四
个参数,这四个参数分别代
表相对Parent的左、上、
右、下坐标。而且还可以看
见左上都为0,右下分别为

上面刚刚测量的
width和height。至此又回归
到Vie w的layout(int l, int t, int
r, int b)方法中去实现具体逻
辑了,所以接下来我们开始
分析Vie w的layout过程。
整个Vie w树的layout递归流
程图如下:
3
-1 layout源码分析
layout既然也是递归结构,
那我们先看下Vie wGroup的
layout方法,如下:
@
Override
public final void layout(
int l, int t, int r, int b) {
.....
super.layout(l, t, r,
.
b);
.
.....
}
看着没有?Vie wGroup的
layout方法实质还是调运了
Vie w父类的layout方法,所
以我们看下Vie w的layout源
码,如下:

public void layout(int l, int
t, int r, int b) {
.
/
.....
/实质都是调用setFrame
方法把参数分别赋值给mLeft、mTop、
mRight和mBottom这几个变量
/
/判断View的位置是否发生
过变化,以确定有没有必要对当前的Vie
w进行重新layout
boolean changed = isL
ayoutModeOptical(mParent) ?
setOpticalFra
me(l, t, r, b) : setFrame(l,
t, r, b);
/
/需要重新layout
if (changed || (mPriv
ateFlags & PFLAG_LAYOUT_REQUI
RED) == PFLAG_LAYOUT_REQUIRED
)
{
/
/回调onLayout
onLayout(changed,

l, t, r, b);
.
.....
}
.
.....
}
看见没有,类似measure过
程,lauout调运了onLayout方
法。
对比上面Vie w的layout和
Vie wGroup的layout方法可以
发现,Vie w的layout方法是
可以在子类重写的,而
Vie wGroup的layout是不能在
子类重写的,言外之意就是

说Vie wGroup中只能通过重
写onLayout方法。那我们接
下来看下Vie wGroup的
onLayout方法,如下:
@
Override
protected abstract void o
nLayout(boolean changed,
int l, int t, int
r, int b);
看见没有?Vie wGroup的
onLayout()方法竟然是一个
抽象方法,这就是说所有
Vie wGroup的子类都必须重

写这个方法。所以在自定义
Vie wGroup控件
中,onLayout配合onMeasure
方法一起使用可以实现自定
义Vie w的复杂布局。自定义
Vie w首先调用onMeasure进
行测量,然后调用onLayout
方法动
态获取子Vie w和子Vie w的测
量大小,然后进行layout布
局。重载onLayout的目的就
是安排其children在父Vie w的
具体位置,重载onLayout通
常做法
就是写一个for循环调用每一
个子视图的layout(l, t, r, b)函
数,传入不同的参数l, t, r, b
来确定每个子视图在父视图
中的显示位置。
再看下Vie w的onLayout方法
源码,如下:
protected void onLayout(boole
an changed, int left, int top
,
int right, int bottom) {
}

我勒个去!是一个空方法,
没啥可看的。
既然这样那我们只能分析一
个现有的继承Vie wGroup的
控件了,就拿LinearLayout来
说吧,如下是LinearLayout中
onLayout的一些代码:
public class LinearLayout ext
ends ViewGroup {
@
Override
protected void onLayout(b
oolean changed, int l, int t,
int r, int b) {
if (mOrientation == V
ERTICAL) {

layoutVertical(l,
t, r, b);
}
else {
layoutHorizontal(
l, t, r, b);
}
}
}
看见没有,LinearLayout的
layout过程是分Vertical和
Horizontal的,这个就是xml
布局的orientation属性设置
的,我们为例说明
Vie wGroup的onLayout
重写一般步骤就拿这里的

V ERTICAL模式来解释吧,
如下是layoutVertical方法源
码:
void layoutVertical(int left,
int top, int right, int bott
om) {
final int paddingLeft
=
mPaddingLeft;
int childTop;
int childLeft;
/
/ Where right end of
child should go
/
/计算父窗口推荐的子View
宽度
final int width = rig
ht - left;
/计算父窗口推荐的子View
/

右侧位置
int childRight = widt
h - mPaddingRight;
/
/
/ Space available fo
/child可使用空间大小
r child
int childSpace = widt
h - paddingLeft - mPaddingRig
ht;
/
/通过ViewGroup的getCh
ildCount方法获取ViewGroup的子Vi
ew个数
final int count = get
VirtualChildCount();
/
/获取Gravity属性设置
final int majorGravit
y = mGravity & Gravity.VERTIC
AL_GRAVITY_MASK;
final int minorGravit
y = mGravity & Gravity.RELATI
VE_HORIZONTAL_GRAVITY_MASK;

/
/依据majorGravity计算
childTop的位置值
switch (majorGravity)
{
case Gravity.BOTTO
/ mTotalLengt
M:
/
h contains the padding alread
y
childTop = mPa
ddingTop + bottom - top - mTo
talLength;
break;
/
/ mTotalLengt
h contains the padding alread
y
case Gravity.CENTE
R_VERTICAL:
childTop = mPa
ddingTop + (bottom - top - mT
otalLength) / 2;

break;
case Gravity.TOP:
default:
childTop = mPa
ddingTop;
break;
}
/
/重点!!!开始遍历
for (int i = 0; i < c
ount; i++) {
final View child
getVirtualChildAt(i);
=
)
if (child == null
{
childTop += m
easureNullChild(i);
}
else if (child.
getVisibility() != GONE) {
/
/LinearLayou
t中其子视图显示的宽和高由measure过
程来决定的,因此measure过程的意义

就是为layout过程提供视图显示范围的
参考值
final int chi
ldWidth = child.getMeasuredWi
dth();
final int chi
ldHeight = child.getMeasuredH
eight();
/
/获取子View的
LayoutParams
final LinearL
ayout.LayoutParams lp =
(Line
arLayout.LayoutParams) child.
getLayoutParams();
int gravity =
lp.gravity;
if (gravity <
0
) {
gravity =
minorGravity;

}
final int lay
outDirection = getLayoutDirec
tion();
final int abs
oluteGravity = Gravity.getAbs
oluteGravity(gravity, layoutD
irection);
/
/依据不同的abs
oluteGravity计算childLeft位置
switch (absol
uteGravity & Gravity.HORIZONT
AL_GRAVITY_MASK) {
case Grav
ity.CENTER_HORIZONTAL:
child
Left = paddingLeft + ((childS
pace - childWidth) / 2)
+
lp.leftMargin - lp.right
Margin;
break

;
case Grav
child
ity.RIGHT:
Left = childRight - childWidt
h - lp.rightMargin;
break
;
case Grav
ity.LEFT:
default:
child
Left = paddingLeft + lp.leftM
argin;
break
;
}
if (hasDivide
rBeforeChildAt(i)) {

childTop
+
= mDividerHeight;
}
childTop += l
/通过垂直排列
p.topMargin;
/
计算调运child的layout设置child的
位置
setChildFrame
(child, childLeft, childTop +
getLocationOffset(child),
child
Width, childHeight);
childTop += c
hildHeight + lp.bottomMargin
+
)
getNextLocationOffset(child
;
i += getChild
renSkipCount(child, i);
}

}
}
从上面分析的Vie wGroup子
类LinearLayout的onLayout实
现代码可以看出,一般情况
下layout过程会参考measure
过程中计算得到的
mMeasuredWidth
和mMeasuredHeight来安排子
Vie w在父Vie w中显示的位
置,但这不是必须的,
measure过程得到的结果可能
完全没有实际用处,特别是

对于一些自定
义的Vie wGroup,其子Vie w
的个数、位置和大小都是固
定的,这时候我们可以忽略
整个measure过程,只在
layout函数中传入的4个参数
来安排每个子
Vie w的具体位置。到这里就
不得不提ge tWidth()、
getHeight()和
getMeasuredWidth()、
getMeasuredHeight()这两对
方法之间的区别(上面分析
measure过程已经说过
getMeasuredWidth()、
getMeasuredHeight()必须在
onMeasure之后使用才有
效)。可以看出来ge tWidth( )
与getHeight()方法必须在
layout(int l, int t, int r, int b)执
行之后才有效。那我们看下
Vie w源码中这些方法的实现
吧,如下:
public final int getMeasuredW
idth() {
return mMeasuredWidth

&
MEASURED_SIZE_MASK;
}
public final int getMeasu
redHeight() {
return mMeasuredHeigh
t & MEASURED_SIZE_MASK;
}
public final int getWidth
() {
return mRight - mLeft
;
}
public final int getHeigh
t() {
return mBottom - mTop
;
}
public final int getLeft(

)
{
return mLeft;
}
public final int getRight
() {
return mRight;
}
public final int getTop()
{
return mTop;
}
public final int getBotto
m() {
return mBottom;
}
这也解释了为什么有些情况

下ge tWidth()和
getMeasuredWidth()以及
getHeight()和
getMeasuredHeight()会得到
不同的值,所以这里不做过
多解释。
到此整个Vie w的layout过程
分析就算结束了,接下来进
行一些总结工作。
3
-2 layout原理总结
整个layout过程比较容易理
解,从上面分析可以看出
layout也是从顶层父Vie w向
子Vie w的递归调用
vie w. la yout方法的过程,即
父Vie w根据上一步measure
子Vie w所得到的布局大小和
布局参数,将子Vie w放在合
适的位置上。具体layout核
心主要有以下几点:
Vie w. la yout方法可被重
载,ViewGroup. layout为
fina l的不可重载,
ViewGroup. onLayout为
abstract的,子类必须重载

实现自己的位置逻辑。
measure操作完成后得到
的是对每个Vie w经测量过
的measuredWidth和
measuredHeight,layout操
作完成之后得到的是对每
个Vie w进行位置分配后的
mLeft、mTop、mRight、
mBottom,这些值都是相
对于父Vie w来说的。
凡是layout_XXX的布局属
性基本都针对的是包含子


Vie w的Vie wGroup的,当
对一个没有父容器的Vie w
设置相关layout_XXX属性
是没有任何意义的(前面
《
Android应用
setContentView与
LayoutInflater加载解析机
制源码分析》也有提到
过)。
使用Vie w的ge tWidth()和
getHeight()方法来获取
Vie w测量的宽高,必须保
证这两个方法在onLayout

流程之后被调用才能返回
有效值。
【工匠若
水http://blog.csdn.net/yanbob
er 转载烦请注明出处,尊重
分享成果】
4
View绘制流程第三
步:递归draw源码分
析
在上面的背景介绍就说过,
当ViewRootImpl的
performTraversals中measure
和layout执行完成以后会接
着执行mVie w. la yout,具体
如下:
private void performTraversal
s() {
.
.....
final Rect dirty = mDirty
;
.
.....
canvas = mSurface.lockCan
vas(dirty);
.....
mView.draw(canvas);
.....
.
.
}

draw过程也是在
ViewRootImpl的
performTraversals()内部调运
的,其调用顺序在measure()
和layout()之后,这里的
mVie w对于Actiity来说就是
PhoneWindow.DecorView,
ViewRootImpl中的代码会创
建一个Canvas对象,然后调
用Vie w的draw()方法来执行
具体的绘制工。所以又回归
到了
Vie wGroup与Vie w的树状递
归draw过程。
先来看下Vie w树的递归draw
流程图,如下:
如下我们详细分析这一过
程。
4
-1 draw源码分析
由于Vie wGroup没有重写
Vie w的draw方法,所以如下
直接从Vie w的draw方法开始
分析:

public void draw(Canvas canv
as) {
.
/
.....
*
*
Draw traversal per
forms several drawing steps w
hich must be executed
*
in the appropriate
order:
*
*
1. Draw the b
2. If necessa
ackground
*
ry, save the canvas' layers t
o prepare for fading
*
*
*
3. Draw view'
4. Draw child
5. If necessa
s content
ren
ry, draw the fading edges and
restore layers

*
6. Draw decor
ations (scrollbars for instan
ce)
*
/
/
/ Step 1, draw the b
ackground, if needed
.....
.
if (!dirtyOpaque) {
drawBackground(ca
nvas);
}
/
/ skip step 2 & 5 if
possible (common case)
.
/
.....
/ Step 2, save the c
anvas' layers
.....
if (drawTop) {
canvas.saveLa
.

yer(left, top, right, top + l
ength, null, flags);
}
.
.....
/
/ Step 3, draw the c
ontent
if (!dirtyOpaque) onD
raw(canvas);
/
/ Step 4, draw the c
hildren
dispatchDraw(canvas);
/
/ Step 5, draw the f
ade effect and restore layers
.....
if (drawTop) {
matrix.setScale(1
fadeHeight * topFadeStrengt
h);
.
,
matrix.postTransl

ate(left, top);
fade.setLocalMatr
ix(matrix);
p.setShader(fade)
canvas.drawRect(l
;
eft, top, right, top + length
,
p);
}
.
.....
/
/ Step 6, draw decor
ations (scrollbars)
onDrawScrollBars(canv
as);
.
.....
}
看见整个Vie w的draw方法很
复杂,但是源码注释也很明

显。从注释可以看出整个
draw过程分为了6步。源码
注释说
(”skip step 2 & 5 if possible
(common case)”)第2和5步
可以跳过,所以我们接下来
重点剩余四步。如下:
第一步,对Vie w的背景进行
绘制。
可以看见,draw方法通过调
运drawBackground(canvas);
方法实现了背景绘制。我们
来看下这个方法源码,如
下:
private void drawBackground(C
anvas canvas) {
/
/获取xml中通过android:
background属性或者代码中setBack
groundColor()、setBackgroundR
esource()等方法进行赋值的背景Draw
able
final Drawable backgr
ound = mBackground;
.
/
.....
/根据layout过程确定的V
iew位置来设置背景的绘制区域
if (mBackgroundSizeCh
anged) {
background.setBou
nds(0, 0, mRight - mLeft, mB
ottom - mTop);

mBackgroundSizeCh
anged = false;
rebuildOutline();
}
.
.....
/调用Drawable的dr
aw()方法来完成背景的绘制工作
background.draw(c
/
anvas);
.
.....
}
第三步,对Vie w的内容进行
绘制。
可以看到,这里去调用了一
下Vie w的onDraw()方法,所
以我们看下Vie w的onDraw方

法(Vie wGroup也没有重写
该方法),如下:
/
**
*
Implement this to do y
our drawing.
*
*
@param canvas the canv
as on which the background wi
ll be drawn
*
/
protected void onDraw(Can
vas canvas) {
}
可以看见,这是一个空方
法。因为每个Vie w的内容部
分是各不相同的,所以需要

由子类去实现具体逻辑。
第四步,对当前Vie w的所有
子Vie w进行绘制,如果当前
的Vie w没有子Vie w就不需要
进行绘制。
我们来看下Vie w的draw方法
中的dispatchDraw(canvas);方
法源码,可以看见如下:
/
**
*
Called by draw to draw
the child views. This may be
overridden
*
by derived classes to
gain control just before its

children are drawn
*
(but after its own vie
w has been drawn).
*
@param canvas the canv
as on which to draw the view
*
/
protected void dispatchDr
aw(Canvas canvas) {
}
看见没有,Vie w的
dispatchDraw()方法是一个空
方法,而且注释说明了如果
Vie w包含子类需要重写他,
所以我们有必要看下
Vie wGroup的dispatchDraw

方法源码(这也就是刚刚说
的对当前Vie w的所有子Vie w
进行绘制,如果当前的Vie w
没有子Vie w就不需要进行绘
制的原因,因为如果是Vie w
调运该方法
是空的,而Vie wGroup才有
实现),如下:
@
Override
protected void dispatchDr
aw(Canvas canvas) {
.....
final int childrenCou
nt = mChildrenCount;
final View[] children
.

=
mChildren;
.....
for (int i = 0; i < c
hildrenCount; i++) {
.....
.
.
if ((child.mViewF
lags & VISIBILITY_MASK) == VI
SIBLE || child.getAnimation()
!
= null) {
more |= drawC
hild(canvas, child, drawingTi
me);
}
}
.
/
.....
/ Draw any disappear
ing views that have animation
s
if (mDisappearingChil
dren != null) {
.
.....
for (int i = disa

ppearingCount; i >= 0; i--) {
.....
.
more |= drawC
hild(canvas, child, drawingTi
me);
}
.....
}
.
}
可以看见,Vie wGroup确实
重写了Vie w的dispatchDraw()
方法,该方法内部会遍历每
个子Vie w,然后调用
drawChild()方法,我们可以
看下

Vie wGroup的drawChild方
法,如下:
protected boolean drawChild(C
anvas canvas, View child, lon
g drawingTime) {
return child.draw(can
vas, this, drawingTime);
}
可以看见drawChild()方法调
运了子Vie w的draw()方法。
所以说Vie wGroup类已经为
我们重写了dispatchDraw()的
功能实现,我们一般不需要
重写该方法

,但可以重载父类函数实现
具体的功能。
第六步,对Vie w的滚动条进
行绘制。
可以看到,这里去调用了一
下Vie w的onDrawScrollBars()
方法,所以我们看下Vie w的
onDrawScrollBars(canvas);方
法,如下:
/
**
*
<p>Request the drawing
of the horizontal and the ve
rtical scrollbar. The

*
scrollbars are painted
only if they have been awake
ned first.</p>
*
*
@param canvas the canv
as on which to draw the scrol
lbars
*
*
@see #awakenScrollBars
(int)
*
/
protected final void onDr
awScrollBars(Canvas canvas) {
/
/绘制ScrollBars分析不
是我们这篇的重点,所以暂时不做分析
.....
.
}
可以看见其实任何一个Vie w
都是有(水平垂直)滚动条

的,只是一般情况下没让它
显示而已。
到此,Vie w的draw绘制部分
源码分析完毕,我们接下来
进行一些总结。
4
-2 draw原理总结
可以看见,绘制过程就是把
Vie w对象绘制到屏幕上,整
个draw过程需要注意如下细
节:
如果该Vie w是一个

Vie wGroup,则需要递归
绘制其所包含的所有子
Vie w。
Vie w默认不会绘制任何内
容,真正的绘制都需要自
己在子类中实现。
Vie w的绘制是借助onDraw
方法传入的Canvas类来进
行的。
区分Vie w动画和
Vie wGroup布局动画,前
者指的是Vie w自身的动


画,可以通过setAnimation
添加,后者是专门针对
Vie wGroup显示内部子视
图时设置的动画,可以在
xml布局文件中对
Vie wGroup设置
layoutAnimation属性(譬
如对LinearLayout设置子
Vie w在显示时出现逐行、
随机、下等显示等不同动
画效果)。
在获取画布剪切区(每个
Vie w的draw中传入的

Canvas)时会自动处理掉
padding,子Vie w获取
Canvas不用关注这些逻
辑,只用关心如何绘制即
可。
默认情况下子Vie w的
ViewGroup. drawChild绘制
顺序和子Vie w被添加的顺
序一致,但是你也可以重
载
Vie wGroup. ge tChildDra win
gOrder()方法提供不同顺
序。

【
工匠若
水http://blog.csdn.net/yanbob
er 转载烦请注明出处,尊重
分享成果】
5
View的invalidate和
postInvalidate方法源码
分析
你可能已经看见了,在上面
分析Vie w的三步绘制流程中
最后都有调运一个叫
inva lida te的方法,这个方法
是啥玩意?为何出现频率这
么高?很简单,我们拿出来
分析分析不就得了。
5
-1 invalidate方法源码
分析
来看一下Vie w类中的一些
inva lida te方法(Vie wGroup没
有重写这些方法),如下:
/
**
*
Mark the area defined
by dirty as needing to be dra
wn. If the view is
*
visible, {@link #onDra
w(android.graphics.Canvas)} w
ill be called at some

*
*
*
point in the future.
<p>
This must be called fr
om a UI thread. To call from
a non-UI thread, call
*
{@link #postInvalidate
()}.
*
*
<p>
<b>WARNING:</b> In API
1
9 and below, this method ma
y be destructive to
*
*
*
{@code dirty}.
@param dirty the recta
ngle representing the bounds
of the dirty region
*
/
/
/看见上面注释没有?public,
只能在UI Thread中使用,别的Threa
d用postInvalidate方法,View是可
见的才有效,回调onDraw方法,针对局
部View

public void invalidate(Re
ct dirty) {
final int scrollX = m
ScrollX;
ScrollY;
final int scrollY = m
/
/实质还是调运invalidat
eInternal方法
invalidateInternal(di
rty.left - scrollX, dirty.top
scrollY,
-
dirty.right -
scrollX, dirty.bottom - scro
llY, true, false);
}
/
**
*
Mark the area defined
by the rect (l,t,r,b) as need
ing to be drawn. The
*
coordinates of the dir
ty rect are relative to the v

iew. If the view is
*
visible, {@link #onDra
w(android.graphics.Canvas)} w
ill be called at some
*
*
*
point in the future.
<p>
This must be called fr
om a UI thread. To call from
a non-UI thread, call
*
{@link #postInvalidate
()}.
*
*
@param l the left posi
tion of the dirty region
@param t the top posit
ion of the dirty region
*
*
@param r the right pos
ition of the dirty region
*
@param b the bottom po
sition of the dirty region
*
/
/
/看见上面注释没有?public,

只能在UI Thread中使用,别的Threa
d用postInvalidate方法,View是可
见的才有效,回调onDraw方法,针对局
部View
public void invalidate(in
t l, int t, int r, int b) {
final int scrollX = m
ScrollX;
final int scrollY = m
ScrollY;
/
/实质还是调运invalidat
eInternal方法
invalidateInternal(l
scrollX, t - scrollY, r - s
-
crollX, b - scrollY, true, fa
lse);
}
/
**
*
Invalidate the whole v
iew. If the view is visible,
{@link #onDraw(android
*

.
graphics.Canvas)} will be ca
lled at some point in
*
*
*
the future.
<p>
This must be called fr
om a UI thread. To call from
a non-UI thread, call
*
{@link #postInvalidate
()}.
*
/
/
/看见上面注释没有?public,
只能在UI Thread中使用,别的Threa
d用postInvalidate方法,View是可
见的才有效,回调onDraw方法,针对整
个View
public void invalidate()
{
/
/invalidate的实质还是
调运invalidateInternal方法
invalidate(true);
}

/
**
*
This is where the inva
lidate() work actually happen
s. A full invalidate()
*
causes the drawing cac
he to be invalidated, but thi
s function can be
*
called with invalidate
Cache set to false to skip th
at invalidation step
*
for cases that do not
need it (for example, a compo
nent that remains at
*
the same dimensions wi
th the same content).
*
*
@param invalidateCache
Whether the drawing cache fo
r this view should be
*
invalidated
as well. This is usually tru
e for a full

*
invalidate,
but may be set to false if t
he View's contents or
*
dimensions
have not changed.
*
/
/
/看见上面注释没有?default
的权限,只能在UI Thread中使用,别
的Thread用postInvalidate方法,V
iew是可见的才有效,回调onDraw方法
,
针对整个View
void invalidate(boolean i
nvalidateCache) {
/
/实质还是调运invalidateInt
ernal方法
invalidateInternal(0,
, mRight - mLeft, mBottom -
0
mTop, invalidateCache, true)
;
}
/
/!!!!!!看见没有,这是所

有invalidate的终极调运方法!!!
!!
void invalidateInternal(i
!
nt l, int t, int r, int b, bo
olean invalidateCache,
boolean fullInval
idate) {
.
.....
/ Propagate the
/
damage rectangle to the paren
t view.
final AttachInfo
ai = mAttachInfo;
final ViewParent
p = mParent;
if (p != null &&
ai != null && l < r && t < b)
{
final Rect da
mage = ai.mTmpInvalRect;
/
/设置刷新区域
damage.set(l,

t, r, b);
/
/传递调运Pare
nt ViewGroup的invalidateChild
方法
p.invalidateC
hild(this, damage);
}
.
.....
}
看见没有,Vie w的
inva lida te(invalidateInternal
)方法实质是将要刷新区域
直接传递给了父Vie wGroup
的inva lida te Child方法,在
inva lida te中,调

用父Vie w的inva lida te Child,
这是一个从当前向上级父
Vie w回溯的过程,每一层的
父Vie w都将自己的显示区域
与传入的刷新Rect做交集 。
所以我们看
下Vie wGroup的
inva lida te Child方法,源码如
下:
public final void invalidateC
hild(View child, final Rect d
irty) {
ViewParent parent = t
his;

final AttachInfo atta
chInfo = mAttachInfo;
.....
do {
.
.
/
.....
/循环层层上级调运,
直到ViewRootImpl会返回null
parent = parent.i
nvalidateChildInParent(locati
on, dirty);
.
.....
}
while (parent != nu
ll);
}
这个过程最后传递到
ViewRootImpl的
inva lida te ChildInP a re nt方法结
束,所以我们看下

ViewRootImpl的
inva lida te ChildInP a re nt方法,
如下:
@
Override
public ViewParent invalid
ateChildInParent(int[] locati
on, Rect dirty) {
.
/
.....
/View调运invalidate最
终层层上传到ViewRootImpl后最终触
发了该方法
scheduleTraversals();
.
.....
return null;
}
看见没有?这个

ViewRootImpl类的
inva lida te ChildInP a re nt方法直
接返回了null,也就是上面
Vie wGroup中说的,层层上
级传递到ViewRootImpl的
inva lida te ChildInP a re nt方法结
束了那个do while循环。看见
这里调运的
scheduleTraversals这个方法
吗?scheduleTraversals会通
过Handler的
Runnable发送一个异步消
息,调运doTraversal方法,
然后最终调用
performTraversals()执行重
绘。开头背景知识介绍说过
的,performTraversals就
是整个Vie w数开始绘制的起
始调运地方,所以说Vie w调
运inva lida te方法的实质是层
层上传到父级,直到传递到
ViewRootImpl后触发了
scheduleTraversals
方法,然后整个Vie w树开始
重新按照上面分析的Vie w绘
制流程进行重绘任务。
到此Vie w的inva lida te方法原
理就分析完成了。
5
-2 postInvalidate方法
源码分析
上面分析inva lida te方法时注
释中说该方法只能在UI
Thread中执行,其他线程中
需要使用postInva lida te方
法,所以我们来分析分析
postInva lida te这个方法源
码。如下:
public void postInvalidate()
{
postInvalidateDelayed
(0);
}
继续看下他的调运方法
postInvalidateDelayed,如
下:
public void postInvalidateDel
ayed(long delayMilliseconds)
{
/
/ We try only with t
he AttachInfo because there's
no point in invalidating


/
/ if we are not atta
ched to our window
final AttachInfo atta
chInfo = mAttachInfo;
/
/核心,实质就是调运了Vie
wRootImpl.dispatchInvalidateD
elayed方法
if (attachInfo != nul
l) {
attachInfo.mViewR
ootImpl.dispatchInvalidateDel
ayed(this, delayMilliseconds)
;
}
}
我们继续看他调运的
ViewRootImpl类的
dispatchInvalidateDelayed方

法,如下源码:
public void dispatchInvalidat
eDelayed(View view, long dela
yMilliseconds) {
Message msg = mHandle
r.obtainMessage(MSG_INVALIDAT
E, view);
mHandler.sendMessageD
elayed(msg, delayMilliseconds
)
;
}
看见没有,通过
ViewRootImpl类的Handler发
送了一条MSG_INVALIDATE
消息,继续追踪这条消息的

处理可以发现:
public void handleMessage(Mes
sage msg) {
.
.....
switch (msg.what) {
case MSG_INVALIDATE:
((View) msg.obj).inva
lidate();
break;
.....
.
}
.
.....
}
看见没有,实质就是又在UI
Thread中调运了Vie w的
invalidate();方法,那接下来

Vie w的invalidate();方法我们
就不说了,上名已经分析过
了。
到此整个Vie w的
postInva lida te方法就分析完
成了。
5
-3 invalidate与
postInvalidate方法总结
依据上面对Vie w的inva lida te
分析我总结绘制如下流程
图:
依据上面对Vie w的
postInva lida te分析我总结绘
制如下流程图:
关于这两个方法的具体流程
和原理上面也分析过了,流
程图也给出了,相信已经很
明确了,没啥需要解释的
了。所以我们对其做一个整
体总结,归纳出重点如下:
inva lida te系列方法请求重绘
Vie w树(也就是draw方
法),如果Vie w大小没有发
生变化就不会调用layout过
程,并且只绘制那些“需要
重绘的”View,也就是哪个
Vie w(Vie w只绘制该Vie w,
Vie wGroup绘制整个
ViewGroup)请求inva lida te系
列方法,就绘制该Vie w。
常见的引起inva lida te方法操
作的原因主要有:
直接调用inva lida te方法.请
求重新draw,但只会绘制
调用者本身。

触发setSelection方法。请
求重新draw,但只会绘制
调用者本身。
触发se tVisibility方法。 当
Vie w可视状态在
INVISIBLE转换VISIBLE
时会间接调用inva lida te方
法,继而绘制该Vie w。当
Vie w的可视状态在
INVISIBLE\VISIBLE 转换
为GONE状态时会间接调
用requestLayout和
inva lida te方法,同时由于


Vie w树大小发生了变化,
所以会请求measure过程
以及draw过程,同样只绘
制需要“重新绘制”的视
图。
触发setEnabled方法。请
求重新draw,但不会重新
绘制任何Vie w包括该调用
者本身。
触发requestFocus方法。请
求Vie w树的draw过程,只
绘制“需要重绘”的Vie w。
5
-4 通过invalidate方法


分析结果回过头去解
决一个背景介绍中的
疑惑
分析完inva lida te后需要你回
过头去想一个问题。还记不
记得这篇文章的开头背景介
绍,我们说整个Vie w绘制流
程的最初代码是在
ViewRootImpl类的
performTraversals()方法中开
始的。上面当时只是告诉你
了这个结论,至于这个
ViewRootImpl类的
performTraversals()方法为何
会被触发没有说明原因。现
在我们就来分析一下这个触
发的源头。
让我们先把大脑思考暂时挪
回到《Android应用
setContentView与
LayoutInflater加载解析机制
源码分析》这篇博文的
setContentView机制分析中
(不清楚的请点击先看这篇
文章再回过头来继续看)。
我们先来看下那篇博文分析
的PhoneWindow的
setContentView方法源码,如
下:
@
Override
public void setContentVie
w(View view, ViewGroup.Layout
Params params) {
.
/
.....
/如果mContentParent为
空进行一些初始化,实质mContentPar
ent是通过findViewById(ID_ANDRO
ID_CONTENT);获取的id为content的
FrameLayout的布局(不清楚的请先看
《
Android应用setContentView与L
ayoutInflater加载解析机制源码分析
文章)
》
if (mContentParent ==

null) {
installDecor();
}
.
/
.....
/把我们的view追加到mCo
ntentParent
mContentParent.addVie
w(view, params);
.....
.
}
这个方法是Ac tivity中
setContentView的实现,我们
继续看下这个方法里调运的
addView方法,也就是
Vie wGroup的addView方法,
如下:


public void addView(View chil
d) {
addView(child, -1);
}
public void addView(View
child, int index) {
.
.....
addView(child, index,
params);
}
public void addView(View
child, int index, LayoutParam
s params) {
.
/
.....
/该方法稍后后面会详细分
析
requestLayout();
/重点关注!!!
invalidate(true);
.....
/
.

}
看见addView调运inva lida te方
法没有?这不就真相大白
了。当我们写一个Ac tivity
时,我们一定会通过
setContentView方法将我们要
展示的界面传入
该方法,该方法会讲我们界
面通过addView追加到id为
content的一个
FrameLayout(Vie wGroup)
中,然后addView方法中通

过调运invalidate(true)
去通知触发ViewRootImpl类
的performTraversals()方法,
至此递归绘制我们自定义的
所有布局。
【工匠若
水http://blog.csdn.net/yanbob
er 转载烦请注明出处,尊重
分享成果】
6
View的requestLayout
方法源码分析
6
-1 requestLayout方法
分析
和inva lida te类似,其实在上
面分析Vie w绘制流程时或多
或少都调运到了这个方法,
而且这个方法对于Vie w来说
也比较重要,所以我们接下
来分析一下他。如下Vie w的
requestLayout源码:
public void requestLayout() {
.
.....
if (mParent != null &
&
!mParent.isLayoutRequested(

)
) {
/
/
/由此向ViewParent
/从这个View开始向
请求布局
上一直requestLayout,最终到达Vie
wRootImpl的requestLayout
mParent.requestLa
yout();
}
.
.....
}
看见没有,当我们触发Vie w
的requestLayout时其实质就
是层层向上传递,直到
ViewRootImpl为止,然后触
发ViewRootImpl的
requestLayout方法,

如下就是ViewRootImpl的
requestLayout方法:
@
Override
public void requestLayout
() {
if (!mHandlingLayoutI
nLayoutRequest) {
checkThread();
mLayoutRequested
=
true;
/
/View调运request
Layout最终层层上传到ViewRootImp
l后最终触发了该方法
scheduleTraversal
s();
}
}

看见没有,类似于上面分析
的inva lida te过程,只是设置
的标记不同,导致对于Vie w
的绘制流程中触发的方法不
同而已。
6
-2 requestLayout方法
总结
可以看见,这些方法都是大
同小异。对于requestLayout
方法来说总结如下:
requestLayout()方法会调用
measure过程和layout过程,
不会调用draw过程,也不会
重新绘制任何Vie w包括该调
用者本身。
7
View绘制流程总结
至此整个关于Android应用程
序开发中的Vie w绘制机制及
相关重要方法都已经分析完
毕。关于各个方法的总结这
里不再重复,直接通过该文
章前面的目录索引到相应方
法的总结小节进行查阅即
可。
【
工匠若
水http://blog.csdn.net/yanbob
er 转载烦请注明出处,尊重
分享成果】
