


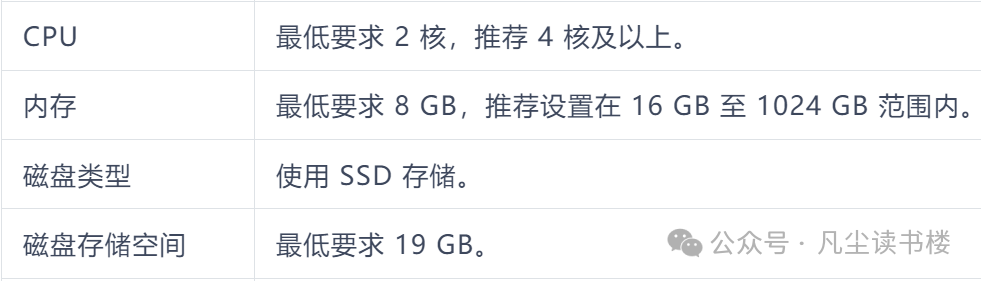
最近开始学习 OceanBase,需要搭建一套个人环境做实验,由于官方推荐环境配置要求较高(见下表,指的都是空闲CPU、内存和磁盘),在内存不够的情况下,按官方文档搭建一直无法通过,经过个人研究后,即使内存不够,按照以下安装步骤,也能顺利完成搭建,步骤如下:
其中官方文档安装步骤可供参考:
https://www.oceanbase.com/docs/common-oceanbase-database-cn-1000000000507531
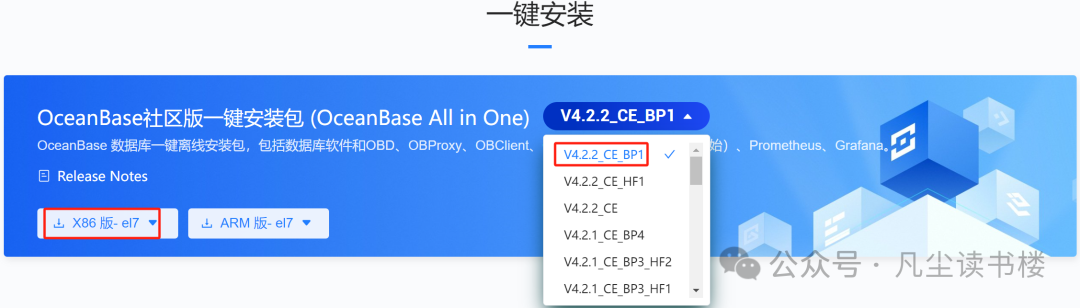
步骤一、下载并安装 all-in-one 安装包
1、下载 all-in-one 安装包,并将其上传到机器任一目录下。
安装包下载路径:https://www.oceanbase.com/softwarecenter,建议下载最新版本。
在这里,解释一下 OceanBase 的版本号命名规则:
VA.B.C_CE[_BETA][_BPX][_HFY]
A.B.C:保留三位版本,和 OceanBase 内核版本的前三位保持一致。
BETA:版本定位,可选的值有 ALPHA、BETA、RC、RELEASE;
目前 OceanBase 的版本策略,只有 beta 和 release 的概念,beta 表示测试版本,不推荐生产使用;release 版本,表示代表可以上生产;如有需要,后续再加 alpha,rc 等;默认不写,代表是 Release 版本,例如V4.0.0_CE 表示 V4.0.0_CE_RELEASE。
BP:表示是第 X 个 Bugfix 版本。
HF:表示是第 X 个 Bugfix 版本的第 Y 个 Hotfix。
Hotfix 版本是针对紧急问题而进行的修补程序,通常只修复一个或少数几个紧急问题,而 Bugfix 版本则是针对所有已知问题的修复程序。
2、在安装包所在目录下执行如下命令解压安装包并安装。
[root@localhost]# tar -xzf oceanbase-all-in-one-*.tar.gz
[root@localhost]# cd oceanbase-all-in-one/bin/
[root@localhost]# ./install.sh
[root@localhost]# source ~/.oceanbase-all-in-one/bin/env.sh
3、检验是否安装成功
[root@localhost]# which obd
/root/.oceanbase-all-in-one/obd/usr/bin/obd
4、查看本地安装包列表
[root@localhost]# obd mirror list local
+------------------------------------------------------------------------------------------------------------------+
|                                                local Package List                                                |
+---------------------------+---------+------------------------+--------+------------------------------------------+
| name                      | version | release                | arch   | md5                                      |
+---------------------------+---------+------------------------+--------+------------------------------------------+
| grafana                   | 7.5.17  | 1                      | x86_64 | 1bf1f338d3a3445d8599dc6902e7aeed4de4e0d6 |
| obagent                   | 4.2.2   | 100000042024011120.el7 | x86_64 | 19739a07a12eab736aff86ecf357b1ae660b554e |
| ob-configserver           | 1.0.0   | 2.el7                  | x86_64 | feca6b9c76e26ac49464f34bfa0780b5a8d3f4a0 |
| ob-deploy                 | 2.6.1   | 6.el7                  | x86_64 | e9a0a7af5ecedd7a267ccef44e64b6323ea568c2 |
| obproxy-ce                | 4.2.1.0 | 11.el7                 | x86_64 | 0aed4b782120e4248b749f67be3d2cc82cdcb70d |
| oceanbase-ce              | 4.2.2.0 | 100010012024022719.el7 | x86_64 | 60fe842818ef64631dd3bb6f90bf4cab0e737195 |
| oceanbase-ce-libs         | 4.2.2.0 | 100010012024022719.el7 | x86_64 | 756bc0a7949701b0a6c707a29cf623f7fb966bb7 |
| oceanbase-diagnostic-tool | 1.5.2   | 22024010415.el7        | x86_64 | 4c0f0551be4ad04bc40a66763f66f76fb8bdf10c |
| ocp-express               | 4.2.2   | 100000022024011120.el7 | x86_64 | 09ffcf156d1df9318a78af52656f499d2315e3f7 |
| prometheus                | 2.37.1  | 10000102022110211.el7  | x86_64 | 58913c7606f05feb01bc1c6410346e5fc31cf263 |
+---------------------------+---------+------------------------+--------+------------------------------------------+
Trace ID: 99924856-e299-11ee-876f-005056af29cb
If you want to view detailed obd logs, please run: obd display-trace 99924856-e299-11ee-876f-005056af29cb
步骤二、单机本地部署 OceanBase 数据库
1、因为内存不足,使用以下方式安装官方 demo 集群无法成功
[admin@test001 ~]$ obd demo2、需修改配置文件内存参数,默认单机配置文件路径在
/root/.oceanbase-all-in-one/conf/autodeploy/single-example.yaml
[root@localhost example]# cd /root/.oceanbase-all-in-one
[root@localhost .oceanbase-all-in-one]# ll
total 8
drwxr-xr-x 2 root root  58 Mar 14 15:08 bin
lrwxrwxrwx 1 root root  47 Mar 14 15:08 conf -> /root/.oceanbase-all-in-one/obd/usr/obd/example
drwxr-xr-x 3 root root  17 Mar 14 15:08 obclient
drwxr-xr-x 4 root root  28 Mar 14 15:08 obd
-rw-r--r-- 1 root root 666 Mar 14 15:08 README.md
-rw-r--r-- 1 root root  27 Mar 14 15:08 VERSION
[root@localhost .oceanbase-all-in-one]# cd conf/
[root@localhost conf]# ll
total 112
-rw-r--r-- 1 root root 15449 Mar 14 15:08 all-components-min.yaml
-rw-r--r-- 1 root root 16102 Mar 14 15:08 all-components.yaml
drwxr-xr-x 2 root root   262 Mar 14 15:08 autodeploy
-rw-r--r-- 1 root root  7193 Mar 14 15:08 default-components-min.yaml
-rw-r--r-- 1 root root  7396 Mar 14 15:08 default-components.yaml
-rw-r--r-- 1 root root  4240 Mar 14 15:08 distributed-example.yaml
-rw-r--r-- 1 root root  5765 Mar 14 15:08 distributed-with-obproxy-example.yaml
drwxr-xr-x 2 root root   129 Mar 14 15:08 grafana
-rw-r--r-- 1 root root  2289 Mar 14 15:08 local-example.yaml
-rw-r--r-- 1 root root  4226 Mar 14 15:08 mini-distributed-example.yaml
-rw-r--r-- 1 root root  5736 Mar 14 15:08 mini-distributed-with-obproxy-example.yaml
-rwxr-xr-x 1 root root  2446 Mar 14 16:37 mini-local-example.yaml
-rwxr-xr-x 1 root root  2721 Mar 14 16:27 mini-single-example.yaml
-rw-r--r-- 1 root root  4197 Mar 14 15:08 mini-single-with-obproxy-example.yaml
drwxr-xr-x 2 root root   135 Mar 14 15:08 obagent
drwxr-xr-x 2 root root   109 Mar 14 15:08 ob-configserver
drwxr-xr-x 2 root root   102 Mar 14 15:08 oblogproxy
drwxr-xr-x 2 root root    84 Mar 14 15:08 obproxy
drwxr-xr-x 2 root root  4096 Mar 14 15:08 oceanbase-3.x
drwxr-xr-x 2 root root    35 Mar 14 15:08 ocp-express
drwxr-xr-x 2 root root   102 Mar 14 15:08 prometheus
-rw-r--r-- 1 root root  2557 Mar 14 15:08 single-example.yaml
-rw-r--r-- 1 root root  4068 Mar 14 15:08 single-with-obproxy-example.yaml
[root@localhost conf]# cd autodeploy/
[root@localhost autodeploy]# ll
total 68
-rw-r--r-- 1 root root 17800 Mar 14 15:08 all-components.yaml
-rw-r--r-- 1 root root 11329 Mar 14 15:08 default-example.yaml
-rw-r--r-- 1 root root  3871 Mar 14 15:08 distributed-example.yaml
-rw-r--r-- 1 root root  9287 Mar 14 15:08 distributed-with-obproxy-and-obagent-example.yaml
-rw-r--r-- 1 root root  5075 Mar 14 15:08 distributed-with-obproxy-example.yaml
-rw-r--r-- 1 root root  3679 Mar 14 15:08 single-example.yaml
-rw-r--r-- 1 root root  4885 Mar 14 15:08 single-with-obproxy-example.yaml
[root@localhost autodeploy]# cp single-example.yaml single-example.yaml_bak
[root@localhost autodeploy]# ll
total 72
-rw-r--r-- 1 root root 17800 Mar 14 15:08 all-components.yaml
-rw-r--r-- 1 root root 11329 Mar 14 15:08 default-example.yaml
-rw-r--r-- 1 root root  3871 Mar 14 15:08 distributed-example.yaml
-rw-r--r-- 1 root root  9287 Mar 14 15:08 distributed-with-obproxy-and-obagent-example.yaml
-rw-r--r-- 1 root root  5075 Mar 14 15:08 distributed-with-obproxy-example.yaml
-rw-r--r-- 1 root root  3679 Mar 14 15:08 single-example.yaml
-rw-r--r-- 1 root root  3679 Mar 15 09:22 single-example.yaml_bak
-rw-r--r-- 1 root root  4885 Mar 14 15:08 single-with-obproxy-example.yaml
[root@localhost autodeploy]# vi single-example.yaml
3、把单机本地配置文件模板/root/.oceanbase-all-in-one/conf/mini-local-example.yaml内容拷贝到single-example.yaml,修改home_path
[root@localhost example]# cd /root/.oceanbase-all-in-one/conf
[root@localhost conf]# ll
total 112
-rw-r--r-- 1 root root 15449 Mar 14 15:08 all-components-min.yaml
-rw-r--r-- 1 root root 16102 Mar 14 15:08 all-components.yaml
drwxr-xr-x 2 root root   262 Mar 15 09:20 autodeploy
-rw-r--r-- 1 root root  7193 Mar 14 15:08 default-components-min.yaml
-rw-r--r-- 1 root root  7396 Mar 14 15:08 default-components.yaml
-rw-r--r-- 1 root root  4240 Mar 14 15:08 distributed-example.yaml
-rw-r--r-- 1 root root  5765 Mar 14 15:08 distributed-with-obproxy-example.yaml
drwxr-xr-x 2 root root   129 Mar 14 15:08 grafana
-rw-r--r-- 1 root root  2289 Mar 14 15:08 local-example.yaml
-rw-r--r-- 1 root root  4226 Mar 14 15:08 mini-distributed-example.yaml
-rw-r--r-- 1 root root  5736 Mar 14 15:08 mini-distributed-with-obproxy-example.yaml
-rwxr-xr-x 1 root root  2446 Mar 14 16:37 mini-local-example.yaml
-rwxr-xr-x 1 root root  2721 Mar 14 16:27 mini-single-example.yaml
-rw-r--r-- 1 root root  4197 Mar 14 15:08 mini-single-with-obproxy-example.yaml
drwxr-xr-x 2 root root   135 Mar 14 15:08 obagent
drwxr-xr-x 2 root root   109 Mar 14 15:08 ob-configserver
drwxr-xr-x 2 root root   102 Mar 14 15:08 oblogproxy
drwxr-xr-x 2 root root    84 Mar 14 15:08 obproxy
drwxr-xr-x 2 root root  4096 Mar 14 15:08 oceanbase-3.x
drwxr-xr-x 2 root root    35 Mar 14 15:08 ocp-express
drwxr-xr-x 2 root root   102 Mar 14 15:08 prometheus
-rw-r--r-- 1 root root  2557 Mar 14 15:08 single-example.yaml
-rw-r--r-- 1 root root  4068 Mar 14 15:08 single-with-obproxy-example.yaml
[root@localhost conf]# cat mini-local-example.yaml
oceanbase-ce:
  servers:
    # Please don't use hostname, only IP can be supported
    - 127.0.0.1
  global:
    #  The working directory for OceanBase Database. OceanBase Database is started under this directory. This is a required field.
    home_path: /opt/ob
    # The directory for data storage. The default value is $home_path/store.
    # data_dir: /data
    # The directory for clog, ilog, and slog. The default value is the same as the data_dir value.
    # redo_dir: /redo
    # Starting from observer version 4.2, the network selection for the observer is based on the 'local_ip' parameter, and the 'devname' parameter is no longer mandatory.
    # If the 'local_ip' parameter is set, the observer will first use this parameter for the configuration, regardless of the 'devname' parameter.
    # If only the 'devname' parameter is set, the observer will use the 'devname' parameter for the configuration.
    # If neither the 'devname' nor the 'local_ip' parameters are set, the 'local_ip' parameter will be automatically assigned the IP address configured above.
    # devname: eth0
    mysql_port: 2881 # External port for OceanBase Database. The default value is 2881. DO NOT change this value after the cluster is started.
    rpc_port: 2882 # Internal port for OceanBase Database. The default value is 2882. DO NOT change this value after the cluster is started.
    zone: zone1
    cluster_id: 1
    # please set memory limit to a suitable value which is matching resource.
    memory_limit: 6G # The maximum running memory for an observer
    system_memory: 1G # The reserved system memory. system_memory is reserved for general tenants. The default value is 30G.
    datafile_size: 2G # Size of the data file.
    datafile_next: 2G # the auto extend step. Please enter an capacity, such as 2G
    datafile_maxsize: 20G # the auto extend max size. Please enter an capacity, such as 20G
    log_disk_size: 14G # The size of disk space used by the clog files.
    cpu_count: 16
    production_mode: false
    enable_syslog_wf: false # Print system logs whose levels are higher than WARNING to a separate log file. The default value is true.
    enable_syslog_recycle: true # Enable auto system log recycling or not. The default value is false.
    max_syslog_file_count: 4 # The maximum number of reserved log files before enabling auto recycling. The default value is 0.
    # root_password: # root user password, can be empty
4、命令解释
obd cluster autodeploy
使用该命令可传入一个简易的配置文件,OBD 会根据目标机器资源自动生成最大规格的完整配置并部署启动集群,命令格式如下:
obd cluster autodeploy <deploy name>-c<yaml path>[-f][-U][-A][-s]5、正式部署
[root@localhost autodeploy]# obd cluster autodeploy ob_cluster -c single-example.yaml
Cluster param config check ok
Open ssh connection ok
Generate observer configuration ok
+--------------------------------------------------------------------------------------------+
|                                          Packages                                          |
+--------------+---------+------------------------+------------------------------------------+
| Repository   | Version | Release                | Md5                                      |
+--------------+---------+------------------------+------------------------------------------+
| oceanbase-ce | 4.2.2.0 | 100010012024022719.el7 | 60fe842818ef64631dd3bb6f90bf4cab0e737195 |
+--------------+---------+------------------------+------------------------------------------+
Repository integrity check ok
Parameter check ok
Cluster status check ok
Initializes observer work home ok
Remote oceanbase-ce-4.2.2.0-100010012024022719.el7-60fe842818ef64631dd3bb6f90bf4cab0e737195 repository install ok
Remote oceanbase-ce-4.2.2.0-100010012024022719.el7-60fe842818ef64631dd3bb6f90bf4cab0e737195 repository lib check !!
Try to get lib-repository
Remote oceanbase-ce-libs-4.2.2.0-100010012024022719.el7-756bc0a7949701b0a6c707a29cf623f7fb966bb7 repository install ok
Remote oceanbase-ce-4.2.2.0-100010012024022719.el7-60fe842818ef64631dd3bb6f90bf4cab0e737195 repository lib check ok
ob_cluster deployed
Get local repositories ok
Search plugins ok
Load cluster param plugin ok
Open ssh connection ok
Check before start observer ok
[WARN] OBD-1011: (127.0.0.1) The recommended value of fs.aio-max-nr is 1048576 (Current value: 65536)
[WARN] OBD-1007: (127.0.0.1) The recommended number of max user processes is 655350 (Current value: 120000)
[WARN] OBD-1007: (127.0.0.1) The recommended number of core file size is unlimited (Current value: 0)
[WARN] OBD-1007: (127.0.0.1) The recommended number of stack size is unlimited (Current value: 8192)
[WARN] OBD-1017: (127.0.0.1) The value of the "vm.max_map_count" must be within [327600, 1310720] (Current value: 65530, Recommended value: 655360)
[WARN] OBD-1017: (127.0.0.1) The value of the "fs.file-max" must be greater than 6573688 (Current value: 761286, Recommended value: 6573688)
[WARN] OBD-2000: (127.0.0.1) not enough memory. (Free: 226.1M, Need: 4.0G)
[WARN] OBD-1012: (127.0.0.1) clog and data use the same disk (/opt)

Start observer ok
observer program health check ok
Connect to observer 127.0.0.1:2881 ok
Initialize oceanbase-ce ok
Wait for observer init ok
+---------------------------------------------+
|                   observer                  |
+-----------+---------+------+-------+--------+
| ip        | version | port | zone  | status |
+-----------+---------+------+-------+--------+
| 127.0.0.1 | 4.2.2.0 | 2881 | zone1 | ACTIVE |
+-----------+---------+------+-------+--------+
obclient -h127.0.0.1 -P2881 -uroot -p'PrWjxOLFwcKgE3c1KUss' -Doceanbase -A

ob_cluster running
Trace ID: c8af4c44-e26a-11ee-aae2-005056af29cb
If you want to view detailed obd logs, please run: obd display-trace c8af4c44-e26a-11ee-aae2-005056af29cb
中途如果报错,可以查看详细debug,please run: obd display-trace c8af4c44-e26a-11ee-aae2-005056af29cb
6、清理无效集群
obd cluster destroy
销毁已部署的集群。如果集群处于运行中的状态,该命令会先尝试执行 stop,成功后再执行 destroy。
[root@localhost ob]# obd cluster list
+--------------------------------------------------------------+
|                         Cluster List                         |
+------------+-------------------------------+-----------------+
| Name       | Configuration Path            | Status (Cached) |
+------------+-------------------------------+-----------------+
| demo       | /root/.obd/cluster/demo       | deployed        |
| test       | /root/.obd/cluster/test       | deployed        |
| ob_cluster | /root/.obd/cluster/ob_cluster | running         |
+------------+-------------------------------+-----------------+
Trace ID: cc668fd6-e270-11ee-a639-005056af29cb
If you want to view detailed obd logs, please run: obd display-trace cc668fd6-e270-11ee-a639-005056af29cb
[root@localhost ob]#
[root@localhost ob]#
[root@localhost ob]#
[root@localhost ob]# obd cluster destroy demo
Are you sure to destroy the "demo" cluster ? [y/n]: y
Get local repositories ok
Open ssh connection ok
Check for standby tenant ok
Search plugins ok
Cluster status check ok
obproxy work dir cleaning ok
observer work dir cleaning ok
prometheus work dir cleaning ok
grafana work dir cleaning ok
obagent work dir cleaning ok
demo destroyed
Trace ID: 274bb89a-e271-11ee-8069-005056af29cb
If you want to view detailed obd logs, please run: obd display-trace 274bb89a-e271-11ee-8069-005056af29cb
[root@localhost ob]#
[root@localhost ob]#
[root@localhost ob]#
[root@localhost ob]# obd cluster list
+--------------------------------------------------------------+
|                         Cluster List                         |
+------------+-------------------------------+-----------------+
| Name       | Configuration Path            | Status (Cached) |
+------------+-------------------------------+-----------------+
| demo       | /root/.obd/cluster/demo       | destroyed       |
| test       | /root/.obd/cluster/test       | deployed        |
| ob_cluster | /root/.obd/cluster/ob_cluster | running         |
+------------+-------------------------------+-----------------+
Trace ID: 2fa4054c-e271-11ee-b569-005056af29cb
If you want to view detailed obd logs, please run: obd display-trace 2fa4054c-e271-11ee-b569-005056af29cb
[root@localhost ob]#
[root@localhost ob]#
[root@localhost ob]#
[root@localhost ob]# obd cluster destroy test
Are you sure to destroy the "test" cluster ? [y/n]: y
Get local repositories ok
Open ssh connection ok
Check for standby tenant ok
Search plugins ok
Cluster status check ok
observer work dir cleaning ok
test destroyed
Trace ID: 3d227cb2-e271-11ee-9760-005056af29cb
If you want to view detailed obd logs, please run: obd display-trace 3d227cb2-e271-11ee-9760-005056af29cb
[root@localhost ob]#
[root@localhost ob]#
[root@localhost ob]#
[root@localhost ob]# obd cluster list
+--------------------------------------------------------------+
|                         Cluster List                         |
+------------+-------------------------------+-----------------+
| Name       | Configuration Path            | Status (Cached) |
+------------+-------------------------------+-----------------+
| demo       | /root/.obd/cluster/demo       | destroyed       |
| test       | /root/.obd/cluster/test       | destroyed       |
| ob_cluster | /root/.obd/cluster/ob_cluster | running         |
+------------+-------------------------------+-----------------+
Trace ID: 4345356c-e271-11ee-9f59-005056af29cb
If you want to view detailed obd logs, please run: obd display-trace 4345356c-e271-11ee-9f59-005056af29cb
删除 Cluster List 列表无效集群
[root@localhost ~]# cd ~/.obd/cluster
[root@localhost cluster]# ll
total 0
drwxr-xr-x 2 root root 63 Mar 14 15:14 demo
drwxr-xr-x 2 root root 63 Mar 15 09:24 ob_cluster
drwxr-xr-x 2 root root 63 Mar 14 16:36 test
[root@localhost cluster]# rm -rf demo
[root@localhost cluster]# rm -rf test
[root@localhost cluster]# ll
total 0
drwxr-xr-x 2 root root 63 Mar 15 10:18 ob_cluster
[root@localhost ob]# obd cluster list
+--------------------------------------------------------------+
|                         Cluster List                         |
+------------+-------------------------------+-----------------+
| Name       | Configuration Path            | Status (Cached) |
+------------+-------------------------------+-----------------+
| ob_cluster | /root/.obd/cluster/ob_cluster | running         |
+------------+-------------------------------+-----------------+
Trace ID: 6c9e943e-e272-11ee-a26d-005056af29cb
If you want to view detailed obd logs, please run: obd display-trace 6c9e943e-e272-11ee-a26d-005056af29cb
7、查看ob进程
[root@localhost sstable]# ps -ef | grep ob
root       5105  49204  0 13:46 pts/2    00:00:00 grep --color=auto ob
root      97444      1 19 09:24 ?        00:49:43 /opt/ob/bin/observer -r 127.0.0.1:2882:2881 -p 2881 -P 2882 -z zone1 -c 1 -d /opt/ob/store -I 127.0.0.1 -o __min_full_resource_pool_memory=2147483648,memory_limit=4G,system_memory=1G,datafile_size=2G,datafile_next=2G,datafile_maxsize=20G,log_disk_size=14G,cpu_count=16,enable_syslog_wf=False,enable_syslog_recycle=True,max_syslog_file_count=4
root      98069      1  0 09:25 pts/3    00:00:01 /opt/ob/bin/obshell daemon --ip 127.0.0.1 --port 2886
root      98090  98069  0 09:25 pts/3    00:00:22 /opt/ob/bin/obshell server --ip 127.0.0.1 --port 2886
root     111459  55520  0 10:58 pts/3    00:00:00 obclient -h127.0.0.1 -P2881 -uroot -px xxxxxxxxxxxxxxxxxx -Doceanbase -A
全文完,希望可以帮到正在阅读的你,如果觉得有帮助,可以分享给你身边的朋友,同事,你关心谁就分享给谁,一起学习共同进步~~~
❤ 欢迎关注我的公众号【凡尘读书楼】,一起学习新知识!
————————————————————————————
公众号:凡尘读书楼
墨天轮:https://www.modb.pro/u/399450
知识星球 :凡尘dba人生有限公司
————————————————————————————
