


//创建Boostrap对象Bootstrap bootstrap = new Bootstrap();//创建线程组,处理消息读取EventLoopGroup group = new NioEventLoopGroup();bootstrap.group(group) //设置使用的eventLoopGroup.channel(NioSocketChannel.class) //设置被实例化的NioServerSocketChannel类.handler(new ChannelInitializer<NioSocketChannel>() { // 设置SocketChannel处理器@Overrideprotected void initChannel(NioSocketChannel ch) throws Exception {// TODO}});try {bootstrap.connect("127.0.0.1",2237).sync().channel().closeFuture().sync();} catch (InterruptedException e) {// TODO Auto-generated catch blocke.printStackTrace();}
// 调用Selector.open()方法创建一个Selector对象Selector selector = Selector.open();// 通过调用SocketChannel.open()方法来打开SocketChannelSocketChannel sc = SocketChannel.open();// 设置channel非阻塞sc.configureBlocking(false);if (!sc.connect(new InetSocketAddress("127.0.0.1", 2237))){//不断地轮询连接状态,直到完成连接while (!sc.finishConnect()){// TODO}}// 设置selector关注channel的READ请求事件和WRITE事件sc.register(selector, SelectionKey.OP_READ|SelectionKey.OP_WRITE);
Java原生NIO方式一如既往的简单,当然Netty也是做了一些好的封装操作,比如单线程封装处理等.因为Boostrap的启动较为简单,我们就分析在哪实现了Java NIO的封装即可,首先是在哪实现了connect()方法,由时序图可知道在NioSocketChannel处的doConnect()方法实现:
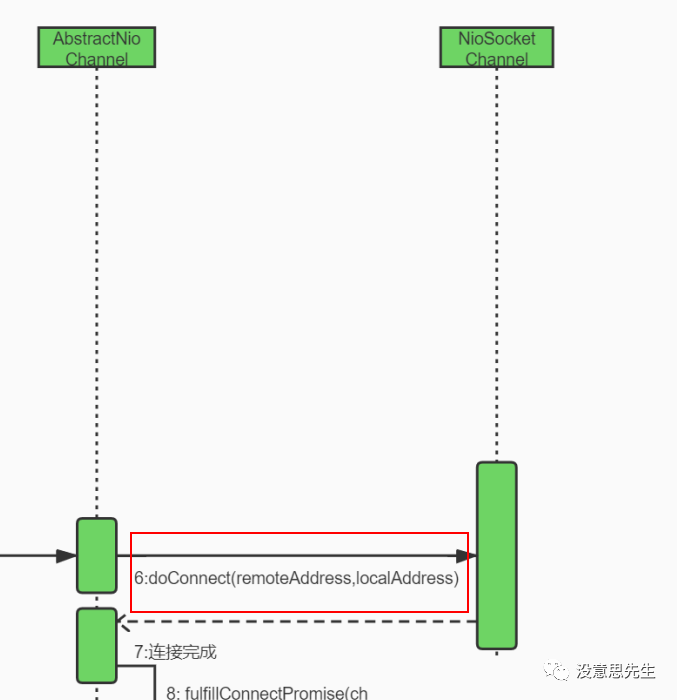
NioSocketChannel处的doConnect()方法代码如下:
protected boolean doConnect(SocketAddress remoteAddress, SocketAddress localAddress) throws Exception {// 略boolean success = false;try {boolean connected = SocketUtils.connect(javaChannel(), remoteAddress);// 略success = true;return connected;} finally {if (!success) {doClose();}}}
SocketUtils的connect()方法代码如下:
public static void connect(final Socket socket, final SocketAddress remoteAddress, final int timeout)throws IOException {try {AccessController.doPrivileged(new PrivilegedExceptionAction<Void>() {@Overridepublic Void run() throws IOException {socket.connect(remoteAddress, timeout);return null;}});} catch (PrivilegedActionException e) {throw (IOException) e.getCause();}}
最终也是调用了Java Nio的API进行connect远程IP和端口.然后和前文(Netty源码分析篇(一):ServerBootStrap的启动)提及一样通过pipeline触发channelActive()方法到Selector中设置感兴趣的事件.最终设置事件在AbstractNioChannel的doBeginRead()方法内实现,具体代码如下:
@Overrideprotected void doBeginRead() throws Exception {// 略final int interestOps = selectionKey.interestOps();if ((interestOps & readInterestOp) == 0) {// 将之前 Channel 注册到 EventLoop 上的 Selector 时产生的 SelectionKey 的关注事件集合进行更新// NioServerSocketChannel 的传入的值为 OP_ACCEPT,也就是其感兴趣的事件为客户端接入就绪事件// NioSocketChannel 的传入的值为 OP_READ,也就是其感兴趣的事件为读就绪事件selectionKey.interestOps(interestOps | readInterestOp);}}
方法内的readInterestOp是在构造参数就写好的,NioSocketChannel继承自AbstractNioByteChannel,传入的是SelectionKey.OP_READ,因为NioSocketChannel会接收到Selector的读事件的通知.
整个Bootstrap启动流程的时序图如下:
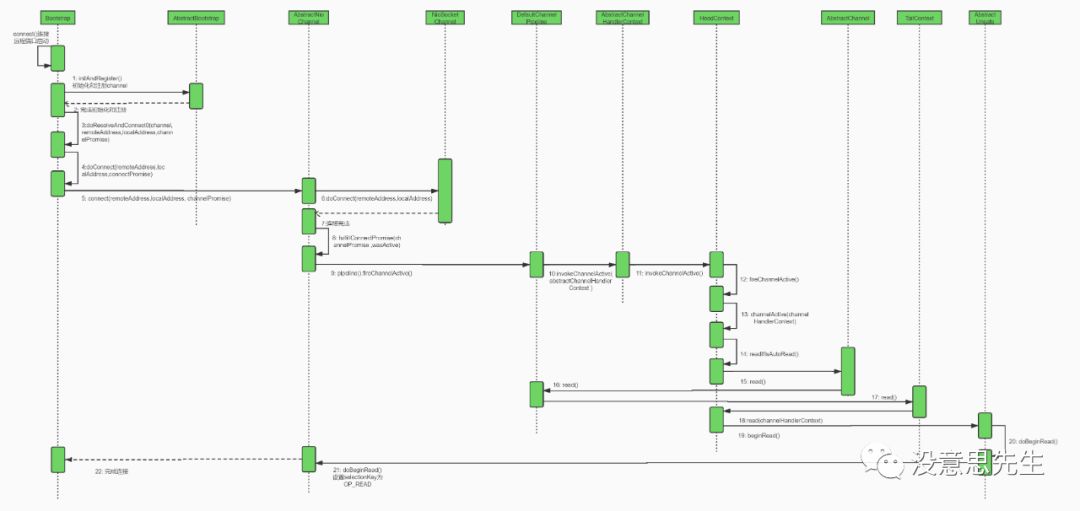
时序图链接:
https://www.processon.com/view/link/5e40e2f8e4b085b5f21a7193
文章转载自没意思先生,如果涉嫌侵权,请发送邮件至:contact@modb.pro进行举报,并提供相关证据,一经查实,墨天轮将立刻删除相关内容。
