


MobileNet V1
MobileNet V1 有点像VGG,它们的网络结构都是单分支的,通俗点说就是:一条路走到底。
只不过,相比于VGG,MobileNet V1 大量使用了深度可分离卷积,在模型的预测能力变化很小的前提下,极大地提升了模型的速度,从而推进了深度学习模型在移动端的使用。
ps:关于深度可分离卷积,可以查看这篇文章;关于VGG,可以查看这篇文章。
MobileNet V1 的网络结构如下: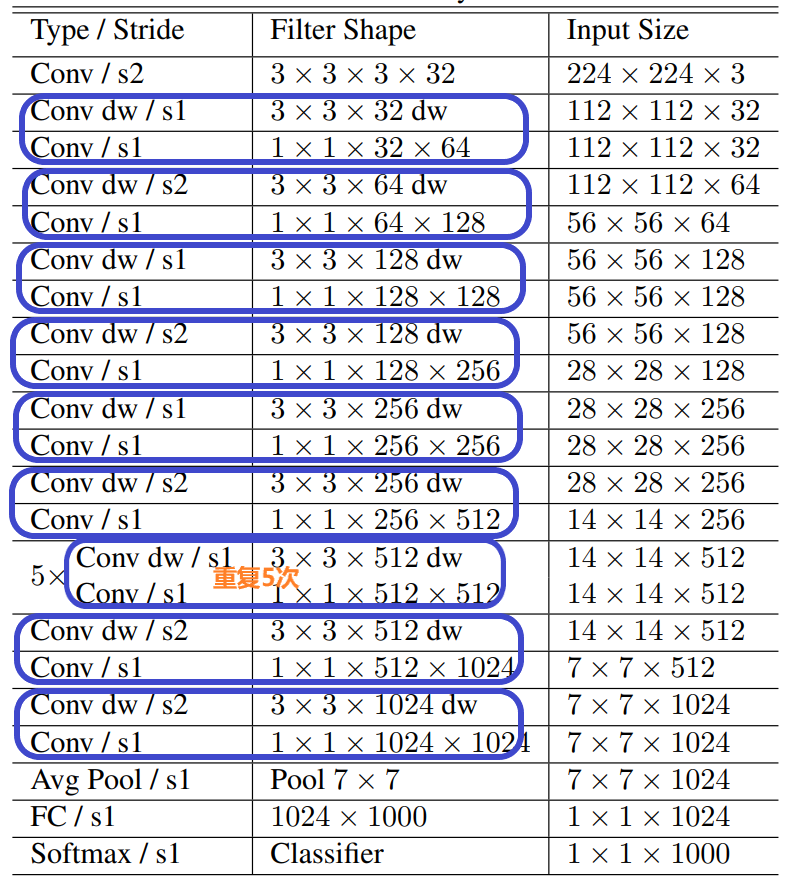
其中,Conv
表示普通卷积,Conv dw
表示逐通道卷积,s1
表示卷积步长为1,s2
表示卷积步长为2。
PyTorch 实现 MobileNet V1
对于普通的卷积,即上面结构图中的Conv
直接调用torch.nn.Conv2d
就可以了;
而在上面的网络结构图中,每一个蓝色框起来的两部分组合起来就是深度可分离卷积,它包括了逐通道卷积(Conv dw
)和逐点卷积(Conv
,kernel_size=1),其结构如下(左侧是普通卷积,右侧是深度可分离卷积):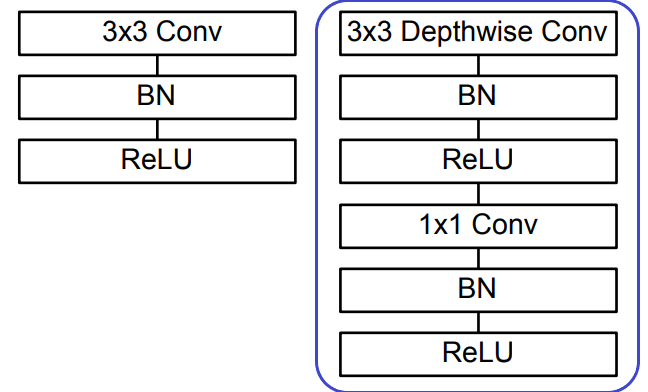
根据这个结构,就可以写代码实现深度可分离卷积了:
import torch
import torch.nn as nn

#深度可分离卷积
class Depth_Separable_Conv(nn.Module):

    def __init__(self,in_channels,out_channels,stride=1):
        super().__init__()
        self.in_channels=in_channels
        self.out_channels=out_channels
        self.stride=stride

        self.dw_conv=self.depth_wise_conv()#逐通道卷积:groups=in_channels
        self.pw_conv=self.point_wise_conv()#逐点卷积,即普通1x1卷积

    #逐通道卷积:groups=in_channels
    def depth_wise_conv(self):
        return nn.Sequential(
            nn.Conv2d(in_channels=self.in_channels,out_channels=self.in_channels,kernel_size=3,stride=self.stride,padding=1,groups=self.in_channels,bias=False),
            nn.BatchNorm2d(self.in_channels),
            nn.ReLU()
            )

    #逐点卷积,即普通1x1卷积
    def point_wise_conv(self):
        return nn.Sequential(
            nn.Conv2d(in_channels=self.in_channels,out_channels=self.out_channels,kernel_size=1,stride=1,padding=0,groups=1,bias=False),
            nn.BatchNorm2d(self.out_channels),
            nn.ReLU()
            )

    def forward(self,x):
        x=self.dw_conv(x)
        x=self.pw_conv(x)
        return x
根据总的网络结构图,可以发现其中的point wise conv
,即1x1
卷积的stride始终为1,因此在上面的代码中就把这个超参数固定为1了。而对于depth wise conv
,其stride不固定,因此使用的是传入的stride参数值。
有了上述结构,现在来实现整个MobileNet V1:
class MobileNetV1(nn.Module):

    def __init__(self,num_classes=1000,img_channels=3):
        super().__init__()
        #输出类别数
        self.num_classes=num_classes
        #输入图片的通道数
        self.img_channels=img_channels
        #网络结构
        self.m=nn.Sequential(
                    nn.Conv2d(in_channels=self.img_channels,out_channels=32,kernel_size=3,stride=2,padding=1,groups=1,bias=False),
                    nn.BatchNorm2d(32),
                    nn.ReLU(),

                    #Depth_Separable_Conv的参数顺序:in_channels,out_channels,stride
                    Depth_Separable_Conv(32,64,1),
                    Depth_Separable_Conv(64,128,2),
                    Depth_Separable_Conv(128,128,1),
                    Depth_Separable_Conv(128,256,2),
                    Depth_Separable_Conv(256,256,1),
                    Depth_Separable_Conv(256,512,2),

                    #重复5次
                    Depth_Separable_Conv(512,512,1),
                    Depth_Separable_Conv(512,512,1),
                    Depth_Separable_Conv(512,512,1),
                    Depth_Separable_Conv(512,512,1),
                    Depth_Separable_Conv(512,512,1),

                    Depth_Separable_Conv(512,1024,2),
                    Depth_Separable_Conv(1024,1024,2),

                    nn.AdaptiveAvgPool2d((1,1)),
                    nn.Flatten(start_dim=1),
                    nn.Linear(in_features=1024,out_features=self.num_classes)
                )

    def forward(self,x):
        x=self.m(x)
        return x
上述代码就是根据网络结构图,堆叠相应的卷积块,从完成了MobileNet V1网络的搭建。每一个卷积块都和网络结构图中的相应模块是对应的,因此强烈建议对照着网络结构图阅读以上代码,就自然清晰明了了。
注意,在卷积块堆叠完成后,我使用了更常用的自适应平均池化来代替平均池化,以便更能适应不同大小的输入。
现在来测试一下: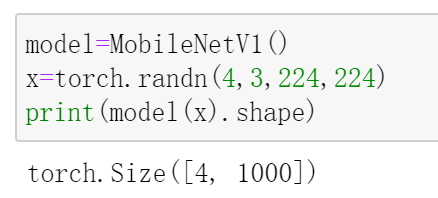
关于MobileNet V1的介绍就到这里,后续将对其改进版本,即MobileNet V2,MobileNet V3进行实现,敬请期待~
参考:
[1] https://arxiv.org/pdf/1704.04861.pdf
南极Python交流群已成立,长按下方二维码添加我的微信,备注加群即可,欢迎进群学习交流(划水 )
)

原创不易,感谢点赞,分享和在看的你!
