


使用repmgr实现PostgreSQL数据库的高可用架构部署
看腻了就来听听视频演示吧(持续更新中):https://www.bilibili.com/video/BV1SVBiYWESH/
repmgr简介
repmgr:一个用于PostgreSQL集群流复制管理的开源工具套件,用于管理PostgreSQL服务器集群中的复制和故障切换。通过设置备用服务器、监控复制和执行管理任务(如故障切换或手动切换操作)的工具增强了PostgreSQL内置的热备用功能。
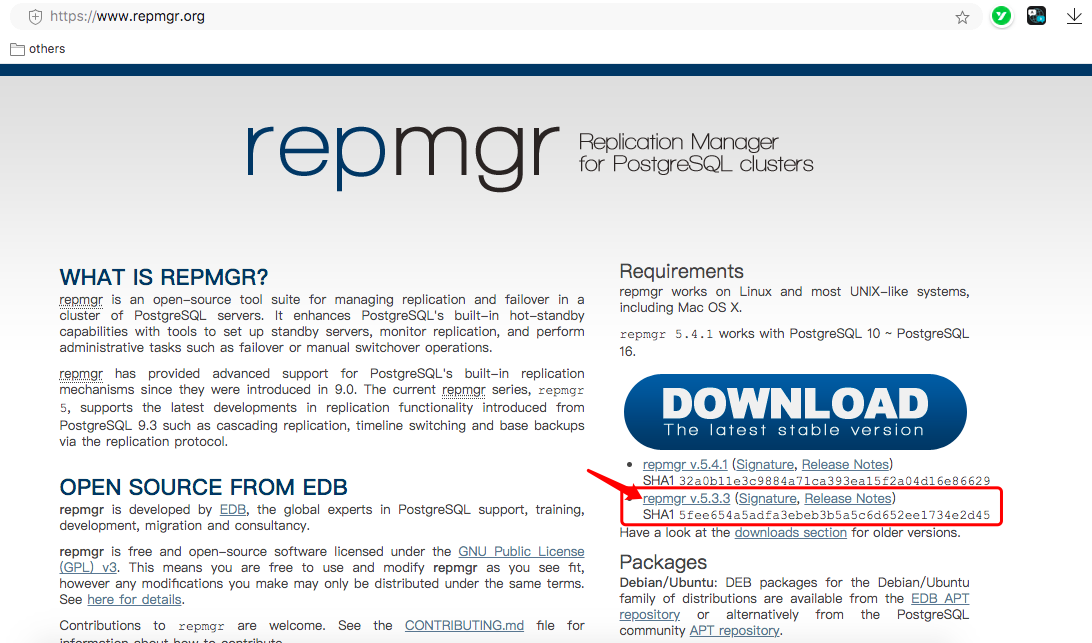
官网:https://www.repmgr.org/
推荐下载5.3.3版本,最新的5.4.1安装有点小问题
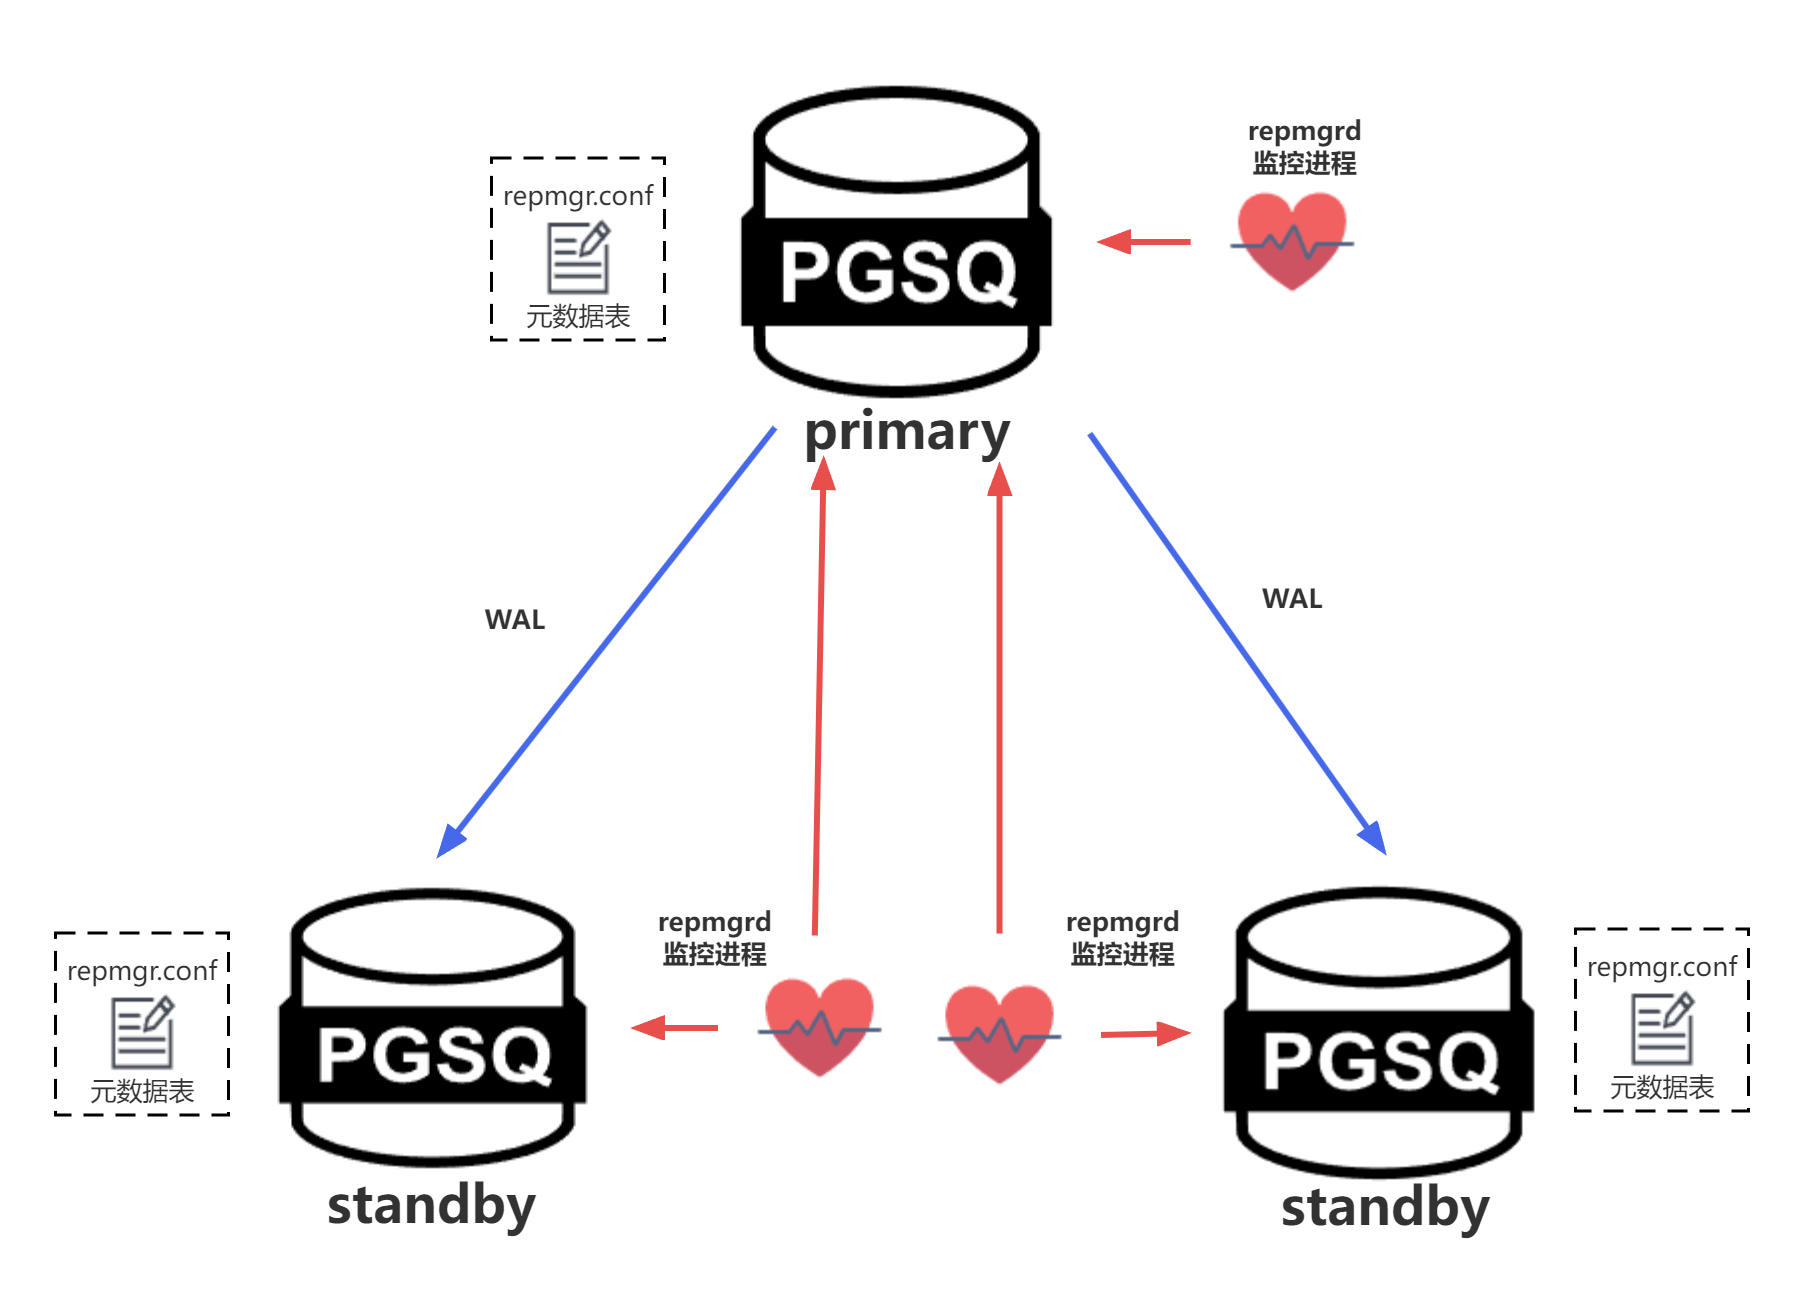
repmgr构架:
每个节点都有自己的repmgrd守护进程来监控节点数据库状态,且每个节点维护自己的元数据表,用于记录所有集群节点的信息。其中主节点守护进程主要用来监控本节点数据库服务状态,备节点守护进程主要用来监控主节点和本节点数据库服务状态。
环境配置和规划
基于repmgr工具部署一套1主1备的高可用环境,并测试手动切换场景
| hostname | OS | PostgreSQL | repmgr | IP |
|---|---|---|---|---|
| db06 | CentOS 7.9 | 16.2 | 5.3.3 | 172.16.107.156 |
| db07 | CentOS 7.9 | 16.2 | 5.3.3 | 172.16.107.157 |
安装需要的依赖
yum install -y readline readline-devel zlib zlib-devel gettext gettext-devel openssl openssl-devel pam pam-devel libxml2 libxml2-devel libxslt libxslt-devel perl perl-devel libcurl-devel libicu libicu-devel tcl-devel uuid-devel gcc gcc-c++ make flex bison perl-ExtUtils*
部署PostgreSQL软件工具并初始化主库
详细步骤略,可参考之前的文章和视频:https://www.modb.pro/db/1776517616701607936
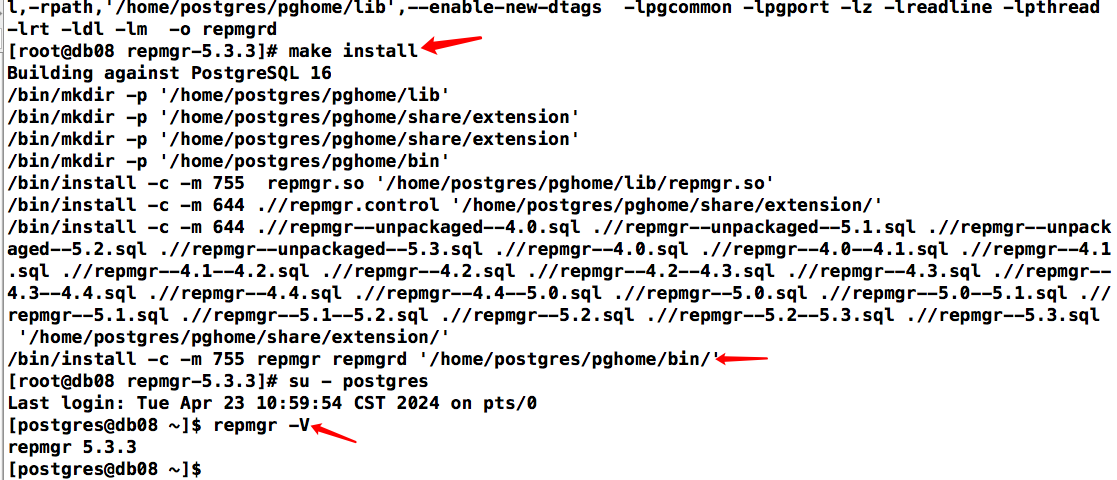
安装repmgr
tar -xzvf repmgr-5.3.3.tar.gz
cd repmgr-5.3.3
./configure PG_CONFIG=/home/postgres/pghome/bin/pg_config
make
make install
配置repmgr集群环境
主节点配置启动
# 初始化主库
initdb -D /home/postgres/pgdata/ --data-checksums -E UTF8 --locale=zh_CN.UTF-8

# 主库修改参数文件
vi $PGDATA/postgresql.conf
listen_addresses = '*'
port = 54321
max_connections = 2000
wal_level = replica
archive_mode = on
archive_command = 'test ! -f /home/postgres/pg_archive/%f && cp %p /home/postgres/pg_archive/%f'
max_wal_senders = 10
wal_keep_size = 512
hot_standby = on
wal_log_hints = on
shared_preload_libraries = 'repmgr'

# 主库修改认证配置文件
vi $PGDATA/pg_hba.conf
host replication repuser 172.16.107.156/32 trust
host replication repuser 172.16.107.157/32 trust
host all all 0.0.0.0/0 scram-sha-256

# 启动主库
pg_ctl start

# 创建repmgr库和replication用户
psql
create user repmgr superuser password 'repmgr';
create database repmgr owner repmgr;
create user repuser replication;
\l

# 各个节点都配置免密
vi ~/.pgpass
172.16.107.156:54321:repmgr:repmgr:repmgr
172.16.107.157:54321:repmgr:repmgr:repmgr

chmod 600 ~/.pgpass
创建repmgr配置文件
根据主机写不同的node_id、node_name和IP地址
mkdir /home/postgres/scripts/
vi /home/postgres/scripts/repmgr.conf

# add by repmgr
node_id = 1
node_name = 'pgdb01'
conninfo = 'host=172.16.107.156 port=54321 user=repmgr password=repmgr dbname=repmgr connect_timeout=3'
data_directory = '/home/postgres/pgdata'
replication_user = 'repuser'
replication_type = 'physical'
repmgr_bindir = '/home/postgres/pghome/bin'
pg_bindir = '/home/postgres/pghome/bin'
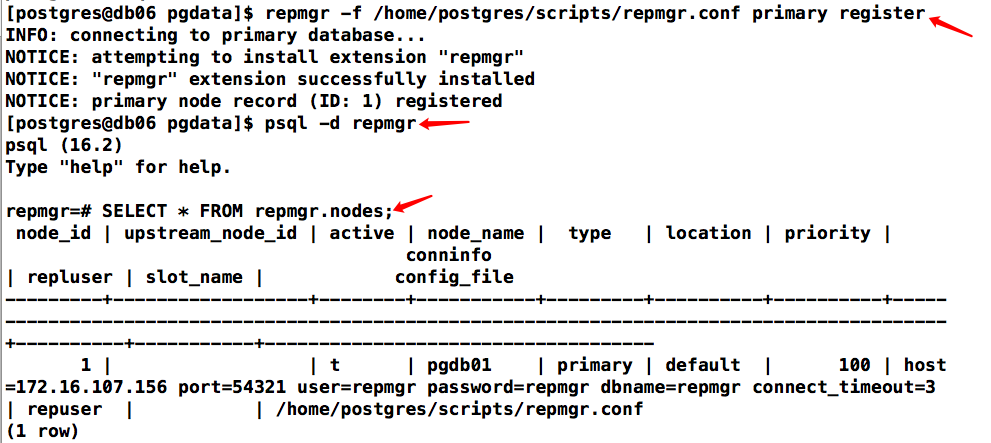
注册主节点、查看元数据
repmgr -f /home/postgres/scripts/repmgr.conf primary register
psql -d repmgr
SELECT * FROM repmgr.nodes;
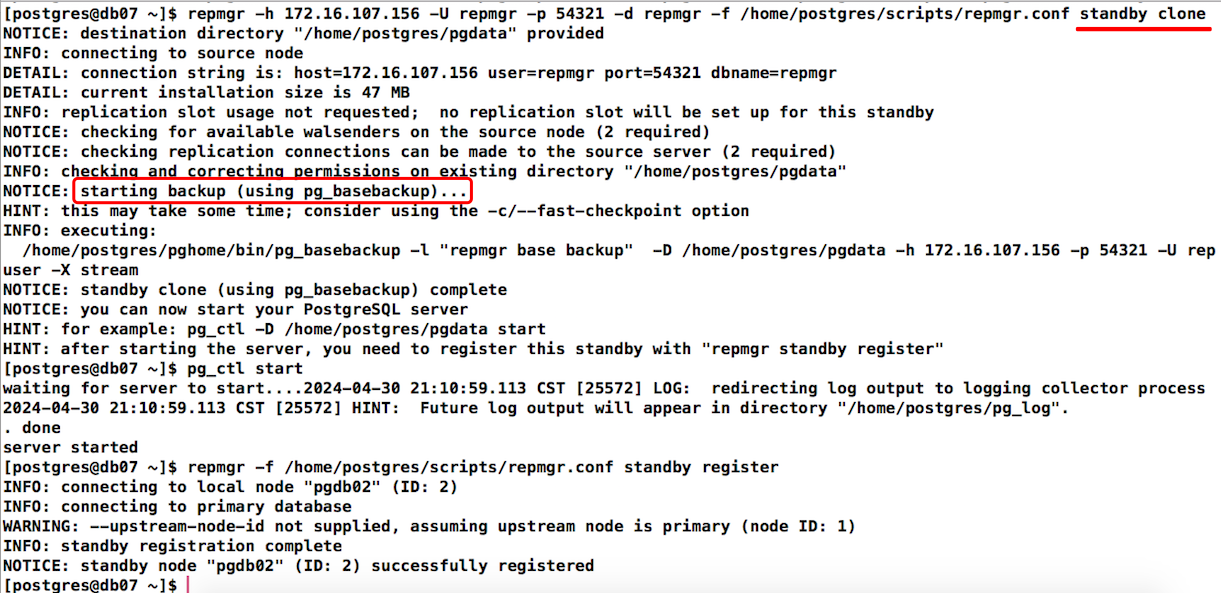
克隆standby、启动数据库并注册
repmgr -h 172.16.107.156 -U repmgr -p 54321 -d repmgr -f /home/postgres/scripts/repmgr.conf standby clone
pg_ctl start
repmgr -f /home/postgres/scripts/repmgr.conf standby register
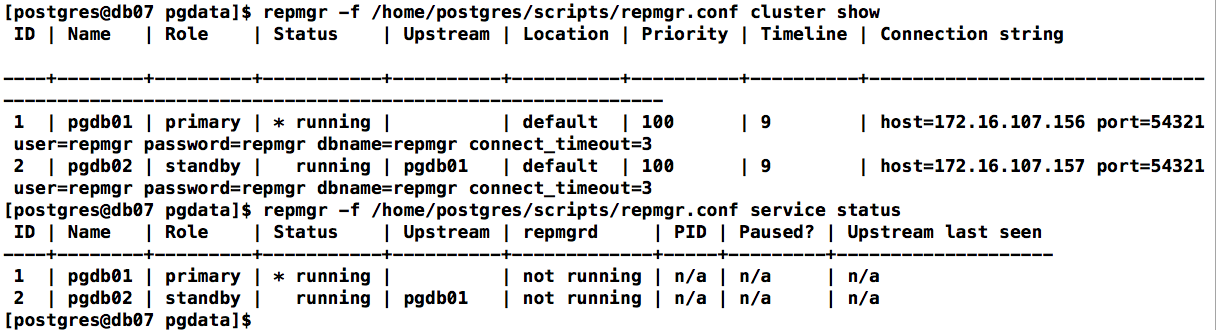
查看集群状态及数据库元数据
repmgr -f /home/postgres/scripts/repmgr.conf cluster show
repmgr -f /home/postgres/scripts/repmgr.conf service status
psql -d repmgr
SELECT * FROM repmgr.nodes\gx
启动repmgrd服务
# 追加配置
vi /home/postgres/scripts/repmgr.conf

# repmgrd
repmgrd_service_start_command = '/home/postgres/pghome/bin/repmgrd -f /home/postgres/scripts/repmgr.conf -p /home/postgres/scripts/repmgrd.pid -d'
repmgrd_service_stop_command = 'kill `cat /home/postgres/scripts/repmgrd.pid`'

# 启动repmgrd服务
repmgrd -f /home/postgres/scripts/repmgr.conf -p /home/postgres/scripts/repmgrd.pid -d

配置repmgrd为系统服务并设置开机自启动:
# 配置repmgrd为系统服务
vi /etc/systemd/system/repmgrd.service

[Unit]
Description=repmgrd service
After=network.target network-online.target

[Service]
Type=forking
User=postgres
Group=postgres

WorkingDirectory=/home/postgres/pghome/
ExecStart=/home/postgres/pghome/bin/repmgrd -f /home/postgres/scripts/repmgr.conf -p /home/postgres/scripts/repmgrd.pid -d
ExecStop=kill `cat /home/postgres/scripts/repmgrd.pid`
PrivateTmp=false

[Install]
WantedBy=multi-user.target


# 加载服务,启动服务并设置开机启动
systemctl daemon-reload
systemctl enable repmgrd
kill `cat /home/postgres/scripts/repmgrd.pid`
systemctl start repmgrd
切换测试
switchover
切换测试,在备库操作,注意,切换操作需要配置主机间互信
repmgr -f /home/postgres/scripts/repmgr.conf standby switchover

切换流程:
- 停止主库
- 备库promte为主库
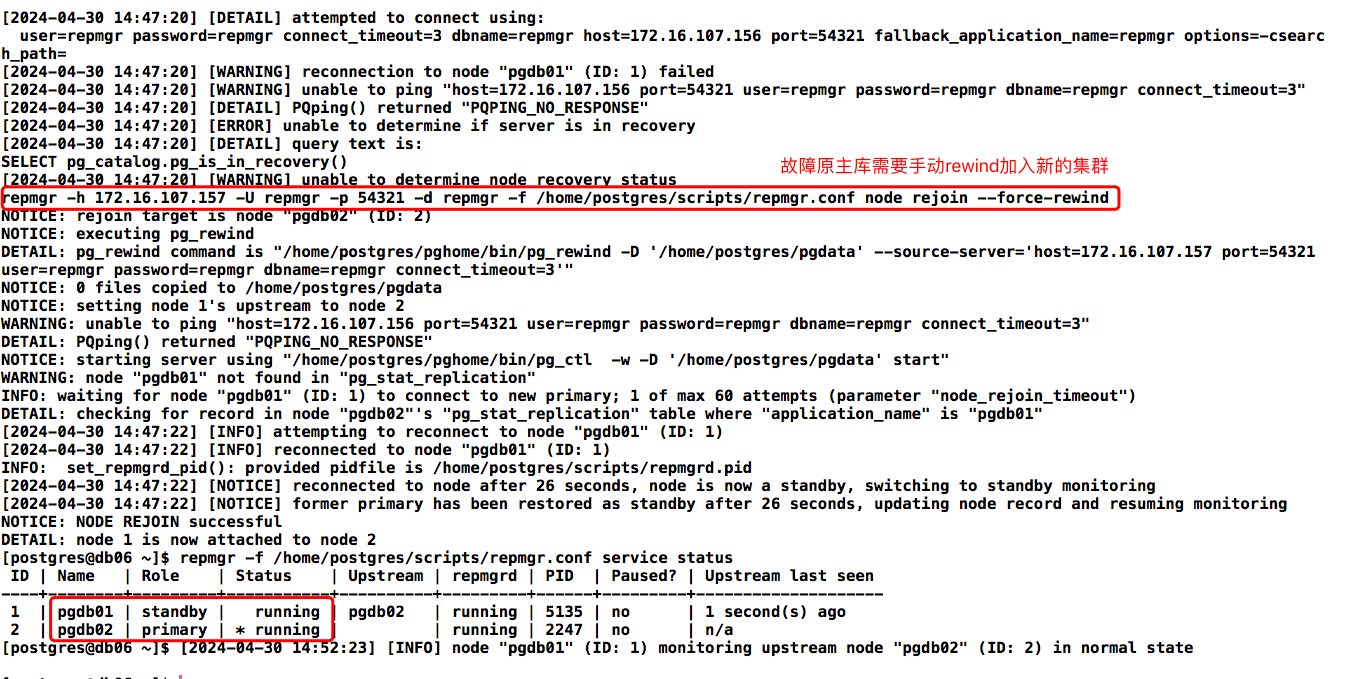
- 原主库执行rejoin操作:repmgr node rejoin -d ‘host=172.16.107.156 dbname=repmgr user=repmgr’ --force-rewind --config-files=postgresql.conf,postgresql.auto.conf --verbose
repmgr node rejoin操作,执行该命令之前先删除recovery.conf文件,并且要求数据库之前是干净的关闭,达到一个一致性状态。然后repmgr会检查数据库能否加入,如果不能的话就会使用pg_rewind进行恢复操作
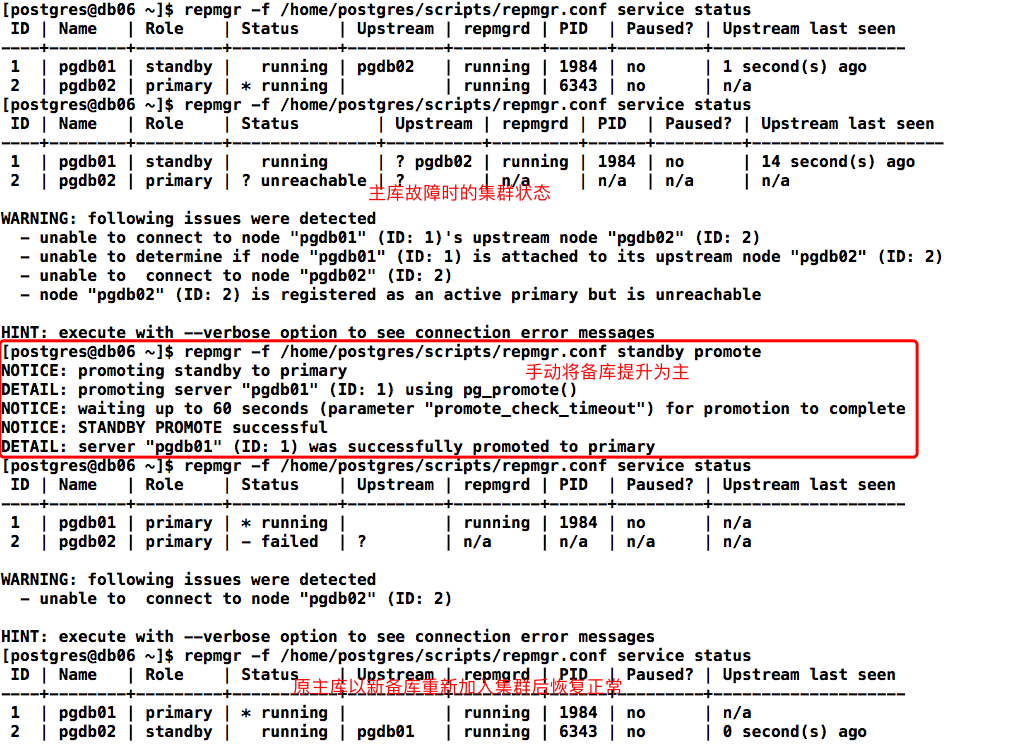
测试手动提升standby为primary
# 查看集群状态
repmgr -f /home/postgres/scripts/repmgr.conf service status
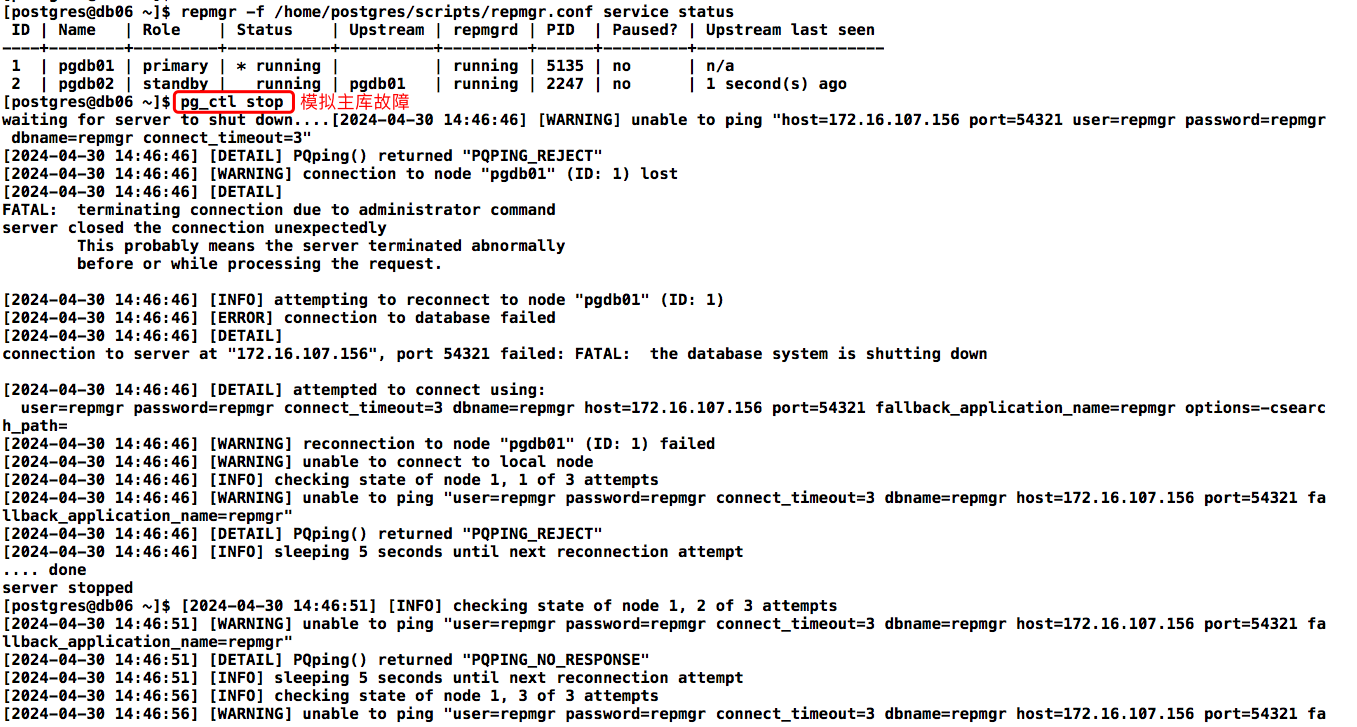
# 主库模拟故障
pg_ctl stop
# 备库手动提升为 primary 节点
repmgr -f /home/postgres/scripts/repmgr.conf standby promote
# 若有其他从库需操作重新指向新 primary
repmgr -f /home/postgres/scripts/repmgr.conf standby follow
# 原主库操作降级为standby节点
repmgr -h 172.16.107.156 -U repmgr -p 54321 -d repmgr -f /home/postgres/scripts/repmgr.conf node rejoin --force-rewind
主库模拟故障,在备库提升为主后再重新rewind加入新集群:
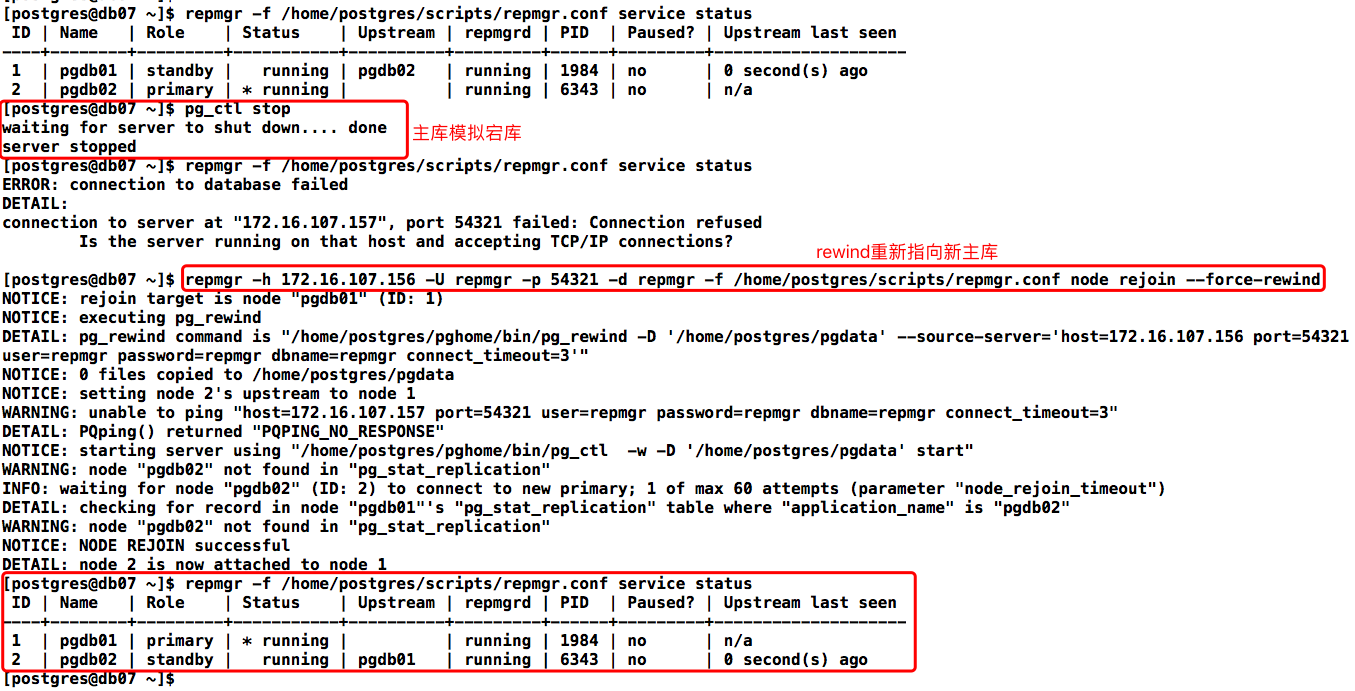
手动将备库提升为主:
配置自动切换
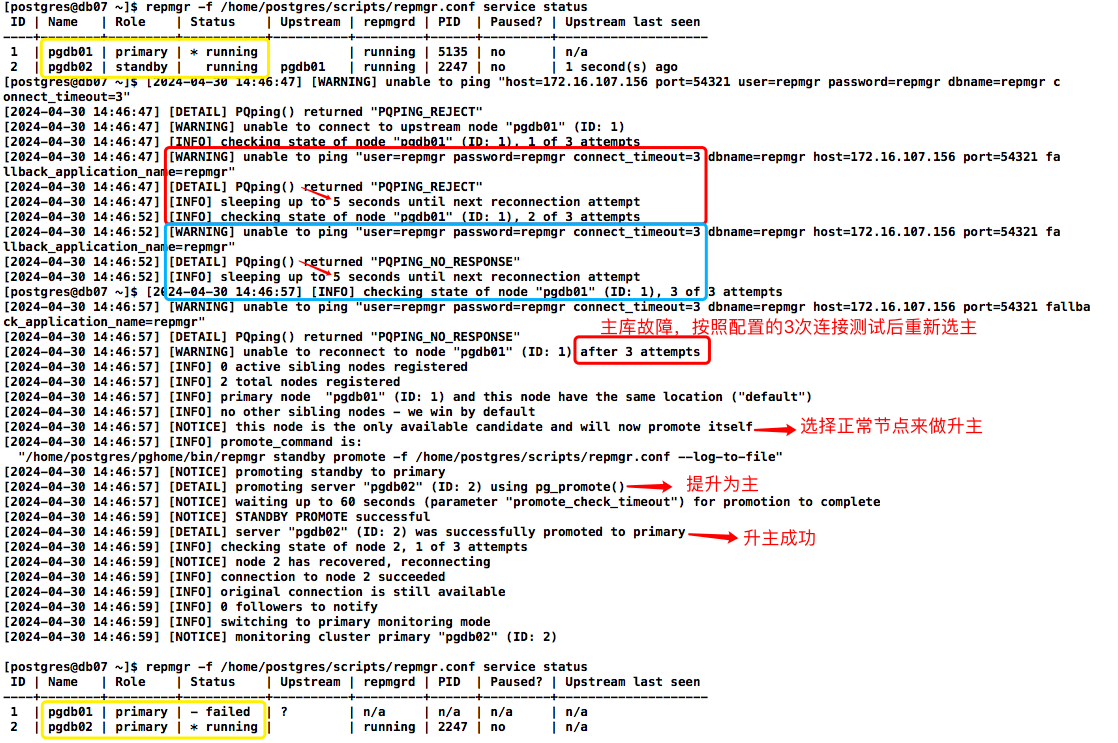
配置自动切换的检查策略:当主节点出现任何故障,将每隔reconnect_interval秒尝试reconnect_attempts次重新连接。当所有连接到主节点的尝试都失败时,Repmgrd 将通过选举选择最符合条件的备用节点作为新的主节点。
# 追加配置
vi /home/postgres/scripts/repmgr.conf

# add by autofailover
failover='automatic'
connection_check_type=ping
reconnect_attempts=3
reconnect_interval=5
promote_command='/home/postgres/pghome/bin/repmgr standby promote -f /home/postgres/scripts/repmgr.conf --log-to-file'
follow_command='/home/postgres/pghome/bin/repmgr standby follow -f /home/postgres/scripts/repmgr.conf --log-to-file --upstream-node-id=%n'

# 启动repmgrd服务(重启)
kill `cat /home/postgres/scripts/repmgrd.pid`
repmgrd -f /home/postgres/scripts/repmgr.conf -p /home/postgres/scripts/repmgrd.pid -d
自动failover测试
# 主库
pg_ctl stop
# 备库升主后原主库操作降级为standby节点
repmgr -h 172.16.107.156 -U repmgr -p 54321 -d repmgr -f /home/postgres/scripts/repmgr.conf node rejoin --force-rewind
模拟主库故障:
观察备库自动提升为主时打印的日志信息:
故障原主库需要rewind加入新集群:
维护信息查看
# 查看集群状态
repmgr -f /home/postgres/scripts/repmgr.conf cluster show
# 查看服务状态
repmgr -f /home/postgres/scripts/repmgr.conf service status
# 查看数据库节点信息
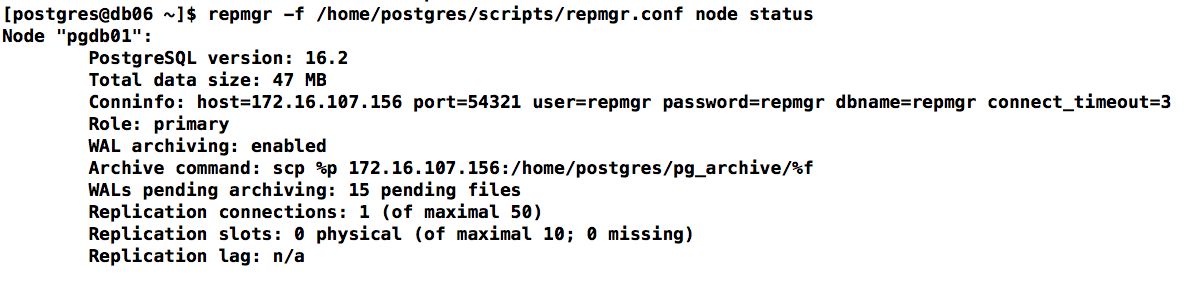
repmgr -f /home/postgres/scripts/repmgr.conf node status
# 查看repmgr管理的事件信息
repmgr -f /home/postgres/scripts/repmgr.conf cluster event --event=repmgrd_start
查询信息在库里对应的元数据表和视图:
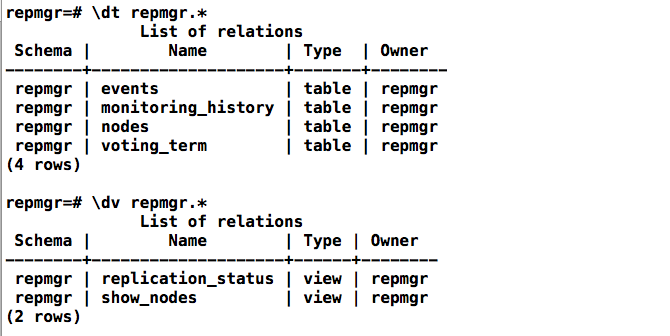
repmgr=# \dt repmgr.*
              List of relations
 Schema |        Name        | Type  | Owner
--------+--------------------+-------+--------
 repmgr | events             | table | repmgr	-- 记录repmgr管理的事件信息
 repmgr | monitoring_history | table | repmgr	-- repmgrd写入的历史备用监视信息
 repmgr | nodes              | table | repmgr	-- 集群中每个服务器的连接和状态信息
 repmgr | voting_term        | table | repmgr	-- 【5.2新增】主要用来记录投票信息
(4 rows)

repmgr=# \dv repmgr.*
              List of relations
 Schema |        Name        | Type | Owner
--------+--------------------+------+--------
 repmgr | replication_status | view | repmgr	-- 启用repmgrd监视时,显示每个备库的当前监视状态
 repmgr | show_nodes         | view | repmgr	-- 基于表repmgr.nodes,增加了显示上游节点的信息
(2 rows)
问题记录
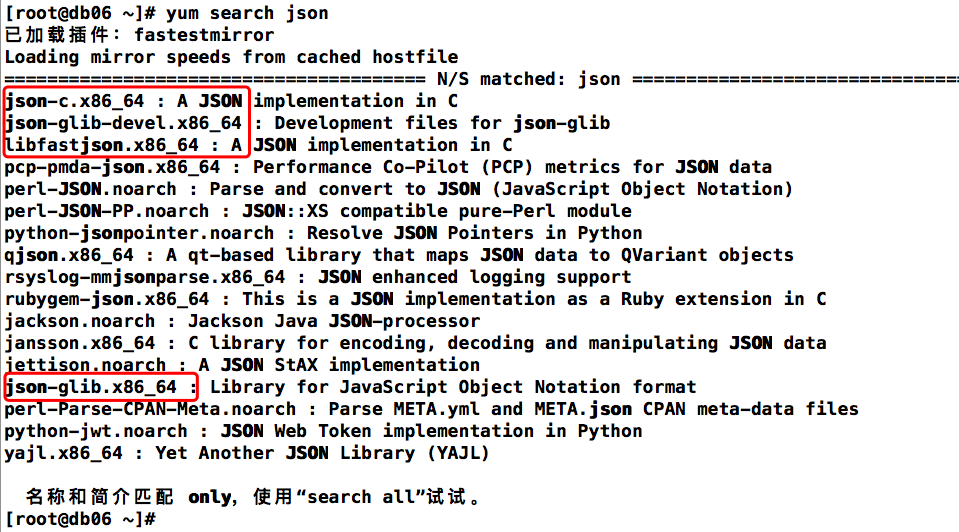
问题一:版本选择
不建议选择最新的 5.4.1 ,这个版本安装是会报错找不到一个依赖文件
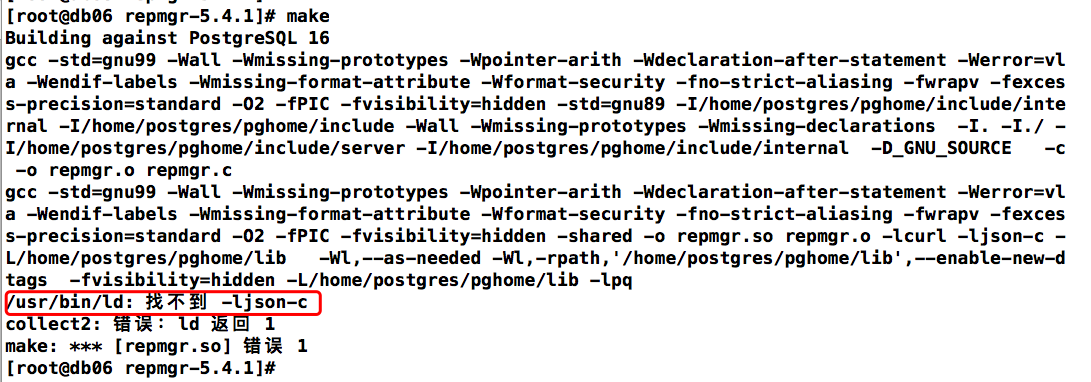
把yum源找到的几个json依赖安装了也不行,直接下载上一个版本的5.3.3编译安装没问题
问题二:repmgr编译报错
make:flex:Command not found
yum install -y flex
问题三:rewind密码认证报错
连接认证.pgpass未配置用户免密
ERROR: connection to database failed
DETAIL:
connection to server at "172.16.107.157", port 54321 failed: fe_sendauth: no password supplied

常见问题
VIP
Repmgr本身不支持虚拟IP的功能 ,我们可以借助keepalived来实现虚拟IP的功能。另外在配置文件中,也可以设置promote_command为一个自定义脚本
Repmgr如何仲裁哪台备机升主
- 每个备机检查到主机数据库故障后会进行重试,重试最后一次后,会去询问其他备用数据库。如果其它备用节点的最后一个复制的LSN或与主节点的最后一次通信的时间比当前节点的最后一个复制的LSN或最后一次通信的时间更近,则该节点不执行任何操作,并等待与主节点的通信恢复。
- 如果所有备机数据库节点都看不到主库,则它们将检查witness见证节点是否可用。如果也无法到达witness见证节点,则备机会假定主服务器端发生网络中断,因此不会继续选择新的主服务器。如果可以到达witness见证节点,则备机节点会假定主服务器已关闭,然后继续选择主节点。之后将升级配置为“首选”主节点的节点。每个备机数据库节点将重新初始化其复制,以跟随新的主数据库。
Repmgr怎么选主: 当需要failover时,repmgr选举候选备节点会以以下顺序选举:LSN > Priority > Node_ID。若LSN一样,会根据priority优先级进行比较,该优先级是在配置文件中进行参数配置,将priority设置为0会禁止参与选主。若优先级也一样,会比较节点的Node ID,小者会优先选举
Repmgr优缺点
repmgr 优点
- Repmgr 提供了帮助设置主节点和备用节点以及配置复制的实用程序。
- 不使用任何额外的端口进行通信。如果想执行切换,那么它才需要配置无密码SSH。
- 通过调用已注册事件的用户脚本来提供通知。
- 在主服务器发生故障时可以执行自动故障转移。
- 对数据库侵入小,维护起来和正常主备流复制基本一致。
- 配置简单。
repmgr 缺点
- repmgr 不会检测备用库是否在恢复配置中使用未知或不存在的节点错误配置。即使节点在未连接到主/级联备用节点的情况下运行,节点也会显示为备用节点。
- 无法从 PostgreSQL 服务关闭的节点检索另一个节点的状态。因此,它不提供分布式控制解决方案。
- 它不能在备机单个节点down掉时,自动把其拉起。
