


PostgreSQL集群部署
- 环境设置
- 环境规划
主机名称 | 主机IP | 用途 | 操作系统 | PostgreSQL版本 | Repmgr版本 |
Node1 | 192.168.4.71 | Primary | CentOS Linux 7.9 | 16.2 | 5.4.1 |
Node2 | 192.168.4.72 | Standby | CentOS Linux 7.9 | 16.2 | 5.4.1 |
Node3 | 192.168.4.73 | Standby | CentOS Linux 7.9 | 16.2 | 5.4.1 |
- 统一主机名称
vi /etc/hostname
或 hostnamectl set-hostname Node1
- 关闭SELINUX
sed -i "s/SELINUX=enforcing/SELINUX=disabled/" /etc/selinux/config
- 关闭防火墙
systemctl stop firewalld.service
systemctl disable firewalld.service
- 安装插件
yum -y install readline readline-devel zlib zlib-devel gettext gettext-devel openssl openssl-devel pam pam-devel libxml2 libxml2-devel libxslt libxslt-devel perl perl-devel tcl-devel uuid-devel gcc gcc-c++ make flex bison perl-ExtUtils* libicu libicu-devel ntp libcurl-devel json-c-devel libcurl-devel
- 编辑hosts
将主机名和 ip 解析写到/etc/hosts 文件。
cat>>/etc/hosts<<EOF
192.168.4.71 Node1
192.168.4.72 Node2
192.168.4.73 Node3
EOF
- 用户limits设置
cat>>/etc/security/limits.conf<<EOF
postgres soft nofile 1048576
postgres hard nofile 1048576
postgres soft nproc 131072
postgres hard nproc 131072
postgres soft stack 10240
postgres hard stack 32768
postgres soft core 6291456
postgres hard core 6291456
EOF
- 调整内核
--内核参数调整
cat>>/etc/sysctl.conf<<EOF
fs.file-max = 76724200
kernel.sem = 10000 10240000 10000 1024
kernel.shmmni = 4096
kernel.shmall = 253702
kernel.shmmax = 1039163392
net.ipv4.ip_local_port_range = 9000 65500
net.core.rmem_default = 262144
net.core.wmem_default = 262144
net.core.rmem_max = 4194304
net.core.wmem_max = 1048576
fs.aio-max-nr = 40960000
vm.dirty_ratio=20
vm.dirty_background_ratio=3
vm.dirty_writeback_centisecs=100
vm.dirty_expire_centisecs=500
vm.swappiness=10
vm.min_free_kbytes=524288
vm.swappiness=0
vm.overcommit_memory=2
vm.overcommit_ratio=75
net.ipv4.ip_local_port_range = 10000 65535
EOF
sysctl -p
- 时间同步
配置时间同步,开启ntp
主节点执行(172.168.4.71)
sed -i '12arestrict 192.168.4.71 nomodify notrap nopeer noquery' /etc/ntp.conf
sed -i '22,25s/^/# /' /etc/ntp.conf
sed -i '25aserver 127.127.1.0' /etc/ntp.conf
sed -i '26aFudge 127.127.1.0 stratum 10' /etc/ntp.conf
service ntpd start
Redirecting to /bin/systemctl start ntpd.service
chkconfig ntpd on
systemctl enable ntpd.service
systemctl start ntpd.service
Node2节点(192.168.4.72)
sed -i '12arestrict 192.168.1.72 nomodify notrap nopeer noquery' /etc/ntp.conf
sed -i '22,25s/^/# /' /etc/ntp.conf
sed -i '25aserver 192.168.4.71' /etc/ntp.conf
sed -i '26aFudge 192.168.4.71 stratum 10' /etc/ntp.conf
service ntpd start
chkconfig ntpd on
systemctl enable ntpd.service
systemctl start ntpd.service
Node3节点(192.168.4.73)
cp /etc/ntp.conf /etc/ntp.conf.bak
sed -i '12arestrict 192.168.4.73 nomodify notrap nopeer noquery' /etc/ntp.conf
sed -i '22,25s/^/# /' /etc/ntp.conf
sed -i '25aserver 192.168.4.71' /etc/ntp.conf
sed -i '26aFudge 192.168.4.71 stratum 10' /etc/ntp.conf
service ntpd start
chkconfig ntpd on
systemctl enable ntpd.service
systemctl start ntpd.service
- 创建用户
注:在在所有节点上创建DBA用户
groupadd postgres -g 400
useradd postgres -g 400 -u 400
echo "postgres"|passwd --stdin postgres
- 所有节点配置sudo
sed -i.bak '100apostgres ALL=(ALL) NOPASSWD:ALL' /etc/sudoers
- 配置各节点互信
su - postgres
rm -rf /home/postgres/.ssh
mkdir ~/.ssh
chmod 700 ~/.ssh
ssh-keygen -t rsa
ssh-copy-id postgres@192.168.4.71
ssh-copy-id postgres@192.168.4.72
ssh-copy-id postgres@192.168.4.73
- 系统部署
2.1、目录规划
目录编号 | 目录名称 | 备注 |
1 | postgres | postgres根目录 |
2 | /postgres/server | 软件安装目录 |
3 | /postgres/data | 数据目录 |
4 | /postgres/WAL | WAL 目录 |
5 | /postgres/archive | 归档目录 |
6 | /postgres/backup | 备份目录 |
7 | /install | 安装包上传目录 |
8 | /postgres/repmgr | 集群安装目录 |
9 | /postgres/repmgr/log | 集群日志目录 |
mkdir /install
chmod -R 777 /install
mkdir /postgres
mkdir -p /postgres/server /postgres/data /postgres/wal /postgres/archive /postgres/backup /postgres/repmgr/log
chown -R postgres:postgres /postgres /install
chmod 0775 /postgres
chmod 0700 /postgres/data
2.2、部署PostgreSQL(三台主机Node1、Node2、Node3都要部署)
su postgres
cd /install
wget https://ftp.postgresql.org/pub/source/v16.2/postgresql-16.2.tar.gz
tar -zxvf postgresql-16.2.tar.gz
cd /install/postgresql-16.2
./configure --prefix=/postgres/server --with-pgport=5432
使用 make 或者 make world
$ make world
使用 make install 或者 make install-world 进行安装
$ make install-world #包含扩展包和文档
2.3、设置软链接
su root
mkdir /postgresql
chmod -R 777 /postgresql
chown -R postgres:postgres /postgresql
cd /postgres
ln -s /postgres/server /postgresql
2.4、设置环境变量
vi /home/postgres/.bashrc
export PGPORT=5432
export PGUSER=postgres
export PGHOME=/postgres/server
export PGDATA=/postgres/data
export PATH=$PGHOME/bin:$PATH
source /home/postgres/.bashrc
2.5、初始化数据库
说明:只初始化主库,备库不需初始化
/postgresql/server/bin/initdb -D/postgres/data -X/postgres/wal -EUTF8 -Upostgres -W
2.6、设置开机自启
PostgreSQL的开机自启动脚本位于PostgreSQL源码目录的contrib/start-scripts路径下
这个路径是安装包解压完的路径。
linux文件即为linux系统上的启动脚本
1)修改linux文件属性,添加X属性
exit
切换到root用户
cd /install/postgresql-16.2/contrib/start-scripts
切换到解压目录下
chmod a+x linux
2) 复制linux文件到/etc/init.d目录下,更名为PostgreSQL
cp linux /etc/init.d/PostgreSQL
3)修改/etc/init.d/PostgreSQL文件的两个变量
vi /etc/init.d/PostgreSQL
prefix设置为PostgreSQL的安装路径:prefix=/postgres/server
PGDATA设置为PostgreSQL的数据目录路径:PGDATA="/postgres/data"
4) 执行service PostgreSQL start,就可以启动PostgreSQL服务
service PostgreSQL start
5)设置PostgreSQL服务开机自启动
chkconfig --add PostgreSQL
执行上面的命令,就可以实现PostgreSQL服务的开机自启动。
Reboot
2.7、设置postgresql.conf
vi $PGDATA/postgresql.conf
#主机IP
listen_addresses = '*'
#最大并发连接数
max_wal_senders = 10
#主机支持的最大复制槽数量
max_replication_slots = 10
#决定多少数据写入WAL
wal_level = hot_standby
#当备用服务器上的hot_standby参数设置为 true 时,一旦恢复使系统达到一致状态,它将开始接受连接。所有此类连接都是严格只读的;甚至临时表也不能写入。
hot_standby = on
#在检查点后第一次修改该页面时,服务器将每个磁盘页面的全部内容写入WAL,即使是所谓的提示位的非关键修改。
wal_log_hints = on
#在检查点之后第一次修改该页面时,服务器将每个磁盘页面的全部内容写入WAL
full_page_writes=on
#该变量指定在服务器启动时预加载的一个或多个共享库
shared_preload_libraries = 'repmgr'
#开启归档
archive_mode = on
#归档文件存放路径
archive_command = 'test ! -f /postgres/archive/%f && cp %p /postgres/archive/%f'
说明:wal_level 的值有:
- mininal:只写入从崩溃到立即关机恢复所需要的信息。
- archive:写入CREATE TABLE、CREATE INDEX、CLUSTER、COPY
- hot_standby:日志记录的信息和archive相同,外加从WAL重建运行事务状态所需的信息。
- logical:与hot_standby相同的信息会被记录,外加上允许从WAL抽取逻辑修改集所需的信息,使用logical会增加WAL容量,特别是如果为了REPLICA IDENTITY FULL配置了很多表并且执行了很多UPDATE和DELETE语句时。
2.8、配置pg_hba.conf
vi $PGDATA/pg_hba.conf
host replication all 0.0.0.0/0 scram-sha-256
host repmgr repmgr 192.168.4.71/24 scram-sha-256
host repmgr repmgr 192.168.4.72/24 scram-sha-256
host repmgr repmgr 192.168.4.73/24 scram-sha-256
2.9、部署Repmgr(三台主机Node1、Node2、Node3都要部署)
cd /install
wget -c https://repmgr.org/download/repmgr-5.4.1.tar.gz
tar -zxvf repmgr-5.4.1.tar.gz
cd /install/repmgr-5.4.1
./configure && make install
2.10、配置repmgr.conf(3个节点Node1、Node2、Node3都要配置)
Node1节点:
vi /postgres/repmgr/repmgr.conf
#repmgr基本配置信息
node_id=1
node_name='Node1'
conninfo='host=192.168.4.71 port=5432 dbname=repmgr user=repmgr password=repmgr'
priority=3
reconnect_attempts=6
reconnect_interval=10
data_directory='/postgres/data'
#可执行文件配置
pg_bindir='/postgres/server/bin'
config_directory='/postgres/data'
#repmgr日志配置
log_level=INFO
log_facility=STDERR
log_file='/postgres/repmgr/log/repmgr.log'
Node2节点:
vi /postgres/repmgr/repmgr.conf
#repmgr基本配置信息
node_id=2
node_name='Node2'
conninfo='host=192.168.4.72 port=5432 dbname=repmgr user=repmgr password=repmgr'
priority=2
reconnect_attempts=6
reconnect_interval=10
data_directory='/postgres/data'
#可执行文件配置
pg_bindir='/postgres/server/bin'
config_directory='/postgres/data'
#repmgr日志配置
log_level=INFO
log_facility=STDERR
log_file='/postgres/repmgr/log/repmgr.log'
Node3节点:
vi /postgres/repmgr/repmgr.conf
#repmgr基本配置信息
node_id=3
node_name='Node3'
conninfo='host=192.168.4.73 port=5432 dbname=repmgr user=repmgr password=repmgr'
priority=1
reconnect_attempts=6
reconnect_interval=10
data_directory='/postgres/data'
#可执行文件配置
pg_bindir='/postgres/server/bin'
config_directory='/postgres/data'
#repmgr日志配置
log_level=INFO
log_facility=STDERR
log_file='/postgres/repmgr/log/repmgr.log'
2.11、节点注册
2.11.1、在Node1登录psql,创建集群管理用户repmgr,数据库repmgr
create user repmgr with superuser password 'repmgr' connection limit 10;
create database repmgr owner repmgr;
2.11.2、注册Primary主库(在Node1节点执行)
/postgres/server/bin/repmgr -f /postgres/repmgr/repmgr.conf primary register
2.11.4、注册Standby主库(在Node2节点执行)
pg_ctl stop
cp -r /postgres/data/* /postgres/backup
Rm -r /postgres/data
--检查是否可以注册备节点
/postgres/server/bin/repmgr -h 192.168.4.71 -p5432 -U repmgr -d repmgr -f /postgres/repmgr/repmgr.conf standby clone --dry-run
--注意备库repmgr.conf文件中的目录要为空
/postgres/server/bin/repmgr -h 192.168.4.71 -p5432 -U repmgr -d repmgr -f /postgres/repmgr/repmgr.conf standby clone --force
--注册备库1
/postgres/server/bin/repmgr -f /postgres/repmgr/repmgr.conf standby register
2.11.4、注册Standby主库(在Node3节点执行)
pg_ctl stop
cp -r /postgres/data/* /postgres/backup
Rm -r /postgres/data
--检查是否可以注册备节点
/postgres/server/bin/repmgr -h 192.168.4.71 -p5432 -U repmgr -d repmgr -f /postgres/repmgr/repmgr.conf standby clone --dry-run
--注意备库repmgr.conf文件中的目录要为空
/postgres/server/bin/repmgr -h 192.168.4.71 -p5432 -U repmgr -d repmgr -f /postgres/repmgr/repmgr.conf standby clone --force
--注册备库2
/postgres/server/bin/repmgr -f /postgres/repmgr/repmgr.conf standby register
3、集群监控
监控各节点运行状况方式一:
/postgres/server/bin/repmgr -f /postgres/repmgr/repmgr.conf cluster show

监控各节点运行状况方式二:
select * from nodes;
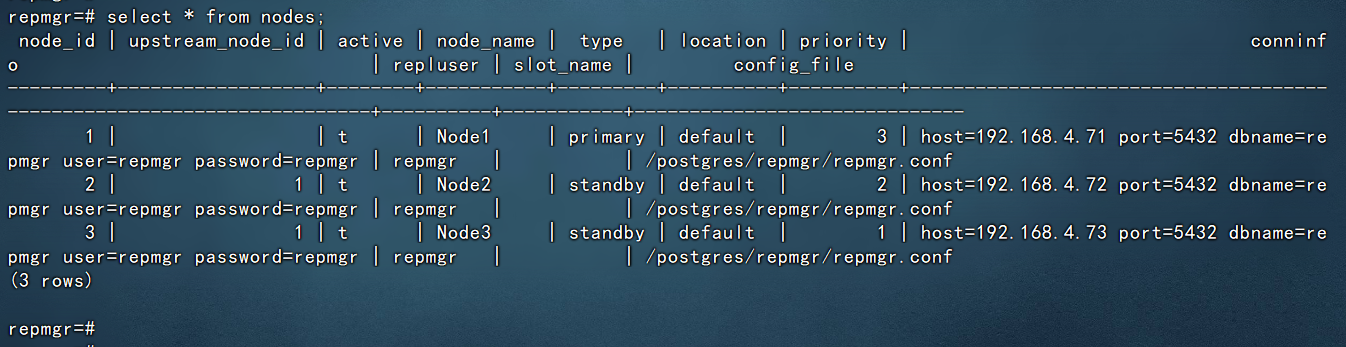
PostgreSQL16.2+Repmgr5.4.1集群部署到此完成,接下来就可以进行使用操作了。
