


环境说明
| 主机名 | ip地址 | OS版本 | 内存、CPU | 节点角色 | 数据库端口 | cmserver端口 |
|---|---|---|---|---|---|---|
| node1 | 192.168.100.10 | Centos7.9 | 4G 、 1个双核 | 主节点 | 17700 | 18800 |
| node2 | 192.168.100.12 | Centos7.9 | 4G 、 1个双核 | 从节点 | 17700 | 18800 |
| node3 | 192.168.100.14 | Centos7.9 | 4G 、 1个双核 | 从节点 | 17700 | 18800 |
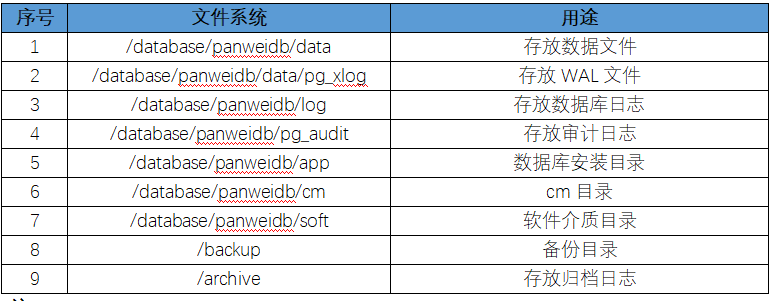
目录规划
安装要求
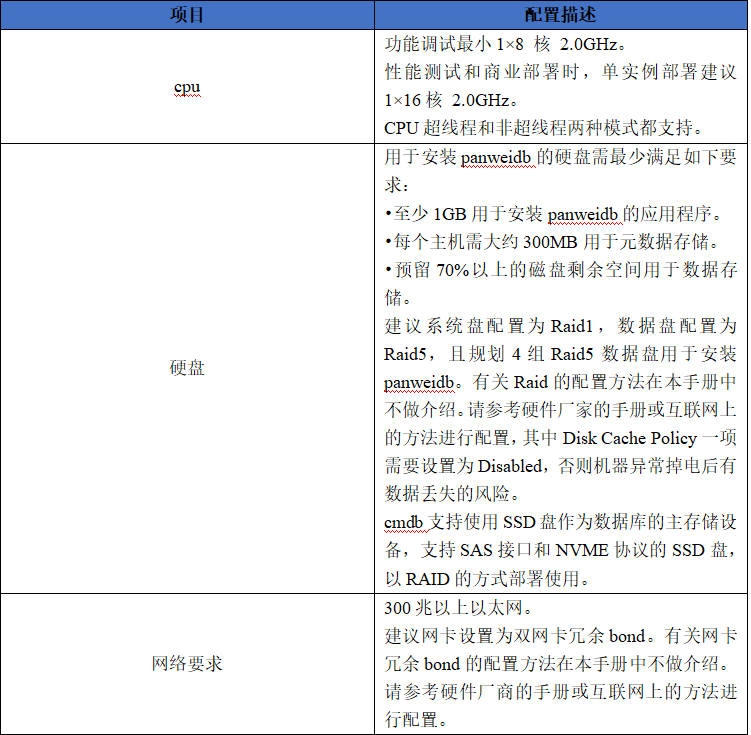
硬件环境要求
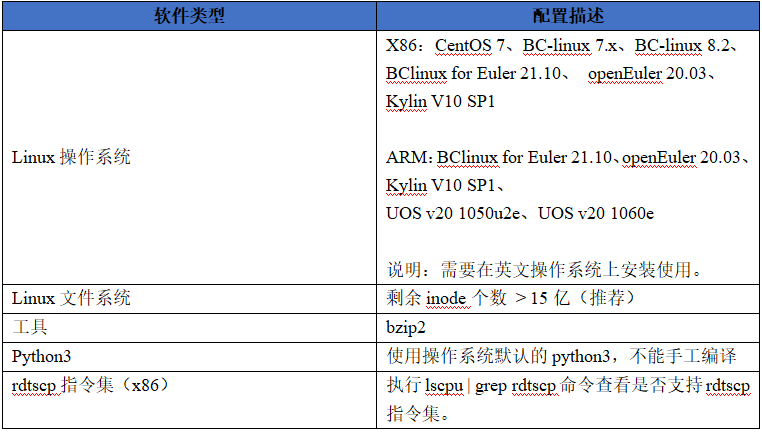
软件环境要求
安装包准备
os环境是centos7.9,使用下面的安装包部署:
PanWeiDB-2.0.0_Build0(9fbca90)-centos_7-x86_64-no_mot.tar.gz
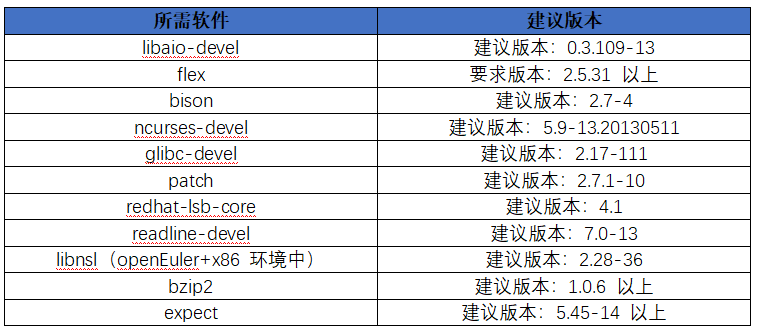
软件依赖要求
安装步骤
(一)配置操作系统
注意:以下步骤中除了第18、19、20步只需在主节点执行外,其他操作都需要在所有节点执行。
1.检查软件依赖
rpm -q libaio-devel flex bison ncurses-devel glibc-devel patch redhat-lsb-core readline-devel bzip2 expect python3
2.安装软件依赖包
yum -y install libaio-devel flex bison ncurses-devel glibc-devel patch readline-devel python3 expect* bzip2 libnsl gcc gcc-c++ zlib-devel expect
3.检查root权限是否禁止登录
注意事项:检查三台主机的 sshd_config 文件内 PermitRootLogin 是否为 yes,如果不是,需要修改为 yes,并重启 sshd 服务
cat /etc/ssh/sshd_config | grep PermitRootLogin
PermitRootLogin yes
vi /etc/ssh/sshd_config

# 重启sshd服务
systemctl restart sshd
4.关闭SELINUX
vi /etc/selinux/config
修改SELINUX=disabled
或者
sed -i ‘s/^SELINUX=enforcing/SELINUX=disabled/g’ /etc/selinux/config
5.关闭防火墙
systemctl disable firewalld.service
systemctl stop firewalld.service
systemctl status firewalld
6.设置字符集
# 查看字符集
echo $LANG
# 设置字符集
export LANG=en_US.UTF-8
7.设置时区和时间
略
8.关闭 swap 交换
swapoff -a
9.设置网卡MTU值
当网卡的speed 超过 20000Mb/s(万兆)时(不包含20000Mb/s),可设置mtu参数,其他情况下可以跳过此步骤。
10.关闭THP
#检查THP开启情况
cat /sys/kernel/mm/transparent_hugepage/enabled
always madvise [never]

##关闭THP
echo never > /sys/kernel/mm/transparent_hugepage/enabled
## 设置重启后自动关闭
chmod +x /etc/rc.d/rc.local
systemctl enable rc-local.service

cat >> /etc/rc.d/rc.local <<EOF
swapoff -a
if test -f /sys/kernel/mm/transparent_hugepage/enabled;
then
   echo never > /sys/kernel/mm/transparent_hugepage/enabled
fi
if test -f /sys/kernel/mm/transparent_hugepage/defrag;
then
  echo never > /sys/kernel/mm/transparent_hugepage/defrag
fi
EOF
11.关闭RemoveIPC
在各数据库节点上,关闭RemoveIPC。CentOS操作系统默认为关闭,可以跳过该步骤。
 (1) 修改/etc/systemd/logind.conf文件中的“RemoveIPC”值为“no”
vim  /etc/systemd/logind.conf
RemoveIPC=no

(2) 修改/usr/lib/systemd/system/systemd-logind.service文件中的“RemoveIPC”值为“no”
vim /usr/lib/systemd/system/systemd-logind.service
RemoveIPC=no

(3) 重启服务
systemctl daemon-reload
systemctl restart systemd-logind.service

(4) 结果验证确认
loginctl show-session | grep RemoveIPC
systemctl show systemd-logind | grep RemoveIPC
12.内核参数优化
vi /etc/sysctl.conf

# panweidb
net.ipv4.tcp_max_tw_buckets = 10000
net.ipv4.tcp_tw_reuse = 1
net.ipv4.tcp_keepalive_time = 30
net.ipv4.tcp_keepalive_probes = 9
net.ipv4.tcp_keepalive_intvl = 30
net.ipv4.tcp_retries1 = 5
net.ipv4.tcp_syn_retries = 5
net.ipv4.tcp_synack_retries = 5
net.ipv4.tcp_retries2 = 12
vm.overcommit_memory = 0
net.ipv4.tcp_rmem = 8192 250000 16777216
net.ipv4.tcp_wmem = 8192 250000 16777216
net.core.wmem_max = 21299200
net.core.rmem_max = 21299200
net.core.wmem_default = 21299200
net.core.rmem_default = 21299200
net.ipv4.ip_local_port_range = 26000 65535
kernel.sem = 250 6400000 1000 25600
net.core.somaxconn = 65535
net.ipv4.tcp_syncookies = 1
net.core.netdev_max_backlog = 65535
net.ipv4.tcp_max_syn_backlog = 65535
net.ipv4.tcp_fin_timeout = 60
kernel.shmall = 1073741824
kernel.shmmax = 751619276800
net.ipv4.tcp_sack = 1
net.ipv4.tcp_timestamps = 1
vm.extfrag_threshold = 500
vm.overcommit_ratio = 90
vm.swappiness = 0

# 生效
sysctl -p
13.配置资源限制
vi /etc/security/90-nproc.conf
或者
vi /etc/security/limits.conf

# panweidb
* soft nofile 1000000
* hard nofile 1000000
* soft nproc 655360
* hard nproc 655360
* soft memlock unlimited
* hard memlock unlimited
* soft core unlimited
* hard core unlimited
* soft stack unlimited
* hard stack unlimited
14.检查python3
检查 python3 版本,如果为 Python 3.6或3.7则满足要求,如果不满足则需重新yum安装
python3 --version
15.配置/etc/hosts文件
vi /etc/hosts

192.168.100.10 node1
192.168.100.12 node2
192.168.100.14 node3
16.创建用户及用户组
groupadd -g 1101 dbgrp
useradd -g dbgrp -u 1101 -m omm
passwd omm
17、创建目录
mkdir -p /database/panweidb
mkdir -p /database/panweidb/archive
mkdir -p /database/panweidb/pg_audit
18、创建安装包目录(主节点)
--只在主节点创建
mkdir -p /database/panweidb/soft
19、上传磐维数据库软件并解压(主节点)
把软件上传到/database/panweidb/soft下。
tar -xf PanWeiDB-2.0.0_Build0\(9fbca90\)-centos_7-x86_64-no_mot.tar.gz
tar -xf PanWeiDB-2.0.0_Build0\(9fbca90\)-CentOS-64bit-om.tar.gz
20、安装目录授权(主节点)
chown -R omm:dbgrp /database/
chmod -R 755 /database/
(二)预安装磐维数据库
1.编辑panweidb1m2s.xml配置文件
vi /database/panweidb/soft/panweidb1m2s.xml

<?xml version="1.0" encoding="utf-8"?>
<ROOT>
  <CLUSTER>
    <PARAM name="clusterName" value="panweidb" />
    <PARAM name="nodeNames" value="node1,node2,node3"/>
    <PARAM name="gaussdbAppPath" value="/database/panweidb/app" />
    <PARAM name="gaussdbLogPath" value="/database/panweidb/log" />
    <PARAM name="tmpMppdbPath" value="/database/panweidb/tmp"/>
    <PARAM name="gaussdbToolPath" value="/database/panweidb/tool" />
    <PARAM name="corePath" value="/database/panweidb/corefile"/>
    <PARAM name="backIp1s" value="192.168.100.10,192.168.100.12,192.168.100.14"/>
    <PARAM name="sshPort" value="55555"/>
  </CLUSTER>

  <DEVICELIST>
    <DEVICE sn="node1">
      <PARAM name="name" value="node1"/>
      <PARAM name="azName" value="AZ1"/>
      <PARAM name="azPriority" value="1"/>
      <PARAM name="backIp1" value="192.168.100.10"/>
      <PARAM name="sshIp1" value="192.168.100.10"/>
      <PARAM name="cmsNum" value="1"/>
      <PARAM name="cmServerPortBase" value="18800"/>
      <PARAM name="cmServerListenIp1" value="192.168.100.10,192.168.100.12,192.168.100.14"/>
      <PARAM name="cmServerHaIp1" value="192.168.100.10,192.168.100.12,192.168.100.14"/>
      <PARAM name="cmServerlevel" value="1"/>
      <PARAM name="cmServerRelation" value="node1,node2,node3"/>
      <PARAM name="cmDir" value="/database/panweidb/cm"/>
      <PARAM name="dataNum" value="1"/>
      <PARAM name="dataPortBase" value="17700"/>
      <PARAM name="dataNode1" value="/database/panweidb/data,node2,/database/panweidb/data,node3,/database/panweidb/data"/>
      <PARAM name="dataNode1_syncNum" value="1"/>
    </DEVICE>

    <DEVICE sn="node2">
      <PARAM name="name" value="node2"/>
      <PARAM name="azName" value="AZ1"/>
      <PARAM name="azPriority" value="1"/>
      <PARAM name="backIp1" value="192.168.100.12"/>
      <PARAM name="sshIp1" value="192.168.100.12"/>
      <PARAM name="cmServerPortStandby" value="18800"/>
      <PARAM name="cmDir" value="/database/panweidb/cm"/>
    </DEVICE>

    <DEVICE sn="node3">
      <PARAM name="name" value="node3"/>
      <PARAM name="azName" value="AZ1"/>
      <PARAM name="azPriority" value="1"/>
      <PARAM name="backIp1" value="192.168.100.14"/>
      <PARAM name="sshIp1" value="192.168.100.14"/>
      <PARAM name="cmServerPortStandby" value="18800"/>
      <PARAM name="cmDir" value="/database/panweidb/cm"/>
    </DEVICE>
  </DEVICELIST>
</ROOT>
2.root用户在主节点预安装
cd /database/panweidb/soft/script
./gs_preinstall -U omm -G dbgrp -X /database/panweidb/soft/panweidb1m2s.xml
安装日志如下:
[root@node1 script]# ./gs_preinstall -U omm -G dbgrp -X /database/panweidb/soft/panweidb1m2s.xml
Parsing the configuration file.
Successfully parsed the configuration file.
Installing the tools on the local node.
Successfully installed the tools on the local node.
Are you sure you want to create trust for root (yes/no)?yes
Please enter password for root
Please enter password for current user[root].
Password:
Checking network information.
All nodes in the network are Normal.
Successfully checked network information.
Creating SSH trust.
Creating the local key file.
Successfully created the local key files.
Appending local ID to authorized_keys.
Successfully appended local ID to authorized_keys.
Updating the known_hosts file.
Successfully updated the known_hosts file.
Appending authorized_key on the remote node.
Successfully appended authorized_key on all remote node.
Checking common authentication file content.
Successfully checked common authentication content.
Distributing SSH trust file to all node.
Distributing trust keys file to all node successfully.
Successfully distributed SSH trust file to all node.
Verifying SSH trust on all hosts.
Verifying SSH trust on all hosts by ip.
Successfully verified SSH trust on all hosts by ip.
Verifying SSH trust on all hosts by hostname.
Successfully verified SSH trust on all hosts.
Successfully created SSH trust.
Successfully created SSH trust for the root permission user.
Setting host ip env
Successfully set host ip env.
Distributing package.
Begin to distribute package to tool path.
Successfully distribute package to tool path.
Begin to distribute package to package path.
Successfully distribute package to package path.
Successfully distributed package.
Are you sure you want to create the user[omm] and create trust for it (yes/no)? yes
Preparing SSH service.
Successfully prepared SSH service.
Installing the tools in the cluster.
Successfully installed the tools in the cluster.
Checking hostname mapping.
Successfully checked hostname mapping.
Creating SSH trust for [omm] user.
Please enter password for current user[omm].
Password:
Checking network information.
All nodes in the network are Normal.
Successfully checked network information.
Creating SSH trust.
Creating the local key file.
Successfully created the local key files.
Appending local ID to authorized_keys.
Successfully appended local ID to authorized_keys.
Updating the known_hosts file.
Successfully updated the known_hosts file.
Appending authorized_key on the remote node.
Successfully appended authorized_key on all remote node.
Checking common authentication file content.
Successfully checked common authentication content.
Distributing SSH trust file to all node.
Distributing trust keys file to all node successfully.
Successfully distributed SSH trust file to all node.
Verifying SSH trust on all hosts.
Verifying SSH trust on all hosts by ip.
Successfully verified SSH trust on all hosts by ip.
Successfully verified SSH trust on all hosts.
Successfully created SSH trust.
Successfully created SSH trust for [omm] user.
Checking OS software.
Successfully check os software.
Checking OS version.
Successfully checked OS version.
Creating cluster’s path.
Successfully created cluster’s path.
Set and check OS parameter.
Setting OS parameters.
Successfully set OS parameters.
Warning: Installation environment contains some warning messages.
Please get more details by “/database/panweidb/soft/script/gs_checkos -i A -h node1,node2,node3 --detail”.
Set and check OS parameter completed.
Preparing CRON service.
Successfully prepared CRON service.
Setting user environmental variables.
Successfully set user environmental variables.
Setting the dynamic link library.
Successfully set the dynamic link library.
Setting Core file
Successfully set core path.
Setting pssh path
Successfully set pssh path.
Setting Cgroup.
Successfully set Cgroup.
Set ARM Optimization.
No need to set ARM Optimization.
Fixing server package owner.
Setting finish flag.
Successfully set finish flag.
Preinstallation succeeded.
(三)正式安装磐维数据库
1.安装目录授权(主节点)
chown -R omm:dbgrp /database/
chmod -R 755 /database/
2.omm用户安装(主节点)
su - omm
gs_install -X /database/panweidb/soft/panweidb1m2s.xml \
--gsinit-parameter="--encoding=UTF8" \
--gsinit-parameter="--lc-collate=C" \
--gsinit-parameter="--lc-ctype=C" \
--gsinit-parameter="--dbcompatibility=B"
安装日志如下:
[omm@node1 ~]$ gs_install -X /database/panweidb/soft/panweidb1m2s.xml \
–gsinit-parameter="–encoding=UTF8"
–gsinit-parameter="–lc-collate=C"
–gsinit-parameter="–lc-ctype=C"
–gsinit-parameter="–dbcompatibility=B"
Parsing the configuration file.
Successfully checked gs_uninstall on every node.
Check preinstall on every node.
Successfully checked preinstall on every node.
Creating the backup directory.
Successfully created the backup directory.
begin deploy…
Installing the cluster.
begin prepare Install Cluster…
Checking the installation environment on all nodes.
begin install Cluster…
Installing applications on all nodes.
Successfully installed APP.
begin init Instance…
encrypt cipher and rand files for database.
Please enter password for database:
Please repeat for database:
begin to create CA cert files
The sslcert will be generated in /database/panweidb/app/share/sslcert/om
Create CA files for cm beginning.
Create CA files on directory [/database/panweidb/app_9fbca90/share/sslcert/cm]. file list: [‘cacert.pem’, ‘server.key’, ‘server.crt’, ‘client.key’, ‘client.crt’, ‘server.key.cipher’, ‘server.key.rand’, ‘client.key.cipher’, ‘client.key.rand’]
Non-dss_ssl_enable, no need to create CA for DSS
Cluster installation is completed.
Configuring.
Deleting instances from all nodes.
Successfully deleted instances from all nodes.
Checking node configuration on all nodes.
Initializing instances on all nodes.
Updating instance configuration on all nodes.
Check consistence of memCheck and coresCheck on database nodes.
Successful check consistence of memCheck and coresCheck on all nodes.
Warning: The license file does not exist, so there is no need to copy it to the home directory.
Configuring pg_hba on all nodes.
Configuration is completed.
Starting cluster.
======================================================================
Successfully started primary instance. Wait for standby instance.
======================================================================
.
Successfully started cluster.
======================================================================
cluster_state : Normal
redistributing : No
node_count : 3
Datanode State
primary : 1
standby : 2
secondary : 0
cascade_standby : 0
building : 0
abnormal : 0
down : 0
Successfully installed application.
end deploy…
3.查看集群状态
[omm@node1 ~]$ gs_om -t status --detail
[  CMServer State   ]

node     node_ip         instance                             state
---------------------------------------------------------------------
1  node1 192.168.100.10  1    /database/panweidb/cm/cm_server Primary
2  node2 192.168.100.12  2    /database/panweidb/cm/cm_server Standby
3  node3 192.168.100.14  3    /database/panweidb/cm/cm_server Standby

[   Cluster State   ]

cluster_state   : Normal
redistributing  : No
balanced        : No
current_az      : AZ_ALL

[  Datanode State   ]

node     node_ip         instance                     state
-----------------------------------------------------------------------
1  node1 192.168.100.10  6001 /database/panweidb/data P Standby Normal
2  node2 192.168.100.12  6002 /database/panweidb/data S Primary Normal
3  node3 192.168.100.14  6003 /database/panweidb/data S Standby Normal
