


HA体系结构
1、Pacemaker体系结构
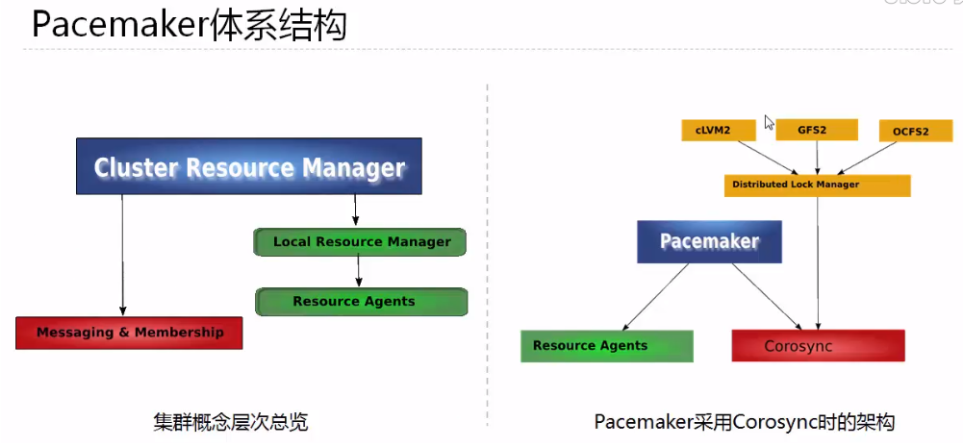
群集的组成:
1 基本的消息层
2 资源管理层
3 为群集提供一些功能,节点的并发读写和锁的管理
红帽高可用性附加组件配置使用 Pacemaker 集群资源管理器的高可用性集群。此标题提供了熟悉 Pacemaker 集群配置的流程,以及配置主动/主动和主动/被动集群的示例流程。
官网:
2、Pacemaker 内部组件

四个关键组件:
1 CIB(群集信息基础)xml 文件,信息在群集之间同步
2 CRMd(群集资源管理守护进程)通过选举一个DC,是一个指定的协调者
3 PEngine(PE or 策略引擎)
4 STONITH dshoot-the-other-node-in-the-head
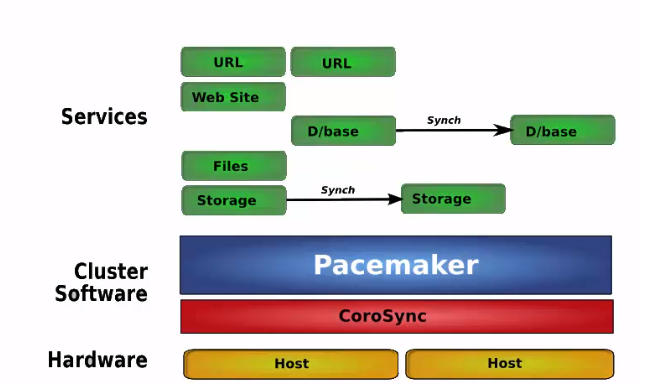
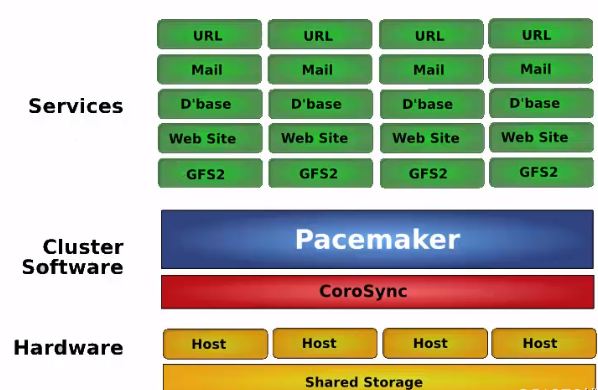
corosync
corosync 位于高可用集群结构中的底层,为各个节点(node)之间提供心跳信息传递这样一个角色
心跳: 就是讲多台服务器用网络连接起来,而后每一台服务器都不停的将自己依然在线的信息使用很简短很小的通告给同一网络中的其他主机,告诉他们自己依然在线,其他服务器收到这个心跳信息就认为它是在线的,尤其是主服务器
fencing agent
隔离引擎
集群通常需要使用fencing agent
fencing 是在一个节点不稳定或者无答复时将其关闭,使得他不会损坏集群的其他资源,其主要用途是消除脑裂,常见的fencing agent 类型power 类型的agent会将节点的电源断电,他通常链接到物理设备比如UPS
storage类型的agent会确保某个时刻只有一个节点会读写共享的存储
resource agent
RA 是管理一个集群资源的可执行程序,没有固定其实现的编程语言,但大部分RA 都是使用shell 脚本实现的
pacemaker 使用RA来和收管理资源进行交互,它即支持它自身实现的70多个RA,也支持第三方RA
要实现一个RA, 需要遵循OCF 规范
pacemaker 支持三种类型的RA:
LSB resource agents
OCF resource agents
legacy heartbeat resource agents
RA 支持的主要操作包括:
start 、 stop 、monitor、validate-all、meta-data...
pcs resource agnet 查看相关的agent
STONITH
stonith 是“shoot the other node in the head ” 的首字母简写他是heartbeat 软件包的一个组件它允许使用一个远程或“智能的”链接到健康服务器的电源设备自动重启失效负无穷的电源stonith 设备可以关闭电源并相应软件命令,运行heartbeat的服务器可以通过串口线或网线向stonith设备发送命令,他控制高可用服务器对其他服务器的电力供应,主服务器可以复位备用服务器的电源,备用服务器也可以复位主服务的电源
高可用架构概述:
1 active/passive
只有当主节点故障时,备用节点才会启用
2 shared failover

最后一个设备作为前面几台服务器的备用服务器节点
3 N to N redundancy
主机规划
主机名 | IP地址 | VIP | 系统版本 |
Node1 | 172.16.100.132 | 172.16.100.222 | Redhat8.4 |
Node2 | 172.16.100.133 | Redhat8.4 |
组件规划
pcs+pacemaker+corosyn
基础环境配置
修改主机名(两台机器上操作)
[root@node1 root1]#hostnamectlset-hostname node1
[root@node2 root1]#hostnamectlset-hostname node2
- 配置IP地址(两台机器上操作)
[root@node1 root1]#nmclicon modify eno1 ipv4.method manual ipv4.address 172.16.100.132/24 ipv4.gateway172.16.100.1
[root@node2 root1]#nmclicon modify eno1 ipv4.method manual ipv4.address 172.16.100.133/24 ipv4.gateway172.16.100.1
- 设置自动连接(两台机器上操作)
[root@node1 root1]#nmclicon modify eno1 connection.autoconnect yes
[root@node2 root1]#nmclicon modify eno1 connection.autoconnect yes
- 配置hosts文件
Node1
[root@node1 root1]# vi /etc/hosts
127.0.0.1 localhost localhost.localdomain localhost4 localhost4.localdomain4
::1 localhost localhost.localdomain localhost6 localhost6.localdomain6
172.16.100.132 node1
172.16.100.133 node2
Node2
[root@node2 root1]# vi /etc/hosts
127.0.0.1 localhost localhost.localdomain localhost4 localhost4.localdomain4
::1 localhost localhost.localdomain localhost6 localhost6.localdomain6
172.16.100.132 node1
172.16.100.133 node2
- 关闭防火墙(两台机器上操作)
Node1
[root@node1 root1]##systemctl disable firewalld
[root@node1 root1]##systemctl stop firewalld
Node2
[root@node2 root1]##systemctl disable firewalld
[root@node2 root1]##systemctl stop firewalld
- 关闭SElinux(两台机器上操作)
Node1
[root@node1 root1]##setenforce0
[root@node1 root1]##vim/etc/selinux/config
# This file controls the state of SELinux on the system.
# SELINUX= can take one of these three values:
# enforcing - SELinux security policy is enforced.
# permissive - SELinux prints warnings instead of enforcing.
# disabled - No SELinux policy is loaded.
SELINUX=disabled
# SELINUXTYPE= can take one of these three values:
# targeted - Targeted processes are protected,
# minimum - Modification of targeted policy. Only selected processes are protected.
# mls - Multi Level Security protection.
SELINUXTYPE=targeted
Node2
[root@node2 root1]##setenforce0
[root@node2 root1]##vim/etc/selinux/config
# This file controls the state of SELinux on the system.
# SELINUX= can take one of these three values:
# enforcing - SELinux security policy is enforced.
# permissive - SELinux prints warnings instead of enforcing.
# disabled - No SELinux policy is loaded.
SELINUX=disabled
# SELINUXTYPE= can take one of these three values:
# targeted - Targeted processes are protected,
# minimum - Modification of targeted policy. Only selected processes are protected.
# mls - Multi Level Security protection.
SELINUXTYPE=targeted
- 配置SSH互信(两台机器上操作)
Node1
[root@node1 root1]# #ssh-keygen-t rsa -P ''
[root@node1 root1]# ssh-copy-id -i /root/.ssh/id_rsa.pub root@node2
Node2
[root@node2 root1]# #ssh-keygen-t rsa -P ''
[root@node2 root1]# ssh-copy-id -i /root/.ssh/id_rsa.pub root@node1
- 配置时钟同步(两台机器上操作)
#yum-y install chrony
#systemctl enable chronyd
#systemctl start chronyd
#vim/etc/chrony.conf
serverntp.aliyun.com iburst
#systemctl restart chronyd
#chronyc sources –v
- 安装HA (HighAvailability)软件(离线安装)
- 上传离线软件包
packages.zip
- 解决软件包
[root@node1 root1]# unzip packages.zip
- 通过yum安装离线包(两台机器上操作)
[root@node1 root1]# yum localinstall packages/*.rpm
- 查看hacluster用户(两台机器上操作)
[root@node1 root1]# cat /etc/passwd|grep hacluster
hacluster:x:189:189:cluster user:/home/hacluster:/sbin/nologin
- 设置hacluster密码(两台机器上操作)
[root@node1 root1]#echo "redhat" |passwd --stdin hacluster
- 开启PCSD服务(两台机器上操作)
Node 1
[root@node1 root1]#systemctl start pcsd
[root@node1 root1]#systemctl enable pcsd
[root@node1 root1]#systemctl start pcsd.service
[root@node1 root1]#systemctl enable pcsd.service
Node 2
[root@node2 root1]#systemctl start pcsd
[root@node2 root1]#systemctl enable pcsd
[root@node2 root1]#systemctl start pcsd.service
[root@node2 root1]#systemctl enable pcsd.service
- 验证hacluster用户
[root@node1 root1]#pcs host auth node1 node2
- 创建cluster集群
[root@node1 root1]#pcs cluster setup mycluster --start node1 node2
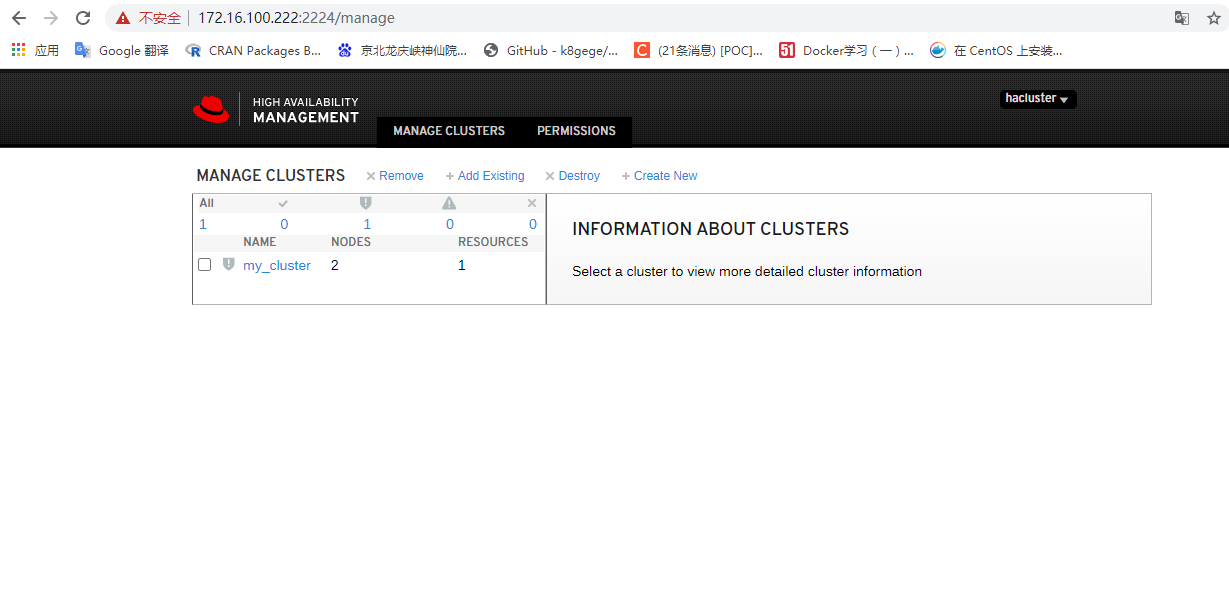
- 登陆web控制平台
https://172.16.100.132:2224 (node 节点IP)
- 添加cluster
[root@node1 root1]#pcs cluster setup -name mycluster pcs01 pcs02
- 添加VIP
[root@node1 root1]#pcs resource create VirtualIP ocf:heartbeat:IPaddr2 ip=172.16.100.222 cidr_netmask=24 op monitor interval=30s
- web登陆界面
- 添加fence设备
节点的IMM管理口 IP 、用户名、密码
A Red Hat High Availability cluster requires that you configure fencing for the cluster. The
reasons for this requirement are described in Fencing in a Red Hat High Availability Cluster. For
this introduction, however, which is intended to show only how to use the basic Pacemaker
commands, disable fencing by setting the stonith-enabled cluster option to false.
WARNING
The use of stonith-enabled=false is completely inappropriate for a
production cluster. It tells the cluster to simply pretend that failed nodes are
safely powered off.
[root@node1 root1]# pcs property set stonith-enabled=false
四、软件管理
1、资源检查
pcs status
pcs status –full
pcs status resources –full
pcs status resources arch
pcs status resources dsdb
pcs resource show
pcs resource show vip
2、配置资源优先级
pcs constraint location ora prefers pcs01=150
pcs constraint location ora prefers pcs02=50
pcs constraint location arch prefers pcs01=150
pcs constraint location arch prefers pcs02=50
pcs constraint location data prefers pcs01=150
pcs constraint location data prefers pcs02=50
pcs constraint location VIP prefers pcs01=150
pcs constraint location VIP prefers pcs02=50
pcs constraint location LVM prefers pcs01=150
pcs constraint location LVM prefers pcs02=50
pcs constraint location lsnrctl prefers pcs01=150
pcs constraint location lsnrctl prefers pcs02=50
pcs constraint location database prefers pcs01=150
pcs constraint location database prefers pcs02=50
3禁用与启用资源
pcs resource enable resource_id
pcs resource disable resource_id --关闭资源,并不再启动资源
4资源组切换
pcs resource clearup
pcs resource clear dsdb
pcs resource move dsdb
pcs resource move dsdb pcs01
pcs resource move dsdb pcs02
5其他命令
1、pcs resource move 资源名/资源组名 --把资源/资源组 移动到另一个节点
2、执行 pcs resource clear
pcs resource cleanup WebSite资源名/资源组名 --清楚此资源在此节点上的 location限制,清楚限制之后,此资源/组,才可以在一次切换到这个节点,否则这个节点不能接收资源/组了。
pcs status 查看cluster 整体状态
pcs status nodes ftp2 显示ftp2节点状态
pcs status groups ftpgroup 显示资源组状态
pcs config 显示所有配置信息
pcs resource show --full 显示所有资源信息
pcs resource show VIP 查看资源信息
fence_ipmilan -a 10.228.230.98 -l USERID -p PASSW0RD -o status 测试 fence 设备
pcs cluster stop [--all] [node] [...] 停止cluster
pcs cluster start 启动cluster
使 z1.example.com 進入 standby 模式中
# pcs cluster standby z1.example.com
使z1 從 standby 模式中退出
# pcs cluster unstandby z1.example.com
集群模块管理
模块信息如下:
pcs cluster status
如何保障pacemaker corssync以及pcsd均属于enable状态?
systemctl enable corosync pacemaker pcsd
模拟故障
监听故障
模拟监听故障,手工停止监听程序,则cluster软件(资源参数intervals)过一段时间,会自动启动监听程序。
[oracle@pcs01 trace]$ lsnrctl stop listener_dsdb <--模拟监听故障
LSNRCTL for Linux: Version 11.2.0.4.0 - Production on 09-NOV-2018 17:53:44
Copyright (c) 1991, 2013, Oracle. All rights reserved.
Connecting to (DESCRIPTION=(ADDRESS=(PROTOCOL=TCP)(HOST=10.228.110.133)(PORT=1521)))
The command completed successfully
[oracle@pcs01 trace]$ ps -ef|grep tns
root 183 2 0 11月06 ? 00:00:00 [netns]
oracle 4393 46314 0 17:53 pts/0 00:00:00 grep --color=auto tns
[oracle@pcs01 trace]$ ps -ef|grep tns
root 183 2 0 11月06 ? 00:00:00 [netns]
oracle 4468 46314 0 17:53 pts/0 00:00:00 grep --color=auto tns
[oracle@pcs01 trace]$ ps -ef|grep tns
root 183 2 0 11月06 ? 00:00:00 [netns]
oracle 4513 46314 0 17:53 pts/0 00:00:00 grep --color=auto tns
[oracle@pcs01 trace]$ ps -ef|grep tns
root 183 2 0 11月06 ? 00:00:00 [netns]
oracle 4516 46314 0 17:53 pts/0 00:00:00 grep --color=auto tns
[oracle@pcs01 trace]$ ps -ef|grep tns
root 183 2 0 11月06 ? 00:00:00 [netns]
oracle 4777 46314 0 17:53 pts/0 00:00:00 grep --color=auto tns
[oracle@pcs01 trace]$ ps -ef|grep tns ß 监听程序已经启动
root 183 2 0 11月06 ? 00:00:00 [netns]
oracle 5110 1 0 17:53 ? 00:00:00 /sjgxpt/oracle/product/11.2/db_1/bin/tnslsnr listener_dsdb -inherit
oracle 5233 46314 0 17:53 pts/0 00:00:00 grep --color=auto tns
[oracle@pcs01 trace]$ ps -ef|grep tns
root 183 2 0 11月06 ? 00:00:00 [netns]
oracle 5110 1 1 17:53 ? 00:00:00 /sjgxpt/oracle/product/11.2/db_1/bin/tnslsnr listener_dsdb -inherit
oracle 5376 46314 0 17:53 pts/0 00:00:00 grep --color=auto tns
[oracle@pcs01 trace]$
监听关闭,会重启监听。
数据库故障
ABORT方式模拟数据库宕库故障
[oracle@pcs01 ~]$ sqlplus / as sysdba
SQL*Plus: Release 11.2.0.4.0 Production on Mon Nov 12 11:43:05 2018
Copyright (c) 1982, 2013, Oracle. All rights reserved.
Connected to:
Oracle Database 11g Enterprise Edition Release 11.2.0.4.0 - 64bit Production
With the Partitioning, OLAP, Data Mining and Real Application Testing options
SQL> shutdown abort
ORACLE instance shut down.
SQL> exit
数据库alert日志如下:
Mon Nov 12 11:44:05 2018
Shutting down instance (abort)
License high water mark = 33
USER (ospid: 8659): terminating the instance
Instance terminated by USER, pid = 8659
Mon Nov 12 11:44:07 2018
Instance shutdown complete
Mon Nov 12 11:46:03 2018
Adjusting the default value of parameter parallel_max_servers
from 1280 to 970 due to the value of parameter processes (1000)
Starting ORACLE instance (normal)
************************ Large Pages Information *******************
Per process system memlock (soft) limit = 13 GB
Total Shared Global Region in Large Pages = 0 KB (0%)
Large Pages used by this instance: 0 (0 KB)
Large Pages unused system wide = 0 (0 KB)
Large Pages configured system wide = 0 (0 KB)
Large Page size = 2048 KB
RECOMMENDATION:
Total System Global Area size is 20 GB. For optimal performance,
prior to the next instance restart:
1. Increase the number of unused large pages by
at least 10241 (page size 2048 KB, total size 20 GB) system wide to
get 100% of the System Global Area allocated with large pages
2. Large pages are automatically locked into physical memory.
Increase the per process memlock (soft) limit to at least 20 GB to lock
100% System Global Area's large pages into physical memory
********************************************************************
LICENSE_MAX_SESSION = 0
LICENSE_SESSIONS_WARNING = 0
Initial number of CPU is 32
Number of processor cores in the system is 16
Number of processor sockets in the system is 4
Picked latch-free SCN scheme 3
Autotune of undo retention is turned on.
IMODE=BR
ILAT =168
LICENSE_MAX_USERS = 0
SYS auditing is disabled
NUMA system with 8 nodes detected
Oracle NUMA support not enabled
The parameter _enable_NUMA_support should be set to TRUE to enable Oracle NUMA support
Starting up:
Oracle Database 11g Enterprise Edition Release 11.2.0.4.0 - 64bit Production
With the Partitioning, OLAP, Data Mining and Real Application Testing options.
ORACLE_HOME = /sjgxpt/oracle/product/11.2/db_1
System name: Linux
Node name: pcs01
Release: 3.10.0-693.el7.x86_64
Version: #1 SMP Thu Jul 6 19:56:57 EDT 2017
Machine: x86_64
Using parameter settings in server-side spfile /sjgxpt/oracle/product/11.2/db_1/dbs/spfiledsdb.ora
System parameters with non-default values:
processes = 1000
sessions = 1536
sga_target = 20G
control_files = "/sjgxpt/oracle/data/dsdb/control01.ctl"
control_files = "/sjgxpt/oracle/data/dsdb/control02.ctl"
db_block_size = 8192
compatible = "11.2.0.4.0"
log_archive_dest_1 = "LOCATION=/sjgxpt/oracle/arch"
log_archive_format = "%t_%s_%r.dbf"
undo_tablespace = "UNDOTBS1"
remote_login_passwordfile= "EXCLUSIVE"
db_domain = ""
dispatchers = "(PROTOCOL=TCP) (SERVICE=dsdbXDB)"
local_listener = "(DESCRIPTION_LIST =
(DESCRIPTION =
(ADDRESS = (PROTOCOL = TCP)(HOST =10.228.110.133)(PORT = 1521))
(ADDRESS = (PROTOCOL = IPC)(KEY = EXTPROC1521))
)
)"
java_jit_enabled = TRUE
audit_file_dest = "/sjgxpt/oracle/product/admin/dsdb/adump"
audit_trail = "DB"
db_name = "dsdb"
open_cursors = 300
pga_aggregate_target = 12875M
diagnostic_dest = "/sjgxpt/oracle/product"
Mon Nov 12 11:46:03 2018
PMON started with pid=2, OS id=16298
Mon Nov 12 11:46:04 2018
PSP0 started with pid=3, OS id=16300
Mon Nov 12 11:46:05 2018
VKTM started with pid=4, OS id=16309 at elevated priority
VKTM running at (1)millisec precision with DBRM quantum (100)ms
Mon Nov 12 11:46:05 2018
GEN0 started with pid=5, OS id=16313
Mon Nov 12 11:46:05 2018
DIAG started with pid=6, OS id=16315
Mon Nov 12 11:46:05 2018
DBRM started with pid=7, OS id=16317
Mon Nov 12 11:46:05 2018
DIA0 started with pid=8, OS id=16319
Mon Nov 12 11:46:05 2018
MMAN started with pid=9, OS id=16321
Mon Nov 12 11:46:05 2018
DBW0 started with pid=10, OS id=16323
Mon Nov 12 11:46:05 2018
DBW1 started with pid=11, OS id=16325
Mon Nov 12 11:46:05 2018
DBW2 started with pid=12, OS id=16327
Mon Nov 12 11:46:05 2018
DBW3 started with pid=13, OS id=16329
Mon Nov 12 11:46:05 2018
LGWR started with pid=14, OS id=16331
Mon Nov 12 11:46:05 2018
CKPT started with pid=15, OS id=16333
Mon Nov 12 11:46:05 2018
SMON started with pid=16, OS id=16335
Mon Nov 12 11:46:05 2018
RECO started with pid=17, OS id=16337
Mon Nov 12 11:46:05 2018
MMON started with pid=18, OS id=16339
Mon Nov 12 11:46:05 2018
MMNL started with pid=19, OS id=16341
starting up 1 dispatcher(s) for network address '(ADDRESS=(PARTIAL=YES)(PROTOCOL=TCP))'...
starting up 1 shared server(s) ...
ORACLE_BASE not set in environment. It is recommended
that ORACLE_BASE be set in the environment
Reusing ORACLE_BASE from an earlier startup = /sjgxpt/oracle/product
Mon Nov 12 11:46:05 2018
ALTER DATABASE MOUNT
Successful mount of redo thread 1, with mount id 605261437
Database mounted in Exclusive Mode
Lost write protection disabled
Completed: ALTER DATABASE MOUNT
Mon Nov 12 11:46:09 2018
alter database open
Beginning crash recovery of 1 threads
parallel recovery started with 31 processes
Started redo scan
Completed redo scan
read 47 KB redo, 30 data blocks need recovery
Started redo application at
Thread 1: logseq 250, block 12222
Recovery of Online Redo Log: Thread 1 Group 1 Seq 250 Reading mem 0
Mem# 0: /sjgxpt/oracle/data/dsdb/redo01.log
Completed redo application of 0.02MB
Completed crash recovery at
Thread 1: logseq 250, block 12317, scn 4277695
30 data blocks read, 30 data blocks written, 47 redo k-bytes read
LGWR: STARTING ARCH PROCESSES
Mon Nov 12 11:46:10 2018
ARC0 started with pid=54, OS id=16641
ARC0: Archival started
LGWR: STARTING ARCH PROCESSES COMPLETE
ARC0: STARTING ARCH PROCESSES
Thread 1 advanced to log sequence 251 (thread open)
Mon Nov 12 11:46:10 2018
ARC1 started with pid=55, OS id=16667
Mon Nov 12 11:46:10 2018
ARC2 started with pid=56, OS id=16683
Mon Nov 12 11:46:10 2018
ARC3 started with pid=57, OS id=16697
ARC1: Archival started
ARC2: Archival started
ARC1: Becoming the 'no FAL' ARCH
ARC1: Becoming the 'no SRL' ARCH
ARC2: Becoming the heartbeat ARCH
Thread 1 opened at log sequence 251
Current log# 2 seq# 251 mem# 0: /sjgxpt/oracle/data/dsdb/redo02.log
Successful open of redo thread 1
MTTR advisory is disabled because FAST_START_MTTR_TARGET is not set
SMON: enabling cache recovery
ARC3: Archival started
ARC0: STARTING ARCH PROCESSES COMPLETE
Archived Log entry 244 added for thread 1 sequence 250 ID 0x23e8dee0 dest 1:
[16498] Successfully onlined Undo Tablespace 2.
Undo initialization finished serial:0 start:501291664 end:501291704 diff:40 (0 seconds)
Verifying file header compatibility for 11g tablespace encryption..
Verifying 11g file header compatibility for tablespace encryption completed
SMON: enabling tx recovery
Database Characterset is AL32UTF8
No Resource Manager plan active
replication_dependency_tracking turned off (no async multimaster replication found)
Starting background process QMNC
Mon Nov 12 11:46:10 2018
QMNC started with pid=58, OS id=16794
Completed: alter database open
Starting background process CJQ0
Mon Nov 12 11:46:11 2018
CJQ0 started with pid=59, OS id=16892
主机故障
主机重启方式进行模拟:
[root@pcs01 ~]# reboot
Connection to 10.228.110.126 closed by remote host.
Connection to 10.228.110.126 closed.
软件资源维护
更新psu以及jvm补丁,如果需要对oracle数据库进行维护,包括停止数据库或者监听等需要采用维护模式,避免资源重启以及切换:
进入维护模式:pcs resource unmanage resource1
解除维护模式 pcs resource manage resource1
资源状态察看pcs状态
[root@pcs01 ~]# pcs status
Cluster name: cluster1
Stack: corosync
Current DC: pcs02 (version 1.1.16-12.el7-94ff4df) - partition with quorum
Last updated: Thu May 30 10:07:00 2019
Last change: Wed Apr 3 15:40:08 2019 by hacluster via crmd on pcs01
2 nodes configured
9 resources configured
Online: [ pcs01 pcs02 ]
Full list of resources:
ibmca (stonith:fence_ipmilan): Stopped
ibmcb (stonith:fence_ipmilan): Started pcs01
Resource Group: dsdb
VIP (ocf::heartbeat:IPaddr): Started pcs01
LVM (ocf::heartbeat:LVM): Started pcs01
orahome (ocf::heartbeat:Filesystem): Started pcs01
arch (ocf::heartbeat:Filesystem): Started pcs01
data (ocf::heartbeat:Filesystem): Started pcs01
database (ocf::heartbeat:oracle): Started pcs01
lsnrctl (ocf::heartbeat:oralsnr): Started pcs01
Failed Actions:
* ibmca_start_0 on pcs02 'unknown error' (1): call=239, status=Timed Out, exitreason='none',
last-rc-change='Wed Apr 3 14:42:27 2019', queued=0ms, exec=20177ms
* ibmcb_monitor_60000 on pcs01 'unknown error' (1): call=182, status=Timed Out, exitreason='none',
last-rc-change='Wed May 29 19:30:59 2019', queued=0ms, exec=20136ms
Daemon Status:
corosync: active/enabled
pacemaker: active/enabled
pcsd: active/enabled
[root@pcs01 ~]#
将节点置为维护模式:
[oracle@pcs01 20190415psu_11.2.0.4]$ lsnrctl stop listener_dsdb
LSNRCTL for Linux: Version 11.2.0.4.0 - Production on 30-MAY-2019 10:10:11
Copyright (c) 1991, 2013, Oracle. All rights reserved.
Connecting to (DESCRIPTION=(ADDRESS=(PROTOCOL=TCP)(HOST=10.228.110.133)(PORT=1521)))
The command completed successfully
[oracle@pcs01 20190415psu_11.2.0.4]$
[oracle@pcs01 29141056]$ opatch apply
