


一、GBase 8a MPP Cluster 产品简介
南大通用大规模分布式并行数据库集群系统,简称:GBase 8a MPP Cluster,它是在 GBase 8a 列存储数据库基础上开发的一款 Shared Nothing 架构的分布式并行数据库集群,具备高性能、高可用、高扩展等特性,可以为各种规模数据管理提供高性价比的通用计算平台,并广泛用于支撑各类数据仓库系统、BI系统和决策支持系统。
GBase 8a MPP Cluster 具有联邦架构、大规模并行计算、海量数据压缩、高效存储结构、智能索引、虚拟集群及镜像、灵活的数据分布、完善的资源管理、在线快速扩展、在线节点替换、高并发、高可用性、高安全性、易维护、高效加载等技术特征。详情请参考官网的文档。
二、GBase 8a MPP Cluster 产品架构
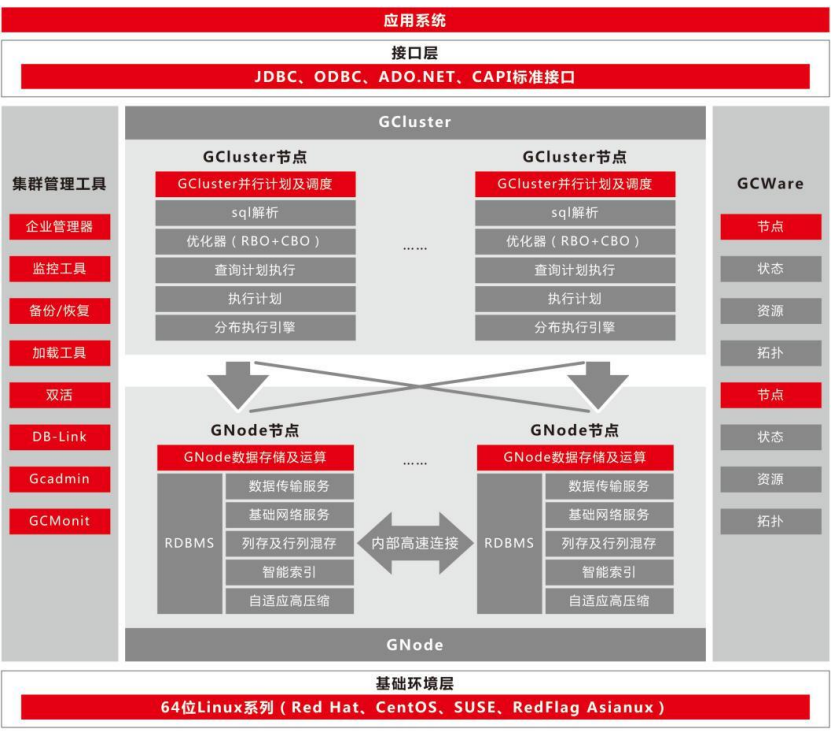
GBase 8a MPP Cluster 产品总共包含三大核心组件,分布式管理集群GCWare、分布式调度集群 GCluster 和分布式存储计算集群 GNode。
它们的功能分别为:
(1)GCluster:负责 SQL 的解析、SQL 优化、分布式执行计划生成、执行调度。
(2)GCWare: 用于各节点 GCluster 实例间共享信息(包括集群结构,节点状态,节点资源状态等信息),以及控制多副本数据操作时,提供可操作节点,控制各节点数据一致性状态。
(3)GNode:是 GBase 8a MPP Cluster 中最基本的存储和计算单元。GNode 负责集群数据在节点上的实际存储,并从 GCluster 接收和执行经分解的SQL执行计划,执行结果返回给GCluster。数据加载时,GNode 直接从集群加载服务接收数据,写入本地存储空间。采用虚拟集群部署策略时,可以按不同业务特点将不同节点进行物理隔离,形成不同的 VC。
VC(Virtual Cluster):实现单个业务的独立管理,包括 database、表等数据库对象。
Free Nodes (闲置节点):不属于任何 VC 的 GNode 节点,通常是备机或待扩容或节点替换的节点。
除了以上核心组件外,还有 GCMonit 组件,用于实时监测 GBase 8a MPP Cluster 服务程序的运行状态, 一旦发现某个服务程序的进程状态发生变化,就会根据配置文件中的内容来执行相应的服务启停脚本命令,从而保证服务程序健康运行。
三、GBase 8a MPP Cluster free 版本说明
下面是free版本的限制:
1、 规模限制
- 节点规模为 4 节点
- 每个节点的容量为 500G(总容量为 2TB)
- 集群并发数为 10(集群最大任务数 ddl、dml、Query 合计的最大并发数小于 10)
- 平台:x86+centos7、x86+centos8、arm+centos8
2、功能限制
- 不支持全文检索功能
- 不支持 GBMLLib 插件,即数据挖掘和机器学习扩展库
- 不支持 GBFS 文件服务器
四、GBase8a MPP Cluster free版本安装
1、环境说明
| 主机名 | ip地址 | OS版本 | 内存、CPU | 节点组件 |
|---|---|---|---|---|
| node1 | 192.168.100.10 | Centos8 | 4G 、 1个双核 | Gcluster、Gnode、Gcware |
| node2 | 192.168.100.12 | Centos8 | 4G 、 1个双核 | Gcluster、Gnode、Gcware |
| node3 | 192.168.100.14 | Centos8 | 4G 、 1个双核 | Gcluster、Gnode、Gcware |
2、安装准备
2.1 下载GBase8a MPP Cluster free安装介质
下载地址:https://www.gbase.cn/download/gbase-8a?category=INSTALL_PACKAGE
软件名称:GBase8a_MPP_Cluster-NoLicense-FREE-9.5.3.28.12-redhat8-x86_64.tar.bz2
软件上传位置:/opt
2.2 设置各节点软硬件环境
2.2.1 确认SSH服务开启状态
# service sshd status
# 如果sshd服务没开启,重启sshd服务
systemctl restart sshd
2.2.2 关闭SELINUX
vi /etc/selinux/config
修改SELINUX=disabled
或者
sed -i 's/^SELINUX=enforcing/SELINUX=disabled/g' /etc/selinux/config
2.2.3 关闭防火墙
systemctl disable firewalld.service
systemctl stop firewalld.service
systemctl status firewalld
2.2.4 检查端口号是否被占用
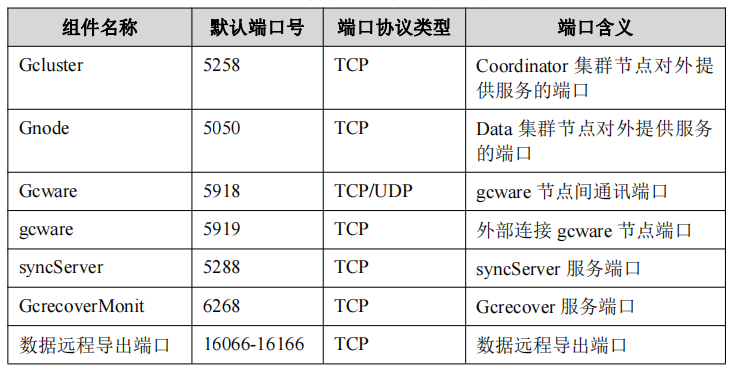
lsof -i:端口号
示例:
lsof -i:5258
2.2.5 检查透明大页和 I/O 调度参数调整
#检查透明大页开启情况
cat /sys/kernel/mm/transparent_hugepage/enabled
always madvise [never]

#方法一、使用命令行修改:
1. 修改文件/etc/default/grub
2. 找到 GRUB_CMDLINE_LINUX 这一行,在双引号内加入 elevator=deadline transparent_hugepage=never
3. 保存退出
4. 然后使用操作系统 root 用户执行 grub2-mkconfig -o /boot/grub2/grub.cfg
5. reboot 重启

#方法二、使用脚本修改:
cp /etc/default/grub /etc/default/grub_bak
line_num=`cat -n /etc/default/grub|grep 'GRUB_CMDLINE_LINUX'|awk
'{print $1}'|head -n 1` sed -i --follow-symlinks 's/elevator=deadline//g' /etc/default/grub
sed -i --follow-symlinks 's/transparent_hugepage=never//g' /etc/default/grub
sed -i --follow-symlinks ""${line_num}"s/\"$/ elevator=deadline\"/g"
/etc/default/grub
echo "参数 elevator=deadline 已修改"
sed -i --follow-symlinks ""${line_num}"s/\"$/ transparent_hugepage=never\"/g"
/etc/default/grub
echo "参数 transparent_hugepage 已修改"
#########执行如下命令使之生效 ##########
grub2-mkconfig -o /boot/grub2/grub.cfg
#重启本机
reboot
3、安装集群软件
3.1 解压安装包
#root用户执行
cd /opt
tar xjf GBase8a_MPP_Cluster-NoLicense-FREE-9.5.3.28.12-redhat8-x86_64.tar.bz2
#解压后,将会在解压目录下生成 gcinstall 目录
ls
GBase8a_MPP_Cluster-NoLicense-FREE-9.5.3.28.12-redhat8-x86_64.tar.bz2  gcinstall
3.2 创建用户并配置权限
#root用户在所有节点执行
useradd gbase
passwd gbase
#root用户在集群软件包上传节点执行
chown -R gbase:gbase /opt/gcinstall/
3.3 安装目录授权
#root用户在所有节点执行
chown -R gbase:gbase /data
3.4 拷贝系统参数初始化脚本(SetSysEnv.py)文件到其他节点
#使用root用户将gcinstall目录下的SetSysEnv.py文件拷贝到集群所有节点服务器上
scp SetSysEnv.py root@192.168.100.12:/opt
scp SetSysEnv.py root@192.168.100.14:/opt
#执行SetSysEnv.py文件
/opt/SetSysEnv.py --dbaUser=gbase --installPrefix=/data
3.5 编辑安装配置文件
[gbase@node1 ~]$ vi /opt/gcinstall/demo.options

installPrefix= /data
coordinateHost = 192.168.100.10,192.168.100.12,192.168.100.14
coordinateHostNodeID = 10,12,14
dataHost = 192.168.100.10,192.168.100.12,192.168.100.14
#existCoordinateHost =
#existDataHost =
#existGcwareHost=
gcwareHost = 192.168.100.10,192.168.100.12,192.168.100.14
gcwareHostNodeID = 10,12,14
dbaUser = gbase
dbaGroup = gbase
dbaPwd = 'gbase'
rootPwd = 'root'
#dbRootPwd = ''
#rootPwdFile = rootPwd.json
#characterSet = utf8
#sshPort = 22
3.6 执行安装
在任意一个 Coordinator 节点上执行 gcinstall.py 进行安装。
su - gbase
cd /opt/gcinstall
./gcinstall.py --silent=demo.options

#安装过程如下:
[gbase@node1 gcinstall]$ ./gcinstall.py --silent=demo.options
*********************************************************************************
Thank you for choosing GBase product!


Please read carefully the following licencing agreement before installing GBase product:
TIANJIN GENERAL DATA TECHNOLOGY CO., LTD. LICENSE AGREEMENT

READ THE TERMS OF THIS AGREEMENT AND ANY PROVIDED SUPPLEMENTAL LICENSETERMS (COLLECTIVELY "AGREEMENT") CAREFULLY BEFORE OPENING THE SOFTWAREMEDIA PACKAGE.  BY OPENING THE SOFTWARE MEDIA PACKAGE, YOU AGREE TO THE TERMS OF THIS AGREEMENT.  IF YOU ARE ACCESSING THE SOFTWARE ELECTRONICALLY, INDICATE YOUR ACCEPTANCE OF THESE TERMS.  IF YOU DO NOT AGREE TO ALL THESE TERMS, PROMPTLY RETURN THE UNUSED SOFTWARE TO YOUR PLACE OF PURCHASE FOR A REFUND.


1. Any user who tries out (including self-downloaded trial or trial version provided by General Data Technology Co., Ltd) General Data Technology Co., Ltd Software Products should read this statement carefully. Users may choose not to try Nanda General Software Products. The user's tries out General Data Technology Co., Ltd Software Products will be deemed to be an endorsement of the full content of this statement.

2. Universal software products of General Data Technology Co., Ltd have complete autonomous knowledge rights and do not infringe on the relevant rights and interests of any other unit or individual. Universal software products of General Data Technology Co., Ltd are protected by law. Any transfer, reproduction, dissemination or use in unauthorized projects are strictly prohibited without the written permission of Universal of Nanda. Otherwise, the infringer will bear full responsibility.

...<略>...

8. General Data Technology Co., Ltd Corporation has the final right to interpret General Data Technology Co., Ltd Products and this statement.

*********************************************************************************
Do you accept the above licence agreement ([Y,y]/[N,n])? y
*********************************************************************************
                     Welcome to install GBase products
*********************************************************************************
Environmental Checking on cluster nodes.
checking rpms ...
checking Cgconfig service
command "lssubsys" not found on host [192.168.100.12]
command "lssubsys" not found on host [192.168.100.10]
command "lssubsys" not found on host [192.168.100.14]
Cgconfig service is not exist on host ['192.168.100.10', '192.168.100.12', '192.168.100.14'], resource manangement can not be used, continue ([Y,y]/[N,n])? y
parse extendCfg.xml
CoordinateHost:
192.168.100.10    192.168.100.12    192.168.100.14
DataHost:
192.168.100.10    192.168.100.12    192.168.100.14
GcwareHost:
192.168.100.10    192.168.100.12    192.168.100.14
Are you sure to install GCluster on these nodes ([Y,y]/[N,n])? y
192.168.100.10          start install gcware on host 192.168.100.10
192.168.100.12          start install gcware on host 192.168.100.12
192.168.100.14          start install gcware on host 192.168.100.14

192.168.100.10          mkdir /data/192.168.100.10/cluster_prepare on host 192.168.100.10.
192.168.100.12          mkdir /data/192.168.100.12/cluster_prepare on host 192.168.100.12.
192.168.100.14          mkdir /data/192.168.100.14/cluster_prepare on host 192.168.100.14.

192.168.100.10          Copying InstallTar.py to host 192.168.100.10:/data/192.168.100.10/cluster_prepare
192.168.100.12          Copying InstallTar.py to host 192.168.100.12:/data/192.168.100.12/cluster_prepare
192.168.100.14          Copying InstallTar.py to host 192.168.100.14:/data/192.168.100.14/cluster_prepare

192.168.100.10          Copying InstallFuns.py to host 192.168.100.10:/data/192.168.100.10/cluster_prepare
192.168.100.12          Copying InstallFuns.py to host 192.168.100.12:/data/192.168.100.12/cluster_prepare
192.168.100.14          Copying InstallFuns.py to host 192.168.100.14:/data/192.168.100.14/cluster_prepare

192.168.100.10          Copying rmt.py to host 192.168.100.10:/data/192.168.100.10/cluster_prepare
192.168.100.12          Copying rmt.py to host 192.168.100.12:/data/192.168.100.12/cluster_prepare
192.168.100.14          Copying rmt.py to host 192.168.100.14:/data/192.168.100.14/cluster_prepare

192.168.100.10          Copying SSHThread.py to host 192.168.100.10:/data/192.168.100.10/cluster_prepare
192.168.100.12          Copying SSHThread.py to host 192.168.100.12:/data/192.168.100.12/cluster_prepare
192.168.100.14          Copying SSHThread.py to host 192.168.100.14:/data/192.168.100.14/cluster_prepare


192.168.100.10          Copying RestoreLocal.py to host 192.168.100.10:/data/192.168.100.10/cluster_prepare
192.168.100.12          Copying RestoreLocal.py to host 192.168.100.12:/data/192.168.100.12/cluster_prepare
192.168.100.14          Copying RestoreLocal.py to host 192.168.100.14:/data/192.168.100.14/cluster_prepare

192.168.100.10          Copying RestoreLocal.py to host 192.168.100.10:/data/192.168.100.10/cluster_prepare
192.168.100.12          Copying pexpect.py to host 192.168.100.12:/data/192.168.100.12/cluster_prepare
192.168.100.14          Copying RestoreLocal.py to host 192.168.100.14:/data/192.168.100.14/cluster_prepare

192.168.100.10          Copying pexpect.py to host 192.168.100.10:/data/192.168.100.10/cluster_prepare
192.168.100.12          Copying pexpect.py to host 192.168.100.12:/data/192.168.100.12/cluster_prepare
192.168.100.14          Copying pexpect.py to host 192.168.100.14:/data/192.168.100.14/cluster_prepare

192.168.100.10          Copying BUILDINFO to host 192.168.100.10:/data/192.168.100.10/cluster_prepare
192.168.100.12          Copying BUILDINFO to host 192.168.100.12:/data/192.168.100.12/cluster_prepare
192.168.100.14          Copying BUILDINFO to host 192.168.100.14:/data/192.168.100.14/cluster_prepare

192.168.100.10          Copying UpdateSysTable.json to host 192.168.100.10:/data/192.168.100.10/cluster_prepare
192.168.100.12          Copying UpdateSysTable.json to host 192.168.100.12:/data/192.168.100.12/cluster_prepare
192.168.100.14          Copying UpdateSysTable.json to host 192.168.100.14:/data/192.168.100.14/cluster_prepare

192.168.100.10          Copying bundle.tar.bz2 to host 192.168.100.10:/data/192.168.100.10/cluster_prepare
192.168.100.12          Copying bundle.tar.bz2 to host 192.168.100.12:/data/192.168.100.12/cluster_prepare
192.168.100.14          Copying bundle.tar.bz2 to host 192.168.100.14:/data/192.168.100.14/cluster_prepare

192.168.100.10          Copying bundle_data.tar.bz2 to host 192.168.100.10:/data/192.168.100.10/cluster_prepare
192.168.100.12          Copying bundle_data.tar.bz2 to host 192.168.100.12:/data/192.168.100.12/cluster_prepare
192.168.100.14          Copying bundle.tar.bz2 to host 192.168.100.14:/data/192.168.100.14/cluster_prepare

192.168.100.10          Copying bundle_data.tar.bz2 to host 192.168.100.10:/data/192.168.100.10/cluster_prepare
192.168.100.12          Installing gcware and gcluster.
192.168.100.14          Copying bundle_data.tar.bz2 to host 192.168.100.14:/data/192.168.100.14/cluster_prepare

192.168.100.10          Installing gcware and gcluster.
192.168.100.12          Installing gcware and gcluster.
192.168.100.14          Installing gcware and gcluster.

192.168.100.10          install gcware and cluster on host 192.168.100.10 successfully.
192.168.100.12          install gcware and cluster on host 192.168.100.12 successfully.
192.168.100.14          Installing gcware and gcluster.

192.168.100.10          install gcware and cluster on host 192.168.100.10 successfully.
192.168.100.12          install gcware and cluster on host 192.168.100.12 successfully.
192.168.100.14          install gcware and cluster on host 192.168.100.14 successfully.
Starting all gcluster nodes ...
adding new datanodes to gcware ...
InstallCluster Successfully
4、查看集群状态
[gbase@node1 gcinstall]$ source ~/.bash_profile
[gbase@node1 gcinstall]$ gcadmin
CLUSTER STATE:         ACTIVE

======================================
|  GBASE GCWARE CLUSTER INFORMATION  |
======================================
| NodeName |   IpAddress    | gcware |
--------------------------------------
| gcware1  | 192.168.100.10 |  OPEN  |
--------------------------------------
| gcware2  | 192.168.100.12 |  OPEN  |
--------------------------------------
| gcware3  | 192.168.100.14 |  OPEN  |
--------------------------------------
========================================================
|        GBASE COORDINATOR CLUSTER INFORMATION         |
========================================================
|   NodeName   |   IpAddress    | gcluster | DataState |
--------------------------------------------------------
| coordinator1 | 192.168.100.10 |   OPEN   |     0     |
--------------------------------------------------------
| coordinator2 | 192.168.100.12 |   OPEN   |     0     |
--------------------------------------------------------
| coordinator3 | 192.168.100.14 |   OPEN   |     0     |
--------------------------------------------------------
===============================================================
|          GBASE CLUSTER FREE DATA NODE INFORMATION           |
===============================================================
| NodeName  |   IpAddress    | gnode | syncserver | DataState |
---------------------------------------------------------------
| FreeNode1 | 192.168.100.12 | OPEN  |    OPEN    |     0     |
---------------------------------------------------------------
| FreeNode2 | 192.168.100.10 | OPEN  |    OPEN    |     0     |
---------------------------------------------------------------
| FreeNode3 | 192.168.100.14 | OPEN  |    OPEN    |     0     |
---------------------------------------------------------------

0 virtual cluster
3 coordinator node
3 free data node
5、创建 distribution
集群安装成功后,会在安装包目录下生成一个 gcChangeInfo.xml 文件,用于描述数据在集群各节点的分布方式。可以直接使用安装完后 gcinstall 目录中默认的gcChangeInfo.xml 文件创建 distribution,也可以使用gbase用户按需配置 gcChangeInfo.xml。
[gbase@node1 gcinstall]$ cat gcChangeInfo.xml
<?xml version="1.0" encoding="utf-8"?>
<servers>
    <rack>
        <node ip="192.168.100.12"/>
    </rack>
    <rack>
        <node ip="192.168.100.10"/>
    </rack>
    <rack>
        <node ip="192.168.100.14"/>
    </rack>
</servers>
执行创建 distribution 的命令:
gcadmin distribution <gcChangeInfo.xml> <p num> [d num] [pattern 1|2]
如果只有一个节点,使用 p 1 d 0
参数说明:
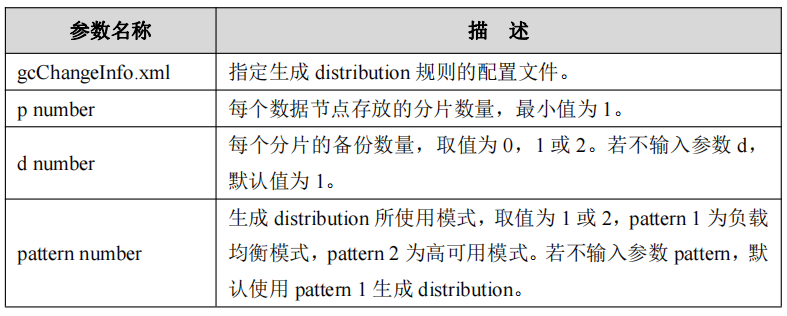
执行过程如下:
[gbase@node1 gcinstall]$ gcadmin distribution gcChangeInfo.xml p 1 d 1
gcadmin generate distribution ...

NOTE: node [192.168.100.12] is coordinator node, it shall be data node too
NOTE: node [192.168.100.10] is coordinator node, it shall be data node too
NOTE: node [192.168.100.14] is coordinator node, it shall be data node too
gcadmin generate distribution successful
6、集群初始化(initnodedatamap)
集群安装完毕且建立 distribution 之后,在首次执行SQL命令之前,需要对数据库系统做初始化操作,才能正确执行所有的SQL操作。
使用数据库用户 root 登录数据库(root 用户默认密码是空),执行 initnodedatamap
命令。
[gbase@node1 gcinstall]$ gccli -uroot

GBase client Free Edition 9.5.3.28.12509af275af. Copyright (c) 2004-2024, GBase.  All Rights Reserved.

gbase> initnodedatamap;
Query OK, 1 row affected (Elapsed: 00:00:02.14)
使用gbase用户在所有节点启动服务
gcluster_services all start
7、查看集群数据分片分布情况
[gbase@node1 gcinstall]$ gcadmin showdistribution

                                 Distribution ID: 1 | State: new | Total segment num: 3

             Primary Segment Node IP                   Segment ID                 Duplicate Segment node IP
========================================================================================================================
|                 192.168.100.12                 |         1          |                 192.168.100.10                 |
------------------------------------------------------------------------------------------------------------------------
|                 192.168.100.10                 |         2          |                 192.168.100.14                 |
------------------------------------------------------------------------------------------------------------------------
|                 192.168.100.14                 |         3          |                 192.168.100.12                 |
========================================================================================================================
8、启停服务
gcluster_services <gcluster|gcrecover|gbase|syncserver|gbase_ip|syncserver_ip|all>  <start|stop [--force]|restart [--force]|info>

#停止所有服务
[gbase@node1 data]$ gcluster_services all stop
Stopping gcrecover :                                       [  OK  ]
Stopping gcluster :                                        [  OK  ]
Stopping gbase :                                           [  OK  ]
Stopping syncserver :                                      [  OK  ]

#启动所有服务
[gbase@node1 data]$ gcluster_services all start
Starting gbase :                                           [  OK  ]
Starting syncserver :                                      [  OK  ]
Starting gcluster :                                        [  OK  ]
Starting gcrecover :                                       [  OK  ]

#查看服务状态
[gbase@node1 data]$ gcmonit --status
+-----------------------------------------------------------------------------------------------------------------------------------+
|SEG_NAME                                 PROG_NAME                                                   STATUS              PID       |
+-----------------------------------------------------------------------------------------------------------------------------------+
|gcluster                                 gclusterd                                                   Running             20444     |
|gcrecover                                gcrecover                                                   Running             21000     |
|gbase_192.168.100.10                     /data/192.168.100.10/gnode/server/bin/gbased                Running             19387     |
|syncserver_192.168.100.10                /data/192.168.100.10/gnode/server/bin/gc_sync_server        Running             20429     |
|gcmmonit                                 gcmmonit                                                    Running             20439     |
+-----------------------------------------------------------------------------------------------------------------------------------+
五、安装过程中碰到的问题
1、执行gcinstall.py时缺少ncurses-compat-libs包
Environmental Checking on cluster nodes.
checking rpms ...
Error: gcinstall.py(line 3354) -- cluster needs some rpms to running.
192.168.100.10: ncurses-compat-libs
192.168.100.12: ncurses-compat-libs
192.168.100.14: ncurses-compat-libs
解决办法:yum install -y ncurses-compat-libs
2、使用centos7部署时缺少包
192.168.100.10: ncurses-compat-libs,libnsl2,libxcrypt,python2-libs
192.168.100.12: ncurses-compat-libs,libnsl2,libxcrypt,python2-libs
192.168.100.14: ncurses-compat-libs,libnsl2,libxcrypt,python2-libs
解决办法:直接使用centos8部署
六、总结
安装过程还算顺利~~~
