


数据库介绍
1.1 版本说明
本次安装使用opengauss数据库的LTS版本 5.0.0,版本分为X86_64和AARCH64两个架构,安装建议使用当前最新LTS版本。

1.2 架构介绍
1.2.1 数据库openGauss支持单机部署和一主多备部署两种部署形态
单机指的是只有一个数据库实例。
双机指的是系统中存在主备数据库实例,主实例支持读写,备实例支持只读。
一主多备指的是在系统存在一个主机,多个备机,openGauss最多支持8个备机。
冷备份:是指备份就是一个简单的备份集,不可以提供服务。
热备份:是指备份实例可以对外提供服务 。
1.2.2 部署形态汇总
部署形态 | 技术方案 | 高可用 | 基础设置要求 | 业务场景 | 场景特点 | 技术规格 |
单机 | 单机 | 无高可用能力 | 单机房 | 物理机 | 对系统的可靠性和可用性无任何要求 主要用于体验试用以及调测场景 | 系统RTO和RPO不可控 无实例级容灾能力,一旦出现实例故障,系统不可用 一旦实例级数据丢失,则数据永久丢失,无法恢复 |
主备 | 主机+备机 | 抵御实例级故障 | 单机房 | 物理机 | 节点间无网络延迟 要求承受实例级故障 适用于对系统可靠性要求不高的场景 | RPO=0 实例故障RTO<10s 无AZ级容灾能力 推荐主备最大可用模式 |
一主多备 | 主机+多个备机 Quorum/Paxos | 抵御实例级故障 | 单机房 | 物理机 | 节点间无网络延迟 要求承受实例级故障 | RPO=0 实例故障RTO<10s 无AZ级容灾能力 推荐主备同步模式 最少2个副本,最多4个副本 |
1.2.3 软硬件规格说明
交付模式 | CPU | OS |
开源线下 | x86 | CentOS 7.6、openEuler 20.03 LTS、openEuler 22.03 LTS、Asianux 7.6 |
鲲鹏 | openEuler 20.03 LTS、openEuler 22.03 LTS、麒麟V10、Asianux 7.5 |
整体部署方案可以分为四类:
单机部署;
一主一备部署;
一主多备部署;
资源池化部署。
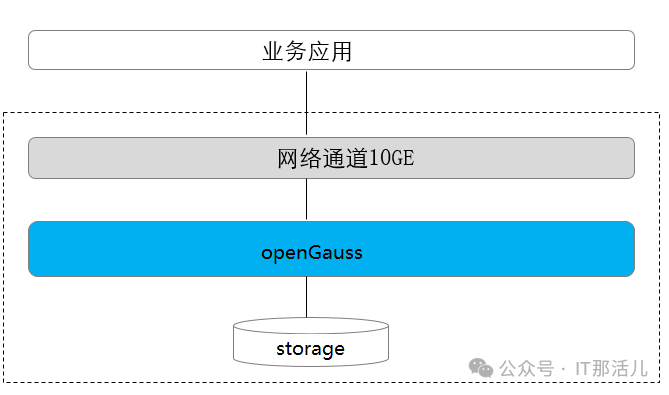
1.2.5 单机部署
单机部署形态是一种非常特殊的部署形态,这种形态对于可靠性、可用性均无任何保证。
由于只有一个数据副本,一旦发生数据损坏、丢失,只能通过物理备份恢复数据。这种部署形态,一般用于数据库体验用户,以及测试环境做语法功能调测等场景。不建议用于商业现网运行。
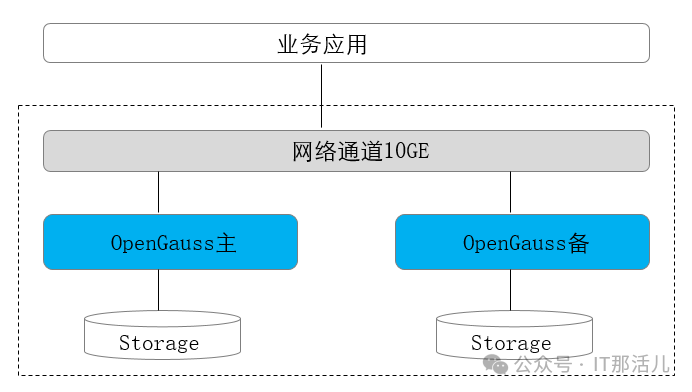
1.2.6 主备部署(本文采用主备模式)
主备模式相当于两个数据副本,主机和备机各一个数据副本,备机接受日志、执行日志回放。
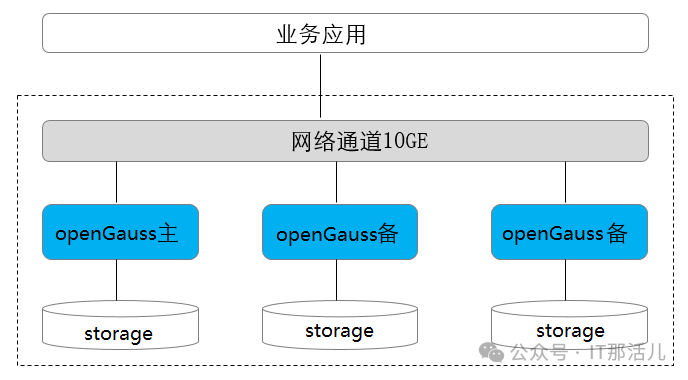
1.2.7 一主多备部署
多副本的部署形态,提供了抵御实例级故障的能力,适用于不要求机房级别容灾,但是需要抵御个别硬件故障的应用场景。
一般多副本部署时使用1主2备模式,总共3个副本,3个副本的可靠性为99.99%,可以满足大多数应用的可靠性要求。
主备间Quorum复制,至少同步到一台备机,保证最大性能。
主备任意一个节点故障,不影响业务的进行。
数据有三份,任何一个节点故障,系统仍然有双份数据确保继续运行。任何一个备份都可以升主。
主备实例之间不可部署在同一台物理机上。
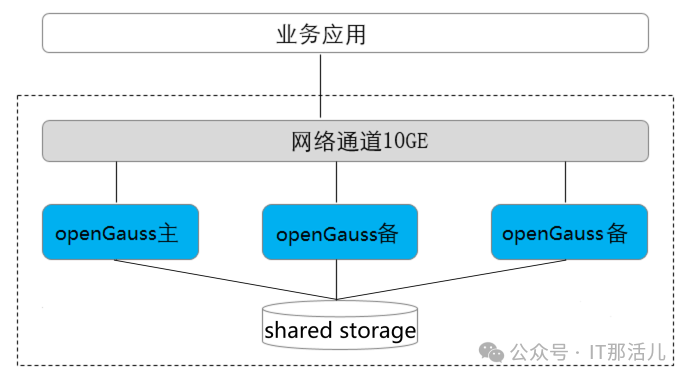
1.2.8 资源池化部署
基于磁阵设备的主备资源池化HA部署形态,只支持主备部署在同一磁阵设备上,不支持容灾部署,也不支持主备混合部署(如主和备部署在不同的磁阵设备上)。
安装部署
本文安装参照官方安装部署说明,参考地址:
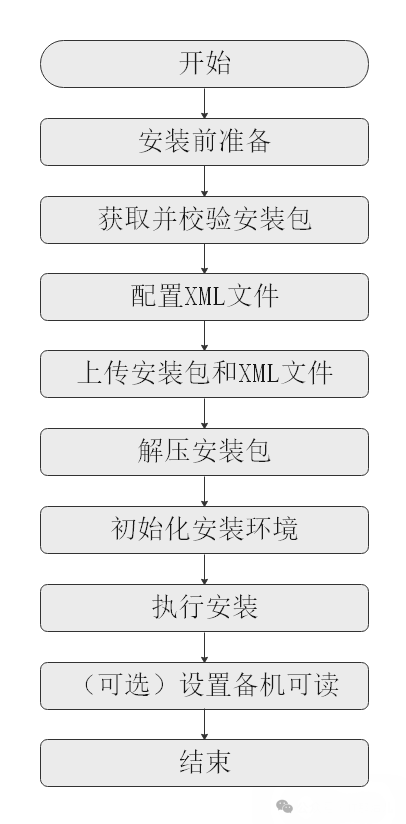
流程 | 说明 |
安装前准备 | openGauss安装前需要准备相应的软硬件环境以及完成相关配置。 本文档提供了openGauss安装所需的最低要求,实际安装中,请用户根据实际情况进行规划。 更多信息,请参考安装准备。 |
获取并校验安装包 | 安装包需要在openGauss开源社区下载并且对安装包内容进行检查,详细请参见获取安装包。 |
配置XML文件 | 安装openGauss前需要创建XML文件。XML文件包含部署openGauss的服务器信息、安装路径、IP地址以及端口号等。用于告知openGauss如何部署。用户需根据不同场景配置对应的XML文件。 关于如何配置XML文件,详细请参见创建XML配置文件。 |
上传安装包和XML文件 | 上传安装包和XML配置文件到待安装的服务器。 |
解压安装包 | 使用tar命令解压安装包。 |
初始化安装环境 | 安装环境的初始化包含上传安装包和XML文件、解压安装包、使用gs_preinstall准备好安装环境。 关于如何初始化安装环境,详细请参见初始化安装环境。 |
执行安装 | 使用gs_install安装openGauss。 关于如何执行安装,详细请参见执行安装。 |
设置备机可读 | 可选操作。在开启备机可读之后,备机将支持读操作,并满足数据一致性要求。 |
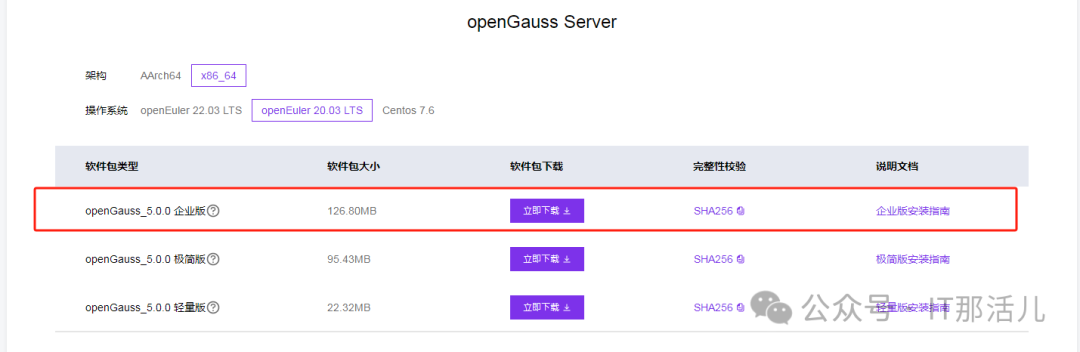
2.1 安装包下载
官方下载地址:
https://opengauss.org/zh/download/archive/
IP地址 | 操作系统 | 安装包 | 版本信息 | 服务器配置 |
11.11.11.183 | OpenEuler 20.03 LTS | openGauss_5.0.0 企业版 | openGauss-5.0.0-openEuler-64bit-all.tar.gz | 8C24G |
11.11.11.184 | OpenEuler 20.03 LTS | openGauss_5.0.0 企业版 | openGauss-5.0.0-openEuler-64bit-all.tar.gz | 4C12G |
2.2 安装依赖包
需要安装以下依赖包,配置使用yum源安装。
yum -y install libaio-devel \
flex \
bison \
ncurses-devel \
glibc-devel \
patch \
*lsb-core* \
readline-devel \
libnsl
2.3 内核参数修改
net.ipv4.tcp_max_tw_buckets=10000
net.ipv4.tcp_tw_reuse=1
net.ipv4.tcp_keepalive_time=30
net.ipv4.tcp_keepalive_probes=9
net.ipv4.tcp_keepalive_intvl=30
net.ipv4.tcp_retries1=5
net.ipv4.tcp_syn_retries=5
net.ipv4.tcp_synack_retries=5
net.ipv4.tcp_retries2=12
vm.overcommit_memory=0
net.ipv4.tcp_rmem=8192 250000 16777216
net.ipv4.tcp_wmem=8192 250000 16777216
net.core.wmem_max=21299200
net.core.rmem_max=21299200
net.core.wmem_default=21299200
net.core.rmem_default=21299200
kernel.sem=250 6400000 1000 25600
net.core.somaxconn=65535
net.ipv4.tcp_syncookies=1
net.core.netdev_max_backlog=65535
net.ipv4.tcp_max_syn_backlog=65535
net.ipv4.tcp_fin_timeout=60
kernel.shmall=1152921504606846720
kernel.shmmax=18446744073709551615
net.ipv4.tcp_sack=1
net.ipv4.tcp_timestamps=1
vm.extfrag_threshold=500
vm.overcommit_ratio=90
vm.min_free_kbytes = 1207701
## 不存在的配置:
net.ipv4.tcp_tw_recycle=1

net.ipv4.ip_local_port_range=26000-65535
##MTU=8192 MTU交换机也是1500,所以不用修改。
2.4 配置资源限制
设置为最大使用。
vim /etc/security/limits.d/90-nproc.conf
* soft nproc unlimited
* hard nproc unlimited
2.5 创建用户
用户也可以不创建,后面执行安装会自动创建。
groupadd dbgrp
useradd omm -g dbgrp
设置密码:
passwd omm
密码过期设置:
chage -M 99999 omm
chage -l omm
2.6 创建目录
本次单独挂载了一个磁盘分区目录,单独目录或其他目录均可,只要保证有足够空间。
pvcreate dev/sdb
vgcreate vg_data /dev/sdb
lvcreate -l 100%VG -n lv_ogdata vg_data
mkfs.xfs /dev/vg_data/lv_ogdata
mount /dev/vg_data/lv_ogdata /opt
chown -R omm:dbgrp /opt/
2.7 修改python版本
修改python版本,修改为3.x版本,安装软件需要依赖Python3的版本。
root@host-02[/usr/bin]mv python python.bak
root@host-02[/usr/bin]ln -s python3 python
root@host-02[/usr/bin]ls -l|grep python
-rwxr-xr-x. 1 root root 14376 Jan 1  2022 pmpython
lrwxrwxrwx 1 root root 7 Dec 18 10:13 python -> python3
lrwxrwxrwx. 1 root root 9 Jan 1  2022 python2 -> python2.7
-rwxr-xr-x. 1 root root 14376 Jan 1  2022 python2.7
-rwxr-xr-x. 1 root root 1846 Jan 1  2022 python2.7-config
-rwxr-xr-x. 1 root root 14384 Jan 1  2022 python2.7-debug
-rwxr-xr-x. 1 root root 1852 Jan 1  2022 python2.7-debug-config
lrwxrwxrwx. 1 root root 16 Jan 1  2022 python2-config -> python2.7-config
lrwxrwxrwx. 1 root root 15 Jan 1  2022 python2-debug -> python2.7-debug
lrwxrwxrwx. 1 root root 22 Jan 1  2022 python2-debug-config -> python2.7-debug-config
lrwxrwxrwx. 1 root root 9 Jan 1  2022 python3 -> python3.7
-rwxr-xr-x. 2 root root 14376 Jan 1  2022 python3.7
-rwxr-xr-x. 2 root root 14376 Jan 1  2022 python3.7m
-rwxr-xr-x. 1 root root 388 Jan 1  2022 python3-chardetect
lrwxrwxrwx. 1 root root 7 Jan 1  2022 python.bak -> python2
lrwxrwxrwx. 1 root root 14 Jan 1  2022 python-config -> python2-config
lrwxrwxrwx. 1 root root 13 Jan 1  2022 python-debug -> python2-debug
lrwxrwxrwx. 1 root root 20 Jan 1  2022 python-debug-config -> python2-debug-config
root@host-02[/usr/bin]python -V
Python 3.7.9
2.8 创建XML配置文件
需要提前创建安装时使用的配置文件,配置文件里有对应命名和目录结构参数配置。
omm@host-02[~]cat cluster_config.xml
<?xml version="1.0" encoding="utf-8"?>
<ROOT>
  <CLUSTER>
    <PARAM name="clusterName" value="ogCluster" />
    <PARAM name="nodeNames" value="host-01,host-02"/>
    <PARAM name="gaussdbAppPath" value="/opt/opengauss/install/app" />
    <PARAM name="gaussdbLogPath" value="/var/log/opengauss" />
    <PARAM name="tmpMppdbPath" value="/opt/opengauss/tmp"/>
    <PARAM name="gaussdbToolPath" value="/opt/opengauss/install/om" />
    <PARAM name="corePath" value="/opt/opengauss/corefile"/>
    <PARAM name="backIp1s" value="11.11.11.183,11.11.11.184"/>
  </CLUSTER>

  <DEVICELIST>
    <DEVICE sn="host-01">
      <PARAM name="name" value="host-01"/>
      <PARAM name="azName" value="AZ1"/>
      <PARAM name="azPriority" value="1"/>
      <PARAM name="backIp1" value="11.11.11.183"/>
      <PARAM name="sshIp1" value="11.11.11.183"/>
      <!-- dn -->
      <PARAM name="dataNum" value="1"/>
      <PARAM name="dataPortBase" value="15400"/>
      <PARAM name="dataNode1" value="/opt/opengauss/install/data/dn,host-02,/opt/opengauss/install/data/dn"/>
      <PARAM name="dataNode1_syncNum" value="0"/>
    </DEVICE>

    <DEVICE sn="host-02">
      <PARAM name="name" value="host-02"/>
      <PARAM name="azName" value="AZ1"/>
      <PARAM name="azPriority" value="1"/>
      <PARAM name="backIp1" value="11.11.11.184"/>
      <PARAM name="sshIp1" value="11.11.11.184"/>
    </DEVICE>
  </DEVICELIST>
</ROOT>
2.9 节点配置互信
配置两个节点omm用户的互信。
2.10 安装前检查
root@host-01[/home/omm/software/script]./gs_preinstall -U omm -G dbgrp -L -X /home/omm/cluster_config.xml
Parsing the configuration file.
Successfully parsed the configuration file.
Installing the tools on the local node.
Successfully installed the tools on the local node.
Setting host ip env
Successfully set host ip env.
Preparing SSH service.
Successfully prepared SSH service.
Checking OS software.
Successfully check os software.
Checking OS version.
Successfully checked OS version.
Creating cluster's path.
Successfully created cluster's path.
Set and check OS parameter.
Setting OS parameters.
Successfully set OS parameters.
Warning: Installation environment contains some warning messages.
Please get more details by "/home/omm/software/script/gs_checkos -i A -h host-01 --detail".
Set and check OS parameter completed.
Preparing CRON service.
Successfully prepared CRON service.
Setting user environmental variables.
Successfully set user environmental variables.
Setting the dynamic link library.
Successfully set the dynamic link library.
Setting Core file
Successfully set core path.
Setting pssh path
Successfully set pssh path.
Setting Cgroup.
Successfully set Cgroup.
Set ARM Optimization.
No need to set ARM Optimization.
Fixing server package owner.
Setting finish flag.
Successfully set finish flag.
Preinstallation succeeded.
预检查通过后,可以进行下一步安装动作。
2.11 执行安装
指定参数启动数据库,内存、进程和字符集等参数,主节点执行即可。
gs_install -X /home/omm/cluster_config.xml --gsinit-parameter="--encoding=UTF8" --dn-guc="max_process_memory=4GB"
--dn-guc="shared_buffers=256MB" --dn-guc="bulk_write_ring_size=256MB"
--dn-guc="cstore_buffers=16MB"
Parsing the configuration file.
Check preinstall on every node.
Successfully checked preinstall on every node.
Creating the backup directory.
Last time end with Install cluster.
Continue this step.
Successfully created the backup directory.
begin deploy..
Rolling back.
Rollback succeeded.
Installing the cluster.
begin prepare Install Cluster..
Checking the installation environment on all nodes.
begin install Cluster..
Installing applications on all nodes.
Successfully installed APP.
begin init Instance..
encrypt cipher and rand files for database.
Please enter password for database:
Please repeat for database:
begin to create CA cert files
The sslcert will be generated in /opt/opengauss/install/app/share/sslcert/om
NO cm_server instance, no need to create CA for CM.
Non-dss_ssl_enable, no need to create CA for DSS
Cluster installation is completed.
Configuring.
Deleting instances from all nodes.
Successfully deleted instances from all nodes.
Checking node configuration on all nodes.
Initializing instances on all nodes.
Updating instance configuration on all nodes.
Check consistence of memCheck and coresCheck on database nodes.
Successful check consistence of memCheck and coresCheck on all nodes.
Configuring pg_hba on all nodes.
Configuration is completed.
The cluster status is Normal.
Successfully started cluster.
Successfully installed application.
end deploy..
omm@host-01[~]
2.12 状态检查
安装完成后执行gs_om命令检查状态。
omm@host-01[/opt/opengauss/install/app/bin]gs_om -t status --detail
[ Cluster State ]

cluster_state : Normal
redistributing : No
current_az : AZ_ALL


[ Datanode State ]

node node_ip port instance                               state

----------------------------------------------------------------------------------------------------------

1  host-01 11.11.xx.183    15400      6001 /opt/opengauss/install/data/dn P Primary Normal
2  host-02 11.11.xx.184    15400      6002 /opt/opengauss/install/data/dn S Standby Normal
2.13 备库只读
设置备库只读。
1)如果主备机上的openGauss数据库实例正在运行,请先分别停止主备机上的数据库实例。
2)分别打开主机与备机的postgresql.conf配置文件,找到并将对应参数修改为:
wal_level=hot_standby
hot_standby = on
hot_standby_feedback = on
3)参数max_standby_streaming_delay、 max_prepared_transactions、 max_standby_archive_delay、 hot_standby_feedback可以参考《数据库参考》按需进行设置。
4)修改完成后,分别启动主备机即可。
2.14 取消public 权限
创建用户后,取消public权限,同时创建一个与用户名相同的schema,创建对象默认放到该schema下。
revoke all on schema public  from public;
create user user1 login identified by "passwd1";
grant all privileges on database db1 to user1;
2.15 高可用切换测试
进行主备切换测试,以及主备故障恢复测试。
## 切主操作。
#在备库执行:
omm@host-02[~]gs_om -t status --detail
[ Cluster State ]

cluster_state : Normal
redistributing : No
current_az : AZ_ALL

[ Datanode State ]

    node node_ip port instance state
----------------------------------------------------------------------------------------------------------
1 host-01 11.11.11.183 15400 6001 /opt/opengauss/install/data/dn P Primary Normal
2 host-02 11.11.11.184 15400 6002 /opt/opengauss/install/data/dn S Standby Normal


omm@host-02[~]gs_ctl switchover -D /opt/opengauss/install/data/dn
[2023-12-19 23:10:18.450][160831][][gs_ctl]: gs_ctl switchover ,datadir is /opt/opengauss/install/data/dn
[2023-12-19 23:10:18.450][160831][][gs_ctl]: switchover term (1)
[2023-12-19 23:10:18.456][160831][][gs_ctl]: waiting for server to switchover........
[2023-12-19 23:10:23.493][160831][][gs_ctl]: done
[2023-12-19 23:10:23.493][160831][][gs_ctl]: switchover completed (/opt/opengauss/install/data/dn)
omm@host-02[~]gs_om -t status --detail
[ Cluster State ]

cluster_state : Normal
redistributing : No
current_az : AZ_ALL

[ Datanode State ]

    node node_ip port instance state
----------------------------------------------------------------------------------------------------------
1 host-01 11.11.11.183 15400 6001 /opt/opengauss/install/data/dn P Standby Normal
2 host-02 11.11.11.184 15400 6002 /opt/opengauss/install/data/dn S Primary Normal
omm@host-02[~]gs_om -t refreshconf ## 一定要更新配置
Generating dynamic configuration file for all nodes.
Successfully generated dynamic configuration file.
##回切操作:
omm@host-01[~]gs_ctl switchover -D /opt/opengauss/install/data/dn
[2023-12-19 23:11:33.767][307027][][gs_ctl]: gs_ctl switchover ,datadir is /opt/opengauss/install/data/dn
[2023-12-19 23:11:33.767][307027][][gs_ctl]: switchover term (1)
[2023-12-19 23:11:33.773][307027][][gs_ctl]: waiting for server to switchover........
[2023-12-19 23:11:38.811][307027][][gs_ctl]: done
[2023-12-19 23:11:38.811][307027][][gs_ctl]: switchover completed (/opt/opengauss/install/data/dn)
omm@host-01[~]
omm@host-01[~]gs_om -t refreshconf
Generating dynamic configuration file for all nodes.
Successfully generated dynamic configuration file.
omm@host-01[~]gs_om -t status --detail
[ Cluster State ]
cluster_state : Normal
redistributing : No
current_az : AZ_ALL
[ Datanode State ]
node node_ip port instance state

----------------------------------------------------------------------------------------------------------

1 host-01 11.11.11.183 15400 6001 /opt/opengauss/install/data/dn P Primary Normal
2  host-02 11.11.11.184    15400      6002 /opt/opengauss/install/data/dn S Standby Normal
omm@host-01[~]
## 失败切换。
# 停掉主库:
omm@host-01[~]gs_om -t status --detail
[ Cluster State ]
cluster_state : Unavailable
redistributing : No
current_az : AZ_ALL
[ Datanode State ]
node node_ip port instance state

----------------------------------------------------------------------------------------------------------

1 host-01 11.11.11.183 15400 6001 /opt/opengauss/install/data/dn P Down Manually stopped
2  host-02 11.11.11.184    15400      6002 /opt/opengauss/install/data/dn S Standby Need repair(Disconnected)
# 备库强制切主:
omm@host-02[~]gs_ctl failover -D /opt/opengauss/install/data/dn
[2023-12-19 23:14:16.444][172210][][gs_ctl]: gs_ctl failover ,datadir is /opt/opengauss/install/data/dn
[2023-12-19 23:14:16.444][172210][][gs_ctl]: failover term (1)
[2023-12-19 23:14:16.449][172210][][gs_ctl]: waiting for server to failover...
.[2023-12-19 23:14:17.460][172210][][gs_ctl]: done
[2023-12-19 23:14:17.460][172210][][gs_ctl]: failover completed (/opt/opengauss/install/data/dn)
omm@host-02[~]gs_om -t status --detail
[ Cluster State ]
cluster_state : Degraded
redistributing : No
current_az : AZ_ALL
[ Datanode State ]
    node node_ip port instance state
----------------------------------------------------------------------------------------------------------
1 host-01 11.11.11.183 15400 6001 /opt/opengauss/install/data/dn P Down Manually stopped
2  host-02 11.11.11.184    15400      6002 /opt/opengauss/install/data/dn S Primary Normal
omm@host-02[~]
# 原主库启动后,加入复制关系:
omm@host-01[~] gs_ctl start -D /opt/opengauss/install/data/dn -M standby
[2023-12-19 23:15:14.417][314811][][gs_ctl]: gs_ctl started,datadir is /opt/opengauss/install/data/dn
[2023-12-19 23:15:14.441][314811][][gs_ctl]: waiting for server to start...
.0 LOG: [Alarm Module]can not read GAUSS_WARNING_TYPE env.
[2023-12-19 23:15:15.448][314811][][gs_ctl]: server started (/opt/opengauss/install/data/dn)
omm@host-01[~]gs_om -t status --detail
[ Cluster State ]

cluster_state : Degraded
redistributing : No
current_az : AZ_ALL

[ Datanode State ]

    node node_ip port instance state
----------------------------------------------------------------------------------------------------------
1 host-01 11.11.11.183 15400 6001 /opt/opengauss/install/data/dn P Standby Need repair(WAL)
2 host-02 11.11.11.184 15400 6002 /opt/opengauss/install/data/dn S Primary Normal
omm@host-01[~]gs_ctl build -D /opt/opengauss/install/data/dn
[2023-12-19 23:15:47.397][316058][dn_6001_6002][gs_ctl]: fprintf build pid file "/opt/opengauss/install/data/dn/gs_build.pid" success
[2023-12-19 23:15:47.399][316058][dn_6001_6002][gs_ctl]: fsync build pid file "/opt/opengauss/install/data/dn/gs_build.pid" success
omm@host-01[~]gs_om -t status --detail
[ Cluster State ]
cluster_state : Normal
redistributing : No
current_az : AZ_ALL

[ Datanode State ]

    node node_ip port instance state
----------------------------------------------------------------------------------------------------------
1 host-01 11.11.11.183 15400 6001 /opt/opengauss/install/data/dn P Standby Normal
2  host-02 11.11.11.184    15400      6002 /opt/opengauss/install/data/dn S Primary Normal
2.16 参数优化
password_encryption_type,因客户端访问时不支持新的密码加密方式,修改为1兼容之前版本。
gs_guc reload -N all -I all -c "password_encryption_type=1"
gs_guc reload -N all -I all -c "password_reuse_max=3"
gs_guc reload -N all -I all -c "enable_memory_limit=on"
gs_guc reload -N all -I all -c "work_mem=512MB"
gs_guc reload -N all -I all -c "maintenance_work_mem=512MB"
gs_guc reload -N all -I all -c "bulk_read_ring_size=512MB"
gs_guc reload -N all -I all -c "bulk_write_ring_size=512MB" ?
gs_guc reload -N host-01 -D /opt/opengauss/install/data/dn -c "max_process_memory=16GB"
gs_guc reload -N host-02 -D /opt/opengauss/install/data/dn -c "max_process_memory=8GB"
gs_guc reload -N host-02 -D /opt/opengauss/install/data/dn -c "work_mem=1GB"
gs_guc reload -N host-01 -D /opt/opengauss/install/data/dn -c "shared_buffers=10GB"
gs_guc reload -N host-02 -D /opt/opengauss/install/data/dn -c "shared_buffers=4GB"
omm@host-01[~]gs_om -t restart #重启生效
Stopping cluster.

=========================================

Successfully stopped cluster.

=========================================

End stop cluster.

Starting cluster.

=========================================

[SUCCESS] host-01

2023-12-20 10:38:08.725 65825390.1 [unknown] 139684122632128 [unknown] 0 dn_6001_6002 01000  0 [BACKEND] WARNING: could not create any HA TCP/IP sockets

[SUCCESS] host-02

2023-12-20 10:38:12.216 65825394.1 [unknown] 139862630883264 [unknown] 0 dn_6001_6002 01000  0 [BACKEND] WARNING: could not create any HA TCP/IP sockets

=========================================

Successfully started.
2.17 错误处理
omm@host-01[~]export TMOUT=0

omm@host-01[~]gs_install -X /home/omm/cluster_config.xml --
gsinit-parameter="--encoding=UTF8" --dn-
guc="max_process_memory=4GB" --dn-guc="shared_buffers=256MB" --dn-guc="bulk_write_ring_size=256MB" --dn-guc="cstore_buffers=16MB"

Parsing the configuration file.

Check preinstall on every node.

[GAUSS-51400] : Failed to execute the command: python3
'/opt/opengauss/install/om/script/local/CheckPreInstall.py' -U omm -t preinstall. Result:{'host-01': 'Failure', 'host-02': 'Success'}.

Error:

[FAILURE] host-01:

[SUCCESS] host-02:

Successfully checked GAUSS_ENV.
需要手工执行验证互信,包括本机和远端,两节点一样操作:
omm@host-01[~]python3 '/opt/opengauss/install/om/script/local/CheckPreInstall.py' -U omm -t preinstall
Successfully checked GAUSS_ENV.
omm@host-01[~]ssh host-01 date
The authenticity of host 'host-01 (11.11.11.183)' can't be established.
ECDSA key fingerprint is SHA256:ei10qMITbfPdLiU7EJ1WdJZfzCPcj/6U60ckhXQKfO8.
Are you sure you want to continue connecting (yes/no/[fingerprint])? yes
Warning: Permanently added 'host-01,11.11.11.183' (ECDSA) to the list of known hosts.

Authorized users only. All activities may be monitored and reported.
Mon Dec 18 14:45:33 CST 2023
omm@host-01[~]ssh host-01 date
Authorized users only. All activities may be monitored and reported.
Mon Dec 18 14:45:35 CST 2023
omm@host-01[~]ssh host-02 date
数据迁移(ora2pg)
3.1 安装ora2pg
yum install perl-ExtUtils-CBuilder
yum install perl-ExtUtils-MakeMaker
yum install perl-CPAN
rpm -ivh oracle-instantclient19.11-basic-19.11.0.0.0-1.x86_64.rpm
rpm -ivh oracle-instantclient19.11-devel-19.11.0.0.0-1.x86_64.rpm
rpm -ivh oracle-instantclient19.11-jdbc-19.11.0.0.0-1.x86_64.rpm
rpm -ivh oracle-instantclient19.11-sqlplus-19.11.0.0.0-1.x86_64.rpm
export ORACLE_HOME=/usr/lib/oracle/19.11/client64/
#安装DBI,DBD::Oracle,DBD::Pg ,在 www.cpan.org/modules/by-module 进行下载,版本选择最近版本。
DBD-Oracle-1.83.tar.gz
DBI-1.643.tar.gz
DBD-Pg-3.18.0.tar.gz
#在安装前需要设置环境变量:
export ORACLE_HOME=/usr/lib/oracle/19.11/client64/
export GAUSSHOME=/opt/opengauss/install/app/
export C_INCLUDE_PATH=/opt/opengauss/install/app_a07d57c3/include/p
ostgresql/server/libpq/:/opt/opengauss/install/app_a07d57c3/include/postgresql/server/
#分别解压后,执行:
perl Makefile.PL
make && make install
# 安装JSON:
JSON-4.10.tar.gz
perl Makefile.PL
make && make install
## 源码安装:
perl Makefile.PL
make && make install
export PERL5LIB=/home/omm/software/ora2og/openGauss-tools-ora2og-master/
export PATH=$PATH:/usr/local/bin/
ora2pg --help

root@host-01[/home/omm/software]ora2pg -v
Ora2Pg v21.1
3.2 软件环境检查
使用下面提供的脚本检查当前安装组件是否正确。
vi check.pl
#!/usr/bin/perl
use strict;
use ExtUtils::Installed;

my $inst=ExtUtils::Installed->new();
my @modules=$inst->modules();

foreach(@modules)
{
  my $ver = $inst->version($_)||"????";
  printf("%-12s -- %s\n", $_, $ver);
}
exit;

root@host-01[/usr/local/bin]perl check.pl
DBD::Oracle -- 1.83
DBD::Pg -- 3.18.0
DBI -- 1.643
JSON -- 4.10
Ora2Pg -- 21.1
Perl -- 5.28.3
RRDs -- 1.6999
3.3 项目初始化
Ora2pg可以针对每次迁移任务创建一个逻辑项目,项目下有对应目录存放迁移过程中的数据和文件。
root@host-01[/home/omm/ora2pg]ora2pg --init_project dir1
Creating project dir1.
./dir1/
        schema/
                dblinks/
                directories/
                functions/
                grants/
                mviews/
                packages/
                partitions/
                procedures/
                sequences/
                synonyms/
                tables/
                tablespaces/
                triggers/
                types/
                views/
        sources/
                functions/
                mviews/
                packages/
                partitions/
                procedures/
                triggers/
                types/
                views/
        data/
        config/
        reports/

Generating generic configuration file
Creating script export_schema.sh to automate all exports.
Creating script import_all.sh to automate all imports.
3.4 编辑配置文件
root@host-01[/etc/ora2pg]cat ora2pg.conf
ORACLE_HOME /usr/lib/oracle/19.11/client64/
ORACLE_DSN dbi:Oracle:host=10.19.190.90;sid=reportdb;port=1521
ORACLE_USER csprpt6
ORACLE_PWD KFQ_kf4
USER_GRANTS 0
DEBUG 0
EXPORT_SCHEMA 0
CREATE_SCHEMA 1
COMPILE_SCHEMA 0
NO_FUNCTION_METADATA 0
TYPE TABLE
DISABLE_COMMENT 0
NO_VIEW_ORDERING 0
EXTERNAL_TO_FDW 1
TRUNCATE_TABLE 0
USE_TABLESPACE 0
REORDERING_COLUMNS 0
CONTEXT_AS_TRGM 0
FTS_INDEX_ONLY 1
USE_UNACCENT 0
USE_LOWER_UNACCENT 0
DATADIFF 0
DATADIFF_UPDATE_BY_PKEY 0
DATADIFF_DEL_SUFFIX _del
DATADIFF_UPD_SUFFIX _upd
DATADIFF_INS_SUFFIX _ins
DATADIFF_WORK_MEM 512 MB
DATADIFF_TEMP_BUFFERS 1024 MB
KEEP_PKEY_NAMES 0
PKEY_IN_CREATE 0
FKEY_ADD_UPDATE never
FKEY_DEFERRABLE 0
DEFER_FKEY 0
DROP_FKEY 0
DISABLE_SEQUENCE 0
DISABLE_TRIGGERS 0
PRESERVE_CASE 0
INDEXES_RENAMING 0
USE_INDEX_OPCLASS 0
PREFIX_PARTITION 0
PREFIX_SUB_PARTITION 1
DISABLE_PARTITION 0
WITH_OID 0
ORA_RESERVED_WORDS audit,comment,references
USE_RESERVED_WORDS 0
DISABLE_UNLOGGED 0
OUTPUT          output.sql
BZIP2
FILE_PER_CONSTRAINT 0
FILE_PER_INDEX 0
FILE_PER_FKEYS 0
FILE_PER_TABLE 0
FILE_PER_FUNCTION 0
STOP_ON_ERROR 1
COPY_FREEZE 0
CREATE_OR_REPLACE 1
PG_NUMERIC_TYPE 1
PG_INTEGER_TYPE 1
DEFAULT_NUMERIC bigint
ENABLE_MICROSECOND 1
TO_NUMBER_CONVERSION numeric
GEN_USER_PWD 0
FORCE_OWNER 0
FORCE_SECURITY_INVOKER 0
DATA_LIMIT 10000
NOESCAPE 0
TRANSACTION     serializable
STANDARD_CONFORMING_STRINGS 1
USE_LOB_LOCATOR 1
LOB_CHUNK_SIZE 512000
XML_PRETTY 0
LOG_ON_ERROR 0
TRIM_TYPE BOTH
INTERNAL_DATE_MAX 49
FUNCTION_CHECK 1
ENABLE_BLOB_EXPORT 1
DATA_EXPORT_ORDER name
PSQL_RELATIVE_PATH 0
JOBS 1
ORACLE_COPIES 1
PARALLEL_TABLES 1
DEFAULT_PARALLELISM_DEGREE 0
PARALLEL_MIN_ROWS 100000
DROP_INDEXES 0
SYNCHRONOUS_COMMIT 0
EXPORT_INVALID 0
PLSQL_PGSQL 1
NULL_EQUAL_EMPTY 0
EMPTY_LOB_NULL 1
PACKAGE_AS_SCHEMA 1
REWRITE_OUTER_JOIN 1
FUNCTION_STABLE 1
COMMENT_COMMIT_ROLLBACK 0
COMMENT_SAVEPOINT 0
USE_ORAFCE 0
AUTONOMOUS_TRANSACTION 1
ESTIMATE_COST 0
COST_UNIT_VALUE 5
DUMP_AS_HTML 0
TOP_MAX 10
HUMAN_DAYS_LIMIT 5
PG_VERSION 12
BITMAP_AS_GIN 1
PG_BACKGROUND 0
PG_SUPPORTS_SUBSTR 1
AUTODETECT_SPATIAL_TYPE 1
CONVERT_SRID 1
DEFAULT_SRID 4326
GEOMETRY_EXTRACT_TYPE INTERNAL
FDW_SERVER orcl
MYSQL_PIPES_AS_CONCAT 0
MYSQL_INTERNAL_EXTRACT_FORMAT 0
## 验证:
root@host-01[/etc/ora2pg]ora2pg -t SHOW_VERSION -c ora2pg.conf
Oracle Database 11g Enterprise Edition Release 11.2.0.4.0
3.5 数据迁移
本次只针对几张表和几个存储过程迁移,分别使用结构转换和数据同步功能。
ora2pg -t TABLE -a T1,T2,T3 -c /etc/ora2pg/ora2pg.conf

root@host-01[/etc/ora2pg]ora2pg -t TABLE -a T1,T2,T3 -c /etc/ora2pg/ora2pg.conf
[========================>] 12/12 tables (100.0%) end of scanning.
Retrieving table partitioning information...
[========================>] 12/12 tables (100.0%) end of table export.


##存储过程处理
P1,P2,P3A
root@host-01[/home/omm/ora2pg/dir1]sh export_schema.sh
[========================>] 685/685 tables (100.0%) end of scanning.
[========================>] 13/13 objects types (100.0%) end of objects auditing.
Running: ora2pg -p -t TABLE -a T1,T2,T3 -o table.sql -b ./schema/tables -c ./config/ora2pg.conf


[========================>] 12/12 tables (100.0%) end of scanning.
Retrieving table partitioning information...
[========================>] 12/12 tables (100.0%) end of table export.
Running: ora2pg -p -t PROCEDURE -a P1,P2,P3 A -o procedure.sql -b ./schema/procedures -c ./config/ora2pg.conf

[========================>] 8/8 procedures (100.0%) end of procedures export.
Running: ora2pg -t PROCEDURE -a P1,P2,P3 A -o procedure.sql -b ./sources/procedures -c ./config/ora2pg.conf
[========================>] 8/8 procedures (100.0%) end of procedures export.

##上面定义转换完成后,可以在目标端执行。

To extract data use the following command:
ora2pg -t COPY -a T1,T2,T3 -o data.sql -b ./data -c ./config/ora2pg.conf
sh import_all.sh -d db1 -o user1 -w xxxx -p 15400 -h 127.0.0.1 -f
ora2pg -p -t TABLE -a T1,T2,T3 -o tales2.sql -b ./schema/tables -c ./config/ora2pg.conf
3.6 错误处理
root@host-01[/home/omm/software/ora2og/DBD-Pg-3.18.0]make
cp lib/Bundle/DBD/Pg.pm blib/lib/Bundle/DBD/Pg.pm
cp Pg.pm blib/lib/DBD/Pg.pm
Running Mkbootstrap for Pg ()
chmod 644 "Pg.bs"
"/usr/bin/perl" -MExtUtils::Command::MM -e 'cp_nonempty' -- Pg.bs blib/arch/auto/DBD/Pg/Pg.bs 644
"/usr/bin/perl" -p -e "s/~DRIVER~/Pg/g; s/^do\(/dontdo\(/" /usr/local/lib64/perl5/auto/DBI/Driver.xst > Pg.xsi
"/usr/bin/perl" "/usr/share/perl5/vendor_perl/ExtUtils/xsubpp"  -typemap '/usr/share/perl5/ExtUtils/typemap'  Pg.xs > Pg.xsc
mv Pg.xsc Pg.c

gcc -c -I/opt/opengauss/install/app/include -I/usr/local/lib64/perl5/auto/DBI -D_REENTRANT
-D_GNU_SOURCE -O2 -g -pipe -Wall -Werror=format-security -Wp,-D_FORTIFY_SOURCE=2 -Wp,
-D_GLIBCXX_ASSERTIONS -fstack-protector-strong -grecord-gcc-switches -specs=/usr/lib/rpm/generic-hardened-cc1
-m64 -mtune=generic -fasynchronous-unwind-tables
-fstack-clash-protection -fwrapv -fno-strict-aliasing -I/usr/local/include -D_LARGEFILE_SOURCE
-D_FILE_OFFSET_BITS=64 -DPGLIBVERSION=90204 -DPGDEFPORT=5432
-g -DPERL_EXTMALLOC_DEF -Dmalloc=Perl_malloc -Dfree=Perl_mfree -Drealloc=Perl_realloc -Dcalloc=Perl_calloc
-DVERSION=\"3.18.0\" -DXS_VERSION=\"3.18.0\" -fPIC "-I/usr/lib64/perl5/CORE" Pg.c

In file included from Pg.xs:14:0:
Pg.h:35:10: fatal error: libpq-fe.h: No such file or directory
 #include "libpq-fe.h"
          ^~~~~~~~~~~~
compilation terminated.
make: *** [Makefile:359: Pg.o] Error 1

export
C_INCLUDE_PATH=/opt/opengauss/install/app_a07d57c3/include/postgresql/server/libpq/:/opt/opengauss/install/app_a07d57c3/include/postgresql/server/

omm@host-01[~]ora2pg --help
Can't locate JSON.pm in @INC (you may need to install the JSON module) (@INC contains: /usr/local/lib64/perl5
/usr/local/share/perl5 /usr/lib64/perl5/vendor_perl
/usr/share/perl5/vendor_perl /usr/lib64/perl5
/usr/share/perl5) at /usr/local/share/perl5/Ora2Pg.pm line 41.
BEGIN failed--compilation aborted at /usr/local/share/perl5/Ora2Pg.pm line 41.
Compilation failed in require at /usr/local/bin/ora2pg line 27.
BEGIN failed--compilation aborted at /usr/local/bin/ora2pg line 27.
omm@host-01[~]timed out waiting for input: auto-logout
JSON-4.10]perl Makefile.PL
JSON-4.10]make && make install

本文作者:孙其成(上海新炬中北团队)
本文来源:“IT那活儿”公众号

