


repmgr搭建
本文档搭建1主3备1仲裁的repmgr架构
linux版本是7.9,pg版本时14.6
搭建repmgr的前提是已安装linux7.9操作系统
postgres和repmgr包分别从这里获取
https://www.postgresql.org/ftp/source/
https://github.com/EnterpriseDB/repmgr
介绍
repmgr是一款开源的用于集群复制管理和故障转移的工具。它扩展了PostgreSQL内建的hot-standby能力,可以设置热备服务器、流复制监控、故障切换等,由2ndQuadrant开发。
特点
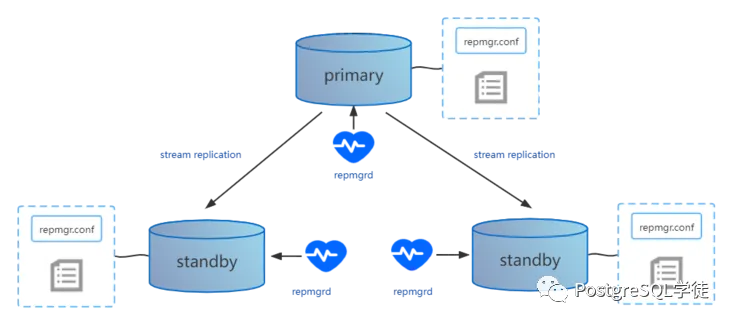
repmgr对集群内节点的管理采用分布式的管理方式,每个节点都有一个 repmgr.conf 配置文件,用来记录本节点的 ID、节点名称、连接串信息、数据库配置参数和管理操作命令等。在完成参数配置后,就可以通过 repmgr 命令实现对集群节点的 “一键式” 部署。不同于Patroni,repmgr会将信息存储在本地数据库内,比如操作日志、元信息等,因此 repmgr 相较于 Patroni 要轻量一些。
Implemented as a PostgreSQL extension
Replication cluster monitoring
Standby cloning with pg_basebackup or Barman
Timeline following:
a standby that can be promoted to a primary without requiring a restart
other standbys that can connect to the new master without being resynced
Cascading standby support
Standbys not directly connected to the master node are not affected during failover of the primary to another standby mode
Replication slot support , simplifying WAL retention management
Switchover support for role-switching between primary and standby
选举机制
代码流程在repmgrd-physical.c中
/* don't check 0-priority nodes */
if (cell->node_info->priority <= 0)
{
log_info(_("node \"%s\" (ID: %i) has priority of %i, skipping"),
cell->node_info->node_name,
cell->node_info->node_id,
cell->node_info->priority);
continue;
}
/* get node's last receive LSN - if "higher" than current winner, current node is candidate */
cell->node_info->last_wal_receive_lsn = sibling_replication_info.last_wal_receive_lsn;
log_info(_("last receive LSN for sibling node \"%s\" (ID: %i) is: %X/%X"),
cell->node_info->node_name,
cell->node_info->node_id,
format_lsn(cell->node_info->last_wal_receive_lsn));
/* compare LSN */
if (cell->node_info->last_wal_receive_lsn > candidate_node->last_wal_receive_lsn) ---先比较LSN
{
/* other node is ahead */
log_info(_("node \"%s\" (ID: %i) is ahead of current candidate \"%s\" (ID: %i)"),
cell->node_info->node_name,
cell->node_info->node_id,
candidate_node->node_name,
candidate_node->node_id);
candidate_node = cell->node_info;
}
/* LSN is same - tiebreak on priority, then node_id */ ---再比较优先级和node_id
else if (cell->node_info->last_wal_receive_lsn == candidate_node->last_wal_receive_lsn)
{
log_info(_("node \"%s\" (ID: %i) has same LSN as current candidate \"%s\" (ID: %i)"),
cell->node_info->node_name,
cell->node_info->node_id,
candidate_node->node_name,
candidate_node->node_id);
可以看到,当发生了failover时,repmgr选举候选备节点会以以下顺序选举:LSN > Priority > Node_ID。若LSN一样,会根据priority优先级进行比较,该优先级是在配置文件中进行参数配置,将priority设置为0会禁止参与选主。若优先级也一样,会比较节点的Node ID,小者会优先选举
安装部署
所有服务器安装postgresql软件
安装依赖
yum -y install readline readline-devel zlib zlib-devel gettext gettext-devel openssl openssl-devel pam pam-devel libxml2 libxml2-devel libxslt libxslt-devel perl perl-devel tcl-devel uuid-devel gcc gcc-c++ make flex bison perl-ExtUtils*
yum -y install libicu
yum -y install libicu-devel
(检查
[postgres@pg16 postgresql-16.1]$ rpm -qa libicu*
libicu-50.2-4.el7_7.x86_64
libicu-devel-50.2-4.el7_7.x86_64
)
创建用户和组
groupadd dba -g 2000
useradd postgres -g 2000 -u 2000
id postgres
#uid=2000(postgres) gid=2000(dba) groups=2000(dba)
echo "postgres123"|passwd --stdin postgres
配置ssh互信
每个主机配置主机名
hostnamectl set-hostname xxxx
配置主机名本地解析
cat>>/etc/hosts<<EOF
192.168.131.20 primary
192.168.131.21 standby1
192.168.131.22 standby2
192.168.131.23 witness
EOF
每个主机执行
ssh-keygen -t rsa
ssh-copy-id -i .ssh/id_rsa.pub postgres@primary
ssh-copy-id -i .ssh/id_rsa.pub postgres@standby1
ssh-copy-id -i .ssh/id_rsa.pub postgres@standby2
ssh-copy-id -i .ssh/id_rsa.pub postgres@witness
ssh-copy-id -i .ssh/id_rsa.pub root@primary
ssh-copy-id -i .ssh/id_rsa.pub root@standby1
ssh-copy-id -i .ssh/id_rsa.pub root@standby2
ssh-copy-id -i .ssh/id_rsa.pub root@witness
内核参数调整
cat>>/etc/sysctl.conf<<EOF
fs.file-max = 76724200
kernel.sem = 10000 10240000 10000 1024
kernel.shmmni = 4096
kernel.shmall = 253702
kernel.shmmax = 1039163392
net.ipv4.ip_local_port_range = 9000 65500
net.core.rmem_default = 262144
net.core.wmem_default = 262144
net.core.rmem_max = 4194304
net.core.wmem_max = 1048576
fs.aio-max-nr = 40960000
vm.dirty_ratio=20
vm.dirty_background_ratio=3
vm.dirty_writeback_centisecs=100
vm.dirty_expire_centisecs=500
vm.swappiness=10
vm.min_free_kbytes=524288
vm.swappiness=0
vm.overcommit_memory=2
vm.overcommit_ratio=75
net.ipv4.ip_local_port_range = 10000 65535
EOF
sysctl -p
目录规划
#源文件目录
mkdir /soft
mkdir -p /opt/pg14
mkdir -p /opt/pgwal
mkdir -p /opt/pgarchive
chown -R postgres:dba /soft /opt
chmod 0700 /opt/pgdata /opt/pgwal /opt/pgarchive
用户 limits 设置
把下面的行增加到/etc/security/limits.conf 文件中
cat>>/etc/security/limits.conf<<EOF
postgres soft nofile 1048576
postgres hard nofile 1048576
postgres soft nproc 131072
postgres hard nproc 131072
postgres soft stack 10240
postgres hard stack 32768
postgres soft core 6291456
postgres hard core 6291456
EOF
#检查是否修改正确:
cat /etc/security/limits.conf
#重启,内核参数修改生效,准备安装软件。
reboot
su - postgres
cd /soft
postgres解压安装包
tar -zxvf postgresql-14.6.tar.gz
cd /soft/postgresql-14.6
./configure --prefix=/opt/pg14
./configure --prefix=/opt/pg14 --with-pgport=5432 --enable-dtrace --enable-debug
gmake world&& gmake install-world
2所有服务器安装repmgr
yum -y install libcurl-devel
yum install json-c-devel
su - postgres
tar -zxvf repmgr-5.4.1.tar.gz
cd /soft/repmgr-5.4.1/
./configure PG_CONFIG=/opt/pg14/bin/pg_config
make && make install
- 初始化主库,只需要主库执行
cd /opt
ln -s /opt/pg14 /opt/pgsql
/opt/pgsql/bin/initdb -D/opt/pgdata -X/opt/pgwal -EUTF8 -Upostgres -W
5.每个服务器配置sudo权限
su - root
修改/etc/sudoers后结果
#%wheel ALL=(ALL) ALL
%wheel ALL=(ALL) NOPASSWD: ALL
6.每个服务器将postgres用户加入wheel组
usermod -G wheel postgres
id postgres
uid=2000(postgres) gid=2000(dba) groups=2000(dba),10(wheel)
这样就可以sudo执行root的命令了
主库修改参数文件
postgresql.conf
listen_addresses = '0.0.0.0'
port = 5432
shared_preload_libraries = 'repmgr'
wal_log_hints = on
hba_file = '/opt/pgdata/pg_hba.conf'
archive_mode = on
archive_command = 'cp %p /opt/pgarchive/%f'
logging_collector = on
wal_level = replica
hot_standby = on
主库修改认证文件
pg_hba.conf
# "local" is for Unix domain socket connections only
local all all trust
# IPv4 local connections:
host repmgr repmgr 192.168.131.20/32 trust
host repmgr repmgr 192.168.131.21/32 trust
host repmgr repmgr 192.168.131.22/32 trust
host repmgr repmgr 192.168.131.23/32 trust
host replication repmgr 192.168.131.20/32 trust
host replication repmgr 192.168.131.21/32 trust
host replication repmgr 192.168.131.22/32 trust
host replication repmgr 192.168.131.23/32 trust
host all all 0.0.0.0/0 scram-sha-256
# IPv6 local connections:
host all all ::/0 scram-sha-256
# Allow replication connections from localhost, by a user with the
# replication privilege.
local replication all reject
host replication all 127.0.0.1/32 reject
host replication all ::1/128 reject
host replication repmgr 0.0.0.0/0 trust
host replication repuser 0.0.0.0/0 trust
主库配置相关权限
create user repuser replication;
create user repmgr superuser ;
\c postgres repmgr
create database repmgr owner repmgr;
\c repmgr repmgr
drop schema public ;
create schema repmgr authorization repmgr;
create extension repmgr with schema repmgr;
\c repmgr postgres
grant execute on function pg_read_binary_file(text) to repmgr;
grant execute on function pg_read_binary_file(text, bigint, bigint) to repmgr;
grant execute on function pg_read_binary_file(text, bigint, bigint, boolean) to
repmgr;
grant execute on function pg_ls_dir(text) to repmgr;
grant execute on function pg_ls_dir(text, boolean, boolean) to repmgr;
grant execute on function pg_stat_file(text) to repmgr;
grant execute on function pg_stat_file(text, boolean) to repmgr;
10.每个服务器创建repmgr.conf文件放在postgres家目录(node_id,node_name,conninfo根据实际情况修改,每个主机不一样)这里展示的是节点1的repmgr.conf文件。
主库repmgr.conf node_id=1 node_name='primary' conninfo='host=192.168.131.20 port=5432 user=repmgr connect_timeout=2' data_directory='/opt/pgdata' replication_user='repuser' replication_type='physical' repmgr_bindir='/opt/pg14/bin' failover='automatic' promote_command='/opt/pg14/bin/repmgr standby promote -f /home/postgres/repmgr.conf --log-to-file --siblings-follow' follow_command='/opt/pg14/bin/repmgr standby follow -f /home/postgres/repmgr.conf' monitoring_history=yes connection_check_type=ping reconnect_attempts=6 reconnect_interval=10 standby_disconnect_on_failover=true service_start_command='/usr/bin/sudo /usr/bin/systemctl restart postgresql' service_stop_command='/usr/bin/sudo /usr/bin/systemctl stop postgresql' service_restart_command='/usr/bin/sudo /usr/bin/systemctl restart postgresql' service_reload_command='/usr/bin/sudo /usr/bin/systemctl reload postgresql' repmgrd_service_start_command='/opt/pg14/bin/repmgrd -f /home/postgres/repmgr.conf' log_level=INFO log_facility=STDERR log_file='/home/postgres/log.log' priority=98 |
备库repmgr.conf node_id=1 node_name='primary' conninfo='host=192.168.131.20 port=5432 user=repmgr connect_timeout=2' data_directory='/opt/pgdata' replication_user='repuser' replication_type='physical' repmgr_bindir='/opt/pg14/bin' failover='automatic' promote_command='/opt/pg14/bin/repmgr standby promote -f /home/postgres/repmgr.conf --log-to-file --siblings-follow' follow_command='/opt/pg14/bin/repmgr standby follow -f /home/postgres/repmgr.conf' monitoring_history=yes connection_check_type=ping reconnect_attempts=6 reconnect_interval=10 standby_disconnect_on_failover=true service_start_command='/usr/bin/sudo /usr/bin/systemctl restart postgresql' service_stop_command='/usr/bin/sudo /usr/bin/systemctl stop postgresql' service_restart_command='/usr/bin/sudo /usr/bin/systemctl restart postgresql' service_reload_command='/usr/bin/sudo /usr/bin/systemctl reload postgresql' repmgrd_service_start_command='/opt/pg14/bin/repmgrd -f /home/postgres/repmgr.conf' log_level=INFO log_facility=STDERR log_file='/home/postgres/log.log' priority=98 |
11.仲裁库初始化
initdb -D /opt/pgdata -W
拷贝主库的参数文件和认证文件到仲裁库并替换
scp pg2:/opt/pgdata/pg_hba.conf /opt/pgdata
scp pg2:/opt/pgdata/postgresql.conf /opt/pgdata/
启动仲裁库
pg_ctl start
create user repmgr superuser ;
create database repmgr owner repmgr;
主库注册
repmgr -f repmgr.conf primary register
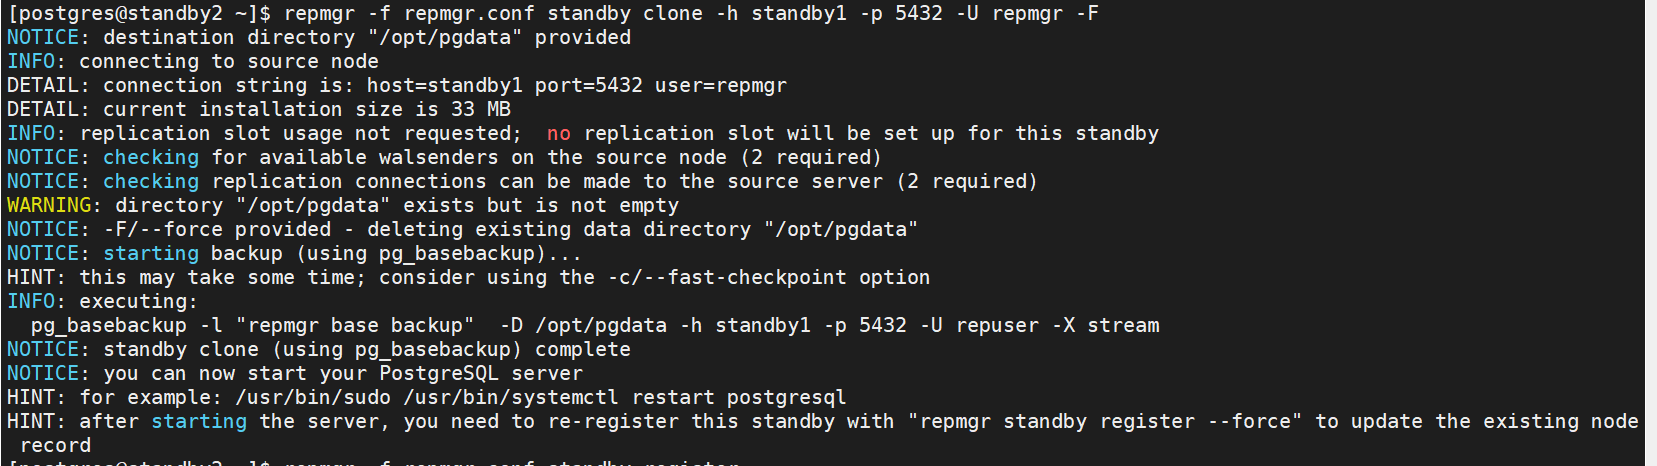
从库clone
repmgr -f repmgr.conf standby clone -h pg4 -p 5432 -U repmgr -F
从库注册
启动数据库
pg_ctl start
repmgr -f repmgr.conf standby register
启动repmgr守护进程。
repmgrd -d
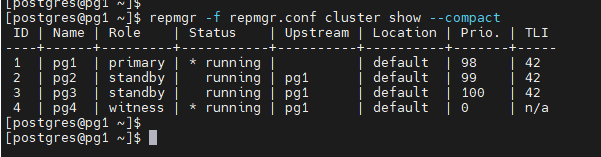
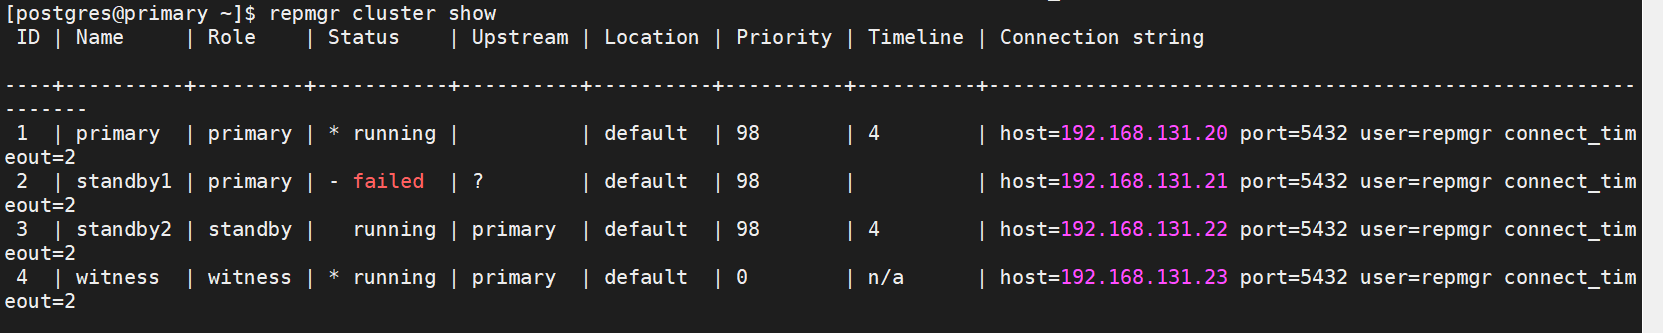
集群状态
repmgr -f repmgr.conf cluster show --compac
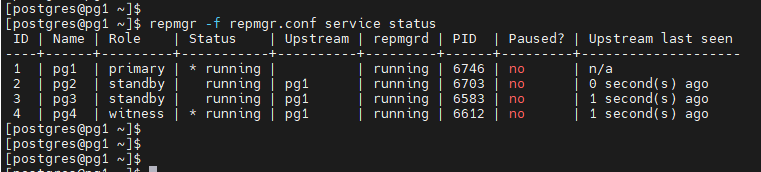
repmgrd状态
repmgr -f repmgr.conf service status
启动repmgrd
repmgrd -f repmgr.conf
从库follow
repmgr -f repmgr.conf standby follow --upstream-node-id=2
switchover
repmgr -f repmgr.conf standby switchover --siblings-follow
failover
repmgr -f repmgr.conf standby promote --siblings-follow
原主库重新注册
repmgr -f repmgr.conf node rejoin -h pg4 -p 5432 -U repmgr --force-rewind
仲裁节点注册
repmgr -f repmgr.conf witness register -h pg1 -p 5432 -U repmgr
故障切换
repmgr standby follow 更新standby的upstream节点到新primary
备注:需要完成如下准备linux系统的准备工作才可以正常使用repmgr.conf中sudo的命令。
一.
postges需要使用sudo命令执行管理员命令
方法是将postgres加入wheel组
然后修改/etc/sudoers文件
操作参考:
将postgres加入wheel组
usermod -G wheel postgres
id postgres

2 vi /etc/sudoers
将如下两行
%wheel ALL=(ALL) ALL
#%wheel ALL=(ALL) NOPASSWD: ALL
修改为
#%wheel ALL=(ALL) ALL
%wheel ALL=(ALL) NOPASSWD: ALL
保存退出
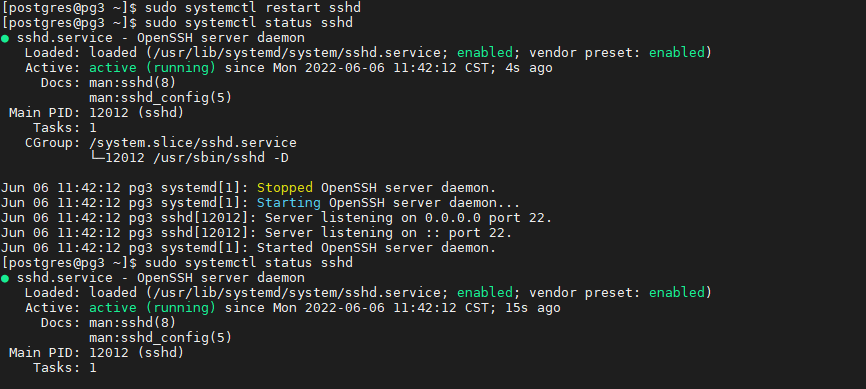
- 测试
使用postgres用户重启sshd测试
sudo systemctl restart sshd
sudo systemctl status sshd
二.
postgres需要配置开机启动
方法参考
- 进入postgres安装包的解压目录,如安装包解压到了/soft目录下
cd /soft/postgresql-14.2/contrib/start-scripts
这个目录下有一个linux文件

2使用root将linux文件拷贝到/etc/init.d
cp linux /etc/init.d/
3root进入/etc/init.d赋权并修改文件名
cd /etc/init.d
chmod +x linux
mv linux postgresql
4vi postgresql
将prefix和pgdata这两个参数修改为实际目录
prefix=/opt/pg14
PGDATA="/opt/pgdata"

5root添加服务
Chkconfig --add postgresql
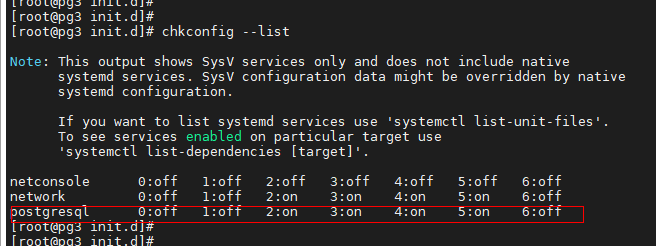
6.检查postgresql服务是否添加成功
Chkconfig --list
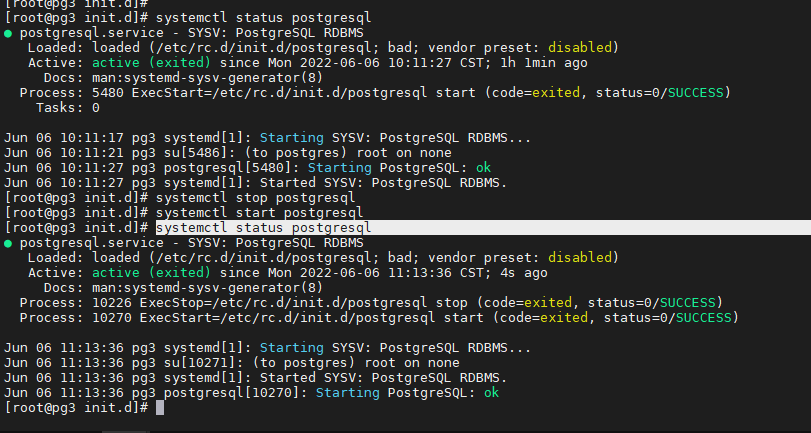
- 执行进行验证
systemctl status postgresql
systemctl stop postgresql
systemctl start postgresql
systemctl status postgresql
故障记录
repmgr报错缺失归档

重新重主节点同步clone数据
repmgr -f repmgr.conf standby clone -h standby1 -p 5432 -U repmgr -F
强制重新注册standby
repmgr -f repmgr.conf standby register -h standby1 -p 5432 -U repmgr -F

切换primary
先停止需要切换得standby1库
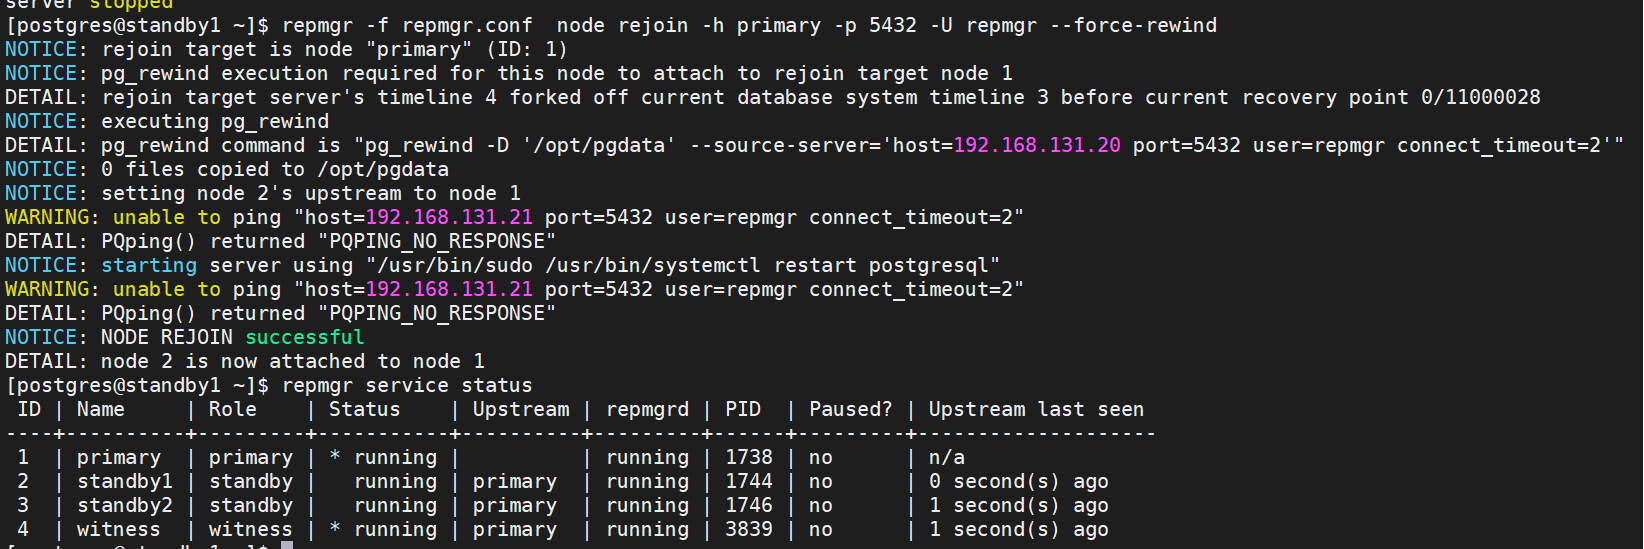
[postgres@standby1 ~]$ pg_ctl stop
waiting for server to shut down..... done
server stopped
在新的primary查看正常后
在停库下执行如下命令重新注册原primary:
[postgres@standby1 ~]$ repmgr -f repmgr.conf node rejoin -h primary -p 5432 -U repmgr --force-rewind
参考文档:
https://mp.weixin.qq.com/s?__biz=MzUyOTAyMzMyNg==&mid=2247487588&idx=1&sn=6bf3b823142e0e1deebff6e519391854&chksm=fa663855cd11b14313423bb88c61c9eaa9d0b1a2d50893990fff22c47b706a0aeb9ac5412c9a&token=1039605624&lang=zh_CN#rd
