


点击上方“IT那活儿”公众号--专注于企业全栈运维技术分享,不管IT什么活儿,干就完了!!!
软件环境要求及依赖要求:
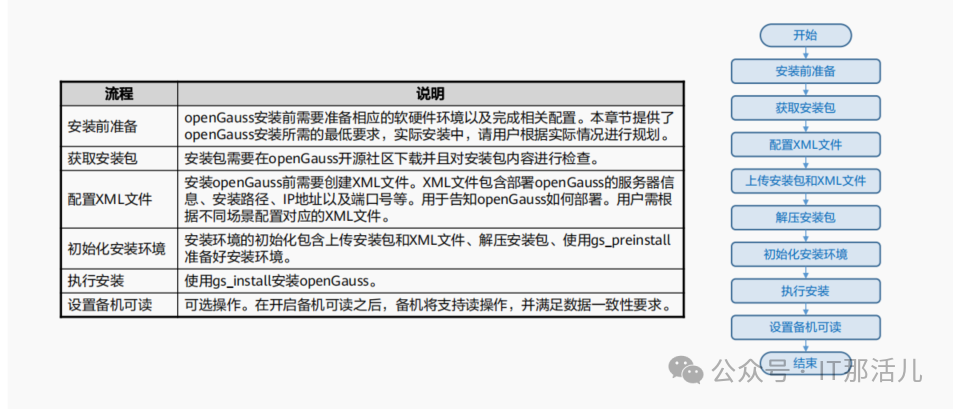
环境准备:
3.1 检查CPU核心数
[root@openguass01 ~]# cat /proc/cpuinfo | grep processor
processor : 0
processor : 1
3.2 检查内存大小
[root@openguass01 ~]#free -h
total used free shared buff/cache available
Mem: 3.7G 882M 1.9G 27M 956M 2.6G
Swap: 5.0G 0B 5.0G
3.3 检查系统版本
[root@openguass01 ~]#cat etc/redhat-release
CentOS Linux release 7.9.2009 (Core)
3.4 数据库版本下载
opengauss3.0.0企业版:openGauss-3.0.0-CentOS-64bit-all.tar.gz 下载地址:https://opengauss.org/zh/download.html
4.1 修改hostsname 、hosts
[root@localhost ~]# hostnamectl set-hostname 1ge53
[root@localhost ~]# hostname 1ge53

[root@1ge53 ~]# echo "192.168.100.53 1ge53" >> /etc/hosts
cat /etc/hosts | grep 100
4.2 修改SELINUX
[root@1ge53 ~]# vim /etc/selinux/config
SELINUX=disabled
getenforce
sed -i 's/^SELINUX=.*/SELINUX=disabled/' /etc/selinux/config
cat /etc/selinux/config | grep SELINUX=disabled
setenforce 0
getenforce
4.3 关闭防火墙
systemctl status firewalld
systemctl disable firewalld.service
systemctl stop firewalld.service
4.4 设置字符集参数
*要求英文系统
cat>> /etc/profile<<EOF
export LANG=en_US.UTF-8
EOF
source /etc/profile
cat /etc/profile | grep LANG
echo $LANG
4.5 设置时区和时间

hwclock --systohc
4.6 关闭REmoveIPC(openEuler环境)
cat /usr/lib/systemd/system/systemd-logind.service
sed -i '/^RemoveIPC/d' /usr/lib/systemd/system/systemd-logind.service
echo "RemoveIPC=no" >> /etc/systemd/logind.conf
echo "RemoveIPC=no" >> /usr/lib/systemd/system/systemd-logind.service
systemctl daemon-reload
systemctl restart systemd-logind
loginctl show-session | grep RemoveIPC
systemctl show systemd-logind | grep RemoveIPC
4.7 设置网卡MTU相同大小
ifconfig
对于X86 千兆网卡MTU默认值是1500(推荐) ARM MTU值和万兆网卡推荐8192; ifconfig 网卡名称 mtu 值。
4.8 设置root用户远程登陆
sed -i '/Banner/s/^/#/' /etc/ssh/sshd_config
sed -i '/PermitRootLogin/s/^/#/' /etc/ssh/sshd_config
echo -e "\n" >> /etc/ssh/sshd_config
echo "Banner none " >> /etc/ssh/sshd_config
echo "PermitRootLogin yes" >> /etc/ssh/sshd_config
systemctl restart sshd.service
cat /etc/ssh/sshd_config |grep -v ^#|grep -E 'PermitRootLogin|Banner'
Banner none
PermitRootLogin yes
4.9 设置操作系统参数
cat >> /etc/sysctl.conf << EOF
net.ipv4.tcp_max_tw_buckets = 10000
net.ipv4.tcp_tw_reuse = 1
net.ipv4.tcp_tw_recycle = 1
net.ipv4.tcp_keepalive_time = 30
net.ipv4.tcp_keepalive_intvl = 30
net.ipv4.tcp_retries2 = 12
net.ipv4.ip_local_reserved_ports = 15400-15407,20050-20057
net.core.wmem_max = 21299200
net.core.rmem_max = 21299200
net.core.wmem_default = 21299200
net.core.rmem_default = 21299200
net.sctp.sctp_mem = 94500000 915000000 927000000
net.sctp.sctp_rmem = 8192 250000 16777216
net.sctp.sctp_wmem = 8192 250000 16777216
kernel.sem = 250 6400000 1000 25600
net.ipv4.tcp_rmem = 8192 250000 16777216
net.ipv4.tcp_wmem = 8192 250000 16777216
vm.min_free_kbytes = 193064
net.core.netdev_max_backlog = 65535
net.ipv4.tcp_max_syn_backlog = 65535
net.core.somaxconn = 65535
kernel.shmall = 1152921504606846720
kernel.shmmax = 18446744073709551615
net.ipv4.tcp_retries1 = 5
net.ipv4.tcp_syn_retries = 5
net.sctp.path_max_retrans = 10
net.sctp.max_init_retransmits = 10
net.ipv4.tcp_fin_timeout = 60
EOF
4.10 performance
vi /etc/profile.d/performance.sh
4.11 设置系统资源限制
echo "* soft stack 3072" >> /etc/security/limits.conf
echo "* hard stack 3072" >> /etc/security/limits.conf
echo "* soft nofile 1000000" >> /etc/security/limits.conf
echo "* hard nofile 1000000" >> /etc/security/limits.conf
echo "* soft nproc unlimited" >> /etc/security/limits.d/90-nproc.conf
tail -n 4 /etc/security/limits.conf
tail -n 1 /etc/security/limits.d/90-nproc.conf
4.12 关闭swap分区
swapoff -a
free -h
4.13 关闭透明页
cat /sys/kernel/mm/redhat_transparent_hugepage/enabled
cat /sys/kernel/mm/transparent_hugepage/enabled
always madvise [never]
grep -i HugePages_Total /proc/meminfo
sed -i 's/.*rhgb.*quiet/& numa=off transparent_hugepage=never/g' /etc/default/grub
cat /etc/default/grub | grep GRUB_CMDLINE_LINUX
生效
grub2-mkconfig -o /boot/grub2/grub.cfg
echo never > /sys/kernel/mm/transparent_hugepage/enabled
echo never > /sys/kernel/mm/transparent_hugepage/defrag
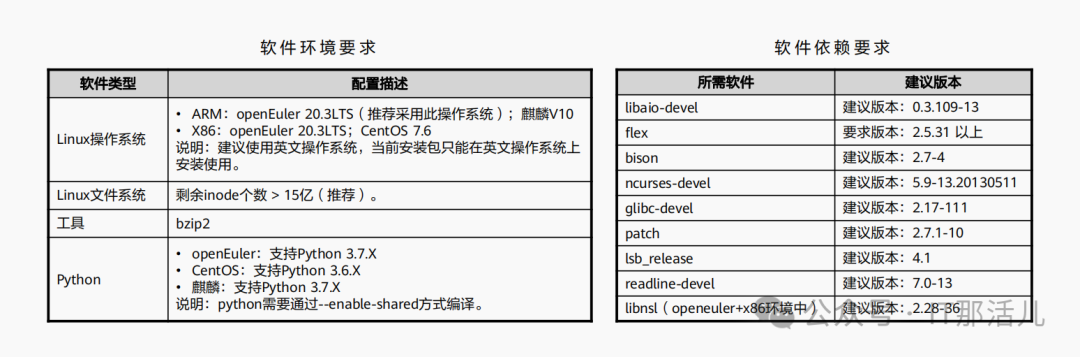
4.14 依赖包安装
rpm -qa libaio-devel flex bison ncurses-devel glibc-devel patch redhat-lsb-core readline-devel bzip2 python3 java-1.8.0-openjdk*
yum install -y lksctp*
yum install -y java-1.8.0-openjdk* psmisc bzip2 python3 python3-devel
yum install libaio-devel flex bison ncurses-devel glibc-devel patch   readline-devel redhat-lsb-core libnsl
rpm -qa libaio-devel flex bison ncurses-devel glibc-devel patch redhat-lsb-core readline-devel bzip2 python3 java-1.8.0-openjdk* libnsl
4.15 创建软件包目录
mkdir -p /opt/software/openGauss
chmod 755 -R /opt/software
4.16 上传安装包到指定位置
4.17 创建用户
groupadd dbgrp
useradd -g dbgrp -d /home/omm -m -s /bin/bash omm
4.18 重启
有条件可以重启下。
5.1 解压缩
tar -zxvf openGauss-2.0.0-CentOS-64bit-all.tar.gz
[root@1ge53 openGauss]# ll
total 198980
-rw-r--r--. 1 root root 101382908 Nov  3 17:39 openGauss-2.0.0-CentOS-64bit-all.tar.gz
-rw-r--r--. 1 root root        65 Mar 31 2021 openGauss-2.0.0-CentOS-64bit-om.sha256
-rw-r--r--. 1 root root  12646330 Mar 31 2021 openGauss-2.0.0-CentOS-64bit-om.tar.gz
-rw-r--r--. 1 root root        65 Mar 31 2021 openGauss-2.0.0-CentOS-64bit.sha256
-rw-r--r--. 1 root root  89573052 Mar 31 2021 openGauss-2.0.0-CentOS-64bit.tar.bz2
-rw-------. 1 root root        65 Mar 31 2021 upgrade_sql.sha256
-rw-------. 1 root root    133704 Mar 31 2021 upgrade_sql.tar.gz
tar -zxvf openGauss-2.0.0-CentOS-64bit-om.tar.gz
5.2 创建 XML 配置文件

单实例配置文件参考:
<?xml version="1.0" encoding="UTF-8"?>
<ROOT>
    <!-- openGauss整体信息 -->
    <CLUSTER>
        <!-- 数据库名称 -->
        <PARAM name="clusterName" value="1geCluster" />
        <!-- 数据库节点名称(hostname) -->
        <PARAM name="nodeNames" value="1ge53" />
        <!-- 数据库安装目录-->
        <PARAM name="gaussdbAppPath" value="/opt/app/install/app" />
        <!-- 日志目录-->
        <PARAM name="gaussdbLogPath" value="/var/log/omm" />
        <!-- 临时文件目录-->
        <PARAM name="tmpMppdbPath" value="/opt/app/tmp" />
        <!-- 数据库工具目录-->
        <PARAM name="gaussdbToolPath" value="/opt/app/install/om" />
        <!-- 数据库core文件目录-->
        <PARAM name="corePath" value="/opt/app/corefile" />
        <!-- 节点IP,与数据库节点名称列表一一对应 -->
        <PARAM name="backIp1s" value="192.168.100.50"/>
    </CLUSTER>
    <!-- 每台服务器上的节点部署信息 -->
    <DEVICELIST>
        <!-- 节点1上的部署信息 -->
        <DEVICE sn="1000001">
            <!-- 节点1的主机名称 -->
            <PARAM name="name" value="1ge53"/>
            <!-- 节点1所在的AZ及AZ优先级 -->
            <PARAM name="azName" value="AZ1"/>
            <PARAM name="azPriority" value="1"/>
            <!-- 节点1的IP,如果服务器只有一个网卡可用,将backIP1和sshIP1配置成同一个IP -->
            <PARAM name="backIp1" value="192.168.100.50"/>
            <PARAM name="sshIp1" value="192.168.100.50"/>

      <!--dbnode-->
      <PARAM name="dataNum" value="1"/>
        <!–DBnode端口号–>
      <PARAM name="dataPortBase" value="15400"/>
        <!–DBnode主节点上数据目录,及备机数据目录–>
      <PARAM name="dataNode1" value="/opt/app/install/data/dn01"/>
<!–DBnode节点上设定同步模式的节点数–>
            <PARAM name="dataNode1_syncNum" value="0"/>
        </DEVICE>
    </DEVICELIST>
</ROOT>
5.3 安装前交互(OM工具)
自动设置Linux内核参数以达到提高服务器负载能力的目的。这些参数直接影响数据库系统的运行状态,请仅在确认必要时调整。 自动将openGauss配置文件、安装包拷贝到openGauss主机的相同目录下。 openGauss安装用户、用户组不存在时,自动创建安装用户以及用户组。 读取openGauss配置文件中的目录信息并创建,将目录权限授予安装用户。
1)前提条件
2)注意事项
用户需要检查上层目录权限,保证安装用户对安装包和配置文件目录读写执行的权限。 xml文件中各主机的名称与IP映射配置正确。 只能使用root用户执行gs_preinstall命令。
3)执行gs_preinstall
[root@1ge53 script]# ./gs_preinstall -U omm -G dbgrp -X /opt/software/openGauss/cluster_config.xml
Parsing the configuration file.
Successfully parsed the configuration file.
Installing the tools on the local node.
Successfully installed the tools on the local node.
Setting pssh path
Successfully set core path.
您确定要创建用户[omm]并为其创建信任吗
Are you sure you want to create the user[omm] and create trust for it (yes/no)? y
Please enter password for cluster user.
Password:omm123
Please enter password for cluster user again.
Password:omm123
Successfully created [omm] user on all nodes.
Preparing SSH service.
Successfully prepared SSH service.
Checking OS software.
Successfully check os software.
Checking OS version.
Successfully checked OS version.
Creating cluster's path.
Successfully created cluster's path.
Setting SCTP service.
Successfully set SCTP service.
Set and check OS parameter.
Setting OS parameters.
Successfully set OS parameters.
Warning: Installation environment contains some warning messages.
Please get more details by "/opt/software/openGauss/script/gs_checkos -i A -h 1ge53 --detail".
Set and check OS parameter completed.
Preparing CRON service.
Successfully prepared CRON service.
Setting user environmental variables.
Successfully set user environmental variables.
Setting the dynamic link library.
Successfully set the dynamic link library.
Setting Core file
Successfully set core path.
Setting pssh path
Successfully set pssh path.
Set ARM Optimization.
No need to set ARM Optimization.
Fixing server package owner.
Setting finish flag.
Successfully set finish flag.
Preinstallation succeeded.
4)detail检查信息
[root@1ge53 script]# ./gs_checkos -i A -h 1ge53 --detail
Checking items:
    A1. [ OS version status ] : Normal
        [1ge53]
        centos_7.6.1810_64bit

    A2. [ Kernel version status ] : Normal
        The names about all kernel versions are same. The value is "3.10.0-1160.el7.x86_64".
    A3. [ Unicode status ] : Normal
        The values of all unicode are same. The value is "LANG=en_US.UTF-8".
    A4. [ Time zone status ] : Normal
        The informations about all timezones are same. The value is "+0800".
    A5. [ Swap memory status ] : Normal
        The value about swap memory is correct.
    A6. [ System control parameters status ] : Warning
        [1ge53]
        Warning reason: variable 'net.ipv4.tcp_retries1' RealValue '3' ExpectedValue '5'.
        Warning reason: variable 'net.ipv4.tcp_syn_retries' RealValue '6' ExpectedValue '5'.
        Warning reason: variable 'net.sctp.path_max_retrans' RealValue '5' ExpectedValue '10'.
        Warning reason: variable 'net.sctp.max_init_retransmits' RealValue '8' ExpectedValue '10'.
        Check_SysCtl_Parameter warning.

    A7. [ File system configuration status ] : Warning
        [1ge53]
        Warning reason: variable 'max user processes' RealValue '14950' ExpectedValue 'unlimited'

    A8. [ Disk configuration status ] : Normal
        The value about XFS mount parameters is correct.
    A9. [ Pre-read block size status ] : Normal
        The value about Logical block size is correct.
    A10.[ IO scheduler status ] : Normal
        The value of IO scheduler is correct.
    A11.[ Network card configuration status ] : Warning
        [1ge53]
BondMode Null
        Warning reason: network 'ens33' 'mtu' RealValue '1500' ExpectedValue '8192'

    A12.[ Time consistency status ] : Warning
        [1ge53]
        The NTPD not detected on machine and local time is "2022-11-03 22:54:03".

    A13.[ Firewall service status ] : Normal
        The firewall service is stopped.
    A14.[ THP service status ] : Normal
        The THP service is stopped.
Total numbers:14. Abnormal numbers:0. Warning numbers:4.
5)根据报告手动添加sysctl.conf修改值
cat >> /etc/sysctl.conf << EOF
net.ipv4.tcp_retries1 = 5
net.ipv4.tcp_syn_retries = 5
net.sctp.path_max_retrans = 10
net.sctp.max_init_retransmits = 10
net.ipv4.tcp_fin_timeout = 60
EOF
sysctl -p
5.4 执行安装
已成功执行前置脚本gs_preinstall ; 服务器操作系统和网络均正常运行。
1)使用root执行如下命令
cd /opt/software/openGauss/script
chmod -R 775 /opt/software/openGauss/script
chown -R omm:dbgrp /opt/software/openGauss/script
2)使用omm用户安装openGauss DBMS和创建openGauss数据库
su - omm
cd /opt/software/openGauss/script
3)执行
最少包含8个字符。 不能和用户名、当前密码(ALTER)、或当前密码反序相同。 至少包含大写字母(A-Z),小写字母(a-z),数字,非字母数字字符(限定为~!@#$%^&*()-_=+\|[{}];:,<.>/?)四类字符中的三类字符。
安装方式一:
gs_install -X /opt/software/openGauss/cluster_config.xml --gsinit-parameter="--locale=en_US.utf8"
Parsing the configuration file.
Check preinstall on every node.
Successfully checked preinstall on every node.
Creating the backup directory.
Successfully created the backup directory.
begin deploy..
Installing the cluster.
begin prepare Install Cluster..
Checking the installation environment on all nodes.
begin install Cluster..
Installing applications on all nodes.
Successfully installed APP.
begin init Instance..
encrypt cipher and rand files for database.
Please enter password for database:huawei@1234
Please repeat for database:huawei@1234
begin to create CA cert files
The sslcert will be generated in /opt/huawei/install/app/share/sslcert/om
Cluster installation is completed.
Configuring.
Deleting instances from all nodes.
Successfully deleted instances from all nodes.
Checking node configuration on all nodes.
Initializing instances on all nodes.
Updating instance configuration on all nodes.
Check consistence of memCheck and coresCheck on database nodes.
Configuring pg_hba on all nodes.
Configuration is completed.
Successfully started cluster.
Successfully installed application.
end deploy..
安装方式二:
gs_install -X /opt/software/openGauss/script/clusterconfig.xml \
--gsinit-parameter="--encoding=UTF8" \
--dn-guc="max_connections=1000" \
--dn-guc="max_process_memory=3GB" \
--dn-guc="shared_buffers=128MB" \
--dn-guc="bulk_write_ring_size=128MB" \
--dn-guc="cstore_buffers=16MB"
[omm@1ge53 ~]$ gsql -d postgres -p 15400 -r
gsql ((openGauss 2.0.0 build 78689da9) compiled at 2021-03-31 21:04:03 commit 0 last mr )
Non-SSL connection (SSL connection is recommended when requiring high-security)
Type "help" for help.
postgres=#
【说明】-r 具有编辑功能,例如键盘的上下箭头。
6.1 预检查时GAUSS-51900 不支持7.9

处理一:
rpm -ivh centos-release-7-6.1810.2.el7.centos.x86_64.rpm --force
[root@1ge53 script]# rpm -qa | grep -i centos-release
centos-release-7-9.2009.0.el7.centos.x86_64
centos-release-7-6.1810.2.el7.centos.x86_64
[root@1ge53 script]# rpm -ev centos-release-7-9.2009.0.el7.centos.x86_64
Preparing packages...
centos-release-7-9.2009.0.el7.centos.x86_64
[root@1ge53 script]# rpm -qa | grep -i centos-release
centos-release-7-6.1810.2.el7.centos.x86_64
处理二:
[root@localhost ~]#cat /etc/redhat-release
CentOS Linux release 7.6.1810 (Core)
6.2 安装数据库时GAUSS-51400

[omm@1ge53 script]$ gs_om -t status
-----------------------------------------------------------------------
cluster_name : 1geCluster
cluster_state : Unavailable
redistributing : No
-----------------------------------------------------------------------
[omm@1ge53 script]$ gs_om -t stop
Stopping cluster.
=========================================
Successfully stopped cluster.
=========================================
End stop cluster.

[omm@1ge53 script]$ gs_om -t start
Starting cluster.
=========================================
[SUCCESS] 1ge53
2022-11-04 11:42:03.705 63648a0b.1 [unknown] 140177987811072 [unknown] 0 dn_6001 01000  0 [BACKEND] WARNING: could not create any HA TCP/IP sockets
2022-11-04 11:42:03.707 63648a0b.1 [unknown] 140177987811072 [unknown] 0 dn_6001 01000  0 [BACKEND] WARNING: Failed to initialize the memory protect for g_instance.attr.attr_storage.cstore_buffers (1024 Mbytes)or shared memory (3310 Mbytes) is larger. ##正常告警
=========================================
Successfully started.

本文作者:刘忠一(上海新炬中北团队)
本文来源:“IT那活儿”公众号

文章转载自IT那活儿,如果涉嫌侵权,请发送邮件至:contact@modb.pro进行举报,并提供相关证据,一经查实,墨天轮将立刻删除相关内容。
