前言:之前我一直使用的是wordpress搭建的博客,由于是在某云搞活动时买的最低配置服务器,而wordpress又需要安装很多组件,网站变得越来越慢。最近发现了Hugo 是 Go 编写的静态网站生成器,速度很快,依赖于 Markdown 文件, 非常适合博客,索性就把之前的全部干掉了。
看了一些帖子,大部分是在本地编辑好,然后转化为html文件扔到Github,然后通过 Github Page的方式访问,我也测了下感觉访问Github还是太慢了,并且最近GIthub也不稳定,所以我就直接在我Linux服务器上部署了,使用个人域名访问还是挺快的。我的博客
本文部署方式是使用Nginx作为Web服务器,代理Hugo和Gitbook的静态网页,通过个人域名访问。
. 一、部署hugo
在Github上下载Hugo的Release包上传到Linux服务器
1$ yum -y install  git golang
2$ mkdir -p /app/hugo_0.74.3
3$ tar xf hugo_0.74.3_Linux-64bit.tar.gz -C /app/hugo_0.74.3
4$ cp /app/hugo_0.74.3/hugo  /usr/local/bin/
5$ hugo version
6Hugo Static Site Generator v0.74.3-DA0437B4 linux/amd64 BuildDate: 2020-07-23T16:22:34Z
创建网站
1$ hugo new site zhanminblog[名称自定义]
2$ ls
3archetypes  config.toml  content  data  layouts  static  themes
选择主题
在这里hugo themes选择你喜欢的主题并根据主题的REAMDE进行相应操作,比如我选择的是Pure主题
1$ cd /app/zhanminlog
2$ git clone https://github.com/xiaoheiAh/hugo-theme-pure themes/pure
因为每个主题的样式和功能不同,所以要根据主题的README介绍进行调试,将主题的配置和文章目录复制到网站根目录下
1$ rm -f /app/zhanminlog/config.toml
2$ cp -r themes/pure/exampleSite/*  /app/zhanminblog/
根据自己的想法修改模板的配置文件进行调试,可参考主题的README文件,我的部分定义如下:
 1$ cat  config.
 2baseURL: http://www.unmin.club
 3theme: pure
 4title: 前行
 5defaultContentLanguage: zh  # en/zh/...
 6footnoteReturnLinkContents: ↩
 7hasCJKLanguage: true
 8paginate: 7
 9enableEmoji: true
10PygmentsCodeFences: false
11googleAnalytics: ""      # UA-XXXXXXXX-X
12permalinks:
13  posts: /:year/:month/:filename/
14taxonomies:
15------------------------
创建第一篇文章
根据主题的定义,文章需要放在posts目录下,由于上面我们已经copy了主题模板的文件。所以我们可以直接新建文章,无需使用hugo new posts/xxx.md
指令。
 1$ cd /app/zhanminblog/content/posts
 2$ touch heelo.md
 3$ cat hello.md
 4+++ #为文章的定义,如标题,作者,目录等。
 5author = "前行"
 6title = "第一篇文章"
 7date = "2020-07-29"
 8description = "这是我使用hugo创建的第一篇文章"
 9tags = [
10    "hugo",
11
12]
13categories = [
14    "hugoblog",
15]
16#series = ["系列"]
17#aliases = ["别名"]
18+++
19# 一、Hugo介绍
20Hugo是轻量级的静态资源服务
21$ hello hugo
22--------
启动服务预览
由于我使用的是Linux公有云服务器,需要开启外机访问,如果是windows本机调试,则直接使用hugo server
启动访问4000端口即可
1$ hugo server --bind="0.0.0.0" -v -w -b http://www.unmin.club
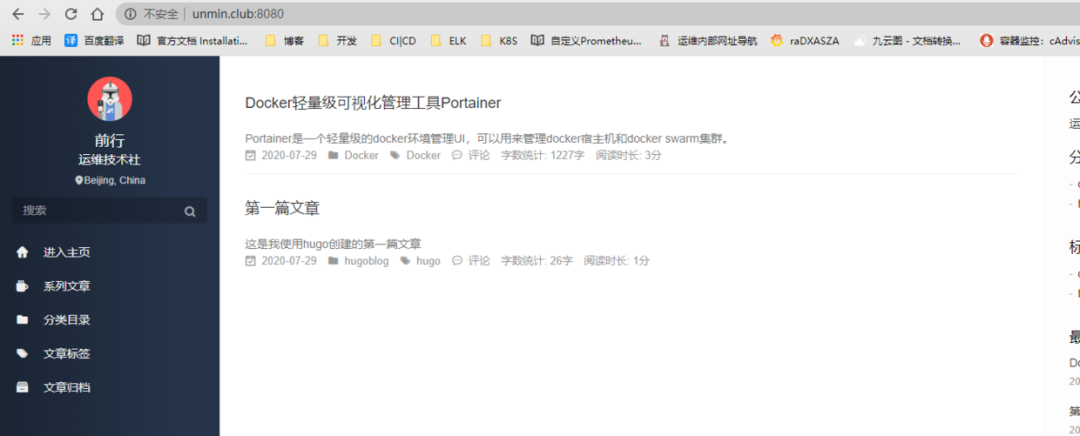
当然这种启动方式也可直接使用到线上,直接修改或者创建md文件即可,无需使用build指令转化为html文件。
如果你是本地调试则可以使用hugo
命令将文件转化为html格式,会生成名为“public”的目录,然后将这个目录的内容放到Github或者Nginx上即可访问。
由于我还需要使用Gitbook来写文章,而且打算将这两个集成到一块,所以我选择的方式是直接在Linux上修改文章,通过启动其他端口号来预览文章,然后在通过hugo
转换为html,复制到Nginx的html目录下发布,最后通过nginx的80端口访问。
指定端口号来预览文章
1$ hugo server --bind="0.0.0.0" -v -w -p 8080 -b http://www.unmin.club
发布文章
预览没有问题则构建为html文件,生成public目录,注意使用hugo
指令需要在网站的根目录。
1$ hugo
2$ ls public/
32020      about       about-us    categories  css     elk-book     fonts       index.xml  k8s-book  posts            searchindex.json  sitemap.xml
4404.html  about-hugo  avatar.png  contact     donate  favicon.ico  index.html  js         page      prometheus-book  series            tags
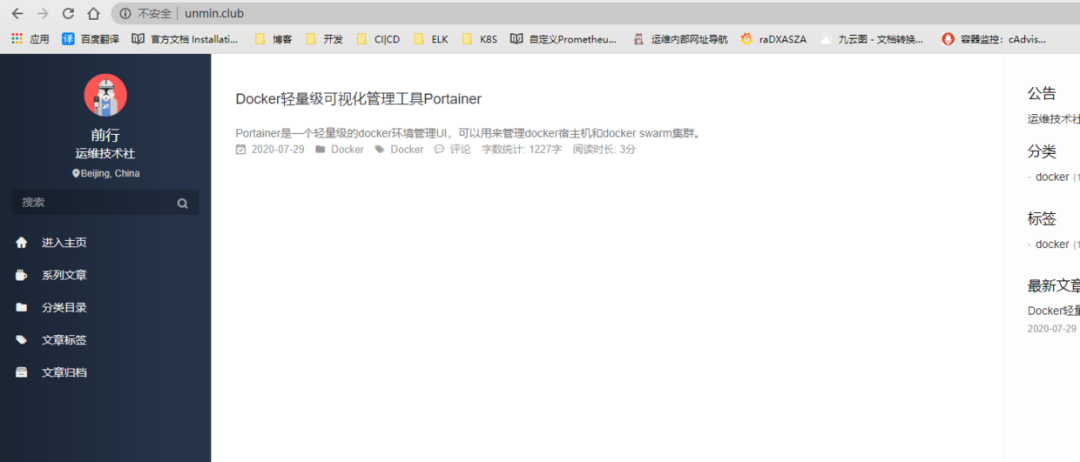
二、部署Nginx作为前端代理
使用nginx作为前端,代理后面的hugo与gitbook服务
1$ yum -y install nginx
复制刚才转换生成的html文件到Nginx下,更新文章时可以写一个update.sh 脚本
1$ rm -rf   /usr/share/nginx/html/*
2$ cp -r  /app/zhanminblog/public/* /usr/share/nginx/html
启动nginx
1$ systemctl start nginx
访问网站
三、部署gitbook
Hugo现在已经可以使用了,我们开始部署gitbook
部署node.js
1$ wget https://nodejs.org/dist/v12.18.1/node-v12.18.1-linux-x64.tar.xz
2$ tar xf node-v12.18.1-linux-x64.tar.xz
3$ vim /etc/profil
4$ export PATH=$PATH:/app/node-v12.18.1-linux-x64/bin
5$ source /etc/profile
6$ node -v
7v12.18.1
安装gitbook
1$ npm install gitbook-cli -g
2$  gitbook  -V
3CLI version: 2.3.2
4GitBook version: 3.2.3
创建书籍
1$ mkdir /app/k8s-book
2$ gitbook init
3$ ls /app/k8s-book
4 README.md  SUMMARY.md
创建书籍目录
 1$ cat SUMMARY.md
 2# Summary
 3
 4* [前言](README.md)
 5* [Kubernetes基础](Chapter1/README.md)
 6    * [基本概念与组件原理](Chapter1/jieshao.md)
 7    * [使用Kubeadm部署集群](Chapter1/kubeadm.md)
 8    * [YAML文件语法](Chapter1/YAML.md)
 9    * [深入理解Pod](Chapter1/Pod.md)
10* [Kubernetesb编排控制器](Chapter2/README.md)
11    * [Deployment](Chapter2/deployment.md)
12    * [StatefulSet](Chapter2/StatefulSet.md)
13    * [DaemonSet](Chapter2/DaemonSet.md)
14* [Kubernets配置管理](Chapter3/README.md)
15    * [ConfigMap](Chapter3/ConfigMap.md)
16    * [Secret](Chapter3/Secret.md)
17    * [ServiceAccount](Chapter3/ServiceAccount.md)
18    * [RBAC](Chapter3/RBAC.md)
19* [Kubernetes持久化存储](Chapter4/README.md)
20    * [PV](Chapter4/Pv.md)
21    * [PVC](Chapter4/PVC.md)
22    * [StorageClass](Chapter4/StorageClass.md)
23    * [本地持久化存储](Chapter4/LocalPv.md)
24    * [网络分布式存储](Chapter3/Ceph.md)
安装功能插件
 1$ vim book.json
 2{
 3    "title": "前行",
 4    "author": "前行",
 5    "description": "kubernetes",
 6    "language": "zh-hans",
 7    "gitbook": "3.2.3",
 8    "styles": {
 9        "website": "./style/website.css"
10    },
11    "structure": {
12        "readme": "README.md"
13    },
14    "links": {
15        "sidebar": {
16            "回到博客": "http://www.unmin.club"
17        }
18    },
19    "plugins": [
20        "anchors",
21        "auto-scroll-table",
22    "chapter-fold",
23    "expandable-chapters-small",
24    "toggle-chapters",
25        "advanced-emoji",
26        "code",
27        "favicon",
28        "fontsettings",
29        "klipse",
30        "-livereload",
31        "-lunr",
32        "pageview-count",
33        "page-toc-button",
34        "popup",
35        "sharing-plus",
36        "-sharing",
37        "splitter",
38        "-search",
39        "search-pro",
40        "tbfed-pagefooter",
41        "todo",
42        "hide-element"
43    ],
44    "pluginsConfig": {
45        "hide-element": {
46            "elements": [".gitbook-link"]
47        },
48        "theme-default": {
49            "showLevel": true
50        },
51        "code": {
52            "copyButtons": true
53        },
54        "tbfed-pagefooter": {
55            "copyright": "Copyright © zhanmin 2020",
56            "modify_label": "本书发布时间:",
57            "modify_format": "YYYY-MM-DD HH:mm:ss"
58        },
59        "page-toc-button": {
60            "maxTocDepth": 2,
61            "minTocSize": 2
62        },
63        "sharing": {
64            "douban": false,
65            "facebook": false,
66            "google": false,
67            "hatenaBookmark": false,
68            "instapaper": false,
69            "line": false,
70            "linkedin": false,
71            "messenger": false,
72            "pocket": false,
73            "qq": true,
74            "qzone": true,
75            "stumbleupon": false,
76            "twitter": false,
77            "viber": false,
78            "vk": false,
79            "weibo": true,
80            "whatsapp": false,
81            "all": [
82                "weibo","qq", "qzone", "douban", "facebook","google",
83                              "linkedin","twitter","whatsapp"
84            ]
85        },
86        "anchor-navigation-ex": {
87            "showLevel": true
88        },
89        "favicon":{
90            "shortcut": "",
91            "bookmark": ""
92        }
93    }
94}
安装文件中的插件
1$ gitbook install
创建文章
1$ mkdir /app/k8s-book/Chapter1
2$ vim /app/k8s-book/Chapter1/README.md
3hello  gitbook
gitbook也是支持本地预览的,使用gitbook serve
指令即可
1$ gitbook serve
没问题我们就和hugo一样转换为html文件,会生成_book目录,使用gitbook build
指令即可更新文章。
1$ gitbook build
2$ ls /app/k8s-book
3_book  Chapter1  Chapter2  Chapter3  Chapter4  Chapter5  Chapter6  Chapter7  README.md  SUMMARY.md  update.sh
配置Nginx
ok,现在我们修改Nginx的配置文件,添加gitbook的目录地址
 1$ vim /etc/nginx/nginx.conf
 2--------------------
 3    server {
 4        listen       80 default_server;
 5        listen       [::]:80 default_server;
 6        server_name  _;
 7        root         /usr/share/nginx/html;
 8
 9        # Load configuration files for the default server block.
10        include /etc/nginx/default.d/*.conf;
11
12      location / {
13       }
14
15        error_page 404 /404.html;
16            location = /40x.html {
17        }
18
19        error_page 500 502 503 504 /50x.html;
20            location = /50x.html {
21        }
22
23      location /k8s-book {   ## 新增加gitbook访问路径
24           alias /app/k8s-gitbook/_book;  # 这个路径是关键,就是GitBook工程下build出来的_book目录,需要运行gitbook build命令自动生成
25           index  index.html index.htm;
26           autoindex on;
27--------------------
平滑重启
1$ nginx -s reload
访问验证
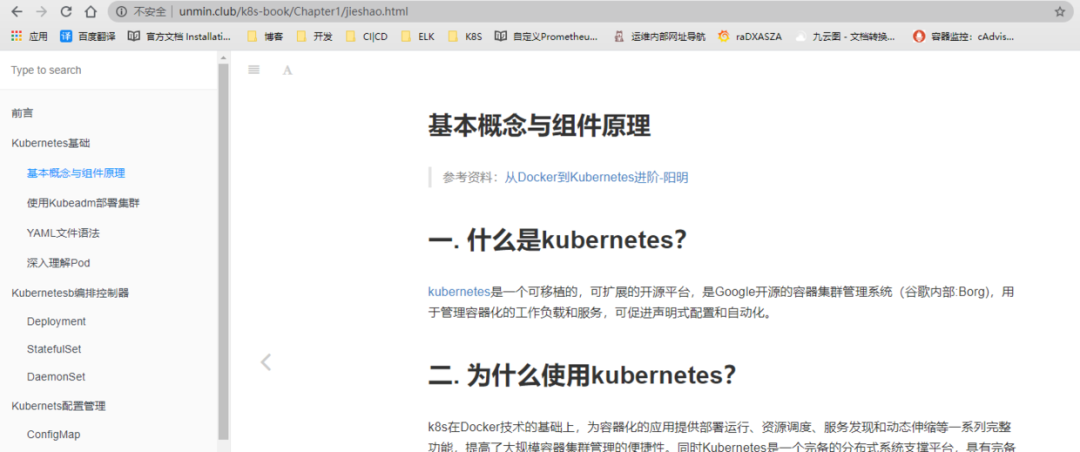
访问hugo

访问gitbook,添加后缀/k8s-book,当然也可以在Hugo上添加个跳转链接。
四、配置七牛云图床
由于是使用markdown进行写作,一些图片在静态博客上是无法显示的,所以我们需要设置自己的图床,我使用的是七牛云,免费空间为10G,时间不限。
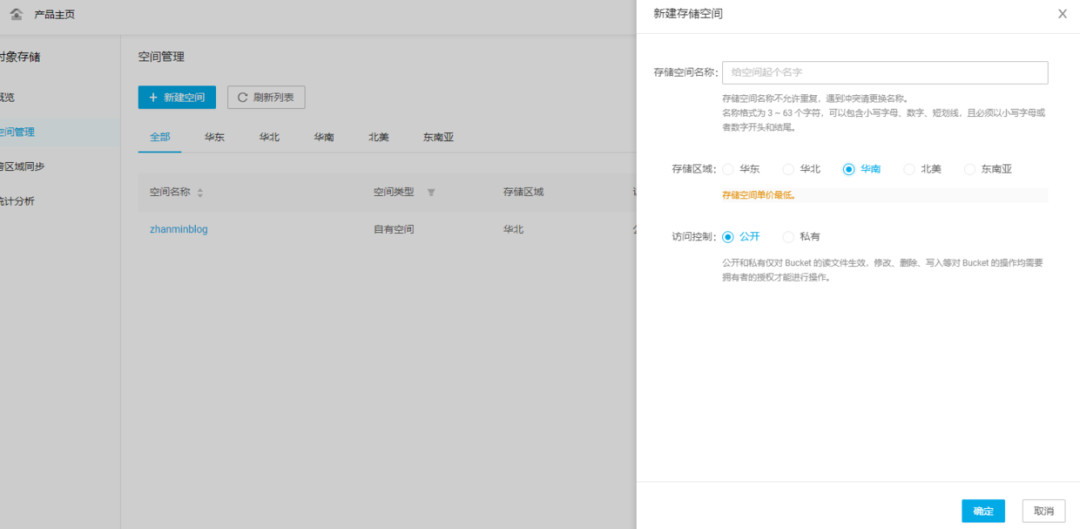
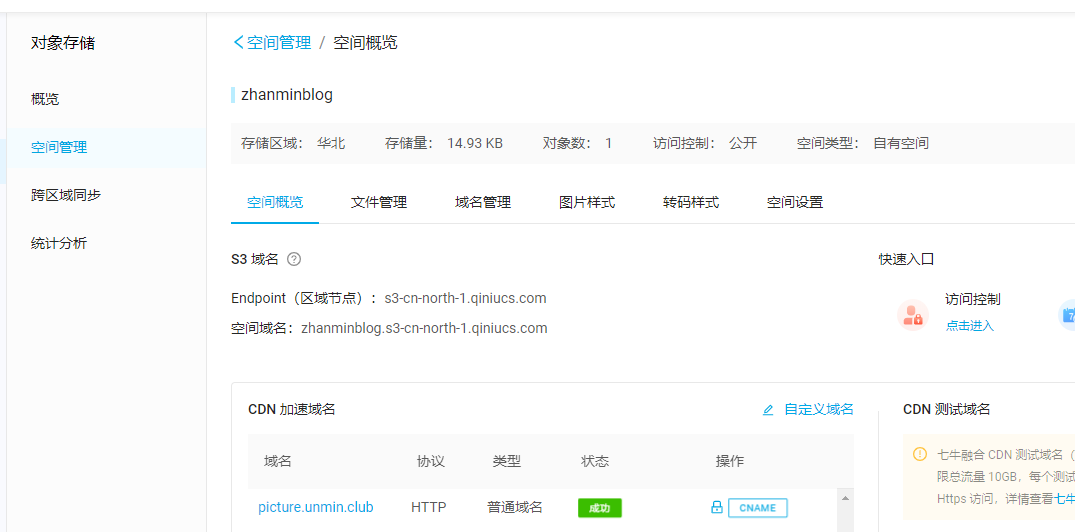
在这里注册七牛云用户,点击对象存储,创建存储空间
会给你一个30天的临时测试域名,到期会回收,所以最好使用自己的域名。
添加CDN加速域名,我配置的是二级域名,这个二级域名我还没在服务商那里添加解析
现在到域名服务商那里,添加个二级域名解析
比如我的腾讯云
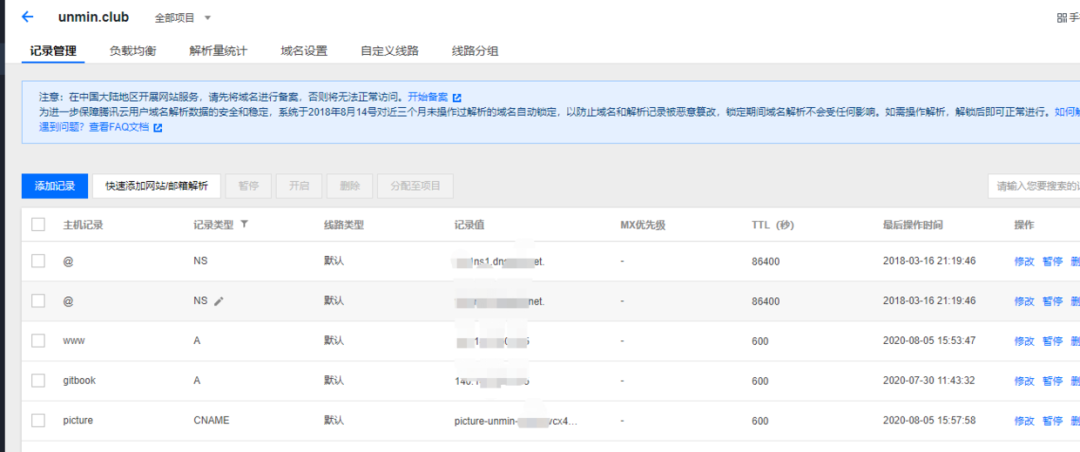
其中记录值是在七牛云添加CDN域名加速时获得的CNAME值,鼠标停留在域名上即可获得。
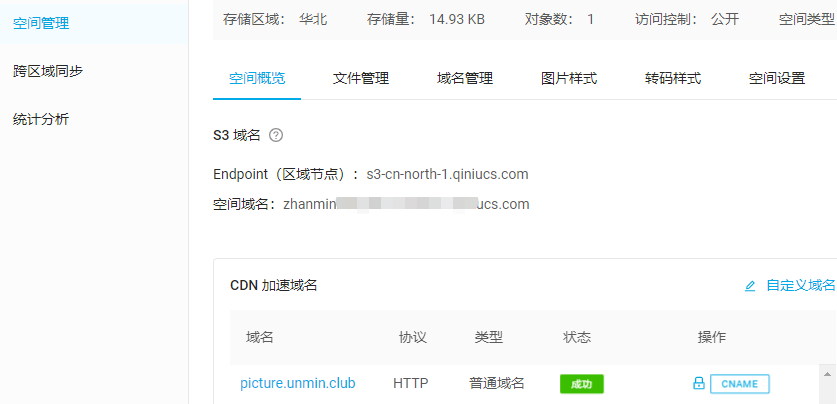
详细配置可查看官方文档
最后域名配置显示成功即可
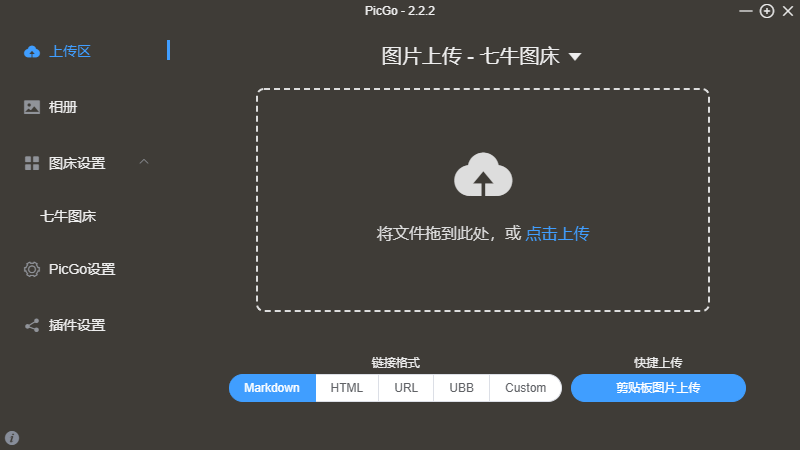
五. 使用PicGO
PicGo可以帮我们自动将复制的图片转换为Markdown链接,非常方便。下载地址
安装完成后配置七牛云图床
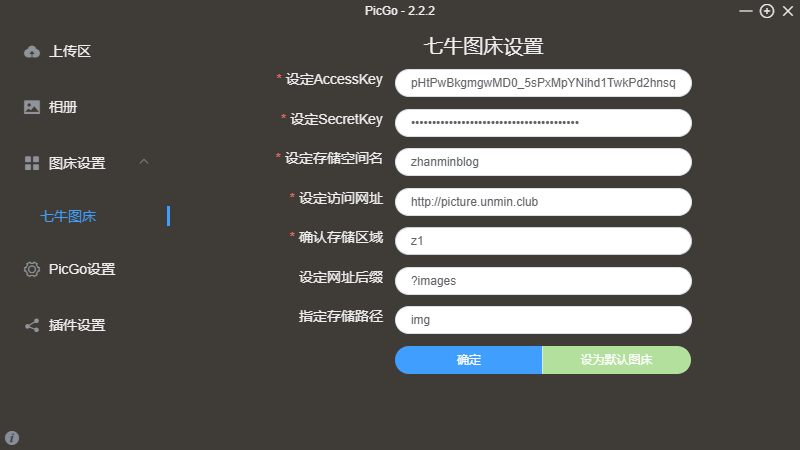
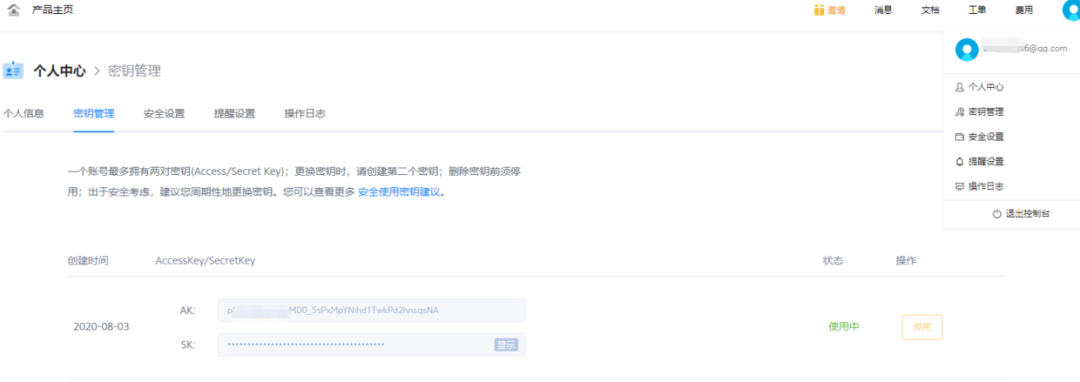
AccessKey/SecretKey获取方式
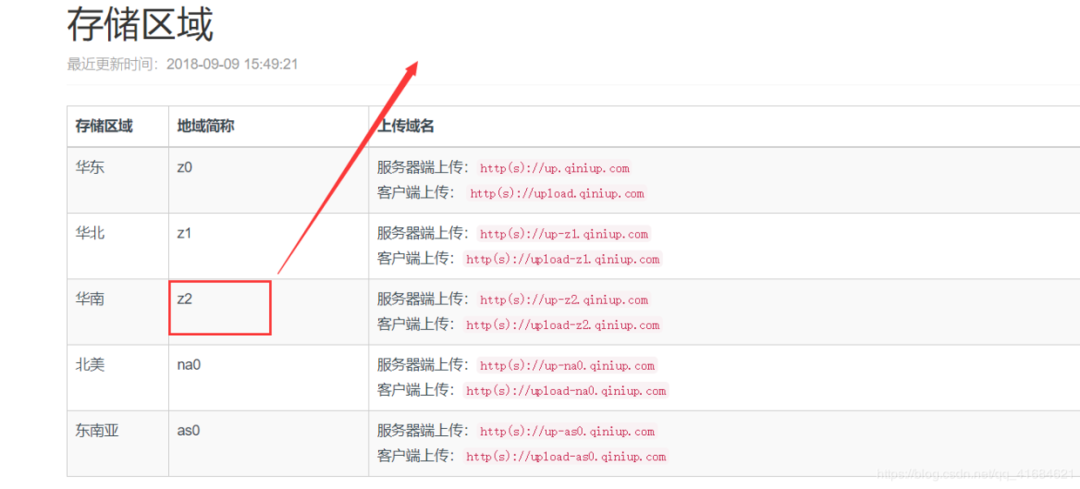
设定访问网址是你添加的二级域名,存储区域如下
配置完成点击确定,就可以使用了。
.
关注公众号回复【k8s】获取视频教程及更多资料: