一、ElastAlert介绍
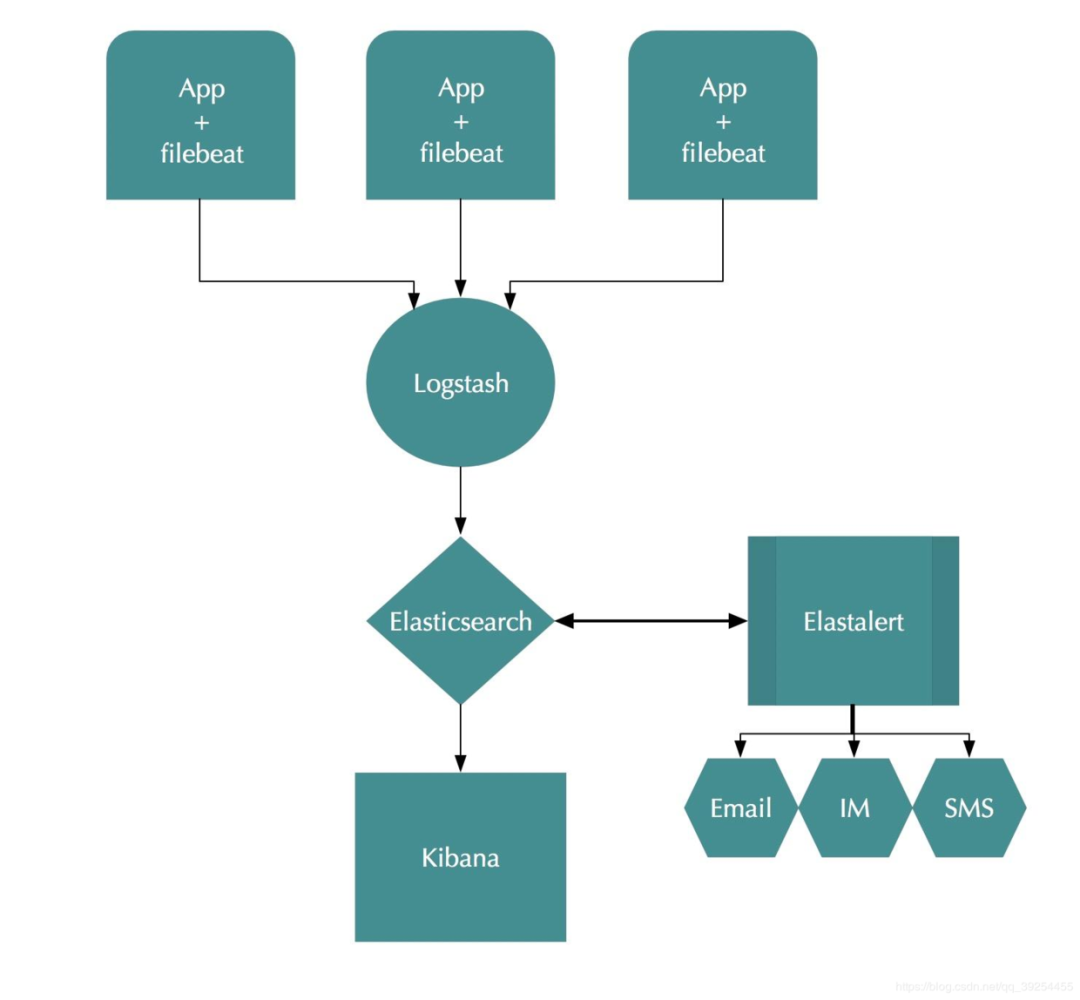
在日志管理上我们使用Elasticsearch,Logstash和Kibana技术栈来管理不断增长的数据和日志,但是对于错误日志的监控ELK架构并没有提供,所以我们需要使用到第三方工具ElastAlert,来帮助我们及时发现业务中存在的问题。
ElastAlert通过定期查询Elasticsearch,并将数据传递到规则类型,该规则类型确定何时找到匹配项。发生匹配时,将为该警报提供一个或多个警报,这些警报将根据匹配采取行动。
这是由一组规则配置的,每个规则定义一个查询,一个规则类型和一组警报。
ElastAlert支持以下方式报警
Command (可调用短信接口)
Email
JIRA
OpsGenie
SNS
HipChat
Slack
Telegram
Debug
Stomp
除了这种基本用法外,还有许多其他功能使警报更加有用:
警报链接到Kibana仪表板
任意字段的合计计数
将警报合并为定期报告
通过使用唯一键字段来分隔警报
拦截并增强比赛数据
二、部署ElastAlert
. 1. 部署所需环境
ELK 环境部署
EFK6.3+kafka+logstash日志分析平台集群
安装依赖包
1$ yum -y install zlib-devel bzip2-devel openssl-devel ncurses-devel sqlite-devel readline-devel tk-devel gdbm-devel db4-devel libpcap-devel xz-devel
部署python3.6
1$ mkdir -p /usr/local/python3
2$ cd /usr/local/python3
3$ wget https://www.python.org/ftp/python/3.6.9/Python-3.6.9.tgz
4$ tar xf Python-3.6.9.tgz
5$ cd Python-3.6.9
6$ ./configure --prefix=/usr/local/python3
7$ make && make install
配置环境变量
1# 将python2.7 软链删除,换成python3.6
2$ rm /usr/bin/python
3$ ln -s /usr/local/python3/bin/python3.6 /usr/bin/python
4$ rm /usr/bin/pip
5$ ln -s /usr/local/python3/bin/pip3 /usr/bin/pip
验证版本
1$ python
2Python 3.6.9 (default, Jun  2 2020, 12:12:43)
3[GCC 4.4.7 20120313 (Red Hat 4.4.7-18)] on linux
4Type "help", "copyright", "credits" or "license" for more information.
5>>>
6$ pip -V
7pip 18.1 from /usr/local/python3/lib/python3.6/site-packages/pip (python 3.6)
. 2. 部署ElastAlert
1$ cd /app
2$ git clone https://github.com/Yelp/elastalert.git
安装模块:
1$ pip install "setuptools>=11.3"
2$ python setup.py install
根据Elasticsearch的版本,您可能需要手动安装正确版本的elasticsearch-py。
Elasticsearch 5.0+:
1$ pip install "elasticsearch>=5.0.0"
Elasticsearch 2.X:
1$ pip install "elasticsearch<3.0.0"
. 3. 配置ElastAlert
配置config.yaml 文件
 1$ cp config.yaml.example  config.yaml
 2$ cat config.yaml
 3rules_folder: example_rules
 4run_every:
 5  seconds: 10
 6buffer_time:
 7  minutes: 15
 8es_host: 10.1.144.208
 9es_port: 9201
10#es_username: elastic
11#es_password: 123456
12writeback_index: elastalert_status
13alert_time_limit:
14  days: 2
rules_folder
:ElastAlert从中加载规则配置文件的位置。它将尝试加载文件夹中的每个.yaml文件。没有任何有效规则,ElastAlert将无法启动。run_every
:ElastAlert多久查询一次Elasticsearch的时间。buffer_time
:查询窗口的大小,从运行每个查询的时间开始向后延伸。对于其中use_count_query或use_terms_query设置为true的规则,将忽略此值。es_host
:是Elasticsearch群集的地址,ElastAlert将在其中存储有关其状态,查询运行,警报和错误的数据。es_port
:es对应的端口。es_username
:可选的; 用于连接的basic-auth用户名es_host。es_password
:可选的; 用于连接的basic-auth密码es_host。es_send_get_body_as
:可选的; 方法查询Elasticsearch - GET,POST或source。默认是GETwriteback_index
:ElastAlert将在其中存储数据的索引的名称。我们稍后将创建此索引。alert_time_limit
:失败警报的重试窗口。
创建elastalert-create-index索引
1$ elastalert-create-index
2New index name (Default elastalert_status)
3Name of existing index to copy (Default None)
4New index elastalert_status created
5Done!
三、使用微信报警
由于ElastAlert没有内置企业微信的报警方式,我们还需要使用一个开源插件elastalert-wechat-plugin来实现微信的报警,Github项目地址
. 1. 下载项目文件
1$ cd elastalert
2$ wget -P ~/elastalert/elastalert_modules/ wget https://raw.githubusercontent.com/anjia0532/elastalert-wechat-plugin/master/elastalert_modules/wechat_qiye_alert.py
3$ touch ~/elastalert/elastalert_modules/__init__.py
. 2. 修改插件源码
由于这个插件是基于python2.x版本开发的,而ElastAlert的最新版本使用的是python3.6版本开发,所以需要改一些代码,以便正常运行,另外还添添加了转中文字符功能。
wechat_qiye_alert.py修改后如下:
  1#! /usr/bin/env python
  2# -*- coding: utf-8 -*-
  3
  4import json
  5import datetime
  6from elastalert.alerts import Alerter, BasicMatchString
  7from requests.exceptions import RequestException
  8from elastalert.util import elastalert_logger,EAException #[感谢minminmsn分享](https://github.com/anjia0532/elastalert-wechat-plugin/issues/2#issuecomment-311014492)
  9import requests
 10from elastalert_modules.MyEncoder import MyEncoder
 11
 12'''
 13#################################################################
 14# 微信企业号推送消息                                              #
 15#                                                               #
 16# 作者: AnJia <anjia0532@gmail.com>                              #
 17# 作者博客: https://anjia.ml/                                    #
 18# Github: https://github.com/anjia0532/elastalert-wechat-plugin #
 19#                                                               #
 20#################################################################
 21'''
 22class WeChatAlerter(Alerter):
 23
 24    #企业号id,secret,应用id必填
 25
 26    required_options = frozenset(['corp_id','secret','agent_id'])
 27
 28    def __init__(self, *args):
 29        super(WeChatAlerter, self).__init__(*args)
 30        self.corp_id = self.rule.get('corp_id', '')     #企业号id
 31        self.secret = self.rule.get('secret', '')       #secret
 32        self.agent_id = self.rule.get('agent_id', '')   #应用id
 33
 34        self.party_id = self.rule.get('party_id')       #部门id
 35        self.user_id = self.rule.get('user_id', '')     #用户id,多人用 | 分割,全部用 @all
 36        self.tag_id = self.rule.get('tag_id', '')       #标签id
 37        self.access_token = ''                          #微信身份令牌
 38        self.expires_in=datetime.datetime.now() - datetime.timedelta(seconds=60)
 39
 40    def create_default_title(self, matches):
 41        subject = 'ElastAlert: %s' % (self.rule['name'])
 42        return subject
 43
 44    def alert(self, matches):
 45
 46        if not self.party_id and not self.user_id and not self.tag_id:
 47            elastalert_logger.warn("All touser & toparty & totag invalid")
 48
 49        # 参考elastalert的写法
 50        # https://github.com/Yelp/elastalert/blob/master/elastalert/alerts.py#L236-L243
 51        body = self.create_alert_body(matches)
 52
 53        #matches 是json格式
 54        #self.create_alert_body(matches)是String格式,详见 [create_alert_body 函数](https://github.com/Yelp/elastalert/blob/master/elastalert/alerts.py)
 55
 56        # 微信企业号获取Token文档
 57        # http://qydev.weixin.qq.com/wiki/index.php?title=AccessToken
 58        self.get_token()
 59
 60        self.senddata(body)
 61
 62        elastalert_logger.info("send message to %s" % (self.corp_id))
 63
 64    def get_token(self):
 65
 66        #获取token是有次数限制的,本想本地缓存过期时间和token,但是elastalert每次调用都是一次性的,不能全局缓存
 67        if self.expires_in >= datetime.datetime.now() and self.access_token:
 68            return self.access_token
 69
 70        #构建获取token的url
 71        get_token_url = 'https://qyapi.weixin.qq.com/cgi-bin/gettoken?corpid=%s&corpsecret=%s' %(self.corp_id,self.secret)
 72
 73        try:
 74            response = requests.get(get_token_url)
 75            response.raise_for_status()
 76        except RequestException as e:
 77            raise EAException("get access_token failed , stacktrace:%s" % e)
 78            #sys.exit("get access_token failed, system exit")
 79
 80        token_json = response.json()
 81
 82        if 'access_token' not in token_json :
 83            raise EAException("get access_token failed , , the response is :%s" % response.text())
 84            #sys.exit("get access_token failed, system exit")
 85
 86        #获取access_token和expires_in
 87        self.access_token = token_json['access_token']
 88        self.expires_in = datetime.datetime.now() + datetime.timedelta(seconds=token_json['expires_in'])
 89
 90        return self.access_token
 91
 92    def senddata(self, content):
 93
 94        #如果需要原始json,需要传入matches
 95
 96        # http://qydev.weixin.qq.com/wiki/index.php?title=%E6%B6%88%E6%81%AF%E7%B1%BB%E5%9E%8B%E5%8F%8A%E6%95%B0%E6%8D%AE%E6%A0%BC%E5%BC%8F
 97        # 微信企业号有字符长度限制(2048),超长自动截断
 98
 99        # 参考 http://blog.csdn.net/handsomekang/article/details/9397025
100        #len utf8 3字节,gbk2 字节,ascii 1字节
101        if len(content) > 512 :
102            content = content[:512] + "..."
103
104        # 微信发送消息文档
105        # http://qydev.weixin.qq.com/wiki/index.php?title=%E6%B6%88%E6%81%AF%E7%B1%BB%E5%9E%8B%E5%8F%8A%E6%95%B0%E6%8D%AE%E6%A0%BC%E5%BC%8F
106        send_url = 'https://qyapi.weixin.qq.com/cgi-bin/message/send?access_token=%s' %( self.access_token)
107
108        headers = {'content-type': 'application/json'}
109
110        # 替换消息标题为中文,下面的字段为logstash切分的日志字段
111        title_dict = {
112#            "At least": "报警规则:At least",
113            "@timestamp": "报警时间",
114            "_index": "索引名称",
115            "_type": "索引类型",
116            "ServerIP": "报警主机",
117            "hostname": "报警机器",
118            "message": "报警内容",
119            "class": "报错类",
120            "lineNum": "报错行"
121           "num_hits": "文档命中数",
122           "num_matches": "文档匹配数"
123        }
124
125        #print(f"type:{type(content)}")
126        for k, v in title_dict.items():
127            content = content.replace(k, v, 1 )
128
129        # 最新微信企业号调整校验规则,tagid必须是string类型,如果是数字类型会报错,故而使用str()函数进行转换
130        payload = {
131            "touser": self.user_id and str(self.user_id) or '', #用户账户,建议使用tag
132            "toparty": self.party_id and str(self.party_id) or '', #部门id,建议使用tag
133            "totag": self.tag_id and str(self.tag_id) or '', #tag可以很灵活的控制发送群体细粒度。比较理想的推送应该是,在heartbeat或者其他elastic工具自定义字段,添加标签id。这边根据自定义的标签id,进行推送
134            'msgtype': "text",
135            "agentid": self.agent_id,
136            "text":{
137                "content": content.encode('UTF-8').decode("latin1") #避免中文字符发送失败
138               },
139            "safe":"0"
140        }
141
142        # set https proxy, if it was provided
143        # 如果需要设置代理,可修改此参数并传入requests
144        # proxies = {'https': self.pagerduty_proxy} if self.pagerduty_proxy else None
145        try:
146            #response = requests.post(send_url, data=json.dumps(payload, ensure_ascii=False), headers=headers)
147            response = requests.post(send_url, data=json.dumps(payload, cls=MyEncoder, indent=4, ensure_ascii=False), headers=headers)
148            response.raise_for_status()
149        except RequestException as e:
150            raise EAException("send message has error: %s" % e)
151
152        elastalert_logger.info("send msg and response: %s" % response.text)
153
154
155    def get_info(self):
156        return {'type': 'WeChatAlerter'}
在同级目录下创建MyEncoder.py文件
 1#!/usr/bin/env python3
 2# -*- coding: utf-8 -*-
 3
 4import json
 5
 6class MyEncoder(json.JSONEncoder):
 7     def default(self, obj):
 8         if isinstance(obj, bytes):
 9            return str(obj, encoding='utf-8')
10         return json.JSONEncoder.default(self, obj)
. 3. 申请企业微信账号
step 1: 访问网站 注册企业微信账号(不需要企业认证)。
step 2: 访问apps 创建第三方应用,点击创建应用按钮 -> 填写应用信息:
Step3: 创建部门,获取部门ID
. 4. 配置报警规则
配置规则文件
1$ cd elastalert/example_rules/
2$ cp example_frequency.yaml applog.yaml
3$ cat sms-applog.yaml | grep -v ^#
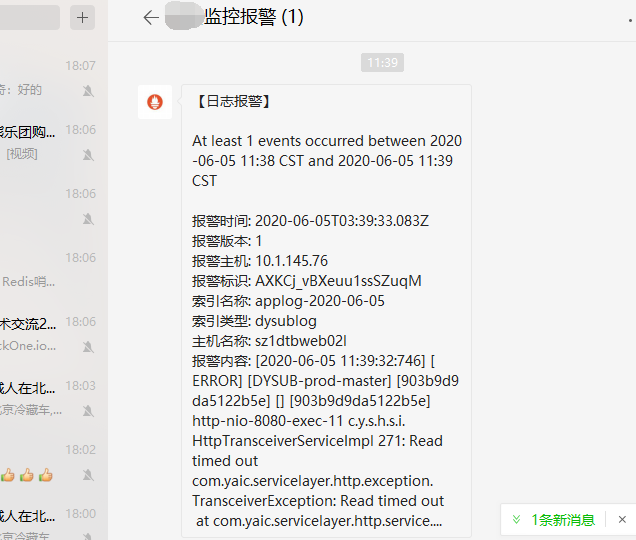
4name: 【日志报警】
5use_strftine_index: true
6type: frequency
7
8index: applog-*
9num_events: 1
10timeframe:
11 minutes: 1
12filter:
13- query:
14 query_string:
15 query: '"\[ERROR\]" NOT "发送邮件失败"'
16
17alert:
18 - "elastalert_modules.wechat_qiye_alert.WeChatAlerter"
19corp_id: wxdxxx40b4720f24
20secret: xa4pWq63sxxtaZzzEg8X860ZBIoOkToCbh_oNc
21agent_id: 1000002
22party_id: 2
index
:要查询的索引的名称, ES中存在的索引。num_events
:此参数特定于frequency类型,并且是触发警报时的阈值。filter
:用于过滤结果的Elasticsearch过滤器列表,这里的规则定义是除了包含“发送邮件失败”的错误日志,其他所有ERROR的日志都会触发报警。alert
:定义报警方式,我们这里采用企业微信报警。corp_id
:企业微信的接口认证信息
. 5. 运行ElastAlert
1$ python -m elastalert.elastalert --verbose --config /app/elastalert/config.yaml --rule /app/elastalert/example_rules/sms-applog.yaml
21 rules loaded
3INFO:elastalert:Starting up
4INFO:elastalert:Disabled rules are: []
5INFO:elastalert:Sleeping for 9.999904 seconds
6INFO:elastalert:Queried rule 【日志报警】 from 2020-06-05 17:47 CST to 2020-06-05 17:47 CST: 0 / 0 hits
7INFO:elastalert:Ran 【日志报警】 from 2020-06-05 17:47 CST to 2020-06-05 17:47 CST: 0 query hits (0 already seen), 0 matches, 0 alerts sent
8后台运行
9$ nohup python -m elastalert.elastalert --verbose --config /app/elastalert/config.yaml --rule /app/elastalert/example_rules/sms-applog.yaml > nohup.txt 2>&1
微信端添加企业号报警格式如下:
关注公众号获取视频教程及更多资料: