


背景
Windows 10 2004后版本及Windows 11引入了一个新功能:Windows Subsystem for Linux(适用于Linux的Windows子系统),简称WSL.
那么,利用WSL功能,是否可以在windows无需使用Vmware/VirtualBox安装上MogDB呢。
本文做了一下尝试。
准备WSL环境
要使用WSL, 必须在Windows里启用"Hyper-V"和"适用于Linux的Windows子系统"
进入控制面板,搜索“windows功能”
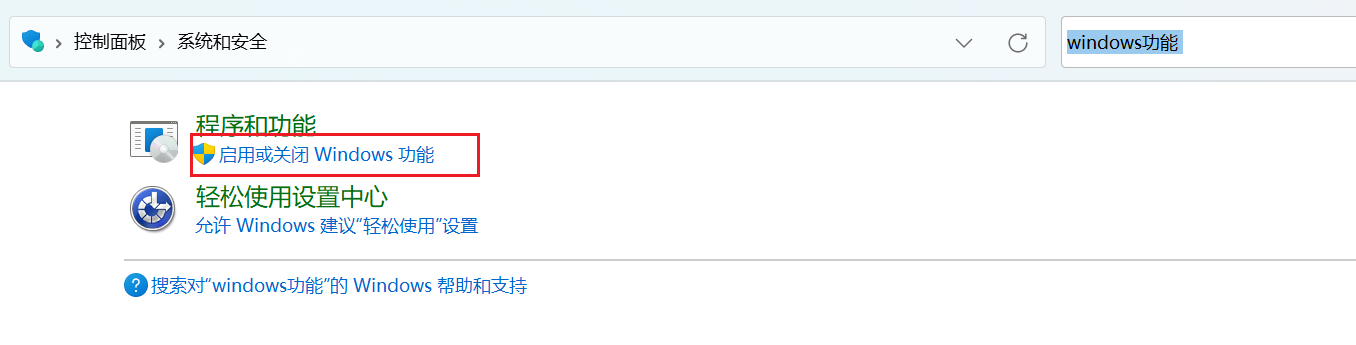
选择“启用或关闭Windows功能”
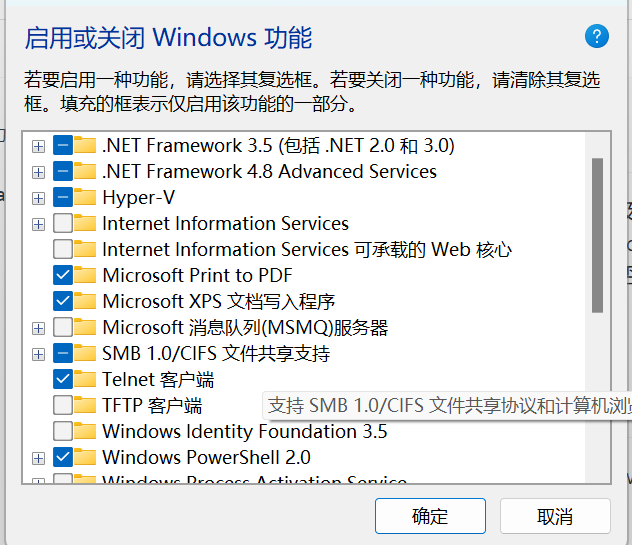
找到Hyper-v, 选上
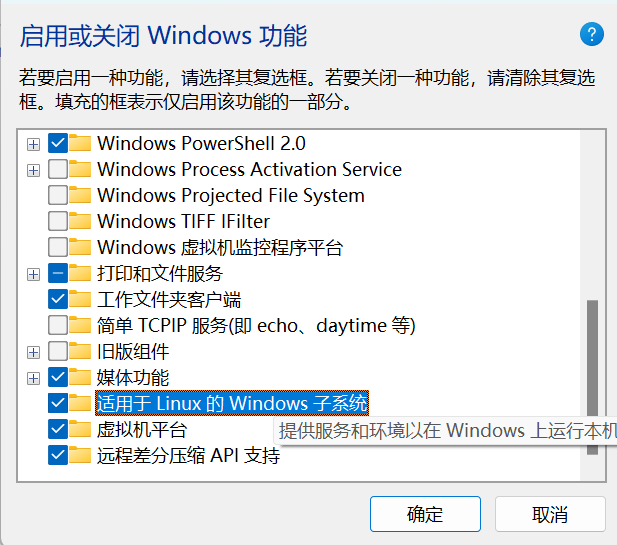
找到“适用于Linux的Windows子系统”和“虚拟机平台”,选上
选确定,开始安装启用这几个功能。
进入windows服务
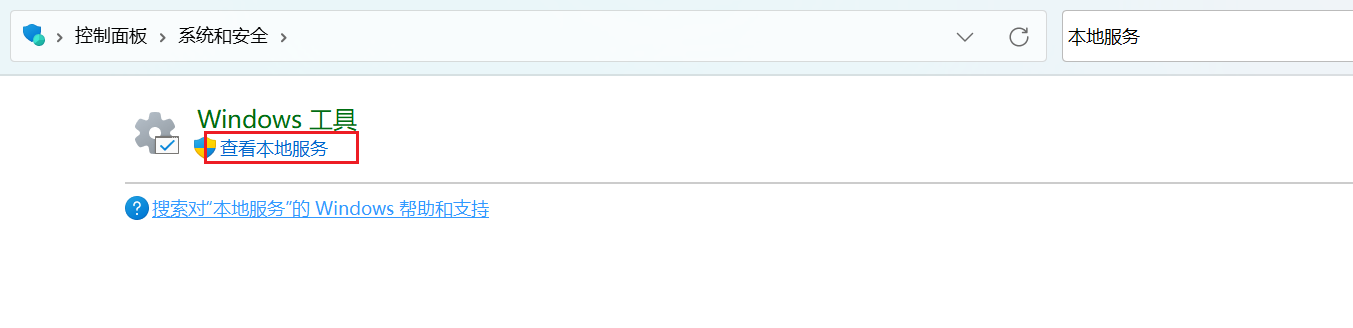
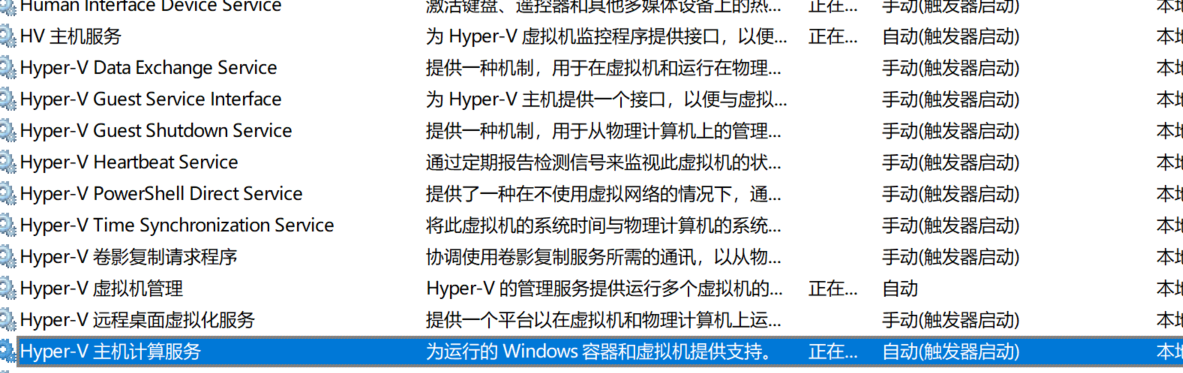
确保Hyper-V相关服务没有处于禁用状态。
通过WLS安装 Linux发行版
以管理员权限进行命令行(cmd或者power shell)
然后运行 wsl -l -o
C:\Windows\System32>wsl --list --online
以下是可安装的有效分发的列表。
请使用“wsl --install -d <分发>”安装。

NAME                            FRIENDLY NAME
Ubuntu                          Ubuntu
Debian                          Debian GNU/Linux
kali-linux                      Kali Linux Rolling
Ubuntu-18.04                    Ubuntu 18.04 LTS
Ubuntu-20.04                    Ubuntu 20.04 LTS
Ubuntu-22.04                    Ubuntu 22.04 LTS
Ubuntu-24.04                    Ubuntu 24.04 LTS
OracleLinux_7_9                 Oracle Linux 7.9
OracleLinux_8_7                 Oracle Linux 8.7
OracleLinux_9_1                 Oracle Linux 9.1
openSUSE-Leap-15.6              openSUSE Leap 15.6
SUSE-Linux-Enterprise-15-SP5    SUSE Linux Enterprise 15 SP5
SUSE-Linux-Enterprise-15-SP6    SUSE Linux Enterprise 15 SP6
openSUSE-Tumbleweed             openSUSE Tumbleweed
根据MogDB.io上的操作系统兼容性列表,选择一个合适的操作系统。
我这里选择了“Ubuntu-18.04”进行安装
wsl --install -d Ubuntu-20.04
根据网速,等个几分钟或者十几分钟,完成安装。
安装MogDB
命令行运行 wsl进入安装好的Linux子系统。
C:\Windows\System32>  wsl
[root@SerolL System32]#
安装ptk
使用以下命令安装MogDB安装工具ptk
curl --proto ‘=https’ --tlsv1.2 -sSf https://cdn-mogdb.enmotech.com/ptk/install.sh | sh
## ptk进行自动fix
source /root/.bashrc
ptk template -l > local.yaml
ptk checkos -f local.yaml --gen-warning-fix
Item | Level
------------------------------------±--------------
A1.Check_OS_Version | OK
A2.Check_Kernel_Version | OK
A3.Check_Unicode | OK
A4.Check_TimeZone | OK
A5.Check_Swap_Memory_Configure | OK
A6.Check_SysCtl_Parameter | Abnormal
A7.Check_FileSystem_Configure | OK
A8.Check_Disk_Configure | OK
A9.Check_BlockDev_Configure | Warning
A9.Check_Logical_Block | OK
A10.Check_NR_Request | Warning
A10.Check_Asynchronous_IO_Request | OK
A10.Check_IO_Configure | Warning
A11.Check_Network_Configure | OK
A12.Check_Time_Consistency | OK
A13.Check_Firewall_Status | ExecuteError
A14.Check_THP_Status | Abnormal
A15.Check_Dependent_Package | OK
A16.Check_CPU_Instruction_Set | OK
A17.Check_Port | OK
A18.Check_Selinux | OK
A19.Check_User_Ulimit | Abnormal
A20.Check_Directory | OK
Total count 23, abnormal count 5, warning count 3
Failed to check os, can’t perform installation unless fix all the abnormal items.
You can use ‘ptk checkos -i ITEM --detail’ to get detail message
Please check root_fix_os.0827.150825.sh for commands to resolve.
运行生成的fix脚本名称.
bash root_fix_os.0827.150825.sh
## 下载合适版本MogDB安装包
尝试过直接用ptk自动安装,但是,由于没适配过WSL, 自动安装的版本操作系统选择错误。因此。需要手动选择
到
download.mogdb.io
选择合适数据库版本,操作系统版本选择CentOS8 x86-64(对于本文选择的Ubuntu-20.04)。
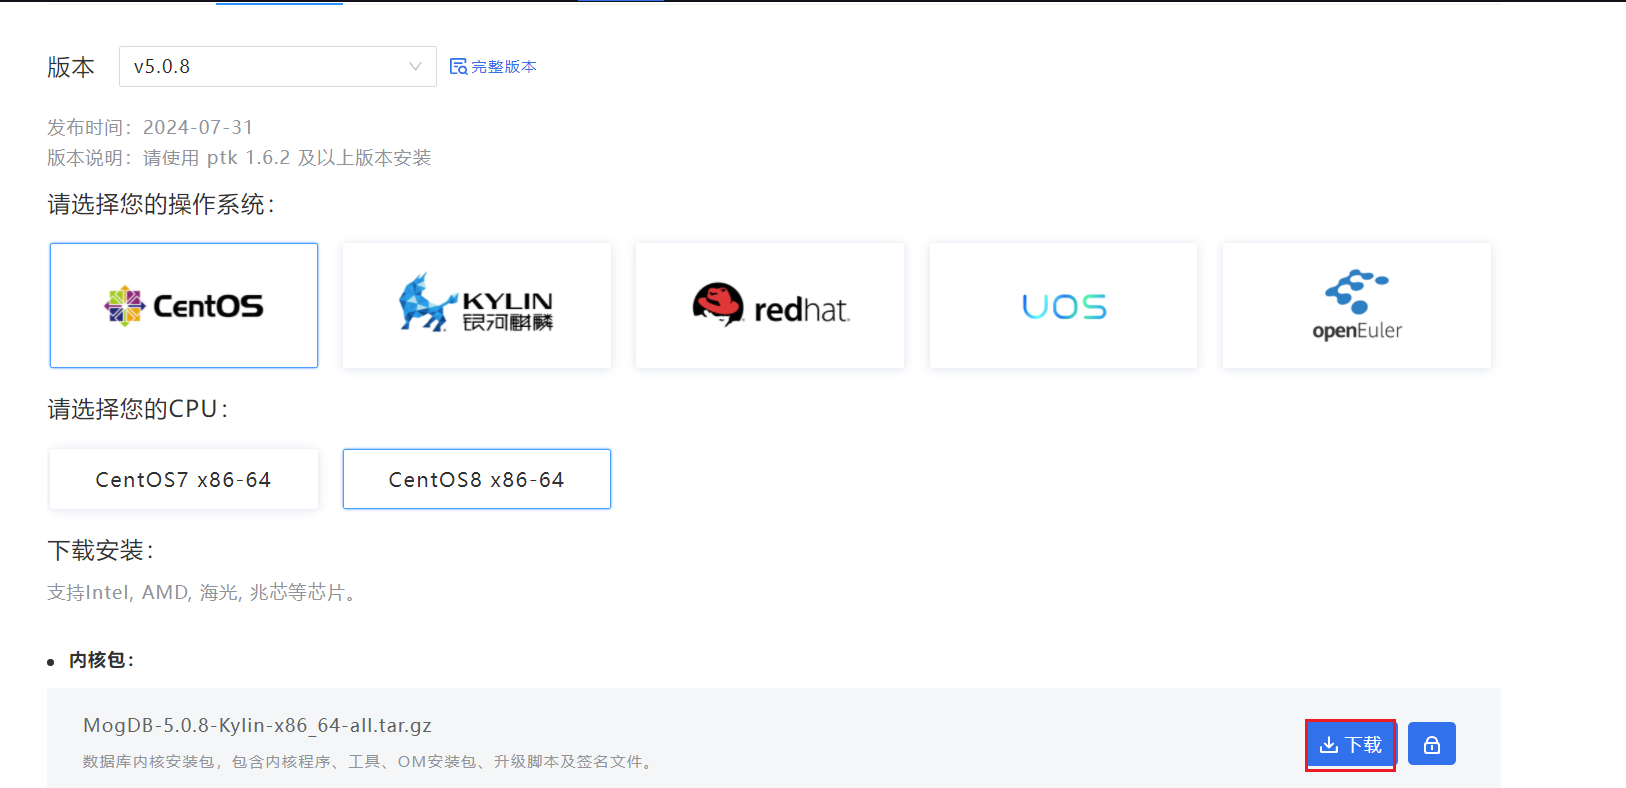
复制链接地址,然后wget下载
wget https://cdn-mogdb.enmotech.com/mogdb-media/5.0.8/Kylin_x86_64/MogDB-5.0.8-Kylin-x86_64-all.tar.gz
## 开始安装
ptk install -f local.yaml -y -p MogDB-5.0.8-Kylin-x86_64-all.tar.gz --skip-check-package
中间需要输入数据库密码

## 简单验证数据库可用性
su - omm
gs_ctl stop
gs_ctl start
gsql -r
create table test(id int);
MogDB=# create table test(id int);
CREATE TABLE
## 测试外部连接-准备
wsl内检查主机IP
ip a
6: eth0: <BROADCAST,MULTICAST,UP,LOWER_UP> mtu 1500 qdisc mq state UP group default qlen 1000
link/ether 00:15:5d:e0:6a:40 brd ff:ff:ff:ff:ff:ff
inet 192.168.109.224/20 brd 192.168.111.255 scope global eth0
valid_lft forever preferred_lft forever
inet6 fe80::215:5dff:fee0:6a40/64 scope link
valid_lft forever preferred_lft forever
记下ip

设置pg_hba.conf
以omm用户
gs_guc reload -h “host all all 0.0.0.0/0 sha256”
The gs_guc run with the following arguments: [gs_guc -h host all all 0.0.0.0/0 sha256 reload ].
expected instance path: [/opt/mogdb/data/pg_hba.conf]
Notice: the above configuration uses cluster internal communication, your configuration may affect the cluster internal communication.
gs_guc reloadhba: host all all 0.0.0.0/0 sha256: [/opt/mogdb/data/pg_hba.conf]
server signaled
Total instances: 1. Failed instances: 0.
Success to perform gs_guc!
创建测试用户
gsql -c “create user wsl sysadmin monadmin password ‘Test@123’;”
## 测试外部连接-Mogeaver
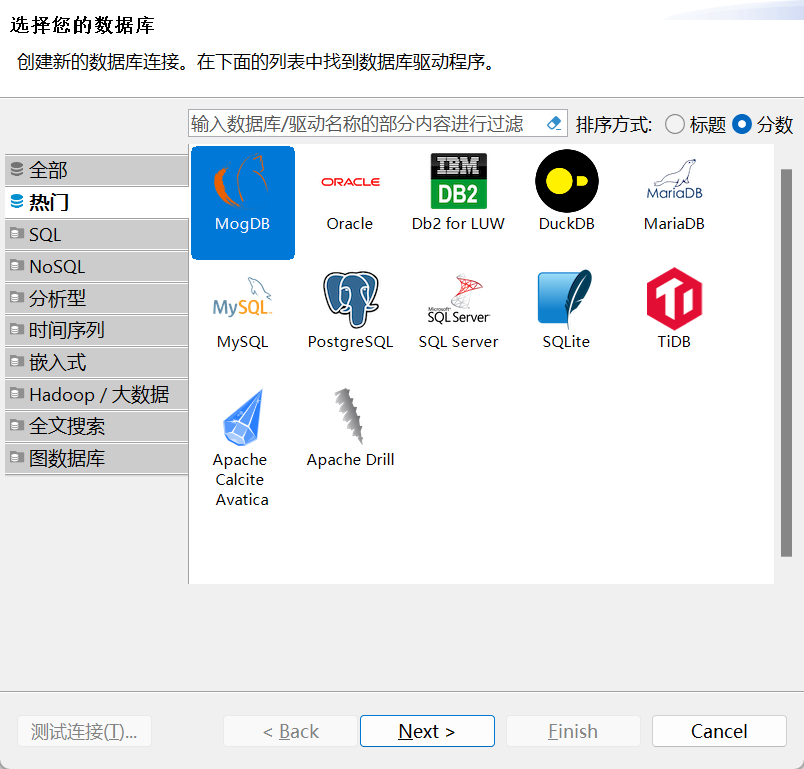
在windows上,启动Mogeaver
新增连接
填入ip、端口、用户、密码
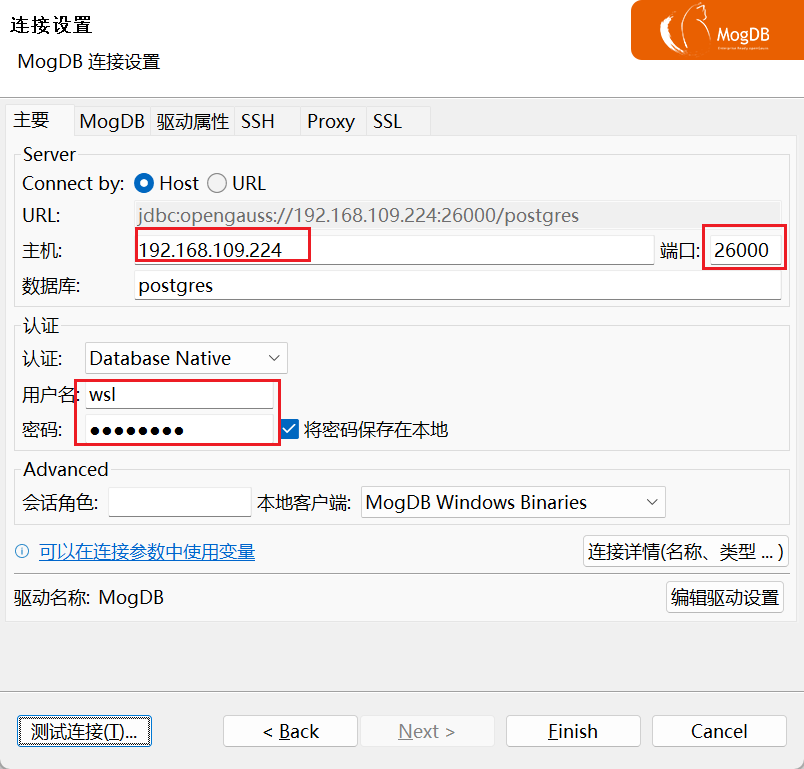
点击测试连接
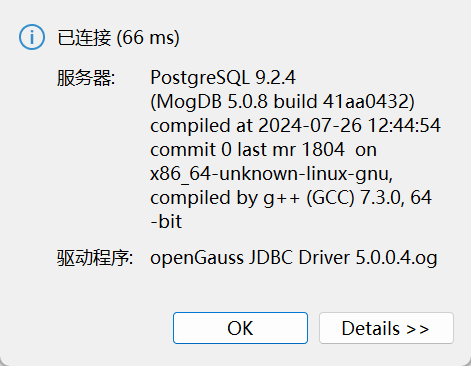
测试成功