


一、JDK动态代理执行过程
上一篇我们讲了JDK动态代理的简单使用,今天我们就来研究一下它的原理。
首先我们回忆下上一篇的代码:
public class Main {public static void main(String[] args){IPaymentService paymentService = new WatchPaymentService();PaymentIH paymentIH = new PaymentIH(paymentService);IPaymentService proxy = (IPaymentService) Proxy.newProxyInstance(paymentService.getClass().getClassLoader(),new Class[] {IPaymentService.class}, paymentIH);proxy.pay();}}
我们通过Proxy.newProxyInstance方法创建了代理对象,我们通过Debug看下这个proxy到底是什么:
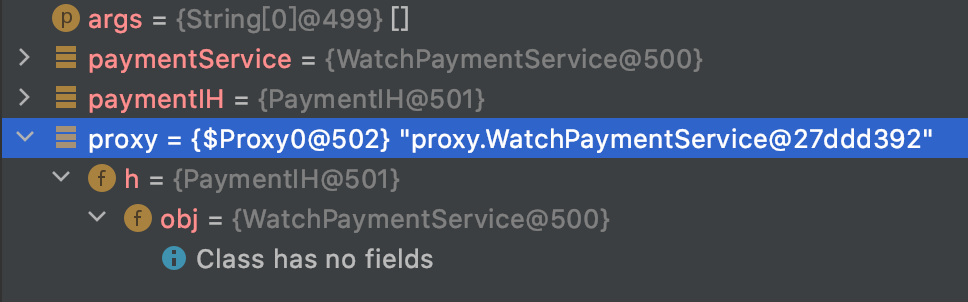
我们看到proxy的类是$Proxy0,很显然这是一个自动生成的类,我们使用如下工具类将此动态类保存下来看看:
public class ProxyUtils {/*** 将动态类的二进制字节码保存到硬盘中,默认的是clazz目录下* params: clazz 需要生成动态代理类的类* proxyName: 为动态生成的代理类的名称*/public static void generateClassFile(Class clazz, String proxyName) {// 根据类信息和提供的代理类名称,生成字节码byte[] classFile = ProxyGenerator.generateProxyClass(proxyName, clazz.getInterfaces());String paths = clazz.getResource(".").getPath();System.out.println(paths);FileOutputStream out = null;try {//保留到硬盘中out = new FileOutputStream(paths + proxyName + ".class");out.write(classFile);out.flush();} catch (Exception e) {e.printStackTrace();} finally {try {out.close();} catch (IOException e) {e.printStackTrace();}}}}
在main方法中执行下面这段代码,我们便可以在target的classes下找到生成的动态类。
ProxyUtils.generateClassFile(paymentService.getClass(), "PaymentServiceProxy");

我们通过IDEA查看这个动态类的内容如下:
public final class PaymentServiceProxy extends Proxy implements IPaymentService {private static Method m1;private static Method m3;private static Method m2;private static Method m0;public PaymentServiceProxy(InvocationHandler var1) throws {super(var1);}public final boolean equals(Object var1) throws {try {return (Boolean)super.h.invoke(this, m1, new Object[]{var1});} catch (RuntimeException | Error var3) {throw var3;} catch (Throwable var4) {throw new UndeclaredThrowableException(var4);}}public final void pay() throws {try {super.h.invoke(this, m3, (Object[])null);} catch (RuntimeException | Error var2) {throw var2;} catch (Throwable var3) {throw new UndeclaredThrowableException(var3);}}public final String toString() throws {try {return (String)super.h.invoke(this, m2, (Object[])null);} catch (RuntimeException | Error var2) {throw var2;} catch (Throwable var3) {throw new UndeclaredThrowableException(var3);}}public final int hashCode() throws {try {return (Integer)super.h.invoke(this, m0, (Object[])null);} catch (RuntimeException | Error var2) {throw var2;} catch (Throwable var3) {throw new UndeclaredThrowableException(var3);}}static {try {m1 = Class.forName("java.lang.Object").getMethod("equals", Class.forName("java.lang.Object"));m3 = Class.forName("proxy.IPaymentService").getMethod("pay");m2 = Class.forName("java.lang.Object").getMethod("toString");m0 = Class.forName("java.lang.Object").getMethod("hashCode");} catch (NoSuchMethodException var2) {throw new NoSuchMethodError(var2.getMessage());} catch (ClassNotFoundException var3) {throw new NoClassDefFoundError(var3.getMessage());}}}
从 PaymentServiceProxy 的代码中我们可以发现:
PaymentServiceProxy 继承了 Proxy 类,并且实现了被代理的所有接口,以及equals、hashCode、toString等方法;
由于 PaymentServiceProxy继承了 Proxy 类,所以每个代理类都会关联一个 InvocationHandler 方法调用处理器;
类和所有方法都被 public final 修饰,所以代理类只可被使用,不可以再被继承;
每个方法都有一个 Method 对象来描述,Method 对象在static静态代码块中创建,以 m + 数字 的格式命名;
被代理对象方法的调用是通过super.h.invoke(this, m1, (Object[])null); 完成的,其中的 super.h.invoke 实际上是在创建代理的时候传递给 Proxy.newProxyInstance 的 PaymentIH 对象,即 InvocationHandler的实现类,负责实际的调用处理逻辑;
PaymentIH的invoke方法接收到method、args等参数后,通过反射机制让被代理对象执行对应的方法。
综上,JDK的动态代理执行流程如下:

那么这个类是如何生成的呢?这个类与InvocationHandler又是如何关联起来的?带着这两个问题我们深入研究下Proxy的源码。
二、JDK动态代理源码解读
@CallerSensitivepublic static Object newProxyInstance(ClassLoader loader,Class<?>[] interfaces,InvocationHandler h)throws IllegalArgumentException{// null检查,h为null就抛出NullPointerExceptionObjects.requireNonNull(h);// 将接口类对象数组clone一份。final Class<?>[] intfs = interfaces.clone();//执行权限检查final SecurityManager sm = System.getSecurityManager();if (sm != null) {checkProxyAccess(Reflection.getCallerClass(), loader, intfs);}/** Look up or generate the designated proxy class.*/// 查找或者是生成一个特定的代理类对象Class<?> cl = getProxyClass0(loader, intfs);/** Invoke its constructor with the designated invocation handler.*/try {if (sm != null) {checkNewProxyPermission(Reflection.getCallerClass(), cl);}// 从代理类对象中查找参数为InvocationHandler的构造器final Constructor<?> cons = cl.getConstructor(constructorParams);final InvocationHandler ih = h;// 判断构造器是否是Public,如果不是则将其设置为可以访问的。if (!Modifier.isPublic(cl.getModifiers())) {AccessController.doPrivileged(new PrivilegedAction<Void>() {public Void run() {cons.setAccessible(true);return null;}});}// 通过反射,将h作为参数,实例化代理类,返回代理类实例。return cons.newInstance(new Object[]{h});} catch (IllegalAccessException|InstantiationException e) {throw new InternalError(e.toString(), e);} catch (InvocationTargetException e) {Throwable t = e.getCause();if (t instanceof RuntimeException) {throw (RuntimeException) t;} else {throw new InternalError(t.toString(), t);}} catch (NoSuchMethodException e) {throw new InternalError(e.toString(), e);}}
上面的代码中最重要的就是第21行和第44行,这两行实现了代理类的生成与实例化代理对象。
首先我们看下getProxyClass0(loader, intfs)的实现逻辑:
private static Class<?> getProxyClass0(ClassLoader loader,Class<?>... interfaces) {if (interfaces.length > 65535) {throw new IllegalArgumentException("interface limit exceeded");}// If the proxy class defined by the given loader implementing// the given interfaces exists, this will simply return the cached copy;// otherwise, it will create the proxy class via the ProxyClassFactory// 如果代理类被指定的类加载器定义了,并实现了给定的接口,// 那么就返回缓存的代理类对象,否则使用ProxyClassFactory创建代理类。return proxyClassCache.get(loader, interfaces);}
根据注释分析,proxyClassCache.get方法是获取代理类的入口,那我们接下来首先看看这个proxyClassCache是什么东东:
private static final WeakCache<ClassLoader, Class<?>[], Class<?>>proxyClassCache = new WeakCache<>(new KeyFactory(), new ProxyClassFactory());
proxyClassCache是一个WeakCache的对象,我们看看他的定义:(由于代码篇幅较大,这里只展示出私有变量定义与构造函数定义)
final class WeakCache<K, P, V> {private final ReferenceQueue<K> refQueue= new ReferenceQueue<>();// the key type is Object for supporting null keyprivate final ConcurrentMap<Object, ConcurrentMap<Object, Supplier<V>>> map= new ConcurrentHashMap<>();private final ConcurrentMap<Supplier<V>, Boolean> reverseMap= new ConcurrentHashMap<>();private final BiFunction<K, P, ?> subKeyFactory;private final BiFunction<K, P, V> valueFactory;/*** Construct an instance of {@code WeakCache}** @param subKeyFactory a function mapping a pair of* {@code (key, parameter) -> sub-key}* @param valueFactory a function mapping a pair of* {@code (key, parameter) -> value}* @throws NullPointerException if {@code subKeyFactory} or* {@code valueFactory} is null.*/public WeakCache(BiFunction<K, P, ?> subKeyFactory,BiFunction<K, P, V> valueFactory) {this.subKeyFactory = Objects.requireNonNull(subKeyFactory);this.valueFactory = Objects.requireNonNull(valueFactory);}
其中map变量是实现缓存的核心变量,它是一个双重的Map结构: (key, subKey) -> value
。其中key是传进来的Classloader进行包装后的对象,subKey是由WeakCache构造函数传人的KeyFactory()
生成的。value就是产生代理类的对象由WeakCache构造函数传人的ProxyClassFactory()
生成,这个可以从proxyClassCache的初始化能看出来。
产生subKey的KeyFactory代码如下:
private static final class KeyFactoryimplements BiFunction<ClassLoader, Class<?>[], Object>{@Overridepublic Object apply(ClassLoader classLoader, Class<?>[] interfaces) {switch (interfaces.length) {case 1: return new Key1(interfaces[0]); // the most frequentcase 2: return new Key2(interfaces[0], interfaces[1]);case 0: return key0;default: return new KeyX(interfaces);}}}
这部分代码没有必要深究,我们只需要知道它是根据传进去的interface生成subKey就行了,我们接着来看WeakCache.get方法:
public V get(K key, P parameter) {// 校验parameter不为空Objects.requireNonNull(parameter);// 清除无效缓存expungeStaleEntries();// cacheKey就是缓存的一级键Object cacheKey = CacheKey.valueOf(key, refQueue);// 根据一级键得到ConcurrentMap<Object, Supplier<V>>,如果不存在则创建之// lazily install the 2nd level valuesMap for the particular cacheKeyConcurrentMap<Object, Supplier<V>> valuesMap = map.get(cacheKey);if (valuesMap == null) {ConcurrentMap<Object, Supplier<V>> oldValuesMap= map.putIfAbsent(cacheKey,valuesMap = new ConcurrentHashMap<>());if (oldValuesMap != null) {valuesMap = oldValuesMap;}}// create subKey and retrieve the possible Supplier<V> stored by that// subKey from valuesMap// 根据classloader和interfaces获取二级键,即KeyFactory的apply方法Object subKey = Objects.requireNonNull(subKeyFactory.apply(key, parameter));// 根据下面的代码可以得知这个supplier就是factory,这里同样也是先看缓存中有没有,没有就重新创建,// 这也是此处代码使用一个while循环的原因Supplier<V> supplier = valuesMap.get(subKey);Factory factory = null;while (true) {if (supplier != null) {// supplier might be a Factory or a CacheValue<V> instance// 这里调用的就是Factory.get,得到代理类并返回V value = supplier.get();if (value != null) {return value;}}// else no supplier in cache// or a supplier that returned null (could be a cleared CacheValue// or a Factory that wasn't successful in installing the CacheValue)// lazily construct a Factoryif (factory == null) {factory = new Factory(key, parameter, subKey, valuesMap);}if (supplier == null) {supplier = valuesMap.putIfAbsent(subKey, factory);if (supplier == null) {// successfully installed Factorysupplier = factory;}// else retry with winning supplier} else {if (valuesMap.replace(subKey, supplier, factory)) {// successfully replaced// cleared CacheEntry / unsuccessful Factory// with our Factorysupplier = factory;} else {// retry with current suppliersupplier = valuesMap.get(subKey);}}}}
上面的代码稍微比较绕,总之就是先尝试从key获取(subKey -> value)如果不存在则创建(subKey -> value),然后再根据subKey获取value,同样的不存在则创建新的value。最终通过Factory.get方法获取代理类,接下来我们来看看Factory的代码:
private final class Factory implements Supplier<V> {private final K key;private final P parameter;private final Object subKey;private final ConcurrentMap<Object, Supplier<V>> valuesMap;Factory(K key, P parameter, Object subKey,ConcurrentMap<Object, Supplier<V>> valuesMap) {this.key = key;this.parameter = parameter;this.subKey = subKey;this.valuesMap = valuesMap;}@Overridepublic synchronized V get() { // serialize access// re-checkSupplier<V> supplier = valuesMap.get(subKey);// 检测得到的supplier是不是当前对象if (supplier != this) {// something changed while we were waiting:// might be that we were replaced by a CacheValue// or were removed because of failure ->// return null to signal WeakCache.get() to retry// the loopreturn null;}// else still us (supplier == this)// create new valueV value = null;try {// 调用ProxyClassFactory创建代理类value = Objects.requireNonNull(valueFactory.apply(key, parameter));} finally {if (value == null) { // remove us on failurevaluesMap.remove(subKey, this);}}// the only path to reach here is with non-null valueassert value != null;// wrap value with CacheValue (WeakReference)// 把value包装成弱引用CacheValue<V> cacheValue = new CacheValue<>(value);// try replacing us with CacheValue (this should always succeed)if (valuesMap.replace(subKey, this, cacheValue)) {// put also in reverseMapreverseMap.put(cacheValue, Boolean.TRUE);} else {throw new AssertionError("Should not reach here");}// successfully replaced us with new CacheValue -> return the value// wrapped by itreturn value;}}
终于我们来到了ProxyClassFactory类了,这个类就是用来创建代理类的工厂类:
private static final class ProxyClassFactoryimplements BiFunction<ClassLoader, Class<?>[], Class<?>>{// prefix for all proxy class names// 代理类的类名前缀private static final String proxyClassNamePrefix = "$Proxy";// next number to use for generation of unique proxy class names// 代理类类名编号,即$Proxy0,$Proxy1,$Proxy2......private static final AtomicLong nextUniqueNumber = new AtomicLong();@Overridepublic Class<?> apply(ClassLoader loader, Class<?>[] interfaces) {Map<Class<?>, Boolean> interfaceSet = new IdentityHashMap<>(interfaces.length);// 校验接口是否能被当前classloader加载以及其是否是接口类for (Class<?> intf : interfaces) {/** Verify that the class loader resolves the name of this* interface to the same Class object.*/Class<?> interfaceClass = null;try {interfaceClass = Class.forName(intf.getName(), false, loader);} catch (ClassNotFoundException e) {}if (interfaceClass != intf) {throw new IllegalArgumentException(intf + " is not visible from class loader");}/** Verify that the Class object actually represents an* interface.*/if (!interfaceClass.isInterface()) {throw new IllegalArgumentException(interfaceClass.getName() + " is not an interface");}/** Verify that this interface is not a duplicate.*/if (interfaceSet.put(interfaceClass, Boolean.TRUE) != null) {throw new IllegalArgumentException("repeated interface: " + interfaceClass.getName());}}// 生成代理类包名String proxyPkg = null; // package to define proxy class inint accessFlags = Modifier.PUBLIC | Modifier.FINAL;/** Record the package of a non-public proxy interface so that the* proxy class will be defined in the same package. Verify that* all non-public proxy interfaces are in the same package.*///验证所有非公共的接口在同一个包内;公共的就无需处理//生成包名和类名的逻辑,包名默认是com.sun.proxy,类名默认是$Proxy 加上一个自增的整数值//如果被代理类是 non-public proxy interface ,则用和被代理类接口一样的包名for (Class<?> intf : interfaces) {int flags = intf.getModifiers();if (!Modifier.isPublic(flags)) {accessFlags = Modifier.FINAL;String name = intf.getName();int n = name.lastIndexOf('.');String pkg = ((n == -1) ? "" : name.substring(0, n + 1));if (proxyPkg == null) {proxyPkg = pkg;} else if (!pkg.equals(proxyPkg)) {throw new IllegalArgumentException("non-public interfaces from different packages");}}}if (proxyPkg == null) {// if no non-public proxy interfaces, use com.sun.proxy packageproxyPkg = ReflectUtil.PROXY_PACKAGE + ".";}/** Choose a name for the proxy class to generate.*/long num = nextUniqueNumber.getAndIncrement();// 代理类的完全限定名,如com.sun.proxy.$Proxy0.calssString proxyName = proxyPkg + proxyClassNamePrefix + num;/** Generate the specified proxy class.*/// 代理类字节码生成byte[] proxyClassFile = ProxyGenerator.generateProxyClass(proxyName, interfaces, accessFlags);try {//把代理类加载到JVM中,至此动态代理过程基本结束了return defineClass0(loader, proxyName,proxyClassFile, 0, proxyClassFile.length);} catch (ClassFormatError e) {/** A ClassFormatError here means that (barring bugs in the* proxy class generation code) there was some other* invalid aspect of the arguments supplied to the proxy* class creation (such as virtual machine limitations* exceeded).*/throw new IllegalArgumentException(e.toString());}}}
在ProxyGenerator.generateProxyClass()方法中完成代理类的字节码的组装,
最终就生成了本文一开始保存出来的代理类的内容,感兴趣的读者可以自行研究,值得注意的是在创建代理类的构造函数时,此处设定需要传入InvocationHandler对象,所以这样就能确保我们代理类能够通过我们实现的InvocationHandler接口去调用被代理类的方法。
private ProxyGenerator.MethodInfo generateConstructor() throws IOException {ProxyGenerator.MethodInfo var1 = new ProxyGenerator.MethodInfo("<init>", "(Ljava/lang/reflect/InvocationHandler;)V", 1);DataOutputStream var2 = new DataOutputStream(var1.code);this.code_aload(0, var2);this.code_aload(1, var2);var2.writeByte(183);var2.writeShort(this.cp.getMethodRef("java/lang/reflect/Proxy", "<init>", "(Ljava/lang/reflect/InvocationHandler;)V"));var2.writeByte(177);var1.maxStack = 10;var1.maxLocals = 2;var1.declaredExceptions = new short[0];return var1;}
