


Whoami:5年+金融、政府、医疗领域工作经验的DBACertificate:OCP、PCPSkill:Oracle、Mysql、PostgreSQLPlatform:CSDN、墨天伦、公众号(呆呆的私房菜)
阅读本文可以了解使用repmgr扩展实现PostgreSQL数据库高可用的相关内容,包含repmgr高可用架构基本原理、搭建部署及主备切换等。
repmgr是什么?
repmgr是一个开源工具套件,用于管理PostgreSQL服务器集群中的复制和故障转移。
它增强了PostgreSQL内置的热备用能力,提供了设置备用服务器、监控复制和执行故障转移或手动切换操作等管理任务的工具。
repmgr收费吗?
repmgr 由全球PostgreSQL支持、培训、开发、迁移和咨询领域的专家EDB开发,并由其他个人和组织贡献。
它是免费且开源的软件,根据GNU公共许可证(GPL)v3许可。这意味着您可以自由使用和修改repmgr,但您所做的任何修改只能在同一条款下分发。
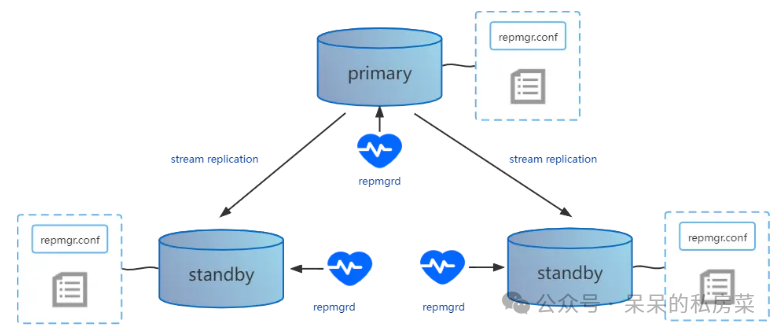
repmgr通过监控PostgreSQL集群中的节点状态并自动执行故障转移来实现高可用。当主机点发生故障时,repmgr能够自动提升一个备用节点作为主节点,从而确保服务的连续性和数据的一致性。
1. 节点管理:repmgr将每个服务器定义为一个节点,每个节点都有唯一的ID和配置文件,记录了节点的详细信息和连接参数;
2. 自动故障转移:repmgrd守护进程实时监控所有节点的健康状态,一旦检测到主节点不可用,它将根据预选的选举机制选择一个备用节点并自动提升其为新的主节点;
3. 数据同步:repmgr通过流复制的方式确保主节点和备用节点之间的数据保持同步,支持同步或异步复制模式以满足不同的数据一致性需求;
4. 元数据管理:repmgr在数据库中维护集群的元数据,包括节点状态和配置信息,这些信息对于故障转移和集群管理至关重要;
5. 手动切换与故障恢复:repmgr提供了命令行工具,允许管理员手动执行主备切换和故障恢复操作,以应对特定的维护场景;
6. witness节点:为了提高故障转移的准确性,repmgr可以配置witness节点,它可以作为一个独立的监控点,帮助避免因网络问题导致的不正确的故障转移决策;
7. 日志和通知:repmgrd记录详细的操作日期,并通过可配置的脚本发送通知,使管理员能及时响应集群中的任何变化。
高可用搭建环境介绍:
本章高可用部署采用的是1主节点+2从节点+1见证服务器的架构。
| 序号 | 主机名 | IP地址 | 介质版本 | 操作系统版本 | 主机资源 |
| 1 | pgdb01 | 192.168.56.11 | postgresql-11.18.tar.gz repmgr-5.3.1.tar.gz | centos7.6 | 4C 8G 500G |
| 2 | pgdb02 | 192.168.56.12 | |||
| 3 | pgdb03 | 192.168.56.13 | |||
| 4 | pgdb04 | 192.168.56.14 | 2c 4G 100G |
1. 主机环境配置cat >> etc/sysctl.conf <<-EOFkernel.shmmax = 4294967296kernel.shmall = 2097152kernel.shmmni = 4096kernel.sem = 250 32000 100 128fs.aio-max-nr = 1048576net.ipv4.ip_local_port_range = 9000 65500net.core.rmem_default = 262144net.core.rmem_max = 4194304net.core.wmem_default = 262144net.core.wmem_max = 4194304fs.file-max = 6815744EOF2. 配置主机资源限制cat >> etc/security/limits.conf <<-EOF* soft nofile 1024000* hard nofile 1024000* soft nproc unlimited* hard nproc unlimited* soft core unlimited* hard core unlimited* soft memlock unlimited* hard memlock unlimitedEOF3. 安装系统依赖yum -y install coreutils glib2 lrzsz mpstat dstat sysstat e4fsprogs xfsprogs ntp readline-devel zlib-devel openssl-devel pam-devel libxml2-devel libxslt-devel python-devel tcl-devel gcc make smartmontools flex bison perl-devel perl-ExtUtils* openldap-devel jadetex openjade bzip2 gettext json-c json-c-devel curl-devel4. 源码安装PostgreSQL数据库和repmgr扩展(所有主机执行)-- 创建安装用户useradd postgresecho "postgres#2024" | passwd --stdin postgres-- 配置用户环境变量cat >> home/postgres/.bash_profile <<-EOFexport PGHOME=/pg/pg11export PGDATA=/pg/pg11/dataexport PATH=\$PATH:\$PGHOME/binEOFchown postgres.postgres ~/.bash_profile-- 上传postgresql-11.18.tar.gz安装包到/pg/pg11下cd pg/pg11/tar xzf postgresql-11.18.tar.gzcd postgresql-11.18./configure --prefix=/pg/pg11 --enable-nls --with-perl --with-python --with-tcl --with-gssapi --with-openssl --with-pam --with-ldap --with-libxml --with-libxsltmake -j 4 && make install-- 上传repmgr-5.3.1.tar.gz安装包到 /pg/pg11/postgresql-11.18/contrib下cd /pg/pg11/postgresql-11.18/contribtar xzf repmgr-5.3.1.tar.gzcd repmgr-5.3.1./configure && make && make install5. 主机互信创建(所有主机执行)cat >> /etc/hosts <<-EOF192.168.56.11 pgdb01192.168.56.12 pgdb02192.168.56.13 pgdb03192.168.56.14 pgdb04EOFssh-keygen -t rsa-- 主节点执行ssh pgdb01 "cat ~/.ssh/id_rsa.pub" >> ~/.ssh/authorized_keysssh pgdb02 "cat ~/.ssh/id_rsa.pub" >> ~/.ssh/authorized_keysssh pgdb03 "cat ~/.ssh/id_rsa.pub" >> ~/.ssh/authorized_keysssh pgdb04 "cat ~/.ssh/id_rsa.pub" >> ~/.ssh/authorized_keysscp ~/.ssh/authorized_keys pgdb-02:~/.ssh/scp ~/.ssh/authorized_keys pgdb-03:~/.ssh/scp ~/.ssh/authorized_keys pgdb-04:~/.ssh/-- 所有主机执行chmod 644 ~/.ssh/authorized_keyschmod 700 ~/.ssh6. 初始化主库initdb -E UTF8 --locale=en_US.utf8 -U postgres7. 主库配置-- 修改数据库参数配置cat >> $PGDATA/postgresql.conf <<EOFlisten_addresses = '*'port=5432unix_socket_directories='/pg/pg11/data'logging_collector = onlog_directory = 'pg_log'log_filename = 'postgresql-%a.log'log_truncate_on_rotation = onwal_level='replica'archive_mode='on'archive_command='test ! -f pg/pg11/archive/%f && cp %p pg/pg11/archive/%f'hot_standby=onmax_wal_senders=10wal_sender_timeout=60swal_keep_segments = 128max_replication_slots=10wal_log_hints=onshared_preload_libraries ='repmgr'EOF-- 修改访问白名单配置cat >> $PGDATA/pg_hba.conf <<EOFhost replication all 0.0.0.0/0 md5local repmgr repmgr md5host repmgr repmgr 127.0.0.1/32 md5host repmgr repmgr 192.168.56.0/24 md5local replication repmgr md5host replication repmgr 127.0.0.1/32 md5host replication repmgr 192.168.56.0/24 md5EOF-- 主库创建用户createuser -s repmgr -h127.0.0.1 -Upostgrescreatedb repmgr -O repmgr -h127.0.0.1 -Upostgrespsql -Upostgres -h 127.0.0.1 -c "alter user repmgr with password 'repmgr#2024';"psql -Upostgres -h 127.0.0.1 -c "select name, setting from pg_settings where name in ('wal_level','archive_mode','archive_command');"8. repmgr配置-- 主库执行cat > $PGHOME/repmgr.conf <<EOFnode_id=1node_name=pgdb01conninfo='host=192.168.56.11 user=repmgr password=repmgr#2024 dbname=repmgr connect_timeout=2'data_directory='/pg/pg11/data'pg_bindir='/pg/pg11/bin'EOF-- 从库1执行cat > $PGHOME/repmgr.conf <<EOFnode_id=2node_name=pgdb02conninfo='host=192.168.56.12 user=repmgr password=repmgr#2024 dbname=repmgr connect_timeout=2'data_directory='/pg/pg11/data'pg_bindir='/pg/pg11/bin'EOF-- 从库2执行cat > $PGHOME/repmgr.conf <<EOFnode_id=3node_name=pgdb03conninfo='host=192.168.56.13 user=repmgr password=repmgr#2024 dbname=repmgr connect_timeout=2'data_directory='/pg/pg11/data'pg_bindir='/pg/pg11/bin'EOF-- 所有节点都配~/.pgpass密码文件cat >> ~/.pgpass <<EOF192.168.56.11:5432:repmgr:repmgr:repmgr#2024192.168.56.12:5432:repmgr:repmgr:repmgr#2024192.168.56.13:5432:repmgr:repmgr:repmgr#2024192.168.56.14:5432:repmgr:repmgr:repmgr#2024192.168.56.11:5432:replication:repmgr:repmgr#2024192.168.56.12:5432:replication:repmgr:repmgr#2024192.168.56.13:5432:replication:repmgr:repmgr#2024192.168.56.14:5432:replication:repmgr:repmgr#2024EOFchmod 0600 ~/.pgpass-- 注册主库服务repmgr -f $PGHOME/repmgr.conf primary registerpsql -Urepmgr -h127.0.0.1 -c "select * from repmgr.nodes;"-- 注册从库1服务repmgr -h 192.168.56.11 -U repmgr -d repmgr -f $PGHOME/repmgr.conf standby clone --dry-runrepmgr -h 192.168.56.11 -U repmgr -d repmgr -f $PGHOME/repmgr.conf standby clonepg_ctl startrepmgr -h 192.168.56.11 -U repmgr -d repmgr -f $PGHOME/repmgr.conf standby registerpsql -Urepmgr -h127.0.0.1 -c "select * from repmgr.nodes;"repmgr -f $PGHOME/repmgr.conf cluster show-- 注册从库2服务repmgr -h 192.168.56.11 -U repmgr -d repmgr -f $PGHOME/repmgr.conf standby clone --dry-runrepmgr -h 192.168.56.11 -U repmgr -d repmgr -f $PGHOME/repmgr.conf standby clonepg_ctl startrepmgr -h 192.168.56.11 -U repmgr -d repmgr -f $PGHOME/repmgr.conf standby registerpsql -Urepmgr -h127.0.0.1 -c "select * from repmgr.nodes;"repmgr -f $PGHOME/repmgr.conf cluster show-- 见证节点配置-- 注意:见证节点不需要克隆,初始化数据库即可initdb -E UTF8 --locale=en_US.utf8 -U postgres-- 修改数据库配置cat >> $PGDATA/postgresql.conf <<EOFlisten_addresses = '*'port=5432unix_socket_directories='/pg/pg11/pgdata'logging_collector = onlog_directory = 'pg_log'log_filename = 'postgresql-%a.log'log_truncate_on_rotation = onwal_level='replica'archive_mode='on'archive_command='test ! -f /pg/pg11/archive/%f && cp %p /pg/pg11/archive/%f'hot_standby=onmax_wal_senders=10wal_sender_timeout=60swal_keep_segments = 128max_replication_slots=10wal_log_hints=onshared_preload_libraries ='repmgr'-- 修改访问白名单配置host replication all 0.0.0.0/0 md5local repmgr repmgr md5host repmgr repmgr 127.0.0.1/32 md5host repmgr repmgr 192.168.56.0/24 md5local replication repmgr md5host replication repmgr 127.0.0.1/32 md5host replication repmgr 192.168.56.0/24 md5-- 见证节点创建用户createuser -s repmgr -h127.0.0.1 -Upostgrescreatedb repmgr -O repmgr -h127.0.0.1 -Upostgrespsql -Upostgres -h 127.0.0.1 -c "alter user repmgr with password 'repmgr#2024';"psql -Upostgres -h 127.0.0.1 -c "select * from pg_settings where name in ('wal_level','archive_mode','archive_command');"-- 见证节点repmgr配置文件cat > $PGHOME/repmgr.conf <<EOFnode_id=4node_name=pgdb-04conninfo='host=192.168.56.14 user=repmgr password=repmgr#2024 dbname=repmgr connect_timeout=2'data_directory='/pg/pg11/data'pg_bindir='/pg/pg11/bin'EOF-- 注册见证节点服务repmgr -h 192.168.56.11 -U repmgr -d repmgr -f $PGHOME/repmgr.conf witness registerrepmgr -f $PGHOME/repmgr.conf cluster show9. 检查repmgr服务repmgr -f $PGHOME/repmgr.conf cluster matrixrepmgr -f $PGHOME/repmgr.conf cluster crosscheckrepmgr -f $PGHOME/repmgr.conf node statusrepmgr -f $PGHOME/repmgr.conf node check10. 自动故障转移配置cat >> /pg/pg11/repmgr.conf <<-EOFmonitoring_history=yesmonitor_interval_secs=5failover=automaticreconnect_attempts=6reconnect_interval=5promote_command='repmgr standby promote -f /pg/pg11/repmgr.conf --log-to-file'follow_command='repmgr standby follow -f /pg/pg11/repmgr.conf --log-to-file --upstream-node-id=%n'log_level=INFOlog_status_interval=10log_file='/pg/pg11/repmgr.log'EOF11. 日志轮询配置cat >> /etc/logrotate.conf <<"EOF"/pg/pg11/repmgr.log {missingokcompressrotate 30dailydateextcreate 0600 postgres postgres}EOF12. 所有节点启动repmgrd进程echo "repmgrd -f /pg/pg11/repmgr.conf --pid-file /tmp/repmgrd.pid --daemonize" >> /etc/rc.localchmod +x /etc/rc.d/rc.localrepmgrd -f /pg/pg11/repmgr.conf --pid-file /tmp/repmgrd.pid --daemonize
repmgr切换分为两种,一种是手动主备切换,一种是故障自动切换。
1. 手动主备切换:
切换目标:主节点切换成从节点,从节点1切换成主节点1. 检查所有节点状态repmgr -f /pg/pg11/repmgr.conf cluster show2. 预执行,从节点1执行切换,必须保证ssh通讯正常repmgr -f /pg/pg11/repmgr.conf standby switchover --siblings-follow --dry-run --log-level DEBUG --force-rewind3. 从节点1执行切换repmgr -f /pg/pg11/repmgr.conf standby switchover --siblings-follow --force-rewind --log-level DEBUG --verbose
2. 故障自动切换:
目标: 模拟主库宕机,从节点自动切换成主节点1. 停止主库pg_ctl stop2. 查看从节点是否切换为主节点repmgr -f /pg/pg11/repmgr.conf cluster show
3. 故障切换后切回原主库:
目标: 宕机的主库重新加入集群,并切回正式主库1. 重新加入集群repmgr -f $PGHOME/repmgr.conf node rejoin -d 'host=192.168.56.12 dbname=repmgr user=repmgr' --force-rewind --config-files=postgresql.conf,postgresql.auto.conf --verbose --dry-run2. 查看是否成功加入集群repmgr -f /pg/pg11/repmgr.conf cluster show3. 原主库执行主备切换repmgr -f /pg/pg11/repmgr.conf standby switchover --siblings-follow --force-rewind --log-level DEBUG --dry-run
本文内容就到这啦,阅读完本篇,相信你对PostgreSQL高可用架构repmgr相关知识有了一定的认识了吧!我们下篇再见!

