


在现代 IT 环境中,系统和网络的监控是确保服务稳定运行的关键。而 Zabbix 作为一款功能强大的开源监控软件,得到了广泛的应用。然而,对于很多初学者来说,如何快速、便捷地安装和配置 Zabbix 仍然是一个不小的挑战。本篇文章将为你详细讲解如何一键安装 Zabbix 5.0,让监控变得不再复杂,轻松搞定!
为什么选择 Zabbix?
Zabbix 是一款企业级的开源监控解决方案,具有以下优势:
「功能强大」:支持监控网络、服务器、应用和服务等各种 IT 资源。
「高度可扩展」:适用于从小型环境到大型企业的各种规模。
「可视化能力强」:提供丰富的图表和报表功能,帮助用户直观了解系统状态。
「开放源码」:完全免费使用,并且可以根据需求定制和扩展。
快速安装 Zabbix 5.0 的准备工作
「环境准备」
在安装 Zabbix 之前,我们需要准备好一个干净的 Linux 环境。本文以 CentOS 7, 进行一键安装, 并且zabbix server与数据库分离。
假设数据库IP是192.168.1.100 , 连接到MySQL并创建zabbix用户和数据库
# 连接到MySQL并创建zabbix用户和数据库
mysql -uroot -proot1234 -h 192.168.1.100 -e "CREATE DATABASE IF NOT EXISTS zabbix CHARACTER SET utf8 COLLATE utf8_bin;"
mysql -uroot -proot1234 -h 192.168.1.100 -e "grant all on zabbix.* to zabbix identified by 'zabbix';"
「一键安装zabbix5.0」
# 此处的ip应该只有一个
# 获取非本地环回IP地址,并存储到变量ipaddr
export ipaddr=$(ip a | grep -w inet | grep -v 127.0 | awk '{ print $2 }' | cut -d'/' -f1 | tr '\n' ' ')
# 使用数组存储可能的多个IP地址
IFS=' ' read -r -a ip_array <<< "$ipaddr"
# 判断数组中的IP地址数量
if [ ${#ip_array[@]} -eq 1 ]; then
# echo "IP 地址为: ${ip_array[0]}"
:
elif [ ${#ip_array[@]} -gt 1 ]; then
echo "错误: 找到多个IP地址 (${ipaddr}), 请检查网络配置。"
exit 1
else
echo "错误: 没有找到有效的IP地址,请检查网络配置。"
exit 1
fi
# 检查当前用户是否是root用户
if [ "$(id -u)" -eq 0 ]; then
echo "当前用户是root用户..."
else
echo "请使用root用户运行本脚本..."
exit 1
fi
echo '关闭防火墙selinux...'
systemctl disable firewalld
systemctl disable iptables
systemctl stop firewalld
systemctl stop iptables
sed -i 's/SELINUX=.*/SELINUX=disabled/' /etc/selinux/config
setenforce 0
echo '安装zabbix相关组件...'
cat>/etc/yum.repos.d/zabbix.repo<<eof
[zabbix]
name=Zabbix Official Repository - \$basearch
baseurl=https://mirrors.tuna.tsinghua.edu.cn/zabbix/zabbix/5.0/rhel/7/\$basearch/
enabled=1
gpgcheck=1
gpgkey=file:///etc/pki/rpm-gpg/RPM-GPG-KEY-ZABBIX-A14FE591
[zabbix-frontend]
name=Zabbix Official Repository frontend - \$basearch
baseurl=https://mirrors.tuna.tsinghua.edu.cn/zabbix/zabbix/5.0/rhel/7/\$basearch/frontend
enabled=1
gpgcheck=1
gpgkey=file:///etc/pki/rpm-gpg/RPM-GPG-KEY-ZABBIX-A14FE591
[zabbix-debuginfo]
name=Zabbix Official Repository debuginfo - \$basearch
baseurl=https://mirrors.tuna.tsinghua.edu.cn/zabbix/zabbix/5.0/rhel/7/\$basearch/debuginfo/
enabled=0
gpgkey=file:///etc/pki/rpm-gpg/RPM-GPG-KEY-ZABBIX-A14FE591
gpgcheck=1
[zabbix-non-supported]
name=Zabbix Official Repository non-supported - \$basearch
baseurl=https://mirrors.tuna.tsinghua.edu.cn/zabbix/non-supported/rhel/7/\$basearch/
enabled=1
gpgkey=file:///etc/pki/rpm-gpg/RPM-GPG-KEY-ZABBIX
gpgcheck=1
[centos-sclo-sclo]
name=CentOS-7 - SCLo sclo
baseurl=https://mirrors.tuna.tsinghua.edu.cn/centos/7/sclo/\$basearch/sclo/
gpgcheck=0
enabled=1
gpgkey=file:///etc/pki/rpm-gpg/RPM-GPG-KEY-CentOS-SIG-SCLo
[centos-sclo-rh]
name=CentOS-7 - SCLo rh
baseurl=https://mirrors.tuna.tsinghua.edu.cn/centos/7/sclo/\$basearch/rh/
gpgcheck=0
enabled=1
gpgkey=file:///etc/pki/rpm-gpg/RPM-GPG-KEY-CentOS-SIG-SCLo
eof
curl https://mirrors.tuna.tsinghua.edu.cn/zabbix/RPM-GPG-KEY-ZABBIX-A14FE591 \
-o /etc/pki/rpm-gpg/RPM-GPG-KEY-ZABBIX-A14FE591
curl https://mirrors.tuna.tsinghua.edu.cn/zabbix/RPM-GPG-KEY-ZABBIX \
-o /etc/pki/rpm-gpg/RPM-GPG-KEY-ZABBIX
yum makecache fast
yum -y install zabbix-server-mysql zabbix-agent
yum -y install zabbix-web-mysql-scl zabbix-apache-conf-scl
gunzip -c /usr/share/doc/zabbix-server-mysql-*/create.sql.gz >/root/create.sql
# 导入SQL文件
mysql -uzabbix -pzabbix -h 192.168.1.100 zabbix < /root/create.sql
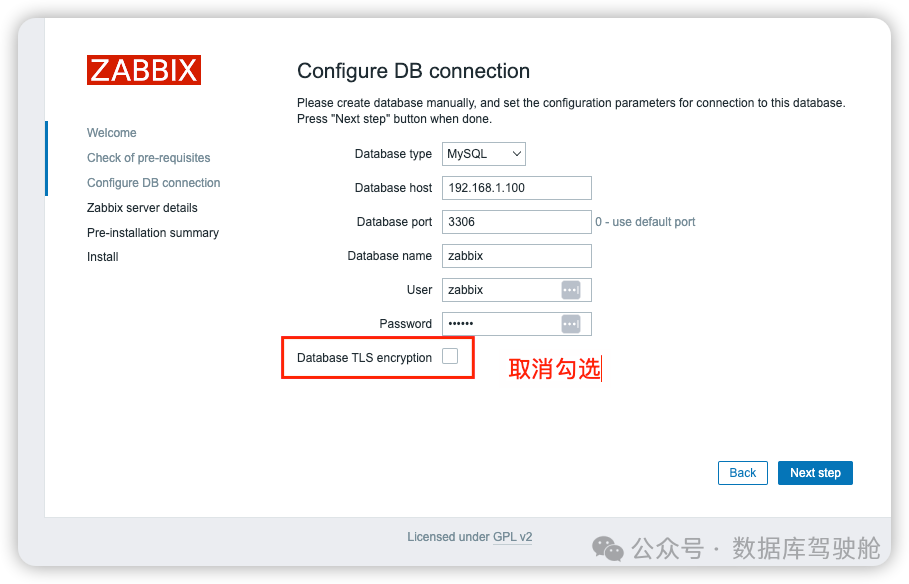
# 修改 /etc/zabbix/zabbix_server.conf 文件
sed -i 's/^# DBHost=localhost/DBHost=192.168.1.100/' /etc/zabbix/zabbix_server.conf
sed -i 's/^# DBPassword=/DBPassword=zabbix/' /etc/zabbix/zabbix_server.conf
sed -i 's/^# DBPort=/DBPort=3306/' /etc/zabbix/zabbix_server.conf
# 修改 /etc/zabbix/zabbix_agentd.conf 文件
sed -i "s/^Server=127.0.0.1/Server=$ipaddr/" /etc/zabbix/zabbix_agentd.conf
sed -i "s/^ServerActive=127.0.0.1/ServerActive=$ipaddr/" /etc/zabbix/zabbix_agentd.conf
# 修改时区
sed -i '$a\php_value[date.timezone] = Asia/Shanghai' /etc/opt/rh/rh-php72/php-fpm.d/zabbix.conf
systemctl restart zabbix-server zabbix-agent
systemctl enable zabbix-server zabbix-agent
systemctl restart httpd rh-php72-php-fpm
systemctl enable httpd rh-php72-php-fpm
浏览器访问 http://zabbix_server_ip//zabbix/
默认用户名:密码 Admin:zabbix

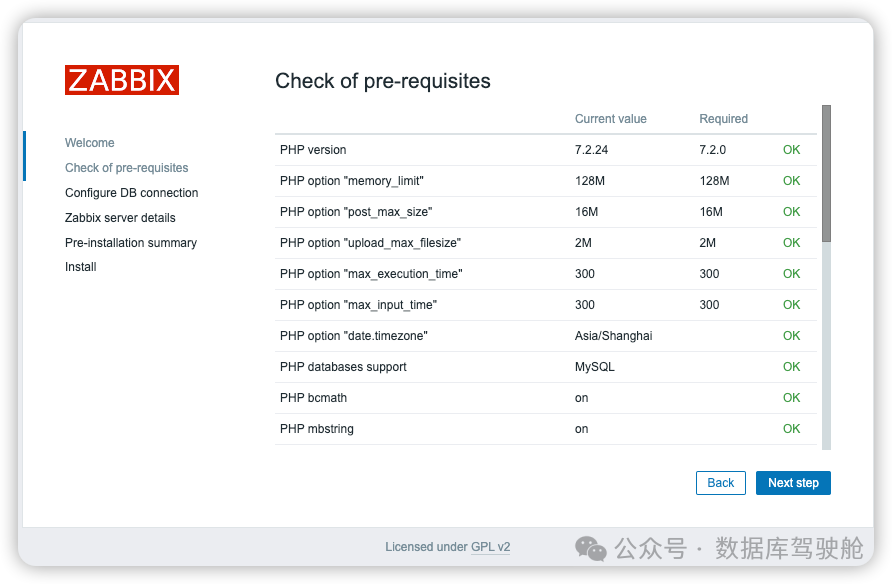
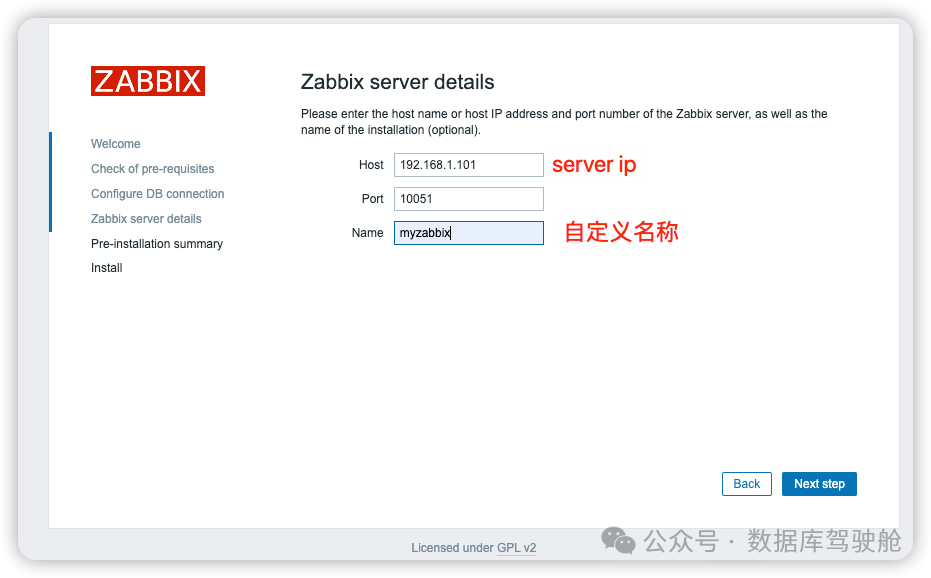
然后next ->finish 完成zabbix安装。
结语
恭喜你!你已经成功安装并配置了 Zabbix 5.0,现在可以开始监控你的系统和网络设备了。通过本文的一键安装教程,希望你能够轻松掌握 Zabbix 的安装技巧,并在未来的运维工作中更加得心应手。如果你对 Zabbix 或其他监控技术有任何疑问,欢迎在评论区留言,我们会及时解答!
「欢迎关注我们的公众号,获取更多技术分享与经验交流。」
文章转载自数据库驾驶舱,如果涉嫌侵权,请发送邮件至:contact@modb.pro进行举报,并提供相关证据,一经查实,墨天轮将立刻删除相关内容。
