Zabbix简介
Zabbix由几部分构成,Zabbix server、Zabbix proxy、Zabbix agent、Zabbix UI和DB。
Zabbix与YashanDB
Zabbix通过oci接口连接YashanDB,简单架构如下图。
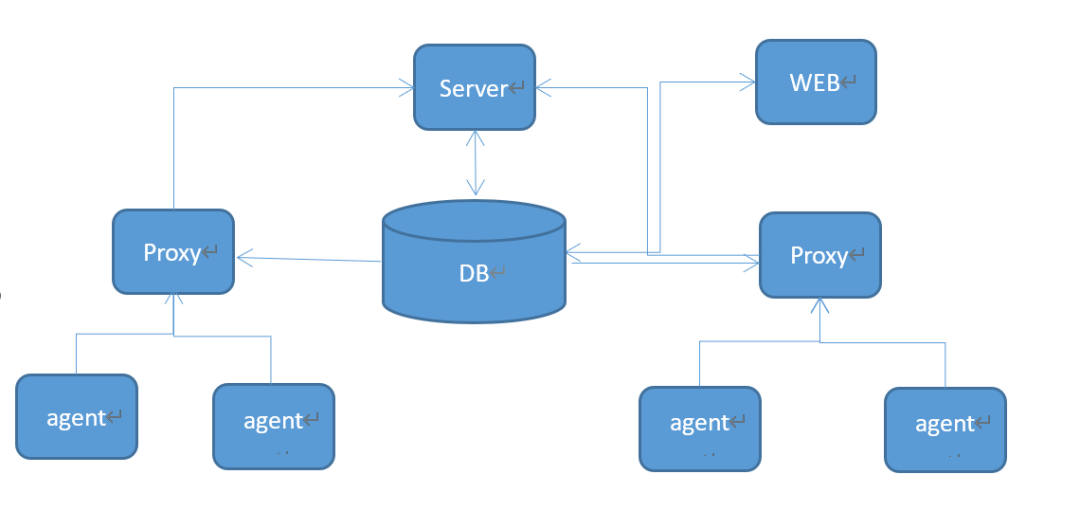
Web:监控管理页面,新增主机、监控项、触发器等(web直接写入db,从db直接获取数据)。
Server:负责数据的主动轮询和被动获取,计算触发器条件,向用户发送通知。从db读取监控有效项,存储在缓存中。接收监控项数据,并写入db。
DB:存储Zabbix表数据
Proxy:proxy连接到server,并请求配置数据。从agent收集数据,所有数据均在本地缓存,然后发送给server。需要独立的数据库。
Agent:根据监控项,监控数据。
主动:agent从server/porxy请求监控项,定期采集数据发送到server/proxy。
被动:server/proxy询求数据,agent返回结果。
Zabbix安装部署
1.安装YashanDB
1、生成配置文件./bin/yasboot package config gen --cluster yashandb -u yashan -p 123456 --ip 192.168.24.49 --port 22 --install-path home/yashan/yasdb_home --data-path home/yashan/yasdb_data --begin-port 1688 --db 1 --yas-type SE2、安装yashandb./bin/yasboot package install -t hosts.toml -i yashandb-23.2.3.100-linux-x86_64.tar.gz3、部署启动数据库./bin/yasboot cluster deploy -t yashandb.toml4、修改sys用户密码./bin/yasboot cluster password set -n yasdb_123 -c yashandb5、设置环境变量source home/yashan/yasdb_home/yashandb/23.2.3.100/conf/yashandb.bash
安装yashandb-oci:
cd datatar -xzvf yashandb-oci-23.2.1.100-4-gecc0e02-linux-x86_64.tar.gzmv yashandb-oci-23.2.1.100-4-gecc0e02-linux-x86_64 yashandb-oci
安装yashandb-client:
cd datamkdir yashandb-clienttar -xzvf yashandb-client-23.2.3.100-linux-x86_64.tar.gz
设置环境变量:
export YASOCI_PATH=/data/yashandb-ociexport YASCLI_PATH=/data/yashandb-client/libexport LD_LIBRARY_PATH=$YASOCI_PATH:$YASCLI_PATH:$LD_LIBRARY_PATH
2.编译安装zabbix server
zabbix版本:zabbix-6.4.17
zabbix下载:https://www.zabbix.com/download_sources
1)oci依赖安装
下载路径:https://www.oracle.com/database/technologies/instant-client/linux-x86-64-downloads.htmloci lib库:rpm -ivh oracle-instantclient-basic-21.11.0.0.0-1.el8.x86_64.rpm/usr/lib/oracle/21/client64/lib/oci头文件:rpm -ivh oracle-instantclient-devel-21.11.0.0.0-1.el8.x86_64.rpm/usr/include/oracle/21/client64/
2)编译安装zabbix server
tar -xzvf zabbix-6.4.17.tar.gzcd zabbix-6.4.17/./configure --prefix=/data/zabbix/ --enable-server --enable-agent --enable-proxy --enable-java --enable-ipv6 --with-net-snmp --with-libcurl --with-libxml2 --with-openipmi --with-unixodbc=yes --with-oracle=yesmakemake install
create tablespace ZABBIX datafile '?/dbfiles/ZABBIX_DATA' size 2G autoextend on next 128M maxsize unlimited databucket '?/local_fs/ZABBIX_DATA';create user ZABBIX IDENTIFIED BY 123456 default TABLESPACE ZABBIX;grant dba to ZABBIX;-- drop user ZABBIX cascade;-- drop tablespace ZABBIX including contents and datafiles CASCADE CONSTRAINTS;-- 如果需要用zabbix proxy,则创建zabbix_proxy用户和表空间create tablespace ZABBIX_PROXY datafile '?/dbfiles/ZABBIX_PROXY_DATA' size 2G autoextend on next 128M maxsize unlimited databucket '?/local_fs/ZABBIX_PROXY_DATA';create user ZABBIX_PROXY IDENTIFIED BY 123456 default TABLESPACE ZABBIX_PROXY;grant dba to ZABBIX_PROXY;
b.导入数据到yashandb
数据文件修改:
yasql默认autocommit=false,所以data.sql与images.sql文件末尾后面添加 "commit;"
schema.sql:
hosts表,字段description类型长度改为nvarchar2(4000)
data.sql插入数据时,数据长度超过了2048个字符,适当改大。
images.sql:
yashandb SQL语句中常量字符串输入长度规格暂时是16000,而images.sql中的数据大部分超过了16000。 用 "||" 连接符连接lob数据。参考:images.sql
末尾添加"commit;"
data.sql:
yashandb暂时不支持TO_NCLOB函数,去掉TO_NCLOB,不影响数据准确性。
末尾添加"commit;"
-- zabbix用户数据迁移cd home/yashan/zabbix/zabbix-6.4.17/database/oracleyasql zabbix/123456 -f -e schema.sqlyasql zabbix/123456 -f -e images.sqlyasql zabbix/123456 -f -e data.sql-- 如有proxy代理用户,建表即可yasql zabbix_proxy/123456 -f -e schema.sql
3.php安装
本次zabbix版本是zabbix-6.4.17,需要php 7.4以上。
下载地址:https://rpmfind.net/linux/remi/enterprise/7/modular/x86_64/
1)安装包
php-json-7.4.33-15.el7.remi.x86_64php-fpm-7.4.33-15.el7.remi.x86_64php-ldap-7.4.33-15.el7.remi.x86_64php-cli-7.4.33-15.el7.remi.x86_64php-bcmath-7.4.33-15.el7.remi.x86_64php-mbstring-7.4.33-15.el7.remi.x86_64php-common-7.4.33-15.el7.remi.x86_64php-odbc-7.4.33-15.el7.remi.x86_64php-embedded-7.4.33-15.el7.remi.x86_64php-sodium-7.4.33-15.el7.remi.x86_64php-mysqlnd-7.4.33-15.el7.remi.x86_64php-devel-7.4.33-15.el7.remi.x86_64php-gd-7.4.33-15.el7.remi.x86_64php-pdo-7.4.33-15.el7.remi.x86_64php-opcache-7.4.33-15.el7.remi.x86_64gd3php-2.3.3-7.el7.remi.x86_64php-imap-7.4.33-15.el7.remi.x86_64oniguruma5php-6.9.9-1.el7.remi.x86_64php-7.4.33-15.el7.remi.x86_64php-xml-7.4.33-15.el7.remi.x86_64
2)php配置
#参数配置:vim etc/php.inipost_max_size = 64Mmax_execution_time = 300max_input_time = 600date.timezone = Asia/Shanghai#php,web中环境变量无法识别vim etc/php-fpm.d/www.confclear_env=no#环境变量配置:vim etc/sysconfig/php-fpmYASOCI_PATH=/data/yashandb-ociYASCLI_PATH=/data/yashandb-client/libLD_LIBRARY_PATH=$YASOCI_PATH:$YASCLI_PATH:$LD_LIBRARY_PATHexport YASOCI_PATHexport YASOCI_PATHexport LD_LIBRARY_PATH#重启phpsudo systemctl restart php-fpm
下载地址:https://pecl.php.net/package/oci8
下载oci8-2.2.0,3.0之后版本需要php更高版本才能支持。PHP 7.4.33,oci8-2.2.0够了。
安装配置步骤:https://www.php.net/manual/zh/oci8.installation.php
编译环境修改:
yashandb有一些oci接口暂时未曾实现,暂时用不了。后续版本会逐步完善oci接口。
undefined symbol: _object_init_ex
基于以上两个原因,oci8.so决定基于libyas_oci.so编译安装。编译前做如下框中修改:
cd /usr/lib/oracle/21/client64/mv lib lib-orgmkdir libcd libln -s /data/yashandb-oci/libyas_oci.so libclntsh.soln -s /data/yashandb-oci/libyas_oci.so libclntsh.so.21.1ln -s /data/yashandb-oci/libyas_oci.so libnnz21.so
编译安装:
phpize./configure -with-oci8=shared,instantclient,/usr/lib/oracle/21/client64/lib/makemake install
php添加oci8扩展库配置:
vim /etc/php.d/oci8.ini; Enable pdo extension moduleextension=oci8.so
1)zabbix web配置
nginx配置:
vi /etc/nginx/conf.d/zbx.confserver {listen 80;server_name 192.168.24.49;root /var/www/zbx;location / {index index.php;}location ~ \.php$ {fastcgi_pass 127.0.0.1:9000;fastcgi_index index.php;fastcgi_param SCRIPT_FILENAME /var/www/zbx$fastcgi_script_name;include fastcgi_params;}}
cp /home/yashan/zabbix/zabbix-6.4.17/ui/* /var/www/zbx -rfcp /var/www/zbx/conf/zabbix.conf.php.example /var/www/zbx/conf/zabbix.conf.phpvim /var/www/zbx/conf/zabbix.conf.php$DB['TYPE'] = 'ORACLE';$DB['SERVER'] = '';$DB['PORT'] = '1688';$DB['DATABASE'] = '192.168.24.49:1688';$DB['USER'] = 'zabbix';$DB['PASSWORD'] = '123456';
2)zabbix server配置
vi /data/zabbix/etc/zabbix_server.confLogFile=/data/zabbix/zabbix_server.logDBHost=#DBName=192.xx.xx.xx:6688,192.xx.xx.xx:6688 主备多个yashandb情况DBName=192.168.24.49:1688DBUser=zabbixDBPort=1688
3)zabbix agent配置
vi /data/zabbix/etc/zabbix_agentd.confServer=192.168.24.49ListenPort=10080 //agent portServerActive=192.168.24.49 //Zabbix server/proxy address
1)启动zabbix和agent
systemctl restart php-fpm nginx/data/zabbix/sbin/zabbix_server [-f]/data/zabbix/sbin/zabbix_agentd -c /data/zabbix/etc/zabbix_agentd.conf
2)如需要,可以把zabbix server的启停功能放入到systemctl
--如下,添加zabbix server启动到systemctl中,agentd也可用同样的方法添加上去vi /usr/lib/systemd/system/zabbix-server.service[Unit]Description=Zabbix Server with YaShanDBAfter=[Service]Type=simpleExecStart=/data/zabbix/zabbix/sbin/zabbix_server -fExecStop=/bin/killall -9 zabbix_serverUser=zabbix[Install]WantedBy=multi-user.target
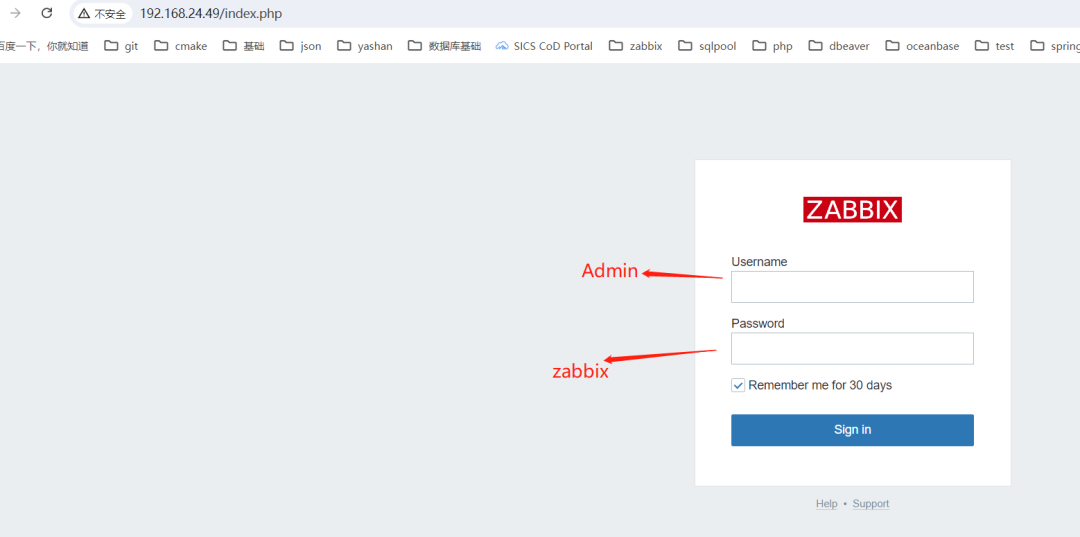
路由:192.168.24.49/index.php
1)初始用户和密码
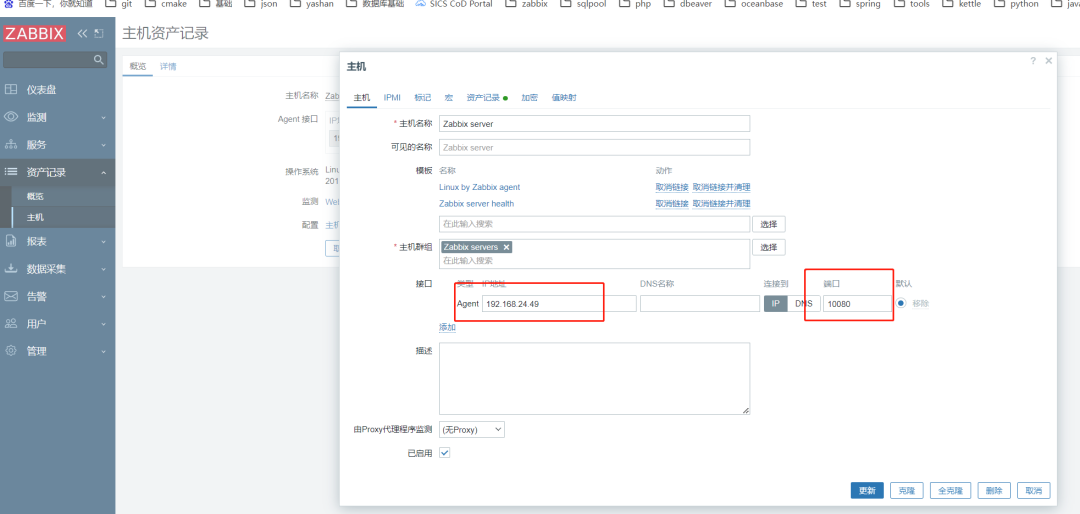
2)配置主机agent IP和端口