


作者:ShunWah
在运维管理领域,我拥有多年深厚的专业积累,兼具坚实的理论基础与广泛的实践经验。我始终站在技术前沿,致力于推动运维自动化,不懈追求运维效率的最大化。
我精通运维自动化流程,对于OceanBase、MySQL等多种数据库的部署与运维,具备从初始部署到后期维护的全链条管理能力。凭借OceanBase的OBCA和OBCP认证、OpenGauss社区认证结业证书,以及崖山DBCA、亚信AntDBCA、翰高HDCA、GBase 8a | 8c | 8s、Galaxybase GBCA、Neo4j Graph Data Science Certification、NebulaGraph NGCI等多项权威认证,我不仅展现了自己的专业技能,也彰显了对技术的深厚热情与执着追求。
在OceanBase & 墨天轮的技术征文大赛中,我凭借卓越的技术实力和独特的见解,多次荣获一、二、三等奖。同时,在OpenGauss第五届、第六届、第七届技术征文大赛,TiDB社区第三届专栏征文大赛,金仓数据库有奖征文活动,以及首批YashanDB「产品体验官」尝鲜征文等活动中,我也屡获殊荣。此外,我还活跃于墨天轮、CSDN等技术平台,经常发布原创技术文章,并多次被首页推荐,积极与业界同仁分享我的运维经验和独到见解。

前言
随着大数据时代的到来,数据库作为数据存储和处理的核心组件,其性能和稳定性对于企业的业务运行至关重要。GBase 8s V8.8,作为天津南大通用数据技术股份有限公司的旗舰产品,以其卓越的性能、高可用性和易用性,赢得了众多企业的青睐。本文将介绍测试GBase 8s V8.8的安装部署过程,希望大家都能快速上手并成功部署这一优秀的数据库系统。
GBase 8s V8.8的安装部署过程可以大致分为以下几个步骤,这些步骤基于多个来源的整合信息,并尽量确保准确性和完整性:
一、准备工作
在正式安装GBase 8s V8.8之前,我们需要做好以下准备工作:
1、下载安装包:
访问GBase官方网站(如www.gbase.cn)下载GBase 8s V8.8的安装包。确保下载的安装包与您的操作系统平台适配。
首先,需要从GBase的官方网站下载GBase 8s V8.8的安装包。下载链接为:https://www.gbase.cn/download/gbase-8s-1?category=INSTALL_PACKAGE。在下载之前,需要在GBase官网注册账号。下载完成后,将安装包上传至需要安装GBase 8s的服务器上。
2、安装预置条件:
确保系统满足GBase 8s V8.8的硬件和软件要求。
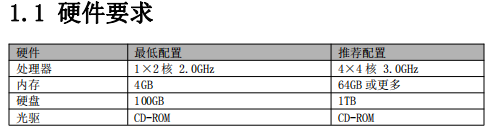
2.1 硬件要求
2.2 系统要求
GBase 8s 产品支持多种处理器平台,除国际主流的 x86_64 处理器(包括 Intel 和 AMD)
外,全面支持飞腾、鲲鹏、龙芯、兆芯、海光、申威等国产处理器。
GBase 8s 产品可以运行于多款操作系统,包括:RHEL和CentOS等Linux操作系统、统信UOS、
麒麟、欧拉等国产操作系统。
2.3 检查服务器系统
[root@master1 ~]# cat /etc/redhat-release
CentOS Linux release 7.4.1708 (Core)
[root@master1 ~]#

2.4 检查服务器内存大小
[root@master1 ~]# free -h
              total        used        free      shared  buff/cache   available
Mem:            31G        857M         28G        724K        1.7G         26G
Swap:            0B          0B          0B
[root@master1 ~]#

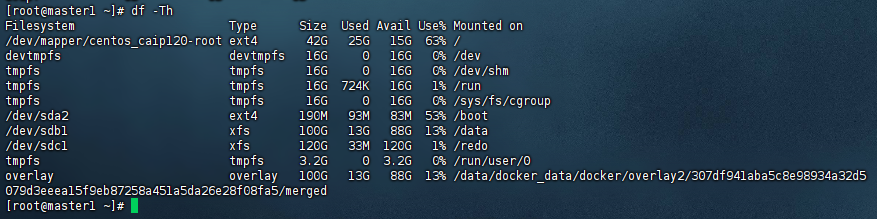
3、检查服务器磁盘空间大小
[root@master1 ~]# df -Th
Filesystem                      Type      Size  Used Avail Use% Mounted on
/dev/mapper/centos_caip120-root ext4       42G   25G   15G  63% /
devtmpfs                        devtmpfs   16G     0   16G   0% /dev
tmpfs                           tmpfs      16G     0   16G   0% /dev/shm
tmpfs                           tmpfs      16G  724K   16G   1% /run
tmpfs                           tmpfs      16G     0   16G   0% /sys/fs/cgroup
/dev/sda2                       ext4      190M   93M   83M  53% /boot
/dev/sdb1                       xfs       100G   13G   88G  13% /data
/dev/sdc1                       xfs       120G   33M  120G   1% /redo
tmpfs                           tmpfs     3.2G     0  3.2G   0% /run/user/0
overlay                         overlay   100G   13G   88G  13% /data/docker_data/docker/overlay2/307df941aba5c8e98934a32d5079d3eeea15f9eb87258a451a5da26e28f08fa5/merged
4、安装必要的依赖包
如jdk(1.6版本以上)、unzip、libaio、libgcc、libstdc、ncurses、pam等。如果系统中缺少这些依赖包,请提前安装。
[root@master1 opt]# java --version
java 17.0.5 2022-10-18 LTS
Java(TM) SE Runtime Environment (build 17.0.5+9-LTS-191)
Java HotSpot(TM) 64-Bit Server VM (build 17.0.5+9-LTS-191, mixed mode, sharing)
[root@master1 opt]# yum install unzip libaio libgcc libstdc++.so.6 ncurses pam

二、安装及配置数据库服务器
1、 安装准备
1.1 创建 gbasedbt 组和用户
在启动安装过程之前,必须准备系统以确保您有足够权限来执行安装。
您必须以 root 用户身份登录才能执行许多与安装有关的任务。同时要求服务器操作系统上
具有 gbasedbt 组和 gbasedbt 用户。
登录系统后可以执行以下命令创建 gbasedbt 组和 gbasedbt 用户:
[root@master1 opt]# groupadd gbasedbt
[root@master1 opt]# useradd -g gbasedbt gbasedbt
[root@master1 opt]#

1.2 为 gbasedbt 用户设置密码
密码为 Gb8sV88@666:(根据实际情况自行设置密码)
[root@master1 opt]# passwd gbasedbt
Changing password for user gbasedbt.
New password:
Retype new password:
passwd: all authentication tokens updated successfully.
[root@master1 opt]#
1.3 设置密码时报错提示
[root@master1 opt]# passwd gbasedbt
Changing password for user gbasedbt.
New password:
BAD PASSWORD: The password contains the user name in some form
Retype new password:
这样的错误提示时,意味着你设置的密码中包含了用户名或其某种变形形式,这是出于安全考虑而禁止的。许多系统或应用程序都有密码策略,这些策略包括避免在密码中使用与用户名相似的字符序列,以防止潜在的猜测或字典攻击。
解决办法,选择一个不包含用户名或其任何部分的新密码。确保密码是复杂且难以猜测的,包括大小写字母、数字和特殊字符的组合。
2、 创建 GBase 8s 数据库安装目录
执行mkdir -p /opt/GBASE/gbase(或指定的其他目录)命令创建GBase 8s的安装目录。
执行chown gbasedbt:gbasedbt /opt/gbase命令将安装目录的所有权更改为gbasedbt用户和组。
GBase 8s 数据库缺省的安装目录为 /opt/GBASE/gbase,并且此文件夹必须为空。
[root@master1 opt]# mkdir -p /opt/GBASE/gbase
[root@master1 opt]# chown gbasedbt:gbasedbt /opt/GBASE/gbase
[root@master1 opt]#

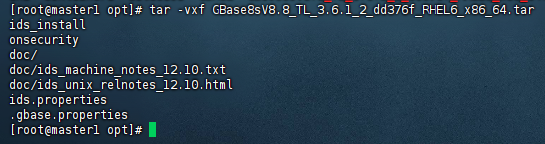
3、上传并解压安装包
将下载的GBase 8s V8.8安装包上传到服务器,并使用unzip命令解压到指定的安装目录。
将产品安装光盘插入光驱,取出光盘中 Setup 目录下的文件,复制到本地目录 /opt。Setup
目录中包含 GBase 8s 产品的安装包文件,该文件通常是形如
GBase8sV8.8_AEE_3.5.1_3_6a4e30_RHEL6_x86_64.tar 的压缩文件。
在本手册中,以 GBase8sV8.8_AEE_3.5.1_3_6a4e30_RHEL6_x86_64.tar 为例进行安装说明。
解压该 tar 包,解压命令为:tar -vxf filename.tar。
[root@master1 opt]# ls
cni  containerd  dataease  GBASE  GBase8sV8.8_TL_3.6.1_2_dd376f_RHEL6_x86_64.tar  jdk  jdk1.8.0_131  software
[root@master1 opt]# tar -vxf GBase8sV8.8_TL_3.6.1_2_dd376f_RHEL6_x86_64.tar
ids_install
onsecurity
doc/
doc/ids_machine_notes_12.10.txt
doc/ids_unix_relnotes_12.10.html
ids.properties
.gbase.properties
[root@master1 opt]#
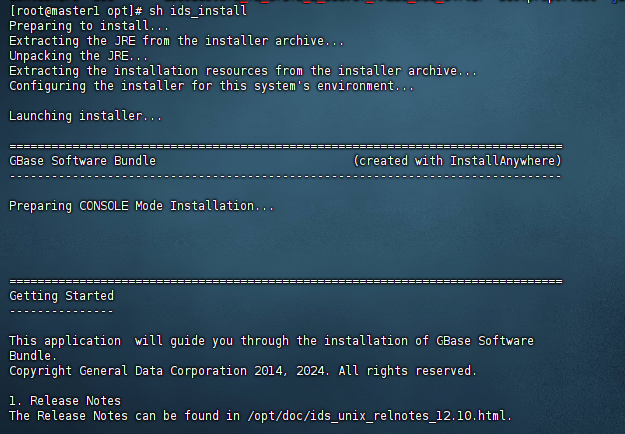
4、执行安装程序
在安装过程中,需要接受许可协议、输入安装目录、选择安装模式等。建议选择典型安装模式,并在安装时不自动创建实例(因为默认实例存在限制,不适合作为应用适配使用)。
进入解压目录:
使用cd命令切换到解压后的安装包目录。
4.1 典型安装
本次测试通过使用典型安装设置来快速安装 GBase 8s 及其所有功能部件。
缺省情况下,典型安装设置将创建为您的主机环境配置的即时可用的数据库服务器实例。
但是,您可以禁用安装应用程序中的创建服务器实例选项。
以 root 身份登录,进入解压目录,执行要安装的产品的安装脚本 ids_install,即可进行安
装,具体命令如下:
4.2 执行安装脚本:
[root@master1 ~]# cd /opt/
[root@master1 opt]# ls
cni         dataease  GBASE                                           ids_install     jdk           onsecurity
containerd  doc       GBase8sV8.8_TL_3.6.1_2_dd376f_RHEL6_x86_64.tar  ids.properties  jdk1.8.0_131  software
[root@master1 opt]# sh ids_install

根据安装包的具体内容,执行相应的安装脚本。例如,可能是./AutoInit_GBase8s.sh或ids_install等脚本。
执行安装过程中,安装程序先检查系统环境,如果系统没有安装JDK,那么安装包会先解
压JDK,自动安装到该系统中。如果已经安装,那么将显示产品的授权条款,并等待确认
4.3 是否接受这些版权条款。
具体安装过程示例如下:
[root@master1 opt]# sh ids_install
Preparing to install...
Extracting the JRE from the installer archive...
Unpacking the JRE...
Extracting the installation resources from the installer archive...
Configuring the installer for this system's environment...

Launching installer...

===============================================================================
GBase Software Bundle                            (created with InstallAnywhere)
-------------------------------------------------------------------------------

Preparing CONSOLE Mode Installation...
===============================================================================
Getting Started
---------------

This application  will guide you through the installation of GBase Software
Bundle.
Copyright General Data Corporation 2014, 2024. All rights reserved.

1. Release Notes
The Release Notes can be found in /opt/doc/ids_unix_relnotes_12.10.html.
2. Launch Information Center
Access the GBase Information Center at http://www.gbase.cn.
To Begin Installation, respond to each prompt to proceed to the next step in
the installation.
If you want to change something on a previous step, type 'back'.
You may cancel this installation at any time by typing 'quit'.
4.4 接受许可协议:
在安装过程中,可能需要接受许可协议。请仔细阅读协议内容,并确认接受。
1. LICENSE TO USE. GeneralData grants you a non-exclusive and non-transferable
license for  the internal use only of the accompanying software and
documentation and any error corrections  provided by GeneralData(collectively
"Software"), by the number of users and the class of  computer hardware for
which the corresponding fee has been paid.

2. RESTRICTIONS. Software is confidential and copyrighted. Title to Software

PRESS <ENTER> TO CONTINUE:

and all  associated intellectual property rights is retained by GeneralData
and/or its licensors. Except as  specifically authorized in any Supplemental
License Terms, you may not make copies of Software,  other than a single copy
of Software for archival purposes. Unless enforcement is prohibited by
applicable law, you may not modify, decompile, or reverse engineer Software.
You acknowledge  that Software is not designed, licensed or intended for use in
the design, construction, operation  or maintenance of any nuclear facility.
GeneralData disclaims any express or implied warranty  of fitness for such
uses. No right, title or interest in or to any trademark, service mark, logo or
trade name of GeneralData or its licensors is granted under this Agreement.

3. DISCLAIMER OF WARRANTY. Unless specified in this agreement, all express of
implied  conditions, representations and warranties, including any implied
warranty of merchantability,  fitness for aparticular purpose or
non-infringement are disclaimed, except to theextent that  these disclaimers
are held to be legally invalid.

4. LIMITATION OF LIABILITY. To the extent not prohibited by law, in no event
will GeneralData  or its licensors be liable for any lost revenue, profit or
data, or for special, indirect,  consequential, incidental orpunitive damages,
however caused regardless of the theory of liability,  arising out of or
related to the use of or inability to use software, even if GeneralData has

PRESS <ENTER> TO CONTINUE:

been  advised of the possibility of such damages. In no event will
GeneralData's libility to you, whether  incontract, tort(including negligence),
or otherwise, exceed the amount paid by you for Software  under this Agreement.
The foregoing limitations will apply even if the above stated warranty  fails
of itsessential purpose.

5. TERMINATION. This Agreement is effective until terminated. You may terminate
this  Agreement at any time by destroying all copies of Software. This
Agreement will terminate  immediately without noticefrom GeneralData if you
fail to comply with any provision of this  Agreement. Upon Termination, you
must destroy all copies of Software.


6. EXPORT REGULATIONS. All Software and technical data delivered under this
Agreement are  subject to US export control laws and may be subject to export
or import regulations in other  countries. You agree to comply strictly with
all such laws and regulations and acknowledge that  you have the responsibility
to obtain such licenses to export, re-export, or import as may be  required
after delivery to you.

7. CHINESE GOVERNMENT RESTRICTED. If Software is being acquired by or on behalf

PRESS <ENTER> TO CONTINUE:

of the  Chinese Government, then the Government's rights in Software and
accompanying documentation  will be only as set forth in this Agreement.

8. GOVERNING LAW. Any action related to this Agreement will be governed by
Chinese law:  "COPYRIGHT LAW OF THE PEOPLE'S REPUBLIC OF CHINA", "PATENT LAW OF
THE PEOPLE'S  REPUBLIC OF CHINA", "TRADEMARK LAW OF THE PEOPLE'S REPUBLIC OF
CHINA", "COMPUTER  SOFTWARE PROTECTION REGULATIONS OF THE PEOPLE'S REPUBLIC OF
CHINA". No choice of  law rules of any jurisdiction will apply."

9. SEVERABILITY. If any provision of this Agreement is held to be
unenforceable, this  Agreement will remain in effect with the provision
omitted, unless omission would frustrate the  intent of the parties, in which
case this Agreement will immediately terminate.

10. INTEGRATION. This Agreement is the entire agreement between you and
GeneralData  relating to its subject matter. It supersedes all prior or
contemporaneous oral or written  communications, proposals, representations and
warranties and prevails over any conflicting or  additional terms of any quote,
order, acknowledgment, or other communication between the  parties relating to
its subject matter during the term of this Agreement. No modification of this
Agreement will be binding, unless in writing and signed by an authorize
depresentative of each  party. When the translation document has the different

PRESS <ENTER> TO CONTINUE:

meaning or has the conflicting views with  Chinese original text conflict,
should take the laws and regulations promulgation unit as well as  the
GeneralData issue Chinese original text as the standard.


All trademarks and registered trademarks mentioned herein are the  property of
their respective owners.

DO YOU ACCEPT THE TERMS OF THIS LICENSE AGREEMENT? (Y/N): Y


===============================================================================
Installation Location
---------------------

Choose location for software installation.

  Default Install Folder: /opt/GBASE/gbase

ENTER AN ABSOLUTE PATH, OR PRESS <ENTER> TO ACCEPT THE DEFAULT
      :
4.5 配置安装选项:
根据安装脚本的提示,配置安装选项。这些选项可能包括安装目录、数据库空间大小、数据库实例名称、监听端口等。
4.5.1 指定安装路径
根据界面提示确认默认安装路径 /opt/GBASE/gbase,并回车。
Installation Location
---------------------
Choose location for software installation
Default Install Folder: /opt/GBASE/gbase
ENTER AN ABSOLUTE PATH, OR PRESS <ENTER> TO ACCEPT THE DEFAULT:
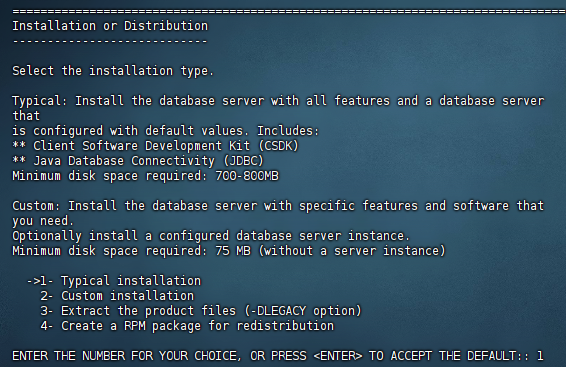
4.5.2 选择安装类型
=========================================================================
Installation or Distribution
----------------------------
Select the installation type.
Typical: Install the database server with all features and a database server
that
is configured with default values. Includes:
** Client Software Development Kit (CSDK)
** Java Database Connectivity (JDBC)
Minimum disk space required: 700-800MB
Custom: Install the database server with specific features and software that
you need.
Optionally install a configured database server instance.
Minimum disk space required: 75 MB (without a server instance)
->1- Typical installation
2- Custom installation
3- Extract the product files (-DLEGACY option)
4- Create a RPM package for redistribution
ENTER THE NUMBER FOR YOUR CHOICE, OR PRESS <ENTER> TO ACCEPT THE DEFAULT:: 1
4.6 使用默认安装选项 1,直接回车,进行典型安装。
开始安装:配置完成后,开始安装过程。等待安装程序完成所有必要的配置和文件复制。
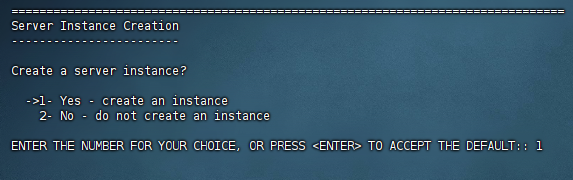
三、创建并初始化数据库实例
安装完成后,根据需要使用相应的脚本或命令创建并初始化数据库实例。这通常包括指定数据库实例的名称、存储路径、监听端口等。
1、 创建实例
系统提示是否创建一个实例,默认选项 1 为创建,直接回车,创建一个实例。
=======================================================================
Server Instance Creation
------------------------
Create a server instance?
->1- Yes - create an instance
2- No - do not create an instance
ENTER THE NUMBER FOR YOUR CHOICE, OR PRESS <ENTER> TO ACCEPT THE DEFAULT::
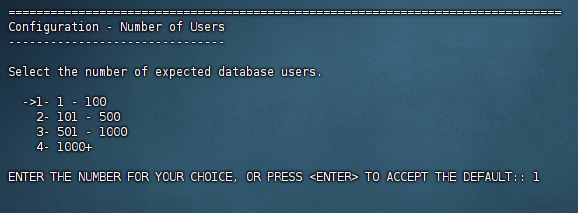
2、 选择数据库用户数
选择实例预期要支持的数据库用户数,默认选项为 1,直接回车继续。
Configuration - Number of Users
-------------------------------
Select the number of expected database users.
->1- 1 - 100
2- 101 - 500
3- 501 - 1000
4- 1000+
ENTER THE NUMBER FOR YOUR CHOICE, OR PRESS <ENTER> TO ACCEPT THE DEFAULT::
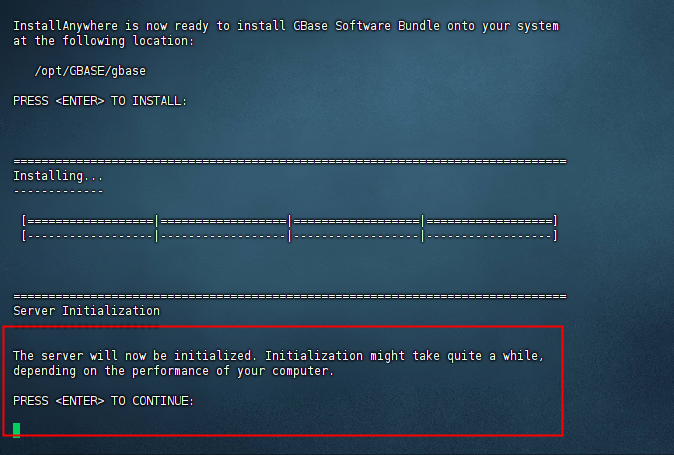
3、 配置结束,点击回车进行安装。
Ready To Install
----------------
InstallAnywhere is now ready to install GBase 8s Software Bundle onto your
system at the following location:
/opt/GBASE/gbase
PRESS <ENTER> TO INSTALL:
=======================================================================
Installing...
-------------
[==================|==================|==================|===============]
[------------------|------------------|------------------|-------------]
=======================================================================
Server Initialization
---------------------
The server will now be initialized. Initialization might take quite a while,
depending on the performance of your computer.
PRESS <ENTER> TO CONTINUE:
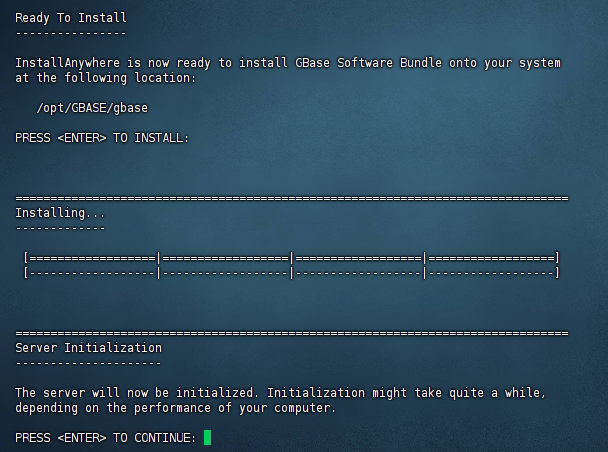
4、安装后会提示将进行数据库实例的初始化,按回车继续。
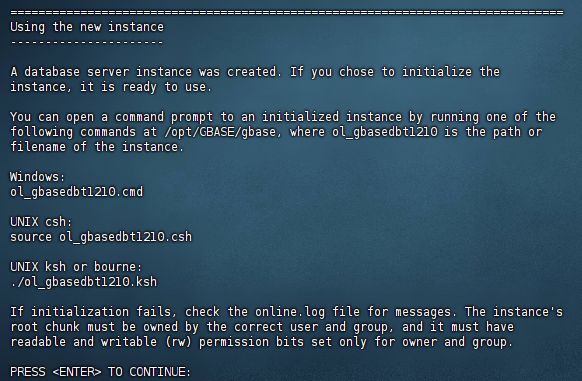
5、 数据库实例创建成功并使用,点击回车后继续。
Using the new instance
----------------------
A database server instance was created. If you chose to initialize the
instance, it is ready to use.
You can open a command prompt to an initialized instance by running one of the
following commands at /opt/GBASE/gbase, where ol_gbasedbt1210 is the path or
filename of the instance.
Windows:
ol_gbasedbt1210.cmd
UNIX csh:
source ol_gbasedbt1210.csh
UNIX ksh or bourne:
./ol_gbasedbt1210.ksh
If initialization fails, check the online.log file for messages. The instance's
root chunk must be owned by the correct user and group, and it must have
readable and writable (rw) permission bits set only for owner and group.
PRESS <ENTER> TO CONTINUE:
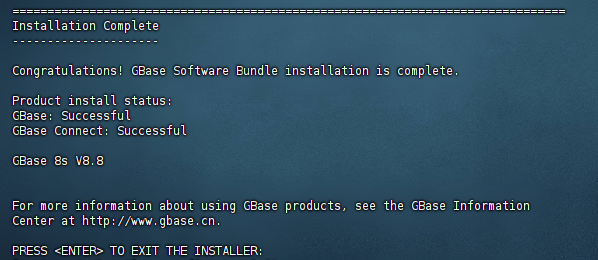
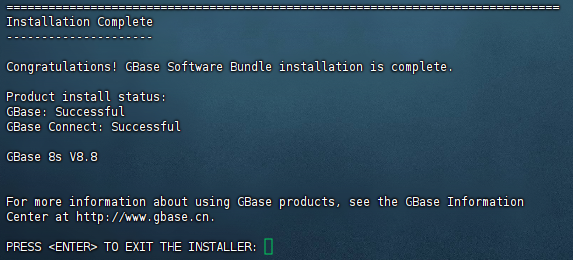
6、安装完成,回车后退出安装程序。
Installation Complete
---------------------
Congratulations! GBase Software Bundle installation is complete.
Product install status:
GBase: Successful
GBase Connect: Successful
Main Version: GBase 8s V8.8
For more information about using GBase products, see the GBase Information
Center at http://www.gbase.cn.
PRESS <ENTER> TO EXIT THE INSTALLER:
四、配置环境变量
为gbasedbt用户配置环境变量,以便能够方便地访问GBase 8s的命令行工具和数据库实例。
1、配置环境变量
在使用 GBase 8s 数据库服务前需要设置几个环境变量。可以把安装目录下的
ol_gbasedbt1210.ksh 文件的内容追加到 gbasedbt 用户主目录下的 .bash_profile文件中,以
便于 gbasedbt 用户在登录后即自动应用这些环境变量。
如果要把 GBase 8s 安装目录下的 ol_gbasedbt1210.ksh 文件的内容追加到 gbasedbt 用户
主目录下的 .bash_profile 文件中,可以执行以下命令:
[root@master1 ~]# cd /opt/GBASE/gbase
[root@master1 gbase]# cat ol_gbasedbt1210.ksh >> /home/gbasedbt/.bash_profile
[root@master1 gbase]# cd /home/gbasedbt/
[root@master1 gbasedbt]# source .bash_profile
[root@master1 gbasedbt]#

配置完毕后,即可使用 GBase 8s 数据库。
2、 使用脚本自动创建和初始化实例
安装完成后,请上传初始化实例脚本 GBaseInit_gbasedbt.sh 。
脚本上传路径
[gbasedbt@master1 ~]$ cd /opt/GBASE/gbase/etc

不上传会报错
[gbasedbt@master1 gbase]$ sh GBaseInit_gbasedbt.sh
sh: GBaseInit_gbasedbt.sh: No such file or directory

使用 gbasedbt 用户执行 GBaseInit_gbasedbt.sh 脚本,自动创建并初始化实例。
[root@master1 opt]# su gbasedbt
[gbasedbt@master1 opt]$ cd GBASE/gbase/
[gbasedbt@master1 gbase]$ sh GBaseInit_gbasedbt.sh
Initializing Program...OK
ENTER THE INSTANCE INFORMATION or PRESS <ENTER> TO ACCEPT THE DEFAULT.
// 创建实例名称,默认为 gbaseserver
ENTER GBASE INSTANCE NAME (GBASEDBTSERVER) [Default:gbaseserver]:
//选择安装目录。默认为 /opt/GBASE/gbase
GBASE INSTALL FOLDER LIST:
1) /opt/GBASE/gbase
CHOOSE GBASE INSTALL FOLDER(GBASEDBTDIR) [Default:/opt/GBASE/gbase]:
//选择本机 IP 地址
CHOOSE SERVICE IP ADDRESS FROM THE LIST:
1) 172.20.2.120
2) 172.19.0.1
3) 172.21.0.1
4) 172.22.0.1
5) 172.23.0.1
6) 172.17.0.1
7) 172.18.0.1
8) 172.20.2.120
9) 127.0.0.1
10) 10.18.0.1
ENTER THE NUMBER FOR YOUR CHOICE [Default:172.20.2.120]:
//指定数据库的监听端口,缺省为 9088
SPECIFY THE PORT NUMBER FOR GBASE [Default:9088]:
//选择安装方式: 2 定制安装
INITIALIZE TYPE:
1) TYPICAL -- Initialize the instance with all features configured with default
values.
2) CUSTOM -- Initialize the instance with specific features that you need.
ENTER THE NUMBER FOR YOUR CHOICE [Default:1]: 2
//选择数据库字符集
GBASE CHARACTER SET LIST:
1) en_US.8859-1
2) zh_CN.GB18030-2000
3) zh_CN.utf8
ENTER THE NUMBER FOR YOUR CHOICE [Default:1]: 2
//输入数据库空间存储路径
ENTER THE DATA SPACE PATH [Default:/opt/GBASE/gbase/gbaseserver_dbs]:
//设置逻辑日志空间大小
ENTER THE LOGICAL LOG DBSPACE SIZE(MB) [Default:2040]:
//设置物理日志空间大小
ENTER THE PHYSICAL LOG DBSPACE SIZE(MB) [Default:2040]:
//设置智能大对象空间大小
ENTER THE SMART LOB DBSPACE SIZE(MB) [Default:438]:
//设置临时数据空间大小
ENTER THE TEMPORARY DBSPACE SIZE(MB) [Default:438]:
// 输入 Y 启动以上设置,N 重新进行配置
ENTER "Y" TO START DATABASE ADVANCED SETTINGS, OR ENTER "N" TO ACCEPT DEFAULT
VALUES: [Default:Y]: Y
ENTER THE NUMBER OF DATA DBSPACES [Default:1]:
ENTER THE NUMBER OF TEMP DBSPACES [Default:1]:
//实例配置如下所示:
INSTANCE SUMMARY:
Instance name: gbaseserver
GBase install directory: /opt/GBASE/gbase
IP address & port: 172.20.2.120:9088
Character set: zh_CN.GB18030-2000
Logical log space size: 2040 MB
Physical log space size: 2040 MB
Smart LOB space size: 438 MB
Temp DBSpace size: 438 MB
Data path: /opt/GBASE/gbase/gbaseserver_dbs
Data path free size: 20260 MB
The number of data DBSpace: 1
The number of temp DBSpace: 1
Environment GL_USEGLU: 1
Enter "Y" to Start database initializing, or Enter "N" to Edit Again:
Enter "Y" to Start database initializing, or Enter "N" to Edit Again: Y
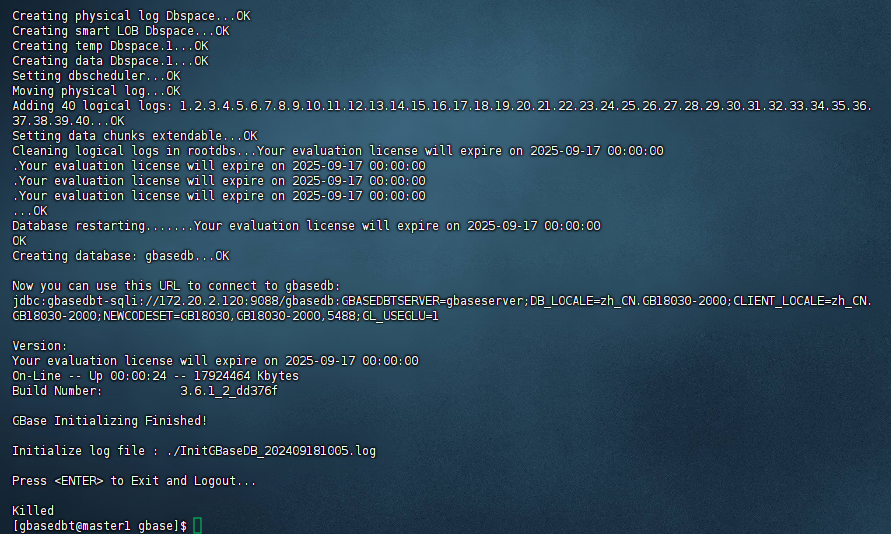
Create sqlhosts File: /opt/GBASE/gbase/etc/sqlhosts.gbaseserver ...OK
Setting Parameters in /opt/GBASE/gbase/etc/onconfig.gbaseserver :
ROOTPATH.ROOTSIZE.DBSERVERNAME.FULL_DISK_INIT.SBSPACENAME.SYSSBSPACENAME.DBSPACETEMP.LOGFILES.MULTIPROCESSOR.VPCLASS.NETTYPE.CLEANERS.DEF_TABLE_LOCKMODE.DIRECT_IO.LOCKS.TAPEDEV.LTAPEDEV.CKPTINTVL.DS_MAX_QUERIES.DS_TOTAL_MEMORY.DS_NONPDQ_QUERY_MEM.PHYSBUFF.LOGBUFF.AUTO_TUNE.MSGPATH.SERVERNUM.ALLOW_NEWLINE.TEMPTAB_NOLOG.DUMPSHMEM.USEOSTIME.STACKSIZE.ON_RECVRY_THREADS.OFF_RECVRY_THREADS.USELASTCOMMITTED.SHMVIRTSIZE.SHMADD.GBASEDBTCONTIME.BUFFERPOOL2K.BUFFERPOOL16K...AUTO_CKPTS.OK
Initializing Root DBSpace & Share Memory...OK
Creating system database........OK
Creating logical log Dbspace...OK
Creating physical log Dbspace...OK
Creating smart LOB Dbspace...OK
Creating temp Dbspace.1...OK
Creating data Dbspace.1...OK
Setting dbscheduler...OK
Moving physical log...OK
Adding 40 logical logs: 1.2.3.4.5.6.7.8.9.10.11.12.13.14.15.16.17.18.19.20.21.22.23.24.25.26.27.28.29.30.31.32.33.34.35.36.37.38.39.40...OK
Setting data chunks extendable...OK
Cleaning logical logs in rootdbs...Your evaluation license will expire on 2025-09-17 00:00:00
.Your evaluation license will expire on 2025-09-17 00:00:00
.Your evaluation license will expire on 2025-09-17 00:00:00
.Your evaluation license will expire on 2025-09-17 00:00:00
...OK
Database restarting.......Your evaluation license will expire on 2025-09-17 00:00:00
OK
Creating database: gbasedb...OK
Now you can use this URL to connect to gbasedb:
jdbc:gbasedbt-sqli://172.20.2.120:9088/gbasedb:GBASEDBTSERVER=gbaseserver;DB_LOCALE=zh_CN.GB18030-2000;CLIENT_LOCALE=zh_CN.GB18030-2000;NEWCODESET=GB18030,GB18030-2000,5488;GL_USEGLU=1
Version:
Your evaluation license will expire on 2025-09-17 00:00:00
On-Line -- Up 00:00:24 -- 17924464 Kbytes
Build Number: 3.6.1_2_dd376f
GBase Initializing Finished!
Initialize log file : ./InitGBaseDB_202409181005.log
Press <ENTER> to Exit and Logout...
自动创建和初始化实例完毕,回车退出。
===============================================================================
Installation Complete
---------------------

Congratulations! GBase Software Bundle installation is complete.

Product install status:
GBase: Successful
GBase Connect: Successful

GBase 8s V8.8


For more information about using GBase products, see the GBase Information
Center at http://www.gbase.cn.

PRESS <ENTER> TO EXIT THE INSTALLER:
恭喜,GBase软件包安装已完成

五、启动和停止数据库服务
使用gbasedbt用户身份登录系统,并启动数据库服务。可以使用oninit -vy命令启动数据库服务,使用onmode -ky命令停止数据库服务。
1、停止数据库服务
以 gbasedbt 用户身份登录后,输入 onmode -ky,可停止数据库服务,示例如下:
[gbasedbt@localhost ~]$ onmode -ky
2、启动数据库服务
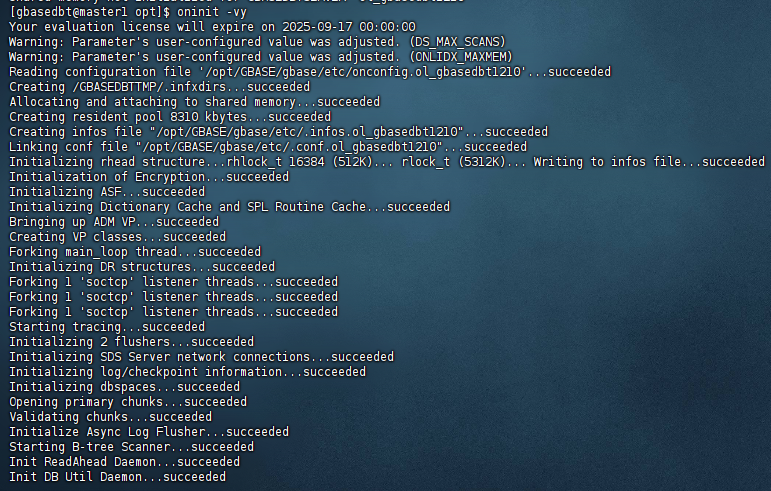
输入 oninit -vy, 启动数据库服务,示例如下:
[gbasedbt@master1 opt]$ oninit -vy
Your evaluation license will expire on 2025-09-17 00:00:00
Warning: Parameter's user-configured value was adjusted. (DS_MAX_SCANS)
Warning: Parameter's user-configured value was adjusted. (ONLIDX_MAXMEM)
Reading configuration file '/opt/GBASE/gbase/etc/onconfig.ol_gbasedbt1210'...succeeded
Creating /GBASEDBTTMP/.infxdirs...succeeded
Allocating and attaching to shared memory...succeeded
Creating resident pool 8310 kbytes...succeeded
Creating infos file "/opt/GBASE/gbase/etc/.infos.ol_gbasedbt1210"...succeeded
Linking conf file "/opt/GBASE/gbase/etc/.conf.ol_gbasedbt1210"...succeeded
Initializing rhead structure...rhlock_t 16384 (512K)... rlock_t (5312K)... Writing to infos file...succeeded
Initialization of Encryption...succeeded
Initializing ASF...succeeded
Initializing Dictionary Cache and SPL Routine Cache...succeeded
Bringing up ADM VP...succeeded
Creating VP classes...succeeded
Forking main_loop thread...succeeded
Initializing DR structures...succeeded
Forking 1 'soctcp' listener threads...succeeded
Forking 1 'soctcp' listener threads...succeeded
Forking 1 'soctcp' listener threads...succeeded
Starting tracing...succeeded
Initializing 2 flushers...succeeded
Initializing SDS Server network connections...succeeded
Initializing log/checkpoint information...succeeded
Initializing dbspaces...succeeded
Opening primary chunks...succeeded
Validating chunks...succeeded
Initialize Async Log Flusher...succeeded
Starting B-tree Scanner...succeeded
Init ReadAhead Daemon...succeeded
Init DB Util Daemon...succeeded
Initializing DBSPACETEMP list...succeeded
Init Auto Tuning Daemon...succeeded
Checking database partition index...succeeded
Initializing dataskip structure...succeeded
Checking for temporary tables to drop...succeeded
Updating Global Row Counter...succeeded
Forking onmode_mon thread...succeeded
Creating periodic thread...succeeded
Creating periodic thread...succeeded
Starting scheduling system...succeeded
Verbose output complete: mode = 5
[gbasedbt@master1 opt]$
3、 手动创建和初始化实例
您也可以按照如下步骤,手动创建实例并初始化。
(1)创建一个实例,假设其实例名为“gbaseserver”。
(2)创建一个实例需要配置以下三个文件,使用用实例名作为文件的后缀:
a) 环境变量文件名为 profile.gbaseserver
b) 配置参数文件名称为 onconfig.gbaseserver
c) sqlhosts 配置文件名称为 sqlhosts.gbaseserver
具体 步骤如下 :
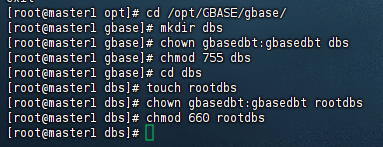
1 1 创建录 数据库的数据文件存储目录 /dbs
以 root 身份登录,进入安装目录,创建数据目录:
[root@master1 opt]# cd /opt/GBASE/gbase/
[root@master1 gbase]# mkdir dbs
[root@master1 gbase]# chown gbasedbt:gbasedbt dbs
[root@master1 gbase]# chmod 755 dbs
[root@master1 gbase]# cd dbs
[root@master1 dbs]# touch rootdbs
[root@master1 dbs]# chown gbasedbt:gbasedbt rootdbs
[root@master1 dbs]# chmod 660 rootdbs
[root@master1 dbs]#
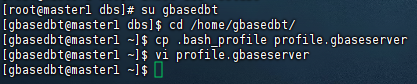
4、 配置 profile.r gbaseserver 环境变量文件
切换到 gbasedbt 用户身份登录,将默认环境变量 .bash_profile 文件复制一份,命名为
profile.gbaseserver,并对它进行编辑。
[root@master1 dbs]# su gbasedbt
[gbasedbt@master1 dbs]$ cd /home/gbasedbt/
[gbasedbt@master1 ~]$ cp .bash_profile profile.gbaseserver
[gbasedbt@master1 ~]$ vi profile.gbaseserver
[gbasedbt@master1 ~]$
(进入文件后按“i”建,开启 insert 模式)
注意:根据实例的实际情况更改红色部分字段信息
export GBASEDBTSERVER=gbaseserver
export GBASEDBTDIR=/opt/GBASE/gbase
export ONCONFIG=onconfig.gbaseserver
export GBASEDBTSQLHOSTS=$GBASEDBTDIR/etc/sqlhosts.gbaseserver
export PATH=$GBASEDBTDIR/bin:$GBASEDBTDIR/sbin:/usr/bin:${PATH}:.
export GL_DATE="%iY-%m-%d"
export DATETIME="%iY-%m-%d %H:%M:%S"
export DB_LOCALE=zh_cn.GB18030-2000
export CLIENT_LOCALE=zh_cn.GB18030-2000
export LD_LIBRARY_PATH=${GBASEDBTDIR}/lib:${GBASEDBTDIR}/lib/esql:${GBASEDBTDIR}/lib/cli
export TERM=vt100
export TERMCAP=$GBASEDBTDIR/etc/termcap
export GBASEDBTTERM=termcap
export DBTEMP=$GBASEDBTDIR/tmp
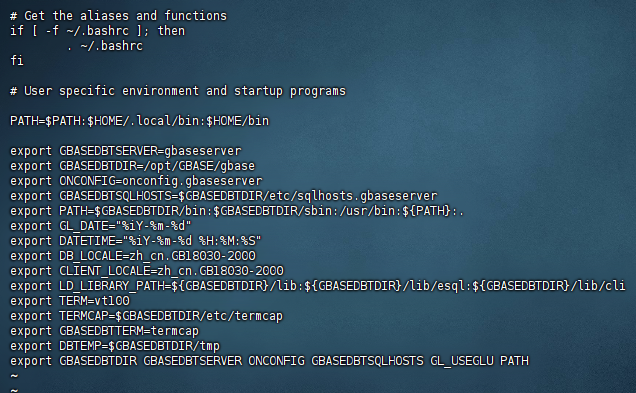
完成之后保存退出。(第一步按 ESC ;第二步 输入冒号“:”;第三步输入 wq 代表保
存退出,q 代表退出,q! 代表强制退出。最后回车)。
5、使环境变量生效:
[gbasedbt@master1 ~]$ source profile.gbaseserver
[gbasedbt@master1 ~]$

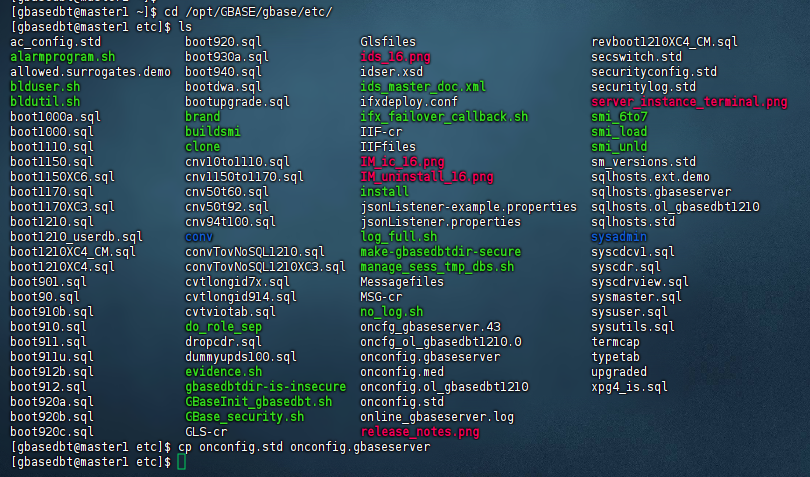
6、配置 onconfig.r gbaseserver 参数文件
将 /opt/BASE/gbase/etc/ 目录中的 onconfig.std 文档复制一份,命名为 $ONCONFIG 变量
指定的名称 onconfig.gbaseserver。
[gbasedbt@master1 ~]$ cd /opt/GBASE/gbase/etc/
[gbasedbt@master1 etc]$ ls
ac_config.std            boot920.sql              Glsfiles                         revboot1210XC4_CM.sql
alarmprogram.sh          boot930a.sql             ids_16.png                       secswitch.std
allowed.surrogates.demo  boot940.sql              idser.xsd                        securityconfig.std
blduser.sh               bootdwa.sql              ids_master_doc.xml               securitylog.std
bldutil.sh               bootupgrade.sql          ifxdeploy.conf                   server_instance_terminal.png
boot1000a.sql            brand                    ifx_failover_callback.sh         smi_6to7
boot1000.sql             buildsmi                 IIF-cr                           smi_load
boot1110.sql             clone                    IIFfiles                         smi_unld
boot1150.sql             cnv10to1110.sql          IM_ic_16.png                     sm_versions.std
boot1150XC6.sql          cnv1150to1170.sql        IM_uninstall_16.png              sqlhosts.ext.demo
boot1170.sql             cnv50t60.sql             install                          sqlhosts.gbaseserver
boot1170XC3.sql          cnv50t92.sql             jsonListener-example.properties  sqlhosts.ol_gbasedbt1210
boot1210.sql             cnv94t100.sql            jsonListener.properties          sqlhosts.std
boot1210_userdb.sql      conv                     log_full.sh                      sysadmin
boot1210XC4_CM.sql       convTovNoSQL1210.sql     make-gbasedbtdir-secure          syscdcv1.sql
boot1210XC4.sql          convTovNoSQL1210XC3.sql  manage_sess_tmp_dbs.sh           syscdr.sql
boot901.sql              cvtlongid7x.sql          Messagefiles                     syscdrview.sql
boot90.sql               cvtlongid914.sql         MSG-cr                           sysmaster.sql
boot910b.sql             cvtviotab.sql            no_log.sh                        sysuser.sql
boot910.sql              do_role_sep              oncfg_gbaseserver.43             sysutils.sql
boot911.sql              dropcdr.sql              oncfg_ol_gbasedbt1210.0          termcap
boot911u.sql             dummyupds100.sql         onconfig.gbaseserver             typetab
boot912b.sql             evidence.sh              onconfig.med                     upgraded
boot912.sql              gbasedbtdir-is-insecure  onconfig.ol_gbasedbt1210         xpg4_is.sql
boot920a.sql             GBaseInit_gbasedbt.sh    onconfig.std
boot920b.sql             GBase_security.sh        online_gbaseserver.log
boot920c.sql             GLS-cr                   release_notes.png
[gbasedbt@master1 etc]$ cp onconfig.std onconfig.gbaseserver
[gbasedbt@master1 etc]$
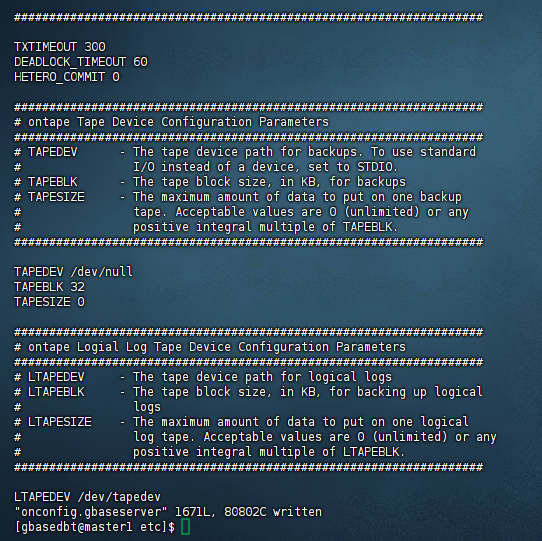
vi onconfig.gbaseserver 文件,配置以下参数并保存:
提示 :vi 编辑器中模糊查找字符串“XXX”方法:输入”/XXX”后回车即可向下检索到该字符串位置。
[gbasedbt@master1 etc]$ vi onconfig.gbaseserver

ROOTPATH /opt/GBASE/gbase/dbs/rootdbs //系统数据库文件存储空间路径,参照步骤 1中的设置
SERVERNUM 1 //实例编号,多实例中每个实例编号要唯一
DBSERVERNAME gbaseserver //数据库服务器实例名称
TAPEDEV /dev/null //用于存储空间备份的磁带设备
LTAPEDEV /dev/null //用于逻辑日志备份的磁带的设备路径
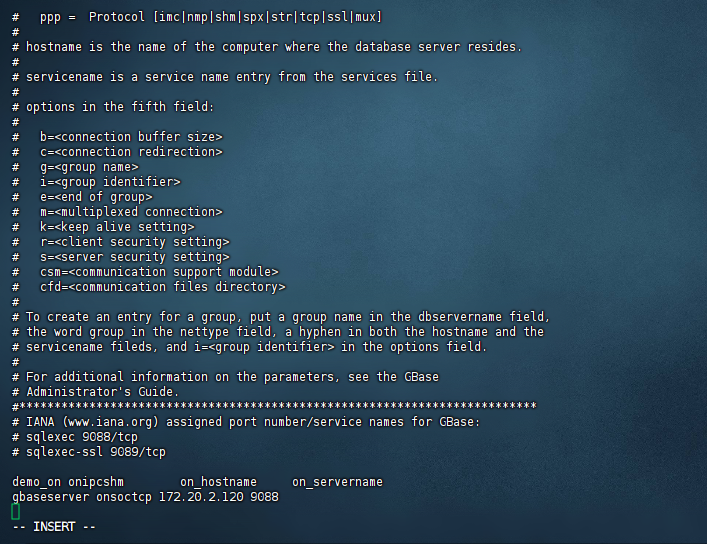
7、配置 sqlhosts.r gbaseserver 文件
GBase 8s 数据库使用的监听端口默认为 9088,多实例中每个实例的端口必须唯一。
将 /opt/GBASE/gbase/etc/ 目录中的 sqlhosts.std 文档复制一份,命名为
GBASEDBTDQLHOSTS 变量指定的名称 sqlhost.gbaseserver。
[gbasedbt@master1 ~]$ cd /opt/GBASE/gbase/etc/
[gbasedbt@master1 etc]$ cp sqlhosts.std sqlhosts.gbaseserver
[gbasedbt@master1 etc]$

vi sqlhosts.r gbaseserver 文件,在文件末尾添加相关实例名、网络连接方式、IP 及端口
号。
[gbasedbt@master1 etc]$ vi sqlhosts.gbaseserver

在文件末尾按照如下格式添加内容并保存:
实例名 网络连接方式 IP 端口
gbaseserver onsoctcp 172.20.2.120 9088
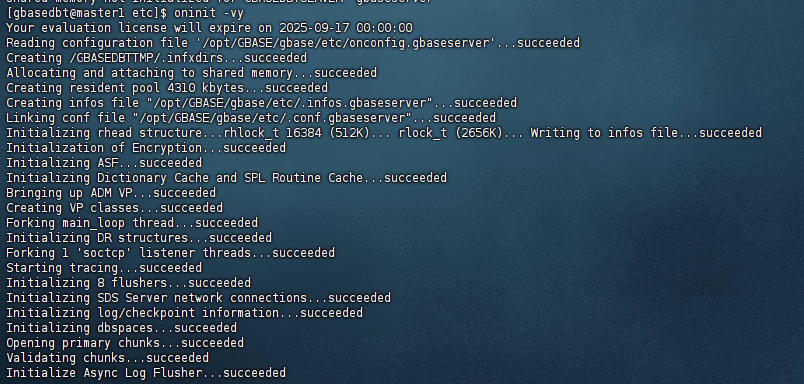
8、初始化数据库
使用 gbasedbt 用户执行初始化命令:
[gbasedbt@master1 etc]$ oninit -ivy
Your evaluation license will expire on 2025-09-17 00:00:00
Reading configuration file '/opt/GBASE/gbase/etc/onconfig.gbaseserver'...succeeded
Creating /GBASEDBTTMP/.infxdirs...succeeded
Allocating and attaching to shared memory...succeeded
Creating resident pool 4310 kbytes...succeeded
Creating infos file "/opt/GBASE/gbase/etc/.infos.gbaseserver"...succeeded
Linking conf file "/opt/GBASE/gbase/etc/.conf.gbaseserver"...succeeded
Initializing rhead structure...rhlock_t 16384 (512K)... rlock_t (2656K)... Writing to infos file...succeeded
Initialization of Encryption...succeeded
Initializing ASF...succeeded
Initializing Dictionary Cache and SPL Routine Cache...succeeded
Bringing up ADM VP...succeeded
Creating VP classes...succeeded
Forking main_loop thread...succeeded
Initializing DR structures...succeeded
Forking 1 'soctcp' listener threads...succeeded
Starting tracing...succeeded
Initializing 8 flushers...succeeded
Initializing log/checkpoint information...succeeded
Initializing dbspaces...succeeded
Opening primary chunks...succeeded
Validating chunks...succeeded
Creating database partition...succeeded
Initialize Async Log Flusher...succeeded
Starting B-tree Scanner...succeeded
Init ReadAhead Daemon...succeeded
Init DB Util Daemon...succeeded
Initializing DBSPACETEMP list...succeeded
Init Auto Tuning Daemon...succeeded
Checking database partition index...succeeded
Initializing dataskip structure...succeeded
Checking for temporary tables to drop...succeeded
Updating Global Row Counter...succeeded
Forking onmode_mon thread...succeeded
Creating periodic thread...succeeded
Creating periodic thread...succeeded
Starting scheduling system...succeeded
Verbose output complete: mode = 5
[gbasedbt@master1 etc]$

六、验证安装
验证数据库服务是否成功启动,并检查数据库实例的运行状态。可以使用ps -ef | grep oninit命令查看数据库服务进程是否存在。
通常情况下,使用 gbasedbt 用户来启动和停止数据库服务。
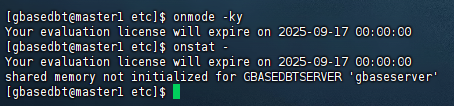
1、查看数据库运行状态
可以使用onstat命令,查看数据库运行状态。
[gbasedbt@master1 etc]$ onstat -
Your evaluation license will expire on 2025-09-17 00:00:00
On-Line -- Up 00:22:00 -- 165168 Kbytes

[gbasedbt@master1 etc]$

命令输出显示,当前数据库运行在OnLine状态。
注意:数据库在线状态时,再次启动数据库会报错。
2、如未启动数据库,可以使用oninit命令启动数据库。
[gbasedbt@master1 etc]$ oninit -vy
Your evaluation license will expire on 2025-09-17 00:00:00
3、停止数据库
可以使用onmode命令,停止数据库的运行。
[gbasedbt@master1 etc]$ onmode -ky
Your evaluation license will expire on 2025-09-17 00:00:00
[gbasedbt@master1 etc]$ onstat -
Your evaluation license will expire on 2025-09-17 00:00:00
shared memory not initialized for GBASEDBTSERVER 'gbaseserver'
[gbasedbt@master1 etc]$
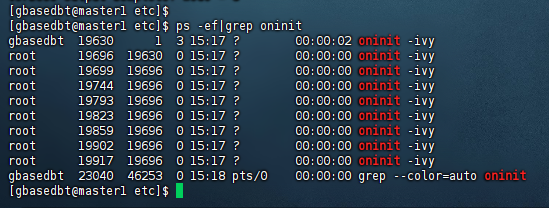
4、检查服务进程是否存在
成功安装数据库 GBase 8s 后,数据库会自动处于启动状态,可通过 ps -ef|grep oninit 命令
[gbasedbt@master1 etc]$ ps -ef|grep oninit
gbasedbt  19630      1  3 15:17 ?        00:00:02 oninit -ivy
root      19696  19630  0 15:17 ?        00:00:00 oninit -ivy
root      19699  19696  0 15:17 ?        00:00:00 oninit -ivy
root      19744  19696  0 15:17 ?        00:00:00 oninit -ivy
root      19793  19696  0 15:17 ?        00:00:00 oninit -ivy
root      19823  19696  0 15:17 ?        00:00:00 oninit -ivy
root      19859  19696  0 15:17 ?        00:00:00 oninit -ivy
root      19902  19696  0 15:17 ?        00:00:00 oninit -ivy
root      19917  19696  0 15:17 ?        00:00:00 oninit -ivy
gbasedbt  23040  46253  0 15:18 pts/0    00:00:00 grep --color=auto oninit
[gbasedbt@master1 etc]$
5、登录数据库
以 gbasedbt 用户身份登录,输入 dbaccess - - 命令进入数据库命令行模式,示例如下:
[gbasedbt@localhost ~]$ dbaccess - -
6、创建数据库
在 dbaccess 交互命令行中,执行如下SQL语句,创建数据库,示例如下:
[gbasedbt@localhost~]$ dbaccess - -
> create database gbase8s;
7、卸载 GBase 8s
当用户需要卸载 GBase 8s 数据库系统时,需要先停止数据库服务,切换到 root 用户,进
入安装目录下的 uninstall/uninstall_ids,执行该目录下的 uninstallids 命令进行卸载。
卸载程序开始后,选择 2 并回车,删除所有相关联的数据库文件,示例如下:
[root@localhost ~]# cd /opt/GBASE/gbase/uninstall/uninstall_ids
[root@localhost uninstall_ids]# ./uninstallids
=========================================================================
GBase Software Bundle (created with InstallAnywhere)
-------------------------------------------------------------------------
Preparing CONSOLE Mode Uninstallation...
=========================================================================
Uninstall GBase Software Bundle
-------------------------------
About to uninstall GBase Software Bundle.
In this uninstall process, all GBase Software Bundle products in
/opt/GBASE/gbase will be uninstalled.
It is recommended that you first shutdown all database server instances related
to this installation prior to uninstalling the product.
PRESS <ENTER> TO CONTINUE:
=========================================================================
Server Uninstall Options
------------------------
Server action:
Important: Choosing to remove all databases will remove all database chunks,
environment files, registry entries, and message log files for all database
server instances associated with this installation.
->1- Retains all databases, but removes all server binaries
2- Removes server binaries and all databases associated with them
ENTER THE NUMBER FOR YOUR CHOICE, OR PRESS <ENTER> TO ACCEPT THE DEFAULT:: 2
=========================================================================
Uninstalling...
---------------
=========================================================================
Uninstall Complete
------------------
Uninstall is complete for GBase Software Bundle.
Product uninstall status:
GBase: Successful
报错,没有初始化;
[gbasedbt@master1 opt]$ dbaccess - -
Your evaluation license will expire on 2025-09-17 00:00:00

  908: Attempt to connect to database server (ol_gbasedbt1210) failed.
[gbasedbt@master1 opt]$

解决办法:
使用 gbasedbt 用户执行初始化命令:
[gbasedbt@master1 etc]$ oninit -ivy
七、常见问题解决方法
在安装和配置GBase 8s V8.8的过程中,可能会遇到一些常见问题,如依赖包缺失、配置文件错误等。针对这些问题,可以采取以下措施进行解决:
查阅GBase的官方文档,了解常见问题的解决方案。
访问GBase的社区论坛或微信群,与其他用户交流心得和经验。
联系GBase的技术支持团队老师,寻求专业的帮助和指导。
结语
根据需要配置数据库的安全策略、备份恢复策略等。
学习和使用GBase 8s提供的各种工具和命令,以便更好地管理和维护数据库。
请注意,以上步骤是基于一般情况的概述,具体安装过程可能会因安装包版本、操作系统平台等因素而有所不同。因此,在安装过程中请务必参考GBase 8s V8.8的官方安装文档和指南。
以上就是我对GBase 8s V8.8安装部署相关的测试过程,记录了快速入门和安装部署的详细步骤,仅供参考。
