


Tips:一些记录,一些笔记

2024/9/04
WEDNESDAY
Peace comes from within. Do not seek.
宁静来自内心,不要向外寻求。

01
背景
很多时候,很多公司会使用闲置的MS Windows作为临时的服务器,而当服务器太多的时候,逐一登录进而操作变得越来越不现实,我们需要有一种远程控制的方式,在一台机器上完成对所有机器的访问与控制。
在过去,如果我们的受控机是Linux的时候,只需要保证「网络连通」并且「SSH」服务开放,就可以通过「Python Paramiko」实现远程控制,更好的方式是使用「Ansible」进行管理。
如果我们的受控端是MS Windows,那么Windows需要做一些基本的配置,然后,才可以使用「Python」或者「Ansible」这样的工具进行远程管理。
下面会具体介绍。
02
受控端「MS Windows」
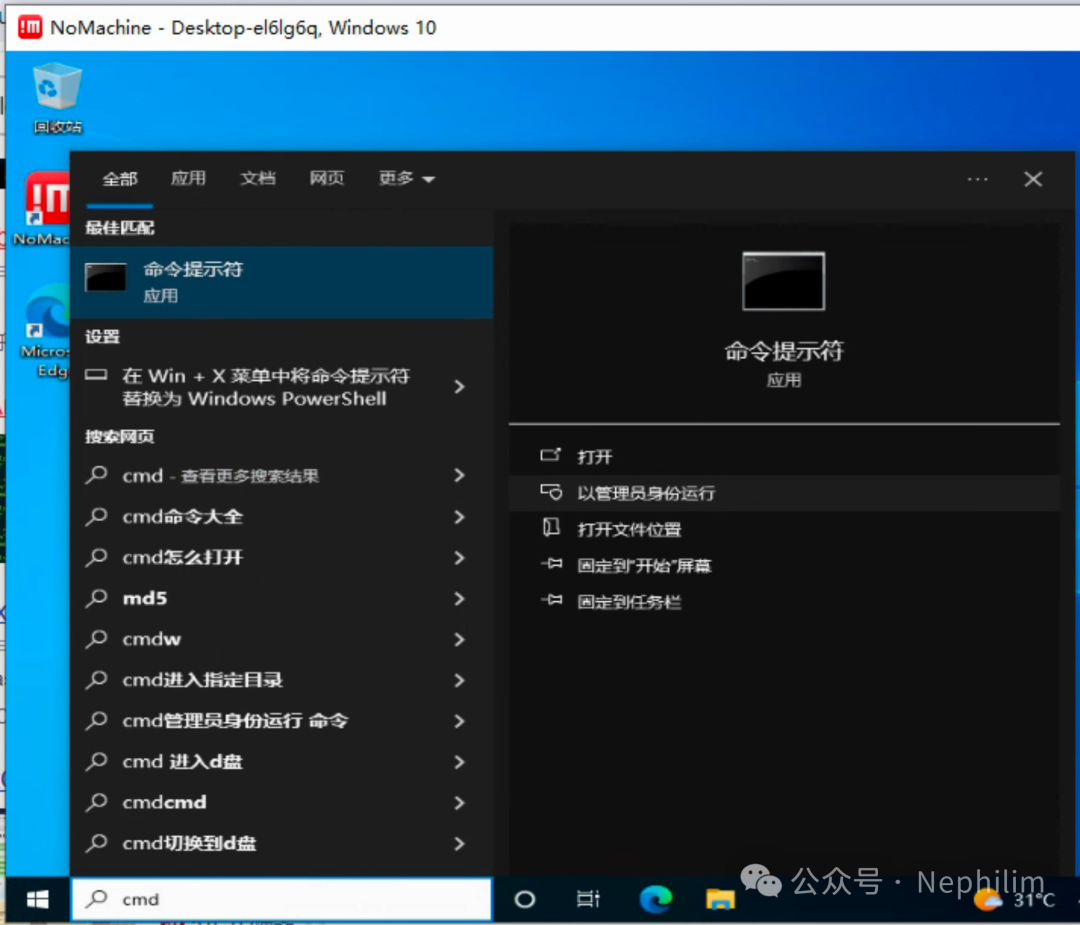
一、启动「winrm」服务
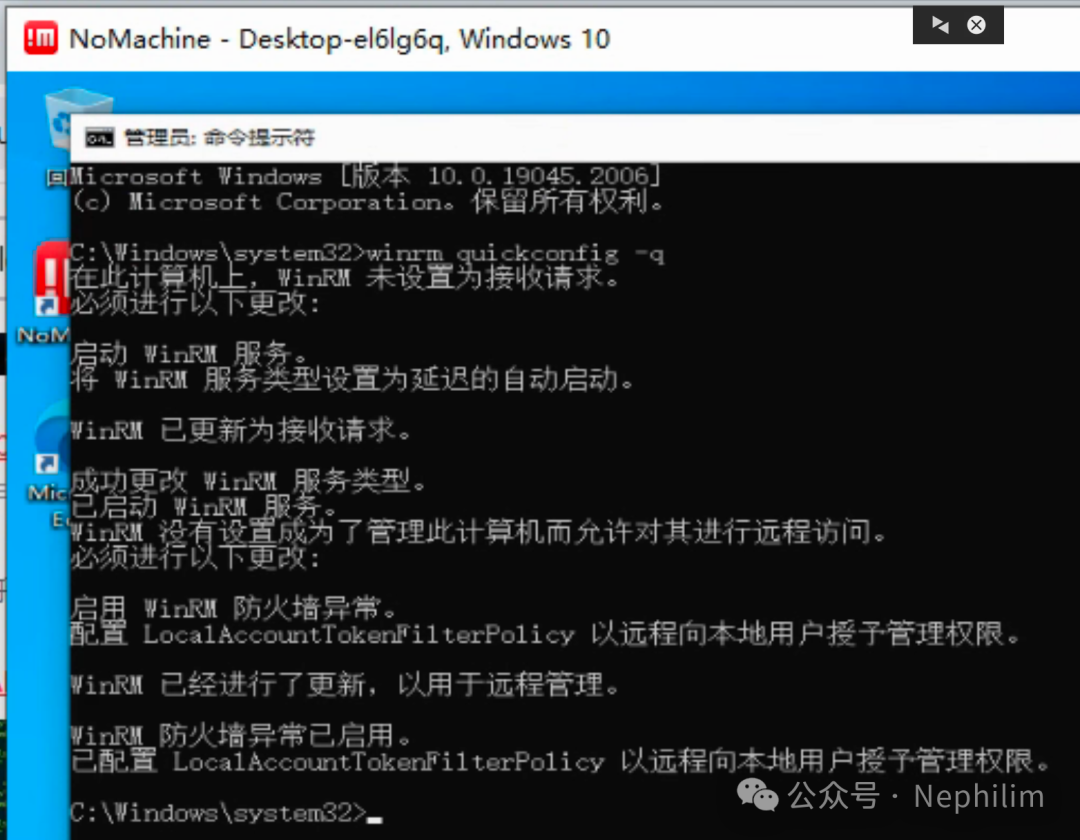
以管理员权限打开终端窗口(cmd):
winrm quickconfig -q
该步骤有可能报错:
如果是网络类型的设置异常,可以通过「win + i」进入「网络和Internet」,修改网络配置文件,从「共用」切换为「专用」
具体如下:
二、查看「winrm」服务的监听状态
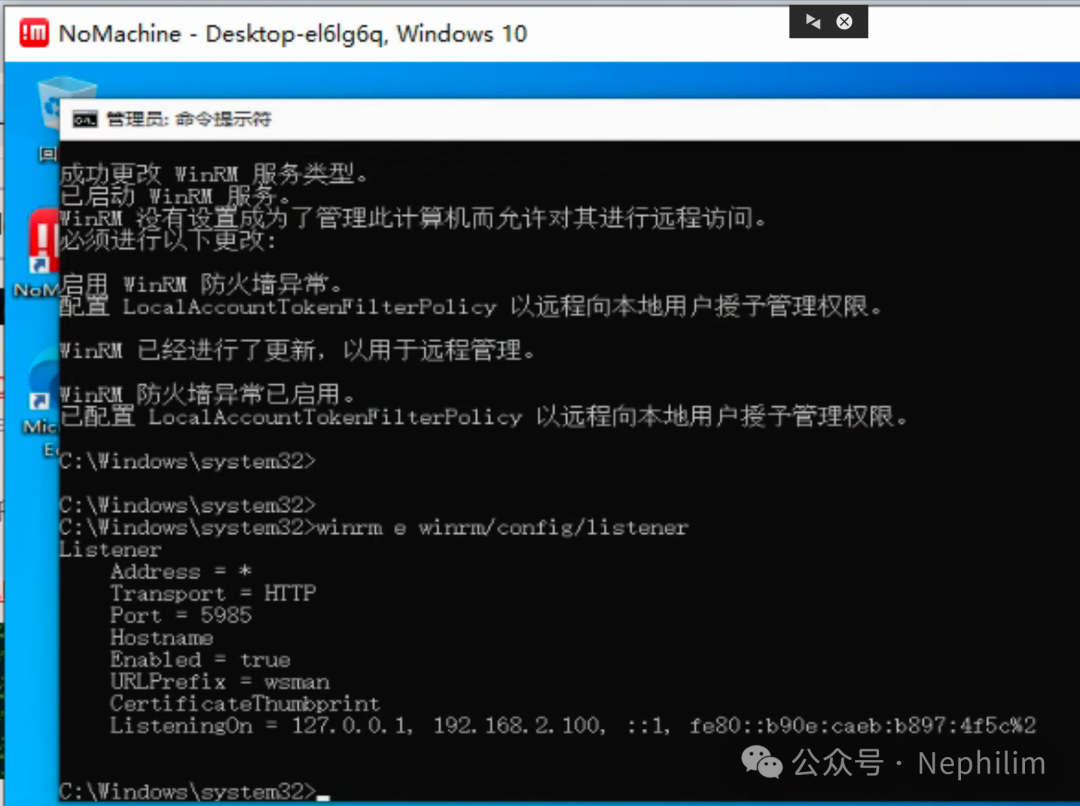
记住这里的监听的端口号,后面会用到。
三、查看「winrm」服务的配置信息
winrm get winrm/configwinrm get winrm/config/clientwinrm get winrm/config/service
具体如下:
C:\Windows\system32>winrm get winrm/configConfigMaxEnvelopeSizekb = 500MaxTimeoutms = 60000MaxBatchItems = 32000MaxProviderRequests = 4294967295ClientNetworkDelayms = 5000URLPrefix = wsmanAllowUnencrypted = falseAuthBasic = trueDigest = trueKerberos = trueNegotiate = trueCertificate = trueCredSSP = falseDefaultPortsHTTP = 5985HTTPS = 5986TrustedHostsServiceRootSDDL = O:NSG:BAD:P(A;;GA;;;BA)(A;;GR;;;IU)S:P(AU;FA;GA;;;WD)(AU;SA;GXGW;;;WD)MaxConcurrentOperations = 4294967295MaxConcurrentOperationsPerUser = 1500EnumerationTimeoutms = 240000MaxConnections = 300MaxPacketRetrievalTimeSeconds = 120AllowUnencrypted = falseAuthBasic = falseKerberos = trueNegotiate = trueCertificate = falseCredSSP = falseCbtHardeningLevel = RelaxedDefaultPortsHTTP = 5985HTTPS = 5986IPv4Filter = *IPv6Filter = *EnableCompatibilityHttpListener = falseEnableCompatibilityHttpsListener = falseCertificateThumbprintAllowRemoteAccess = trueWinrsAllowRemoteShellAccess = trueIdleTimeout = 7200000MaxConcurrentUsers = 2147483647MaxShellRunTime = 2147483647MaxProcessesPerShell = 2147483647MaxMemoryPerShellMB = 2147483647MaxShellsPerUser = 2147483647C:\Windows\system32>
四、配置「winrm client」
命令:
winrm set winrm/config/client @{AllowUnencrypted="true"}winrm set winrm/config/client @{TurstedHosts="*"}winrm set winrm/config/client/auth @{Basic="true"}
具体如下:
C:\Windows\system32>winrm set winrm/config/client @{AllowUnencrypted="true"}ClientNetworkDelayms = 5000URLPrefix = wsmanAllowUnencrypted = trueAuthBasic = trueDigest = trueKerberos = trueNegotiate = trueCertificate = trueCredSSP = falseDefaultPortsHTTP = 5985HTTPS = 5986TrustedHostsC:\Windows\system32>winrm set winrm/config/client @{TrustedHosts="*"}ClientNetworkDelayms = 5000URLPrefix = wsmanAllowUnencrypted = trueAuthBasic = trueDigest = trueKerberos = trueNegotiate = trueCertificate = trueCredSSP = falseDefaultPortsHTTP = 5985HTTPS = 5986TrustedHosts = *C:\Windows\system32>winrm set winrm/config/client/auth @{Basic="true"}AuthBasic = trueDigest = trueKerberos = trueNegotiate = trueCertificate = trueCredSSP = falseC:\Windows\system32>
五、配置「winrm service」
命令:
winrm set winrm/config/service @{AllowUnencrypted="true"}winrm set winrm/config/service/auth @{Basic="true"}
具体如下:
C:\Windows\system32>winrm set winrm/config/service @{AllowUnencrypted="true"}ServiceRootSDDL = O:NSG:BAD:P(A;;GA;;;BA)(A;;GR;;;IU)S:P(AU;FA;GA;;;WD)(AU;SA;GXGW;;;WD)MaxConcurrentOperations = 4294967295MaxConcurrentOperationsPerUser = 1500EnumerationTimeoutms = 240000MaxConnections = 300MaxPacketRetrievalTimeSeconds = 120AllowUnencrypted = trueAuthBasic = falseKerberos = trueNegotiate = trueCertificate = falseCredSSP = falseCbtHardeningLevel = RelaxedDefaultPortsHTTP = 5985HTTPS = 5986IPv4Filter = *IPv6Filter = *EnableCompatibilityHttpListener = falseEnableCompatibilityHttpsListener = falseCertificateThumbprintAllowRemoteAccess = trueC:\Windows\system32>winrm set winrm/config/service/auth @{Basic="true"}AuthBasic = trueKerberos = trueNegotiate = trueCertificate = falseCredSSP = falseCbtHardeningLevel = RelaxedC:\Windows\system32>
这样,受控端就配置完了。
03
控制端:Python
控制端的操作系统并不重要,只需要是Python,并且安装了Python的依赖包「pywinrm」即可。
查看当前安装的依赖包:
[root@ansible ~]# pip3 -Vpip 9.0.3 from usr/lib/python3.6/site-packages (python 3.6)[root@ansible ~]#[root@ansible ~]# pip3 listDEPRECATION: The default format will switch to columns in the future. You can use --format=(legacy|columns) (or define a format=(legacy|columns) in your pip.conf under the [list] section) to disable this warning.ansible (2.9.27)asn1crypto (0.24.0)cffi (1.9.1)cryptography (2.3)idna (2.10)Jinja2 (2.11.1)jmespath (0.9.4)MarkupSafe (0.23)netaddr (0.7.18)paramiko (2.1.1)pexpect (4.9.0)pip (9.0.3)ply (3.9)ptyprocess (0.7.0)pyasn1 (0.4.7)pycparser (2.14)PyYAML (3.13)setuptools (39.2.0)six (1.14.0)[root@ansible ~]#[root@ansible ~]# pip3 list | grep winrmDEPRECATION: The default format will switch to columns in the future. You can use --format=(legacy|columns) (or define a format=(legacy|columns) in your pip.conf under the [list] section) to disable this warning.[root@ansible ~]#
安装「pywinrm」
pip3 install pywinrm
安装完以后,再次检查就看到了:
[root@ansible ~]# pip3 list | grep winrmDEPRECATION: The default format will switch to columns in the future. You can use --format=(legacy|columns) (or define a format=(legacy|columns) in your pip.conf under the [list] section) to disable this warning.pywinrm (0.4.3)[root@ansible ~]#
04
Python脚本
Python访问Windows执行系统命令的脚本:
#!/usr/bin/env python# -*- coding: UTF-8 -*-# ——————————————————# 脚本说明:# xxxxxxxxx# ——————————————————# ========================================# 开始# ))))))))) 模块包导入import winrmimport codecs# ))))))))) 类名# ))))))))) 执行阶段# IP 地址# Winrm Server 端口# auth 用户名与口令class OS_MS_Windows:def __init__(self):self.win_session = winrm.Session("192.168.2.100:5985",auth=('admin', 'oracle'),transport='ntlm')def exec_cmd(self, cmd):result = self.win_session.run_cmd(cmd)code = result.status_codecontent = result.std_out if code == 0 else result.stderr_outtry:result = content.decode("utf-8")except:result = content.decode("GBK")return resultdef exec_powershell(self, cmd):result = self.win_session.run_ps(cmd)code = result.status_codecontent = result.std_out if code == 0 else result.stderr_outtry:result = content.decode("utf-8")except:result = content.decode("GBK")return result# ))))))))) 执行obj_win = OS_MS_Windows()hostname = obj_win.exec_cmd('hostname')print('==================== 主机名')print(hostname)systeminfo = obj_win.exec_powershell('systeminfo')print('==================== 系统信息')print(systeminfo)# ========================================# 结束
脚本的执行:
[root@ansible ~]# cat etc/os-releaseNAME="CentOS Linux"VERSION="7 (Core)"ID="centos"ID_LIKE="rhel fedora"VERSION_ID="7"PRETTY_NAME="CentOS Linux 7 (Core)"ANSI_COLOR="0;31"CPE_NAME="cpe:/o:centos:centos:7"HOME_URL="https://www.centos.org/"BUG_REPORT_URL="https://bugs.centos.org/"CENTOS_MANTISBT_PROJECT="CentOS-7"CENTOS_MANTISBT_PROJECT_VERSION="7"REDHAT_SUPPORT_PRODUCT="centos"REDHAT_SUPPORT_PRODUCT_VERSION="7"[root@ansible ~]#[root@ansible ~]# ifconfig ens192ens192: flags=4163<UP,BROADCAST,RUNNING,MULTICAST> mtu 1500inet 192.168.2.17 netmask 255.255.255.0 broadcast 192.168.2.255inet6 fe80::250:56ff:feac:1c95 prefixlen 64 scopeid 0x20<link>ether 00:50:56:ac:1c:95 txqueuelen 1000 (Ethernet)RX packets 21709086 bytes 11411534010 (10.6 GiB)RX errors 0 dropped 1302 overruns 0 frame 0TX packets 9897319 bytes 122159730193 (113.7 GiB)TX errors 0 dropped 0 overruns 0 carrier 0 collisions 0[root@ansible ~]#[root@ansible ~]# python3 manage_windows.py==================== 主机名DESKTOP-EL6LG6Q==================== 系统信息Host Name: DESKTOP-EL6LG6QOS Name: Microsoft Windows 10 ???OS Version: 10.0.19045 N/A Build 19045OS Manufacturer: Microsoft CorporationOS Configuration: Standalone WorkstationOS Build Type: Multiprocessor FreeRegistered Owner: adminRegistered Organization:Product ID: 00330-80000-00000-AA643Original Install Date: 2024/9/3, 20:02:32System Boot Time: 2024/9/4, 9:19:29System Manufacturer: VMware, Inc.System Model: VMware7,1System Type: x64-based PCProcessor(s): 2 Processor(s) Installed.[01]: Intel64 Family 6 Model 79 Stepping 1 GenuineIntel ~2195 Mhz[02]: Intel64 Family 6 Model 79 Stepping 1 GenuineIntel ~2195 MhzBIOS Version: VMware, Inc. VMW71.00V.16707776.B64.2008070230, 2020/8/7Windows Directory: C:\WindowsSystem Directory: C:\Windows\system32Boot Device: \Device\HarddiskVolume1System Locale: zh-cn;Chinese (China)Input Locale: zh-cn;Chinese (China)Time Zone: (UTC+08:00) Beijing, Chongqing, Hong Kong, UrumqiTotal Physical Memory: 8,191 MBAvailable Physical Memory: 5,289 MBVirtual Memory: Max Size: 10,111 MBVirtual Memory: Available: 7,271 MBVirtual Memory: In Use: 2,840 MBPage File Location(s): C:\pagefile.sysDomain: WORKGROUPLogon Server: \\DESKTOP-EL6LG6QHotfix(s): 7 Hotfix(s) Installed.[01]: KB5017022[02]: KB5015684[03]: KB5020683[04]: KB5026037[05]: KB5017308[06]: KB5014032[07]: KB5016705Network Card(s): 1 NIC(s) Installed.[01]: Intel(R) 82574L Gigabit Network ConnectionConnection Name: Ethernet0DHCP Enabled: NoIP address(es)[01]: 192.168.2.100[02]: fe80::b90e:caeb:b897:4f5cHyper-V Requirements: A hypervisor has been detected. Features required for Hyper-V will not be displayed.[root@ansible ~]#
可以看到,从Linux上的Python,可以远程发起命令的执行,并获得命令执行的结果。
05
Ansible:受控机
如果要通过Ansible管理MS Windows,还需要确认受控机的其他几个配置:
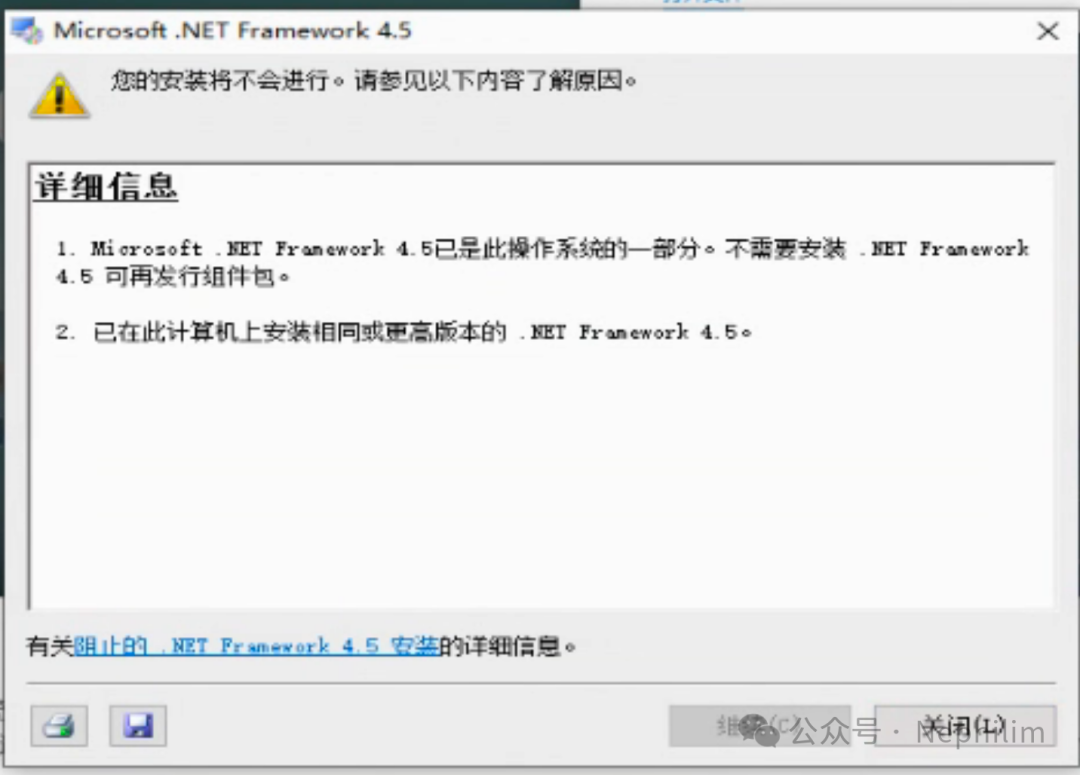
Microsoft .NET Framework 4.5
安装包:
https://download.microsoft.com/download/B/A/4/BA4A7E71-2906-4B2D-A0E1-80CF16844F5F/dotNetFx45_Full_setup.exe
如果已有版本高于4.5,则不需要安装:
Microsoft PowerShell 5.1
安装包:
https://www.filehorse.com/download-windows-powershell-64/37429/
查看版本与执行策略:
PS C:\Windows\system32> get-hostName : ConsoleHostVersion : 5.1.19041.1682InstanceId : 6949ee7e-950d-4f03-934a-0164c24ae917UI : System.Management.Automation.Internal.Host.InternalHostUserInterfaceCurrentCulture : zh-CNCurrentUICulture : zh-CNPrivateData : Microsoft.PowerShell.ConsoleHost+ConsoleColorProxyDebuggerEnabled : TrueIsRunspacePushed : FalseRunspace : System.Management.Automation.Runspaces.LocalRunspacePS C:\Windows\system32> get-executionpolicyRestrictedPS C:\Windows\system32>
修改PowerShell的执行策略为「remotesigned」
PS C:\Windows\system32> get-executionpolicyRestrictedPS C:\Windows\system32>PS C:\Windows\system32> set-executionpolicy remotesignedPS C:\Windows\system32> get-executionpolicyRemoteSignedPS C:\Windows\system32>
Winrm的配置与前面的配置一样。
需要注意的是,防火墙要打开对「5985」的策略。
这样,受控端就配置完成了。
06
Ansible:主控机
「hosts」与「组变量」
[root@ansible git-base]# cat ansible-base/hosts# For:Ansible Manager[ansible-manager]localhost# For: Python[python]192.168.2.17# For: Oracle Database[oracle-database]192.168.2.18 node_id=1192.168.2.20 node_id=2# For: Microsoft Windows[mswin]192.168.2.100[root@ansible git-base]#[root@ansible git-base]# cat ansible-base/group_vars/mswin# %%%%%%%%%%%%%%%%%%%%%%%%%%%%%%%%%# Microsoft Windows - 组参数# %%%%%%%%%%%%%%%%%%%%%%%%%%%%%%%%%# 用户验证ansible_ssh_user: "admin"ansible_ssh_pass: "oracle"ansible_ssh_port: 5985ansible_connection: "winrm"ansible_winrm_server_cert_validation: ignore[root@ansible git-base]#
测试连通性:
[root@ansible git-base]# ansible-3 -i ansible-base/hosts mswin -m win_ping[WARNING]: Invalid characters were found in group names but not replaced, use -vvvv to see details192.168.2.100 | SUCCESS => {"changed": false,"ping": "pong"}[root@ansible git-base]#
可以看到,通过Ansible访问MS Windows,没有问题。
通过Ansible远程MS Windows,执行命令:
[root@ansible git-base]# ansible-3 -i ansible-base/hosts mswin -m win_shell -a "ipconfig"[WARNING]: Invalid characters were found in group names but not replaced, use -vvvv to see details192.168.2.100 | CHANGED | rc=0 >>Windows IP ConfigurationEthernet adapter Ethernet0:Connection-specific DNS Suffix . :Link-local IPv6 Address . . . . . : fe80::b90e:caeb:b897:4f5c%2IPv4 Address. . . . . . . . . . . : 192.168.2.100Subnet Mask . . . . . . . . . . . : 255.255.255.0Default Gateway . . . . . . . . . : 192.168.2.1[root@ansible git-base]#
至此,通过Python以及Ansible,远程Microsoft Windows的方法就介绍完毕了。
END
温馨提示
如果你喜欢本文,请分享到朋友圈,想要获得更多信息,请关注我。
