


Tips:一些记录,一些笔记

2024/08/06
TUESDAY
By reading we enrich the mind; by conversation to make it more perfect.
读书可以使我们的思想充实,谈话使其更臻完美。

01
那些知名的「Vue」的中后台模板
介于「Vue.JS」在国内的火爆,很多大厂都推出了自己的发行版的「Vue.JS」的组件库,并且,基于自己的组件库,构建了自己的「中后台管理平台」。
就像学习编程的第一个测试脚本是「Hello World」一样,中后台管理平台的项目可以说是一个集大成之作,可以充分的展现各家基于自己的理解实现的组件库在各种场景需求下的前端性能表现。
比较知名的中后台管理平台有这几个:
| 蚂蚁金服:Ant Design Pro | https://pro.antdv.com/ |
| 字节跳动:Arco Design Pro | https://pro.arco.design/ |
| 饿了么:Element Plus | https://doc.buildadmin.com/?from=element-plus |
| Vue Shop Vite | https://vuejs-core.cn/ |
| Vue Admin Better | https://github.com/zxwk1998/vue-admin-better |
| Vue Element Admin | https://panjiachen.github.io/vue-element-admin-site/zh/ |
| iView View UI | https://www.iviewui.com/admin-plus/introduce |
| Vue Ant Admin | https://iczer.gitee.io/vue-antd-admin |
| Vue Manage System | https://lin-xin.github.io/example/vue-manage-system/ |
| Vue Element Plus Admin | https://element-plus-admin-doc.cn/ |
这些后台管理系统演示的时候,通常都会使用「Mock.JS」
但MOCK.JS是假数据,如果需要对接真实的用户验证系统,应该怎么做呢?
本文以其中的一个中后台管理模板为例,详细描述配置过程与方法。
本文仅描述「前后端如何集成」,并不会涉及前端源码的分析,如需前端框架,请在以下地址联系作者购买:
https://vuejs-core.cn/authorization/shop-vite.html
02
前端:vue-shop-vite
首先,从官方获得源码:需要在官方购买(支持作者):
https://vuejs-core.cn/authorization/shop-vite.html
然后,解压后,进入项目根目录,安装依赖包:
(base) adamhuan@Leviathan shop-vite-main % pwd/Users/adamhuan/adamhuan_code_base/shop-vite-main(base) adamhuan@Leviathan shop-vite-main %(base) adamhuan@Leviathan shop-vite-main % ls -ltr | grep node(base) adamhuan@Leviathan shop-vite-main %(base) adamhuan@Leviathan shop-vite-main % pnpm installWARN 19 deprecated subdependencies found: @humanwhocodes/config-array@0.11.14, @humanwhocodes/object-schema@2.0.3, abab@2.0.6, are-we-there-yet@2.0.0, domexception@2.0.1, gauge@3.0.2, glob@7.2.3, glob@8.1.0, inflight@1.0.6, npmlog@5.0.1, resolve-url@0.2.1, rimraf@3.0.2, source-map-resolve@0.5.3, source-map-url@0.4.1, sourcemap-codec@1.4.8, stable@0.1.8, urix@0.1.0, w3c-hr-time@1.0.2, webpack-chain@4.12.1Packages: +1814+++++++++++++++++++++++++++++++++++++++++++++++++++++++++++++++++++++++++++++++++++++++++++++++++++++++++++++++++++++++++++++++++++++++++++++++++++++++++++++++++++++++Progress: resolved 1871, reused 1814, downloaded 0, added 1814, donenode_modules/.pnpm/canvas@2.11.2/node_modules/canvas: Running install script, failed in 8.3s (skipped as optional)dependencies:+ @element-plus/icons-vue 2.3.1+ @imengyu/vue3-context-menu 1.4.2+ @kangc/v-md-editor 2.3.18+ @logicflow/core 1.2.28 (2.0.0-beta.9 is available)+ @logicflow/extension 1.2.28 (2.0.0-beta.9 is available)+ @lucky-canvas/vue 0.1.11+ @opentiny/vue 3.17.2+ @vueuse/core 10.11.0+ @vueuse/head 2.0.0+ @wangeditor/editor 5.1.23+ @wangeditor/editor-for-vue 5.1.12+ axios 1.7.3+ dayjs 1.11.12+ disable-devtool 0.3.7+ echarts 5.5.1+ element-plus 2.7.8+ jsencrypt 3.3.2+ lodash-es 4.17.21+ mitt 3.0.1+ mockjs 1.1.0+ normalize.css 8.0.1+ nprogress 0.2.0+ pinia 2.2.0+ qs 6.13.0+ typeit 8.8.4+ vsv-icon 1.2.2+ vue 3.4.35+ vue-draggable-plus 0.5.3+ vue-echarts 6.7.3 (7.0.1 is available)+ vue-i18n 9.13.1+ vue-json-viewer 3.0.4+ vue-pdf-embed 2.1.0+ vue-qr 4.0.9+ vue-router 4.4.2+ vue3-gantt 1.1.8-7+ vue3-puzzle-vcode 1.1.7+ xgplayer 3.0.19+ xgplayer-hls.js 3.0.19devDependencies:+ @element-plus/eslint-config 2.7.8+ @types/lodash-es 4.17.12+ @types/mockjs 1.0.10+ @types/nprogress 0.2.3+ @types/qs 6.9.15+ @vitejs/plugin-basic-ssl 1.1.0+ @vitejs/plugin-vue 5.1.2+ @vitejs/plugin-vue-jsx 4.0.0+ @vue/compiler-sfc 3.4.35+ @vue/eslint-config-prettier 9.0.0+ @vue/eslint-config-typescript 13.0.0+ adm-zip 0.5.15+ autoprefixer 10.4.20+ chokidar 3.6.0+ eslint 8.57.0 (9.8.0 is available)+ eslint-plugin-prettier 5.2.1+ eslint-plugin-unicorn 54.0.0 (55.0.0 is available)+ eslint-plugin-vue 9.27.0+ lint-staged 15.2.8+ picocolors 1.0.1+ plop 4.0.1+ postcss 8.4.41+ postcss-html 1.7.0+ prettier 3.3.3+ rollup-plugin-visualizer 5.12.0+ sass 1.77.6 (1.77.8 is available)+ stylelint 16.8.1+ stylelint-config-recess-order 5.0.1+ stylelint-config-recommended-scss 14.1.0+ stylelint-config-recommended-vue 1.5.0+ terser 5.31.3+ typescript 5.5.4+ unplugin-auto-import 0.18.2+ unplugin-vue-components 0.27.3+ vite 5.3.5+ vite-plugin-banner 0.7.1+ vite-plugin-compression 0.5.1+ vite-plugin-mock 2.9.8 (3.0.2 is available)+ vite-plugin-pwa 0.20.1+ vite-plugin-svg-icons 2.0.1+ vite-plugin-unplugin 1.8.0+ vite-plugin-vitebar 0.0.5 (0.0.8 is available)+ vue-global-api 0.4.1+ vue-tsc 2.0.29WARN Issues with peer dependencies found.└─┬ @vue/composition-api 1.7.2└── ✕ unmet peer vue@">= 2.5 < 2.7": found 3.4.35Done in 27.8s(base) adamhuan@Leviathan shop-vite-main %
然后,第一次运行,看看效果:
(base) adamhuan@Leviathan shop-vite-main % pnpm dev> shop-vite@9.2.0 dev Users/adamhuan/adamhuan_code_base/shop-vite-main> set VITE_CJS_IGNORE_WARNING=true && viteThe CJS build of Vite's Node API is deprecated. See https://vitejs.dev/guide/troubleshooting.html#vite-cjs-node-api-deprecated for more details.2024-08-06 10:41:51VITE v5.3.5 ready in 1138 ms➜ Local: http://localhost:5200/➜ Network: http://10.210.18.192:5200/➜ press h + enter to show help
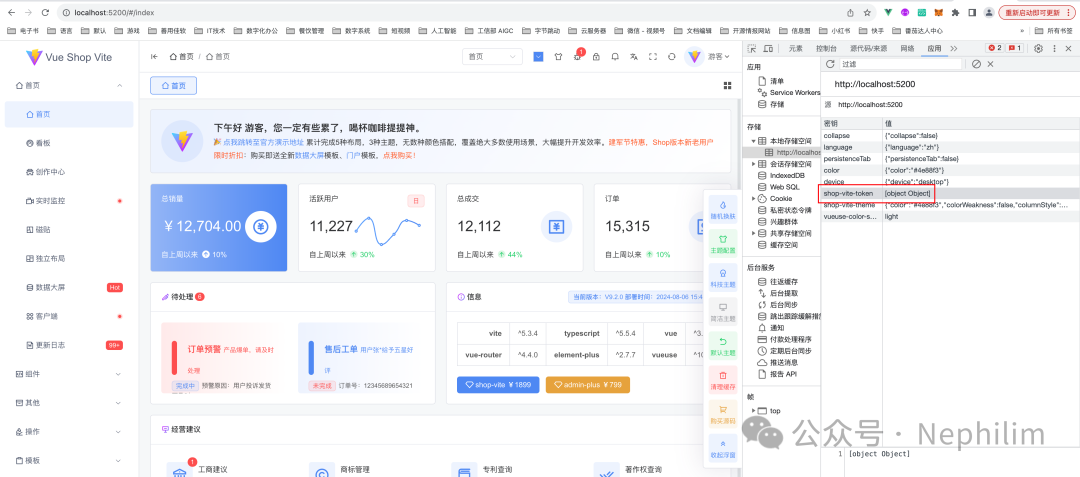
浏览器访问:http://localhost:5200/#/login
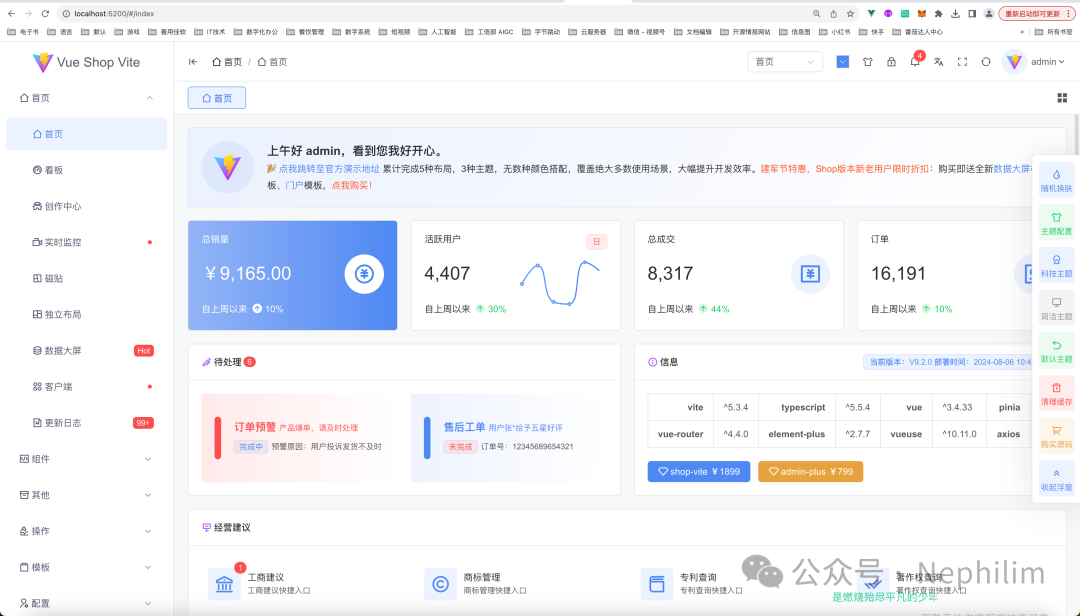
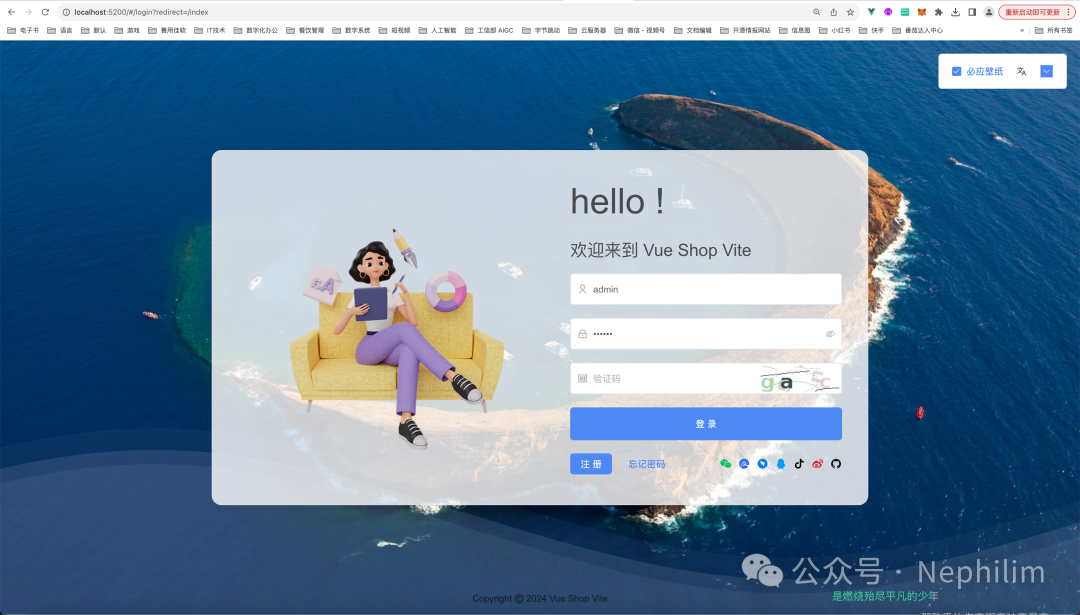
默认情况下,会直接登录,下面先退出,看看它的登录界面:
03
分析TOKEN
打开「开发者工具」:
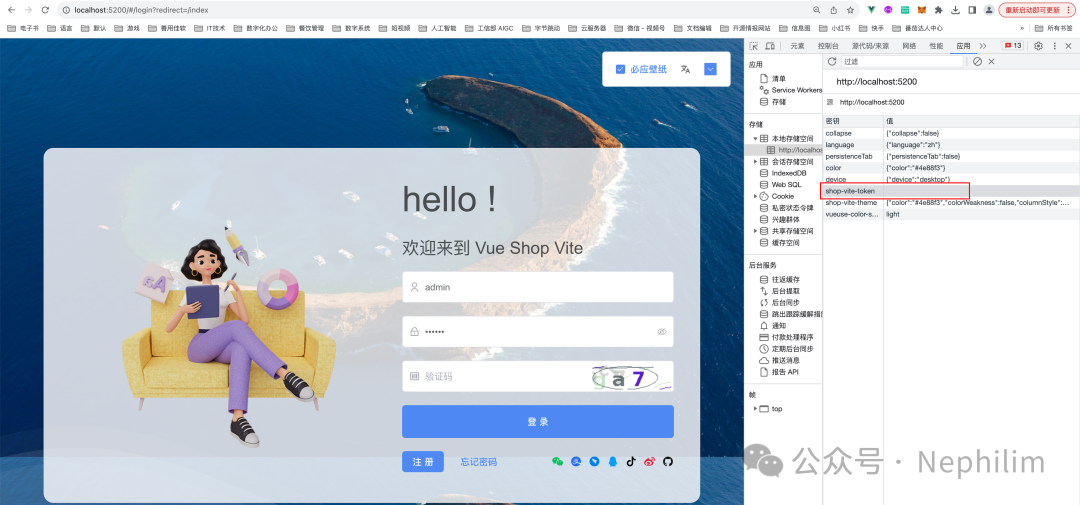
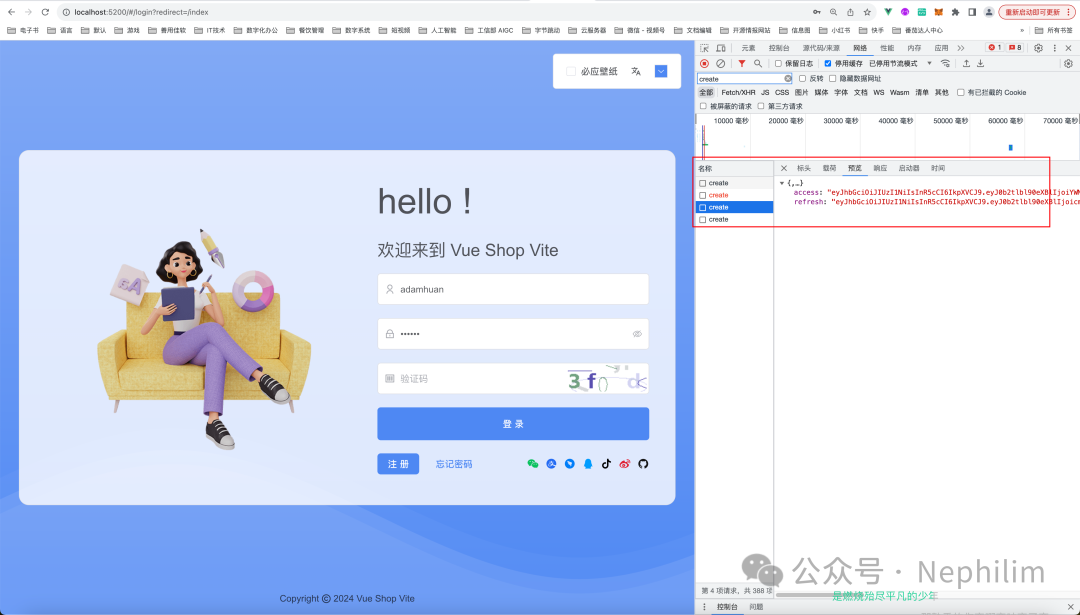
在没有登录的时候,浏览器的Token「shop-vite-token」是空的。
当登录成功后:
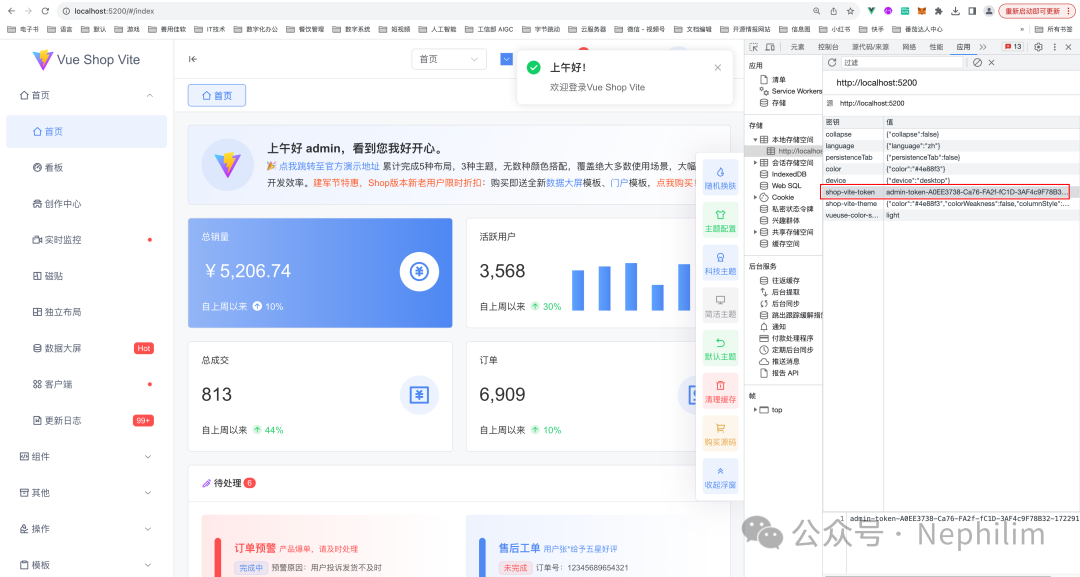
可以看到其中,被填充了值。
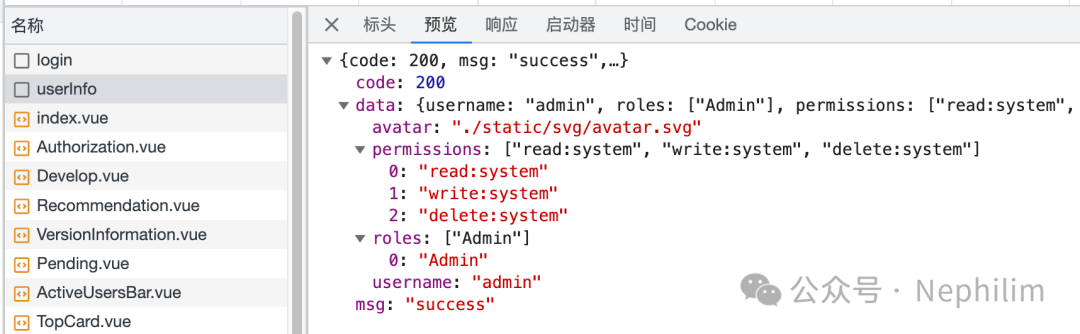
继续查看登录的时候调用的请求「login」反馈过来的信息:

可以看到,该前端模板在处理登录成功请求的时候,对反馈过来的数据是有格式要求的:
{code: xxxx,msg: 'xxx',data: {token: 'xxxxx',}}
再看看其他的请求的返回数据:
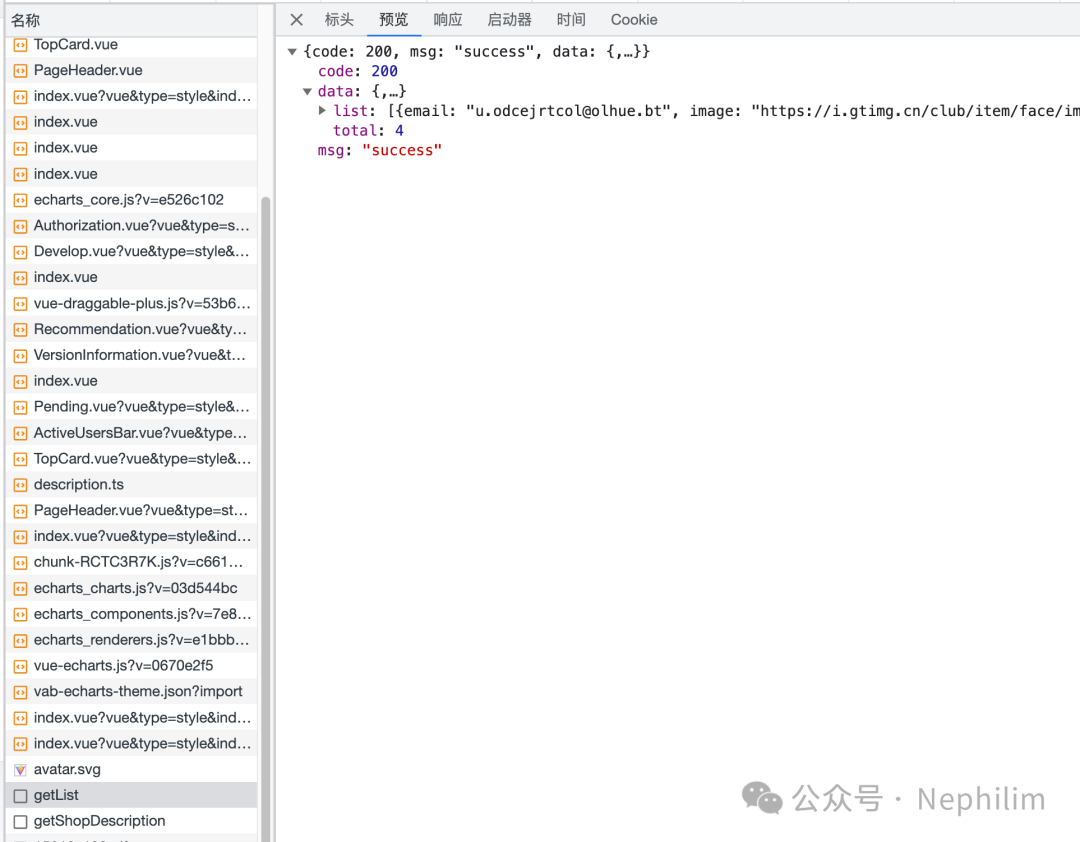
可以看到,返回数据都需要是如上所示的格式。
因此,我们提供用户验证的程序在返回数据的时候,应该按照该模板需要的格式返回数据。
否则,即使后端登录成功,拿到了Token,也无法让前端命中「登录」成功的条件判断。
04
后端:Django Rest Framework + Djoser + SimpleJWT
后端的配置,可以参考之前的文章:
JWT:
Django Rest Framework:JWT(Json Web Token)
DJOSER:
Django:用DJoser模块解决「用户注册、登录」相关的需求
跨域:
DRF + VUE:CORS跨域问题「NO 'Access-Control-Allow-Origin'」
最终,我的配置如下:
全局路由配置「urls.py」
"""URL configuration for djangoProject_DB2Excel_V2_DRF_JWT project.The `urlpatterns` list routes URLs to views. For more information please see:https://docs.djangoproject.com/en/5.0/topics/http/urls/Examples:Function views1. Add an import: from my_app import views2. Add a URL to urlpatterns: path('', views.home, name='home')Class-based views1. Add an import: from other_app.views import Home2. Add a URL to urlpatterns: path('', Home.as_view(), name='home')Including another URLconf1. Import the include() function: from django.urls import include, path2. Add a URL to urlpatterns: path('blog/', include('blog.urls'))"""from django.contrib import adminfrom django.urls import path, includeurlpatterns = [path("admin/", admin.site.urls),]# %%%%%%%%%%%%%%%%%%%%%%%%%%%%%%%%%%%%%% Django Rest Framework# --- 导入from rest_framework.routers import DefaultRouter# --- 实例化router = DefaultRouter()# --- 注册# router.register('users', UserViewSet)# --- 写入路由urlpatterns += [# Django Rest Frameworkpath("api/", include(router.urls)),# Django Djoserpath("api-auth/", include("djoser.urls")),# Django Djoser JWTpath("api-auth-jwt/", include("djoser.urls.jwt")),]
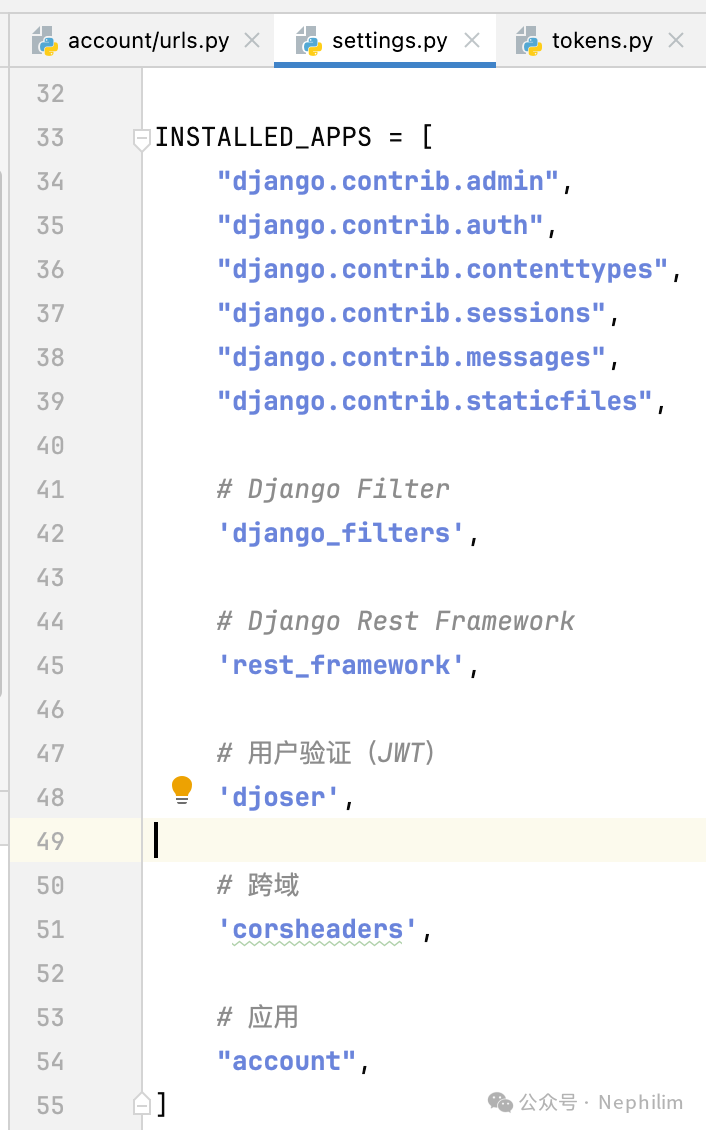
全局配置「settings.py」
"""Django settings for djangoProject_DB2Excel_V2_DRF_JWT project.Generated by 'django-admin startproject' using Django 5.0.7.For more information on this file, seehttps://docs.djangoproject.com/en/5.0/topics/settings/For the full list of settings and their values, seehttps://docs.djangoproject.com/en/5.0/ref/settings/"""from pathlib import Path# Build paths inside the project like this: BASE_DIR 'subdir'.BASE_DIR = Path(__file__).resolve().parent.parent# Quick-start development settings - unsuitable for production# See https://docs.djangoproject.com/en/5.0/howto/deployment/checklist/# SECURITY WARNING: keep the secret key used in production secret!SECRET_KEY = "django-insecure-8&l8$tv3!18)soob3r33o=rfq2k%2fb2%n!wn^jnb+(qupg-6h"# SECURITY WARNING: don't run with debug turned on in production!DEBUG = TrueALLOWED_HOSTS = []# Application definitionINSTALLED_APPS = ["django.contrib.admin","django.contrib.auth","django.contrib.contenttypes","django.contrib.sessions","django.contrib.messages","django.contrib.staticfiles",# Django Filter'django_filters',# Django Rest Framework'rest_framework',# 用户验证(JWT)'djoser',# 跨域'corsheaders',]MIDDLEWARE = ["django.middleware.security.SecurityMiddleware","django.contrib.sessions.middleware.SessionMiddleware","corsheaders.middleware.CorsMiddleware","django.middleware.common.CommonMiddleware","django.middleware.csrf.CsrfViewMiddleware","django.contrib.auth.middleware.AuthenticationMiddleware","django.contrib.messages.middleware.MessageMiddleware","django.middleware.clickjacking.XFrameOptionsMiddleware",]ROOT_URLCONF = "djangoProject_DB2Excel_V2_DRF_JWT.urls"TEMPLATES = [{"BACKEND": "django.template.backends.django.DjangoTemplates","DIRS": [BASE_DIR 'templates'],"APP_DIRS": True,"OPTIONS": {"context_processors": ["django.template.context_processors.debug","django.template.context_processors.request","django.contrib.auth.context_processors.auth","django.contrib.messages.context_processors.messages",],},},]WSGI_APPLICATION = "djangoProject_DB2Excel_V2_DRF_JWT.wsgi.application"# Database# https://docs.djangoproject.com/en/5.0/ref/settings/#databasesDATABASES = {"default": {"ENGINE": "django.db.backends.sqlite3","NAME": BASE_DIR "db.sqlite3",}}# Password validation# https://docs.djangoproject.com/en/5.0/ref/settings/#auth-password-validatorsAUTH_PASSWORD_VALIDATORS = [{"NAME": "django.contrib.auth.password_validation.UserAttributeSimilarityValidator",},{"NAME": "django.contrib.auth.password_validation.MinimumLengthValidator",},{"NAME": "django.contrib.auth.password_validation.CommonPasswordValidator",},{"NAME": "django.contrib.auth.password_validation.NumericPasswordValidator",},]# Internationalization# https://docs.djangoproject.com/en/5.0/topics/i18n/LANGUAGE_CODE = "en-us"TIME_ZONE = "UTC"USE_I18N = TrueUSE_TZ = True# Static files (CSS, JavaScript, Images)# https://docs.djangoproject.com/en/5.0/howto/static-files/STATIC_URL = "static/"# Default primary key field type# https://docs.djangoproject.com/en/5.0/ref/settings/#default-auto-fieldDEFAULT_AUTO_FIELD = "django.db.models.BigAutoField"# Django 跨域问题CORS_ORIGIN_ALLOW_ALL = TrueCORS_ALLOW_CREDENTIALS = TrueCORS_ORIGIN_WHITELIST = ("http://localhost:5200",)# CSRFCSRF_TRUSTED_ORIGINS = ['http://localhost:5200',]# Django Simple JWTSIMPLE_JWT = {'AUTH_HEADER_TYPES': ('JWT',),}# Django Rest FrameworkREST_FRAMEWORK = {'DEFAULT_AUTHENTICATION_CLASSES': {# 'rest_framework.authentication.TokenAuthentication',},'DEFAULT_FILTER_BACKENDS': {'django_filters.rest_framework.DjangoFilterBackend',},'DEFAULT_PAGINATION_CLASS': {# 'rest_framework.pagination.PageNumberPagination',},}# Django DjoserDJOSER = {# 'USER_ID_FIELD': 'username',# 'LOGIN_FIELD': 'email',}
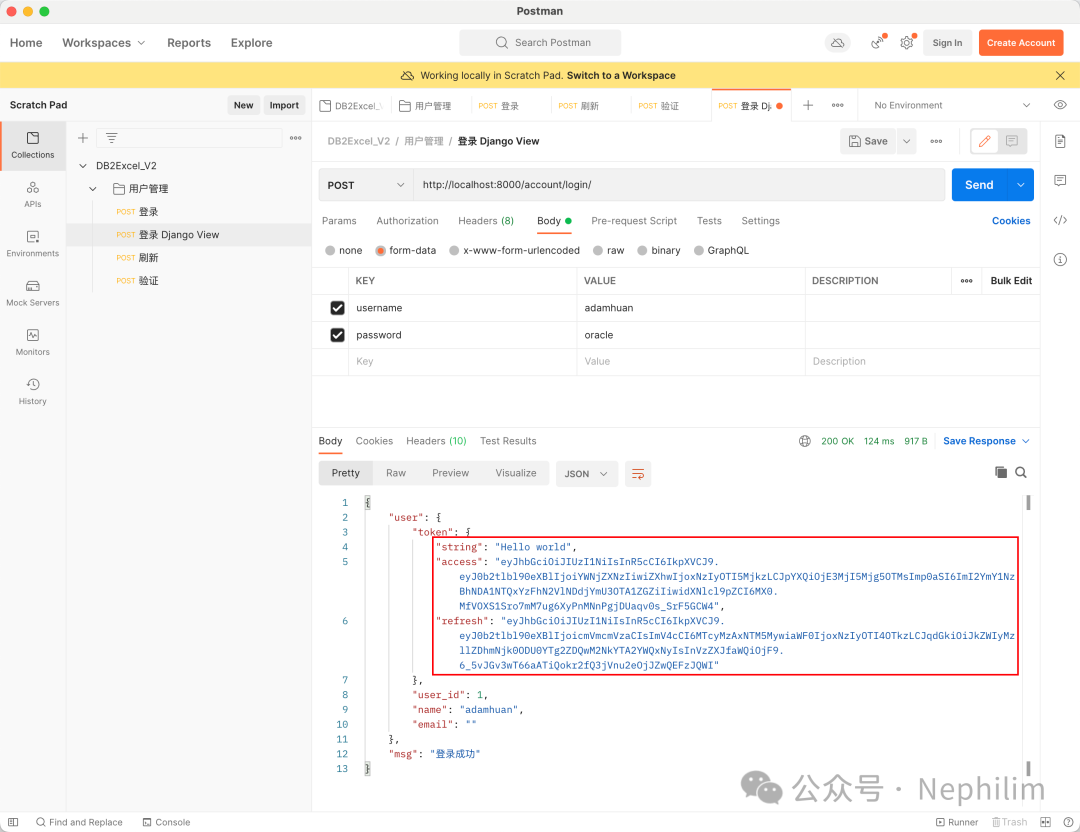
通过「Postman」测试一下接口:
post http://localhost:8000/api-auth-jwt/jwt/create
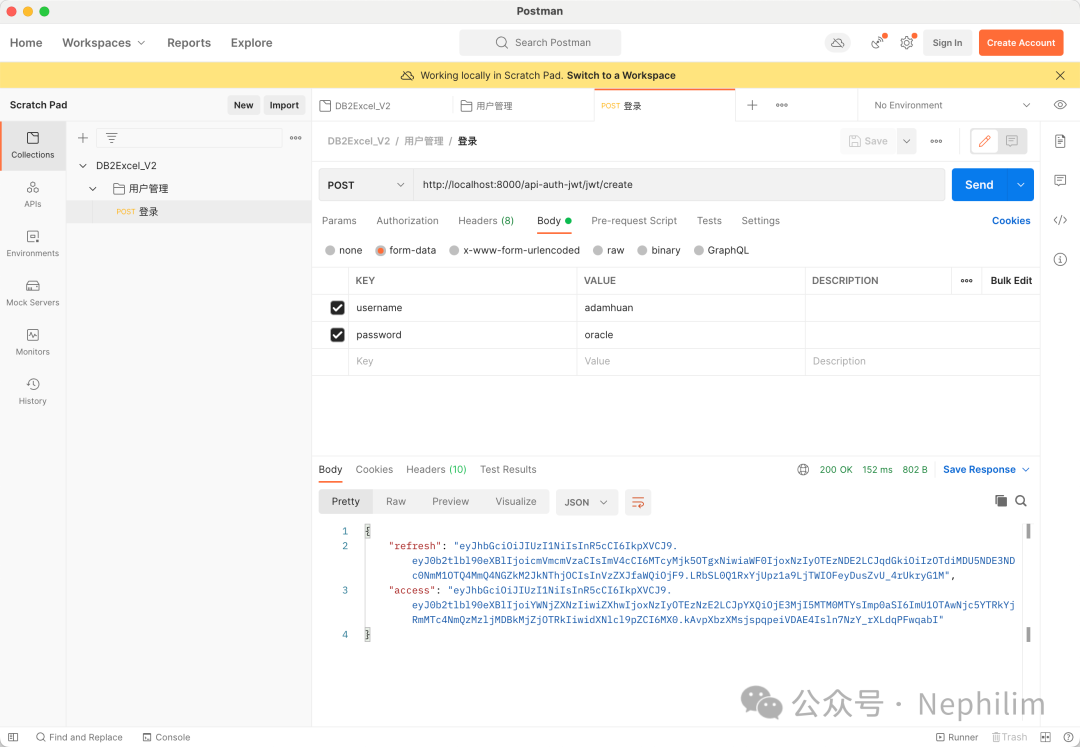
可以看到,「Postman」请求成功,登录成功后,拿到了两个Token:
access:访问令牌
refresh:刷新令牌
到这里「DRF + JWT + Djoser」的基本功能就配置完成了。
05
前端配置后端的用户验证
因为我们目前是在开发环境运行的,所以只需要修改环境文件「.env.development」中的配置即可:
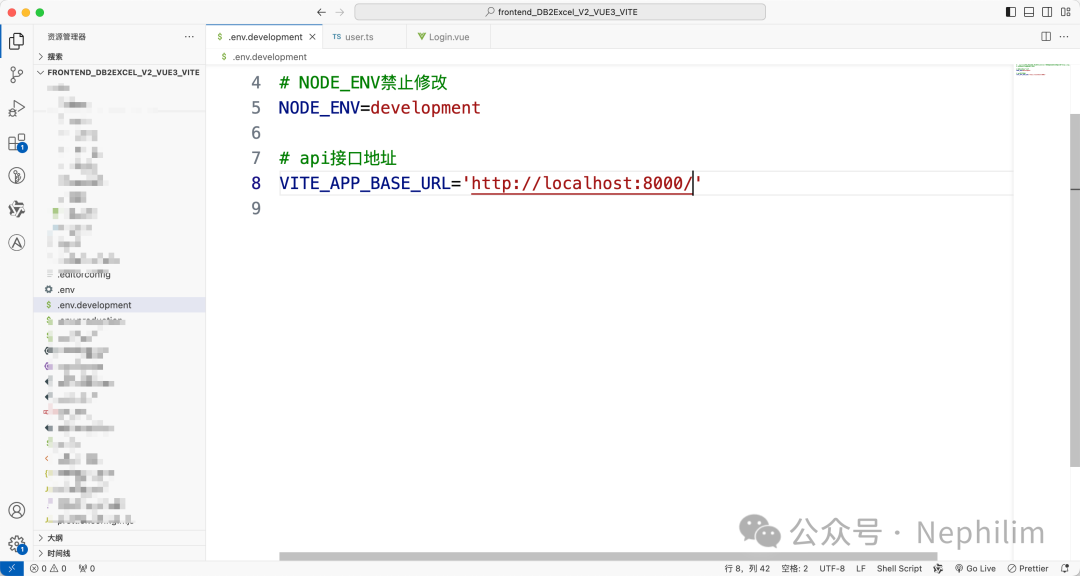
配置后端的数据接口:
# api接口地址VITE_APP_BASE_URL='http://localhost:8000/'
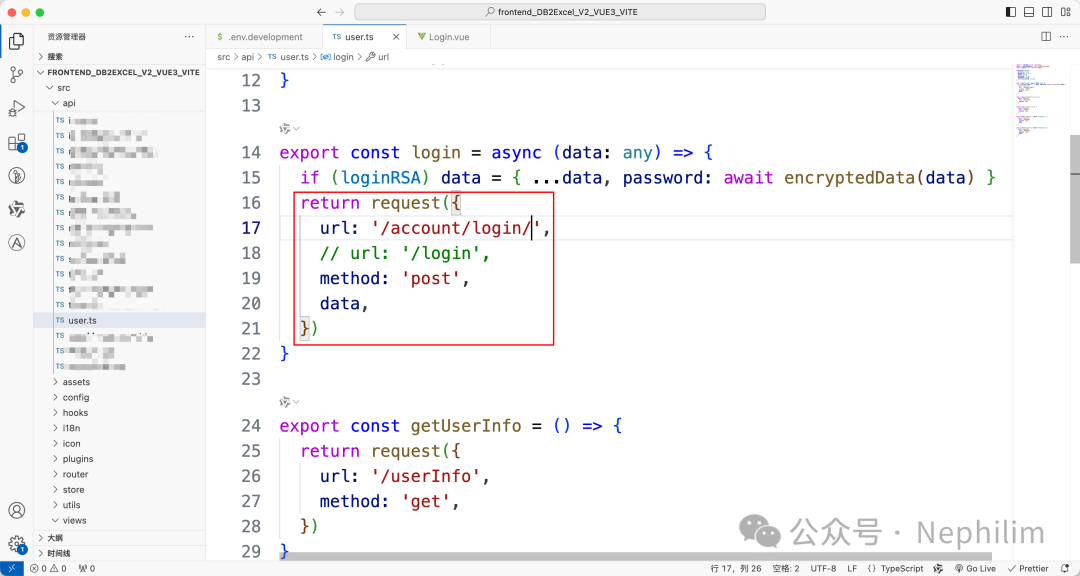
在「src/api/user.ts」中,修改AXIOS请求的API接口地址:
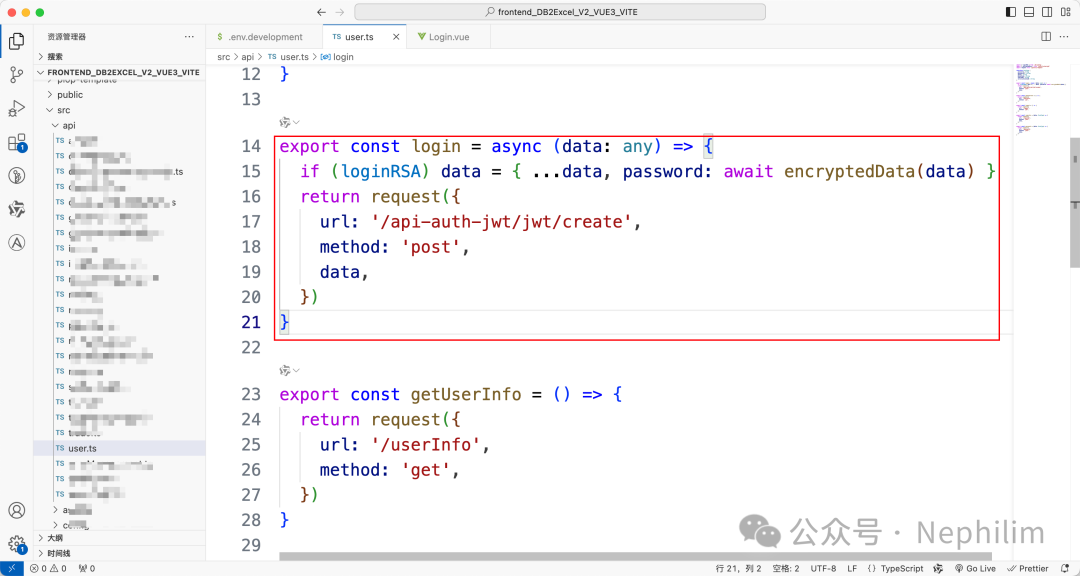
export const login = async (data: any) => {if (loginRSA) data = { ...data, password: await encryptedData(data) }return request({url: '/api-auth-jwt/jwt/create',method: 'post',data,})}
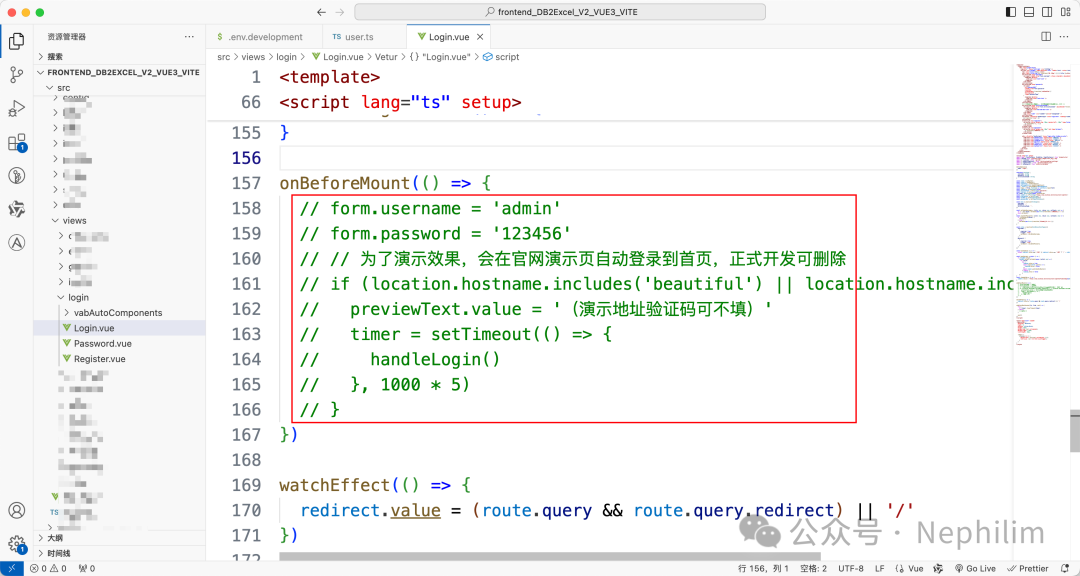
最后,注释掉「Login.vue」中为了演示方便的样例代码:
06
JWT还需要做一些修改才可以使用
但这个时候,你还无法给前端用,原因就像上面说的,JWT默认返回的数据格式与前端模板需要的数据格式不匹配,无法命中前端模板的逻辑:
虽然登录失败会正常显示出来:
但登录成功并不会正常的跳转:
因为,我们后端反馈的数据,与前端需要的数据格式不一致,前端无法判断登录到底成功了没有。
07
后端:Django - 创建「用户管理」应用
为了更好的管理用户相关的操作与事宜,我们在Django中,创建一个专门的应用(App)
(.venv) (base) adamhuan@Leviathan djangoProject_DB2Excel_V2_DRF_JWT % python manage.py startapp account(.venv) (base) adamhuan@Leviathan djangoProject_DB2Excel_V2_DRF_JWT %
然后,开始配置。
08
路由(urls.py)
全局路由配置:
"""URL configuration for djangoProject_DB2Excel_V2_DRF_JWT project.The `urlpatterns` list routes URLs to views. For more information please see:https://docs.djangoproject.com/en/5.0/topics/http/urls/Examples:Function views1. Add an import: from my_app import views2. Add a URL to urlpatterns: path('', views.home, name='home')Class-based views1. Add an import: from other_app.views import Home2. Add a URL to urlpatterns: path('', Home.as_view(), name='home')Including another URLconf1. Import the include() function: from django.urls import include, path2. Add a URL to urlpatterns: path('blog/', include('blog.urls'))"""from django.contrib import adminfrom django.urls import path, includeurlpatterns = [path("admin/", admin.site.urls),path("account/", include("account.urls")),]# %%%%%%%%%%%%%%%%%%%%%%%%%%%%%%%%%%%%%% Django Rest Framework# --- 导入from rest_framework.routers import DefaultRouter# --- 实例化router = DefaultRouter()# --- 注册# router.register('users', UserViewSet)# --- 写入路由urlpatterns += [# Django Rest Frameworkpath("api/", include(router.urls)),# Django Djoserpath("api-auth/", include("djoser.urls")),# Django Djoser JWTpath("api-auth-jwt/", include("djoser.urls.jwt")),]
应用路由配置:
#!/usr/bin/env python# -*- coding: UTF-8 -*-# ——————————————————# 脚本说明:# xxxxxxxxx# ——————————————————# ========================================# 开始# ))))))))) 模块包导入from django.urls import path, includefrom .views import *# ))))))))) 类名# ))))))))) 执行阶段urlpatterns = [# Example# path('login/', login, name='login'),# Login - Rest Framework APIViewpath('login/', LoginView.as_view(), name='login'),]# ))))))))) 结束# ========================================# 结束
09
Django全局配置(settings.py)
Django全局配置中,注册新增的应用:
这时候,该文件的完整配置:
"""Django settings for djangoProject_DB2Excel_V2_DRF_JWT project.Generated by 'django-admin startproject' using Django 5.0.7.For more information on this file, seehttps://docs.djangoproject.com/en/5.0/topics/settings/For the full list of settings and their values, seehttps://docs.djangoproject.com/en/5.0/ref/settings/"""from pathlib import Path# Build paths inside the project like this: BASE_DIR 'subdir'.BASE_DIR = Path(__file__).resolve().parent.parent# Quick-start development settings - unsuitable for production# See https://docs.djangoproject.com/en/5.0/howto/deployment/checklist/# SECURITY WARNING: keep the secret key used in production secret!SECRET_KEY = "django-insecure-8&l8$tv3!18)soob3r33o=rfq2k%2fb2%n!wn^jnb+(qupg-6h"# SECURITY WARNING: don't run with debug turned on in production!DEBUG = TrueALLOWED_HOSTS = []# Application definitionINSTALLED_APPS = ["django.contrib.admin","django.contrib.auth","django.contrib.contenttypes","django.contrib.sessions","django.contrib.messages","django.contrib.staticfiles",# Django Filter'django_filters',# Django Rest Framework'rest_framework',# 用户验证(JWT)'djoser',# 跨域'corsheaders',# 应用"account",]MIDDLEWARE = ["django.middleware.security.SecurityMiddleware","django.contrib.sessions.middleware.SessionMiddleware","corsheaders.middleware.CorsMiddleware","django.middleware.common.CommonMiddleware","django.middleware.csrf.CsrfViewMiddleware","django.contrib.auth.middleware.AuthenticationMiddleware","django.contrib.messages.middleware.MessageMiddleware","django.middleware.clickjacking.XFrameOptionsMiddleware",]ROOT_URLCONF = "djangoProject_DB2Excel_V2_DRF_JWT.urls"TEMPLATES = [{"BACKEND": "django.template.backends.django.DjangoTemplates","DIRS": [BASE_DIR 'templates'],"APP_DIRS": True,"OPTIONS": {"context_processors": ["django.template.context_processors.debug","django.template.context_processors.request","django.contrib.auth.context_processors.auth","django.contrib.messages.context_processors.messages",],},},]WSGI_APPLICATION = "djangoProject_DB2Excel_V2_DRF_JWT.wsgi.application"# Database# https://docs.djangoproject.com/en/5.0/ref/settings/#databasesDATABASES = {"default": {"ENGINE": "django.db.backends.sqlite3","NAME": BASE_DIR "db.sqlite3",}}# Password validation# https://docs.djangoproject.com/en/5.0/ref/settings/#auth-password-validatorsAUTH_PASSWORD_VALIDATORS = [{"NAME": "django.contrib.auth.password_validation.UserAttributeSimilarityValidator",},{"NAME": "django.contrib.auth.password_validation.MinimumLengthValidator",},{"NAME": "django.contrib.auth.password_validation.CommonPasswordValidator",},{"NAME": "django.contrib.auth.password_validation.NumericPasswordValidator",},]# Internationalization# https://docs.djangoproject.com/en/5.0/topics/i18n/LANGUAGE_CODE = "en-us"TIME_ZONE = "UTC"USE_I18N = TrueUSE_TZ = True# Static files (CSS, JavaScript, Images)# https://docs.djangoproject.com/en/5.0/howto/static-files/STATIC_URL = "static/"# Default primary key field type# https://docs.djangoproject.com/en/5.0/ref/settings/#default-auto-fieldDEFAULT_AUTO_FIELD = "django.db.models.BigAutoField"# Django 跨域问题CORS_ORIGIN_ALLOW_ALL = TrueCORS_ALLOW_CREDENTIALS = TrueCORS_ORIGIN_WHITELIST = ("http://localhost:5200",)# CSRFCSRF_TRUSTED_ORIGINS = ['http://localhost:5200',]# Django Simple JWTSIMPLE_JWT = {'AUTH_HEADER_TYPES': ('JWT',),}# Django Rest FrameworkREST_FRAMEWORK = {'DEFAULT_AUTHENTICATION_CLASSES': {# 'rest_framework.authentication.TokenAuthentication',},'DEFAULT_FILTER_BACKENDS': {'django_filters.rest_framework.DjangoFilterBackend',},'DEFAULT_PAGINATION_CLASS': {# 'rest_framework.pagination.PageNumberPagination',},}# Django DjoserDJOSER = {# 'USER_ID_FIELD': 'username',# 'LOGIN_FIELD': 'email',}
10
在应用中新建Token(tokens.py)
文件「tokens.py」
#!/usr/bin/env python# -*- coding: UTF-8 -*-# ——————————————————# 脚本说明:# xxxxxxxxx# ——————————————————# ========================================# 开始# ))))))))) 模块包导入# 生成 JWT Tokensfrom rest_framework_simplejwt.tokens import RefreshToken# 获取 Django 用户from django.contrib.auth import get_user_model# ))))))))) 实例化用户对象User = get_user_model()# ))))))))) 重写 JWT 的 Token 生成方法def create_jwt_pair_for_user(user: User):refresh = RefreshToken.for_user(user)tokens = {"string": "Hello world","access": str(refresh.access_token),"refresh": str(refresh)}return tokens# ))))))))) 执行阶段# ))))))))) 结束# ========================================# 结束
11
视图(views.py)
文件「views.py」
from django.contrib.auth import authenticatefrom django.contrib.auth.models import Userfrom django.shortcuts import renderfrom django.http.response import JsonResponsefrom rest_framework import statusfrom rest_framework.response import Responsefrom rest_framework.views import APIViewfrom .tokens import *# Create your views here.def login(request):return JsonResponse({"code": 200,"msg": "success"})class LoginView(APIView):permission_classes = []def post(self, request):username = request.data.get('username')password = request.data.get('password')user = authenticate(username=username,password=password)# current_user = User.objects.filter(username=username)if user is not None:# 生成 JWT Token 信息jwt_token = create_jwt_pair_for_user(user=user)response = {"user": {"token": jwt_token,"user_id": user.id,"name": user.username,"email": user.email,},"msg": "登录成功"}return Response(data=response, status=status.HTTP_200_OK)else:return Response(data={"msg": "无效的用户名或密码"})def get(self, request):content = {"user": str(request.user),"auth": str(request.auth)}return Response(data=content, status=status.HTTP_200_OK)
12
通过「Postman」进行验证
通过Postman验证:
post http://localhost:8000/account/login/
可以看到,我们确实自定义了JWT返回的数据。
13
改进
在上面确实可以自定义JWT的返回数据后,我们开始将数据格式改成前端框架所认可的格式。
视图(views.py)
from django.contrib.auth import authenticatefrom django.contrib.auth.models import Userfrom django.shortcuts import renderfrom django.http.response import JsonResponsefrom rest_framework import statusfrom rest_framework.response import Responsefrom rest_framework.views import APIViewfrom .tokens import *# Create your views here.def login(request):return JsonResponse({"code": 200,"msg": "success"})class LoginView(APIView):permission_classes = []def post(self, request):username = request.data.get('username')password = request.data.get('password')user = authenticate(username=username,password=password)# current_user = User.objects.filter(username=username)if user is not None:# 生成 JWT Token 信息jwt_token = create_jwt_pair_for_user(user=user)# response = {# "user": {# "token": jwt_token,# "user_id": user.id,# "name": user.username,# "email": user.email,# },# "msg": "登录成功"# }response = {"code": 200,"msg": "success","data": {"token": jwt_token}}return Response(data=response, status=status.HTTP_200_OK)else:return Response(data={"msg": "无效的用户名或密码"})def get(self, request):content = {"user": str(request.user),"auth": str(request.auth)}return Response(data=content, status=status.HTTP_200_OK)
Postman:
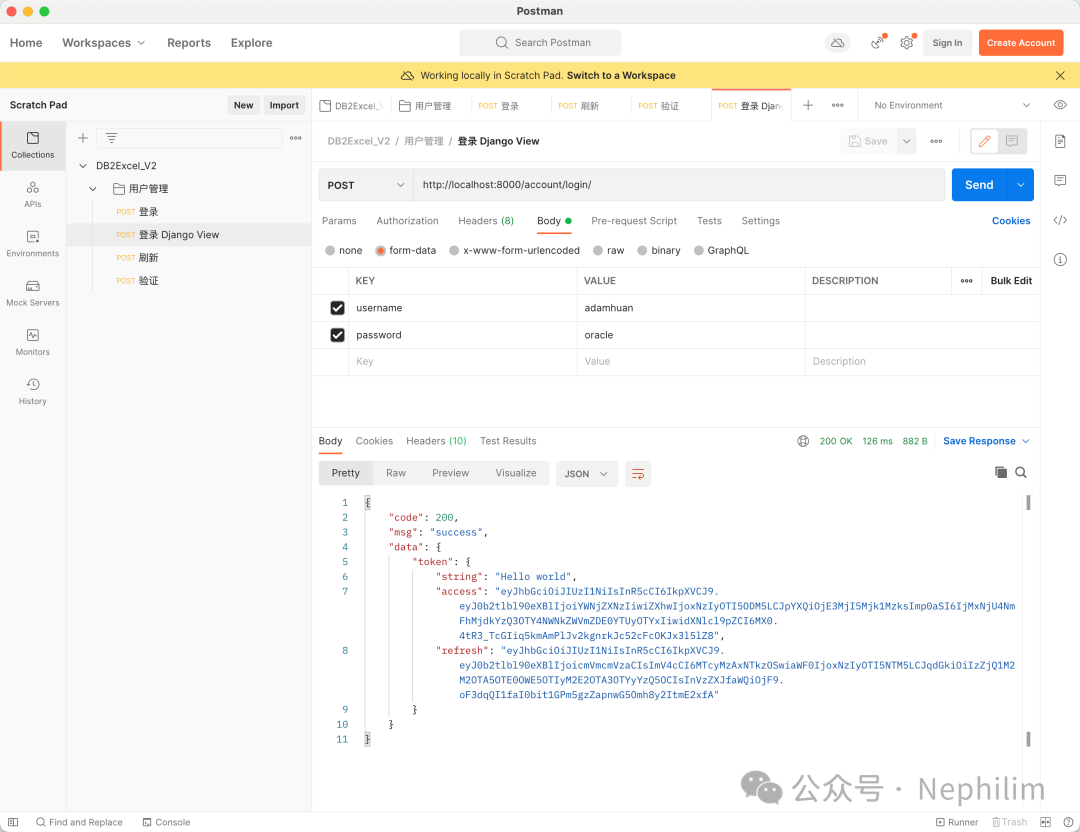
前端框架,修改请求的接口:
14
验证
最后,再次登录的时候,会发现已经可以从自定义的用户验证登录了:
目前只完成了基本的验证功能,更多的细节需要进一步的探索。
END
温馨提示
如果你喜欢本文,请分享到朋友圈,想要获得更多信息,请关注我。
