


Tips:一些记录,一些笔记

2024/05/14
TUESDAY
Life is a kind of art, in under the premise of not enough sufficient conclusions.
生活是一种艺术,要在不充足的前提下得出充足的结论。
01
Django Djoser
官方GitHub:
https://github.com/sunscrapers/djoser
官方PyPi:
https://pypi.org/project/djoser/
官方文档:
https://djoser.readthedocs.io/en/latest/getting_started.html
Django认证系统的REST实现;
Djoser库提供了一组「Django Rest Framework」视图,用于处理注册、登录、注销、密码重置和账户激活等基本操作;
它们适用于自定义用户模型。
Djoser并没有重写Django的代码,而是重新实现了一些东西,以便于更好的适应单页面应用程序的体系结构。
它支持的身份验证后端有两种:
基于DRF的身份认证Token
基于djangorestframework_simplejwt的JWT认证
02
安装
通过Python的「PIP」去安装:
「pip install -U djoser」
(venv) (base) adamhuan@Leviathan django_daily_media % pip listPackage Version------------------- -------asgiref 3.8.1cffi 1.16.0cryptography 42.0.7Django 5.0.6django-cors-headers 4.3.1django-filter 24.2djangorestframework 3.15.1pip 24.0pycparser 2.22PyMySQL 1.1.0setuptools 69.2.0sqlparse 0.5.0typing_extensions 4.11.0wheel 0.43.0(venv) (base) adamhuan@Leviathan django_daily_media %(venv) (base) adamhuan@Leviathan django_daily_media % pip install -U djoserLooking in indexes: https://mirrors.aliyun.com/pypi/simple/Collecting djoserDownloading https://mirrors.aliyun.com/pypi/packages/82/12/f7351496223339be99cd70f79bd1641fe2ea47abfe42a3da168e8d9344ce/djoser-2.2.2-py3-none-any.whl (42 kB)━━━━━━━━━━━━━━━━━━━━━━━━━━━━━━━━━━━━━━━━ 42.6/42.6 kB 2.6 MB/s eta 0:00:00Requirement already satisfied: django>=3.0.0 in ./venv/lib/python3.10/site-packages (from djoser) (5.0.6)Collecting django-templated-mail<2.0.0,>=1.1.1 (from djoser)Downloading https://mirrors.aliyun.com/pypi/packages/f3/ec/0f42b730e17ca087aa79a7aadecff7957a867709f04bd0354e72120e9f68/django_templated_mail-1.1.1-py3-none-any.whl (4.7 kB)Collecting djangorestframework-simplejwt<6.0,>=5.0 (from djoser)Downloading https://mirrors.aliyun.com/pypi/packages/f2/ab/88f73cf08d2ad3fb9f71b956dceca5680a57f121e5ce9a604f365877d57e/djangorestframework_simplejwt-5.3.1-py3-none-any.whl (101 kB)━━━━━━━━━━━━━━━━━━━━━━━━━━━━━━━━━━━━━━━━ 101.3/101.3 kB 2.9 MB/s eta 0:00:00Collecting social-auth-app-django<6.0.0,>=5.0.0 (from djoser)Downloading https://mirrors.aliyun.com/pypi/packages/61/e3/60318a13a5d58daa0b37eb2b8b0bada5a9d5725efb407358cebedbcc0ada/social_auth_app_django-5.4.1-py3-none-any.whl (26 kB)Requirement already satisfied: asgiref<4,>=3.7.0 in ./venv/lib/python3.10/site-packages (from django>=3.0.0->djoser) (3.8.1)Requirement already satisfied: sqlparse>=0.3.1 in ./venv/lib/python3.10/site-packages (from django>=3.0.0->djoser) (0.5.0)Requirement already satisfied: djangorestframework>=3.12 in ./venv/lib/python3.10/site-packages (from djangorestframework-simplejwt<6.0,>=5.0->djoser) (3.15.1)Collecting pyjwt<3,>=1.7.1 (from djangorestframework-simplejwt<6.0,>=5.0->djoser)Downloading https://mirrors.aliyun.com/pypi/packages/2b/4f/e04a8067c7c96c364cef7ef73906504e2f40d690811c021e1a1901473a19/PyJWT-2.8.0-py3-none-any.whl (22 kB)Collecting social-auth-core>=4.4.1 (from social-auth-app-django<6.0.0,>=5.0.0->djoser)Downloading https://mirrors.aliyun.com/pypi/packages/85/9e/c4b21c66ff73bcbd605ba06b7c48260559ec50b5a4216ce2736053fe1bc1/social_auth_core-4.5.4-py3-none-any.whl (410 kB)━━━━━━━━━━━━━━━━━━━━━━━━━━━━━━━━━━━━━━━━ 410.2/410.2 kB 5.7 MB/s eta 0:00:00Requirement already satisfied: typing-extensions>=4 in ./venv/lib/python3.10/site-packages (from asgiref<4,>=3.7.0->django>=3.0.0->djoser) (4.11.0)Collecting requests>=2.9.1 (from social-auth-core>=4.4.1->social-auth-app-django<6.0.0,>=5.0.0->djoser)Downloading https://mirrors.aliyun.com/pypi/packages/70/8e/0e2d847013cb52cd35b38c009bb167a1a26b2ce6cd6965bf26b47bc0bf44/requests-2.31.0-py3-none-any.whl (62 kB)━━━━━━━━━━━━━━━━━━━━━━━━━━━━━━━━━━━━━━━━ 62.6/62.6 kB 5.2 MB/s eta 0:00:00Collecting oauthlib>=1.0.3 (from social-auth-core>=4.4.1->social-auth-app-django<6.0.0,>=5.0.0->djoser)Downloading https://mirrors.aliyun.com/pypi/packages/7e/80/cab10959dc1faead58dc8384a781dfbf93cb4d33d50988f7a69f1b7c9bbe/oauthlib-3.2.2-py3-none-any.whl (151 kB)━━━━━━━━━━━━━━━━━━━━━━━━━━━━━━━━━━━━━━━━ 151.7/151.7 kB 7.6 MB/s eta 0:00:00Collecting requests-oauthlib>=0.6.1 (from social-auth-core>=4.4.1->social-auth-app-django<6.0.0,>=5.0.0->djoser)Downloading https://mirrors.aliyun.com/pypi/packages/3b/5d/63d4ae3b9daea098d5d6f5da83984853c1bbacd5dc826764b249fe119d24/requests_oauthlib-2.0.0-py2.py3-none-any.whl (24 kB)Requirement already satisfied: cryptography>=1.4 in ./venv/lib/python3.10/site-packages (from social-auth-core>=4.4.1->social-auth-app-django<6.0.0,>=5.0.0->djoser) (42.0.7)Collecting defusedxml>=0.5.0rc1 (from social-auth-core>=4.4.1->social-auth-app-django<6.0.0,>=5.0.0->djoser)Downloading https://mirrors.aliyun.com/pypi/packages/5d/c7/6b4ad89ca6f7732ff97ce5e9caa6fe739600d26c5d53c20d0bf9abb79ec5/defusedxml-0.8.0rc2-py2.py3-none-any.whl (25 kB)Collecting python3-openid>=3.0.10 (from social-auth-core>=4.4.1->social-auth-app-django<6.0.0,>=5.0.0->djoser)Downloading https://mirrors.aliyun.com/pypi/packages/e0/a5/c6ba13860bdf5525f1ab01e01cc667578d6f1efc8a1dba355700fb04c29b/python3_openid-3.2.0-py3-none-any.whl (133 kB)━━━━━━━━━━━━━━━━━━━━━━━━━━━━━━━━━━━━━━━━ 133.7/133.7 kB 7.2 MB/s eta 0:00:00Requirement already satisfied: cffi>=1.12 in ./venv/lib/python3.10/site-packages (from cryptography>=1.4->social-auth-core>=4.4.1->social-auth-app-django<6.0.0,>=5.0.0->djoser) (1.16.0)Collecting charset-normalizer<4,>=2 (from requests>=2.9.1->social-auth-core>=4.4.1->social-auth-app-django<6.0.0,>=5.0.0->djoser)Downloading https://mirrors.aliyun.com/pypi/packages/46/6a/d5c26c41c49b546860cc1acabdddf48b0b3fb2685f4f5617ac59261b44ae/charset_normalizer-3.3.2-cp310-cp310-macosx_11_0_arm64.whl (120 kB)━━━━━━━━━━━━━━━━━━━━━━━━━━━━━━━━━━━━━━━━ 120.4/120.4 kB 6.4 MB/s eta 0:00:00Collecting idna<4,>=2.5 (from requests>=2.9.1->social-auth-core>=4.4.1->social-auth-app-django<6.0.0,>=5.0.0->djoser)Downloading https://mirrors.aliyun.com/pypi/packages/e5/3e/741d8c82801c347547f8a2a06aa57dbb1992be9e948df2ea0eda2c8b79e8/idna-3.7-py3-none-any.whl (66 kB)━━━━━━━━━━━━━━━━━━━━━━━━━━━━━━━━━━━━━━━━ 66.8/66.8 kB 4.6 MB/s eta 0:00:00Collecting urllib3<3,>=1.21.1 (from requests>=2.9.1->social-auth-core>=4.4.1->social-auth-app-django<6.0.0,>=5.0.0->djoser)Downloading https://mirrors.aliyun.com/pypi/packages/a2/73/a68704750a7679d0b6d3ad7aa8d4da8e14e151ae82e6fee774e6e0d05ec8/urllib3-2.2.1-py3-none-any.whl (121 kB)━━━━━━━━━━━━━━━━━━━━━━━━━━━━━━━━━━━━━━━━ 121.1/121.1 kB 6.6 MB/s eta 0:00:00Collecting certifi>=2017.4.17 (from requests>=2.9.1->social-auth-core>=4.4.1->social-auth-app-django<6.0.0,>=5.0.0->djoser)Downloading https://mirrors.aliyun.com/pypi/packages/ba/06/a07f096c664aeb9f01624f858c3add0a4e913d6c96257acb4fce61e7de14/certifi-2024.2.2-py3-none-any.whl (163 kB)━━━━━━━━━━━━━━━━━━━━━━━━━━━━━━━━━━━━━━━━ 163.8/163.8 kB 7.2 MB/s eta 0:00:00Requirement already satisfied: pycparser in ./venv/lib/python3.10/site-packages (from cffi>=1.12->cryptography>=1.4->social-auth-core>=4.4.1->social-auth-app-django<6.0.0,>=5.0.0->djoser) (2.22)Installing collected packages: django-templated-mail, urllib3, pyjwt, oauthlib, idna, defusedxml, charset-normalizer, certifi, requests, python3-openid, requests-oauthlib, social-auth-core, djangorestframework-simplejwt, social-auth-app-django, djoserSuccessfully installed certifi-2024.2.2 charset-normalizer-3.3.2 defusedxml-0.8.0rc2 django-templated-mail-1.1.1 djangorestframework-simplejwt-5.3.1 djoser-2.2.2 idna-3.7 oauthlib-3.2.2 pyjwt-2.8.0 python3-openid-3.2.0 requests-2.31.0 requests-oauthlib-2.0.0 social-auth-app-django-5.4.1 social-auth-core-4.5.4 urllib3-2.2.1(venv) (base) adamhuan@Leviathan django_daily_media %(venv) (base) adamhuan@Leviathan django_daily_media % pip listPackage Version----------------------------- --------asgiref 3.8.1certifi 2024.2.2cffi 1.16.0charset-normalizer 3.3.2cryptography 42.0.7defusedxml 0.8.0rc2Django 5.0.6django-cors-headers 4.3.1django-filter 24.2django-templated-mail 1.1.1djangorestframework 3.15.1djangorestframework-simplejwt 5.3.1djoser 2.2.2idna 3.7oauthlib 3.2.2pip 24.0pycparser 2.22PyJWT 2.8.0PyMySQL 1.1.0python3-openid 3.2.0requests 2.31.0requests-oauthlib 2.0.0setuptools 69.2.0social-auth-app-django 5.4.1social-auth-core 4.5.4sqlparse 0.5.0typing_extensions 4.11.0urllib3 2.2.1wheel 0.43.0(venv) (base) adamhuan@Leviathan django_daily_media %
如果打算使用JWT的认证方式,你还需要安装:
pip install -U djangorestframework_simplejwt
如果打算使用基于第三方的身份认证,则需要安装:
pip install -U social-auth-app-django
03
配置
全局配置文件「settings.py」
INSTALLED_APPS = ('django.contrib.auth',(...),'rest_framework','djoser',(...),)
全局路由「urls.py」
"""URL configuration for django_daily_media project.The `urlpatterns` list routes URLs to views. For more information please see:https://docs.djangoproject.com/en/5.0/topics/http/urls/Examples:Function views1. Add an import: from my_app import views2. Add a URL to urlpatterns: path('', views.home, name='home')Class-based views1. Add an import: from other_app.views import Home2. Add a URL to urlpatterns: path('', Home.as_view(), name='home')Including another URLconf1. Import the include() function: from django.urls import include, path2. Add a URL to urlpatterns: path('blog/', include('blog.urls'))"""from django.contrib import adminfrom django.urls import path, includefrom rest_framework.routers import DefaultRouterfrom movie.views import *router = DefaultRouter()router.register('movie', MovieViewSet)router.register('category', CategoryViewSet)urlpatterns = [# Django Adminpath("admin/", admin.site.urls),# Django Rest Frameworkpath("api/", include(router.urls)),# Django Djoserpath("auth/", include("djoser.urls")),]
04
页面访问
http://127.0.0.1:8000/auth/
http://127.0.0.1:8000/auth/users/
Djoser支持的端点:
05
通过「User Craete」Endpoints创建用户
官方文档:
https://djoser.readthedocs.io/en/latest/base_endpoints.html
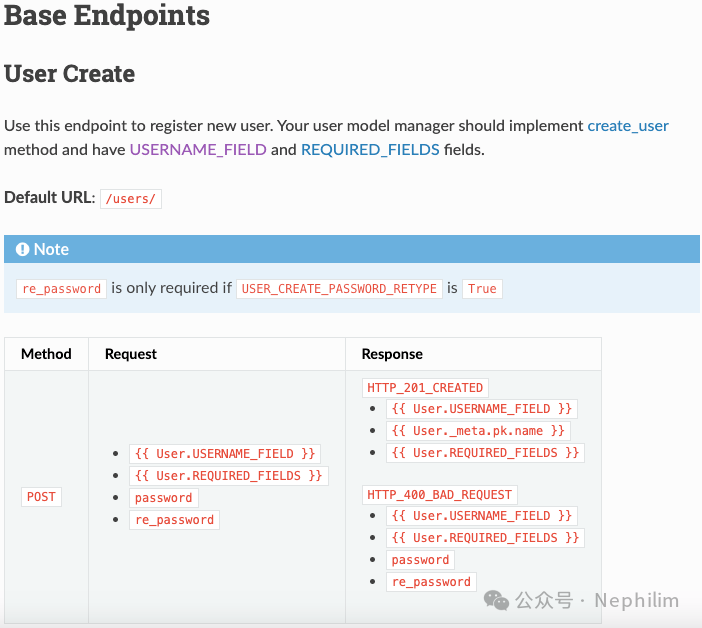
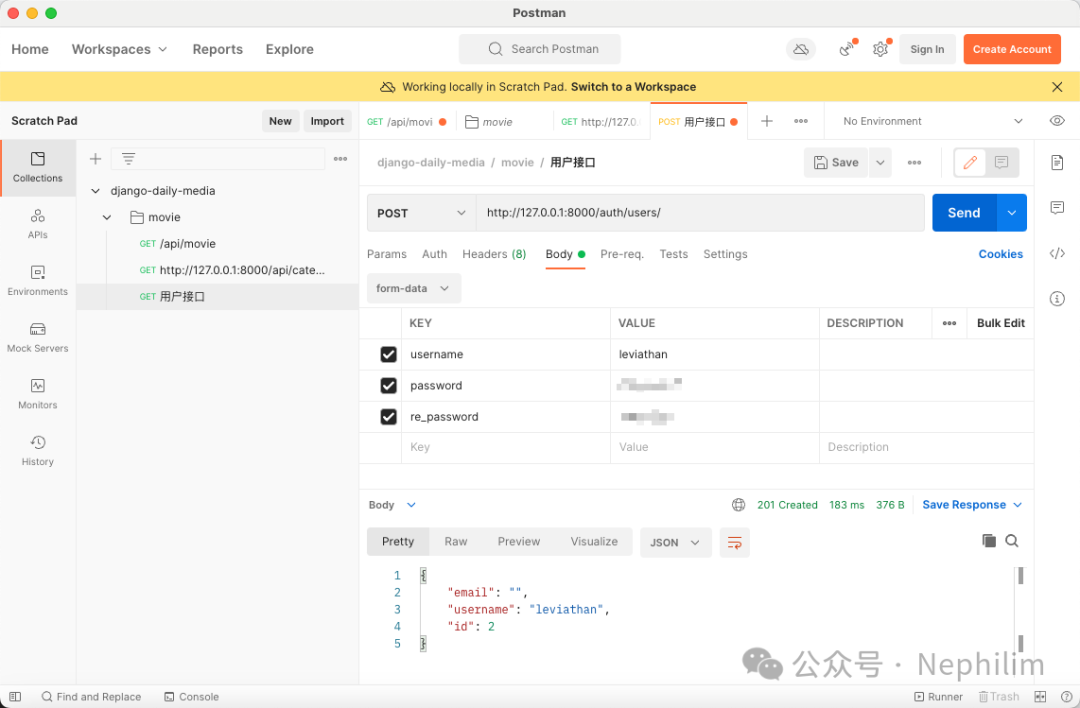
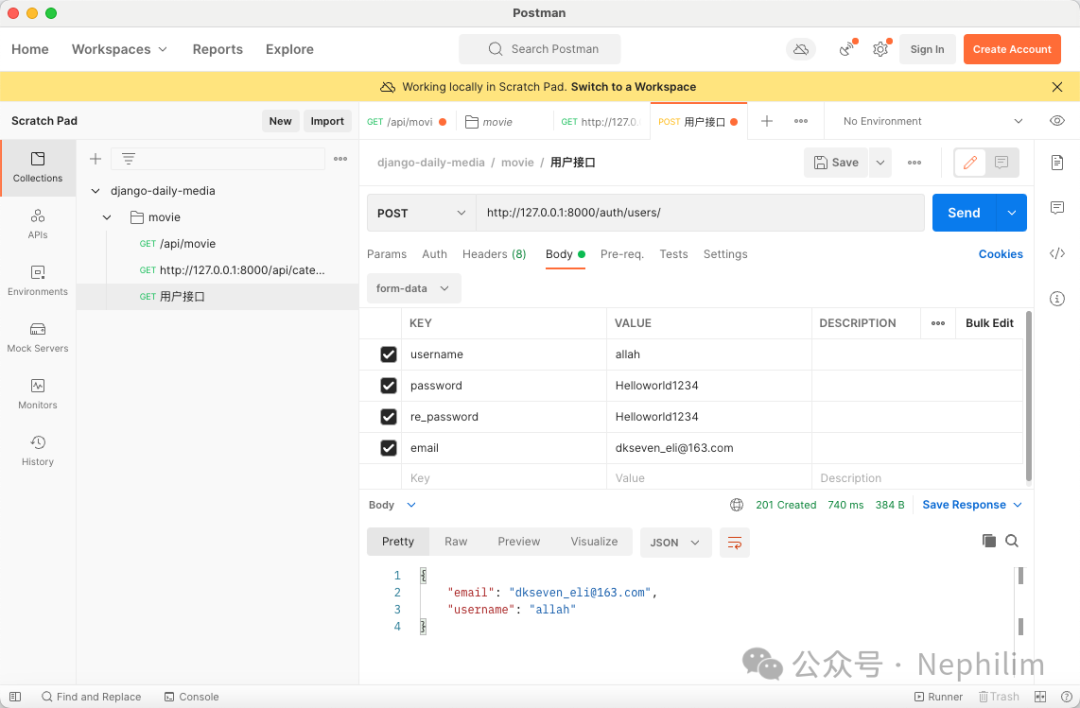
通过Postman发送请求:
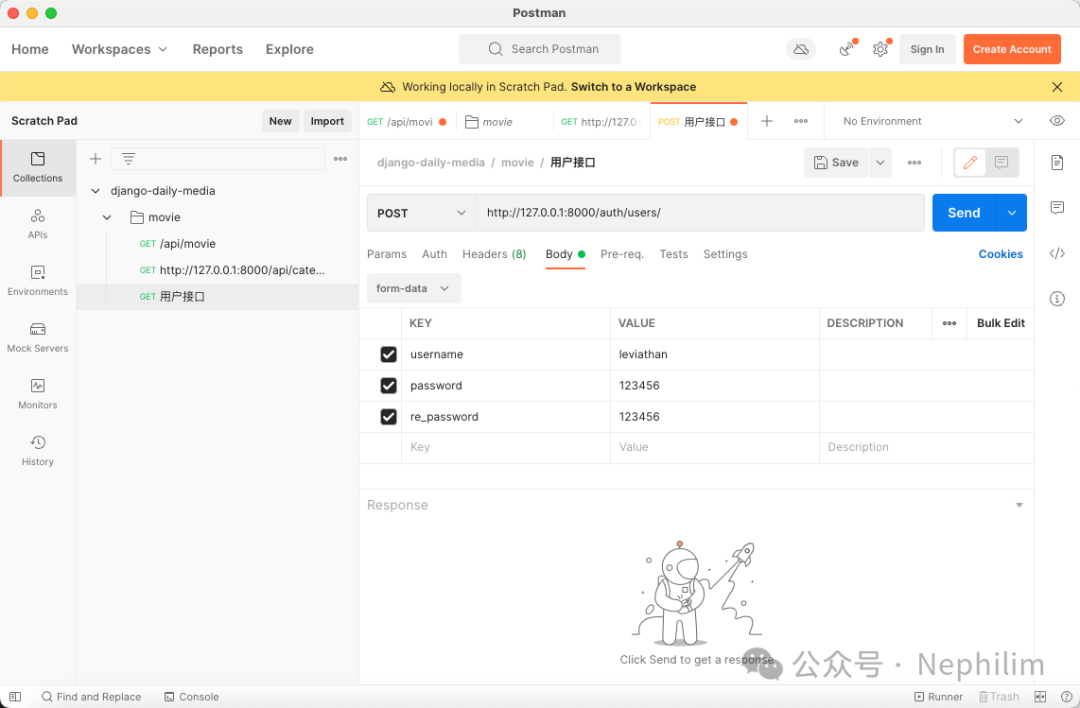
结果:
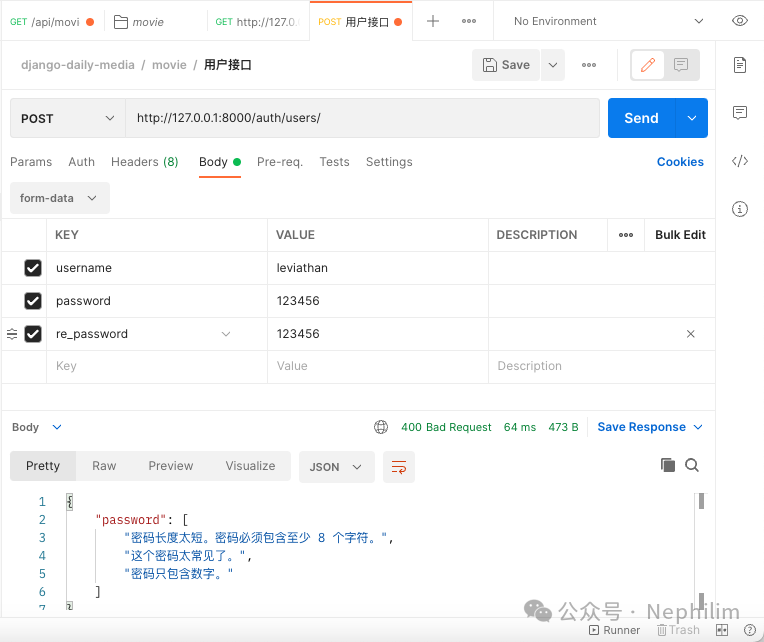
可以看到,会对密码做基本的校验。
当密码强度通过校验后,可以看到,用户创建就成功了:
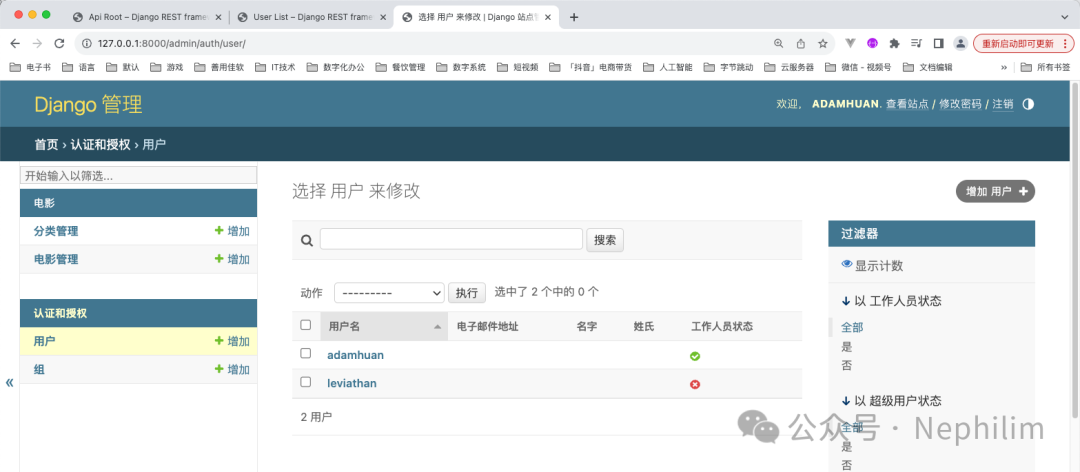
然后,在Django的后台「认证和授权 用户」中,就可以看到新增的用户了:
以上,是最简单的用户注册的演示。
06
Djoser「配置」
其实,除了上面演示的基础功能,Djoser还有更高级的用法。
你可以通过配置的方式去定义Djoser模块的行为,下面来具体展示下这方面的知识点。
有关「配置」的官方文档:
https://djoser.readthedocs.io/en/latest/settings.html
文件「settings.py」
# 邮箱EMAIL_BACKEND = 'django.core.mail.backends.smtp.EmailBackend'EMAIL_HOST = "smtp.163.com"EMAIL_PORT = 25EMAIL_HOST_USER = "leviathan_litan@163.com"EMAIL_HOST_PASSWORD = "通过网易邮箱获取的随机「授权密码」"DEFAULT_FROM_EMAIL = "leviathan_litan@163.com"# DjoserDJOSER = {"USER_ID_FIELD": "username","LOGIN_FIELD": "email",'ACTIVATION_URL': 'activate/{uid}/{token}','SEND_ACTIVATION_EMAIL': True,'SEND_CONFIRMATION_EMAIL': True,}
然后,通过Postman注册:
可以看到,注册成功。
看看后端数据库中的状态:


可以看到,当前该用户并没有激活「is_active」为「0」。
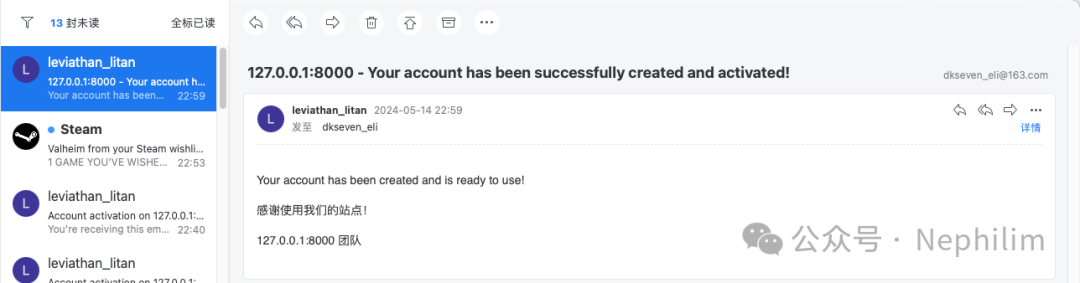
去刚刚我们注册的时候的邮箱中收取「注册邮件」
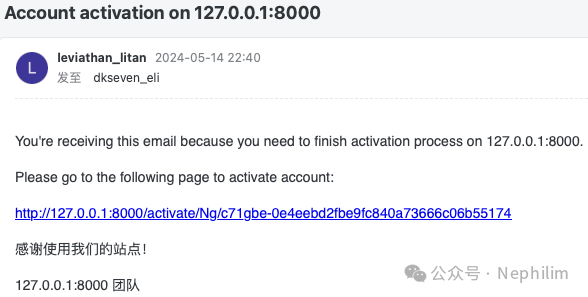
可以从激活的链接:
http://127.0.0.1:8000/activate/Ng/c71gbe-0e4eebd2fbe9fc840a73666c06b55174
看到:
uid「Ng」
token「c71gbe-0e4eebd2fbe9fc840a73666c06b55174」
从Postman激活:
http://127.0.0.1:8000/auth/users/activation/
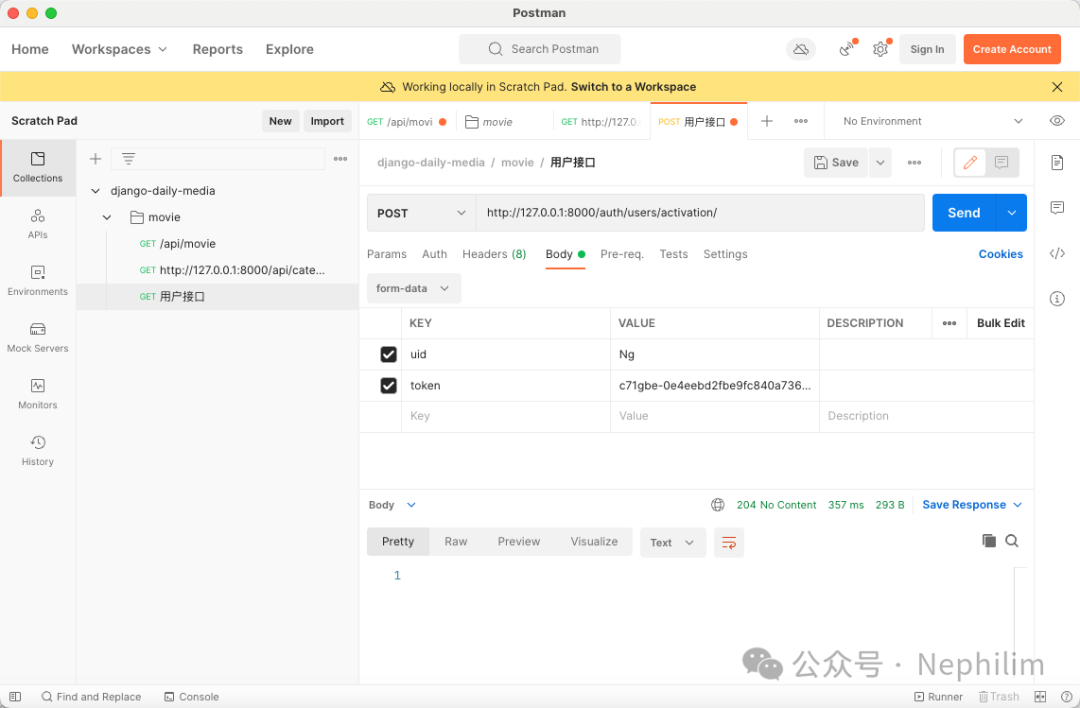
可以看到,激活成功了。
在DB中查看一下:

当你激活成功后,根据DJOSER的设置,你会收到一封激活成功的邮件:
不过通常情况下,一般用户不会通过Postman的方式去操作,而是更习惯直接点击链接。
但默认情况下,你是没有单独配置「activate」的路由的,因此,你直接点击发送给你的邮件中的激活链接的时候,你会遇到「Page Not Found」的错误:
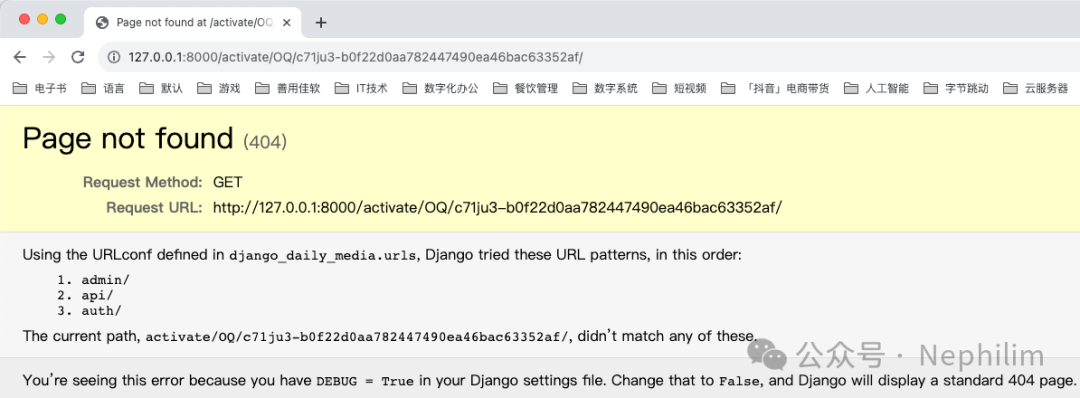
要解决这个问题,你需要去单独定义「activate」的路由。
07
为DJOSER的「激活」配置路由
创建应用:
(venv) (base) adamhuan@Leviathan django_daily_media % python manage.py startapp account(venv) (base) adamhuan@Leviathan django_daily_media %
添加到全局配置「settings.py」中:
INSTALLED_APPS = ["django.contrib.admin","django.contrib.auth","django.contrib.contenttypes","django.contrib.sessions","django.contrib.messages","django.contrib.staticfiles",# Django Filter"django_filters",# Django Rest Framework"rest_framework",# Django Djoser"djoser",# 电影"movie",# 用户"account",]
在应用「account」中配置视图「views.py」:
from django.shortcuts import renderfrom django.http import HttpResponseimport requests# Create your views here.def account_activate(request, uid, token):res = requests.post(url="http://127.0.0.1:8000/auth/users/activation/",data={"uid": uid,"token": token,})if res.status_code == 204:return HttpResponse("账户「成功激活」")return HttpResponse("请确认「激活链接」的正确性")
然后,在全局路由中配置「active」的路由记录:
"""URL configuration for django_daily_media project.The `urlpatterns` list routes URLs to views. For more information please see:https://docs.djangoproject.com/en/5.0/topics/http/urls/Examples:Function views1. Add an import: from my_app import views2. Add a URL to urlpatterns: path('', views.home, name='home')Class-based views1. Add an import: from other_app.views import Home2. Add a URL to urlpatterns: path('', Home.as_view(), name='home')Including another URLconf1. Import the include() function: from django.urls import include, path2. Add a URL to urlpatterns: path('blog/', include('blog.urls'))"""from django.contrib import adminfrom django.urls import path, includefrom rest_framework.routers import DefaultRouterfrom movie.views import *from account.views import *router = DefaultRouter()router.register('movie', MovieViewSet)router.register('category', CategoryViewSet)urlpatterns = [# Django Adminpath("admin/", admin.site.urls),# Django Rest Frameworkpath("api/", include(router.urls)),# Django Djoserpath("auth/", include("djoser.urls")),# Account: Activationpath("activate/<str:uid>/<str:token>/", account_activate),]
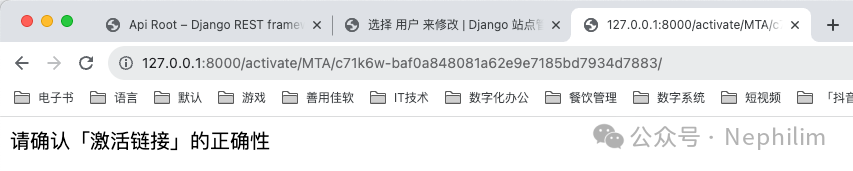
这时候,当你再次注册了一个新用户之后,点击邮件中的激活链接的时候,就不会再是「404」了:

只有当第一次激活的时候,才会成功。
当你第二次访问已经激活过的链接的时候,你的响应代码就不再是「204」,因此将会显示错误信息:
————————————————
HTTP状态码「204」的意思:
HTTP状态204 (No Content)
表示服务器已成功完成请求,并且在响应有效负载正文中没有要发送的内容。
服务器可能希望以entity-headers的形式返回更新的元信息,如果存在,应该将其应用于当前文档的活动视图(如果有的话)。
204响应绝不能包含消息体,因此总是在头字段之后的第一个空行终止。
默认情况下,204 (No Content)
响应是可缓存的。如果需要覆盖缓存,则响应必须包括缓存各自的缓存头。
例如,您可能希望204 (No Content)
在UPDATE操作中返回状态,其中请求有效负载足够大而不能来回传输。用户代理将有效负载发送到服务器以更新资源,如果操作成功,服务器将响应204
以指示成功,以便客户端应用程序可以更新其UI以通知用户操作的成功。
它还经常与期望自动数据传输普遍存在的接口一起使用,例如在分布式版本控制系统中。
08
用自定义的「序列化器」替代Djoser默认的「序列化器」
全局配置文件「settings.py」
# DjoserDJOSER = {"USER_ID_FIELD": "username","LOGIN_FIELD": "email",'ACTIVATION_URL': 'activate/{uid}/{token}','SEND_ACTIVATION_EMAIL': True,'SEND_CONFIRMATION_EMAIL': True,'SERIALIZERS': {'user_create': 'account.serializers.CustomUserCreateSerializer',},}
然后,在应用「account」中创建「serializers.py」
#!/usr/bin/env python# -*- coding: UTF-8 -*-# ——————————————————# 脚本说明:# xxxxxxxxx# ——————————————————# ========================================# 开始# ))))))))) 模块包导入from rest_framework import serializersfrom rest_framework.validators import UniqueValidatorfrom djoser.serializers import UserCreateSerializerfrom django.contrib.auth.models import User# ))))))))) 类名class CustomUserCreateSerializer(UserCreateSerializer):email = serializers.EmailField(validators=[UniqueValidator(queryset=User.objects.all()),])class Meta:model = Userfields = ('id', 'username', 'email', 'password')# ))))))))) 执行阶段# ))))))))) 结束# ========================================# 结束
如上,在自定义的序列化器中,添加了对邮箱唯一性的校验。
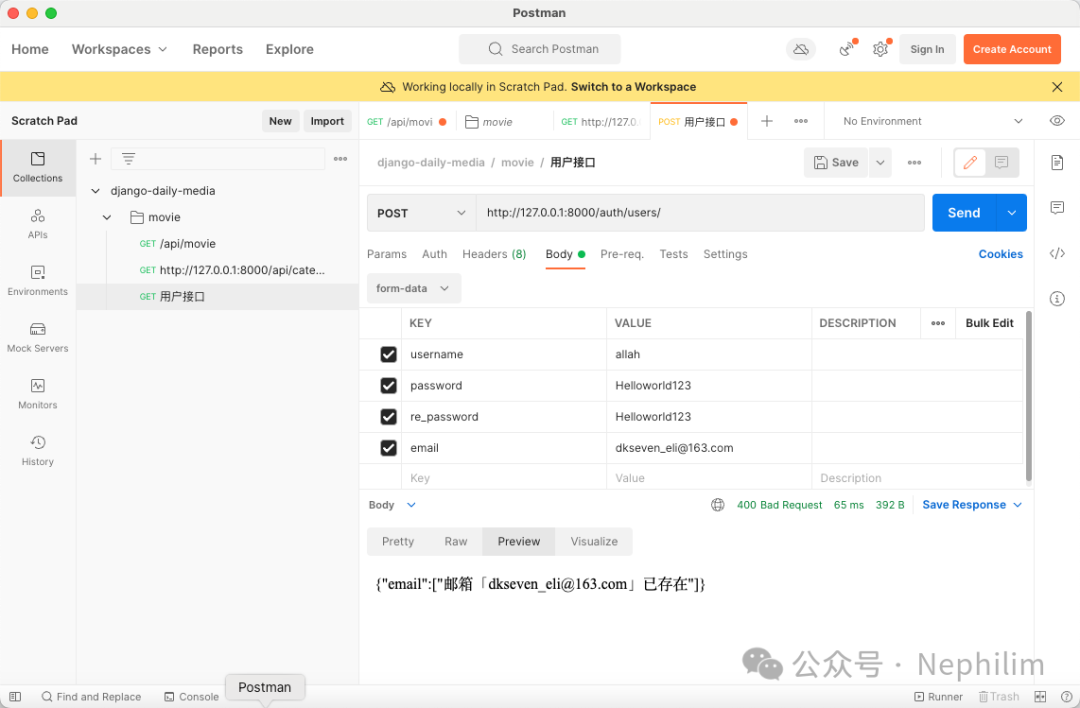
在Postman中看看效果:
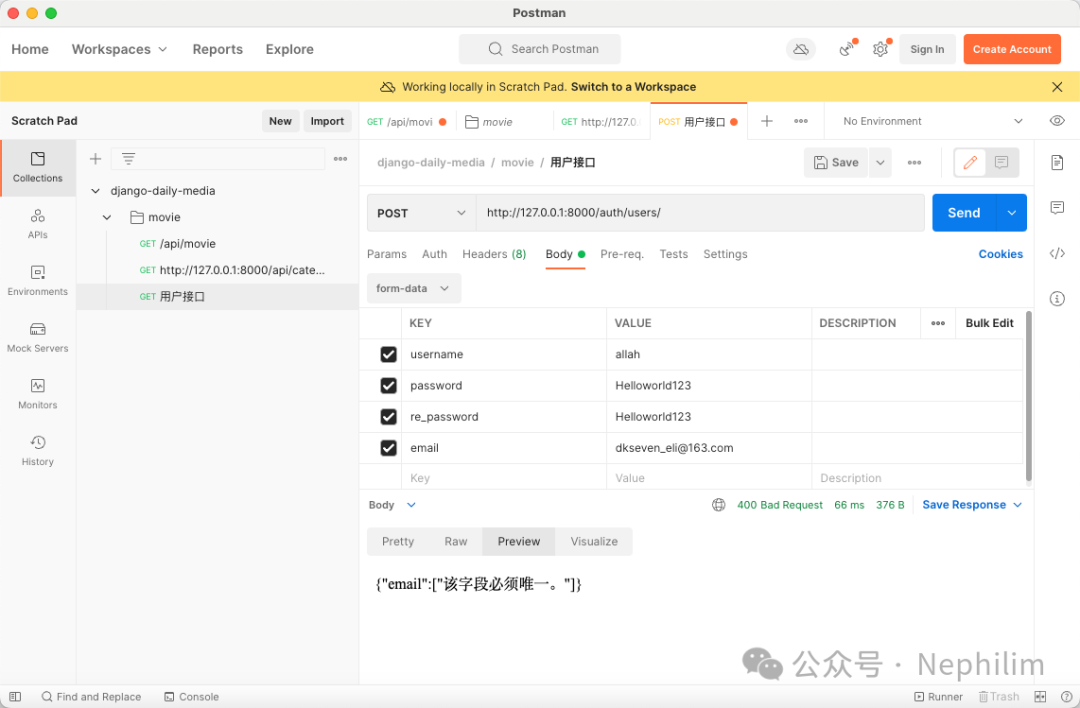
可以看到,邮箱的唯一性校验已经生效了。
————————————
在上面,错误的信息是「该字段必须唯一」,这个错误信息其实是很模糊的;
关于错误信息的输出,我们一样可以自定义。
还是修改文件「serializers.py」
#!/usr/bin/env python# -*- coding: UTF-8 -*-# ——————————————————# 脚本说明:# xxxxxxxxx# ——————————————————# ========================================# 开始# ))))))))) 模块包导入from rest_framework import serializersfrom rest_framework.validators import UniqueValidatorfrom djoser.serializers import UserCreateSerializerfrom django.contrib.auth.models import User# ))))))))) 类名class CustomUniqueValidator(UniqueValidator):def __call__(self, value, serializer_field):self.message = "邮箱「%s」已存在" % valuereturn super().__call__(value=value, serializer_field=serializer_field)class CustomUserCreateSerializer(UserCreateSerializer):email = serializers.EmailField(validators=[CustomUniqueValidator(queryset=User.objects.all()),])class Meta:model = Userfields = ('id', 'username', 'email', 'password')# ))))))))) 执行阶段# ))))))))) 结束# ========================================# 结束
再看看Postman中的效果:
通过上面的步骤,我们实现了后端注册接口的开发,但真实的用户使用的时候,不会通过Postman使用接口的方式去注册网站。
因此,下面我们将设计一个注册页面,并对接到前面开发的这个接口。
09
Vue.JS
首先,配置路由「src/router/index.js」
import { createRouter, createWebHistory } from 'vue-router'import HomeView from '../views/HomeView.vue'import MovieDetail from "@/views/MovieDetail.vue"import RegisterView from "@/views/RegisterView.vue"const router = createRouter({history: createWebHistory(import.meta.env.BASE_URL),routes: [{path: '/',name: 'home',component: HomeView},{path: '/register',name: "register",component: RegisterView},{path: "/movie/:id",name: "MovieDetail",component: MovieDetail},]})export default router
可以看到,添加了一个「register」的路由。
实现Vue的视图「src/views/RegisterView.vue」
<template><div id="main-body" class="bg-primary-100 flex justify-center h-screen"><section class="container flex justify-center items-center rounded "><div class="hidden md:block"><img src="../assets/images/bg.png" alt="" class="rounded-l max-h-[500px]"></div><div class="rounded-r w-80 h-[500px] my-8 px-2 py-4 bg-white shadow shadow-gray-300"><div class="text-center text-lg py-6">用户注册</div><form id="register_form" class="px-4"><div class="flex justify-left items-center relative h-10 px-4 my-2 rounded border-solid border border-gray-400"><svg xmlns="http://www.w3.org/2000/svg" class="h-6 w-6 text-gray-300 mr-2" fill="none" viewBox="0 0 24 24" stroke="currentColor" stroke-width="2"><path stroke-linecap="round" stroke-linejoin="round" d="M5.121 17.804A13.937 13.937 0 0112 16c2.5 0 4.847.655 6.879 1.804M15 10a3 3 0 11-6 0 3 3 0 016 0zm6 2a9 9 0 11-18 0 9 9 0 0118 0z" ></svg><input v-model="username" type="text" placeholder="请输入用户名" class="outline-0 text-sm"></div><div class="flex justify-left items-center relative h-10 px-4 my-2 rounded border-solid border border-gray-400"><svg xmlns="http://www.w3.org/2000/svg" class="h-6 w-6 text-gray-300 mr-2" fill="none" viewBox="0 0 24 24" stroke="currentColor" stroke-width="2"><path stroke-linecap="round" stroke-linejoin="round" d="m19 2-8.4 7.05a1 1 0 0 1-1.2 0L1 2m18 0a1 1 0 0 0-1-1H2a1 1 0 0 0-1 1m18 0v12a1 1 0 0 1-1 1H2a1 1 0 0 1-1-1V2" ></svg><input v-model="email" type="text" placeholder="请输入邮箱" class="outline-0 text-sm"></div><div class="flex justify-left items-center relative h-10 px-4 my-2 rounded border-solid border border-gray-400"><svg xmlns="http://www.w3.org/2000/svg" class="h-6 w-6 text-gray-300 mr-2" fill="none" viewBox="0 0 24 24" stroke="currentColor" stroke-width="2"><path stroke-linecap="round" stroke-linejoin="round" d="M12 15v2m-6 4h12a2 2 0 002-2v-6a2 2 0 00-2-2H6a2 2 0 00-2 2v6a2 2 0 002 2zm10-10V7a4 4 0 00-8 0v4h8z" ></svg><input v-model="password" type="password" placeholder="请输入密码" class="outline-0 text-sm"></div><div class="flex justify-left items-center relative h-10 px-4 my-2 rounded border-solid border border-gray-400"><svg xmlns="http://www.w3.org/2000/svg" class="h-6 w-6 text-gray-300 mr-2" fill="none" viewBox="0 0 24 24" stroke="currentColor" stroke-width="2"><path stroke-linecap="round" stroke-linejoin="round" d="M12 15v2m-6 4h12a2 2 0 002-2v-6a2 2 0 00-2-2H6a2 2 0 00-2 2v6a2 2 0 002 2zm10-10V7a4 4 0 00-8 0v4h8z" ></svg><input v-model="password2" type="password" placeholder="确认密码" class="outline-0 text-sm"></div><div class="flex items-center"><div class="flex items-center relative h-10 w-32 px-4 my-2 rounded border-solid border border-gray-400"><svg xmlns="http://www.w3.org/2000/svg" class="h-6 w-6 text-gray-300 mr-2" fill="none" viewBox="0 0 24 24" stroke="currentColor" stroke-width="2"><path stroke-linecap="round" stroke-linejoin="round" d="M9 12l2 2 4-4m5.618-4.016A11.955 11.955 0 0112 2.944a11.955 11.955 0 01-8.618 3.04A12.02 12.02 0 003 9c0 5.591 3.824 10.29 9 11.622 5.176-1.332 9-6.03 9-11.622 0-1.042-.133-2.052-.382-3.016z" ></svg><input type="text" id="vcode" name="vcode" placeholder="请输入验证码" class="outline-0 text-sm w-24"></div><img id="signInVcodeImg" src="" onclick="refreshVcode()" ></div><div class="pt-6"><button v-on:click.prevent="submitForm" id="login" class="rounded bg-green-500 w-full h-8 text-white">注册</button></div><div class="text-center text-sm my-2">已有账号<a class="text-blue-500" href="/login">去登录</a></div></form></div></section></div></template><script>import axios from 'axios'import showMessage from '@/utils/message.js'export default {name: 'Register',data: function(){return {username: '',password: '',password2: '',email: '',}},methods: {submitForm() {if (this.username === '') {showMessage('用户名不能为空')return}if (this.email === '') {showMessage('邮箱不能为空')return}if (this.password === '') {showMessage('密码不能为空')return}if (this.password !== this.password2) {showMessage('2次密码不一致')return}// 没有错误,提交表单const formData = {username: this.username,email: this.email,password: this.password}// const that = this;axios.post('/auth/users/', formData).then(response => {// 登录成功后回到登录页面showMessage('注册完成,请到邮箱中激活账号')that.$router.push({name: 'Login'});}).catch( error => {// 遍历所有错误信息const errorData = error.response.dataconst errorMessages = Object.values(errorData).flat();for (let i = 0; i < errorMessages.length; i++) {showMessage(errorMessages[i])}})}}}</script>
其中,引入了一个JS「'@/utils/message.js'」
import Toastify from 'toastify-js'import "toastify-js/src/toastify.css"export default function showMessage(message, state='error', callback_func) {let background_color;if (state == 'error') {background_color = 'linear-gradient(to right, #ff5f6d, #ffc371)'} else {background_color = 'linear-gradient(to right, #00b09b, #96c93d)'}Toastify({text: message,duration: 2000,close: true,gravity: "top", // `top` or `bottom`position: "center", // `left`, `center` or `right`stopOnFocus: true, // Prevents dismissing of toast on hoverstyle: {background: background_color,},callback: function(){if (!callback_func) return ;if (callback_func) {callback_func()}},onClick: function(){alert('debug onclick')} // Callback after click}).showToast();}
这里,需要用NPM进行Toastify的安装:
npm install toastify-js
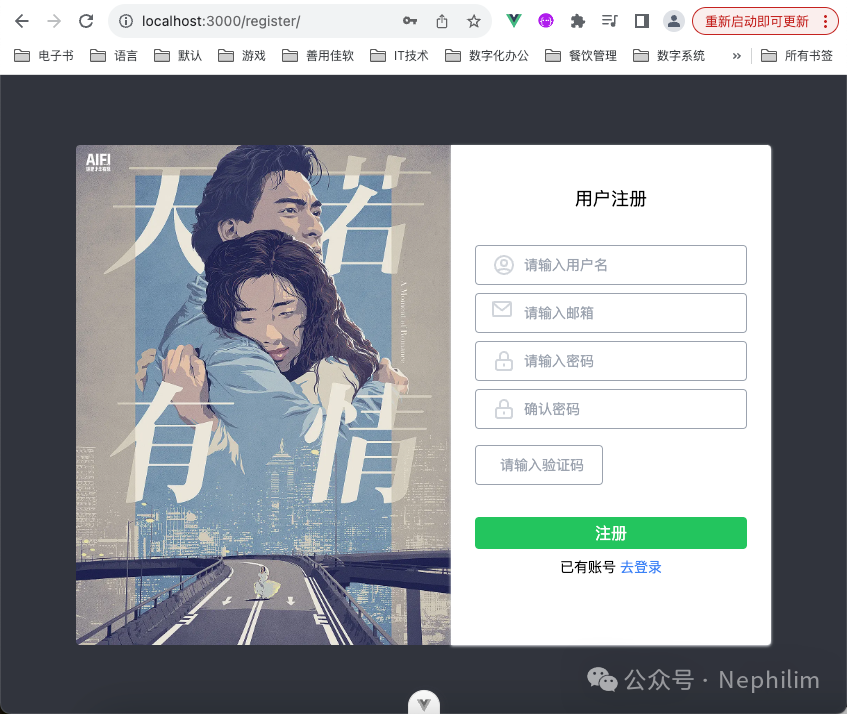
页面看看效果:
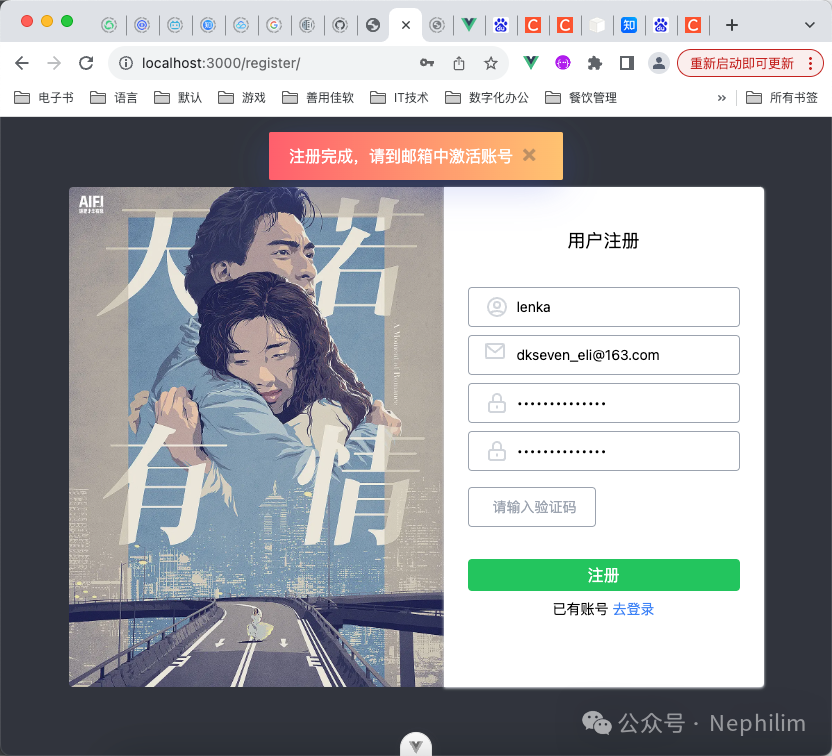
当你成功注册后,你会看到这样的画面:
然后,去看看注册时提供的邮箱的收件箱:
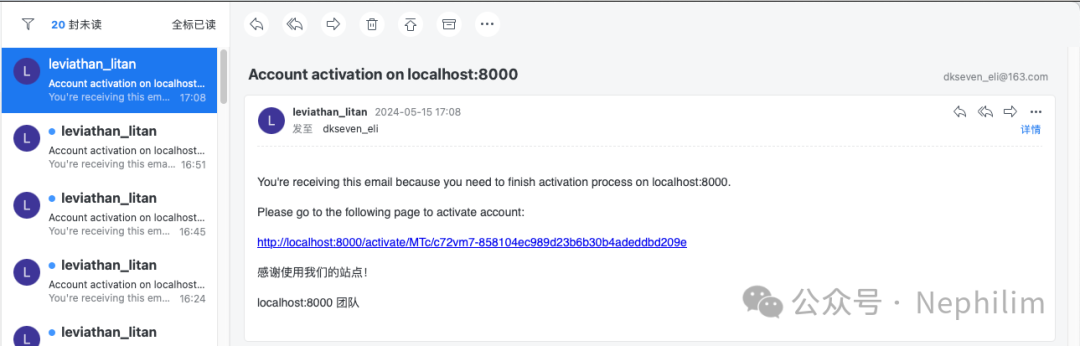
点击激活链接后:

最后,在数据库中可以看到,已经激活成功了:

10
账户激活
前面的激活是通过Django激活的,界面并不好看;
这里,用前端的VUE实现一下。
为了样式好看,先安装「Ant Design」:
(base) adamhuan@Leviathan django_daily_media_frontend % npm install ant-design-vueadded 29 packages, and audited 312 packages in 5s66 packages are looking for fundingrun `npm fund` for detailsfound 0 vulnerabilities(base) adamhuan@Leviathan django_daily_media_frontend %(base) adamhuan@Leviathan django_daily_media_frontend % npm install unplugin-vue-components -Dadded 10 packages, and audited 322 packages in 3s68 packages are looking for fundingrun `npm fund` for detailsfound 0 vulnerabilities(base) adamhuan@Leviathan django_daily_media_frontend %
然后,做出相关的配置:
文件「src/main.ts」
// import './assets/main.css'import '@/assets/css/tailwind.css'import 'ant-design-vue/dist/reset.css'// import '@surely-vue/table/dist/index.less';import { createApp } from 'vue'import {VueCookies} from "vue-cookies";import { createPinia } from 'pinia'import Antd from "ant-design-vue";// import STable from '@surely-vue/table';import App from './App.vue'import router from './router'const app = createApp(App)app.use(VueCookies)app.use(createPinia())app.use(router)app.use(Antd)// app.use(STable)app.mount('#app')
文件「vite.config.ts」
import { fileURLToPath, URL } from 'node:url'import path from 'node:path'import { defineConfig, loadEnv } from 'vite'import vue from '@vitejs/plugin-vue'import VueDevTools from 'vite-plugin-vue-devtools'import Components from 'unplugin-vue-components/vite'import {AntDesignVueResolver, AntDesignVueResolverOptions} from "unplugin-vue-components/dist/resolvers";// https://vitejs.dev/config/export default defineConfig( (config) => {const { command, mode } = config;const env = loadEnv(mode, process.cwd(), '')// 代理记录const proxies = {// 第一条代理[env.VITE_APP_BASE_API]: {target: env.VITE_APP_SERVICE_API,changeOrigin: true,rewrite:(path:any) => path.replace(new RegExp("^" + env.VITE_APP_BASE_API),""),},// 其他代理"/auth": {target: "http://localhost:8000/auth",changeOrigin: true,rewrite:(path:any) => path.replace(new RegExp("^/auth"),""),},}return {plugins: [vue(),VueDevTools(),Components({resolvers: [AntDesignVueResolver({importStyle: false,}),],}),],// css: {}resolve: {alias: {'@': fileURLToPath(new URL('./src', import.meta.url))}},server: {host: "0.0.0.0",port: Number(env.VITE_APP_PORT),open: true,proxy: proxies,}}})
路由配置「src/router/index.ts」
import { createRouter, createWebHistory } from 'vue-router'import HomeView from '../views/HomeView.vue'import MovieDetail from "@/views/MovieDetail.vue"import RegisterView from "@/views/RegisterView.vue"import ActivateEmail from '@/views/ActivateEmail.vue'const router = createRouter({history: createWebHistory(import.meta.env.BASE_URL),routes: [{path: '/',name: 'home',component: HomeView},{path: '/register',name: "register",component: RegisterView},{path: "/activate/:uid/:token",name: "ActivateEmail",component: ActivateEmail},{path: "/movie/:id",name: "MovieDetail",component: MovieDetail},]})export default router
文件「src/views/ActivateEmail.vue」
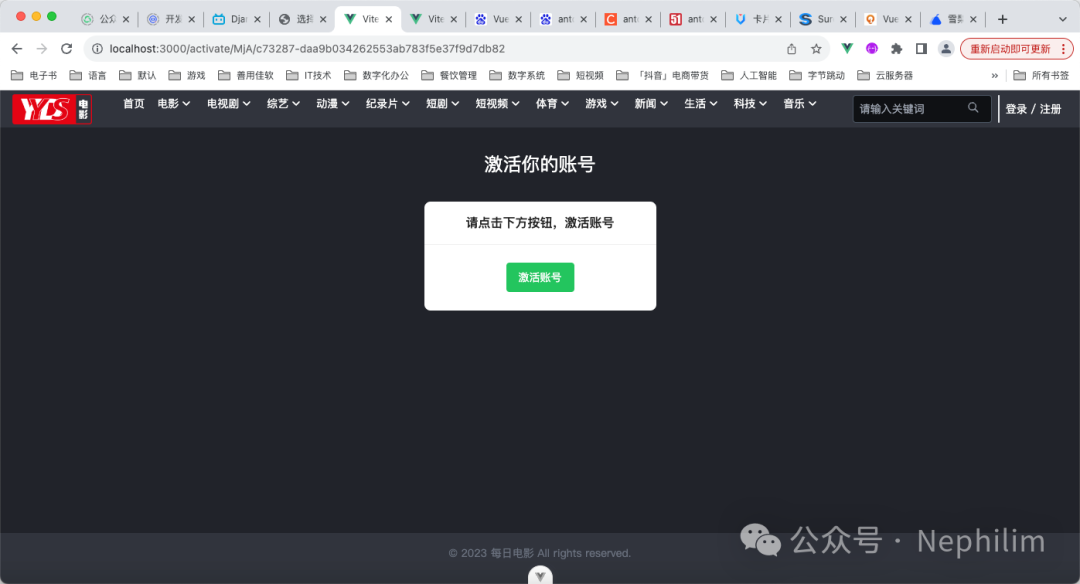
<template><div id="container" class="text-white text-sm bg-primary-300 min-h-screen pb-4"><Header/><div class="text-center text-2xl p-8">激活你的账号</div><div class="flex items-center justify-center"><a-card title="请点击下方按钮,激活账号" :bordered="false" :headStyle="{ 'text-align': 'center' }" style="width: 300px"><div class="flex justify-center"><button v-on:click="activate" class="bg-green-500 text-white px-4 py-2 rounded">激活账号</button></div></a-card></div><Footer/></div></template><script>import Header from '@/components/Header.vue'import Footer from '@/components/Footer.vue'import axios from 'axios'import showMessage from '@/utils/message.js'import Cookies from "vue-cookies";export default {name: 'ActivateEmail',components: { Header, Footer},methods: {activate() {// 获取参数const uid = this.$route.params.uidconst token = this.$route.params.tokenconst formData = {'uid': uid,'token': token}// 激活用户接口axios.post('/auth/users/activation/', formData,{headers:{'X-CSRFToken': Cookies.get('csrftoken')}},).then(response => {// 登录成功后回到登录页面showMessage('账号激活成功,可以登录了', "info")this.$router.push({name: 'Login'});}).catch( function(error) {// 遍历所有错误信息console.log(error)const errorData = error.response.dataconsole.log(errorData)const errorMessages = Object.values(errorData).flat();for (let i = 0; i < errorMessages.length; i++) {showMessage(errorMessages[i])}})}}}</script><style scoped></style>
然后看看页面效果:
不过需要注意的是,收到的邮件的地址是Django的地址,端口「8000」:
http://localhost:8000/activate/MjA/c73287-daa9b034262553ab783f5e37f9d7db82
如果需要用前端Vue的项目打开,你需要将端口改为前端项目的端口「3000」:
http://localhost:3000/activate/MjA/c73287-daa9b034262553ab783f5e37f9d7db82
11
Djoser模块中的认证方式
官方文档:
https://djoser.readthedocs.io/en/latest/authentication_backends.html
官方提供了两种认证方式:
Token Based Authentication
JSON Web Token Authentication
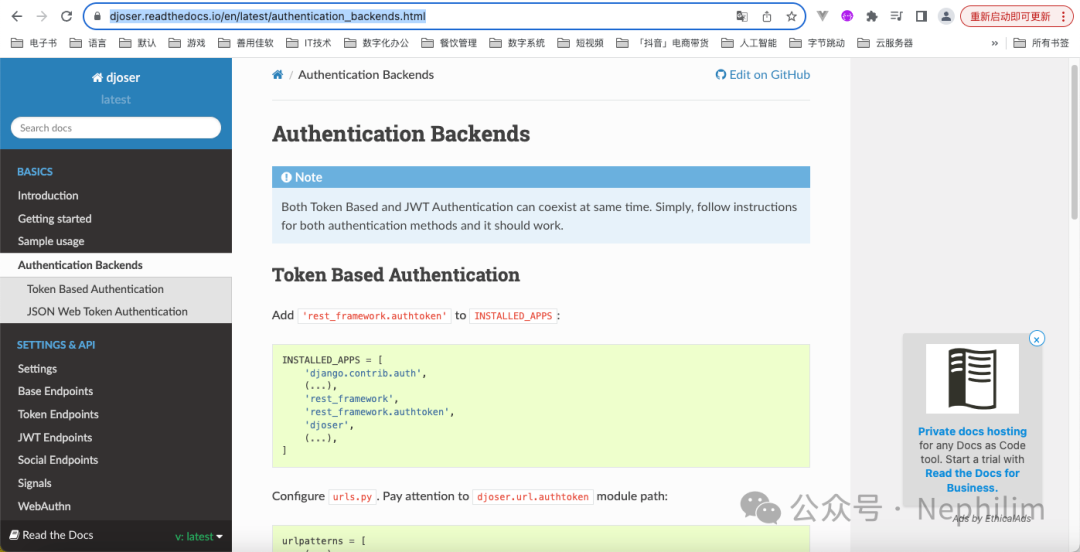
这里使用JWT。
如果你需要使用第三方的社交网络的验证:
pip install -U social-auth-app-django
12
Djoser配置JWT
这是在后端Django中进行配置的。
安装:
pip install -U djangorestframework_simplejwt
官方的配置相关的文档:
https://djoser.readthedocs.io/en/latest/authentication_backends.html#json-web-token-authentication
全局配置文件「settings.py」
REST_FRAMEWORK
REST_FRAMEWORK = {# 分页'DEFAULT_PAGINATION_CLASS': 'rest_framework.pagination.PageNumberPagination',# 'PAGE_SIZE': 12,# 过滤器"DEFAULT_FILTER_BACKENDS": {'django_filters.rest_framework.DjangoFilterBackend',},# 验证"DEFAULT_AUTHENTICATION_CLASSES": {# 'rest_framework.authentication.BasicAuthentication',# 'rest_framework.authentication.TokenAuthentication',# 'rest_framework_simplejwt.authentication.JWTAuthentication',},}
SIMPLE_JWT
SIMPLE_JWT = {'AUTH_HEADER_TYPES': ('JWT',),}
这个时候,全局配置文件「settings.py」的完整内容:
"""Django settings for django_daily_media project.Generated by 'django-admin startproject' using Django 5.0.6.For more information on this file, seehttps://docs.djangoproject.com/en/5.0/topics/settings/For the full list of settings and their values, seehttps://docs.djangoproject.com/en/5.0/ref/settings/"""from pathlib import Path# Build paths inside the project like this: BASE_DIR 'subdir'.BASE_DIR = Path(__file__).resolve().parent.parent# Quick-start development settings - unsuitable for production# See https://docs.djangoproject.com/en/5.0/howto/deployment/checklist/# SECURITY WARNING: keep the secret key used in production secret!SECRET_KEY = "django-insecure-9sqc)8l_#!8ntww9j7ehj!-()re%mp*n(!t$k&9)4dl^eegy*p"# SECURITY WARNING: don't run with debug turned on in production!DEBUG = TrueALLOWED_HOSTS = ['127.0.0.1','localhost',]# Application definitionINSTALLED_APPS = ["django.contrib.admin","django.contrib.auth","django.contrib.contenttypes","django.contrib.sessions","django.contrib.messages","django.contrib.staticfiles",# Django Filter"django_filters",# Django Rest Framework"rest_framework",# Django Djoser"djoser",# pip install django-cors-headers"corsheaders",# 电影"movie",# 用户"account",]MIDDLEWARE = [# Django Default"django.middleware.security.SecurityMiddleware","django.contrib.sessions.middleware.SessionMiddleware",# pip install django-cors-headers"corsheaders.middleware.CorsMiddleware","django.middleware.common.CommonMiddleware","django.middleware.csrf.CsrfViewMiddleware","django.contrib.auth.middleware.AuthenticationMiddleware","django.contrib.messages.middleware.MessageMiddleware","django.middleware.clickjacking.XFrameOptionsMiddleware",]ROOT_URLCONF = "django_daily_media.urls"TEMPLATES = [{"BACKEND": "django.template.backends.django.DjangoTemplates","DIRS": [BASE_DIR 'templates'],"APP_DIRS": True,"OPTIONS": {"context_processors": ["django.template.context_processors.debug","django.template.context_processors.request","django.contrib.auth.context_processors.auth","django.contrib.messages.context_processors.messages",],},},]WSGI_APPLICATION = "django_daily_media.wsgi.application"# Database# https://docs.djangoproject.com/en/5.0/ref/settings/#databasesDATABASES = {# SQLite# "default": {# "ENGINE": "django.db.backends.sqlite3",# "NAME": BASE_DIR "db.sqlite3",# }# MySQL'default': {"ENGINE": "django.db.backends.mysql","HOST": "127.0.0.1","USER": "root","PASSWORD": "xxxxx","NAME": "xxxxx",}}# Password validation# https://docs.djangoproject.com/en/5.0/ref/settings/#auth-password-validatorsAUTH_PASSWORD_VALIDATORS = [{"NAME": "django.contrib.auth.password_validation.UserAttributeSimilarityValidator",},{"NAME": "django.contrib.auth.password_validation.MinimumLengthValidator",},{"NAME": "django.contrib.auth.password_validation.CommonPasswordValidator",},{"NAME": "django.contrib.auth.password_validation.NumericPasswordValidator",},]# Internationalization# https://docs.djangoproject.com/en/5.0/topics/i18n/LANGUAGE_CODE = "zh-hans"TIME_ZONE = "Asia/Shanghai"USE_I18N = TrueUSE_TZ = True# Static files (CSS, JavaScript, Images)# https://docs.djangoproject.com/en/5.0/howto/static-files/STATIC_URL = "static/"# Default primary key field type# https://docs.djangoproject.com/en/5.0/ref/settings/#default-auto-fieldDEFAULT_AUTO_FIELD = "django.db.models.BigAutoField"REST_FRAMEWORK = {# 分页'DEFAULT_PAGINATION_CLASS': 'rest_framework.pagination.PageNumberPagination',# 'PAGE_SIZE': 12,# 过滤器"DEFAULT_FILTER_BACKENDS": {'django_filters.rest_framework.DjangoFilterBackend',},# 验证"DEFAULT_AUTHENTICATION_CLASSES": {# 'rest_framework.authentication.BasicAuthentication',# 'rest_framework.authentication.TokenAuthentication',# 'rest_framework_simplejwt.authentication.JWTAuthentication',},}SIMPLE_JWT = {'AUTH_HEADER_TYPES': ('JWT',),}# 邮箱EMAIL_BACKEND = 'django.core.mail.backends.smtp.EmailBackend'EMAIL_HOST = "smtp.163.com"EMAIL_PORT = 25EMAIL_HOST_USER = "leviathan_litan@163.com"EMAIL_HOST_PASSWORD = "IEXXWXSVGNOQDTBN"DEFAULT_FROM_EMAIL = "leviathan_litan@163.com"# EMAIL_USE_TLS = True# DjoserDJOSER = {"USER_ID_FIELD": "username","LOGIN_FIELD": "email",'ACTIVATION_URL': 'activate/{uid}/{token}','SEND_ACTIVATION_EMAIL': True,'SEND_CONFIRMATION_EMAIL': True,'SERIALIZERS': {'user_create': 'account.serializers.CustomUserCreateSerializer',},}# 跨域 pip install django-cors-headers# CORS_ALLOW_ALL_ORIGINS = True# CORS_ALLOW_CREDENTIALS = True# CORS_ALLOW_HEADERS = (# "accept",# "authorization",# "content-type",# "user-agent",# "x-csrftoken",# "x-requested-with",# )# CORS_ALLOW_METHODS = [# "DELETE",# "GET",# "OPTIONS",# "PATCH",# "POST",# "PUT",# ]# CORS_ALLOWED_ORIGINS = [# "https://example.com",# "https://sub.example.com",# "http://localhost:8000",# "http://127.0.0.1:8000",# ]# CORS_ALLOWED_ORIGIN_REGEXES = [# r"^https://\w+\.example\.com$",# ]CSRF_TRUSTED_ORIGINS = ["http://localhost:3000",]# 导入「local_settings.py」# ——————————————————————————————# 「敏感的、本地化的」配置需要在「local_settings.py」中进行设置# ——————————————————————————————try:from .local_settings import *except ImportError:# 仅仅捕获「导入异常」相关的错误pass
然后,配置全局路由「urls.py」
urlpatterns = [# Django Adminpath("admin/", admin.site.urls),# Django Rest Frameworkpath("api/", include(router.urls)),# Django Djoserpath('auth/', include('djoser.urls')),# Django Token Based Authentication# path('auth/', include('djoser.urls.authtoken')),# Django Djoser SWTpath("jwt/", include("djoser.urls.jwt")),# Account: Activationpath("activate/<str:uid>/<str:token>/", account_activate),]
这时候,该文件的完整内容:
"""URL configuration for django_daily_media project.The `urlpatterns` list routes URLs to views. For more information please see:https://docs.djangoproject.com/en/5.0/topics/http/urls/Examples:Function views1. Add an import: from my_app import views2. Add a URL to urlpatterns: path('', views.home, name='home')Class-based views1. Add an import: from other_app.views import Home2. Add a URL to urlpatterns: path('', Home.as_view(), name='home')Including another URLconf1. Import the include() function: from django.urls import include, path2. Add a URL to urlpatterns: path('blog/', include('blog.urls'))"""from django.contrib import adminfrom django.urls import path, includefrom rest_framework.routers import DefaultRouterfrom movie.views import *from account.views import *router = DefaultRouter()router.register('movie', MovieViewSet)router.register('category', CategoryViewSet)urlpatterns = [# Django Adminpath("admin/", admin.site.urls),# Django Rest Frameworkpath("api/", include(router.urls)),# Django Djoserpath('auth/', include('djoser.urls')),# Django Token Based Authentication# path('auth/', include('djoser.urls.authtoken')),# Django Djoser SWTpath("jwt/", include("djoser.urls.jwt")),# Account: Activationpath("activate/<str:uid>/<str:token>/", account_activate),]
这样,JWT的配置就完成了。
与JWT相关的端口,官方文档:
https://djoser.readthedocs.io/en/latest/jwt_endpoints.html
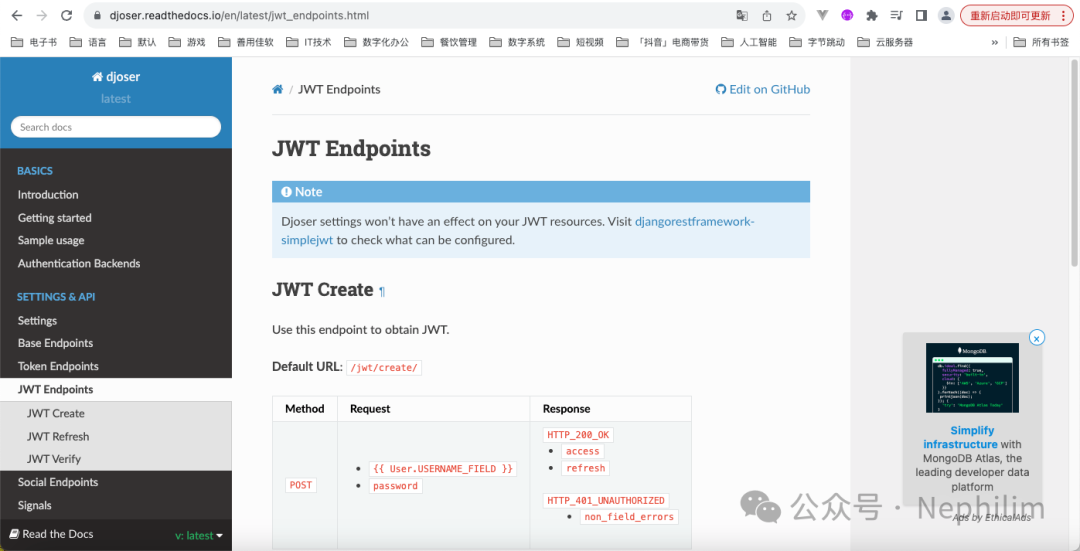
JWT接口:
| 登录 | JWT Create |
| 刷新 | JWT Refresh |
| 验证 | JWT Verify |
JWT Create:
先用Postman试试:
http://127.0.0.1:8000/jwt/jwt/create
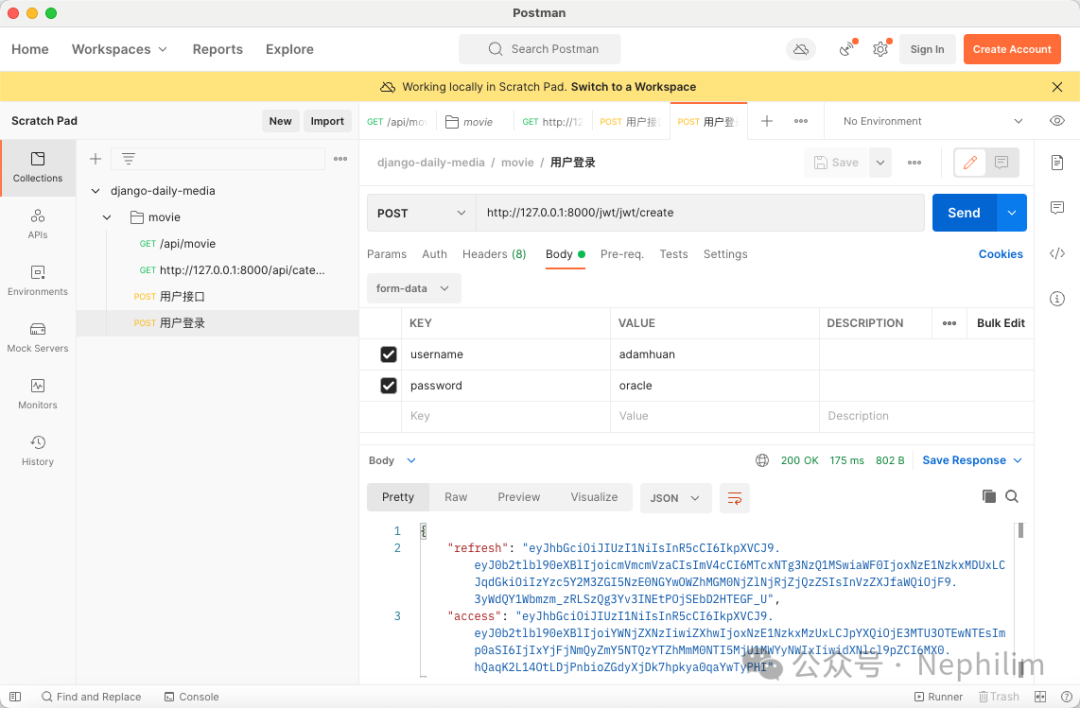
可以看到,当请求成功后,就会返回两个令牌:
refresh:用于刷新令牌的
access:令牌
这样后端的接口就配置好了。
13
Vue前端「登录界面」
安装「vuex@next」
(base) adamhuan@Leviathan django_daily_media_frontend % npm install vuex@nextadded 1 package, and audited 344 packages in 2s69 packages are looking for fundingrun `npm fund` for detailsfound 0 vulnerabilities(base) adamhuan@Leviathan django_daily_media_frontend %
文件「src/main.ts」
// import './assets/main.css'import '@/assets/css/tailwind.css'import 'ant-design-vue/dist/reset.css'// import '@surely-vue/table/dist/index.less';import { createApp } from 'vue'import {VueCookies} from "vue-cookies";import { createPinia } from 'pinia'import Antd from "ant-design-vue";// import STable from '@surely-vue/table';import App from './App.vue'import router from './router'import store from './stores'const app = createApp(App)app.use(VueCookies)app.use(createPinia())app.use(router)app.use(Antd)app.use(store)// app.use(STable)app.mount('#app')
文件「src/stores/index.ts」
import { createStore } from 'vuex'export default createStore({state: {isLogin: false,token: ''},getters: {},mutations: {initializeStore(state) {if (localStorage.getItem('token')) {state.isLogin = truestate.token = localStorage.getItem('token')}else {state.isLogin = falsestate.token = ''}},setLoginStatus(state, status) {state.isLogin = status},setToken(state, token) {state.token = token},removeToken(state, token) {state.token = ''},},actions: {},modules: {}})
————————————
由于前面新增了一个接口,因此Vue的「vite.config.ts」中需要添加代理:
import { fileURLToPath, URL } from 'node:url'import path from 'node:path'import { defineConfig, loadEnv } from 'vite'import vue from '@vitejs/plugin-vue'import VueDevTools from 'vite-plugin-vue-devtools'import Components from 'unplugin-vue-components/vite'import {AntDesignVueResolver, AntDesignVueResolverOptions} from "unplugin-vue-components/dist/resolvers";// https://vitejs.dev/config/export default defineConfig( (config) => {const { command, mode } = config;const env = loadEnv(mode, process.cwd(), '')// 代理记录const proxies = {// 第一条代理[env.VITE_APP_BASE_API]: {target: env.VITE_APP_SERVICE_API,changeOrigin: true,rewrite:(path:any) => path.replace(new RegExp("^" + env.VITE_APP_BASE_API),""),},// 其他代理"/auth": {target: "http://localhost:8000/auth",changeOrigin: true,rewrite:(path:any) => path.replace(new RegExp("^/auth"),""),},// 其他代理"/jwt": {target: "http://localhost:8000/jwt",changeOrigin: true,rewrite:(path:any) => path.replace(new RegExp("^/jwt"),""),},}return {plugins: [vue(),VueDevTools(),Components({resolvers: [AntDesignVueResolver({importStyle: false,}),],}),],// css: {}resolve: {alias: {'@': fileURLToPath(new URL('./src', import.meta.url))}},server: {host: "0.0.0.0",port: Number(env.VITE_APP_PORT),open: true,proxy: proxies,}}})
添加路由「src/router/index.ts」
import { createRouter, createWebHistory } from 'vue-router'import HomeView from '../views/HomeView.vue'import MovieDetail from "@/views/MovieDetail.vue"import RegisterView from "@/views/RegisterView.vue"import ActivateEmail from '@/views/ActivateEmail.vue'import Login from "@/views/LoginView.vue"const router = createRouter({history: createWebHistory(import.meta.env.BASE_URL),routes: [{path: '/',name: 'home',component: HomeView},{path: '/register',name: "register",component: RegisterView},{path: "/login",name: "login",component: Login},{path: "/activate/:uid/:token",name: "ActivateEmail",component: ActivateEmail},{path: "/movie/:id",name: "MovieDetail",component: MovieDetail},]})export default router
文件「src/views/LoginView.vue」
<template><div id="main-body" class="bg-primary-100 flex justify-center h-screen"><section class="container flex justify-center items-center rounded "><div class="hidden md:block"><img src="../assets/images/bg.png" alt="" class="rounded-l max-h-[500px]"></div><div class="rounded-r w-80 h-[500px] my-8 px-2 py-4 bg-white shadow shadow-gray-300"><div class="text-center text-lg py-6">用户登录</div><form id="register_form" class="px-4"><div class="flex justify-left items-center relative h-10 px-4 my-2 rounded border-solid border border-gray-400"><svg xmlns="http://www.w3.org/2000/svg" class="h-6 w-6 text-gray-300 mr-2" fill="none" viewBox="0 0 24 24" stroke="currentColor" stroke-width="2"><path stroke-linecap="round" stroke-linejoin="round" d="M5.121 17.804A13.937 13.937 0 0112 16c2.5 0 4.847.655 6.879 1.804M15 10a3 3 0 11-6 0 3 3 0 016 0zm6 2a9 9 0 11-18 0 9 9 0 0118 0z" ></svg><input v-model="username" type="text" placeholder="请输入用户名" class="outline-0 text-sm"></div><div class="flex justify-left items-center relative h-10 px-4 my-2 rounded border-solid border border-gray-400"><svg xmlns="http://www.w3.org/2000/svg" class="h-6 w-6 text-gray-300 mr-2" fill="none" viewBox="0 0 24 24" stroke="currentColor" stroke-width="2"><path stroke-linecap="round" stroke-linejoin="round" d="M12 15v2m-6 4h12a2 2 0 002-2v-6a2 2 0 00-2-2H6a2 2 0 00-2 2v6a2 2 0 002 2zm10-10V7a4 4 0 00-8 0v4h8z" ></svg><input v-model="password" type="password" placeholder="请输入密码" class="outline-0 text-sm"></div><div class="pt-6"><button v-on:click.prevent="submitForm" id="login" class="rounded bg-green-500 w-full h-8 text-white">登录</button></div><div class="text-center text-sm my-2"><span class="text-left text-green-500"><router-link to="/reset_password">忘记密码?</router-link></span>没有账号<a class="text-blue-500" href="/register">去注册</a></div></form></div></section></div></template><script>import showMessage from "@/utils/message.js";import axios from "axios";export default {name: "Login",data: function () {return {username: "",password: "",};},methods: {submitForm(){const username = this.username;const password = this.password;if (username === '') {showMessage('用户名不能为空')return}if (password === '') {showMessage('密码不能为空')return}// 先清空axios.defaults.headers.common["Authorization"] = ""localStorage.removeItem("token")const formData = {username: username,password: password,}axios.post('/jwt/jwt/create/', formData).then(response => {const token = response.data.access;const refreshToken = response.data.refresh;const username = this.username;localStorage.setItem("token", token)localStorage.setItem("refreshToken", refreshToken)localStorage.setItem("username", username)localStorage.setItem("expiredTime", Date.now() + 5 * 60 * 1000 )this.$store.commit('setToken', token)showMessage('登录成功','info',()=>{this.$router.push({name: 'home'})})}).catch(error => {console.log(error);const errorData = error.response.data;const errorMessage = Object.values(errorData).flat();for (let i = 0; i < errorMessage.length; i++) {showMessage(errorMessage[i]);}})}}}</script>
文件「src/components/Header.vue」
<template><div id="header" class="h-12 py-1 bg-primary-100 flex items-center justify-center"><div class="w-full px-4" style="max-width:1440px;"><div class="flex justify-between" ><div class="flex items-center"><a href="/"><img src="../assets/images/logo.png" style="height:39px" ></a><!-- 分类导航 --><div id="nav" class="px-4"><category/></div></div><!-- 最右侧 --><div class="flex items-center space-x-2"><!--输入框 --><div class="relative shrink"><form><input v-model="keyword" type="text" name="keyword" class="outline-0h-9roundedbg-primary-700borderborder-gray-600placeholder-gray-400w-64px-2py-1max-w-[180px]" placeholder="请输入关键词" ><div class="absolutetop-0right-0flexitems-centerh-full"><div class=" rounded text-xs text-gray-400 px-2 mr-2"><button v-on:click.prevent="searchMovies"><svg xmlns="http://www.w3.org/2000/svg" class="h-4 w-4" fill="none" viewBox="0 0 24 24" stroke="currentColor" stroke-width="2"><path stroke-linecap="round" stroke-linejoin="round" d="M21 21l-6-6m2-5a7 7 0 11-14 0 7 7 0 0114 0z" ></svg></button></div></div></form></div><!-- 最右侧:用户信息 --><div v-if="$store.state.isLogin" @click="toggleMenu" id="userinfo" class="flex relative hover: cursor-pointer items-center justify-center rounded border border-solid text-white text-lg h-9 text-center"><div id="username" class="px-2">{{ username }}</div><div class="pr-2"><svg xmlns="http://www.w3.org/2000/svg" class="h-5 w-5" viewBox="0 0 20 20" fill="currentColor"><path fill-rule="evenodd" d="M5.293 7.293a1 1 0 011.414 0L10 10.586l3.293-3.293a1 1 0 111.414 1.414l-4 4a1 1 0 01-1.414 0l-4-4a1 1 0 010-1.414z" clip-rule="evenodd" ></svg></div><div :class="{hidden: !showMenu}" id="userinfo_menu" class="absolute top-[40px] w-32 transition ease-in-out delay-150 z-50"><ul class="bg-primary-700 py-2 px-4 text-sm"><li class="plx-2 py-2"><a href="/personal">个人中心</a></li><li class="plx-2 py-2"><a href="/collect">我的收藏</a></li><li class="plx-2 py-2"><router-link to="/" v-on:click.prevent="logout()">退出</router-link></li></ul></div></div><!-- 如果没有登录 --><div v-else class="text-white flex-shrink-0 pr-2"><a href="/login/">登录</a><a href="/register/">注册</a></div></div></div></div></div></template><script>import Category from "@/components/Category.vue";export default {name: "Header",components: {Category,},data: function() {return {keyword: '',username: '',showMenu: false,}},mounted() {this.username = localStorage.getItem('username')// 判断登录状态const currentTime = Date.now()const expiredTime = localStorage.getItem('expiredTime')const refreshToken = localStorage.getItem('refreshToken')console.log(currentTime)console.log(expiredTime)if (expiredTime > currentTime) {this.$store.commit('setLoginStatus', true)}else if (refreshToken) {axios.post('/api/jwt/refresh/', {refresh: refreshToken}).then(response => {console.log('执行refresh')const token = response.data.accesslocalStorage.setItem("token", token)// 更新过期时间const expiredTime = Date.now() + 5 * 60 * 1000localStorage.setItem('expiredTime', expiredTime)this.$store.commit('setLoginStatus', true)this.$store.commit('setToken', token)}).catch( error => {console.log(error)this.$store.commit('setLoginStatus', false)this.$store.commit('removeToken')localStorage.clear()})}else {this.$store.commit('setLoginStatus', false)this.$store.commit('removeToken')localStorage.clear()}},methods: {searchMovies() {const keyword = this.keyword.trim()this.$router.push({name: 'home',query: {search: keyword}})},// 切换展示和隐藏toggleMenu() {this.showMenu = !this.showMenu},// 退出logout() {localStorage.clear() // 情况本地数据this.$store.commit('setLoginStatus', false)this.$store.commit('setToken')}},}</script><style scoped></style>
来看看页面效果:
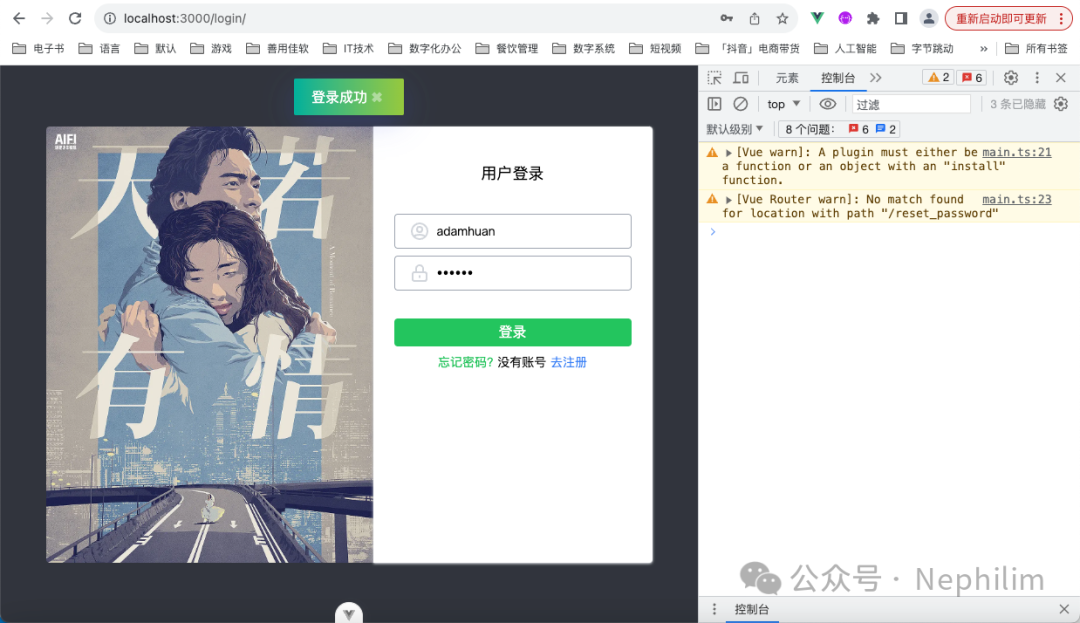
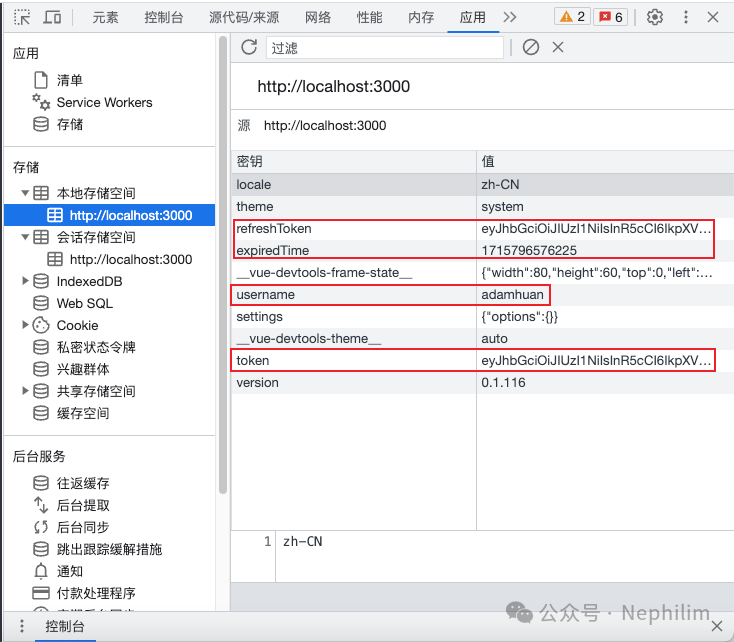
来看看浏览器缓存的数据:
最后,成功登录后,会通过「message.js」的回调函数转到「home」主页:

可以看到,右上角有登陆成功的账号状态。
END
温馨提示
如果你喜欢本文,请分享到朋友圈,想要获得更多信息,请关注我。
