



Tips:一些记录,一些笔记

2024/07/17
WEDNESDAY
Riches serve a wise man makes, but a fool let it control yourself.
聪明人使财富为自己服务,傻瓜却任它只配自己。

01
前述
我们在使用 Vue
的过程中,每个 script
以及 js
文件中或多或少需要引入一些像 ref、reactive
等 VueAPI
,包括 VueRouter、Pinia
等都要引入一些 API
,还有我们自己写的组件也都需要我们手动去引入使用。
下面,来进行配置。
02
配置文件「vite.config.ts」
进行这一部分的配置,首先需要安装并引入两个插件:
import AutoImport from 'unplugin-auto-import/vite'import Components from 'unplugin-vue-components/vite'
然后进行具体的配置,如下所示:
AutoImport({// 需要去解析的文件include: [/\.[tj]sx?$/, // .ts, .tsx, .js, .jsx\.vue$/,/\.vue\?vue/, // .vue\.md$/ // .md],// imports 指定自动引入的包位置(名)imports: ['vue', 'pinia', 'vue-router'],// 生成相应的自动导入json文件。eslintrc: {// 启用enabled: true,// 生成自动导入json文件位置filepath: './.eslintrc-auto-import.json',// 全局属性值globalsPropValue: true},resolvers: [// Element PlusElementPlusResolver()]}),Components({// 指定组件所在的目录dirs: ['src/components', 'src/views'],// 需要解析的文件include: [/\.vue$/, /\.vue\?vue/, /\.md$/],// 解释器resolvers: [// 图标(unplugin-icons)IconsResolver({// 自动引入组件「Icon」的统一前缀:默认为「i」prefix: 'icon'// 可选配置:默认启用 Iconify// enabledCollections: ['ep']}),// Element PlusElementPlusResolver()]})
这时候,该文件「vite.config.ts」的完整内容如下所示:
// =============================== 导入// Basicimport { fileURLToPath, URL } from 'node:url'import { resolve } from 'node:path'import path from 'path'// Viteimport { defineConfig, loadEnv } from 'vite'import type { UserConfig, ConfigEnv } from 'vite'// Vueimport vue from '@vitejs/plugin-vue'import vueJsx from '@vitejs/plugin-vue-jsx'import vueDevTools from 'vite-plugin-vue-devtools'// Element Plus// pnpm install -D element-plusimport { ElementPlusResolver } from 'unplugin-vue-components/resolvers'// 自动引入import AutoImport from 'unplugin-auto-import/vite'import Components from 'unplugin-vue-components/vite'// import {} from 'unplugin-vue-components/resolvers'// 图标(unplugin-icons)// pnpm install -D unplugin-iconsimport Icons from 'unplugin-icons/vite'import IconsResolver from 'unplugin-icons/resolver'// 图标(vite-plugin-svg-icons)// pnpm install -D vite-plugin-svg-iconsimport { createSvgIconsPlugin } from 'vite-plugin-svg-icons'// =============================== 配置// https://vitejs.dev/config/// 实例化const root = process.cwd()function pathResolve(dir: string) {return resolve(root, '.', dir)}export default ({ command, mode }: ConfigEnv): UserConfig => {// 环境相关变量与参数let env = {} as any// 判断是否执行了「打包」const isBuild = command === 'build'if (!isBuild) {env = loadEnv(process.argv[3] === '--mode' ? process.argv[4] : process.argv[3], root)} else {env = loadEnv(mode, root)}// 返回最终配置return {base: '/', // 后期写到环境变量的文件中// 插件plugins: [vue({script: {// 开启 defineModeldefineModel: true}}),vueJsx(),vueDevTools(),Icons({compiler: 'vue3',autoInstall: true,// 放大比例scale: 4}),createSvgIconsPlugin({iconDirs: [path.resolve(process.cwd(), 'src/assets/svgs')],symbolId: 'icon-[dir]-[name]',svgoOptions: true}),AutoImport({// 需要去解析的文件include: [/\.[tj]sx?$/, // .ts, .tsx, .js, .jsx\.vue$/,/\.vue\?vue/, // .vue\.md$/ // .md],// imports 指定自动引入的包位置(名)imports: ['vue', 'pinia', 'vue-router'],// 生成相应的自动导入json文件。eslintrc: {// 启用enabled: true,// 生成自动导入json文件位置filepath: './.eslintrc-auto-import.json',// 全局属性值globalsPropValue: true},resolvers: [// Element PlusElementPlusResolver()]}),Components({// 指定组件所在的目录dirs: ['src/components', 'src/views'],// 需要解析的文件include: [/\.vue$/, /\.vue\?vue/, /\.md$/],// 解释器resolvers: [// 图标(unplugin-icons)IconsResolver({// 自动引入组件「Icon」的统一前缀:默认为「i」prefix: 'icon'// 可选配置:默认启用 Iconify// enabledCollections: ['ep']}),// Element PlusElementPlusResolver()]})],resolve: {// 别名alias: {'@': fileURLToPath(new URL('./src', import.meta.url))}},// 样式css: {preprocessorOptions: {less: {additionalData: ``},scss: {prependData: ``,additionalData: `自定义字体样式@use "@/assets/fonts/index.scss" as *;`}}},// 服务端server: {host: env.VITE_APP_HOST || '0.0.0.0',port: env.VITE_APP_PORT || 4001,strictPort: true},// 打包build: {target: 'es2015',// 打包导出目录outDir: 'dist',sourcemap: env.VITE_IF_SOURCEMAP === 'true',// brotliSize: false,rollupOptions: {// 拆包output: {manualChunks: {'vue-chunks': ['vue', 'vue-router', 'pinia', 'vue-i18n']// 'element-plus': ['element-plus'],// 'wang-editor': ['@wangeditor/editor', '@wangeditor/editor-for-vue']}}}}}}
这样,就配置好了。
03
验证
测试页面:
<template><div class="about"><h1>This is an about page</h1><h1><icon-material-symbols-10k-sharp ><icon-material-symbols-11mp-outline-sharp ><svg-icon class="icon" size="45" name="logo" ></h1><divclass="inline-block m-2 rounded cursor-pointer shadow transition-all duration-150 ease-in-out transform hover:scale-105"><span class="bg-blue-500 text-white px-2 py-1 rounded-l">Search</span><span class="bg-blue-700 text-white px-2 py-1 rounded-r font-bold">搜索</span></div><divclass="inline-block m-2 rounded cursor-pointer shadow transition-all duration-150 ease-in-out transform hover:scale-105"><span class="bg-gray-500 text-white px-2 py-1 rounded-l">Search</span><span class="bg-green-400 text-white px-2 py-1 rounded-r">搜索</span></div><el-button>{{ message }}</el-button><el-button :plain="true" @click="open2">Success</el-button></div></template><script lang="ts" setup>import { ElMessage } from 'element-plus'const message = ref('Helloworld.')const open2 = () => {ElMessage({message: 'Congrats, this is a success message.',type: 'success'})}</script><style>@media (min-width: 1024px) {.about {min-height: 100vh;display: flex;align-items: center;}}</style>
可以看到,在「script」中,我们没有引入VueAPI的方法「ref」
但我们在定义变量「message」的时候,却使用了它。
一、没有配置的情况
当你没有配置自动引入的时候,该页面的运行效果如下所示:
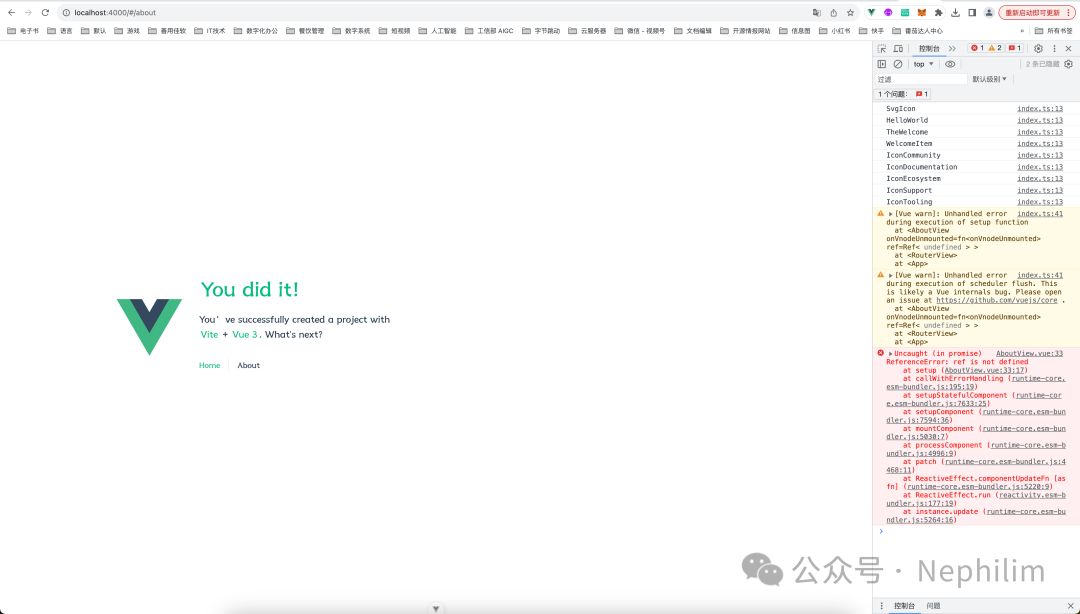
可以看到,有一个报错:
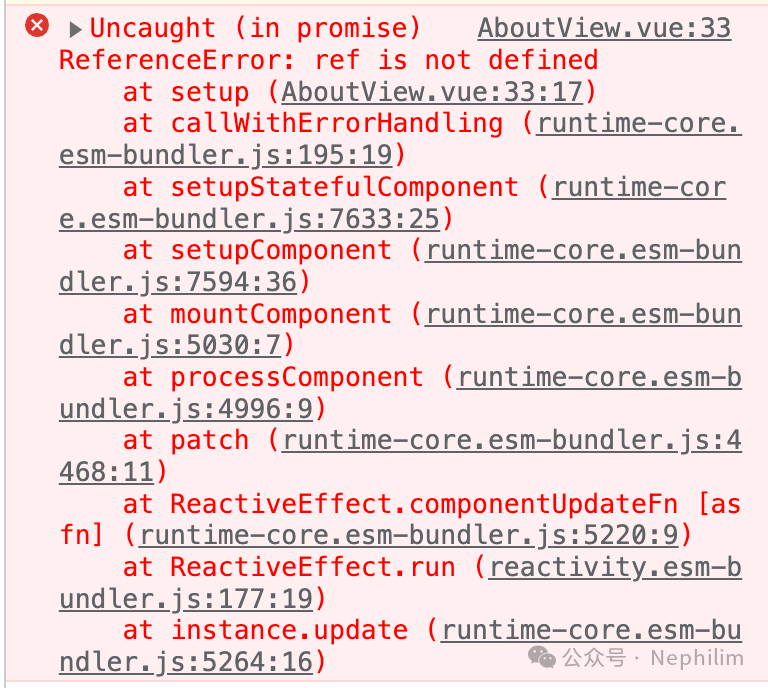
由于VueAPI中的ref没有手动引入,之前也没有配置自动引入,故而在运行的时候,报错「ref is not defined」
二、配置了的情况
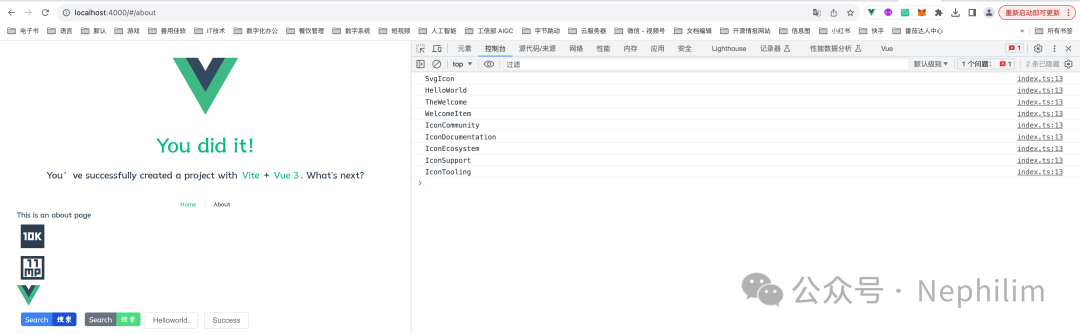
当你配置了「自动引入」后,你看到的画面就是这样的,可以看到,没有问题了。
END
温馨提示
如果你喜欢本文,请分享到朋友圈,想要获得更多信息,请关注我。
文章转载自Nephilim,如果涉嫌侵权,请发送邮件至:contact@modb.pro进行举报,并提供相关证据,一经查实,墨天轮将立刻删除相关内容。
