


Tips:一些记录,一些笔记

2024/06/29
SATURDAY
Living in the living heart, is not die.
活在生者的心里,就是不死。
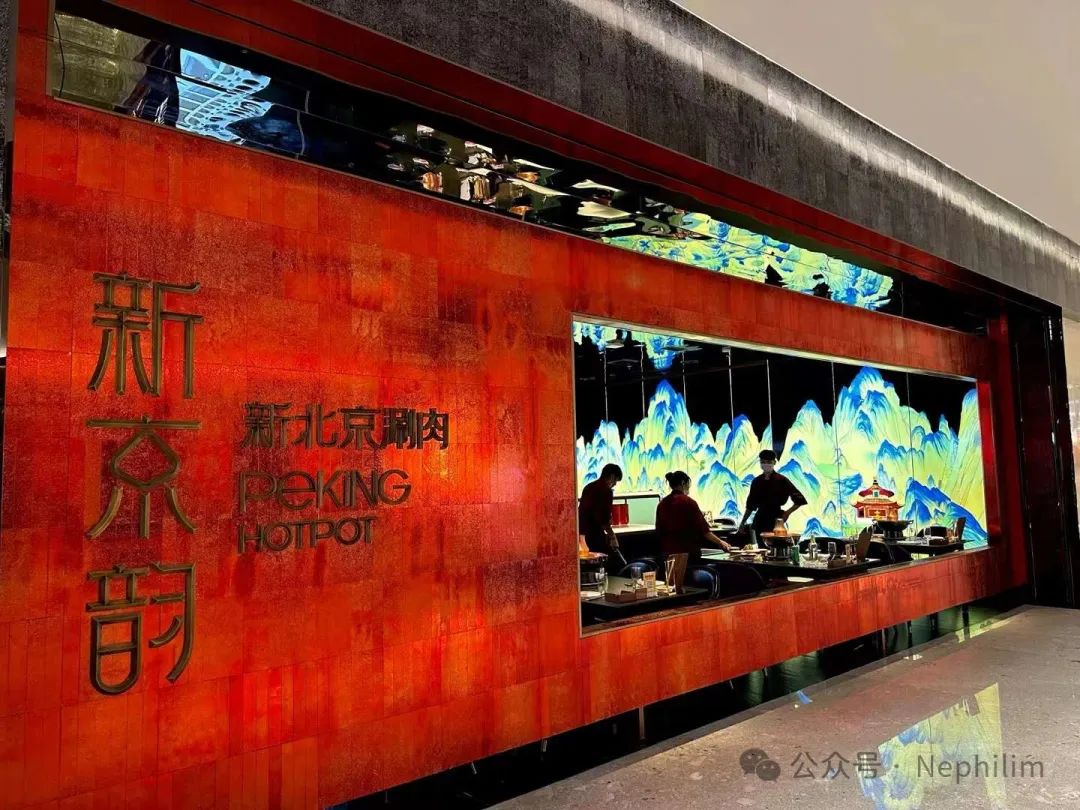
米其林·2024摘星餐厅「新京韵 Peking Hotpot」 | 武汉·武昌万象城店
01
多布局
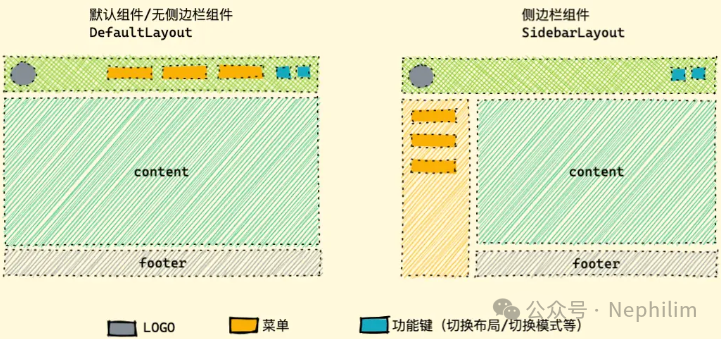
首先,是目前这个项目的架构:
vue | 3.4.29 |
vite | 5.3.1 |
@arco-design/web-vue | 2.55.3 |
02
目录状态
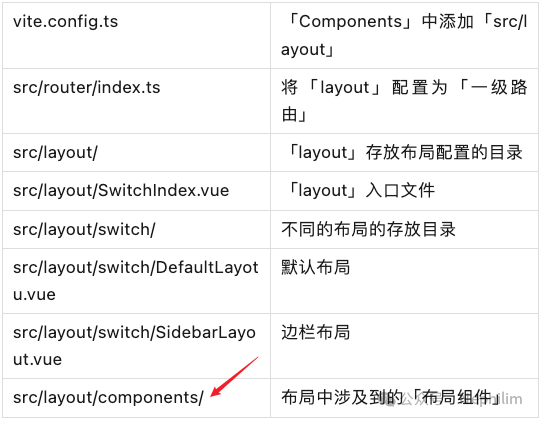
目录描述:
| vite.config.ts | 「Components」中添加「src/layout」 |
| src/router/index.ts | 将「layout」配置为「一级路由」 |
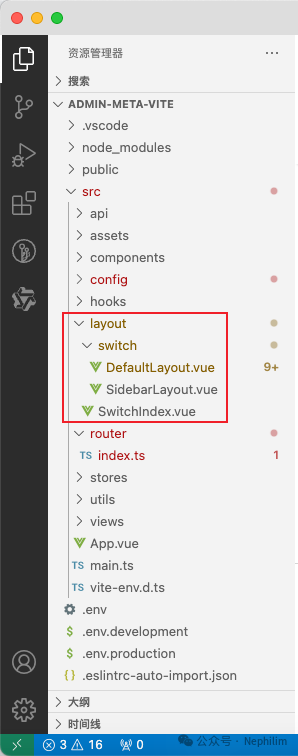
| src/layout/ | 「layout」存放布局配置的目录 |
| src/layout/SwitchIndex.vue | 「layout」入口文件 |
| src/layout/switch/ | 不同的布局的存放目录 |
| src/layout/switch/DefaultLayotu.vue | 默认布局 |
| src/layout/switch/SidebarLayout.vue | 边栏布局 |
| src/layout/components/ | 布局中涉及到的「布局组件」 |
03
具体配置:初始配置
上面介绍了相关的目录与文件,下面来具体描述下其中的配置。
文件「vite.config.ts」
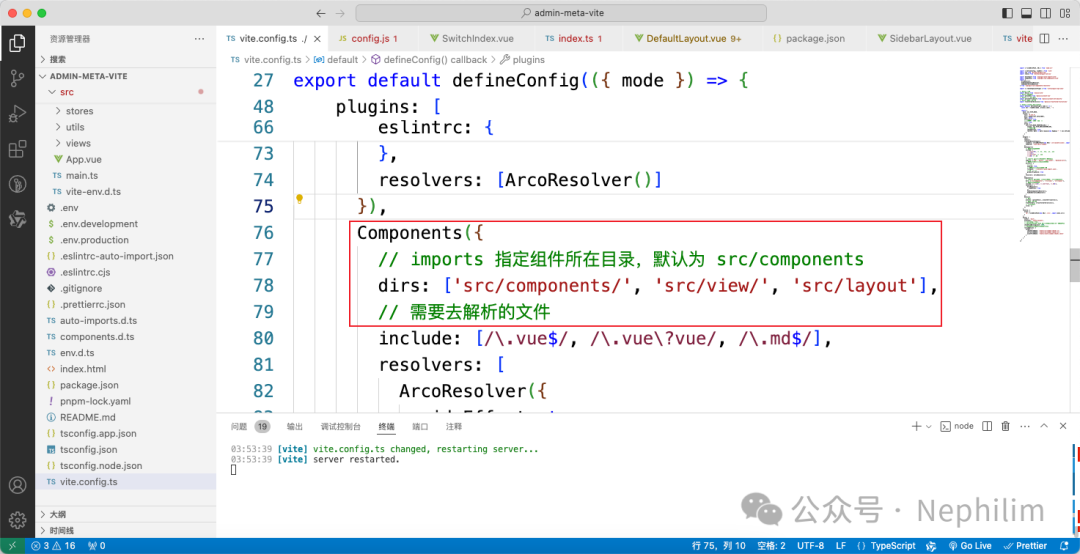
该文件的完整内容:
import { fileURLToPath, URL } from 'node:url'import { defineConfig, loadEnv } from 'vite'import vue from '@vitejs/plugin-vue'import vueJsx from '@vitejs/plugin-vue-jsx'import AutoImport from 'unplugin-auto-import/vite'import Components from 'unplugin-vue-components/vite'import {ArcoResolver,VueUseComponentsResolver,VueUseDirectiveResolver} from 'unplugin-vue-components/resolvers'import { createSvgIconsPlugin } from 'vite-plugin-svg-icons'// Unocss 插件import Unocss from 'unocss/vite'// Unocss 默认预设import presetUno from '@unocss/preset-uno'// Unocss 属性模式预设import presetAttributify from '@unocss/preset-attributify'// Unocss 指令转换插件import transformerDirective from '@unocss/transformer-directives'// https://vitejs.dev/config/export default defineConfig(({ mode }) => {const env = loadEnv(mode, process.cwd(), '')return {base: env.VITE_BASE,server: {host: '0.0.0.0',port: Number(env.VITE_PORT),open: false,strictPort: true,// 本地服务 CORS 是否开启cors: true,proxy: {[env.VITE_BASE_FRONTEND_URL]: {target: env.VITE_BASE_BACKEND_URL,// 允许跨域changeOrigin: true,rewrite: path => path.replace(new RegExp('^' + env.VITE_BASE_FRONTEND_URL), '')}}},plugins: [vue(),vueJsx(),createSvgIconsPlugin({iconDirs: [fileURLToPath(new URL('./src/assets/icons', import.meta.url))],symbolId: 'icon-[dir]-[name]'}),AutoImport({// 需要去解析的文件include: [/\.[tj]sx?$/, // .ts, .tsx, .js, .jsx\.vue$/,/\.vue\?vue/, // .vue\.md$/ // .md],// imports 指定自动引入的包位置(名)imports: ['vue', 'pinia', 'vue-router', '@vueuse/core'],// 生成相应的自动导入json文件。eslintrc: {// 启用enabled: true,// 生成自动导入json文件位置filepath: './.eslintrc-auto-import.json',// 全局属性值globalsPropValue: true},resolvers: [ArcoResolver()]}),Components({// imports 指定组件所在目录,默认为 src/componentsdirs: ['src/components/', 'src/view/', 'src/layout'],// 需要去解析的文件include: [/\.vue$/, /\.vue\?vue/, /\.md$/],resolvers: [ArcoResolver({sideEffect: true}),VueUseComponentsResolver(),VueUseDirectiveResolver()]}),Unocss({// 预设presets: [presetUno(), presetAttributify()],// 指令转换插件transformers: [transformerDirective()],// 自定义规则rules: []})],resolve: {alias: {'@': fileURLToPath(new URL('./src', import.meta.url))}},build: {outDir: 'dist',assetsDir: 'static/assets',// sourcemap: true,// 规定触发警告的 chunk 大小,消除打包大小超过500kb警告chunkSizeWarningLimit: 2000,// 静态资源打包到dist下的不同目录rollupOptions: {output: {chunkFileNames: 'static/js/[name]-[hash].js',entryFileNames: 'static/js/[name]-[hash].js',assetFileNames: 'static/[ext]/[name]-[hash].[ext]'}}}}})
文件「src/router/index.ts」
import { createRouter, createWebHistory } from 'vue-router'const router = createRouter({history: createWebHistory(import.meta.env.BASE_URL),routes: [{path: '/',name: 'Layout',component: () => import('@/layout/SwitchIndex.vue'),redirect: '/',children: [{path: '/',name: 'HomeView',component: () => import('@/views/HomeView.vue'),meta: {title: '首页'}}]}]})export default router
文件「src/layout/SwitchIndex.vue」
<script setup></script><template><div class="switch-index"><!-- <component :is="" > --><DefaultLayout ></div></template><style scoped></style>
上面的代码中,「div」中目前是写死的「DefaultLayout」,后期会定义为「component」
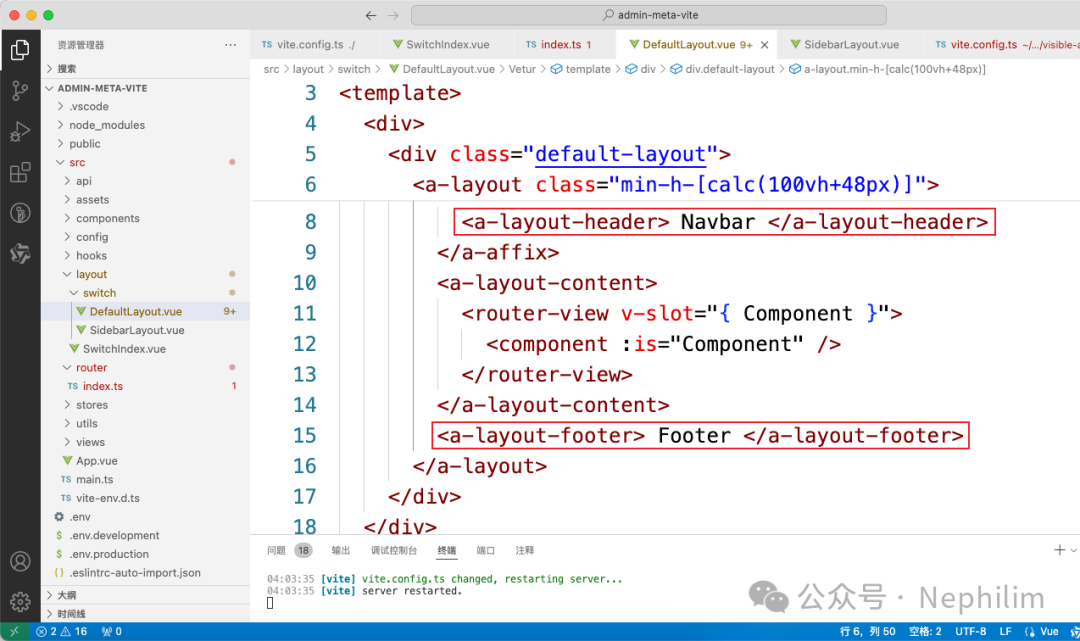
文件「src/layout/switch/DefaultLayout.vue」
<script setup></script><template><div><div class="default-layout"><a-layout class="min-h-[calc(100vh+48px)]"><a-affix><a-layout-header> Navbar </a-layout-header></a-affix><a-layout-content><router-view v-slot="{ Component }"><component :is="Component" ></router-view></a-layout-content><a-layout-footer> Footer </a-layout-footer></a-layout></div></div></template><style scoped>@apply .default-layout :deep(.arco-layout-header),.default-layout :deep(.arco-layout-footer),.default-layout :deep(.arco-layout-content) {@apply text-[var(--color-text-1)] text-14px;}.default-layout :deep(.arco-layout-header) {@apply w-full h-58px overflow-hidden;@apply bg-[var(--color-bg-3)] border-b-[var(--color-border-1)] border-b-solid border-b-width-1px box-border;}.default-layout :deep(.arco-layout-content) {@apply flex flex-col justify-center items-center;@apply bg-[var(--color-bg-1)] relative;}.default-layout :deep(.arco-layout-footer) {@apply w-full flex justify-center items-center;@apply border-t-[var(--color-border-1)] border-t-solid border-t-width-1px box-border;@apply bg-[var(--color-bg-2)] text-[var(--color-text-1)] text-14px;}</style>
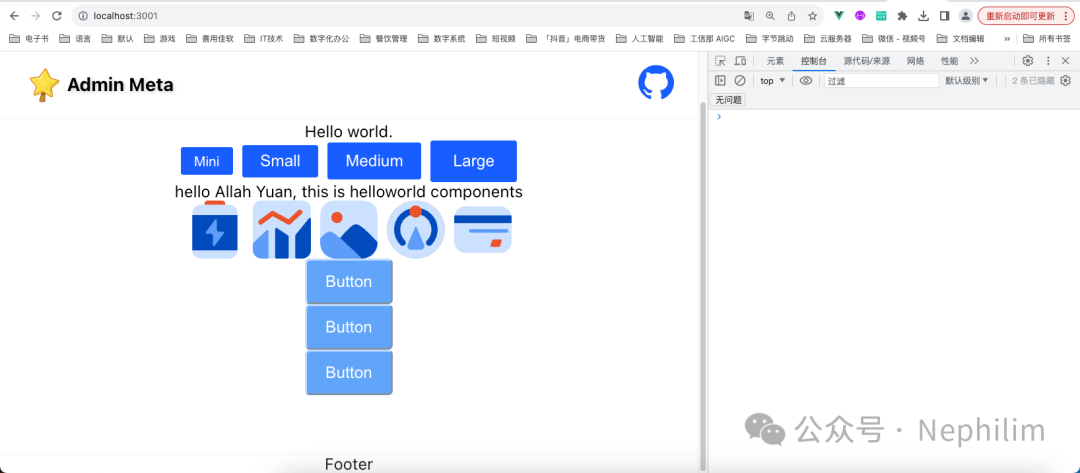
当你完成了上述的配置后,你的前端页面就会变成这样:
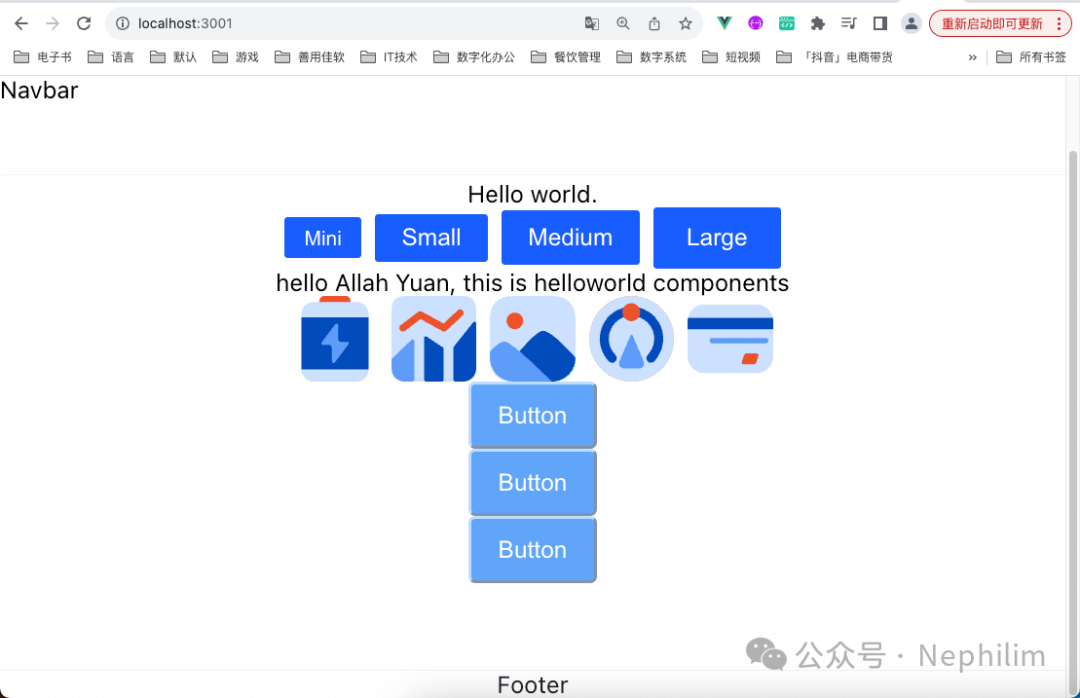
可以看到,在「DefaultLayout」中配置的「header footer」已经生效了:
04
具体配置:进阶配置(组件等)
像上面设置的那样:
这部分设计到的组件会在「src/layout/components」中创建。
05
导航栏的「Logo」组件的定制
文件说明:
| src/layout/components/Nav.vue | 设置「左 中 右」的「slot」留给调用该组件的时候进行设置 |
| src/layout/components/Logo.vue | 设置Logo,包括图标与文字 |
| src/layout/switch/DefaultLayout.vue | 引用「Nav」与「Logo」组件,定义布局 |
文件「src/layout/switch/DefaultLayout.vue」
<script setup></script><template><div><div class="default-layout"><a-layout class="min-h-[calc(100vh+48px)]"><a-affix><a-layout-header><Navbar><!-- left插槽 --><template #left><Logo ></template><!-- 默认插槽和center插槽,默认插槽可不加template直接写内容,作用同center插槽 --><template #center></template><!-- right插槽 --><template #right></template></Navbar></a-layout-header></a-affix><a-layout-content><router-view v-slot="{ Component }"><component :is="Component" ></router-view></a-layout-content><a-layout-footer> Footer </a-layout-footer></a-layout></div></div></template><style scoped>@apply .default-layout :deep(.arco-layout-header),.default-layout :deep(.arco-layout-footer),.default-layout :deep(.arco-layout-content) {@apply text-[var(--color-text-1)] text-14px;}.default-layout :deep(.arco-layout-header) {@apply w-full h-58px overflow-hidden;@apply bg-[var(--color-bg-3)] border-b-[var(--color-border-1)] border-b-solid border-b-width-1px box-border;}.default-layout :deep(.arco-layout-content) {@apply flex flex-col justify-center items-center;@apply bg-[var(--color-bg-1)] relative;}.default-layout :deep(.arco-layout-footer) {@apply w-full flex justify-center items-center;@apply border-t-[var(--color-border-1)] border-t-solid border-t-width-1px box-border;@apply bg-[var(--color-bg-2)] text-[var(--color-text-1)] text-14px;}</style>
文件「src/layout/components/Nav.vue」
<template><div class="w-full h-full flex px-20px box-border"><div class="h-full flex"><slot name="left" ></div><div class="h-full flex-1"><slot ><slot name="center" ></div><div class="h-full flex flex-shrink-0 items-center"><div><slot name="right" ></div></div></div></template>
文件「src/layout/components/Logo.vue」
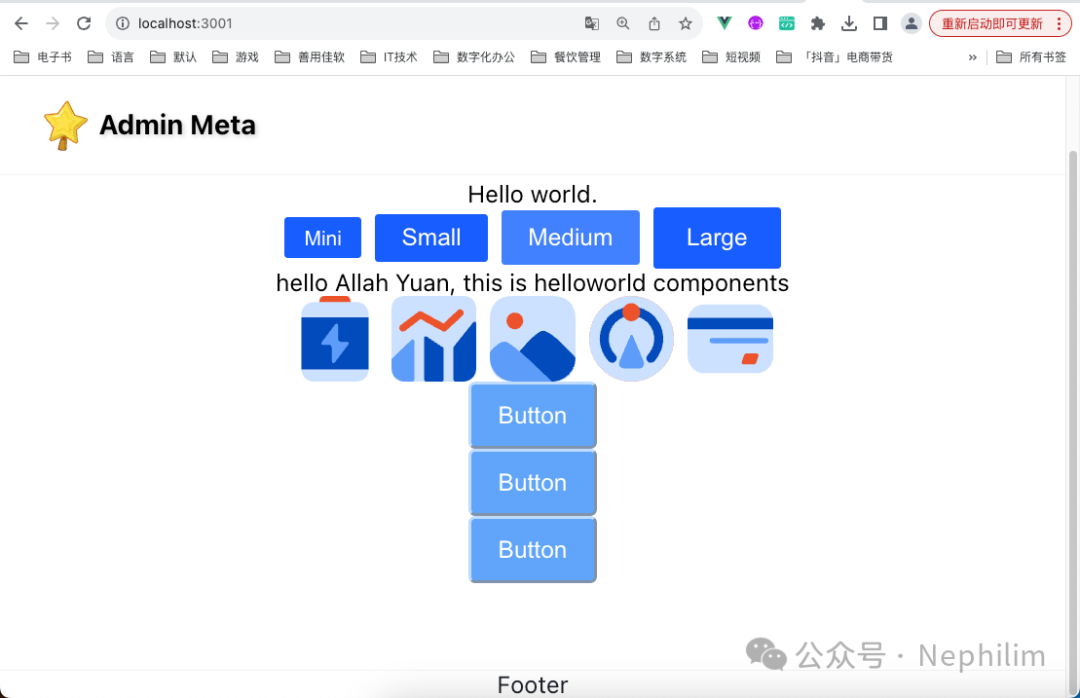
<script setup>const route = useRoute()const title = useTitle()watchEffect(() => {title.value = route.meta.title || 'Admin Meta'})</script><template><divclass="h-full flex items-center text-16px font-700 text-shadow-sm cursor-pointer"@click="$router.push('/')"><divclass="w-36px h-36px rounded-[50%] flex justify-center items-center mr-2px cursor-pointer"hover="bg-[var(--color-fill-1)]"><!-- Logo的图标 --><!--<icon-ri-hammer-fill class="text-18px" >--><svg-icon class="icon" size="50" name="星"></svg-icon></div><!-- Logo的文字 -->{{ title }}</div></template>
这个时候,前端页面的效果是:
06
导航栏的「Github」组件的定制
文件「src/layout/components/Github.vue」
<script setup>import { getConfig } from '@/config/config'const openNewWindow = () => window.open(getConfig('github'), '_blank')</script><template><a-button type="text" @click="openNewWindow"><template #icon><!--<icon-mdi-github class="text-[var(--color-text-1)] text-16px" >--><svg-icon class="icon" size="35" name="github-fill"></svg-icon></template></a-button></template>
文件「src/layout/switch/DefaultLayout.vue」
<script setup></script><template><div><div class="default-layout"><a-layout class="min-h-[calc(100vh+48px)]"><a-affix><a-layout-header><Navbar><!-- left插槽 --><template #left><Logo ></template><!-- 默认插槽和center插槽,默认插槽可不加template直接写内容,作用同center插槽 --><template #center></template><!-- right插槽 --><template #right><Github ></template></Navbar></a-layout-header></a-affix><a-layout-content><router-view v-slot="{ Component }"><component :is="Component" ></router-view></a-layout-content><a-layout-footer> Footer </a-layout-footer></a-layout></div></div></template><style scoped>@apply .default-layout :deep(.arco-layout-header),.default-layout :deep(.arco-layout-footer),.default-layout :deep(.arco-layout-content) {@apply text-[var(--color-text-1)] text-14px;}.default-layout :deep(.arco-layout-header) {@apply w-full h-58px overflow-hidden;@apply bg-[var(--color-bg-3)] border-b-[var(--color-border-1)] border-b-solid border-b-width-1px box-border;}.default-layout :deep(.arco-layout-content) {@apply flex flex-col justify-center items-center;@apply bg-[var(--color-bg-1)] relative;}.default-layout :deep(.arco-layout-footer) {@apply w-full flex justify-center items-center;@apply border-t-[var(--color-border-1)] border-t-solid border-t-width-1px box-border;@apply bg-[var(--color-bg-2)] text-[var(--color-text-1)] text-14px;}</style>
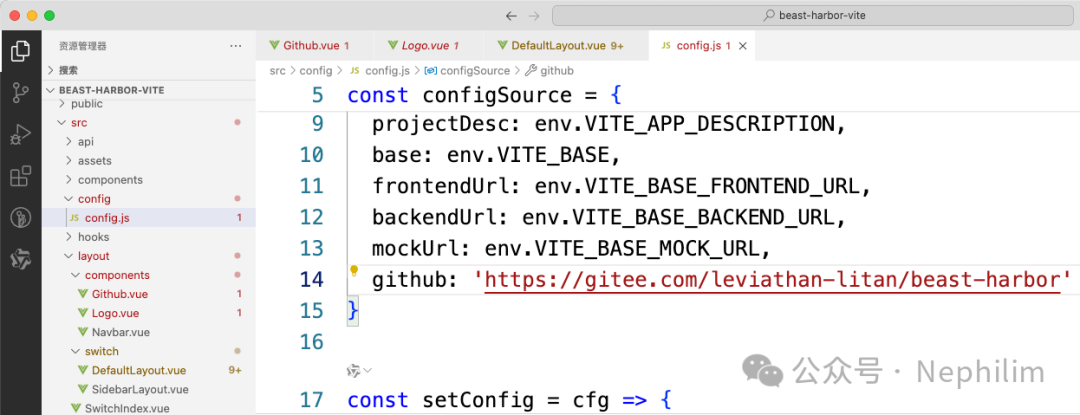
文件「src/config/config.js」
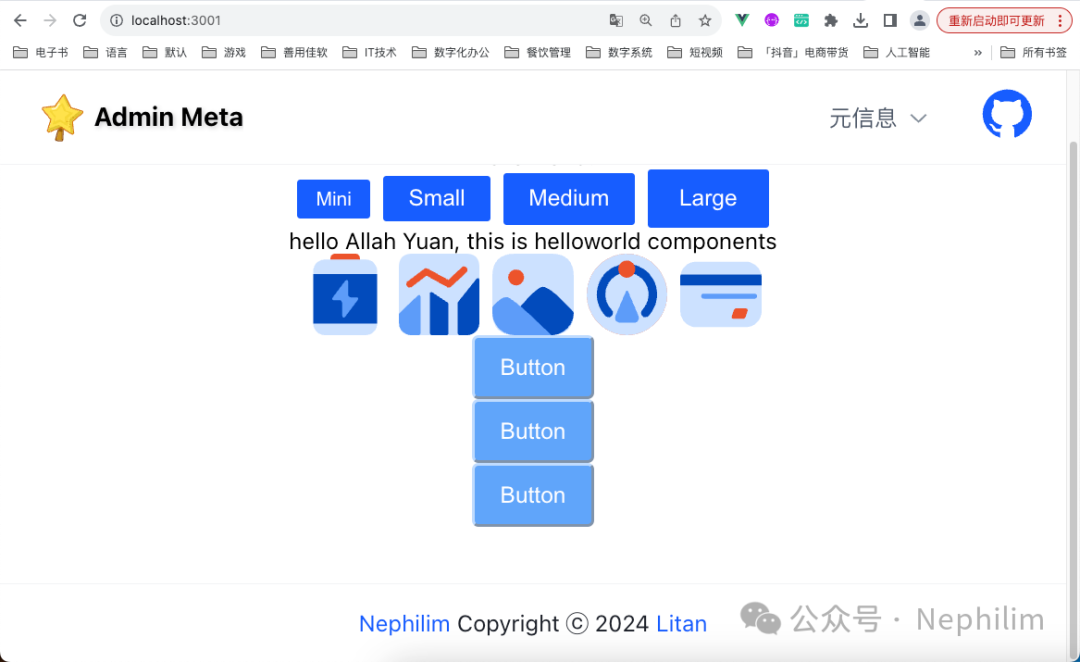
最终效果:
07
菜单组件
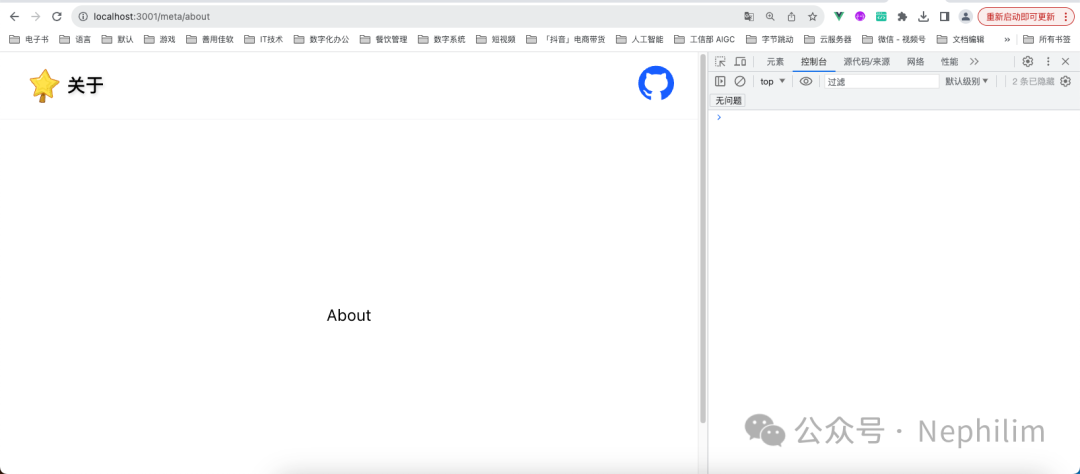
为了演示菜单功能,先创建样例页面「About」
文件「src/views/About/index.vue」
<script setup></script><template><div>About</div></template><style scoped></style>
然后,修改路由的配置:
文件「src/router/index.ts」
import { createRouter, createWebHistory } from 'vue-router'import {menuRouter} from './menuRouter'const router = createRouter({history: createWebHistory(import.meta.env.BASE_URL),routes: [{path: '/',name: 'Layout',component: () => import('@/layout/SwitchIndex.vue'),redirect: '/',children: [{path: '/',name: 'HomeView',component: () => import('@/views/HomeView.vue'),meta: {// title: '首页'}},// 菜单路由...menuRouter,]}]})export default router
文件「src/router/menuRouter.js」
export const menuRouter = [{path: 'meta',name: 'Meta',meta: {title: '元信息',// icon: xxx},redirect: {name: 'About'},children: [{path: 'about',name: 'About',meta: {title: "关于"},component: () => import('@/views/About/index.vue')}]}]export const menuRouterFormat = (router, parentPath) => {return router.map(item => {// 拼接路由,例:'devtools' -> '/devtools' 'regular' -> '/devtools/regular'item.path = parentPath ? `${parentPath}/${item.path}` : `/${item.path}`// 存在 children 属性,且 children 数组长度大于 0,开始递归if (item.children && item.children.length > 0) {item.children = menuRouterFormat(item.children, item.path)}return Object.assign({}, item, item.meta || {})})}// 解析后 路由菜单列表export const menuRouterFormatList = menuRouterFormat([...menuRouter])
前端页面访问路由配置,看看是否生效:
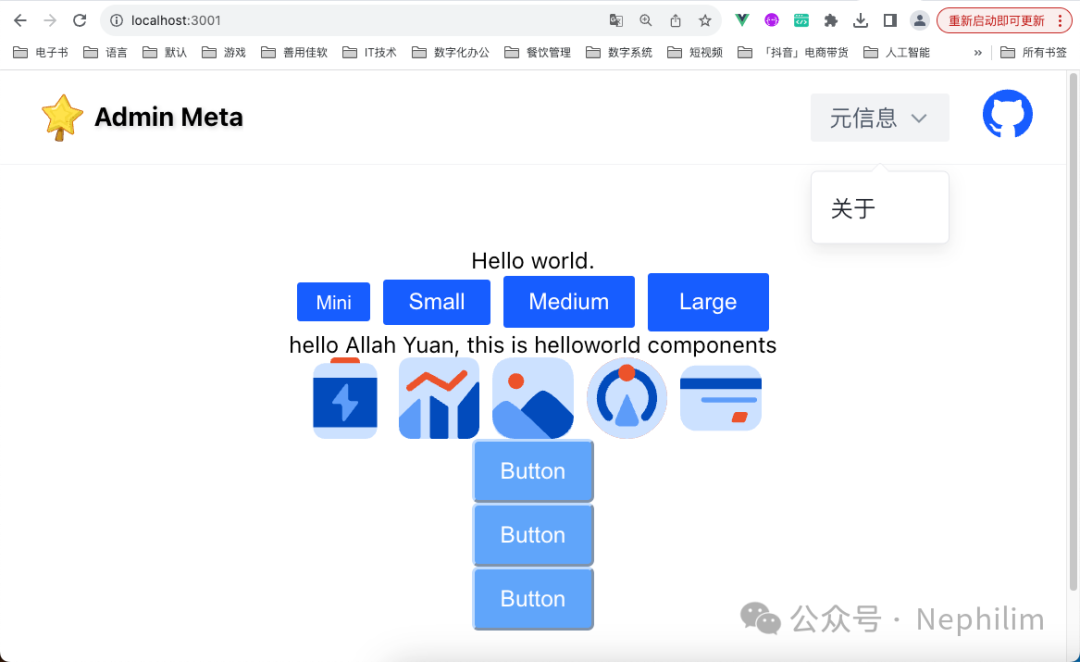
路由配置修改好了以后,开始配置「多布局」中的组件「components/Menu」
文件「src/layout/components/Menu/index.vue」
<script setup>import { menuRouterFormatList } from '@/router/menuRouter.js'const props = defineProps({mode: {type: String,default: 'horizontal'}})// 菜单模式,horizontal 水平,vertical 垂直const mode = toRef(props, 'mode')// 菜单数据const menuList = ref(menuRouterFormatList)const router = useRouter()// 子菜单点击事件const onClickMenuItem = key => {router.push(key)}const route = useRoute()// 当前选中菜单const selectedKeys = computed(() => [route.path])</script><template><a-menuclass="menu"auto-open-selected:selected-keys="selectedKeys"@menuItemClick="onClickMenuItem":mode="mode":accordion="true"><MenuItem v-for="menu of menuList" :key="menu.path" :menu="menu" ></a-menu></template><style scoped>.menu.arco-menu-horizontal {@apply bg-[var(--color-bg-3)];}.menu.arco-menu-horizontal :deep(.arco-menu-icon) {@apply mr-4px leading-[1.2] flex-none align-inherit;}.menu.arco-menu-horizontal :deep(.arco-menu-pop-header) {@apply bg-transparent;}.menu.arco-menu-horizontal :deep(.arco-menu-pop-header):hover {@apply bg-[var(--color-fill-2)];}.menu :deep(.arco-menu-overflow-wrap) {@apply flex justify-end;}</style>
文件「src/layout/components/Menu/MenuItem.vue」
<script setup>const props = defineProps({menu: {type: Object,required: true}})const { menu } = toRefs(props)</script><template><template v-if="!menu.children"><a-menu-item :key="menu.path"><template #icon v-if="menu?.icon"><component :is="menu?.icon"></component></template>{{ menu.title }}</a-menu-item></template><a-sub-menu v-else :key="menu.path" :title="menu.title"><template #icon v-if="menu?.icon"><component :is="menu?.icon"></component></template><MenuItemv-for="menuChild of menu.children":key="menuChild.path":menu="menuChild"></a-sub-menu></template><style scoped></style>
最后,修改默认布局「src/layout/switch/DefaultLayout.vue」
<script setup></script><template><div><div class="default-layout"><a-layout class="min-h-[calc(100vh+48px)]"><a-affix><a-layout-header><Navbar><!-- left插槽 --><template #left><Logo ></template><!-- 默认插槽和center插槽,默认插槽可不加template直接写内容,作用同center插槽 --><template #center><Menu ></template><!-- right插槽 --><template #right><Github ></template></Navbar></a-layout-header></a-affix><a-layout-content><router-view v-slot="{ Component }"><component :is="Component" ></router-view></a-layout-content><a-layout-footer> Footer </a-layout-footer></a-layout></div></div></template><style scoped>@apply .default-layout :deep(.arco-layout-header),.default-layout :deep(.arco-layout-footer),.default-layout :deep(.arco-layout-content) {@apply text-[var(--color-text-1)] text-14px;}.default-layout :deep(.arco-layout-header) {@apply w-full h-58px overflow-hidden;@apply bg-[var(--color-bg-3)] border-b-[var(--color-border-1)] border-b-solid border-b-width-1px box-border;}.default-layout :deep(.arco-layout-content) {@apply flex flex-col justify-center items-center;@apply bg-[var(--color-bg-1)] relative;}.default-layout :deep(.arco-layout-footer) {@apply w-full flex justify-center items-center;@apply border-t-[var(--color-border-1)] border-t-solid border-t-width-1px box-border;@apply bg-[var(--color-bg-2)] text-[var(--color-text-1)] text-14px;}</style>
最终效果:
08
页脚组件
文件「src/config/config.js」
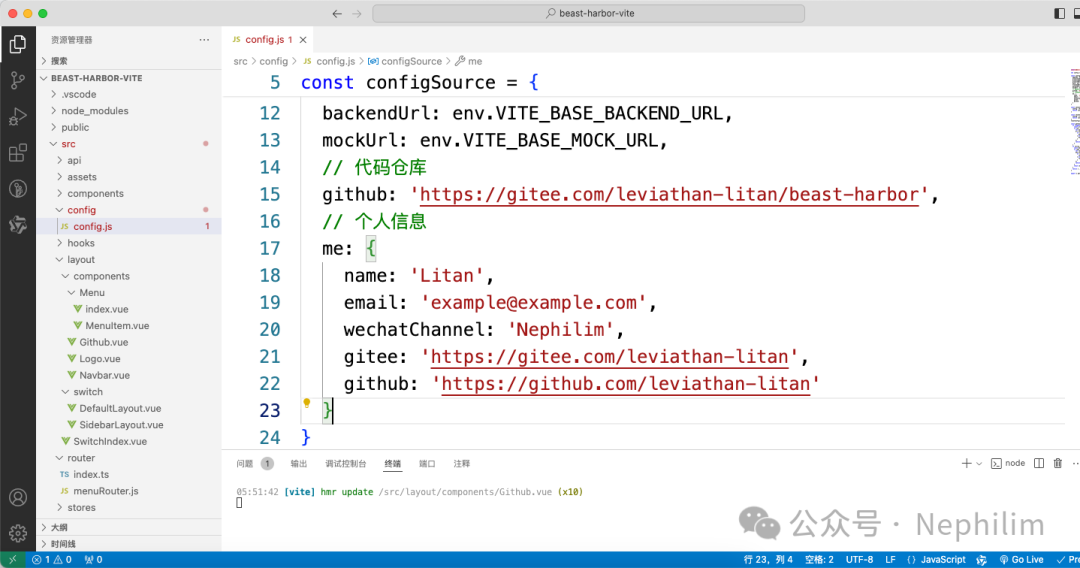
当前文件完整内容:
const env = import.meta.envlet config = {}const configSource = {appCode: env.VITE_APP_CODE,projectCode: `${env.VITE_APP_CODE}_${env.VITE_APP_ENV}`,projectName: env.VITE_APP_NAME,projectDesc: env.VITE_APP_DESCRIPTION,base: env.VITE_BASE,frontendUrl: env.VITE_BASE_FRONTEND_URL,backendUrl: env.VITE_BASE_BACKEND_URL,mockUrl: env.VITE_BASE_MOCK_URL,// 代码仓库github: 'https://gitee.com/leviathan-litan/beast-harbor',// 个人信息me: {name: 'Litan',email: 'example@example.com',wechatChannel: 'Nephilim',gitee: 'https://gitee.com/leviathan-litan',github: 'https://github.com/leviathan-litan'}}const setConfig = cfg => {config = Object.assign(config, cfg)return config}const resetConfig = () => {config = { ...configSource }return config}resetConfig()const getConfig = key => {if (typeof key === 'string') {const arr = key.split('.')if (arr && arr.length) {let data = configarr.forEach(v => {if (data && typeof data[v] !== 'undefined') {data = data[v]} else {data = null}})return data}}if (Array.isArray(key)) {const data = configif (key && key.length > 1) {let res = {}key.forEach(v => {if (data && typeof data[v] !== 'undefined') {res[v] = data[v]} else {res[v] = null}})return res}return data[key]}return { ...config }}export { getConfig, setConfig, resetConfig }
文件「src/layout/components/Footer.vue」
<script setup>import { getConfig } from '@/config/config'</script><template><div class="w-1200px flex justify-between items-center min-h-48px"><div class="w-full h-48px flex justify-center items-center"><a-triggerposition="top"auto-fit-position:unmount-on-close="false":popup-offset="10":show-arrow="true"><a-link :href="getConfig('me.gzh')">{{ getConfig('me.wechatChannel') }}</a-link><template #content><a-image width="100" :src="getConfig('me.wechatChannelImage')" ></template></a-trigger><span> Copyright ⓒ 2024</span><a-link :href="getConfig('me.github')" target="_blank">{{ getConfig('me.name') }}</a-link><!--<a-link href="<https://beian.miit.gov.cn/>" target="_blank">{{ getConfig('icp') }}</a-link>--></div></div></template>
文件「src/layout/switch/DefaultLayout.vue」
<script setup></script><template><div><div class="default-layout"><a-layout class="min-h-[calc(100vh+48px)]"><a-affix><a-layout-header><Navbar><!-- left插槽 --><template #left><Logo ></template><!-- 默认插槽和center插槽,默认插槽可不加template直接写内容,作用同center插槽 --><template #center><Menu ></template><!-- right插槽 --><template #right><Github ></template></Navbar></a-layout-header></a-affix><a-layout-content><router-view v-slot="{ Component }"><component :is="Component" ></router-view></a-layout-content><a-layout-footer><Footer ></a-layout-footer></a-layout></div></div></template><style scoped>@apply .default-layout :deep(.arco-layout-header),.default-layout :deep(.arco-layout-footer),.default-layout :deep(.arco-layout-content) {@apply text-[var(--color-text-1)] text-14px;}.default-layout :deep(.arco-layout-header) {@apply w-full h-58px overflow-hidden;@apply bg-[var(--color-bg-3)] border-b-[var(--color-border-1)] border-b-solid border-b-width-1px box-border;}.default-layout :deep(.arco-layout-content) {@apply flex flex-col justify-center items-center;@apply bg-[var(--color-bg-1)] relative;}.default-layout :deep(.arco-layout-footer) {@apply w-full flex justify-center items-center;@apply border-t-[var(--color-border-1)] border-t-solid border-t-width-1px box-border;@apply bg-[var(--color-bg-2)] text-[var(--color-text-1)] text-14px;}</style>
页面效果:
09
多布局:边栏布局
至此,上面完成了「多布局」的默认布局。
下面开始设置「边栏布局」。
首先,将布局写死为「边栏布局」,以便于调试代码:
文件「src/layout/SwitchIndex.vue」
<script setup></script><template><div class="switch-index"><!-- <component :is="" > --><!-- <DefaultLayout > --><SidebarLayout ></div></template><style scoped></style>
文件「src/layout/switch/SidebarLayout.vue」
<script setup></script><template><div>SidebarLayout<router-view v-slot="{ Component }"><component :is="Component" /></router-view></div></template><style scoped></style>
这时候的效果:
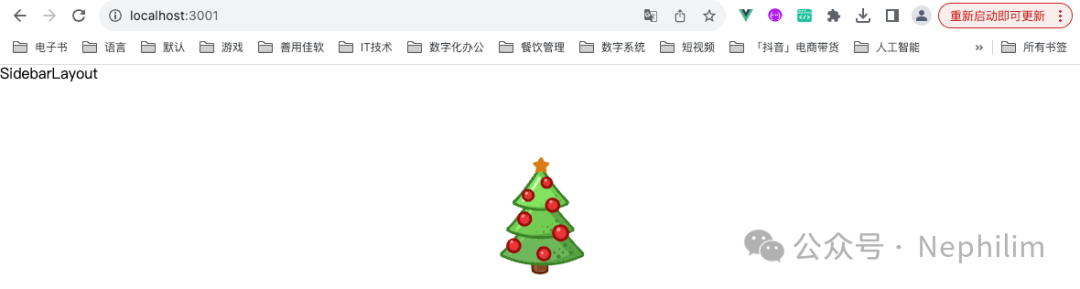
可以看到「SidebarLayout」的效果已经生效,接下来需要「精调」。
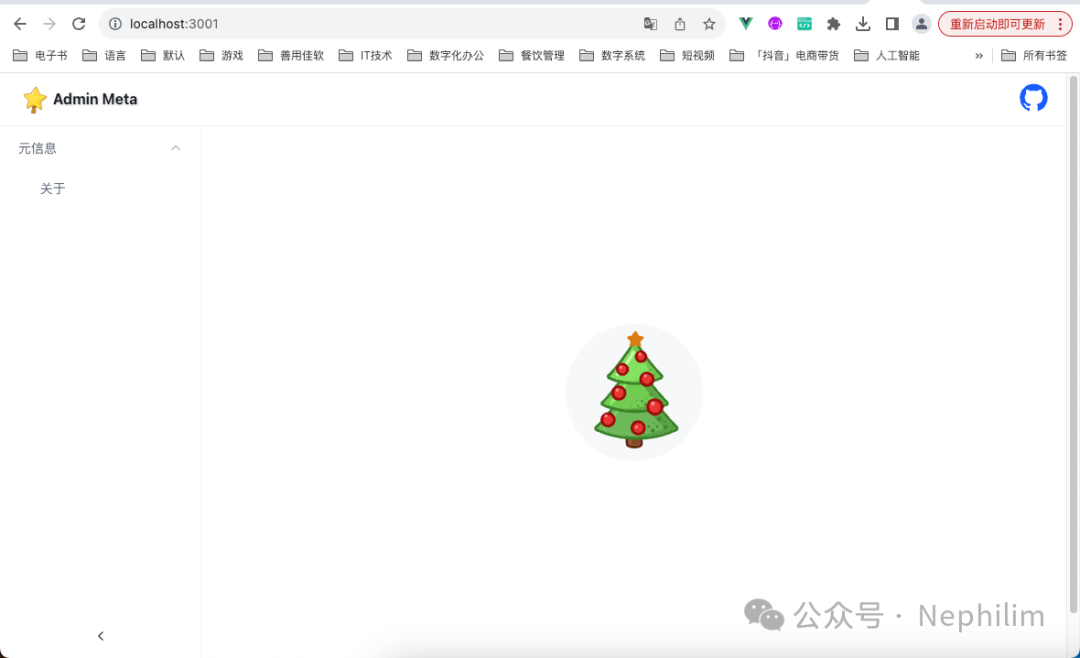
「Menu」组件添加参数:
文件「src/layout/components/Menu/index.vue」
<script setup>import { menuRouterFormatList } from '@/router/menuRouter.js'const props = defineProps({mode: {type: String,default: 'horizontal'}})// 菜单模式,horizontal 水平,vertical 垂直const mode = toRef(props, 'mode')// 菜单数据const menuList = ref(menuRouterFormatList)const router = useRouter()// 子菜单点击事件const onClickMenuItem = key => {router.push(key)}const route = useRoute()// 当前选中菜单const selectedKeys = computed(() => [route.path])</script><template><a-menuclass="menu"auto-open-selected:selected-keys="selectedKeys"@menuItemClick="onClickMenuItem":mode="mode":accordion="true"><MenuItem v-for="menu of menuList" :key="menu.path" :menu="menu" /></a-menu></template><style scoped>.menu.arco-menu-horizontal {@apply bg-[var(--color-bg-3)];}.menu.arco-menu-horizontal :deep(.arco-menu-icon) {@apply mr-4px leading-[1.2] flex-none align-inherit;}.menu.arco-menu-horizontal :deep(.arco-menu-pop-header) {@apply bg-transparent;}.menu.arco-menu-horizontal :deep(.arco-menu-pop-header):hover {@apply bg-[var(--color-fill-2)];}.menu :deep(.arco-menu-overflow-wrap) {@apply flex justify-end;}</style>
文件「src/layout/switch/SidebarLayout.vue」
<script>export default {name: 'SidebarLayout',title: '边栏布局'}</script><script setup>// 侧边栏收缩状态const collapsed = ref(false)// 侧边栏收缩触发事件const handleCollapse = (val, type) => {const content = type === 'responsive' ? '响应式触发' : '点击触发'console.log(`${content}侧边栏,当前状态:${val}`)collapsed.value = val}</script><template><div class="sidebar-layout"><a-layout><a-affix><a-layout-header><Navbar><template #left> <Logo /> </template><template #right><SwitchMode /><SwitchLayout /><Github /></template></Navbar></a-layout-header></a-affix><a-layout><a-affix :offsetTop="58"><a-layout-siderbreakpoint="lg":width="220"height="calc(100vh-58px)"collapsible:collapsed="collapsed"@collapse="handleCollapse"><Menu mode="vertical" /></a-layout-sider></a-affix><a-layout><a-layout-content class="min-h-[calc(100vh-58px)]"><router-view v-slot="{ Component }"><transition name="fade-x"><component :is="Component" /></transition></router-view></a-layout-content><a-layout-footer> <Footer /> </a-layout-footer></a-layout></a-layout></a-layout></div></template><style scoped>.sidebar-layout :deep(.arco-layout-header),.sidebar-layout :deep(.arco-layout-footer),.sidebar-layout :deep(.arco-layout-content) {@apply text-[var(--color-text-1)] text-14px;}.sidebar-layout :deep(.arco-layout-header) {@apply w-full h-58px;@apply bg-[var(--color-bg-3)] border-b-[var(--color-border-1)] border-b-solid border-b-width-1px box-border;}.sidebar-layout :deep(.arco-layout-content) {@apply flex flex-col items-center;@apply bg-[var(--color-bg-1)] relative;}.sidebar-layout :deep(.arco-layout-footer) {@apply w-full flex justify-center items-center;@apply border-t-[var(--color-border-1)] border-t-solid border-t-width-1px box-border;@apply bg-[var(--color-bg-2)] text-[var(--color-text-1)] text-14px;}.sidebar-layout :deep(.arco-layout-sider) {@apply h-[calc(100vh-58px)];}.sidebar-layout :deep(.arco-layout-sider),.sidebar-layout :deep(.arco-layout-sider-trigger) {@apply border-r-[var(--color-border-1)] border-r-solid border-r-width-1px box-border;}</style>
这时候的页面效果:
END
温馨提示
如果你喜欢本文,请分享到朋友圈,想要获得更多信息,请关注我。
