



Tips:一些记录,一些笔记

2023/1/21
SUNDAY
人生的真相是这样的:
我敢骂世界,骂上帝;
我毁谤佛祖,我睥睨天下;
但是我不敢骂路过的行人 和 每个周末都在装修的邻居。
—— 李诞(脱口秀)

01
Vue.JS:组件的生命周期
生命周期(Life Cycle)是指一个组件从 创建、运行,到销毁的整个过程,它强调的是一个【时间段】。
生命周期函数:
Vue框架提供的内置函数,会伴随着组件的生命周期,自动地按序执行。
生命周期函数强调的是【时间点】。
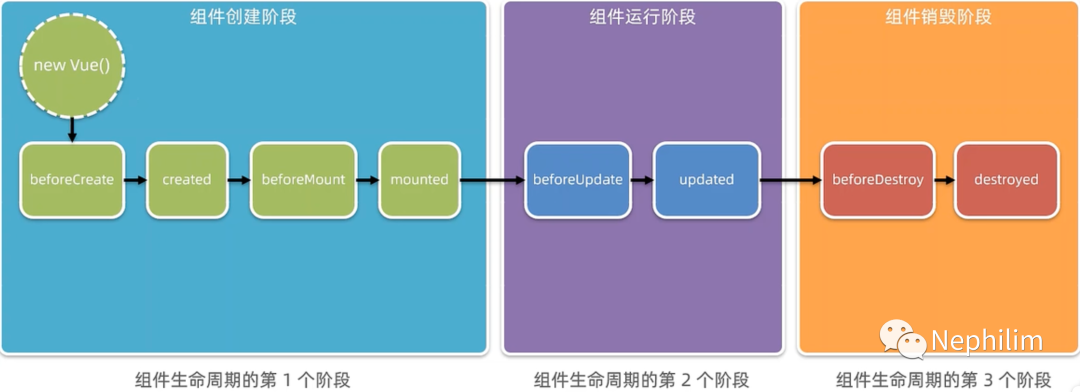
具体如下:
| 组件创建阶段 | new Vue() | 构造函数 |
| beforeCreate | 创建前 | |
| created | 已创建 | |
| beforeMount | 挂载(渲染页面)前 | |
| mounted | 已挂载(渲染) | |
| 组件运行阶段 | beforeUpdate | 数据更新前 |
| updated | 已更新 | |
| 组件销毁阶段 | beforeDestroy | 实例销毁前 |
| destroyed | 已销毁 |
02
生命周期图示(Life Cycle)
Vue.JS官方给出了「生命周期图示」:
https://v2.cn.vuejs.org/v2/guide/instance.html
Vue.JS官方的介绍:
下图展示了实例的生命周期。你不需要立马弄明白所有的东西,不过随着你的不断学习和使用,它的参考价值会越来越高。
https://v2.cn.vuejs.org/v2/guide/instance.html
具体如下:
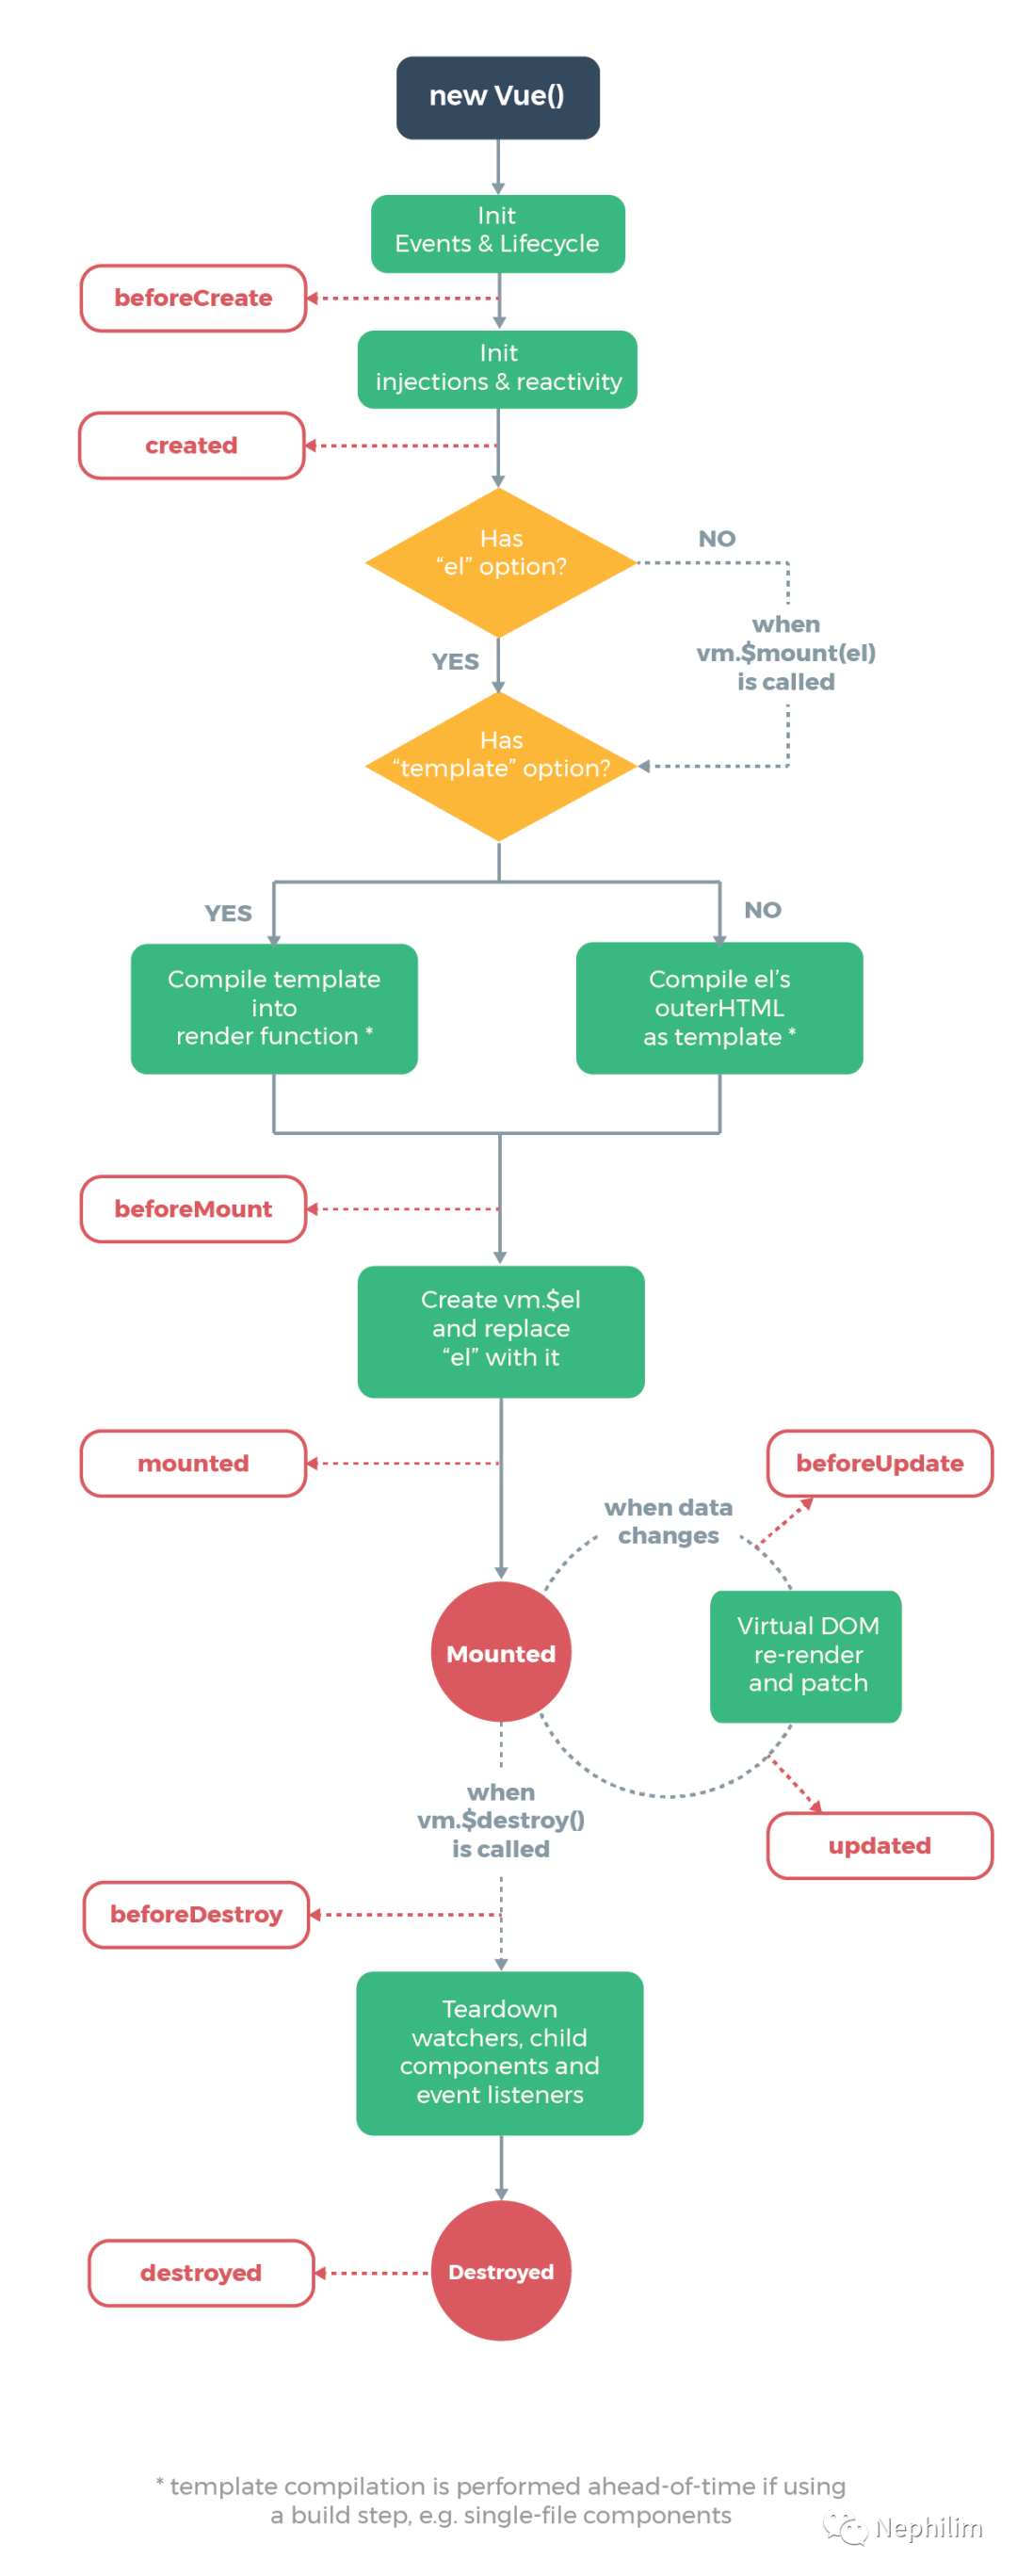
一个Vue.JS的组件,本质上也是一个Vue.JS的实例。
其中:
| created() | 这个方法非常常用,经常会用这个方法中发送Ajax请求,获取初始数据,并把请求的数据转存到data中,以供template模板渲染使用。 |
| beforeMount() | 将要把内存中编译好的HTML结构渲染到浏览器中; |
| Create vm.$el and replace 'el' with it | 用内存中编译生成的HTML结构替换掉el属性指定的DOM元素 |
| mounted() | 已经把内存中的HTML结构,成功的渲染到了浏览器中,这个时候浏览器中已经包含了当前组件的DOM结构; 如果要操纵DOM,最早只能在这个阶段执行。 |
| beforeUpdate() | 将要根据变化过后、最新的数据,重新渲染组件的模板结构 |
| Virtual DOM re-render and patch | 根据最新的数据,重新渲染组件的DOM结构 |
03
组件之间的数据共享:父子组件
组件之间的关系:
在项目开发中,组件之间最常见的关系:父子关系、兄弟关系;
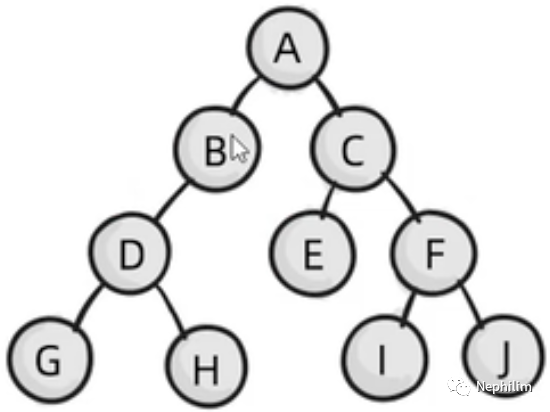
父子组件之间的数据共享:
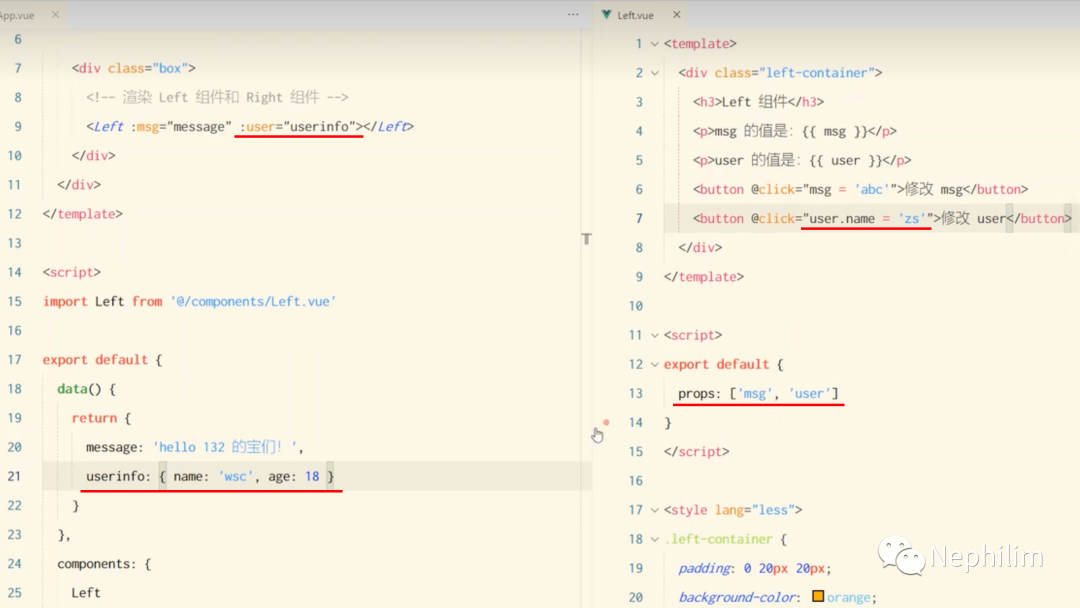
【父组件向子组件传递数据】可以通过子组件的自定义属性;
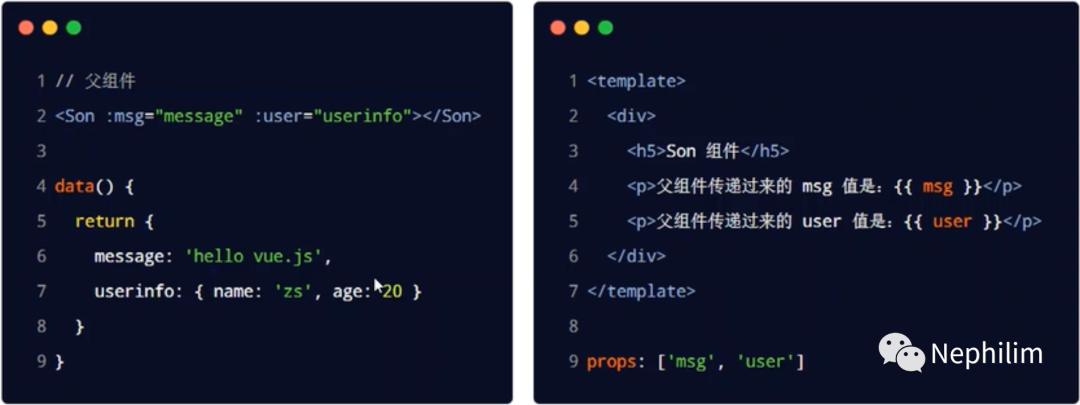
【子组件修改父组件中的数据】:但是实际开发中,不应该这么操作
【子组件向父组件传递数据】
子组件向父组件共享数据,需要使用自定义事件,具体方法如下:
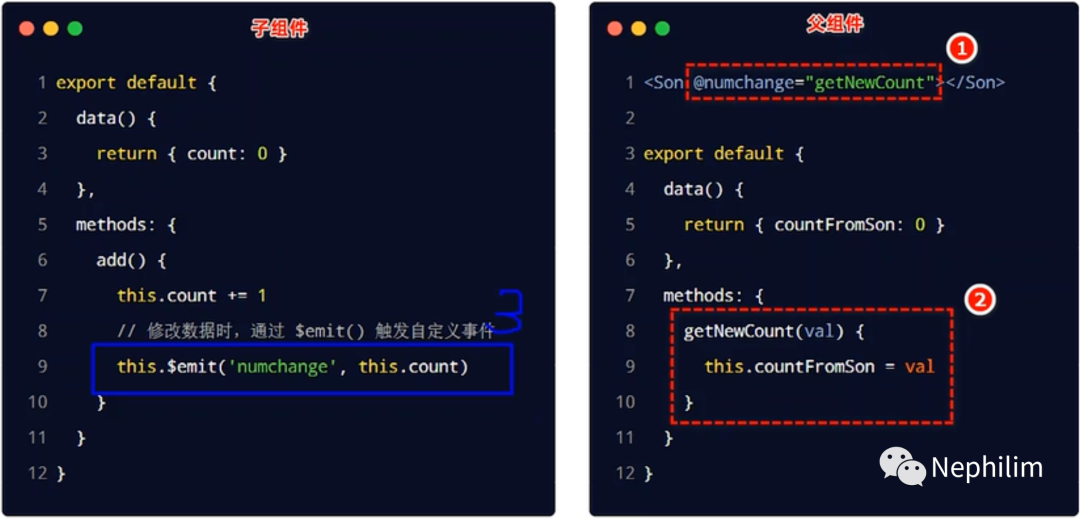
代码:
子组件:Right.vue
<template><div class="right-container"><h3>Right 组件</h3><p>子组件的Count:【{{ count }}】</p><button @click="add">Add</button><!-- <leviathan-count :init="3"></leviathan-count> --></div></template><script>export default {data() {return {// 子组件自己的数据// 后续会将子组件的这个数据传递给父组件count: 0}},methods: {add() {this.count ++// 自定义事件this.$emit('countChange', this.count)}}}</script><style lang="less">.right-container {padding: 0 20px 20px;background-color: lightskyblue;min-height: 250px;flex: 1;}</style>
父组件:Main.vue
<template><div class="app-container"><h1>根组件: Main.vue</h1><h3>The Three-Body Problem 三体问题</h3><p>从子组件「Right.vue」接受的数据 count:【{{ countFromRight }}】</p><!-- <lifecycle info="一人之下"></lifecycle> --><div class="box"><!-- 在这里渲染组件 --><!-- 使用组件:3. 通过HTML标签的形式,使用组件 --><left></left><right @countChange="updateCountFromRight"></right></div></div></template><script>// 使用组件:1. 导入需要的组件import Left from '@/components/Left.vue';import Right from '@/components/Right.vue';import LifeCycle from '@/components/LifeCycle.vue';export default {data () {return {countFromRight: 0}},// 使用组件:2. 注册组件components: {"left": Left,'right': Right,'lifecycle': LifeCycle},methods: {updateCountFromRight(newVal) {this.countFromRight = newVal}}}</script><style lang="less">.app-container {pedding: 1px 20px 20px;background-color: #efefef;}.box {display: flex;}</style>
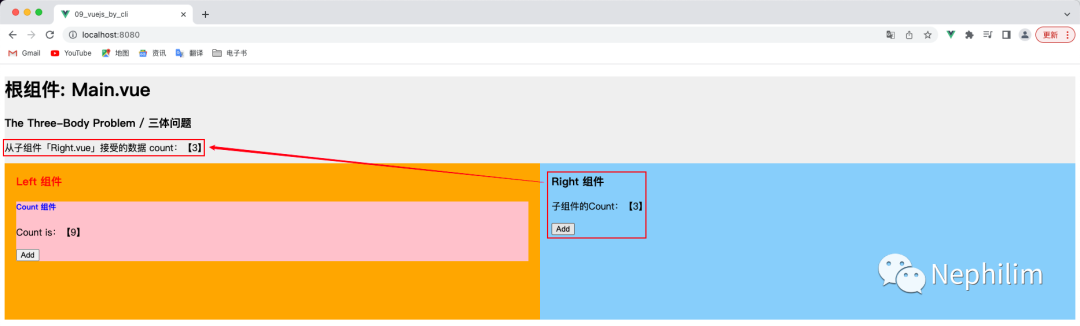
在浏览器中查看执行效果:
04
组件之间的数据共享:兄弟组件
在Vue.JS 2.x中,兄弟组件之间的数据共享是通过「EventBus」实现的。
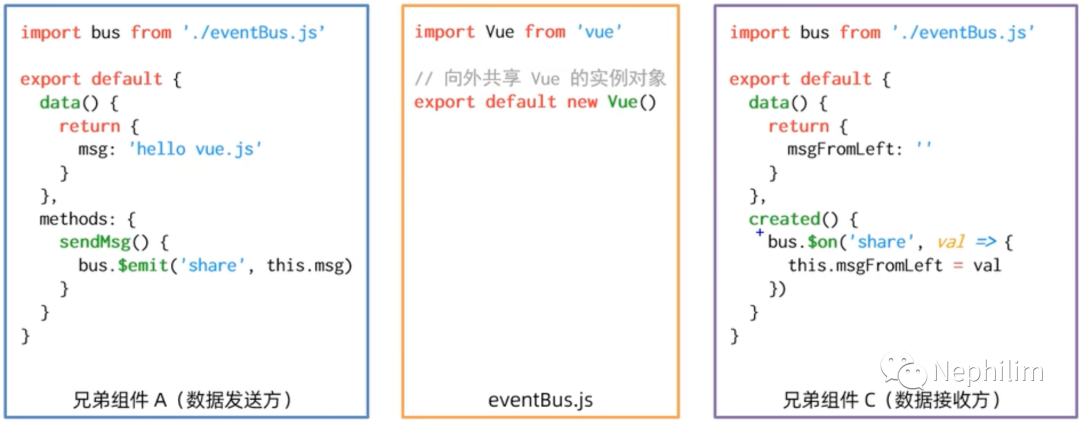
步骤:
| 1 | 创建eventBus.js模块,并向外共享一个Vue的实例对象 |
| 2 | 在数据的发送方,通过【bus.$emit('事件名称', 要发送的数据)】方法,触发自定义事件 |
| 3 | 在数据的接收方,通过【bus.$on('事件名称', 事件处理函数)】方法,注册一个自定义事件 |
例子:兄弟组件之间的数据共享
项目结构:
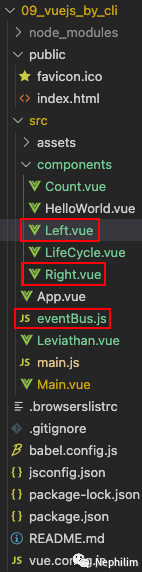
创建【src/eventBus.js】
import Vue from "vue";// 向外共享Vue的实例对象export default new Vue()
发送方组件【Left.vue】
<template><div class="left-container"><h3>Left 组件</h3><textarea name="" id="" v-model="str" rows="5" cols="50"></textarea><br><button @click="sendStr">向「Right.vue」发送数据</button><!-- 通过 v-model 可以将传给组件的数字强行转换成 Number 格式 --><leviathan-count :init="9"></leviathan-count></div></template><script>// 导入 eventBusimport bus from "@/eventBus.js"export default {data() {return {str: "「剑气纵横三万里一剑光寒十九洲」古龙《三少爷的剑》"}},methods: {sendStr() {bus.$emit('shareData', this.str)}}}</script><style lang="less" scoped>.left-container {padding: 0 20px 20px;background-color: orange;min-height: 250px;flex: 1;}h3 {color:red;}deep/ h5 {color: blue;}</style>
接收方组件【Right.vue】
<template><div class="right-container"><h3>Right 组件</h3><p>来自节点 「Left.vue」 的数据【{{ strFromLeft }}】</p><hr><p>子组件的Count:【{{ count }}】</p><button @click="add">Add</button><!-- <leviathan-count :init="3"></leviathan-count> --></div></template><script>//导入 eventBusimport bus from "@/eventBus.js"export default {data() {return {// 子组件自己的数据// 后续会将子组件的这个数据传递给父组件count: 0,// 来自兄弟节点的数据strFromLeft: ""}},methods: {add() {this.count ++// 自定义事件this.$emit('countChange', this.count)}},created() {// 数据的接收方绑定自定义事件bus.$on('shareData', newVal => {// 将自定义事件传递过来的数据,转存到本实例的属性中this.strFromLeft = newVal})}}</script><style lang="less">.right-container {padding: 0 20px 20px;background-color: lightskyblue;min-height: 250px;flex: 1;}</style>
浏览器查看运行效果:
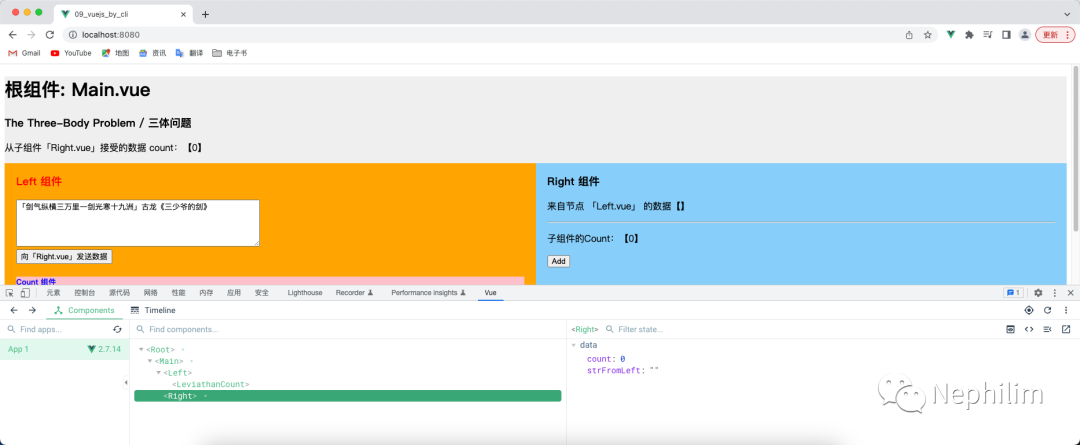
然后,点击发送:
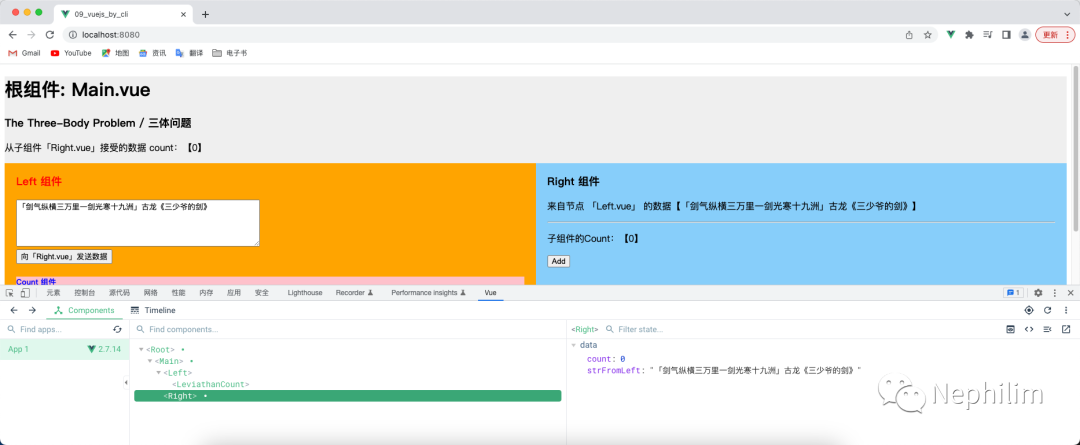
修改发送方文本框中的内容,然后再次点击发送:
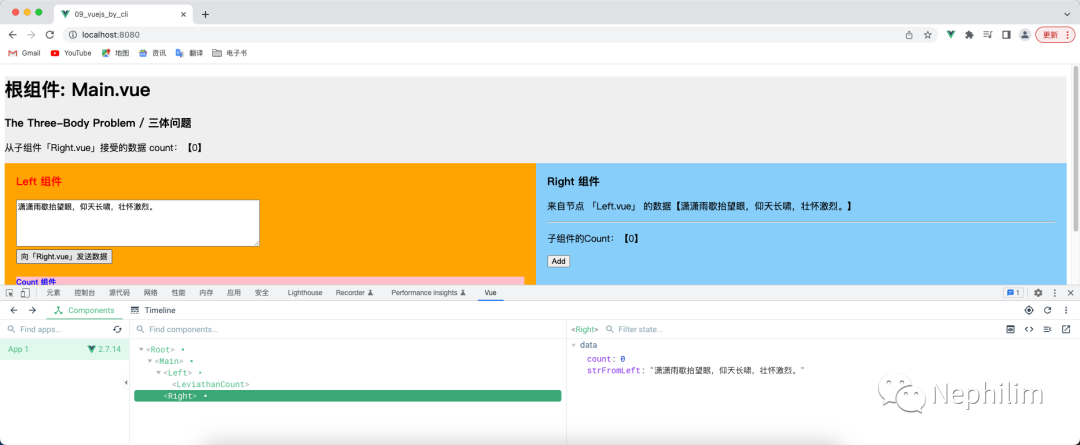
可以看到,兄弟组件之间的数据共享成功。
END
温馨提示
如果你喜欢本文,请分享到朋友圈,想要获得更多信息,请关注我。
