Helm的使用
1. Helm简介:
1. Helm的概念
Helm是Kubernetes的一个包管理工具,用来简化Kubernetes应用的部署和管理。可以把Helm比作CentOS的yum工具.
Helm有如下几个基本概念:
Chart: 是Helm管理的安装包,里面包含需要部署的安装包资源。可以把Chart比作CentOS yum使用的rpm文件。每个Chart包含下面两部分:
- 包的基本描述文件Chart.yaml
- 放在templates目录中的一个或多个Kubernetes manifest文件模板
Release:是chart的部署实例,一个chart在一个Kubernetes集群上可以有多个release,即这个chart可以被安装多次
Repository:chart的仓库,用于发布和存储chart
使用Helm可以完成以下事情:
- 管理Kubernetes manifest files
- 管理Helm安装包charts
- 基于chart的Kubernetes应用分发
2. Helm的组成
Helm由两部分组成,客户端helm和服务端tiller。
- tiller运行在Kubernetes集群上,管理chart安装的release
- helm是一个命令行工具,可在本地运行,一般运行在CI/CD Server上。
3. Helm的安装
下载Helm二进制文件:https://github.com/helm/helm/releases/tag/v2.13.1
[root@test111 software]# tar xzvf helm-v2.13.1-linux-amd64.tar.gz
[root@test111 software]# cd linux-amd64/
[root@test111 linux-amd64]# cp -r helm /usr/local/bin/
[root@test111 linux-amd64]# helm version
Client: &version.Version{SemVer:"v2.13.1", GitCommit:"618447cbf203d147601b4b9bd7f8c37a5d39fbb4", GitTreeState:"clean"}
Error: Get http://localhost:8080/api/v1/namespaces/kube-system/pods?labelSelector=app%3Dhelm%2Cname%3Dtiller: dial tcp [::1]:8080: connect: connection refused
[root@test111 linux-amd64]#
此时运行helm version可以打印出客户端helm的版本,同时会提示无法连接到服务端Tiller。
为了安装服务端tiller,还需要在这台机器上配置好kubectl工具和kubeconfig文件,确保kubectl工具可以在这台机器上访问apiserver且正常使用。
从kubemaster的服务器上面拷贝两个文件到安装Helm客户端的机器,分别拷贝kubectl命令和/root/.kube/config文件
[root@kubemaster ~]# which kubectl
/usr/bin/kubectl
[root@kubemaster ~]# scp -r /usr/bin/kubectl root@test111:/usr/bin/
kubectl                                                                                                                                                      100%   37MB  12.5MB/s   00:03
[root@kubemaster ~]# scp -r /root/.kube/config root@test111:/root/.kube/
config                                                                                                                                                       100% 5448   328.6KB/s   00:00
[root@kubemaster ~]#
然后在安装Helm客户端的任何一台机器上面,输入命令检查是否可以连接集群
[root@test111 linux-amd64]# kubectl get cs
NAME                 STATUS    MESSAGE              ERROR
scheduler            Healthy   ok
controller-manager   Healthy   ok
etcd-0               Healthy   {"health": "true"}
接下来是安装服务端Tiller
# 配置 service account tiller 和 ClusterRoleBinding tiller
vim sa.yaml
apiVersion: v1
kind: ServiceAccount
metadata:
  name: tiller
  namespace: kube-system
vim ClusterRoleBinding.yaml
  apiVersion: rbac.authorization.k8s.io/v1beta1
  kind: ClusterRoleBinding
  metadata:
    name: tiller
  roleRef:
    apiGroup: rbac.authorization.k8s.io
    kind: ClusterRole
    name: cluster-admin
  subjects:
    - kind: ServiceAccount
      name: tiller
      namespace: kube-system
kubectl apply -f  sa.yaml
kubectl apply -f  ClusterRoleBinding.yaml
初始化tiller服务端
helm init --service-account tiller --upgrade --tiller-image=registry.cn-hangzhou.aliyuncs.com/google_containers/tiller:v2.13.1
#注意这里的tiller服务器镜像版本,一定要和helm client的版本一致。这里的版本都为最新的版本  v2.13.1
[root@test111 ~]# helm version
Client: &version.Version{SemVer:"v2.13.1", GitCommit:"618447cbf203d147601b4b9bd7f8c37a5d39fbb4", GitTreeState:"clean"}
Server: &version.Version{SemVer:"v2.13.1", GitCommit:"a80231648a1473929271764b920a8e346f6de844", GitTreeState:"clean"}
设置charts仓库为微软azure仓库,这个仓库同步的是最新的helm包,阿里云仓库的helm包好久不更新了
[root@test111 ~]# cat /root/.helm/repository/repositories.yaml
apiVersion: v1
generated: 2018-11-10T20:32:27.187074383+08:00
repositories:
- caFile: ""
  cache: /root/.helm/repository/cache/stable-index.yaml
  certFile: ""
  keyFile: ""
  name: stable
  password: "password"
  url: http://mirror.azure.cn/kubernetes/charts/
  username: "username"
- caFile: ""
  cache: /root/.helm/repository/cache/local-index.yaml
  certFile: ""
  keyFile: ""
  name: local
  password: ""
  url: http://127.0.0.1:8879/charts
  username: ""
[root@test111 ~]#
#更新chart repo:
helm repo update
Hang tight while we grab the latest from your chart repositories...
...Skip local chart repository
...Successfully got an update from the "stable" chart repository
Update Complete. ⎈ Happy Helming!⎈
4. 管理chart仓库
[root@test111 software]# helm repo list
NAME      URL
stable    https://kubernetes.oss-cn-hangzhou.aliyuncs.com/charts
local     http://127.0.0.1:8879/charts
[root@test111 software]#
#查看目前的chart仓库
[root@test111 software]# helm repo remove stable
"stable" has been removed from your repositories
#删除目前的仓库
[root@test111 software]# helm repo add stable https://cnych.github.io/kube-charts-mirror/
"stable" has been added to your repositories
#添加新的远程仓库
[root@test111 software]# helm repo list
NAME      URL
local     http://127.0.0.1:8879/charts
stable    https://cnych.github.io/kube-charts-mirror/
#查看目前的chart仓库
[root@test111 software]# helm repo update
Hang tight while we grab the latest from your chart repositories...
...Skip local chart repository
...Successfully got an update from the "stable" chart repository
Update Complete. ⎈ Happy Helming!⎈
[root@test111 software]#
#更新repo
5. Helm安装hello-svc应用
使用helm create chart名称 安装一个应用。同时会下载hello-svc项目的目录文件到本地
helm create hello-svc
[root@test111 ~]# tree hello-svc/
hello-svc/
├── charts
├── Chart.yaml
├── templates
│   ├── deployment.yaml
│   ├── _helpers.tpl
│   ├── ingress.yaml
│   ├── NOTES.txt
│   ├── service.yaml
│   └── tests
│       └── test-connection.yaml
└── values.yaml
我们来熟悉一下hello-svc这个chart中目录和文件内容:
- charts目录中是本chart依赖的chart,当前是空的
- Chart.yaml这个yaml文件用于描述Chart的基本信息,如名称版本等
- templates目录是Kubernetes manifest文件模板目录,模板使用chart配置的值生成Kubernetes manifest文件。模板文件使用的Go语言模板语法
- templates/NOTES.txt 纯文本文件,可在其中填写chart的使用说明
- value.yaml 是chart配置的默认值
- 通过查看deployment.yaml和value.yaml,大概知道这个chart默认安装就是在Kubernetes部署一个nginx服务。
cd /root/hello-svc
helm install --dry-run --debug ./  #对chart的模板和配置进行测试
helm install ./  #在Kubernetes上安装chart
helm list    #查看release
[root@test111 hello-svc]# helm list
NAME                REVISION    UPDATED                     STATUS      CHART                  APP VERSION    NAMESPACE
silly-gecko         1           Wed Mar 27 11:25:11 2019    DEPLOYED    hello-svc-0.1.0        1.0            default
stultified-prawn    1           Mon Mar  4 15:21:21 2019    DEPLOYED    nginx-ingress-0.9.5    0.10.2         default
[root@test111 hello-svc]#
6. 使用Helm安装Redis-HA应用
在我以前的博文中介绍过在传统虚拟机上面实现Redis的安装步骤。本文重点介绍在kubernetes容器集群中如何部署Redis应用。在部署之前首先介绍一下Redis集群的两种常用方案:
1. redis-HA方案:
Redis-HA方案应该叫做主从复制方案,不能称为集群方案。主从复制方案的主要原理是,如果主节点宕机,从节点作为主节点的备份会随时顶替主节点工作,也可以将读请求分配到从节点,类似于Mysql的读写分离案节例一样。但是如果主节宕机,从节升级为主节点,但是应用程序连接的redis服务器IP仍然为主节点IP,这个时候还需要人工
干预应用程序的连结Redis服务器的IP,所以需要把这个IP配置成VIP地址,实现自动切换。
Redis Sentinel是一个分布式架构,包含若干个Sentinel节点和Redis数据节点,每个Sentinel节点会对数据节点和其余Sentinel节点进行监控,当发现节点不可达时,会对节点做下线标识。
如果被标识的是主节点,他还会选择和其他Sentinel节点进行“协商”,当大多数的Sentinel节点都认为主节点不可达时,他们会选举出一个Sentinel节点来完成自动故障转移工作,同时将这个变化通知给Redis应用方。
每个Sentinel节点都要定期PING命令来判断Redis数据节点和其余Sentinel节点是否可达,如果超过30000毫秒且没有回复,则判定不可达。当Sentinel节点集合对主节点故障判定达成一致时,Sentinel领导者节点会做故障转移操作,选出新的主节点,原来的从节点会向新的主节点发起复制操作 。
2. redis-Cluster方案:
Redis官方在3.0版本之后才开始支持集群方案。Redis 集群是一个可以在多个 Redis 节点之间进行数据共享的设施(installation)。Redis 集群通过分区(partition)来提供一定程度的可用性(availability): 即使集群中有一部分节点失效或者无法进行通讯, 集群也可以继续处理命令请求。
Redis集群提供了两个好处,第一是将数据自动切分(split)到多个节点,第二是当集群中有一部分节点失效或者无法进行通讯时,仍然可以继续处理命令请求;
Redis 集群使用数据分片(sharding)而非一致性哈希(consistency hashing)来实现。 一个 Redis 集群包含 16384 个哈希槽(hash slot), 数据库中的每个键都属于这 16384 个哈希槽的其中一个, 集群使用公式 CRC16(key) % 16384 来计算键 key 属于哪个槽, 其中 CRC16(key) 语句用于计算键 key 的 CRC16 校验和。
集群中的每个节点负责处理一部分哈希槽。 举个例子, 一个集群可以有三个哈希槽, 其中:
- 节点 A 负责处理 0 号至 5500 号哈希槽
- 节点 B 负责处理 5501 号至 11000 号哈希槽
- 节点 C 负责处理 11001 号至 16384 号哈希槽。
这种将哈希槽分布到不同节点的做法使得用户可以很容易地向集群中添加或者删除节点。 比如说:
- 如果用户将新节点 D 添加到集群中, 那么集群只需要将节点 A 、B 、 C 中的某些槽移动到节点 D 就可以了。
- 与此类似, 如果用户要从集群中移除节点 A , 那么集群只需要将节点 A 中的所有哈希槽移动到节点 B 和节点 C , 然后再移除空白(不包含任何哈希槽)的节点 A 就可以了。
为了使得集群在一部分节点下线或者无法与集群的大多数(majority)节点进行通讯的情况下, 仍然可以正常运作, Redis 集群对节点使用了主从复制功能: 集群中的每个节点都有 1 个至 N 个复制品(replica), 其中一个复制品为主节点(master), 而其余的 N-1 个复制品为从节点(slave)。
在之前列举的节点 A 、B 、C 的例子中, 如果节点 B 下线了, 那么集群将无法正常运行, 因为集群找不到节点来处理 5501 号至 11000号的哈希槽。
另一方面, 假如在创建集群的时候(或者至少在节点 B 下线之前), 我们为主节点 B 添加了从节点 B1 , 那么当主节点 B 下线的时候, 集群就会将 B1 设置为新的主节点, 并让它代替下线的主节点 B , 继续处理 5501 号至 11000 号的哈希槽, 这样集群就不会因为主节点 B 的下线而无法正常运作了。
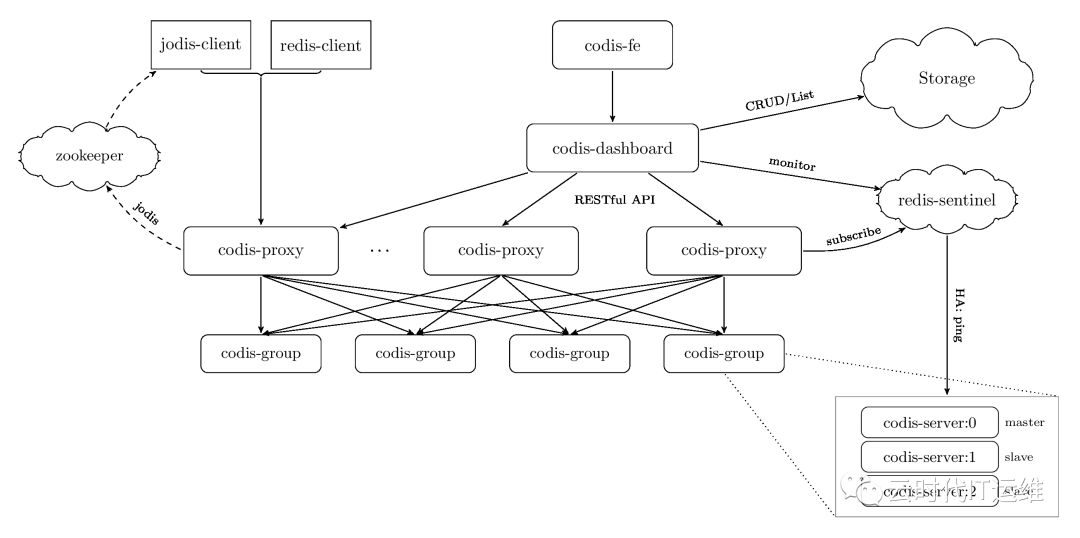
对于Redis集群方案,国内的豌豆荚公司开发的一个分布式的基于代理的高性能Redis 集群解决方案,名字叫做Codis.(国内还有类似于Twemproxy的软件也能实现同样的功能)用Go语言开发的。对于上层的应用来说,连接到 Codis Proxy 和连接原生的 Redis Server 没有明显的区别 (不支持的命令列表),Codis 底层会处理请求的转发,不停机的数据迁移等工作。所有后边的一切事情,对于前面的客户端来说是透明的,可以简单的认为后边连接的是一个内存无限大的 Redis 服务。具体的方案可以参考https://github.com/CodisLabs/codis
Codis 由四部分组成:
Codis Proxy (codis-proxy),处理客户端请求,支持Redis协议,因此客户端访问Codis Proxy跟访问原生Redis没有什么区别;
Codis Dashboard (codis-config),Codis 的管理工具,支持添加/删除 Redis 节点、添加/删除 Proxy 节点,发起数据迁移等操作。codis-config 本身还自带了一个 http server,会启动一个 dashboard,用户可以直接在浏览器上观察 Codis 集群的运行状态;
Codis Redis (codis-server),Codis 项目维护的一个 Redis 分支,基于 2.8.21 开发,加入了 slot 的支持和原子的数据迁移指令;
ZooKeeper/Etcd,Codis 依赖 ZooKeeper 来存放数据路由表和 codis-proxy 节点的元信息,codis-config 发起的命令都会通过 ZooKeeper 同步到各个存活的 codis-proxy
3. 使用Helm安装redis-sentinel主从:
所有的官方Helm包都可以在https://github.com/helm/charts/tree/master/stable/ 网址下载。包括我本次实验的Redis-HA,Mysql、RabbitMQ、Jenkins等。
配置好helm仓库之后,最好微软的那个helm仓库,是同步更新github。然后可以使用命令:
[root@master-01 helm_jenkins]#  helm repo list
NAME        URL
local       http://127.0.0.1:8879/charts
stable      http://mirror.azure.cn/kubernetes/charts/
kiwigrid    https://kiwigrid.github.io
[root@master-01 helm_jenkins]# helm search redis
NAME                                CHART VERSION    APP VERSION    DESCRIPTION
stable/prometheus-redis-exporter    1.0.2            0.28.0         Prometheus exporter for Redis metrics
stable/redis                        7.0.0            4.0.14         Open source, advanced key-value store. It is often referr...
stable/redis-ha                     3.4.0            5.0.3          Highly available Kubernetes implementation of Redis
stable/sensu                        0.2.3            0.28           Sensu monitoring framework backed by the Redis transport
[root@master-01 helm_jenkins]#
然后下载redis-ha的helm包到本地.先创建一个本地的目录,然后直接把helm包下载到本地的目录
[root@master-01 tmp]# mkdir -p redis-ha
[root@master-01 tmp]# helm fetch stable/redis-ha --untar --untardir ./redis-ha/
第二步就是修改value.yaml文件。这个文件的修改方法一般是参考官方的helm说明。https://github.com/helm/charts/tree/master/stable/redis-ha 这个文件的修改方法一般是参考官方的helm说明。官网一般都会详细描述每一个key的用途,value值的默认参数等。
## Configure resource requests and limits
## ref: http://kubernetes.io/docs/user-guide/compute-resources/
##
image:
  repository: k8s.harbor.test.site/system/redis
  tag: 5.0.3-alpine
  pullPolicy: IfNotPresent
## replicas number for each component
replicas: 3
## Custom labels for the redis pod
labels: {}
## Pods Service Account
## ref: https://kubernetes.io/docs/tasks/configure-pod-container/configure-service-account/
serviceAccount:
  ## Specifies whether a ServiceAccount should be created
  ##
  create: true
  ## The name of the ServiceAccount to use.
  ## If not set and create is true, a name is generated using the redis-ha.fullname template
  # name:
## Role Based Access
## Ref: https://kubernetes.io/docs/admin/authorization/rbac/
##
rbac:
  create: true
sysctlImage:
  enabled: false
  command: []
  registry: docker.io
  repository: k8s.harbor.test.site/system/minideb:latest
  tag: latest
  pullPolicy: Always
  mountHostSys: false
## Redis specific configuration options
redis:
  port: 6379
  masterGroupName: mymaster
  config:
    ## Additional redis conf options can be added below
    ## For all available options see http://download.redis.io/redis-stable/redis.conf
    min-slaves-to-write: 1
    min-slaves-max-lag: 5   # Value in seconds
    maxmemory: "0"       # Max memory to use for each redis instance. Default is unlimited.
    maxmemory-policy: "volatile-lru"  # Max memory policy to use for each redis instance. Default is volatile-lru.
    # Determines if scheduled RDB backups are created. Default is false.
    # Please note that local (on-disk) RDBs will still be created when re-syncing with a new slave. The only way to prevent this is to enable diskless replication.
    save: "900 1"
    # When enabled, directly sends the RDB over the wire to slaves, without using the disk as intermediate storage. Default is false.
    repl-diskless-sync: "yes"
    rdbcompression: "yes"
    rdbchecksum: "yes"
  ## Custom redis.conf files used to override default settings. If this file is
  ## specified then the redis.config above will be ignored.
  # customConfig: |-
      # Define configuration here
  resources: {}
  #  requests:
  #    memory: 200Mi
  #    cpu: 100m
  #  limits:
  #    memory: 700Mi
## Sentinel specific configuration options
sentinel:
  port: 26379
  quorum: 2
  config:
    ## Additional sentinel conf options can be added below. Only options that
    ## are expressed in the format simialar to 'sentinel xxx mymaster xxx' will
    ## be properly templated.
    ## For available options see http://download.redis.io/redis-stable/sentinel.conf
    down-after-milliseconds: 10000
    ## Failover timeout value in milliseconds
    failover-timeout: 180000
    parallel-syncs: 5
  ## Custom sentinel.conf files used to override default settings. If this file is
  ## specified then the sentinel.config above will be ignored.
  # customConfig: |-
      # Define configuration here
  resources: {}
  #  requests:
  #    memory: 200Mi
  #    cpu: 100m
  #  limits:
  #    memory: 200Mi
securityContext:
  runAsUser: 1000
  fsGroup: 1000
  runAsNonRoot: true
## Node labels, affinity, and tolerations for pod assignment
## ref: https://kubernetes.io/docs/concepts/configuration/assign-pod-node/#nodeselector
## ref: https://kubernetes.io/docs/concepts/configuration/assign-pod-node/#taints-and-tolerations-beta-feature
## ref: https://kubernetes.io/docs/concepts/configuration/assign-pod-node/#affinity-and-anti-affinity
affinity: |
  podAntiAffinity:
    requiredDuringSchedulingIgnoredDuringExecution:
      - labelSelector:
          matchLabels:
            app: {{ template "redis-ha.name" . }}
            release: {{ .Release.Name }}
        topologyKey: kubernetes.io/hostname
    preferredDuringSchedulingIgnoredDuringExecution:
      - weight: 100
        podAffinityTerm:
          labelSelector:
            matchLabels:
              app:  {{ template "redis-ha.name" . }}
              release: {{ .Release.Name }}
          topologyKey: failure-domain.beta.kubernetes.io/zone
# Prometheus exporter specific configuration options
exporter:
  enabled: true
  image: k8s.harbor.test.site/system/redis_exporter
  tag: v0.31.0
  pullPolicy: IfNotPresent
  # prometheus port & scrape path
  port: 9121
  scrapePath: /metrics
  # cpu/memory resource limits/requests
  resources: {}
  # Additional args for redis exporter
  extraArgs: {}
podDisruptionBudget: {}
  # maxUnavailable: 1
  # minAvailable: 1
## Configures redis with AUTH (requirepass & masterauth conf params)
auth: true
redisPassword: aaaaaa
## Use existing secret containing "auth" key (ignores redisPassword)
# existingSecret:
persistentVolume:
  enabled: true
  ## redis-ha data Persistent Volume Storage Class
  ## If defined, storageClassName: <storageClass>
  ## If set to "-", storageClassName: "", which disables dynamic provisioning
  ## If undefined (the default) or set to null, no storageClassName spec is
  ##   set, choosing the default provisioner.  (gp2 on AWS, standard on
  ##   GKE, AWS & OpenStack)
  ##
  storageClass: "dynamic"
  accessModes:
    - ReadWriteOnce
  size: 10Gi
  annotations: {}
init:
  resources: {}
# To use a hostPath for data, set persistentVolume.enabled to false
# and define hostPath.path.
# Warning: this might overwrite existing folders on the host system!
hostPath:
  ## path is evaluated as template so placeholders are replaced
  # path: "/data/{{ .Release.Name }}"
  # if chown is true, an init-container with root permissions is launched to
  # change the owner of the hostPath folder to the user defined in the
  # security context
  chown: true
在修改value.yaml之前,建议先看一下官方的说明。并且使用helm安装redis-ha等由状态应用之前,需要熟悉redis-ha有状态应用的原理,
并且最好是自己搭建过环境,理解里面的配置。
我一般的个人习惯是,先把value.yaml里面用到的镜像下载到本地然后上传到公司的harbor私有仓库,然后把value.yaml里面的镜像地址都换成
公司私有仓库的镜像地址,这样部署起来会比较快。因为redis-ha应用需要用到持久化存储,这个reids-ha应用主要是kubernetes里面的statefulset资源类型,
也就是每一个Pod重启之后都需要有固定的名称,一般为pod名称+无头服务的名称+namespace+svc.cluster.local. 并且每一个pod重新启动之后需要找到原来的
pvc.
所以我们还要存储这块的配置,增加我们以前配置的storageClassName的名字为dynamic。这个是我们这个环境的ceph RBD存储的sc的名字。这个heml包里面还自带安装了redis-exporter。专门用于将redis的metrics监控数据上传到prometheus的用途;
配置文件中这一段配置podAntiAffinity,主要的用途是调度反亲和性,属于运行时调度策略.podAntiAffinity主要解决POD不能和哪些POD部署在同一个拓扑域中的问题。它们处理的是Kubernetes集群内部POD和POD之间的关系。目的就是让redis Master不要和redis Slave两个pod不要启动在一个物理节点上面;
同时还定义了redis的配置文件,sentinel的配置文件。指定了redis的副本数为3,指定了连接redis的密码。
关于测试redis-ha配置是否正常,可以通过命令helm status redis-ha来查看
[root@master-01 redis-ha]# helm status my-redis
LAST DEPLOYED: Tue Apr 23 15:57:27 2019
NAMESPACE: kube-system
STATUS: DEPLOYED
RESOURCES:
==> v1/ServiceAccount
NAME               SECRETS  AGE
my-redis-redis-ha  1        8d
==> v1/Role
NAME               AGE
my-redis-redis-ha  8d
==> v1/RoleBinding
NAME               AGE
my-redis-redis-ha  8d
==> v1/Service
NAME                          TYPE       CLUSTER-IP      EXTERNAL-IP  PORT(S)                      AGE
my-redis-redis-ha-announce-2  ClusterIP  10.200.111.254  <none>       6379/TCP,26379/TCP           8d
my-redis-redis-ha-announce-0  ClusterIP  10.200.192.130  <none>       6379/TCP,26379/TCP           8d
my-redis-redis-ha-announce-1  ClusterIP  10.200.55.75    <none>       6379/TCP,26379/TCP           8d
my-redis-redis-ha             ClusterIP  None            <none>       6379/TCP,26379/TCP,9121/TCP  8d
==> v1/StatefulSet
NAME                      DESIRED  CURRENT  AGE
my-redis-redis-ha-server  3        3        8d
==> v1/Pod(related)
NAME                        READY  STATUS   RESTARTS  AGE
my-redis-redis-ha-server-0  3/3    Running  3         8d
my-redis-redis-ha-server-1  3/3    Running  4         5d18h
my-redis-redis-ha-server-2  3/3    Running  0         2d19h
==> v1/Secret
NAME               TYPE    DATA  AGE
my-redis-redis-ha  Opaque  1     8d
==> v1/ConfigMap
NAME                         DATA  AGE
my-redis-redis-ha-configmap  3     8d
my-redis-redis-ha-probes     2     8d
NOTES:
Redis can be accessed via port 6379 and Sentinel can be accessed via port 26379 on the following DNS name from within your cluster:
my-redis-redis-ha.kube-system.svc.cluster.local
To connect to your Redis server:
1. To retrieve the redis password:
   echo $(kubectl get secret my-redis-redis-ha -o "jsonpath={.data['auth']}" | base64 --decode)
2. Connect to the Redis master pod that you can use as a client. By default the my-redis-redis-ha-server-0 pod is configured as the master:
   kubectl exec -it my-redis-redis-ha-server-0 sh -n kube-system
3. Connect using the Redis CLI (inside container):
   redis-cli -a <REDIS-PASS-FROM-SECRET>
如果其他的应用需要连接这个redis-ha,就需要使用命令 redis-cli -h my-redis-redis-ha -p 6379 -a aaaaaa 使用这个命令只有在k8s集群内部的应用可以。如果是外部的应用,就需要把redis-ha的端口通过NodePort的类型暴露出去才可以;
4. 使用Helm安装RabbitMQ集群:
前面的博文中我也已经介绍过如何在虚拟机里面安装RabbitMQ集群。通过练习大家应该知道了RabbitMQ集群的一些基础概念和配置。包括生产者、消费者、Exchange、Queue、BinDings、Connection、Channel、交换机的类型单播和广播、消息的持久化定义等。
最简单的RabbitMQ集群需要有3个节点,两个内存节点,一个磁盘节点。顾名思义内存节点就是将所有数据放在内存,磁盘节点将数据放在磁盘。不过,如果在投递消息时,打开了消息的持久化,那么即使是内存节点,数据还是安全的放在磁盘。
由于RabbitMQ是用erlang开发的,RabbitMQ完全依赖Erlang的Cluster,因为erlang天生就是一门分布式语言,集群非常方便,但其本身并不支持负载均衡。Erlang的集群中各节点是经由过程一个magic cookie来实现的,这个cookie存放在 $home/.erlang.cookie 中(像我的root用户安装的就是放在我的root/.erlang.cookie中),文件是400的权限。所以必须包管各节点cookie对峙一致,不然节点之间就无法通信。
Rabbitmq集群大概分为二种方式:
普通模式:默认的集群模式。
镜像模式:把需要的队列做成镜像队列。(我们一般都采用此模式)
rabbitmqctl set_policy ha-all "^" '{"ha-mode":"all"}'这行命令创建了一个策略,策略名称为ha-all,策略模式为 all 即复制到所有节点,包含新增节点,策略正则表达式为 “^” 表示所有匹配所有队列名称。
良好的设计架构可以如下:在一个集群里,有3台以上机器,其中1台使用磁盘模式,其它使用内存模式。其它几台为内存模式的节点,无疑速度更快,因此客户端(consumer、producer)连接访问它们。而磁盘模式的节点,由于磁盘IO相对较慢,因此仅作数据备份使用。
和前面的redis-ha的helm安装一样,先是找到官方网站 https://github.com/helm/charts/tree/master/stable/rabbitmq-ha 仔细阅读以下官方的说明,官方文档里面有针对配置value.yaml的详细说明,并且指导你可以安装chart,卸载chart等;显示搜索rabbitmq,然后下载rabbitmq.这里就不在介绍了。主要有个问题说明以下,rabbitmq有几个版本的chart,有个rabbitmq的chart,我始终都没有研究成功。每次配置好之只要已启动就会报错
NAME                                   CHART VERSION    APP VERSION    DESCRIPTION
stable/prometheus-rabbitmq-exporter    0.4.0            v0.29.0        Rabbitmq metrics exporter for prometheus
stable/rabbitmq                        5.5.0            3.7.14         Open source message broker software that implements the A...
stable/rabbitmq-ha                     1.25.0           3.7.12         Highly available RabbitMQ cluster, the open source messag...
[root@master-01 redis-ha]#
我刚开始的时候一直使用的是stable/rabbitmq这个chart,然后研究了很久都不成功,安装helm包之后启动应用总是报错.
kubectl logs -f -n kube-system my-rabbitmq-0 rabbitmq
Error from server (BadRequest): a container name must be specified for pod my-rabbitmq-0, choose one of: [rabbitmq metrics]
后面找了很久也没有找到问题原因,网上都是说因为找不到正确的节点名字,所以集群无法创建成功。因为在k8s的rabbitmq方案中,rabbitmq有一个专门的k8s插件,这个插件可以实现通过k8s集群的api接口通过pod名字自动发现和创建集群。最终采用了另外一个chart stable/rabbitmq-ha就好了。如果有时间我还要再深究一下两个之间的区别。我的value.yaml文件配置如下:
## RabbitMQ application credentials
## Ref: http://rabbitmq.com/access-control.html
##
rabbitmqUsername: guest
rabbitmqPassword: guest123
## RabbitMQ Management user used for health checks
managementUsername: management
managementPassword: 123456
## Place any additional key/value configuration to add to rabbitmq.conf
## Ref: https://www.rabbitmq.com/configure.html#config-items
extraConfig: |
#  queue_master_locator = min-masters
## Place advanced.config file in /etc/rabbitmq/advanced.config
## Ref: https://www.rabbitmq.com/configure.html#advanced-config-file
advancedConfig: |
## Definitions specification within the secret, will always be mounted
## at /etc/definitions/defintions.json
definitionsSource: definitions.json
## Place any additional plugins to enable in /etc/rabbitmq/enabled_plugins
## Ref: https://www.rabbitmq.com/plugins.html
extraPlugins: |
  rabbitmq_shovel,
  rabbitmq_shovel_management,
  rabbitmq_federation,
  rabbitmq_federation_management,
definitions:
  users: |-
   {
     "name": "test_producer01",
     "password": "111111",
     "tags": "administrator"
   }
  vhosts: |-
   {
     "name": "/rabbit"
   }
  parameters: |-
   {
     "value": {
       "src-uri": "amqp://localhost",
       "src-queue": "source",
       "dest-uri": "amqp://localhost",
       "dest-queue": "destination",
       "add-forward-headers": false,
       "ack-mode": "on-confirm",
       "delete-after": "never"
     },
     "vhost": "/",
     "component": "shovel",
     "name": "test"
   }
  permissions: |-
   {
     "user": "test_producer01",
     "vhost": "/rabbit",
     "configure": ".*",
     "write": ".*",
     "read": ".*"
   }
  queues: |-
    {
       "name":"myName",
       "vhost":"/rabbit",
       "durable":true,
       "auto_delete":false,
       "arguments":{}
    }
  exchanges: |-
    {
       "name":"myName",
       "vhost":"/rabbit",
       "type":"direct",
       "durable":true,
       "auto_delete":false,
       "internal":false,
       "arguments":{}
    }
  bindings: |-
    {
       "source":"myName",
       "vhost":"/rabbit",
       "destination":"myName",
       "destination_type":"queue",
       "routing_key":"myKey",
       "arguments":{}
    }
## Sets the policies in definitions.json. This can be used to control the high
## availability of queues by mirroring them to multiple nodes.
## Ref: https://www.rabbitmq.com/ha.html
  policies: |-
    {
      "name": "ha-all",
      "pattern": ".*",
      "vhost": "/",
      "definition": {
        "ha-mode": "all",
        "ha-sync-mode": "automatic",
        "ha-sync-batch-size": 1
      }
    }
## RabbitMQ default VirtualHost
## Ref: https://www.rabbitmq.com/vhosts.html
##
rabbitmqVhost: "/"
## Erlang cookie to determine whether different nodes are allowed to communicate with each other
## Ref: https://www.rabbitmq.com/clustering.html
##
# rabbitmqErlangCookie:
## RabbitMQ Memory high watermark
## Ref: http://www.rabbitmq.com/memory.html
##
rabbitmqMemoryHighWatermark: 256MB
rabbitmqMemoryHighWatermarkType: absolute
## EPMD port for peer discovery service used by RabbitMQ nodes and CLI tools
## Ref: https://www.rabbitmq.com/clustering.html
##
rabbitmqEpmdPort: 4369
## Node port
rabbitmqNodePort: 5672
## Manager port
rabbitmqManagerPort: 15672
## Set to true to precompile parts of RabbitMQ with HiPE, a just-in-time
## compiler for Erlang. This will increase server throughput at the cost of
## increased startup time. You might see 20-50% better performance at the cost
## of a few minutes delay at startup.
rabbitmqHipeCompile: false
## SSL certificates
## Red: http://www.rabbitmq.com/ssl.html
rabbitmqCert:
  enabled: false
  # Specifies an existing secret to be used for SSL Certs
  existingSecret: ""
  ## Create a new secret using these values
  cacertfile: |
  certfile: |
  keyfile: |
## Extra volumes for statefulset
extraVolumes: []
## Extra volume mounts for statefulset
extraVolumeMounts: []
## Authentication mechanism
## Ref: http://www.rabbitmq.com/authentication.html
rabbitmqAuth:
  enabled: false
  config: |
    # auth_mechanisms.1 = PLAIN
    # auth_mechanisms.2 = AMQPLAIN
    # auth_mechanisms.3 = EXTERNAL
## Automatic Partition Handling Strategy (split brain handling)
## Ref: https://www.rabbitmq.com/partitions.html#automatic-handling
## Note: pause-if-all-down is not supported without using a custom configmap since it requires extra
## configuration.
rabbitmqClusterPartitionHandling: autoheal
## Authentication backend
## Ref: https://github.com/rabbitmq/rabbitmq-auth-backend-http
rabbitmqAuthHTTP:
  enabled: false
  config: |
    # auth_backends.1 = http
    # auth_http.user_path     = http://some-server/auth/user
    # auth_http.vhost_path    = http://some-server/auth/vhost
    # auth_http.resource_path = http://some-server/auth/resource
    # auth_http.topic_path    = http://some-server/auth/topic
## LDAP Plugin
## Ref: http://www.rabbitmq.com/ldap.html
rabbitmqLDAPPlugin:
  enabled: false
  ## LDAP configuration:
  config: |
    # auth_backends.1 = ldap
    # auth_ldap.servers.1  = my-ldap-server
    # auth_ldap.user_dn_pattern = cn=${username},ou=People,dc=example,dc=com
    # auth_ldap.use_ssl    = false
    # auth_ldap.port       = 389
    # auth_ldap.log        = false
## MQTT Plugin
## Ref: http://www.rabbitmq.com/mqtt.html
rabbitmqMQTTPlugin:
  enabled: false
  ## MQTT configuration:
  config: |
    # mqtt.default_user     = guest
    # mqtt.default_pass     = guest
    # mqtt.allow_anonymous  = true
## Web MQTT Plugin
## Ref: http://www.rabbitmq.com/web-mqtt.html
rabbitmqWebMQTTPlugin:
  enabled: false
  ## Web MQTT configuration:
  config: |
    # web_mqtt.ssl.port       = 12345
    # web_mqtt.ssl.backlog    = 1024
    # web_mqtt.ssl.certfile   = /etc/cert/cacert.pem
    # web_mqtt.ssl.keyfile    = /etc/cert/cert.pem
    # web_mqtt.ssl.cacertfile = /etc/cert/key.pem
    # web_mqtt.ssl.password   = changeme
## STOMP Plugin
## Ref: http://www.rabbitmq.com/stomp.html
rabbitmqSTOMPPlugin:
  enabled: false
  ## STOMP configuration:
  config: |
    # stomp.default_user = guest
    # stomp.default_pass = guest
## Web STOMP Plugin
## Ref: http://www.rabbitmq.com/web-stomp.html
rabbitmqWebSTOMPPlugin:
  enabled: false
  ## Web STOMP configuration:
  config: |
    # web_stomp.ws_frame = binary
    # web_stomp.cowboy_opts.max_keepalive = 10
## AMQPS support
## Ref: http://www.rabbitmq.com/ssl.html
rabbitmqAmqpsSupport:
  enabled: false
  # NodePort
  amqpsNodePort: 5671
  # SSL configuration
  config: |
    # listeners.ssl.default             = 5671
    # ssl_options.cacertfile            = /etc/cert/cacert.pem
    # ssl_options.certfile              = /etc/cert/cert.pem
    # ssl_options.keyfile               = /etc/cert/key.pem
    # ssl_options.verify                = verify_peer
    # ssl_options.fail_if_no_peer_cert  = false
## Number of replicas
replicaCount: 3
image:
  repository: k8s.harbor.test.site/system/rabbitmq
  tag: 3.7.12-alpine
  pullPolicy: IfNotPresent
  ## Optionally specify an array of imagePullSecrets.
  ## Secrets must be manually created in the namespace.
  ## ref: https://kubernetes.io/docs/tasks/configure-pod-container/pull-image-private-registry/
  ##
  # pullSecrets:
  #   - myRegistrKeySecretName
busyboxImage:
  repository: k8s.harbor.test.site/system/busybox
  tag: latest
  pullPolicy: Always
## Duration in seconds the pod needs to terminate gracefully
terminationGracePeriodSeconds: 10
service:
  annotations: {}
  clusterIP: None
  ## List of IP addresses at which the service is available
  ## Ref: https://kubernetes.io/docs/user-guide/services/#external-ips
  ##
  externalIPs: []
  loadBalancerIP: ""
  loadBalancerSourceRanges: []
  type: ClusterIP
  ## Customize nodePort number when the service type is NodePort
  ### Ref: https://kubernetes.io/docs/concepts/services-networking/service/#publishing-services-service-types
  ###
  epmdNodePort: null
  amqpNodePort: null
  managerNodePort: null
podManagementPolicy: OrderedReady
## Statefulsets rolling update update strategy
## Ref: https://kubernetes.io/docs/tutorials/stateful-application/basic-stateful-set/#rolling-update
##
updateStrategy: OnDelete
## Statefulsets Pod Priority
## Ref: https://kubernetes.io/docs/concepts/configuration/pod-priority-preemption/#priorityclass
## priorityClassName: ""
## We usually recommend not to specify default resources and to leave this as
## a conscious choice for the user. This also increases chances charts run on
## environments with little resources, such as Minikube. If you do want to
## specify resources, uncomment the following lines, adjust them as necessary,
## and remove the curly braces after 'resources:'.
## If you decide to set the memory limit, make sure to also change the
## rabbitmqMemoryHighWatermark following the formula:
##   rabbitmqMemoryHighWatermark = 0.4 * resources.limits.memory
##
resources: {}
  # limits:
  #   cpu: 100m
  #   memory: 1Gi
  # requests:
  #   cpu: 100m
  #   memory: 1Gi
initContainer:
  resources: {}
  #   limits:
  #     cpu: 100m
  #     memory: 128Mi
  #   requests:
  #     cpu: 100m
  #     memory: 128Mi
## Use an alternate scheduler, e.g. "stork".
## ref: https://kubernetes.io/docs/tasks/administer-cluster/configure-multiple-schedulers/
##
# schedulerName:
## Data Persistency
persistentVolume:
  enabled: true
  ## If defined, storageClassName: <storageClass>
  ## If set to "-", storageClassName: "", which disables dynamic provisioning
  ## If undefined (the default) or set to null, no storageClassName spec is
  ##   set, choosing the default provisioner.  (gp2 on AWS, standard on
  ##   GKE, AWS & OpenStack)
  ##
  storageClass: "dynamic"
  name: data
  accessModes:
    - ReadWriteOnce
  size: 8Gi
  annotations: {}
## Node labels for pod assignment
## Ref: https://kubernetes.io/docs/concepts/configuration/assign-pod-node/#nodeselector
##
nodeSelector: {}
## Node tolerations for pod assignment
## Ref: https://kubernetes.io/docs/concepts/configuration/assign-pod-node/#taints-and-tolerations-beta-feature
##
tolerations: []
## Extra Annotations to be added to pod
podAnnotations: {}
## Pod affinity
## Ref: https://kubernetes.io/docs/concepts/configuration/assign-pod-node/#affinity-and-anti-affinity
podAntiAffinity: soft
## Create default configMap
##
existingConfigMap: false
## Add additional labels to all resources
##
extraLabels: {}
## Role Based Access
## Ref: https://kubernetes.io/docs/admin/authorization/rbac/
##
rbac:
  create: true
## Service Account
## Ref: https://kubernetes.io/docs/admin/service-accounts-admin/
##
serviceAccount:
  create: true
  ## The name of the ServiceAccount to use.
  ## If not set and create is true, a name is generated using the fullname template
  # name:
ingress:
  ## Set to true to enable ingress record generation
  enabled: true
  path: /
  ## The list of hostnames to be covered with this ingress record.
  ## Most likely this will be just one host, but in the event more hosts are needed, this is an array
  hostName: k8s.rabbitmq.test.site
  ## Set this to true in order to enable TLS on the ingress record
  tls: false
  ## If TLS is set to true, you must declare what secret will store the key/certificate for TLS
  tlsSecret: myTlsSecret
  ## Ingress annotations done as key:value pairs
  annotations:
    kubernetes.io/ingress.class: traefik
livenessProbe:
  initialDelaySeconds: 120
  periodSeconds: 10
  timeoutSeconds: 5
  failureThreshold: 6
readinessProbe:
  failureThreshold: 6
  initialDelaySeconds: 20
  timeoutSeconds: 3
  periodSeconds: 5
# Specifies an existing secret to be used for RMQ password and Erlang Cookie
existingSecret: ""
## ref: https://kubernetes.io/docs/tasks/configure-pod-container/security-context/
##
securityContext:
  fsGroup: 101
  runAsGroup: 101
  runAsNonRoot: true
  runAsUser: 100
prometheus:
  ## Configures Prometheus Exporter to expose and scrape stats.
  exporter:
    enabled: true
    env: {}
    image:
      repository: kbudde/rabbitmq-exporter
      tag: v0.29.0
      pullPolicy: IfNotPresent
    ## Port Prometheus scrapes for metrics
    port: 9090
    ## Comma-separated list of extended scraping capabilities supported by the target RabbitMQ server
    capabilities: "bert,no_sort"
    ## Allow overriding of container resources
    resources: {}
     # limits:
     #   cpu: 200m
     #   memory: 1Gi
     # requests:
     #   cpu: 100m
     #   memory: 100Mi
  ## Prometheus is using Operator.  Setting to true will create Operator specific resources like ServiceMonitors and Alerts
  operator:
    ## Are you using Prometheus Operator? [Blog Post](https://coreos.com/blog/the-prometheus-operator.html)
    enabled: true
    ## Configures Alerts, which will be setup via Prometheus Operator / ConfigMaps.
    alerts:
      ## Prometheus exporter must be enabled as well
      enabled: true
      ## Selector must be configured to match Prometheus Install, defaulting to whats done by Prometheus Operator
      ## See [CoreOS Prometheus Chart](https://github.com/coreos/prometheus-operator/tree/master/helm)
      selector:
        role: alert-rules
      labels: {}
    serviceMonitor:
      ## Interval at which Prometheus scrapes RabbitMQ Exporter
      interval: 10s
      # Namespace Prometheus is installed in
      namespace: kube-system
      ## Defaults to whats used if you follow CoreOS [Prometheus Install Instructions](https://github.com/coreos/prometheus-operator/tree/master/helm#tldr)
      ## [Prometheus Selector Label](https://github.com/coreos/prometheus-operator/blob/master/helm/prometheus/templates/prometheus.yaml#L65)
      ## [Kube Prometheus Selector Label](https://github.com/coreos/prometheus-operator/blob/master/helm/kube-prometheus/values.yaml#L298)
      selector:
        prometheus: kube-prometheus
## Kubernetes Cluster Domain
clusterDomain: cluster.local
## Pod Disruption Budget
podDisruptionBudget: {}
  # maxUnavailable: 1
  # minAvailable: 1
根据官方文档的参考,我主要修改了如下的配置
- rabbitmq的一些初始账户和密码信息;
- 默认安装了一些pulgins,主要是队列消息同步的组件;
- 定义了一个初始化的vhost、生产者用户、用户权限、队列名、Exchange、Bindings、同步策略等;
- 定义了集群的参数,包括ErlangCookie、集群同步的端口、web管理端口15672、服务端口5672;
- 定义Pods的副本数为3,也就是创建一个3节点的mq集群;定义镜像全部为私有仓库镜像,镜像包括mq镜像,用于初始化的busybox镜像,用于prometheus监控的rabbitmq-exporter镜像
- 还定义了Pod的启动策略 OrderedReady,因为mq集群也是有状态应用,启动和停止都需要有顺序;
- 定义了持久化存储,使用ceph sc;
- 定义了一个ingress,主要是用于访问web管理页面;
使用helm status my-rabbitmq-ha 来查看如何访问rabbitmq
[root@master-01 rabbitmq-ha]# helm status my-rabbitmq-ha
LAST DEPLOYED: Thu Apr 25 19:43:02 2019
NAMESPACE: kube-system
STATUS: DEPLOYED
RESOURCES:
==> v1/Secret
NAME            TYPE    DATA  AGE
my-rabbitmq-ha  Opaque  4     6d16h
==> v1beta1/Role
NAME            AGE
my-rabbitmq-ha  6d16h
==> v1beta1/Ingress
NAME            HOSTS                       ADDRESS  PORTS  AGE
my-rabbitmq-ha  k8s.rabbitmq.maimaiti.site  80       6d16h
==> v1/PrometheusRule
NAME                            AGE
my-rabbitmq-ha-rabbitmq-alerts  6d16h
==> v1/ConfigMap
NAME            DATA  AGE
my-rabbitmq-ha  2     6d16h
==> v1/ServiceAccount
NAME            SECRETS  AGE
my-rabbitmq-ha  1        6d16h
==> v1beta1/RoleBinding
NAME            AGE
my-rabbitmq-ha  6d16h
==> v1/Service
NAME                      TYPE       CLUSTER-IP  EXTERNAL-IP  PORT(S)                               AGE
my-rabbitmq-ha-discovery  ClusterIP  None        <none>       15672/TCP,5672/TCP,4369/TCP           6d16h
my-rabbitmq-ha            ClusterIP  None        <none>       15672/TCP,5672/TCP,4369/TCP,9090/TCP  6d16h
==> v1beta1/StatefulSet
NAME            DESIRED  CURRENT  AGE
my-rabbitmq-ha  3        3        6d16h
==> v1/ServiceMonitor
NAME            AGE
my-rabbitmq-ha  6d16h
==> v1/Pod(related)
NAME              READY  STATUS   RESTARTS  AGE
my-rabbitmq-ha-0  2/2    Running  2         5d20h
my-rabbitmq-ha-1  2/2    Running  2         6d15h
my-rabbitmq-ha-2  2/2    Running  0         2d20h
NOTES:
** Please be patient while the chart is being deployed **
  Credentials:
    Username      : guest
    Password      : $(kubectl get secret --namespace kube-system my-rabbitmq-ha -o jsonpath="{.data.rabbitmq-password}" | base64 --decode)
    ErLang Cookie : $(kubectl get secret --namespace kube-system my-rabbitmq-ha -o jsonpath="{.data.rabbitmq-erlang-cookie}" | base64 --decode)
  RabbitMQ can be accessed within the cluster on port 5672 at my-rabbitmq-ha.kube-system.svc.cluster.local
  To access the cluster externally execute the following commands:
    export POD_NAME=$(kubectl get pods --namespace kube-system -l "app=rabbitmq-ha" -o jsonpath="{.items[0].metadata.name}")
    kubectl port-forward $POD_NAME --namespace kube-system 5672:5672 15672:15672
    kubectl port-forward $POD_NAME --namespace kube-system 9090:9090
  To Access the RabbitMQ AMQP port:
    amqp://127.0.0.1:5672/
  To Access the RabbitMQ Exporter metrics port:
    http://127.0.0.1:9090/
  To Access the RabbitMQ Management interface:
    URL : http://127.0.0.1:15672
[root@master-01 rabbitmq-ha]#
好的,今天的博文就写到这里。由于51放假这几天的大多时间都用来陪伴家人了,趁着今天值班就把这几天的k8s实验总结一下。最近这几个月一直都在忙k8s的项目,后续还会补充一些helm安装mysql、helm安装jenkins,重点还会介绍一下k8s容器里面的CI/CD是如何实现的。希望大家持续关注一下我的技术博客和公众号。
推荐关注我的个人微信公众号 “云时代IT运维”,周期性更新最新的应用运维类技术文档。关注虚拟化和容器技术、CI/CD、自动化运维等最新前沿运维技术和趋势;