


OceanBase 数据库 V4.3.4社区版初体验之部署手册
一、OceanBase 系统架构
1.1、产品介绍
OceanBase是由蚂蚁集团完全自主研发的国产原生分布式数据库,始创于2010年。它已连续10年平稳支撑双11,并创新推出“三地五中心”城市级容灾新标准。OceanBase在TPC-C和TPC-H测试上都刷新了世界纪录,是一个高性能、安全可靠、数智化的数据库,能够有效帮助企业降低成本并提升效率。
1.2、OceanBase架构
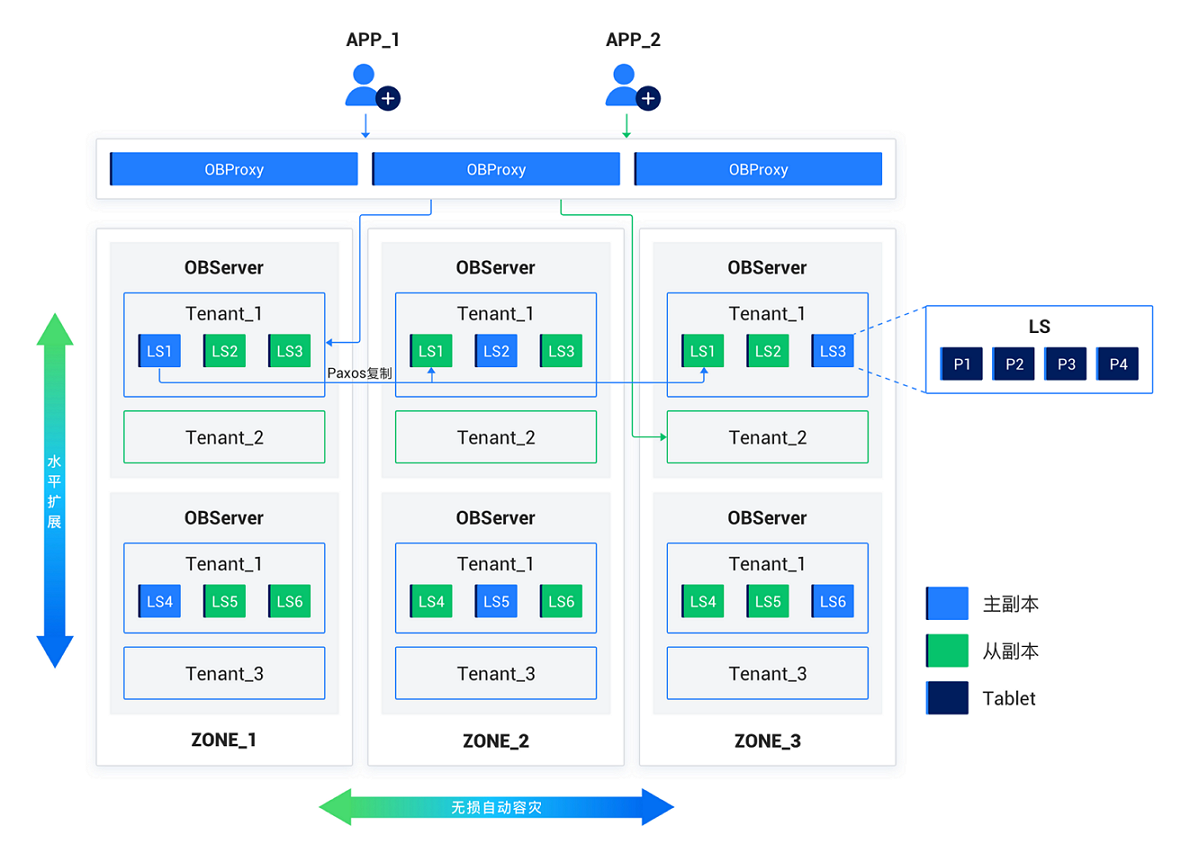
OceanBase 数据库采用无共享(Shared-Nothing)分布式集群架构,各个节点之间完全对等,每个节点都有自己的 SQL 引擎、存储引擎、事务引擎,运行在普通 PC 服务器组成的集群之上,具备高可扩展性、高可用性、高性能、低成本、与主流数据库高兼容等核心特性。
1.3、OceanBase的特点
- 数据强一致:在分布式架构下确保数据强一致性。
- 高可用性:具备金融级别的高可用能力。
- 高性能:能够支持海量并发访问。
- 在线扩展性:支持弹性扩展,满足不断增长的业务需求。
- 兼容性:高度兼容SQL标准和主流关系数据库。
- 低成本:通过开源和高性价比的架构降低成本。
1.4、OceanBase的应用
OceanBase自创立以来,在蚂蚁集团和阿里巴巴的核心业务中发挥了关键作用。自2017年起,开始向广泛的行业客户提供服务,包括银行、保险、证券等领域。典型客户包括中国工商银行、南京银行、中国人保、中华保险、招商证券等。截至2024年,OceanBase已服务超过2000+客户,其中30%的客户将其应用于核心系统。
二、环境初始化
2.1、查看操作系统信息
[root@Node1 ~]# cat /etc/os-release
NAME="CentOS Linux"
VERSION="7 (Core)"
ID="centos"
ID_LIKE="rhel fedora"
VERSION_ID="7"
PRETTY_NAME="CentOS Linux 7 (Core)"
ANSI_COLOR="0;31"
CPE_NAME="cpe:/o:centos:centos:7"
HOME_URL="https://www.centos.org/"
BUG_REPORT_URL="https://bugs.centos.org/"

CENTOS_MANTISBT_PROJECT="CentOS-7"
CENTOS_MANTISBT_PROJECT_VERSION="7"
REDHAT_SUPPORT_PRODUCT="centos"
REDHAT_SUPPORT_PRODUCT_VERSION="7"

[root@Node1 ~]#
2.2、查看内核
[root@Node1 ~]# uname -r
3.10.0-1160.el7.x86_64
[root@Node1 ~]#
- 说明:OceanBase 数据库要求操作系统为 3.10.0 及以上。
2.3、查看内存
[root@Node1 ~]# free -g
              total        used        free      shared  buff/cache   available
Mem:              7           0           7           0           0           7
Swap:             7           0           7
[root@Node1 ~]#
说明:如果可用内存小于配置文件中的 memory_limit 值,请清理缓存或者修改配置 memory_limit,将 memory_limit 修改为小于可用内存的值。
- 执行以下命令,清理缓存:
sudo sysctl -w vm.drop_caches=3
# 或
sudo echo 3 > /proc/sys/vm/drop_caches
2.4、查看磁盘
[root@Node1 ~]# df -h
Filesystem      Size  Used Avail Use% Mounted on
devtmpfs        3.8G     0  3.8G   0% /dev
tmpfs           3.9G     0  3.9G   0% /dev/shm
tmpfs           3.9G   12M  3.8G   1% /run
tmpfs           3.9G     0  3.9G   0% /sys/fs/cgroup
/dev/sda2        92G  2.4G   90G   3% /
tmpfs           781M     0  781M   0% /run/user/0
[root@Node1 ~]#
- 说明:确保配置文件中的 data_dir、redo_dir 和 home_path 对应的磁盘已经完成挂载。data_dir 和 redo_dir 对应目录为空,data_dir 对应目录的磁盘已经使用率必须低于 4%。
2.5、关闭透明大页
1、编辑rc.local文件
[root@Node1 ~]# vi /etc/rc.d/rc.local


1、增加下列内容:

if test -f /sys/kernel/mm/transparent_hugepage/enabled; then
echo never > /sys/kernel/mm/transparent_hugepage/enabled
fi
if test -f /sys/kernel/mm/transparent_hugepage/defrag; then
echo never > /sys/kernel/mm/transparent_hugepage/defrag
fi


2、保存退出,然后赋予rc.local文件执行权限:
[root@Node1 ~]# chmod +x /etc/rc.d/rc.local


3、最后重启系统,以后再检查THP应该就是被禁用了
[root@Node1 ~]# cat /sys/kernel/mm/transparent_hugepage/enabled
always madvise [never]
[root@Node1 ~]# cat /sys/kernel/mm/transparent_hugepage/defrag
always madvise [never]
2.6、查看网卡名称
说明:您需要为配置文件中的 devname 配置项指定网卡。示例配置文件如下:
# Please set devname as the network adaptor's name whose ip is  in the setting of severs.
# if set severs as "127.0.0.1", please set devname as "lo"
# if current ip is 192.168.1.10, and the ip's network adaptor's name is "eth0", please use "eth0"
devname: eth0
- 执行以下命令,查看网卡名称:
[root@Node1 ~]# ifconfig
ens33: flags=4163<UP,BROADCAST,RUNNING,MULTICAST>  mtu 1500
        inet 192.168.4.71  netmask 255.255.255.0  broadcast 192.168.4.255
        inet6 fe80::5c98:4ce2:bd6:c644  prefixlen 64  scopeid 0x20<link>
        ether 00:0c:29:46:64:c8  txqueuelen 1000  (Ethernet)
        RX packets 2695343  bytes 4020804291 (3.7 GiB)
        RX errors 0  dropped 24  overruns 0  frame 0
        TX packets 152883  bytes 10732838 (10.2 MiB)
        TX errors 0  dropped 0 overruns 0  carrier 0  collisions 0

lo: flags=73<UP,LOOPBACK,RUNNING>  mtu 65536
        inet 127.0.0.1  netmask 255.0.0.0
        inet6 ::1  prefixlen 128  scopeid 0x10<host>
        loop  txqueuelen 1000  (Local Loopback)
        RX packets 0  bytes 0 (0.0 B)
        RX errors 0  dropped 0  overruns 0  frame 0
        TX packets 0  bytes 0 (0.0 B)
        TX errors 0  dropped 0 overruns 0  carrier 0  collisions 0

[root@Node1 ~]#
2.7、配置 limits.conf
- 说明:如果您是个人用户,您可以跳过此步骤。如果您是企业用户,建议配置 limits.conf。
- 通过配置文件 /etc/security/limits.conf 在全局级别修改。
- OceanBase 数据库的进程涉及的限制包括线程最大栈空间大小(Stack)、最大文件句柄数(Open Files)和 core 文件大小 (Core File Size)。
- 将会话级别的最大栈空间大小设置为 unlimited,最大文件句柄数设置为 655350,Core 文件大小设置为 unlimited。
- 您需查看 /etc/security/limits.d/20-nproc.conf 文件中是否存在 nproc 的配置,若存在需同步修改该文件中 nproc 的值。
在 /etc/security/limits.conf 配置文件中添加以下内容:
cat>>/etc/security/limits.conf<<EOF
root soft nofile 655350
root hard nofile 655350
* soft nofile 655350
* hard nofile 655350
* soft stack unlimited
* hard stack unlimited
* soft nproc 655360
* hard nproc 655360
* soft core unlimited
* hard core unlimited
EOF
2.8、查看配置
退出当前会话,重新登录。执行以下命令,查看配置是否生效。
[root@Node1 ~]# ulimit -a
core file size          (blocks, -c) 0
data seg size           (kbytes, -d) unlimited
scheduling priority             (-e) 0
file size               (blocks, -f) unlimited
pending signals                 (-i) 31127
max locked memory       (kbytes, -l) 64
max memory size         (kbytes, -m) unlimited
open files                      (-n) 1024
pipe size            (512 bytes, -p) 8
POSIX message queues     (bytes, -q) 819200
real-time priority              (-r) 0
stack size              (kbytes, -s) 8192
cpu time               (seconds, -t) unlimited
max user processes              (-u) 31127
virtual memory          (kbytes, -v) unlimited
file locks                      (-x) unlimited
[root@Node1 ~]#
从结果中可以看出:

core file size 表示核心文件的最大阈值(以块为单位),对应 limits.conf 配置文件中的 core 参数,需查看值是否为 unlimited。

open files 表示最大打开文件描述符数,对应 limits.conf 配置文件中的 nofile 参数,需查看值是否为 655350。

stack size 表示堆栈大小(以千字节为单位),对应 limits.conf 配置文件中的 stack 参数,需查看值是否为 unlimited。

max user processes 表示最大用户进程数,对应 limits.conf 配置文件中的 nproc 参数,需查看值是否为 655360。
2.9、配置 sysctl.conf
本文介绍如何通过修改机器的 sysctl.conf 配置,以提高 Linux 系统的性能。
- 如果您是个人用户,可以跳过此步骤;如果您是企业用户,建议配置 sysctl.conf
1、在 /etc/sysctl.conf 配置文件中添加以下内容:
cat>>/etc/sysctl.conf<<EOF
# for oceanbase
## 修改内核异步 I/O 限制
fs.aio-max-nr = 1048576

## 网络优化
net.core.somaxconn = 2048
net.core.netdev_max_backlog = 10000
net.core.rmem_default = 16777216
net.core.wmem_default = 16777216
net.core.rmem_max = 16777216
net.core.wmem_max = 16777216

net.ipv4.ip_forward = 0
net.ipv4.conf.default.rp_filter = 1
net.ipv4.conf.default.accept_source_route = 0
net.ipv4.tcp_syncookies = 1
net.ipv4.tcp_rmem = 4096 87380 16777216
net.ipv4.tcp_wmem = 4096 65536 16777216
net.ipv4.tcp_max_syn_backlog = 16384
net.ipv4.tcp_fin_timeout = 15
net.ipv4.tcp_slow_start_after_idle = 0

vm.swappiness = 0
vm.min_free_kbytes = 2097152
vm.overcommit_memory = 0

fs.file-max = 6573688
fs.pipe-user-pages-soft = 0

# 修改进程可以拥有的虚拟内存区域数量
vm.max_map_count = 655360

# 此处为 OceanBase 数据库的 data 目录
kernel.core_pattern = /Oceanbase/data/core-%e-%p-%t
EOF
说明:
- kernel.core_pattern 中的 /data 为 OceanBase 数据库的 data 目录。
- max_map_count 配置不合理的情况下,可能会导致严重的内存泄露。
2.加载配置
更改配置完成后,执行以下命令,加载配置,使配置生效。
sysctl -p
2.10、关闭防火墙
systemctl disable firewalld
systemctl stop firewalld
systemctl status firewalld
2.11、关闭 SELinux
sed -i "s/SELINUX=enforcing/SELINUX=disabled/" /etc/selinux/config
2.12、创建用户
说明:
- 如果您是个人用户,您可以直接使用 root 用户部署集群并跳过此步骤。如果您是企业用户,建议您在机器上创建普通用户以确保安全。您可以根据实际需要,创建您的常用账户。
- 您必须在每台机器上分别执行此操作。
[root@Node1 ~]# groupadd admin -g 6000
[root@Node1 ~]# useradd admin -g 6000 -u 6000
[root@Node1 ~]# echo "admin"|passwd --stdin admin
更改用户 admin 的密码 。
passwd:所有的身份验证令牌已经成功更新。
[root@Node1 ~]#
2.13、配置sudo,使用root账户
[root@Node1 ~]# sed -i.bak '100aadmin ALL=(ALL) NOPASSWD:ALL' /etc/sudoers
三、部署体验版OceanBase数据库
3.1、下载安装包
说明:当您仅拥有一台可用机器时,您可参考本文使用 obd demo 命令快速部署单机 OceanBase 数据库。
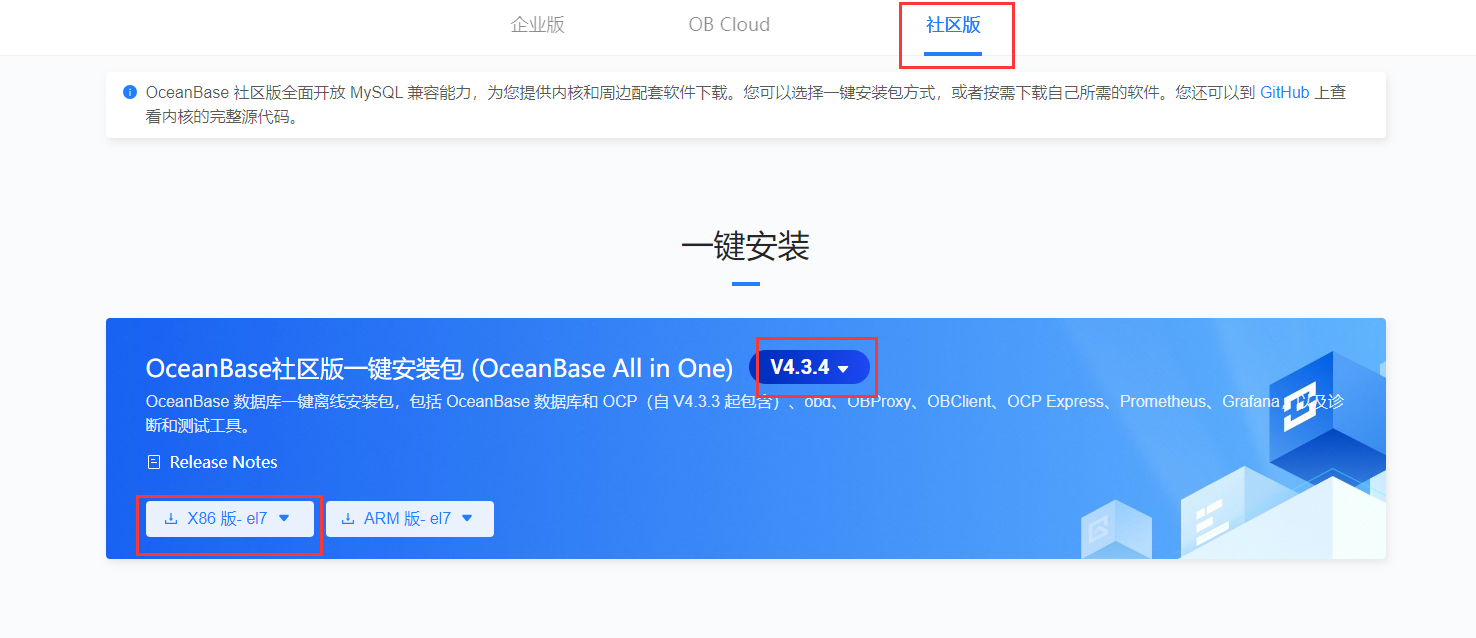
- 1、OceanBase官网地址:https://www.oceanbase.com/softwarecenter
- 2、本文章操作系统CentOS7.9。
- 3、根据对应操作系统下载对应安装包,如下图。
- 代码如下:
[obadmin@Node1 install]$ wget https://obbusiness-private.oss-cn-shanghai.aliyuncs.com/download-center/opensource/oceanbase-all-in-one/7/x86_64/oceanbase-all-in-one-4.3.4_20241108.el7.x86_64.tar.gz
--2024-11-22 14:05:38--  https://obbusiness-private.oss-cn-shanghai.aliyuncs.com/download-center/opensource/oceanbase-all-in-one/7/x86_64/oceanbase-all-in-one-4.3.4_20241108.el7.x86_64.tar.gz
Resolving obbusiness-private.oss-cn-shanghai.aliyuncs.com (obbusiness-private.oss-cn-shanghai.aliyuncs.com)... 180.163.123.158
Connecting to obbusiness-private.oss-cn-shanghai.aliyuncs.com (obbusiness-private.oss-cn-shanghai.aliyuncs.com)|180.163.123.158|:443... connected.
HTTP request sent, awaiting response... 200 OK
Length: 2026707147 (1.9G) [application/gzip]
Saving to: ‘oceanbase-all-in-one-4.3.4_20241108.el7.x86_64.tar.gz’

100%[=======================================================================================>] 2,026,707,147 18.4MB/s   in 1m 40s

2024-11-22 14:07:18 (19.3 MB/s) - ‘oceanbase-all-in-one-4.3.4_20241108.el7.x86_64.tar.gz’ saved [2026707147/2026707147]

[obadmin@Node1 install]$
3.2、解压安装包,并切换换到bin目录
- 代码如下:
[admin@Node1 install]$ tar -xzf oceanbase-all-in-one-*.tar.gz
[admin@Node1 install]$ cd oceanbase-all-in-one/bin/
3.3、执行安装程序./install.sh
- 代码如下:
[admin@Node1 bin]$ ./install.sh
install obd as sudo
No previous obd installed, try install..., wait a moment
name: grafana
version: 7.5.17
release:1
arch: x86_64
md5: 1bf1f338d3a3445d8599dc6902e7aeed4de4e0d6
size: 177766248
add /install/oceanbase-all-in-one/rpms/grafana-7.5.17-1.el8.x86_64.rpm to local mirror
name: obagent
version: 4.2.2
release:100000042024011120.el8
arch: x86_64
md5: bf152b880953c2043ddaf80d6180cf22bb8c8ac2
size: 72919140
add /install/oceanbase-all-in-one/rpms/obagent-4.2.2-100000042024011120.el8.x86_64.rpm to local mirror
name: ob-configserver
version: 1.0.0
release:2.el8
arch: x86_64
md5: 664f93205c913d5dc84e0779d565768fd60f1d5e
size: 24272739
add /install/oceanbase-all-in-one/rpms/ob-configserver-1.0.0-2.el8.x86_64.rpm to local mirror
name: ob-deploy
version: 2.10.1
release:1.el8
arch: x86_64
md5: ece08fac95e86114705d526b178922a33c7ff44a
size: 157287105
add /install/oceanbase-all-in-one/rpms/ob-deploy-2.10.1-1.el8.x86_64.rpm to local mirror
name: obproxy-ce
version: 4.3.2.0
release:26.el8
arch: x86_64
md5: ea8b7867af0f99ca867d40ee12de0b89f317fa7d
size: 90805726
add /install/oceanbase-all-in-one/rpms/obproxy-ce-4.3.2.0-26.el8.x86_64.rpm to local mirror
name: ob-sysbench
version: 1.0.20
release:21.el8
arch: x86_64
md5: ae4bb45f91e434a62af366a59787bcfe6069951c
size: 1546475
add /install/oceanbase-all-in-one/rpms/ob-sysbench-1.0.20-21.el8.x86_64.rpm to local mirror
name: obtpcc
version: 5.0.0
release:1.el8
arch: x86_64
md5: 9bb0d729187938dd66fcfdf89eb7c5e9b59b0e58
size: 1890344
add /install/oceanbase-all-in-one/rpms/obtpcc-5.0.0-1.el8.x86_64.rpm to local mirror
name: obtpch
version: 3.0.0
release:1.el8
arch: x86_64
md5: a09e5586ea25223f97169ee64acd7191610ec602
size: 1864209
add /install/oceanbase-all-in-one/rpms/obtpch-3.0.0-1.el8.x86_64.rpm to local mirror
name: oceanbase-ce
version: 4.2.1.8
release:108000022024072217.el8
arch: x86_64
md5: 67cdfd029a461e9563b4ed301c661479136e58bc
size: 456995444
add /install/oceanbase-all-in-one/rpms/oceanbase-ce-4.2.1.8-108000022024072217.el8.x86_64.rpm to local mirror
name: oceanbase-ce
version: 4.3.4.0
release:100000162024110717.el8
arch: x86_64
md5: bc14c0cf28b8c8b4f3f79dc0a3316344ebe30553
size: 769613438
add /install/oceanbase-all-in-one/rpms/oceanbase-ce-4.3.4.0-100000162024110717.el8.x86_64.rpm to local mirror
name: oceanbase-ce-libs
version: 4.2.1.8
release:108000022024072217.el8
arch: x86_64
md5: b7a867b144db1900a77c50dff33018adcc523232
size: 456120
add /install/oceanbase-all-in-one/rpms/oceanbase-ce-libs-4.2.1.8-108000022024072217.el8.x86_64.rpm to local mirror
name: oceanbase-ce-libs
version: 4.3.4.0
release:100000162024110717.el8
arch: x86_64
md5: d0115a52fea76c1b55309aa7744b66d3006e5c9a
size: 456120
add /install/oceanbase-all-in-one/rpms/oceanbase-ce-libs-4.3.4.0-100000162024110717.el8.x86_64.rpm to local mirror
name: oceanbase-ce-utils
version: 4.2.1.8
release:108000022024072217.el8
arch: x86_64
md5: 8830434f4fde3a60dcfa9308182aa7d07163bda1
size: 403223504
add /install/oceanbase-all-in-one/rpms/oceanbase-ce-utils-4.2.1.8-108000022024072217.el8.x86_64.rpm to local mirror
name: oceanbase-ce-utils
version: 4.3.4.0
release:100000162024110717.el8
arch: x86_64
md5: 193fb8057e2307429ce4455539d9bccf63948e50
size: 1407008944
add /install/oceanbase-all-in-one/rpms/oceanbase-ce-utils-4.3.4.0-100000162024110717.el8.x86_64.rpm to local mirror
name: oceanbase-diagnostic-tool
version: 2.4.0
release:32024091010.el8
arch: x86_64
md5: 5ff288b2c6bbbcd92e0da83d94f94defd537a588
size: 42919107
add /install/oceanbase-all-in-one/rpms/oceanbase-diagnostic-tool-2.4.0-32024091010.el8.x86_64.rpm to local mirror
name: ocp-agent-ce
version: 4.3.2
release:20241012145836.el7
arch: aarch64
md5: 467f53472b5979c8b90cba439d780eee1510f084
size: 121430330
add /install/oceanbase-all-in-one/rpms/ocp-agent-ce-4.3.2-20241012145836.el7.aarch64.rpm to local mirror
name: ocp-agent-ce
version: 4.3.2
release:20241012145836.el7
arch: x86_64
md5: 13e464a5b51e5787b7e3276c913dea3855a631f0
size: 176463404
add /install/oceanbase-all-in-one/rpms/ocp-agent-ce-4.3.2-20241012145836.el7.x86_64.rpm to local mirror
name: ocp-express
version: 4.2.2
release:100000022024011120.el8
arch: x86_64
md5: e5c152ebdd65839ed5f5521ff6c73e6a29cb9e75
size: 78426194
add /install/oceanbase-all-in-one/rpms/ocp-express-4.2.2-100000022024011120.el8.x86_64.rpm to local mirror
name: ocp-server-ce
version: 4.3.2
release:20241012145836.el7
arch: noarch
md5: 610610e2daf63f6df08af686f9a88b6d8cefcc52
size: 650124565
add /install/oceanbase-all-in-one/rpms/ocp-server-ce-4.3.2-20241012145836.el7.noarch.rpm to local mirror
name: openjdk-jre
version: 1.8.0_322
release:b09.el8
arch: x86_64
md5: 45e4b8c216b090a63583b70743c54e87b7b69aad
size: 108654236
add /install/oceanbase-all-in-one/rpms/openjdk-jre-1.8.0_322-b09.el8.x86_64.rpm to local mirror
name: prometheus
version: 2.37.1
release:10000102022110211.el8
arch: x86_64
md5: e4f8a3e784512fca75bf1b3464247d1f31542cb9
size: 211224073
add /install/oceanbase-all-in-one/rpms/prometheus-2.37.1-10000102022110211.el8.x86_64.rpm to local mirror
Trace ID: 0ca2e0be-a7f0-11ef-970a-000c294664c8
If you want to view detailed obd logs, please run: obd display-trace 0ca2e0be-a7f0-11ef-970a-000c294664c8
Disable remote ok
Trace ID: 0e9f382c-a7f0-11ef-a8ae-000c294664c8
If you want to view detailed obd logs, please run: obd display-trace 0e9f382c-a7f0-11ef-a8ae-000c294664c8

add auto set env logic to profile: /home/admin/.bash_profile

#########################################################################################
 Install Finished
=========================================================================================
Setup Environment:              source ~/.oceanbase-all-in-one/bin/env.sh
Quick Start:                    obd demo
Use Web Service to install:     obd web
Use Web Service to upgrade:     obd web upgrade
More Details:                   obd -h
=========================================================================================
[admin@Node1 bin]$
3.4、初始化环境变量
- 代码如下:
[admin@Node1 bin]$ source ~/.oceanbase-all-in-one/bin/env.sh
[admin@Node1 bin]$
3.5、执行部署命令bd demo
obd demo 命令默认在当前用户家目录下以最小规格部署并启动 OceanBase 数据库及相关组件(包括 ODP、OBAgent、Grafana 和 Prometheus),固定部署名为 demo。如需更多定制化的部署形式,参见 快速部署命令。
您也可以使用 obd 命令管理该 OceanBase 数据库,详细命令介绍请参考 集群命令组。
- 代码如下:
[admin@Node1 bin]$ obd demo
Get local repositories ok
Open ssh connection ok
Check for standby tenant ok
Search plugins ok
Cluster status check ok
observer work dir cleaning ok
obproxy work dir cleaning ok
grafana work dir cleaning ok
obagent work dir cleaning ok
prometheus work dir cleaning ok
demo destroyed
Cluster param config check ok
Open ssh connection ok
Generate prometheus configuration ok
Generate obproxy configuration ok
Generate obagent configuration ok
Generate grafana configuration ok
Generate observer configuration ok
+--------------------------------------------------------------------------------------------+
|                                          Packages                                          |
+--------------+---------+------------------------+------------------------------------------+
| Repository   | Version | Release                | Md5                                      |
+--------------+---------+------------------------+------------------------------------------+
| oceanbase-ce | 4.3.4.0 | 100000162024110717.el7 | 5d59e837a0ecff1a6baa20f72747c343ac7c8dce |
| grafana      | 7.5.17  | 1                      | 1bf1f338d3a3445d8599dc6902e7aeed4de4e0d6 |
| obagent      | 4.2.2   | 100000042024011120.el7 | 19739a07a12eab736aff86ecf357b1ae660b554e |
| obproxy-ce   | 4.3.2.0 | 26.el7                 | fd779e401be448715254165b1a4f7205c4c1bda5 |
| prometheus   | 2.37.1  | 10000102022110211.el7  | 58913c7606f05feb01bc1c6410346e5fc31cf263 |
+--------------+---------+------------------------+------------------------------------------+
Repository integrity check ok
Load param plugin ok
Open ssh connection ok
Parameter check ok
Cluster status check ok
Initializes observer work home ok
Initializes grafana work home ok
Initializes obagent work home ok
Initializes obproxy work home ok
Initializes prometheus work home ok
Remote oceanbase-ce-4.3.4.0-100000162024110717.el7-5d59e837a0ecff1a6baa20f72747c343ac7c8dce repository install ok
Remote oceanbase-ce-4.3.4.0-100000162024110717.el7-5d59e837a0ecff1a6baa20f72747c343ac7c8dce repository lib check !!
Remote grafana-7.5.17-1-1bf1f338d3a3445d8599dc6902e7aeed4de4e0d6 repository install ok
Remote grafana-7.5.17-1-1bf1f338d3a3445d8599dc6902e7aeed4de4e0d6 repository lib check ok
Remote obagent-4.2.2-100000042024011120.el7-19739a07a12eab736aff86ecf357b1ae660b554e repository install ok
Remote obagent-4.2.2-100000042024011120.el7-19739a07a12eab736aff86ecf357b1ae660b554e repository lib check ok
Remote obproxy-ce-4.3.2.0-26.el7-fd779e401be448715254165b1a4f7205c4c1bda5 repository install ok
Remote obproxy-ce-4.3.2.0-26.el7-fd779e401be448715254165b1a4f7205c4c1bda5 repository lib check ok
Remote prometheus-2.37.1-10000102022110211.el7-58913c7606f05feb01bc1c6410346e5fc31cf263 repository install ok
Remote prometheus-2.37.1-10000102022110211.el7-58913c7606f05feb01bc1c6410346e5fc31cf263 repository lib check ok
Try to get lib-repository
Remote oceanbase-ce-libs-4.3.4.0-100000162024110717.el7-8f0416a36198edfc7ec8edc3de765e21159dca54 repository install ok
Remote oceanbase-ce-4.3.4.0-100000162024110717.el7-5d59e837a0ecff1a6baa20f72747c343ac7c8dce repository lib check ok
demo deployed
Get local repositories ok
Search plugins ok
Load cluster param plugin ok
Open ssh connection ok
Check before start observer ok
[WARN] OBD-1007: (127.0.0.1) The recommended number of max user processes is 655350 (Current value: 120000)
[WARN] OBD-1012: (127.0.0.1) clog and data use the same disk (/)

Check before start obagent ok
Check before start obproxy ok
Check before start prometheus ok
Check before start grafana ok
cluster scenario: express_oltp
Start observer ok
observer program health check ok
Connect to observer 127.0.0.1:2881 ok
Initialize oceanbase-ce ok
Start obagent ok
obagent program health check ok
Connect to Obagent ok
Start obproxy ok
obproxy program health check ok
Connect to obproxy ok
Initialize obproxy-ce ok
Start promethues ok
prometheus program health check ok
Connect to Prometheus ok
Initialize prometheus ok
Start grafana ok
grafana program health check ok
Connect to grafana ok
Initialize grafana ok
Wait for observer init ok
+---------------------------------------------+
|                 oceanbase-ce                |
+-----------+---------+------+-------+--------+
| ip        | version | port | zone  | status |
+-----------+---------+------+-------+--------+
| 127.0.0.1 | 4.3.4.0 | 2881 | zone1 | ACTIVE |
+-----------+---------+------+-------+--------+
obclient -h127.0.0.1 -P2881 -uroot -p'4X66h1BupMnyKOEUXxyk' -Doceanbase -A

cluster unique id: bbfd18b6-c079-57f0-a5e7-aa7ea5236fc9-19352add8d1-00040304

+-----------------------------------------------------------------+
|                             obagent                             |
+--------------+--------------------+--------------------+--------+
| ip           | mgragent_http_port | monagent_http_port | status |
+--------------+--------------------+--------------------+--------+
| 192.168.4.71 | 8089               | 8088               | active |
+--------------+--------------------+--------------------+--------+
+---------------------------------------------+
|                  obproxy-ce                 |
+-----------+------+-----------------+--------+
| ip        | port | prometheus_port | status |
+-----------+------+-----------------+--------+
| 127.0.0.1 | 2883 | 2884            | active |
+-----------+------+-----------------+--------+
obclient -h127.0.0.1 -P2883 -uroot -p'4X66h1BupMnyKOEUXxyk' -Doceanbase -A

+-----------------------------------------------------+
|                      prometheus                     |
+--------------------------+------+----------+--------+
| url                      | user | password | status |
+--------------------------+------+----------+--------+
| http://192.168.4.71:9090 |      |          | active |
+--------------------------+------+----------+--------+
+--------------------------------------------------------------------+
|                              grafana                               |
+--------------------------------------+-------+------------+--------+
| url                                  | user  | password   | status |
+--------------------------------------+-------+------------+--------+
| http://192.168.4.71:3000/d/oceanbase | admin | B0gNbHnrvk | active |
+--------------------------------------+-------+------------+--------+
demo running
Trace ID: 84cdc586-a89f-11ef-a9a0-000c29740c99
If you want to view detailed obd logs, please run: obd display-trace 84cdc586-a89f-11ef-a9a0-000c29740c99
[admin@Node1 bin]$
3.6、查看部署状态
- 代码如下:
[admin@Node1 ~]$ obd cluster list
+--------------------------------------------------------+
|                      Cluster List                      |
+------+-------------------------------+-----------------+
| Name | Configuration Path            | Status (Cached) |
+------+-------------------------------+-----------------+
| demo | /home/admin/.obd/cluster/demo | running         |
+------+-------------------------------+-----------------+
Trace ID: 6899bf54-a8a0-11ef-8920-000c29740c99
If you want to view detailed obd logs, please run: obd display-trace 6899bf54-a8a0-11ef-8920-000c29740c99
[admin@Node1 ~]$
3.7、查看部署状态
第1次登录错误如下:
[admin@Node1 ~]$ obclient -h127.0.0.1 -P2883 -uroot@sys -Doceanbase -A
ERROR 1045 (42000): Access denied for user 'root'@'xxx.xxx.xxx.xxx' (using password: NO)
解决方案见第四部分第3小节。
第2次登录错误如下:
- 代码如下:
[admin@Node1 ~]$ obclient -h127.0.0.1 -P2883 -uroot@sys -Doceanbase -p -A
Enter password:
Welcome to the OceanBase.  Commands end with ; or \g.
Your OceanBase connection id is 400031751
Server version: OceanBase_CE 4.3.4.0 (r100000162024110717-82547d6edc6ea98ba710e376a736a9a850499a06) (Built Nov  7 2024 17:28:11)

Copyright (c) 2000, 2018, OceanBase and/or its affiliates. All rights reserved.

Type 'help;' or '\h' for help. Type '\c' to clear the current input statement.

obclient [oceanbase]>
3.8、创建数据库
- 代码如下:
obclient [oceanbase]> CREATE DATABASE testserver DEFAULT CHARACTER SET utf8mb4 READ WRITE;
Query OK, 1 row affected (0.059 sec)

obclient [oceanbase]>
3.9、查看当前数据库
- 代码如下:
obclient [oceanbase]> SHOW DATABASES;
+--------------------+
| Database           |
+--------------------+
| information_schema |
| LBACSYS            |
| mysql              |
| oceanbase          |
| ocs                |
| ORAAUDITOR         |
| SYS                |
| sys_external_tbs   |
| test               |
| testserver         |
+--------------------+
10 rows in set (0.012 sec)

obclient [oceanbase]>
四、相关问题
4.1、错误代码OBD-1007
错误如下:
[ERROR] OBD-1007: (127.0.0.1) The value of the ulimit parameter "max user processes" must not be less than 120000 (Current value: 4096), Please execute `echo -e "* soft nproc 120000\n* hard nproc 120000" >> /etc/security/limits.d/nproc.conf` as root in 127.0.0.1. if it dosen't work, please check whether UsePAM is yes in /etc/ssh/sshd_config.
解决方案如下:
说明:登录root账户执行以下脚本
[root@Node1 ~]# echo -e "* soft nproc 120000\n* hard nproc 120000" >> /etc/security/limits.d/nproc.conf
[root@Node1 ~]#
4.2、错误代码OBD-1007
错误如下:
[ERROR] OBD-2000: (127.0.0.1) not enough memory. (Available: 2G, Need: 3G), Please execute `echo 1 > /proc/sys/vm/drop_caches` as root in 127.0.0.1 to release cached.
解决方案如下:
说明:登录root账户执行以下脚本
[root@Node1 ~]# echo 1 > /proc/sys/vm/drop_caches
4.3、部署完成后,登录失败
错误如下:
[admin@Node1 ~]$ obclient -h127.0.0.1 -P2883 -uroot@sys -Doceanbase -A
ERROR 1045 (42000): Access denied for user 'root'@'xxx.xxx.xxx.xxx' (using password: NO)
解决方案如下:
说明:修改配置文件obd cluster edit-config demo执行上述命令打开配置文件后,在配置文件中 oceanbase-ce(社区版)/oceanbase(企业版) ,在对应项目下修改 root_password: xxxx的密码即可,添加完成后保存退出。
1、打开配置文件
[admin@Node1 ~]$ obd cluster edit-config demo


oceanbase-ce:
  servers:
  - 127.0.0.1
  global:
    home_path: /home/admin/oceanbase-ce
    appname: demo
    cluster_id: 1732258863
    scenario: express_oltp
    enable_syslog_wf: false
    max_syslog_file_count: 4
    memory_limit: 6G
    production_mode: false
    __min_full_resource_pool_memory: 1073741824
    system_memory: 1G
    cpu_count: 16
    datafile_size: 2G
    datafile_maxsize: 8G
    datafile_next: 2G
    log_disk_size: 14G
    root_password: 此处密码修改为admin
    ocp_agent_monitor_password: gfOFONzKsz
    proxyro_password: hOK8HZXOzG
grafana:
  servers:
  - 127.0.0.1
  global:
    home_path: /home/admin/grafana
    login_password: B0gNbHnrvk
  depends:
  - prometheus
obagent:
  servers:
  - 127.0.0.1
  global:
    home_path: /home/admin/obagent
    ob_monitor_status: active
  depends:
  - oceanbase-ce
obproxy-ce:
  servers:
  - 127.0.0.1
  global:
    home_path: /home/admin/obproxy-ce
    skip_proxy_sys_private_check: true
    enable_strict_kernel_release: false
    enable_cluster_checkout: false
    proxy_mem_limited: 500M
  127.0.0.1:
    proxy_id: 1526
    client_session_id_version: 2
  depends:
  - oceanbase-ce
prometheus:
  servers:
  - 127.0.0.1
  global:
    home_path: /home/admin/prometheus
  depends:
  - obagent
2、等待修改完成
修改并保存配置文件后,OBD 会输出待执行的重启命令,直接复制执行即可。
[admin@Node1 ~]$ obd cluster edit-config demo
Search param plugin and load ok
Search param plugin and load ok
Parameter check \
Parameter check ok
Deploy "demo" config need reload
Use `obd cluster reload demo` to make changes take effect.
Trace ID: 42ede9aa-a8a1-11ef-905b-000c29740c99
If you want to view detailed obd logs, please run: obd display-trace 42ede9aa-a8a1-11ef-905b-000c29740c99
[admin@Node1 ~]$
3、重启集群
[admin@Node1 ~]$ obd cluster reload demo
Get local repositories and plugins ok
Load cluster param plugin ok
Open ssh connection ok
Cluster status check ok
Connect to observer 127.0.0.1:2881 ok
Reload observer ok
Connect to Obagent ok
Reload obagent ok
[WARN] monitor_user no in obd_agent_mapper.yaml, skip

Connect to obproxy ok
Connect to Prometheus ok
Reload prometheus ok
Connect to grafana ok
Reload Grafana ok
demo reload
Trace ID: 59bb355c-a8a1-11ef-8819-000c29740c99
If you want to view detailed obd logs, please run: obd display-trace 59bb355c-a8a1-11ef-8819-000c29740c99
[admin@Node1 ~]$
[admin@Node1 ~]$
说明:此时再次尝试登录,即可登录成功!
五、总结
5.1、OceanBase的产品和工具
- OceanBase数据库:蚂蚁集团完全自主研发的金融级分布式关系数据库软件。
- OceanBase Database Proxy (ODP):OceanBase数据库代理,保证最佳路由避免分布式事务。
- OceanBase Deployer (OBD):OceanBase开源软件的安装部署工具。
- 运维监控工具 (OCP):为OceanBase数据库量身打造的企业级数据库集群管理平台工具。
- 开发者中心 (ODC):为OceanBase数据库量身打造的开发平台。
- 数据迁移工具 (OMS):实现异构数据库与OceanBase数据库的数据迁移。
- 数据导入导出工具 (OBLOADER/OBDUMPER):快速导入和导出数据。
- OceanBase Admin Toolkit (OAT):方便OCPODC的自动化部署。
- OBClient:兼容访问OceanBase数据库的MYSQL租户。
- OB Admin:OceanBase数据库的配套运维工具。
- CDC:变更数据捕获,帮助识别从上次提取之后发生变化的数据。
- OBLogProxy:OceanBase增量日志代理服务。
- MySQL客户端支持:可以通过MySQL客户端连接OceanBase数据库的MYSQL租户。
- OBAgent:监控采集框架。
除了关系型数据模型,OceanBase还支持存储非结构化数据和半结构化数据,使其能够适应不同类型的应用场景。
以上优势使得OceanBase在金融、政府、互联网等多个行业得到了广泛应用,并且在处理高并发事务和大规模数据分析方面表现出色。
