1、简介
在现代云原生应用中,服务网格和Ingress控制器都是常用的组件。服务网格(如Istio、Linkerd)提供了服务间的通信、监控、安全等功能,而Ingress控制器则帮助我们从外部访问集群内部的服务。
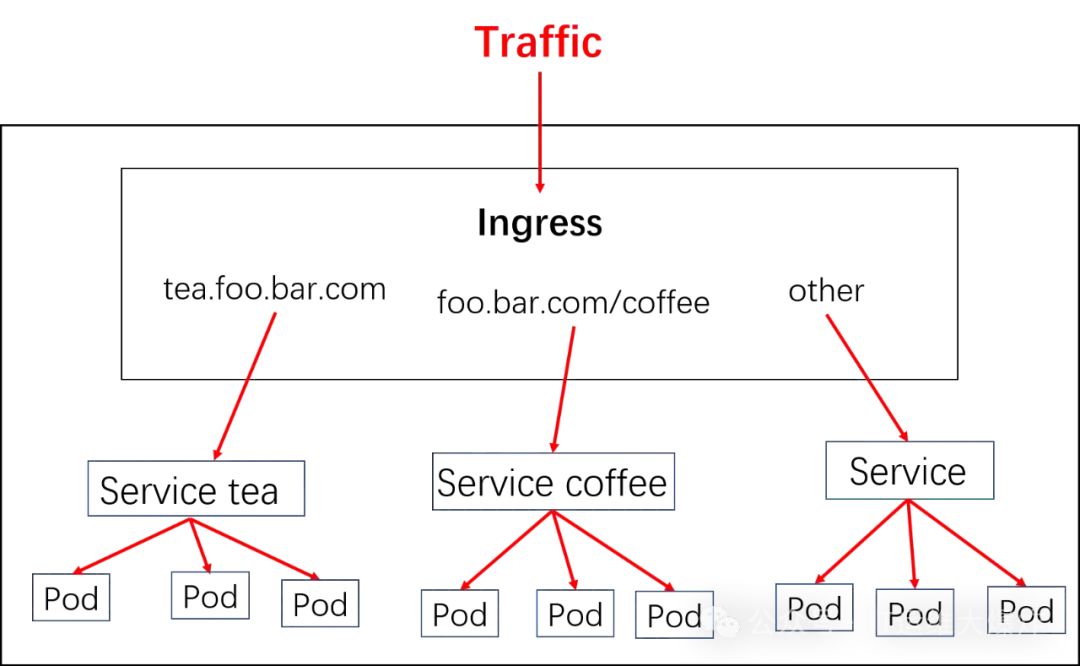
对于Kubernetes的Service,无论是Cluster-Ip和NodePort均是四层的负载,集群内的服务如何实现七层的负载均衡,这就需要借助于Ingress,Ingress控制器的实现方式有很多,比如nginx, Contour, Haproxy, trafik, Istio。几种常用的ingress功能对比和选型可以参考这里。
2、常用组件
Ingress-nginx是7层的负载均衡器 ,负责统一管理外部对k8s cluster中Service的请求。主要包含:
ingress-nginx-controller:根据用户编写的ingress规则(创建的ingress的yaml文件),动态的去更改nginx服务的配置文件,并且reload重载使其生效(是自动化的,通过lua脚本来实现)。
Ingress资源对象:将Nginx的配置抽象成一个Ingress对象。
3、原理
ingress controller通过和kubernetes api交互,动态的去感知集群中ingress规则变化。
然后读取ingress规则(规则就是写明了哪个域名对应哪个service),按照自定义的规则,生成一段nginx配置。
再写到nginx-ingress-controller的pod里,这个Ingress controller的pod里运行着一个Nginx服务,控制器把生成的nginx配置写入/etc/nginx/nginx.conf文件中。
然后reload一下使配置生效。以此达到域名分别配置和动态更新的问题。
4、安装Ingress控制器
[root@mast01 istio]# kubectl apply -f ingress-nginx.yaml

[root@mast01 istio]# kubectl get pod -n ingress-nginx -o wide
NAME                                   READY   STATUS      RESTARTS   AGE   IP               NODE     NOMINATED NODE   READINESS GATES
ingress-nginx-admission-create-nrfz9   0/1     Completed   0          86m   10.244.205.195   work01   <none>           <none>
ingress-nginx-admission-patch-6pjjv    0/1     Completed   1          86m   10.244.75.85     work02   <none>           <none>
ingress-nginx-controller-b7qf6         1/1     Running     0          86m   192.168.58.117   work01   <none>           <none>
ingress-nginx-controller-szc5z         1/1     Running     0          86m   192.168.58.118   work02   <none>           <none>
5、使用ingress访问网格服务
[root@mast01 istio]# vim front-tomcat-ingress.yaml
apiVersion: extensions/v1beta1
kind: Ingress
metadata:
  name: front-tomcat
  namespace: istio-demo
spec:
  rules:
  - host: tomcat.istio-demo.com
    http:
      paths:
      - backend:
          serviceName: front-tomcat
          servicePort: 8080
        path:
status:
  loadBalancer: {}

[root@mast01 ~]# kubectl exec -it ingress-nginx-controller-szc5z -n ingress-nginx bash
bash-5.1$ ps -ef
PID   USER     TIME  COMMAND
    1 www-data  0:00 usr/bin/dumb-init -- nginx-ingress-controller --election-id=ingress-controller-leader --controller-class=k8s.io/ingress-nginx --configmap=ingress-nginx/ing
    7 www-data  0:10 nginx-ingress-controller --election-id=ingress-controller-leader --controller-class=k8s.io/ingress-nginx --configmap=ingress-nginx/ingress-nginx-controller
   26 www-data  0:00 nginx: master process usr/local/nginx/sbin/nginx -c etc/nginx/nginx.conf
   31 www-data  0:02 nginx: worker process
   32 www-data  0:02 nginx: worker process
   33 www-data  0:00 nginx: cache manager process
  108 www-data  0:00 bash
  114 www-data  0:00 ps -ef

bash-5.1$ cat etc/nginx/nginx.conf
...
        server_name tomcat.istio-demo.com ;

        listen 80  ;
        listen [::]:80  ;
        listen 443  ssl http2 ;
        listen [::]:443  ssl http2 ;

        set $proxy_upstream_name "-";

        ssl_certificate_by_lua_block {
            certificate.call()
        }

        location  {

            set $namespace      "istio-demo";
            set $ingress_name   "front-tomcat";
            set $service_name   "front-tomcat";
            set $service_port   "8080";
            set $location_path  "/";
            set $global_rate_limit_exceeding n;
 ...
查看效果
只有网格内部访问会遵从virtualservice
的规则,在宿主机中直接访问Service的ClusterIP还是按照默认的规则转发。流量比例1:1
多路径转发
myblog.luffy.com -> 172.21.51.67 -> foo   service1:4200
                                      bar   service2:8080
                                            myblog:80

myblog.luffy.com/foo ---->  myblog.luffy.com/service1:4200
myblog.luffy.com/bar ---->  myblog.luffy.com/service2:8080
myblog.luffy.com/ ---->  myblog.luffy.com/myblog:80
实现
apiVersion: networking.k8s.io/v1beta1
kind: Ingress
metadata:
  name: simple-fanout-example
  namespace: luffy
spec:
  rules:
  - host: myblog.luffy.com
    http:
      paths:
      - path: /foo
        backend:
          serviceName: service1
          servicePort: 4200
      - path: /bar
        backend:
          serviceName: service2
          servicePort: 8080
      - path: /
        backend:
          serviceName: myblog
          servicePort: 80
nginx的URL重写
myblog.luffy.com -> 172.21.51.67 -> foo/    myblog:80/admin/

myblog.luffy.com/foo/ ---->  myblog.luffy.com/admin/
实现
apiVersion: networking.k8s.io/v1beta1
kind: Ingress
metadata:
  name: rewrite-path
  namespace: luffy
  annotations:
    nginx.ingress.kubernetes.io/rewrite-target: /admin/$1
spec:
  rules:
  - host: myblog.luffy.com
    http:
      paths:
      - path: /foo/(.*)
        backend:
          serviceName: myblog
          servicePort: 80
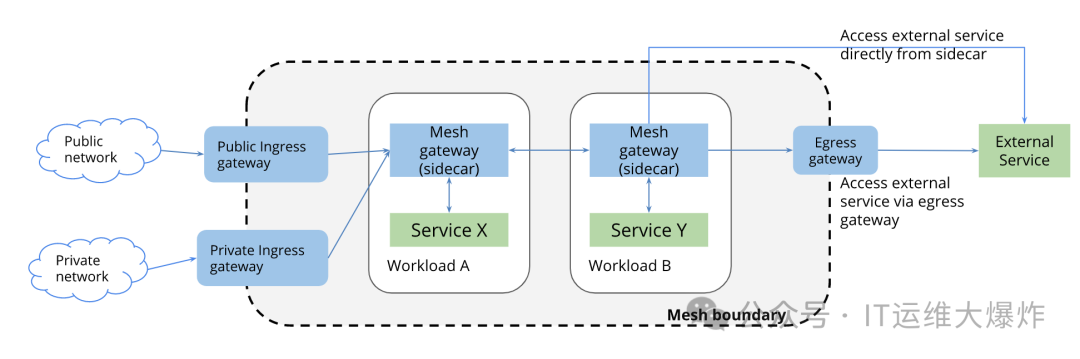
6、使用ingressgateway访问网格服务
Ingress本身无法实现流量权重转发,主要因为其设计初衷是用于在集群外部暴露HTTP和HTTPS路由,并基于路径和主机名分发请求,而不是高级流量管理,其设计并不是为了实现高级流量管理和控制。Ingress缺乏细粒度流量控制和动态调整能力,依赖于静态配置和简单的路由规则,无法根据权重进行复杂的流量分配。
对于入口流量管理,您可能会问:为什么不直接使用 Kubernetes Ingress API ?原因是 Ingress API 无法表达 Istio 的路由需求。Ingress 试图在不同的 HTTP 代理之间取一个公共的交集,因此只能支持最基本的 HTTP 路由,最终导致需要将代理的其他高级功能放入到注解(annotation)中,而注解的方式在多个代理之间是不兼容的,无法移植。
Istio Gateway
通过将 L4-L6 配置与 L7 配置分离的方式克服了 Ingress
的这些缺点。Gateway
只用于配置 L4-L6 功能(例如,对外公开的端口,TLS 配置),所有主流的L7代理均以统一的方式实现了这些功能。然后,通过在 Gateway
上绑定 VirtualService
的方式,可以使用标准的 Istio 规则来控制进入 Gateway
的 HTTP 和 TCP 流量。
[root@mast01 istio]# vim front-tomcat-gateway.yaml
apiVersion: networking.istio.io/v1alpha3
kind: Gateway
metadata:
name: front-tomcat-gateway
namespace: istio-demo
spec:
selector:
istio: ingressgateway # use istio default controller
servers:
- port:
number: 80
name: http
protocol: HTTP
hosts:
- tomcat.istio-demo.com
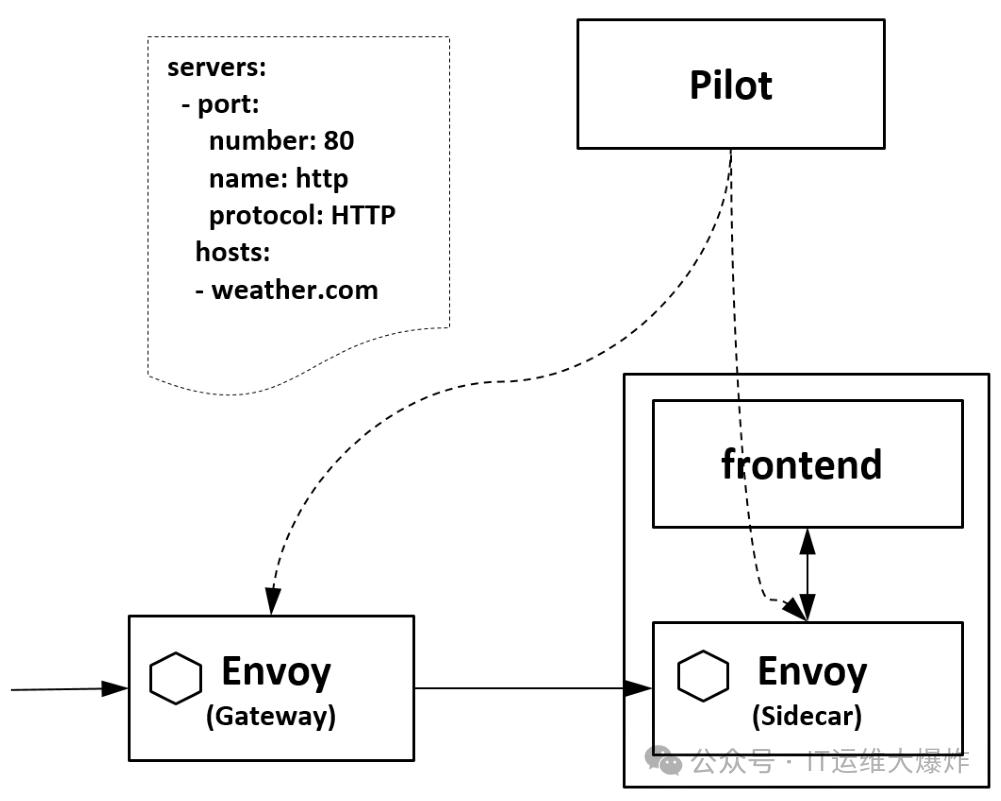
[root@mast01 istio]# kubectl apply -f front-tomcat-gateway-virtualservice.yaml
效果是在Istio的ingress网关上加了一条规则,允许`tomcat.istio-demo.com
的外部http流量进入到网格中,但是只是接受访问和流量输入,当流量到达这个网关时,它还不知道发送到哪里去。
网关已准备好接收流量,我们必须告知它将收到的流量发往何处,这就用到了前面使用过的VirtualService
。
要为进入上面的 Gateway 的流量配置相应的路由,必须为同一个 host 定义一个 VirtualService
,并使用配置中的 gateways
字段绑定到前面定义的 Gateway
上 。
[root@mast01 istio]# vim  front-tomcat-gateway-virtualservice.yaml
apiVersion: networking.istio.io/v1alpha3
kind: VirtualService
metadata:
  name: gateway-front-tomcat
  namespace: istio-demo
spec:
  gateways:
  - front-tomcat-gateway
  hosts:
  - tomcat.istio-demo.com
  http:
  - name: front-tomcat-route
    route:
    - destination:
        host: front-tomcat
        subset: v1
      weight: 90
    - destination:
        host: front-tomcat
        subset: v2
      weight: 10

[root@mast01 istio]# kubectl apply -f front-tomcat-gateway.yaml
该网关列表指定,只有通过我们指定的网关 front-tomcat-gateway
的流量是允许的。所有其他外部请求将被拒绝,并返回 404 响应。
请注意,在此配置中,来自网格中其他服务的内部请求不受这些规则约束
模拟访问
端口 31927 是通过 Kubernetes 中的 Service 类型为 NodePort 来公开服务的一种方式。在 Kubernetes 中,NodePort 允许将服务的端口映射到每个节点的某个固定端口上,从而可以从集群外部访问该服务。
在 Istio 中,istio-ingressgateway
是负责接收外部流量并进入 Istio 网格的组件。通过将 istio-ingressgateway
配置为 NodePort 类型,Kubernetes 将会把这个服务公开在集群的所有节点上,使用固定的端口号 31927。这样,外部用户可以通过访问任何一个集群节点的 IP 地址和端口 31927,来访问和使用 Istio 网格中的服务。
[root@mast01 istio]# kubectl -n istio-system get service istio-ingressgateway -o jsonpath='{.spec.ports[?(@.name=="http2")].nodePort}'
31927

[root@mast01 istio]# curl  -HHost:tomcat.istio-demo.com 192.168.58.117:31927/
去除端口
# 在一台80端口未被占用的机器中,如ip为172.21.51.69
$ docker run -d --restart=always -p 80:80 --name istio-nginx nginx:alpine

# 在容器的/etc/nginx/conf.d/目录中,新增配置文件
$ cat front-tomcat.conf
upstream front-tomcat {
  server 192.168.58.117:31927;
}
server {
    listen       80;
    listen  [::]:80;
    server_name  tomcat.istio-demo.com;

    location / {
        proxy_set_header Host $host;
        proxy_set_header X-Real-IP $remote_addr;
        proxy_set_header X-Forwarded-For $proxy_add_x_forwarded_for;
        proxy_http_version 1.1;
        proxy_pass http://front-tomcat;
    }
}

$ nginx -s reload
本地配置hosts
192.168.58.117 tomcat.istio-demo.com查看效果
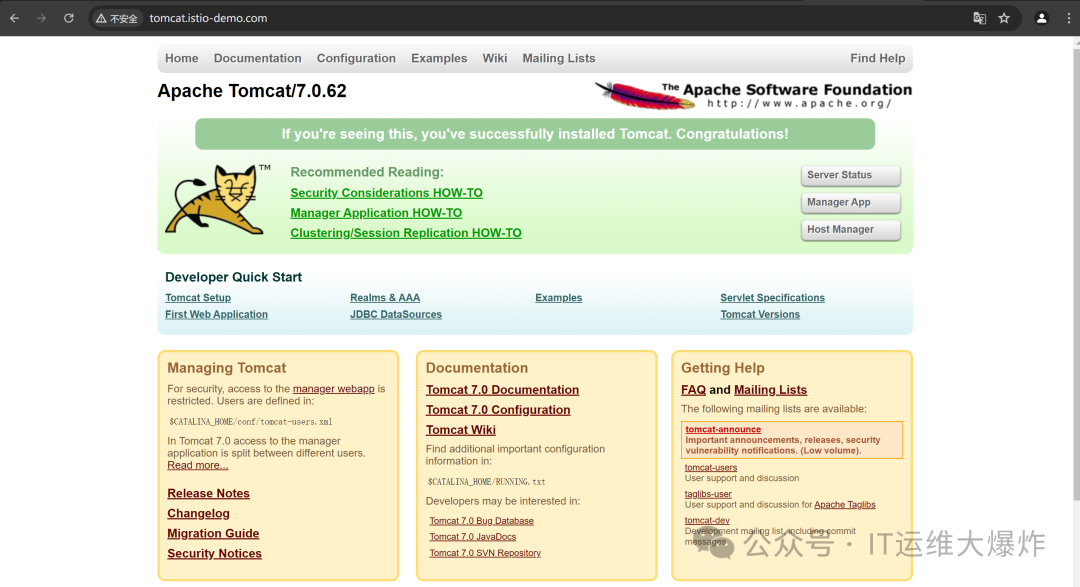
直接访问http://tomcat.istio-demo.com
即可实现外部域名访问到网格内部服务
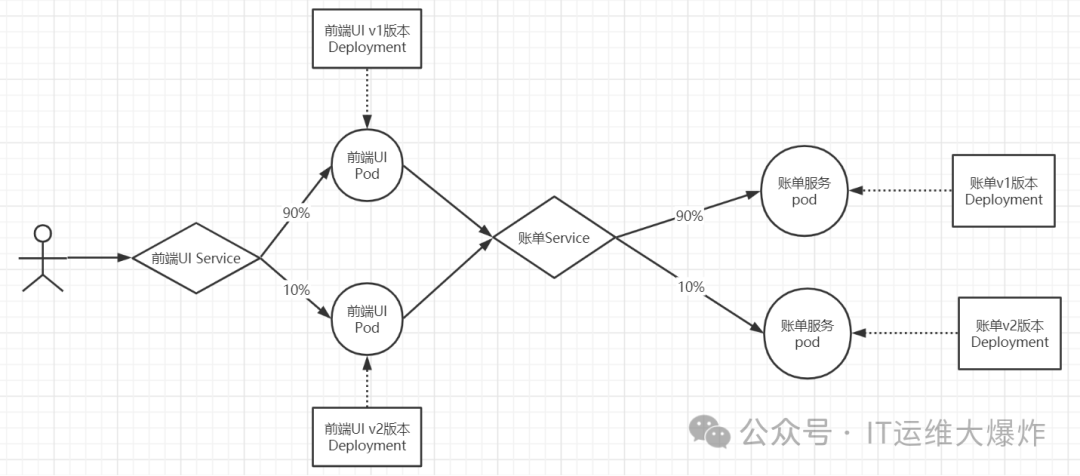
7、使用服务网格访问网格服务
使用 Istio 的主要优势之一是它提供了更高级别的服务网格功能,包括流量管理、安全性、监控和可观察性等方面的解决方案。尽管 Kubernetes 的 Ingress 可以用于简单的 HTTP(S) 流量路由和负载均衡,但它在灵活性和功能上远不及 Istio 的服务网格。Istio 提供了诸如智能路由、故障恢复、流量调节、策略执行等功能,使得在微服务架构中管理和保护服务更加方便和强大。相比之下,服务网格(如Istio)专门设计用于微服务间通信管理,提供细粒度的流量控制、动态调整和全面的可观察性,因此能够实现流量权重转发等高级功能。
流程图
资源清单
[root@mast01 istio]# vim front-tomcat-service.yaml
apiVersion: v1
kind: Service
metadata:
  labels:
    app: front-tomcat
  name: front-tomcat
  namespace: istio-demo
spec:
  ports:
  - name: http
    port: 8080
    protocol: TCP
    targetPort: 8080
  selector:
    app: front-tomcat
  type: ClusterIP

[root@mast01 istio]# kubectl apply -f front-tomcat-service.yaml
[root@mast01 istio]# vim front-tomcat-v2-dpl.yam
apiVersion: apps/v1
kind: Deployment
metadata:
  labels:
    app: front-tomcat
    version: v2
  name: front-tomcat-v2
  namespace: istio-demo
spec:
  replicas: 1
  selector:
    matchLabels:
      app: front-tomcat
      version: v2
  template:
    metadata:
      labels:
        app: front-tomcat
        version: v2
    spec:
      containers:
      - image: consol/tomcat-7.0:latest
        name: front-tomcat
        command: ["/bin/sh", "-c", "echo 'hello tomcat version2'>/opt/tomcat/webapps/ROOT/index.html;/opt/tomcat/bin/deploy-and-run.sh;"]

[root@mast01 istio]# kubectl apply -f <(istioctl kube-inject -f front-tomcat-v2-dpl.yaml)
创建服务网格
[root@mast01 istio]# vim front-tomcat-virtualservice.yaml
apiVersion: networking.istio.io/v1alpha3
kind: VirtualService
metadata:
  name: front-tomcat
  namespace: istio-demo
spec:
  hosts:
  - front-tomcat
  http:
  - name: front-tomcat-route
    route:
    - destination:
        host: front-tomcat
        subset: v1
      weight: 90
    - destination:
        host: front-tomcat
        subset: v2
      weight: 10
---
apiVersion: networking.istio.io/v1alpha3
kind: DestinationRule
metadata:
  name: front-tomcat
  namespace: istio-demo
spec:
  host: front-tomcat
  subsets:
  - name: v1
    labels:
      version: v1
  - name: v2
    labels:
      version: v2

[root@mast01 istio]# kubectl apply -f front-tomcat-virtualservice.yaml

[root@mast01 istio]# kubectl get pod  -n istio-demo
NAME                               READY   STATUS    RESTARTS         AGE
bill-service-v1-7bc6d7b575-tbgrs   2/2     Running   22 (2d23h ago)   15d
bill-service-v2-6755bb6b6d-tkrzm   2/2     Running   22 (2d23h ago)   15d
front-tomcat-v1-57bc6c5d9f-sfn52   2/2     Running   21 (2d23h ago)   15d
front-tomcat-v2-876c9bffd-8ss6r    2/2     Running   0                3h19m

# 多次请求,可以看到流量分摊9比1
[root@mast01 istio]# kubectl -n istio-demo exec -ti bill-service-v1-7bc6d7b575-tbgrs -c bill-service sh
/ # curl  front-tomcat:8080
hello tomcat version2
8、总结
Ingress:对接ingress controller,实现外部流量进入集群内部,只适用于 HTTP 流量,使用方式也很简单,只能对 service、port、HTTP 路径等有限字段匹配来路由流量,这导致它无法路由如 MySQL、Redis 和各种私有 RPC 等 TCP 流量。要想直接路由南北向的流量,只能使用 Service 的 LoadBalancer 或 NodePort,前者需要云厂商支持,后者需要进行额外的端口管理。有些 Ingress controller 支持暴露 TCP 和 UDP 服务,但是只能使用 Service 来暴露,Ingress 本身是不支持的,例如 nginx ingress controller,服务暴露的端口是通过创建 ConfigMap 的方式来配置的。
欢迎大家扫码关注:

本公众号只写原创,不接广告、不接广告、不接广告。下期小伙伴想学习什么技术,可以私信发我吆。