1、简介
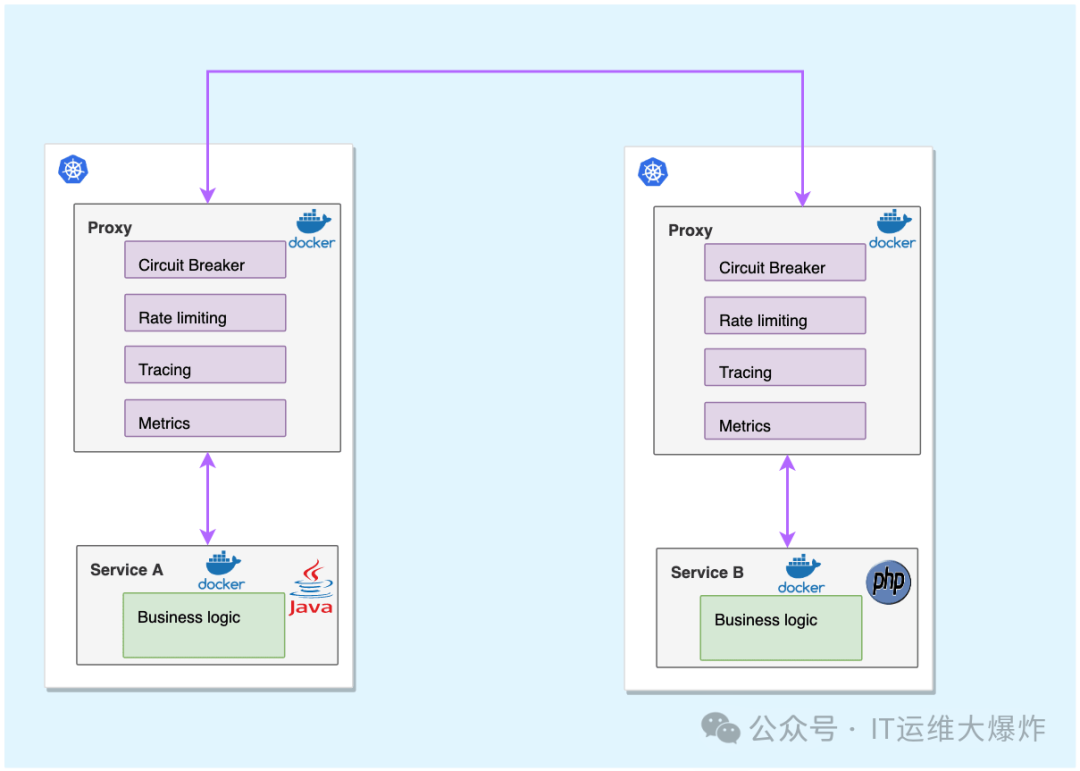
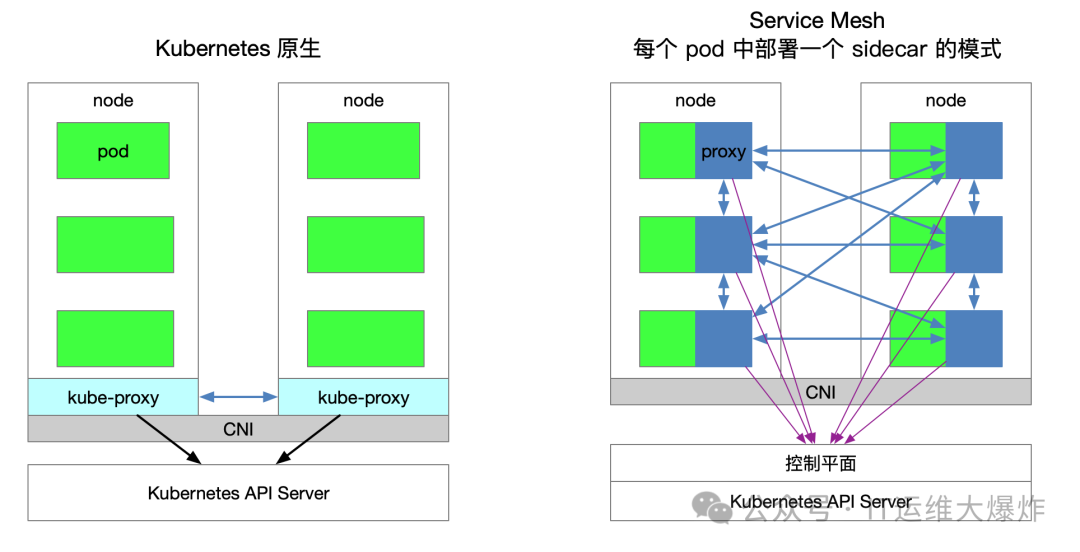
Istio 是一个开源的服务网格(Service Mesh),用于连接、保护、控制和观察微服务。其核心功能之一是网络注入(Sidecar Injection),能够自动将 Envoy 代理注入到应用 Pod 中,从而提供流量管理、可观测性和安全等功能。网络注入是指在 Kubernetes Pod 中自动注入一个 Sidecar 容器,通常是 Envoy 代理。Envoy 代理作为数据平面,负责拦截并处理进入和离开 Pod 的所有网络流量,实现微服务间的流量管理和安全策略。
2、注入类型
自动注入(Automatic Injection):使用 Istio 的 MutatingWebhookAdmissionController 实现。这个控制器会在 Pod 创建时自动注入 Envoy 代理。
手动注入(Manual Injection):使用
istioctl kube-inject
命令在应用部署之前将 Envoy 代理配置注入到应用的 YAML 文件中。
3、注意事项
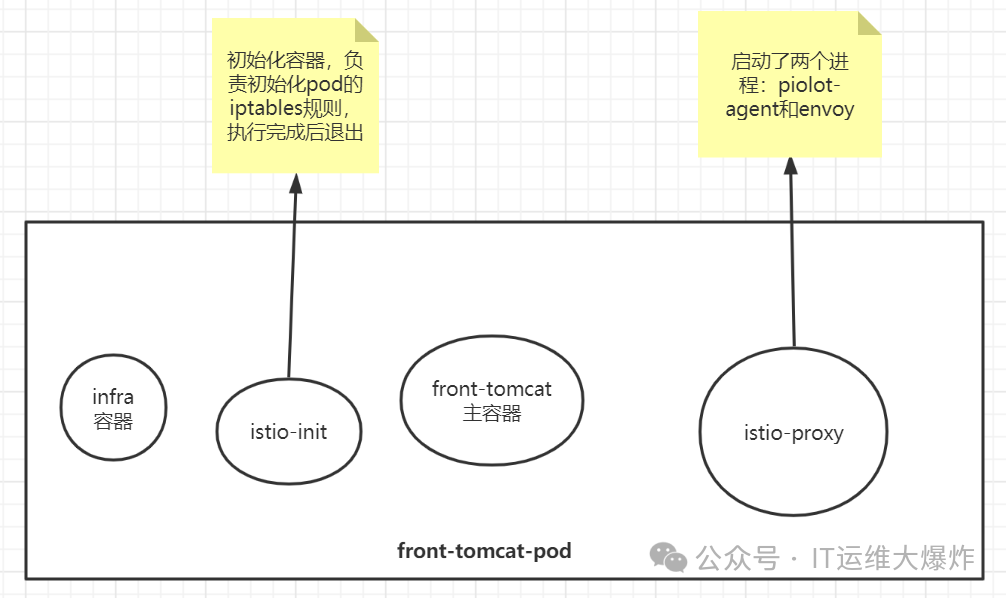
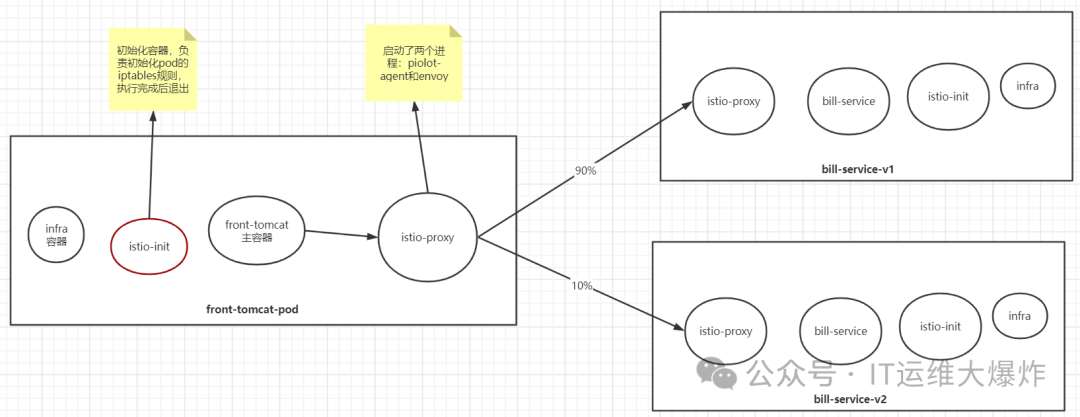
pod被istio注入后,被纳入到服务网格中,每个pod都会添加一个名为istio-proxy的容器(常说的sidecar容器),istio-proxy容器中有两个进程,一个是piolot-agent
,一个是envoy
[root@mast01 ~]# kubectl -n istio-demo exec -ti front-tomcat-v1-57bc6c5d9f-sfn52 -c istio-proxy bash
kubectl exec [POD] [COMMAND] is DEPRECATED and will be removed in a future version. Use kubectl exec [POD] -- [COMMAND] instead.

istio-proxy@front-tomcat-v1-57bc6c5d9f-sfn52:/$ ps aux
USER        PID %CPU %MEM    VSZ   RSS TTY      STAT START   TIME COMMAND
istio-p+      1  0.2  0.9 753008 34832 ?        Ssl  03:08   0:01 usr/local/bin/pilot-agent proxy sidecar --domain istio-demo.svc.cluster.local --proxyLogLevel=warning --proxyCom
istio-p+     16  0.7  1.1 179388 42972 ?        Sl   03:08   0:04 usr/local/bin/envoy -c etc/istio/proxy/envoy-rev.json --drain-time-s 45 --drain-strategy immediate --parent-shut
istio-p+     29  0.2  0.0   4608  2268 pts/0    Ss   03:17   0:00 bash
istio-p+     36  0.0  0.0   7044  1440 pts/0    R+   03:17   0:00 ps aux
确保您的 Pod 不在
kube-system
或kube-public
命名空间中。这些命名空间中的 Pod 将忽略 Sidecar 自动注入。确保您的 Pod 在其 Pod 定义中没有
hostNetwork:true
。hostNetwork:true
的 Pod 将忽略 Sidecar 自动注入。
Sidecar 模型假定 iptables 会拦截所有 Pod 中的流量给 Envoy,但是 hostNetwork:true
的 Pod 不符合此假设,并且会导致主机级别的路由失败。
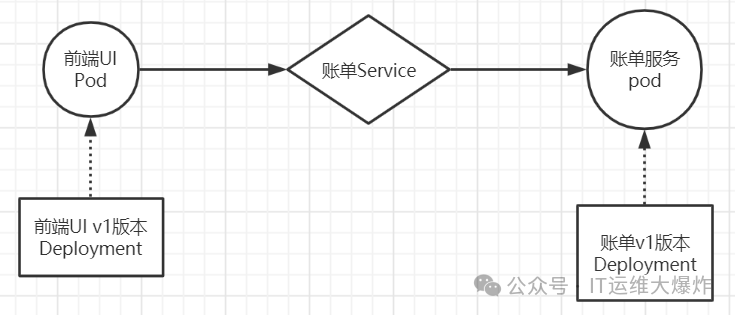
4、未注入
[root@mast01 ~]# kubectl create namespace istio-demo
[root@mast01 ~]# kubectl apply -f front-tomcat-dpl-v1.yaml
[root@mast01 ~]# kubectl apply -f bill-service-dpl-v1.yaml
[root@mast01 ~]# kubectl apply -f bill-service-dpl-v2.yaml
[root@mast01 ~]# kubectl apply -f bill-service-svc.yaml
做不到流量权重分发
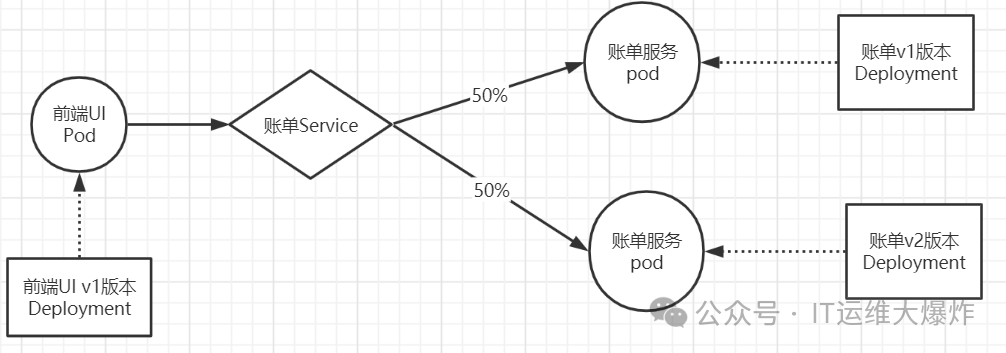
访问规则会按照v1和v2的pod各50%的流量分配
[root@mast01 ~]# kubectl -n istio-demo exec front-tomcat-v1-59d9cc6b65-jgcjb -- curl -s bill-service:9999
hello, this is bill-service-v2
[root@mast01 ~]# kubectl -n istio-demo exec front-tomcat-v1-59d9cc6b65-jgcjb -- curl -s bill-service:9999
this is bill-service-v1
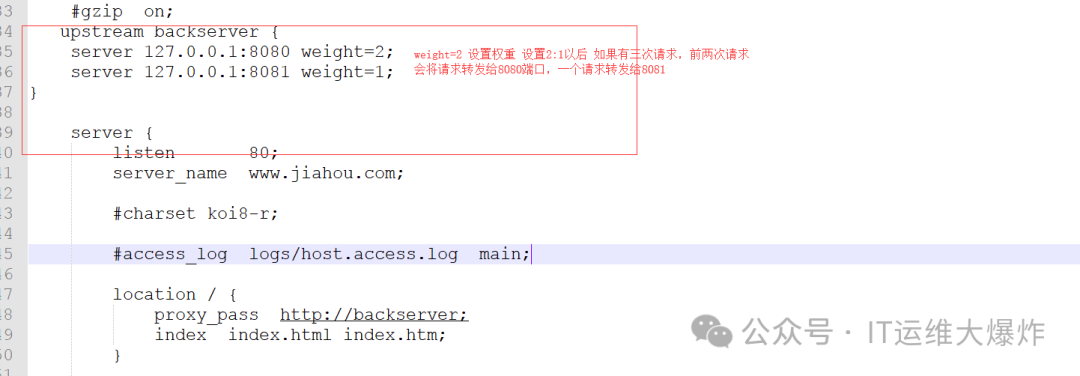
传统模式:nginx的配置中,可以提供类似如下的配置片段实现按照权重的转发
流量走向
[root@mast01 ~]# kubectl get svc -n istio-demo
NAME           TYPE        CLUSTER-IP     EXTERNAL-IP   PORT(S)    AGE
bill-service   ClusterIP   10.108.203.9   <none>        9999/TCP   65m

[root@mast01 ~]# iptables-save |grep 10.108.203.9
-A KUBE-SERVICES -d 10.108.203.9/32 -p tcp -m comment --comment "istio-demo/bill-service:http cluster IP" -m tcp --dport 9999 -j KUBE-SVC-PK4BNTKC2JYVE7B2
-A KUBE-SVC-PK4BNTKC2JYVE7B2 ! -s 10.244.0.0/16 -d 10.108.203.9/32 -p tcp -m comment --comment "istio-demo/bill-service:http cluster IP" -m tcp --dport 9999 -j KUBE-MARK-MASQ

[root@mast01 ~]# iptables-save |grep KUBE-SVC-PK4BNTKC2JYVE7B2
:KUBE-SVC-PK4BNTKC2JYVE7B2 - [0:0]
-A KUBE-SERVICES -d 10.108.203.9/32 -p tcp -m comment --comment "istio-demo/bill-service:http cluster IP" -m tcp --dport 9999 -j KUBE-SVC-PK4BNTKC2JYVE7B2
-A KUBE-SVC-PK4BNTKC2JYVE7B2 ! -s 10.244.0.0/16 -d 10.108.203.9/32 -p tcp -m comment --comment "istio-demo/bill-service:http cluster IP" -m tcp --dport 9999 -j KUBE-MARK-MASQ
-A KUBE-SVC-PK4BNTKC2JYVE7B2 -m comment --comment "istio-demo/bill-service:http" -m statistic --mode random --probability 0.50000000000 -j KUBE-SEP-6OOOSB56IIMYCEYA
-A KUBE-SVC-PK4BNTKC2JYVE7B2 -m comment --comment "istio-demo/bill-service:http" -j KUBE-SEP-AM36T22CJQS6HCG4

[root@mast01 ~]# iptables-save |grep KUBE-SEP-6OOOSB56IIMYCEYA
:KUBE-SEP-6OOOSB56IIMYCEYA - [0:0]
-A KUBE-SEP-6OOOSB56IIMYCEYA -s 10.244.75.113/32 -m comment --comment "istio-demo/bill-service:http" -j KUBE-MARK-MASQ
-A KUBE-SEP-6OOOSB56IIMYCEYA -p tcp -m comment --comment "istio-demo/bill-service:http" -m tcp -j DNAT --to-destination 10.244.75.113:80
-A KUBE-SVC-PK4BNTKC2JYVE7B2 -m comment --comment "istio-demo/bill-service:http" -m statistic --mode random --probability 0.50000000000 -j KUBE-SEP-6OOOSB56IIMYCEYA

[root@mast01 ~]# iptables-save |grep KUBE-SEP-AM36T22CJQS6HCG4
:KUBE-SEP-AM36T22CJQS6HCG4 - [0:0]
-A KUBE-SEP-AM36T22CJQS6HCG4 -s 10.244.75.115/32 -m comment --comment "istio-demo/bill-service:http" -j KUBE-MARK-MASQ
-A KUBE-SEP-AM36T22CJQS6HCG4 -p tcp -m comment --comment "istio-demo/bill-service:http" -m tcp -j DNAT --to-destination 10.244.75.115:80
-A KUBE-SVC-PK4BNTKC2JYVE7B2 -m comment --comment "istio-demo/bill-service:http" -j KUBE-SEP-AM36T22CJQS6HCG4

[root@mast01 ~]# kubectl describe svc bill-service -n istio-demo
Name:              bill-service
Namespace:         istio-demo
Labels:            service=bill-service
Annotations:       <none>
Selector:          service=bill-service
Type:              ClusterIP
IP Family Policy:  SingleStack
IP Families:       IPv4
IP:                10.108.203.9
IPs:               10.108.203.9
Port:              http  9999/TCP
TargetPort:        80/TCP
Endpoints:         10.244.75.113:80,10.244.75.115:80
Session Affinity:  None
Events:            <none>
5、自动注入
在大多数情况下,您不想在每次部署应用程序时都使用 istioctl
命令手动注入边车,而是希望 Istio 自动将 sidecar 注入到您的 pod 中。这是推荐的方法,要使自动注入生效,您只需要用 istio-injection=enabled
标记部署应用程序的命名空间。贴上标签后,Istio 会自动为您在该命名空间中部署的所有 pod 注入 sidecar。
# 给命名空间打标签,这样部署在该命名空间的服务会自动注入sidecar容器
$ kubectl label namespace dafault istio-injection=enabled
6、原理
Istio 依赖于 Mutating Admission Webhook
, istio-sidecar-injector
中的配置详情
[root@mast01 ~]# kubectl get mutatingwebhookconfiguration istio-sidecar-injector -o yaml | grep "namespaceSelector:" -A5
  namespaceSelector:
    matchLabels:
      istio-injection: enabled
  rules:
  - apiGroups:
    - ""
在这里,您可以看到与标签 istio-injection:enabled
相匹配的 webhook namespaceSelector
标签。在这种情况下,您还会看到在创建容器时要完成的操作和资源。当 apiserver
接收到与其中一个规则匹配的请求时,apiserver
会根据 clientconfig
配置中指定的 name: istio-sidecar-injector
键值对,向 webhook 服务发送准入审查请求。
在有 istio-injection=enabled
标签的命名空间中创建 Pod 就会调用注入 webhook
[root@mast01 ~]# kubectl get namespace -L istio-injection
NAME           STATUS    AGE       ISTIO-INJECTION
default        Active    18d       enabled
istio-system   Active    3d
kube-public    Active    18d
kube-system    Active    18d
不包含在注入范围的 namespaceSelector
[root@mast01 ~]# kubectl get mutatingwebhookconfiguration istio-sidecar-injector -o yaml | grep "namespaceSelector:" -A5
  namespaceSelector:
    matchExpressions:
    - key: istio-injection
      operator: NotIn
      values:
      - disabled
  rules:
  - apiGroups:
    - ""
在没有标记 istio-injection=disabled
标签的命名空间中创建 Pod,注入 webhook 就会被调用
[root@mast01 ~]# kubectl get namespace -L istio-injection
NAME           STATUS    AGE       ISTIO-INJECTION
default        Active    18d
istio-system   Active    3d        disabled
kube-public    Active    18d       disabled
kube-system    Active    18d       disabled
验证应用程序 Pod 的命名空间是否已相应地被正确(重新)标记
[root@mast01 ~]# kubectl label namespace istio-system istio-injection=disabled --overwrite在 istio-sidecar-injector configmap
中检查默认注入策略
[root@mast01 ~]# kubectl -n istio-system get configmap istio-sidecar-injector -o jsonpath='{.data.config}' | grep policy:
policy: enabled
策略允许的值为 disabled
或者 enabled
。仅当 webhook 的 namespaceSelector
与目标命名空间匹配时,默认策略才会生效。无法识别的策略值会导致完全禁用注入。命名空间标签具有更高的优先级。
检查每个 Pod 的标签
可以使用 pod template spec metadata 中的标签 sidecar.istio.io/inject
来覆盖默认策略,如果这样的话,Deployment 相应的 metadata 将被忽略。标签值为 true
会被强制注入 Sidecar,为 false
则会强制不注入 Sidecar。
[root@mast01 ~]# kubectl get deployment sleep -o yaml | grep "sidecar.istio.io/inject:" -B4
template:
  metadata:
    labels:
      app: sleep
      sidecar.istio.io/inject: "true"
7、手动注入
Istio中的Sidecar注入是一种将Sidecar代理容器(通常为Envoy代理)注入到Pod中的方法,用以实现服务间的流量控制、安全通信和可观察性。
$ istioctl kube-inject -f bill-service-dpl-v1.yaml|kubectl apply -f -
$ istioctl kube-inject -f bill-service-dpl-v2.yaml|kubectl apply -f -
$ istioctl kube-inject -f front-tomcat-dpl-v1.yaml|kubectl apply -f -
或者
$ kubectl -n bookinfo apply -f <(istioctl kube-inject -f samples/bookinfo/platform/kube/bookinfo.yaml)8、原理
istio中,envoy进行流量治理,更多的使用的是XDS进行配置更新,而我们知道,XDS需要有服务端来提供接口,istiod中的pilot组件则提供了xDS服务端接口的实现 。
用户端,通过创建服务治理的规则(VirtualService、DestinationRule等资源类型),存储到ETCD中。
istio控制平面中的Pilot服务监听上述规则,转换成envoy可读的规则配置,通过xDS接口同步给各envoy。
envoy通过xDS获取最新的配置后,动态reload,进而改变流量转发的策略。
权重分发
配置流量分发
[root@mast01 ~]# kubectl apply -f bill-service-virtualservice.yaml
[root@mast01 ~]# kubectl apply -f bill-service-destnation-rule.yaml
istio中envoy的动态配置
[root@mast01 ~]# kubectl -n istio-demo exec -ti front-tomcat-v1-57bc6c5d9f-sfn52 -c istio-proxy bash

istio-proxy@front-tomcat-v1-57bc6c5d9f-sfn52:/$ netstat -nltp
Active Internet connections (only servers)
Proto Recv-Q Send-Q Local Address           Foreign Address         State       PID/Program name
tcp        0      0 0.0.0.0:15090           0.0.0.0:*               LISTEN      16/envoy
tcp        0      0 0.0.0.0:15090           0.0.0.0:*               LISTEN      16/envoy
tcp        0      0 127.0.0.1:15000         0.0.0.0:*               LISTEN      16/envoy
tcp        0      0 0.0.0.0:15001           0.0.0.0:*               LISTEN      16/envoy
tcp        0      0 0.0.0.0:15001           0.0.0.0:*               LISTEN      16/envoy
tcp        0      0 127.0.0.1:15004         0.0.0.0:*               LISTEN      1/pilot-agent
tcp        0      0 0.0.0.0:15006           0.0.0.0:*               LISTEN      16/envoy
tcp        0      0 0.0.0.0:15006           0.0.0.0:*               LISTEN      16/envoy
tcp        0      0 127.0.0.1:8005          0.0.0.0:*               LISTEN      -
tcp        0      0 0.0.0.0:8009            0.0.0.0:*               LISTEN      -
tcp        0      0 0.0.0.0:8778            0.0.0.0:*               LISTEN      -
tcp        0      0 0.0.0.0:15021           0.0.0.0:*               LISTEN      16/envoy
tcp        0      0 0.0.0.0:15021           0.0.0.0:*               LISTEN      16/envoy
tcp        0      0 0.0.0.0:8080            0.0.0.0:*               LISTEN      -
tcp6       0      0 :::15020                :::*                    LISTEN      1/pilot-agent

istio-proxy@front-tomcat-v1-57bc6c5d9f-sfn52:/$ curl localhost:15000/help

#可以看到所有信息包括init的信息
istio-proxy@front-tomcat-v1-57bc6c5d9f-sfn52:/$ curl localhost:15000/config_dump
在istio的网格内,front-tomcat访问到bill-service,流量的流向

Istio 给应用 Pod 注入的配置主要包括:Istio 在 pod 中注入的 Init 容器名为 istio-init
,作用是为 pod 设置 iptables 端口转发。在Istio 注入完成后的 YAML 文件中看到了该容器的启动命令是:
#Init 容器的启动入口是 `istio-iptables` 命令行
$ istio-iptables -p 15001 -z 15006 -u 1337 -m REDIRECT -i '*' -x "" -b '*' -d 15090,15021,15020
  -p: 指定重定向所有 TCP 出站流量的 sidecar 端口(默认为 $ENVOY_PORT = 15001)
  -m: 指定入站连接重定向到 sidecar 的模式,“REDIRECT” 或 “TPROXY”(默认为 $ISTIO_INBOUND_INTERCEPTION_MODE)
  -b: 逗号分隔的入站端口列表,其流量将重定向到 Envoy(可选)。使用通配符 “*” 表示重定向所有端口。为空时表示禁用所有入站重定向(默认为 $ISTIO_INBOUND_PORTS)
  -d: 指定要从重定向到 sidecar 中排除的入站端口列表(可选),以逗号格式分隔。使用通配符“*” 表示重定向所有入站流量(默认为 $ISTIO_LOCAL_EXCLUDE_PORTS)
  -o:逗号分隔的出站端口列表,不包括重定向到 Envoy 的端口。
  -i: 指定重定向到 sidecar 的 IP 地址范围(可选),以逗号分隔的 CIDR 格式列表。使用通配符 “*” 表示重定向所有出站流量。空列表将禁用所有出站重定向(默认为 $ISTIO_SERVICE_CIDR)
  -x: 指定将从重定向中排除的 IP 地址范围,以逗号分隔的 CIDR 格式列表。使用通配符 “*” 表示重定向所有出站流量(默认为 $ISTIO_SERVICE_EXCLUDE_CIDR)。
  -k:逗号分隔的虚拟接口列表,其入站流量(来自虚拟机)将被视为出站流量。
  -g:指定不应用重定向的用户的 GID。(默认值与 -u param 相同)
  -u:指定不应用重定向的用户的 UID。通常情况下,这是代理容器的 UID(默认值是 1337,即 istio-proxy 的 UID)。
  -z: 所有进入 pod/VM 的 TCP 流量应被重定向到的端口(默认 $INBOUND_CAPTURE_PORT = 15006)。
这条启动命令的作用是:
将应用容器的所有入站流量都转发到 envoy的 15006 端口(15090 端口(Envoy Prometheus telemetry)和 15020 端口(Ingress Gateway)除外,15021(sidecar健康检查)端口)
将所有出站流量都重定向到 sidecar 代理(通过 15001 端口)
上述规则对id为1337用户除外,因为1337是istio-proxy自身的流量
该容器存在的意义就是让 sidecar 代理可以拦截pod所有的入站(inbound)流量以及出站(outbound)流量,这样就可以实现由sidecar容器来接管流量,进而实现流量管控。
因为 Init 容器初始化完毕后就会自动终止,因为我们无法登陆到容器中查看 iptables 信息,但是 Init 容器初始化结果会保留到应用容器和 sidecar 容器中。
# 去work节点查看front-tomcat服务的istio-proxy容器的id
$ docker ps |grep front-tomcat
d02fa8217f2f        consol/tomcat-7.0                                   "/bin/sh -c opt/tom…"   2 days ago          Up 2 days
                                              k8s_front-tomcat_front-tomcat-v1-78cf497978-ppwwk_istio-demo_f03358b1-ed17-4811-ac7e-9f70e6bd797b_0

# 根据容器id获取front-tomcat容器在宿主机中的进程
$ docker inspect d02fa8217f2f|grep -i pid
            "Pid": 28834,
            "PidMode": "",
            "PidsLimit": null,
# 进入该进程的网络命名空间
$ nsenter -n --target 28834
# 查看命名空间的iptables规则
$ iptables -t nat -vnL
# PREROUTING 链:用于目标地址转换(DNAT),将所有入站 TCP 流量跳转到 ISTIO_INBOUND 链上。
Chain PREROUTING (policy ACCEPT 148 packets, 8880 bytes)
 pkts bytes target     prot opt in     out     source               destination
  148  8880 ISTIO_INBOUND  tcp  --  *      *       0.0.0.0/0            0.0.0.0/0

# INPUT 链:处理输入数据包,非 TCP 流量将继续 OUTPUT 链。
Chain INPUT (policy ACCEPT 148 packets, 8880 bytes)
 pkts bytes target     prot opt in     out     source               destination

# OUTPUT 链:将所有出站数据包跳转到 ISTIO_OUTPUT 链上。
Chain OUTPUT (policy ACCEPT 46 packets, 3926 bytes)
 pkts bytes target     prot opt in     out     source               destination
    8   480 ISTIO_OUTPUT  tcp  --  *      *       0.0.0.0/0            0.0.0.0/0
# POSTROUTING 链:所有数据包流出网卡时都要先进入POSTROUTING 链,内核根据数据包目的地判断是否需要转发出去,我们看到此处未做任何处理。
Chain POSTROUTING (policy ACCEPT 46 packets, 3926 bytes)
 pkts bytes target     prot opt in     out     source               destination

# ISTIO_INBOUND 链:将所有入站流量重定向到 ISTIO_IN_REDIRECT 链上,目的地为 15090,15020,15021端口的流量除外,发送到以上两个端口的流量将返回 iptables 规则链的调用点,即 PREROUTING 链的后继 POSTROUTING。
Chain ISTIO_INBOUND (1 references)
 pkts bytes target     prot opt in     out     source               destination
    0     0 RETURN     tcp  --  *      *       0.0.0.0/0            0.0.0.0/0            tcp dpt:15008
    0     0 RETURN     tcp  --  *      *       0.0.0.0/0            0.0.0.0/0            tcp dpt:22
    0     0 RETURN     tcp  --  *      *       0.0.0.0/0            0.0.0.0/0            tcp dpt:15090
  143  8580 RETURN     tcp  --  *      *       0.0.0.0/0            0.0.0.0/0            tcp dpt:15021
    5   300 RETURN     tcp  --  *      *       0.0.0.0/0            0.0.0.0/0            tcp dpt:15020
    0     0 ISTIO_IN_REDIRECT  tcp  --  *      *       0.0.0.0/0            0.0.0.0/0

# ISTIO_IN_REDIRECT 链:将所有入站流量跳转到本地的 15006 端口,至此成功的拦截了流量到sidecar中。
Chain ISTIO_IN_REDIRECT (3 references)
 pkts bytes target     prot opt in     out     source               destination
    0     0 REDIRECT   tcp  --  *      *       0.0.0.0/0            0.0.0.0/0            redir ports 15006

# ISTIO_OUTPUT 链:选择需要重定向到 Envoy(即本地) 的出站流量,所有非 localhost 的流量全部转发到 ISTIO_REDIRECT。为了避免流量在该 Pod 中无限循环,所有到 istio-proxy 用户空间的流量都返回到它的调用点中的下一条规则,本例中即 OUTPUT 链,因为跳出 ISTIO_OUTPUT 规则之后就进入下一条链 POSTROUTING。如果目的地非 localhost 就跳转到 ISTIO_REDIRECT;如果流量是来自 istio-proxy 用户空间的,那么就跳出该链,返回它的调用链继续执行下一条规则(OUTPUT 的下一条规则,无需对流量进行处理);所有的非 istio-proxy 用户空间的目的地是 localhost 的流量就跳转到 ISTIO_REDIRECT。
Chain ISTIO_OUTPUT (1 references)
 pkts bytes target     prot opt in     out     source               destination
    0     0 RETURN     all  --  *      lo      127.0.0.6            0.0.0.0/0
    0     0 ISTIO_IN_REDIRECT  all  --  *      lo      0.0.0.0/0           !127.0.0.1            owner UID match 1337
    0     0 RETURN     all  --  *      lo      0.0.0.0/0            0.0.0.0/0            ! owner UID match 1337
    8   480 RETURN     all  --  *      *       0.0.0.0/0            0.0.0.0/0            owner UID match 1337
    0     0 ISTIO_IN_REDIRECT  all  --  *      lo      0.0.0.0/0           !127.0.0.1            owner GID match 1337
    0     0 RETURN     all  --  *      lo      0.0.0.0/0            0.0.0.0/0            ! owner GID match 1337
    0     0 RETURN     all  --  *      *       0.0.0.0/0            0.0.0.0/0            owner GID match 1337
    0     0 RETURN     all  --  *      *       0.0.0.0/0            127.0.0.1
    0     0 ISTIO_REDIRECT  all  --  *      *       0.0.0.0/0            0.0.0.0/0

# ISTIO_REDIRECT 链:将所有流量重定向到 Sidecar(即本地) 的 15001 端口。
Chain ISTIO_REDIRECT (1 references)
 pkts bytes target     prot opt in     out     source               destination
    0     0 REDIRECT   tcp  --  *      *       0.0.0.0/0            0.0.0.0/0            redir ports 15001
<!--说明pod内的出站流量请求被监听在15001端口的envoy的进程接收到,进而就走到了envoy的Listener -> route -> cluster -> endpoint 转发流程。-->
9、调试envoy
查看listener
envoy的配置非常复杂,直接在config_dump里去跟踪xDS的过程非常繁琐。因此istio提供了调试命令,方便查看envoy的流量处理流程。
# 查看15001的监听,virtualOutbound的监听不做请求处理,useOriginalDst: true, 直接转到原始的请求对应的监听器中
[root@mast01 ~]# istioctl proxy-config listener front-tomcat-v1-57bc6c5d9f-sfn52 -n istio-demo --port 15001 -ojson

# 查看访问端口是9999的监听器
[root@mast01 ~]# istioctl proxy-config listener front-tomcat-v1-57bc6c5d9f-sfn52 -n istio-demo --port 9999 -ojson
...
    {
        "name": "0.0.0.0_9999",
        "address": {
            "socketAddress": {
                "address": "0.0.0.0",
                "portValue": 9999
            }
        },
        "filterChains": [
            {
                "filterChainMatch": {
                    "applicationProtocols": [
                        "http/1.0",
                        "http/1.1",
                        "h2c"
                    ]
                },
                "filters": [
                    {
                        "name": "envoy.filters.network.http_connection_manager",
                        "typedConfig": {
                            "@type": "type.googleapis.com/envoy.extensions.filters.network.http_connection_manager.v3.HttpConnectionManager",
                            "statPrefix": "outbound_0.0.0.0_9999",
                            "rds": {
                                "configSource": {
                                    "ads": {},
                                    "resourceApiVersion": "V3"
                                },
                                "routeConfigName": "9999"
                            },
...
envoy收到请求后,会转给监听器进行处理请求,监听器先匹配address和port和socket都一致的Listener,如果没找到再找port一致,address==0.0.0.0的Listener
查看route
发现istio会为网格内的Service Port创建名为0.0.0.0_<Port>
的虚拟监听器,本例中为0.0.0.0_9999
。envoy的15001端口收到请求后,直接转到了0.0.0.0_9999
,进而转到了"routeConfigName": "9999"
,即9999这个route中。
[root@mast01 ~]# istioctl pc route front-tomcat-v1-57bc6c5d9f-sfn52 -n istio-demo --name 9999
NAME     DOMAINS                                               MATCH     VIRTUAL SERVICE
9999     bill-service, bill-service.istio-demo + 1 more...     *        vs-bill-service.istio-demo

# 发现了前面创建的virtual service
[root@mast01 ~]# istioctl pc route front-tomcat-v1-57bc6c5d9f-sfn52 -n istio-demo --name 9999 -ojson
[
    {
        "name": "9999",
        "virtualHosts": [
            {
                "name": "allow_any",
                "domains": [
                    "*"
                ],
                "routes": [
                    {
                        "name": "allow_any",
                        "match": {
                            "prefix": "/"
                        },
                        "route": {
                            "cluster": "PassthroughCluster",
                            "timeout": "0s",
                            "maxGrpcTimeout": "0s"
                        }
                    }
                ],
                "includeRequestAttemptCount": true
            },
            {
                "name": "bill-service.istio-demo.svc.cluster.local:9999",
                "domains": [
                    "bill-service.istio-demo.svc.cluster.local",
                    "bill-service.istio-demo.svc.cluster.local:9999",
                    "bill-service",
                    "bill-service:9999",
                    "bill-service.istio-demo.svc.cluster",
                    "bill-service.istio-demo.svc.cluster:9999",
                    "bill-service.istio-demo.svc",
                    "bill-service.istio-demo.svc:9999",
                    "bill-service.istio-demo",
                    "bill-service.istio-demo:9999",
                    "10.111.219.247",
                    "10.111.219.247:9999"
                ],
                "routes": [
                    {
                        "name": "bill-service-route",
                        "match": {
                            "prefix": "/"
                        },
                        "route": {
                            "weightedClusters": {
                                "clusters": [
                                    {
                                        "name": "outbound|9999|v1|bill-service.istio-demo.svc.cluster.local",
                                        "weight": 90
                                    },
                                    {
                                        "name": "outbound|9999|v2|bill-service.istio-demo.svc.cluster.local",
                                        "weight": 10
                                    }
                                ]
                            },
...
满足访问domains列表的会优先匹配到,我们访问的是10.111.219.247:9999
,因此匹配bill-service.istio-demo.svc.cluster.local:9999
这组虚拟hosts,进而使用到基于weight的集群配置。

#流量按照预期的配置进行了转发
90% -> outbound|9999|v1|bill-service.istio-demo.svc.cluster.local
10% -> outbound|9999|v2|bill-service.istio-demo.svc.cluster.local
查看cluster
[root@mast01 ~]# istioctl pc cluster front-tomcat-v1-57bc6c5d9f-sfn52.istio-demo --fqdn bill-service.istio-demo.svc.cluster.local -ojson
...
        "name": "outbound|9999|v1|bill-service.istio-demo.svc.cluster.local",
        "type": "EDS",
        "edsClusterConfig": {
            "edsConfig": {
                "ads": {},
                "resourceApiVersion": "V3"
            },
            "serviceName": "outbound|9999|v1|bill-service.istio-demo.svc.cluster.local"
        },
...
查看endpoint
endpoint列表是通过eds获取的,因此,查看endpoint信息:
[root@mast01 ~]# istioctl pc endpoint front-tomcat-v1-57bc6c5d9f-sfn52.istio-demo  --cluster 'outbound|9999|v1|bill-service.istio-demo.svc.cluster.local' -ojson
[
    {
        "name": "outbound|9999|v1|bill-service.istio-demo.svc.cluster.local",
        "addedViaApi": true,
        "hostStatuses": [
            {
                "address": {
                    "socketAddress": {
                        "address": "10.244.75.123",
                        "portValue": 80
                    }
                },
...

[root@mast01 ~]# kubectl get pod -n istio-demo -o wide
NAME                               READY   STATUS    RESTARTS       AGE     IP              NODE     NOMINATED NODE   READINESS GATES
bill-service-v1-7bc6d7b575-tbgrs   2/2     Running   20 (19h ago)   11d     10.244.75.123   work02   <none>           <none>
bill-service-v2-6755bb6b6d-tkrzm   2/2     Running   20 (19h ago)   11d     10.244.75.113   work02   <none>           <none>
front-tomcat-v1-57bc6c5d9f-sfn52   2/2     Running   19 (19h ago)   11d     10.244.75.112   work02   <none>           <none>
front-tomcat-v2-876c9bffd-8hnfm    2/2     Running   15 (19h ago)   7d21h   10.244.75.119   work02   <none>           <none>
virtualOutBound 15001 --> virtial listener 0.0.0.0_9999 --> route bill-service.istio-demo.svc.cluster.local:9999 --> cluster outbound|9999|v1|bill-service.istio-demo.svc.cluster.local --> 10.244.75.123:80
10、入站流量管控
目前为止,经过envoy的规则,流量从front-tomcat的pod中知道要发往10.244.75.123:80
这个pod地址。前面提到过,envoy不止接管出站流量,入站流量同样会接管。
流量到达bill-service-v1的pod后的处理
先回顾前面的iptables规则,除特殊情况以外,所有的出站流量被监听在15001端口的envoy进程拦截处理,同样的,分析bill-service-v1的iptables规则可以发现,监听在15006端口的envoy进程通过在PREROUTING链上添加规则,同样将进入pod的入站流量做了拦截。
# PREROUTING 链:用于目标地址转换(DNAT),将所有入站 TCP 流量跳转到 ISTIO_INBOUND 链上。
Chain PREROUTING (policy ACCEPT 148 packets, 8880 bytes)
 pkts bytes target     prot opt in     out     source               destination
  148  8880 ISTIO_INBOUND  tcp  --  *      *       0.0.0.0/0            0.0.0.0/0

# INPUT 链:处理输入数据包,非 TCP 流量将继续 OUTPUT 链。
Chain INPUT (policy ACCEPT 148 packets, 8880 bytes)
 pkts bytes target     prot opt in     out     source               destination

# ISTIO_INBOUND 链:将所有入站流量重定向到 ISTIO_IN_REDIRECT 链上,目的地为 15090,15020,15021端口的流量除外,发送到以上两个端口的流量将返回 iptables 规则链的调用点,即 PREROUTING 链的后继 POSTROUTING。
Chain ISTIO_INBOUND (1 references)
 pkts bytes target     prot opt in     out     source               destination
    0     0 RETURN     tcp  --  *      *       0.0.0.0/0            0.0.0.0/0            tcp dpt:15008
    0     0 RETURN     tcp  --  *      *       0.0.0.0/0            0.0.0.0/0            tcp dpt:22
    0     0 RETURN     tcp  --  *      *       0.0.0.0/0            0.0.0.0/0            tcp dpt:15090
  143  8580 RETURN     tcp  --  *      *       0.0.0.0/0            0.0.0.0/0            tcp dpt:15021
    5   300 RETURN     tcp  --  *      *       0.0.0.0/0            0.0.0.0/0            tcp dpt:15020
    0     0 ISTIO_IN_REDIRECT  tcp  --  *      *       0.0.0.0/0            0.0.0.0/0

# ISTIO_IN_REDIRECT 链:将所有入站流量跳转到本地的 15006 端口,至此成功的拦截了流量到sidecar中。
Chain ISTIO_IN_REDIRECT (3 references)
 pkts bytes target     prot opt in     out     source               destination
    0     0 REDIRECT   tcp  --  *      *       0.0.0.0/0            0.0.0.0/0            redir ports 15006
虚拟入站监听器
#15006端口是一个名为 `virtualInbound`虚拟入站监听器
[root@mast01 ~]# istioctl pc l bill-service-v1-7bc6d7b575-tbgrs.istio-demo --port 15006 -ojson
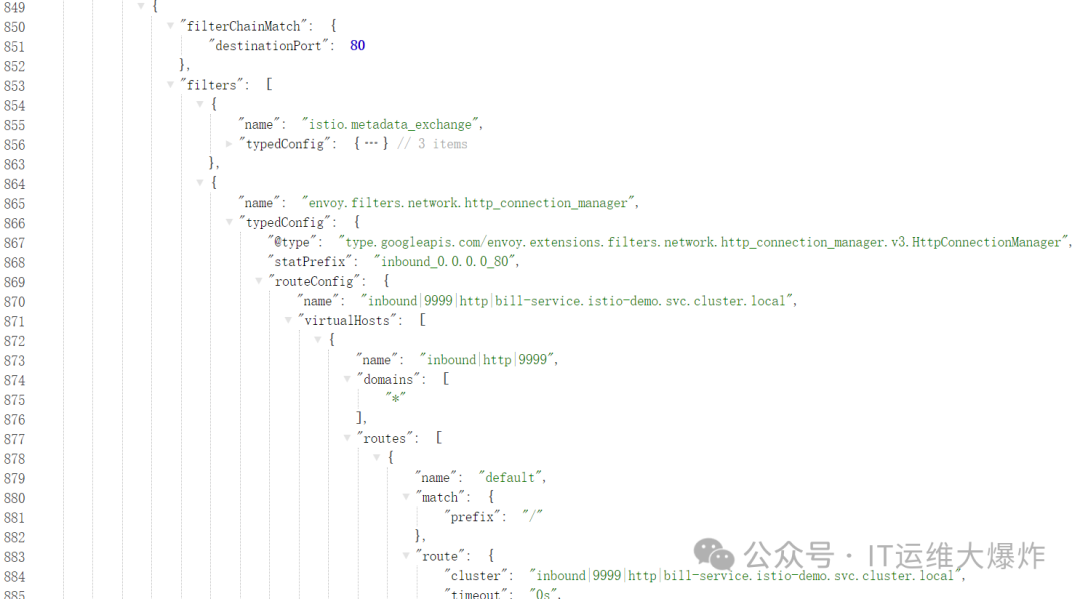
相比于VirtualOutbound
, virtualInbound
不会再次转给别的虚拟监听器,而是直接由本监听器的filterChains
处理,本例中我们可以发现本机目标地址为80的http请求,转发到了inbound|9999|http|bill-service.istio-demo.svc.cluster.local
这个集群中。
#查看该集群信息
[root@mast01 ~]# istioctl pc cluster bill-service-v1-7bc6d7b575-tbgrs.istio-demo --direction inbound -ojson
[
    {
        "name": "inbound|9999|http|bill-service.istio-demo.svc.cluster.local",
        "type": "STATIC",
        "connectTimeout": "10s",
        "loadAssignment": {
            "clusterName": "inbound|9999|http|bill-service.istio-demo.svc.cluster.local",
            "endpoints": [
                {
                    "lbEndpoints": [
                        {
                            "endpoint": {
                                "address": {
                                    "socketAddress": {
                                        "address": "127.0.0.1",
                                        "portValue": 80
                                    }
                                }
                            }
                        }
                    ]
                }
            ]
        },
        "circuitBreakers": {
            "thresholds": [
                {
                    "maxConnections": 4294967295,
                    "maxPendingRequests": 4294967295,
                    "maxRequests": 4294967295,
                    "maxRetries": 4294967295
                }
            ]
        }
    }
]
11、实验:同一个Pod,不同的表现
$ kubectl -n istio-demo exec -ti front-tomcat-v1-78cf497978-ppwwk -c front-tomcat bash
# curl bill-service:9999

$ kubectl -n istio-demo exec -ti front-tomcat-v1-78cf497978-ppwwk -c istio-proxy bash
# curl bill-service:9999
可以发现,在front-tomcat中的访问请求,是受到我们设置的 9:1的流量分配规则限制的,但是istio-proxy中的访问是不受限制的。
istio-proxy自身,发起的10.244.0.17的请求,使用的用户是
uid=1337(istio-proxy)
,因此不会被istio-init
初始化的防火墙规则拦截,可以直接走pod的网络进行通信。
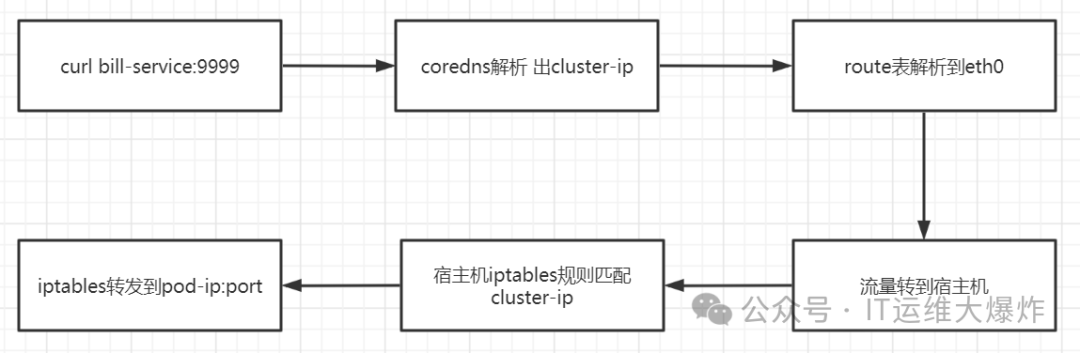
istio服务网格内,流量请求完全绕过了kube-proxy组件
通过上述流程调试,我们可以得知,front-tomcat中访问bill-service:9999,流量是没有用到kube-proxy维护的宿主机中的iptables规则的。
验证一下
# 停掉kube-proxy
[root@mast01 ~]# kubectl -n kube-system edit daemonset kube-proxy
...
      dnsPolicy: ClusterFirst
      hostNetwork: true
      nodeSelector:
        beta.kubernetes.io/os: linux1    #把此处修改一个不存在的label值
      priorityClassName: system-node-critical
...

#清理iptables规则
[root@mast01 ~]# iptables -F -t nat

# 访问测试
[root@mast01 ~]# kubectl -n istio-demo get  svc
NAME           TYPE        CLUSTER-IP      EXTERNAL-IP   PORT(S)    AGE
bill-service   ClusterIP   10.108.203.9    <none>        9999/TCP   13d

#不通
[root@mast01 ~]# curl  10.108.203.9:9999

# 进入front-tomcat容器进行访问
[root@mast01 ~]# kubectl -n istio-demo exec -ti front-tomcat-v1-57bc6c5d9f-sfn52 -c front-tomcat bash
kubectl exec [POD] [COMMAND] is DEPRECATED and will be removed in a future version. Use kubectl exec [POD] -- [COMMAND] instead.
root@front-tomcat-v1-57bc6c5d9f-sfn52:/# curl  10.108.203.9:9999
hello, this is bill-service-v2
#卡死,会因为dns解析失败而访问失败,手动配置挂到coredns即可
root@front-tomcat-v1-57bc6c5d9f-sfn52:/# curl bill-service:9999

[root@mast01 ~]# kubectl -n istio-demo exec -ti front-tomcat-v1-57bc6c5d9f-sfn52 -c istio-proxy bash
kubectl exec [POD] [COMMAND] is DEPRECATED and will be removed in a future version. Use kubectl exec [POD] -- [COMMAND] instead.
istio-proxy@front-tomcat-v1-57bc6c5d9f-sfn52:/$ curl  10.108.203.9:9999
hello, this is bill-service-v1
#卡死,会因为dns解析失败而访问失败,手动配置挂到coredns即可
istio-proxy@front-tomcat-v1-57bc6c5d9f-sfn52:/$ curl bill-service:9999
欢迎大家扫码关注:

本公众号只写原创,不接广告、不接广告、不接广告。下期小伙伴想学习什么技术,可以私信发我吆。