


随着企业对数据分析的要求日益提高,在处理大量历史数据的离线场景下,可以通过搭建数据仓库来解决数据分析问题。本文将为大家介绍利用 OceanBase 搭建数据仓库并进行数据分析的完整流程,可以帮助企业更好地进行数据分析和决策支持。
OceanBase 可以通过搭建数据仓库解决离线数据的分析问题。通过定时任务来实现从原始数据层 (ODS) 到明细数据层 (DWD) 最终到达应用数据层 (ADS) 的数据层级构建,创建基于 OceanBase 的数据仓库。同时通过配套的生态工具搭建可视化看板。
一、前提条件
1、您使用的源端数据库为 MySQL 或已部署 OceanBase V4.3.3 及以上版本的集群并且创建了 MySQL 模式租户。
2、您所创建的 MySQL 模式租户需要拥有插入及查询的权限。
3、您已创建数据库。
4、您使用的源端数据库已开启 Binlog 服务。
5、您已部署 Flink CDC、DBT、airflow、Grafana。
二、准备工作
1、创建数据库并建表
🚩 将源端数据库作为 TP 库,将目标端数据库作为 AP 库,分别创建 tptest 和 aptest 数据库。
create database aptest;create database tptest;🚩 分别在 TP 库和 AP 库中建表。建表语句如下。
CREATE TABLE `orders` (order_id bigint not null primary key,user_id varchar(50) not null,shop_id bigint not null,product_id bigint not null,buy_fee numeric(20,2) not null,create_time timestamp not null,update_time timestamp not null default now(),state int not null);CREATE TABLE `orders_pay` (pay_id bigint not null primary key,order_id bigint not null,pay_platform varchar(64) not null,create_time timestamp not null);CREATE TABLE `product_catalog` (product_id bigint not null primary key,catalog_name varchar(50) not null);
🚩 给 TP 库中的表插入几条数据。
INSERT INTO product_catalog VALUES(1, 'iphone 14'),(2, 'iphone 14 pro max'),(3, 'iphone 15'),(4, 'huawei mate 60'),(5, 'huawei pura 70');insert into `tptest`.`orders_pay`(`pay_id`,`order_id`,`pay_platform`,`create_time`) values(1,1,'test','2024-10-01 00:00:00');insert into `tptest`.`orders_pay`(`pay_id`,`order_id`,`pay_platform`,`create_time`) values(2,2,'test','2024-10-02 00:00:00');insert into `tptest`.`orders_pay`(`pay_id`,`order_id`,`pay_platform`,`create_time`) values(3,3,'test','2024-10-03 00:00:00');insert into `tptest`.`orders_pay`(`pay_id`,`order_id`,`pay_platform`,`create_time`) values(4,4,'test','2024-10-04 00:00:00');insert into `tptest`.`orders_pay`(`pay_id`,`order_id`,`pay_platform`,`create_time`) values(1,1,'test','2024-10-01 00:00:00');insert into `tptest`.`orders_pay`(`pay_id`,`order_id`,`pay_platform`,`create_time`) values(2,2,'test','2024-10-02 00:00:00');insert into `tptest`.`orders_pay`(`pay_id`,`order_id`,`pay_platform`,`create_time`) values(3,3,'test','2024-10-03 00:00:00');insert into `tptest`.`orders_pay`(`pay_id`,`order_id`,`pay_platform`,`create_time`) values(4,4,'test','2024-10-04 00:00:00');
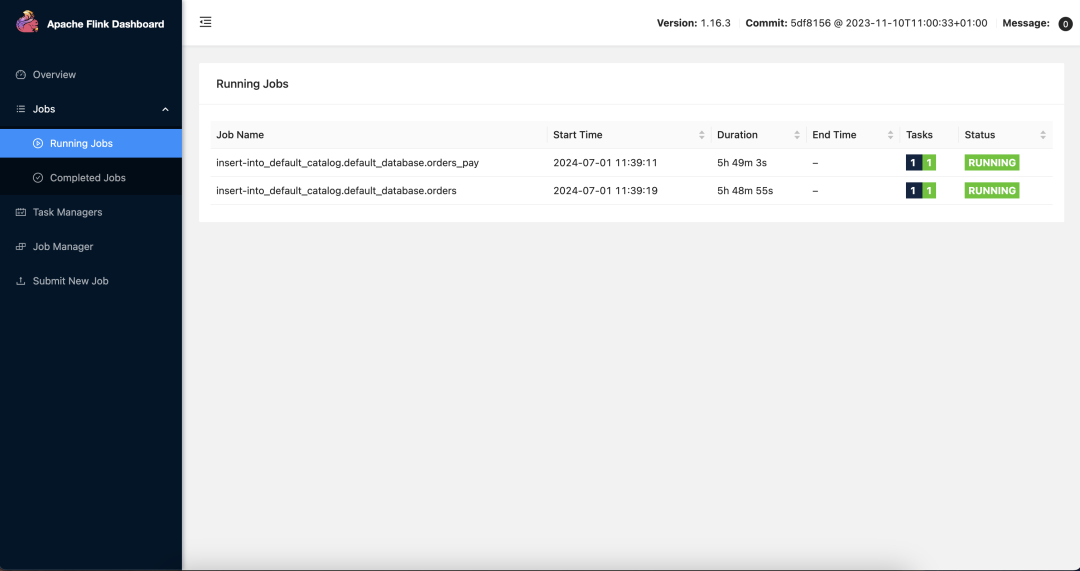
2、构建 Flink 同步链路
启动 flink CDC 后,进入部署 flink 文件夹下,执行 ./bin/sql-client.sh 命令,打开 Flink SQL 界面。依次执行如下 SQL。
```sqlCREATE TABLE mysql_orders (order_id bigint not null primary key NOT ENFORCED,user_id varchar(50) not null,shop_id bigint not null,product_id bigint not null,buy_fee numeric(20,2) not null,create_time timestamp not null,update_time timestamp not null,state int not null)WITH ('connector' = 'mysql-cdc','hostname' = 'xxx.xxx.xxx.xxx','port' = '3306','username' = 'wktest','password' = '******','database-name' = 'tptest','table-name' = 'orders');CREATE TABLE `mysql_orders_pay` (pay_id bigint not null primary key NOT ENFORCED,order_id bigint not null,pay_platform varchar(64) not null,create_time timestamp not null) WITH ('connector' = 'mysql-cdc','hostname' = 'xxx.xxx.xxx.xxx','port' = '3306','username' = 'wktest','password' = '******','database-name' = 'tptest','table-name' = 'orders_pay');CREATE TABLE `mysql_product_catalog` (product_id bigint not null primary key NOT ENFORCED,catalog_name varchar(50) not null) WITH ('connector' = 'mysql-cdc','hostname' = 'xxx.xxx.xxx.xxx','port' = '3306','username' = 'wktest','password' = '******','database-name' = 'tptest','table-name' = 'product_catalog');CREATE TABLE `orders` (order_id bigint not null primary key NOT ENFORCED,user_id varchar(50) not null,shop_id bigint not null,product_id bigint not null,buy_fee numeric(20,2) not null,create_time timestamp not null,update_time timestamp not null,state int not null) WITH ('connector' = 'jdbc','url' = 'jdbc:mysql://******:3306/aptest','username' = 'wktest@mysql001','password' = '******','table-name' = 'orders');CREATE TABLE `orders_pay` (pay_id bigint not null primary key NOT ENFORCED,order_id bigint not null,pay_platform varchar(64) not null,create_time timestamp not null) WITH ('connector' = 'jdbc','url' = 'jdbc:mysql://******:3306/aptest','username' = 'wktest@mysql001','password' = '******','table-name' = 'orders_pay');CREATE TABLE `product_catalog` (product_id bigint not null primary key NOT ENFORCED,catalog_name varchar(50) not null) WITH ('connector' = 'jdbc','url' = 'jdbc:mysql://******:3306/aptest','username' = 'wktest@mysql001','password' = '******','table-name' = 'product_catalog','sink.buffer-flush.max-rows' = '0','sink.buffer-flush.interval' = '0');INSERT INTO product_catalog SELECT * FROM mysql_product_catalog;INSERT INTO orders_pay SELECT * FROM mysql_orders_pay;INSERT INTO orders SELECT * FROM mysql_orders;```
创建上述 Flink CDC 同步链路后,数据会实时从 tptest 数据库同步到 aptest 数据库。可以从 SQL 控制台查看对应的表数据。
3、计算层构建
🚀 构建 DBT 项目
原始的 TP 表结构不适用于直接进行数据分析与展示,需要一定的转换。这里通过使用 DBT 项目进行数据转换。根据 Demo 的原本范例我们构建一个 DBT 项目,并定义模型。详细步骤如下。
1️⃣ DBT 安装部署后,执行 dbt init my_project 创建一个名为 my_project 的 DBT 项目,在弹出的对话框中按照提示输入数据库信息。这里要注意的是 user 只填用户名即可。创建后会在文件 ~/.dbt/profiles.yml 记录刚才输入的信息,并用于数据库连接。
2️⃣ 执行 cd my_project 进入项目目录。
3️⃣ 在 /my_project/models/example 目录下编写 SQL 文件来定义数据模型。
models/example/dwd_orders.sql{{ config(materialized='view')}}selecto.order_id as order_id,o.user_id as order_user_id,o.shop_id as order_shop_id,o.product_id as order_product_id,o.buy_fee as order_fee,o.create_time as order_create_time,o.update_time as order_update_time,o.state as order_state,c.catalog_name as order_product_catalog_name,p.pay_id as pay_id,p.pay_platform as pay_platform,p.create_time as pay_create_timefromorders oleft join product_catalog c on o.product_id = c.product_idleft join orders_pay p on o.order_id = p.order_id
models/example/dwd_shops.sql{{config(materialized='table')}}selectorder_shop_id,str_to_date(date_format(pay_create_time, '%Y%m%d'), '%Y%m%d') as ds,sum(order_fee) as sum_feefrom{{ ref('dwd_orders') }}whereorder_state=1GROUP BYorder_shop_id,date_format(pay_create_time, '%Y%m%d')
models/example/dwd_shops_all.sql{{config(materialized='table')}}selectstr_to_date(date_format(pay_create_time, '%Y%m%d'), '%Y%m%d') as ds,sum(order_fee) as sum_feefrom{{ ref('dwd_orders') }}whereorder_state=1GROUP BYdate_format(pay_create_time, '%Y%m%d')
models/example/dwd_users.sql{{config(materialized='table')}}selectorder_user_id,str_to_date(concat(date_format(pay_create_time, '%Y%m'), '01'), '%Y%m%d') as ds,sum(order_fee) as sum_feefrom{{ ref('dwd_orders') }}whereorder_state = 1group byorder_user_id,date_format(pay_create_time, '%Y%m')
4️⃣ 执行 dbt compile ,编译模型会将 SQL 转换为数据库特定的语句。
5️⃣ 执行 dbt run,运行所有模型。
🚀 创建 DAG 调度任务
这里采用 Airflow 作为基本的 DAG 和调度平台。首次安装部署后,需要执行 airflow db init 初始化 Airflow 的数据库。部署 Airflow 后,执行 airflow scheduler 启动 Scheduler,可以对DAG 做实时调度;执行 airflow webserver,启动 Web 服务器,在 web 界面上能够完整看到整个调度任务。
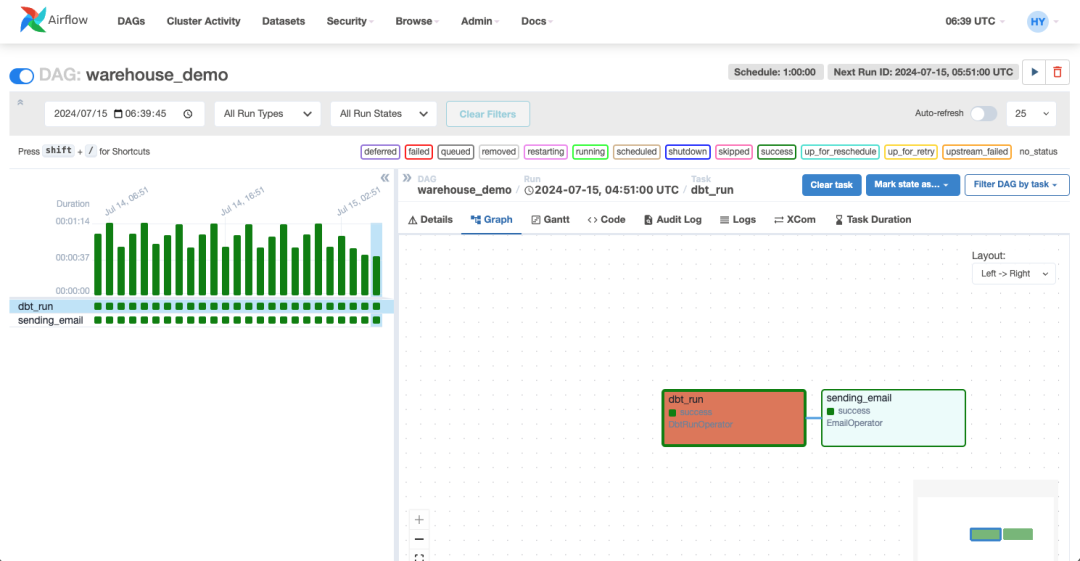
配置好访问的数据库后,从后台登录部署 Airflow 的机器,将你的 DAG 文件(.py文件)放在 Airflow 的 dags 目录下,Airflow 会自动发现并加载这些 DAG。这里定义 2 个计算节点,一个用于运行 DBT 项目,完成数仓计算任务,另一个用于完成计算任务后发送邮件提示使用者。DAG 定义如下。
Copyright (c) 2023 OceanBase.#Licensed under the Apache License, Version 2.0 (the "License");you may not use this file except in compliance with the License.You may obtain a copy of the License at#http://www.apache.org/licenses/LICENSE-2.0#Unless required by applicable law or agreed to in writing, softwaredistributed under the License is distributed on an "AS IS" BASIS,WITHOUT WARRANTIES OR CONDITIONS OF ANY KIND, either express or implied.See the License for the specific language governing permissions andlimitations under the License.from datetime import datetime, timedeltafrom airflow import DAGfrom airflow.operators.email import EmailOperatorfrom airflow_dbt import DbtRunOperatordefault_args = {"owner": "airflow","depends_on_past": False,"start_date": datetime(2024, 7, 12, 8, 35),"email": ["******@oceanbase.com"],"email_on_failure": True,"email_on_retry": False,"retries": 1,"retry_delay": timedelta(minutes=5),}dag = DAG("warehouse_demo", default_args=default_args, schedule=timedelta(minutes=1))t4 = EmailOperator(task_id="sending_email",to="******@oceanbase.com",subject="AirFlow Notice",html_content="<h1>Your Airflow Has been completed</h1>",dag=dag,)dbt_operator = DbtRunOperator(task_id="dbt_run", dir="xxx", dag=dag)dbt_operator >> t4
上述文件部署后,在 Airflow 的 web 界面能够完整看到整个调度任务,可以根据需要对该任务进行调度。
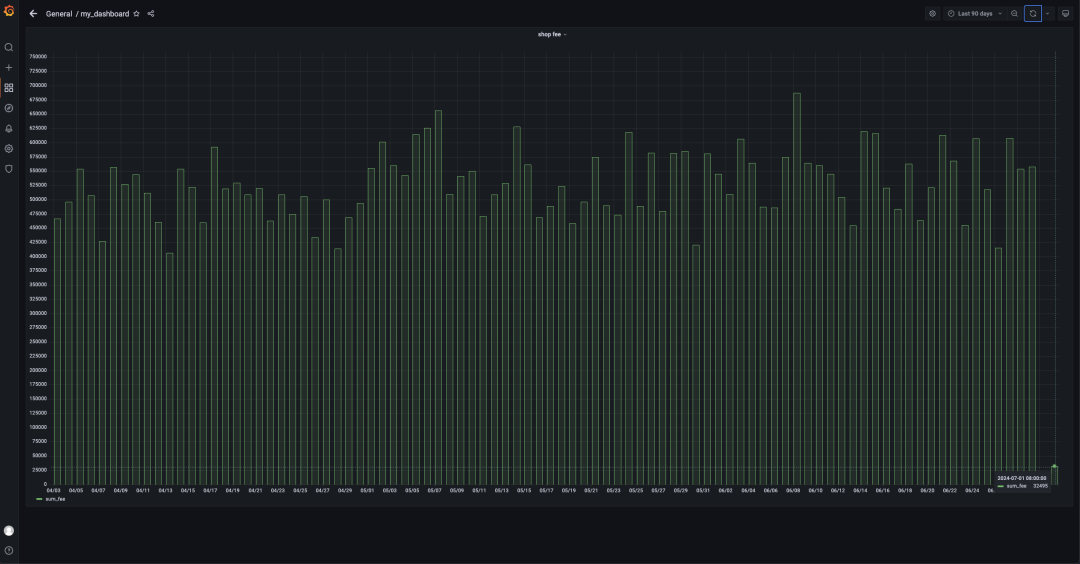
🚀 配置 Grafana 大盘
这里仅展示店铺按日的销售额,只关注其中一个店铺的销售额以及所有店铺的销售额。因此 Grafana 配置 AP 库的连接,图形化展示对应 SQL 即可。SQL 如下。
```sqlSELECTds AS "time",sum_fee AS "sum_fee"FROM dwd_shopsWHEREorder_shop_id = 35ORDER BY ds```
三、实施
1、模拟购买行为
编写一个简单的 python 脚本 test.py 用于模拟用户的购买行为。
Copyright (c) 2023 OceanBase.#Licensed under the Apache License, Version 2.0 (the "License");you may not use this file except in compliance with the License.You may obtain a copy of the License at#http://www.apache.org/licenses/LICENSE-2.0#Unless required by applicable law or agreed to in writing, softwaredistributed under the License is distributed on an "AS IS" BASIS,WITHOUT WARRANTIES OR CONDITIONS OF ANY KIND, either express or implied.See the License for the specific language governing permissions andlimitations under the License.import dataclassesfrom typing import Dictimport mysql.connectorPRODUCT_ID_2_FEE: Dict[int, float] = {1: 5399,2: 10099,3: 4599,4: 5499,5: 6499,}@dataclasses.dataclassclass Phone:product_id: intcatalog_name: strbuy_fee: floatdef get_max_order_id(cur):cur.execute("select order_id from orders order by order_id desc limit 1")id = cur.fetchone()return next(iter(id))def get_max_pay_id(cur):cur.execute("select pay_id from orders_pay order by pay_id desc limit 1")id = cur.fetchone()return next(iter(id))def buy_phone(product_id: int, cursor, user_id=15, shop_id=35):cursor.execute("select product_id, catalog_name from product_catalog")tuples = cursor.fetchall()phones = [Phone(**{"product_id": p_id,"catalog_name": c_name,"buy_fee": PRODUCT_ID_2_FEE.get(p_id),})for p_id, c_name in tuples]target = next(filter(lambda p: p.product_id == product_id, phones))order_id = get_max_order_id(cursor) + 1sql = f"insert into `orders`(`order_id`, `user_id`, `shop_id`, `product_id`, `buy_fee`, `create_time`, `update_time`, `state`) values({order_id}, {user_id}, {shop_id}, {product_id}, {target.buy_fee}, now(), now(), 0)"cursor.execute(sql)pay_id = get_max_pay_id(cursor) + 1sql = f"insert into `orders_pay`(`pay_id`, `order_id`, `pay_platform`, `create_time`) values({pay_id}, {order_id}, 'Alipay', now())"cursor.execute(sql)sql = f"update orders set state=1 where order_id={order_id}"cursor.execute(sql)cursor.execute("commit")print(target)if __name__ == "__main__":with mysql.connector.connect(**{"host": "******","port": "3306","database": "tptest","user": "wktest@mysql001",}) as conn:with conn.cursor() as cursor:buy_phone(5, cursor)
执行 sh python.py 命令,运行该脚本。
2、Airflow 调度
等待 1 分钟,Airflow 将会调度之前配置的 DAG,可以根据 Web 界面上的状态判断节点的运行状态同时可以查看任务的日志。
3、查看数据大盘
查看数据大盘,可以看到最新的数据。这里仅展示店铺按日的销售额,只关注其中一个店铺的销售额以及所有店铺的销售额,可以看到,7.1 的销售额已经变成 32495。
希望可以通过上述流程,为用户搭建基于 OceanBase 数据库的数据仓库提供一些思路参考。
