


动机:
在使用mac自带的Terminal时,黑白配单调、无趣;为了心情愉悦的使用命令行,故此来折腾一番自己的电脑。
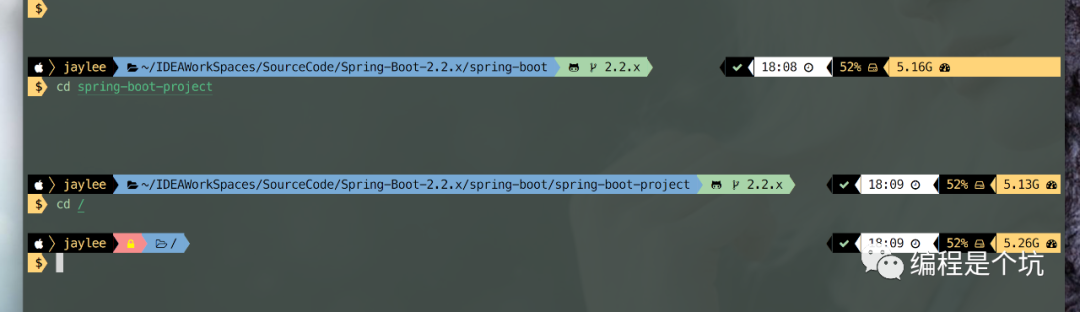
| 终端颜值升级秘籍(iTem2 + oh-my-zsh + powerlevel9k) |
目标效果:
|
开始自我摧残式记录:
1、安装iterm2 (若读者没有brew,请先安装Homebrew)
1.1安装 Homebrew/usr/bin/ruby -e "$(curl -fsSL https://raw.githubusercontent.com/Homebrew/install/master/install)"
1.2安装iterm2brew cask install iterm2
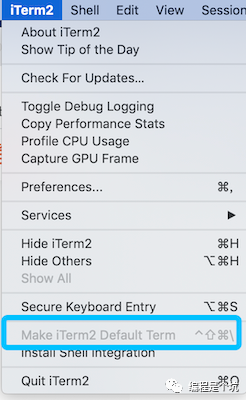
将iTem2设置为默认终端:iTerm2 -> Make iTerm2 Default Term
|
2、导入iTerm2配色
为实现文章开头中的效果,则需要导入Material Design配色,下载后通过
|
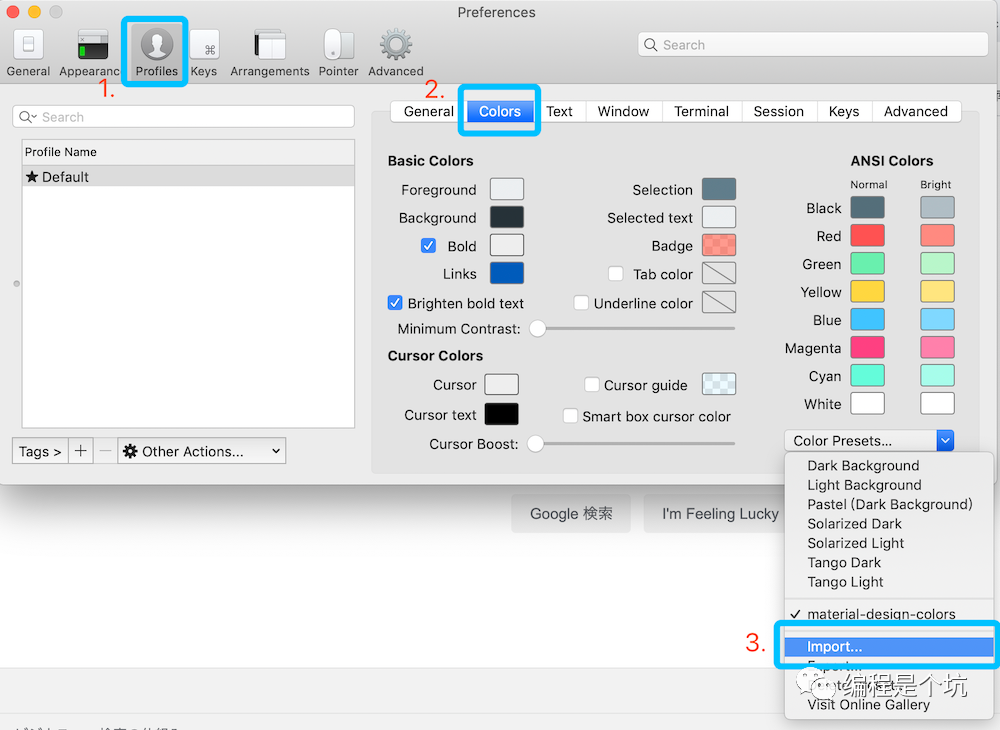
在iTerm2 Color Schemes上面,有很多配色可以选择,可按照自己的喜欢进行下载。 注:重新打开iTem2窗口则会生效 |
git clone 到自定义目录下,在选择导入iTerm2中https://github.com/mbadolato/iTerm2-Color-Schemes
3、安装oh-my-zsh
3.1、安装oh-my-zsh
sh -c "$(curl -fsSL https://raw.githubusercontent.com/robbyrussell/oh-my-zsh/master/tools/install.sh)"
3.2、安装oh-my-zsh插件
3.2.1、 安装语法高亮插件
git clone https://github.com/zsh-users/zsh-syntax-highlighting.git ~/.oh-my-zsh/custom/plugins/zsh-syntax-highlighting
3.2.2、安装自动补全插件
git clone https://github.com/zsh-users/zsh-autosuggestions ~/.oh-my-zsh/custom/plugins/zsh-autosuggestions
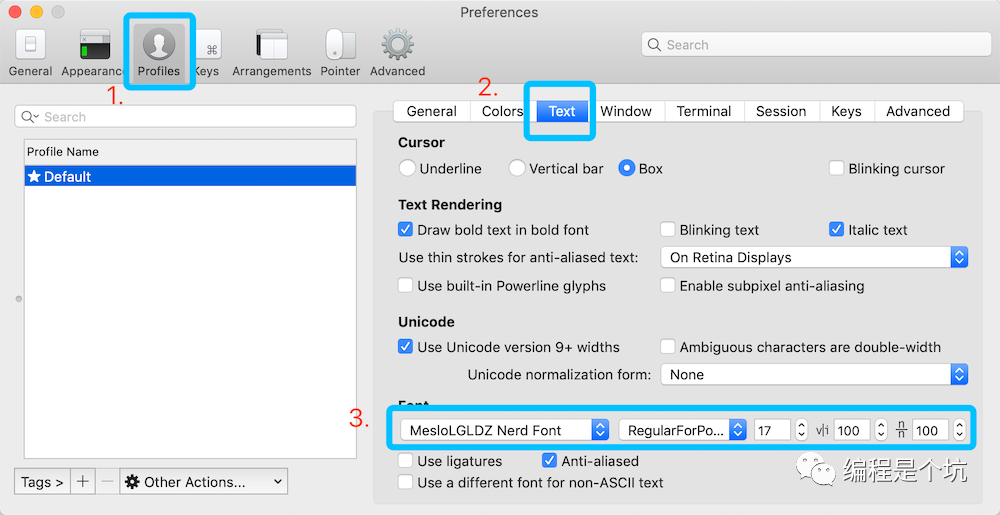
4、安装字体
因为所用主题有很多的特殊icon,所以iTerm2 选用的字体必需能够支持这种特殊icon font。
没有安装的话会遇到icon变框框问号的情况。
安装方法:
方法1:
| 点击Meslo LG L DZ Regular Nerd Font Complete 下载字体,双击进行安装。 |
方法2:
自己去github下载到本地安装https://github.com/ryanoasis/nerd-fonts/patched-fonts/Meslo/L-DZ/complete/Meslo LG L DZ Regular Nerd Font Complete.otf
然后通过
|
5、安装zsh powerlevel9k 主题
git clone https://github.com/bhilburn/powerlevel9k.git ~/.oh-my-zsh/custom/themes/powerlevel9k
6、修改 ~/.zshrc 的配置 (颜值高低,都在这里制造)
用 vi ~/.zshrc 打开进行编辑
vi ~/.zshrc--------------------------# # User configurationsource ~/.bash_profileHOME=/Users/你的电脑用户名export ZSH="$HOME/.oh-my-zsh"ZSH_THEME="powerlevel9k/powerlevel9k"# Nerd 字体POWERLEVEL9K_MODE="nerdfont-complete"POWERLEVEL9K_PROMPT_ON_NEWLINE=true# command line左边想显示的内容:系统icon、用户、写权限、路径、版本控制系统等POWERLEVEL9K_LEFT_PROMPT_ELEMENTS=(os_icon user dir_writable dir vcs)# command line右边想显示的内容:状态、命令执行时间、...、系统时间、已用空间、RAM占用POWERLEVEL9K_RIGHT_PROMPT_ELEMENTS=(status command_execution_time root_indicator background_jobs time disk_usage ram)#POWERLEVEL9K_MULTILINE_LAST_PROMPT_PREFIX="%(?:%{$fg_bold[green]%}➜ :%{$fg_bold[red]%}➜ )"#POWERLEVEL9K_MULTILINE_FIRST_PROMPT_PREFIX=""#POWERLEVEL9K_USER_ICON="\uF415" # POWERLEVEL9K_ROOT_ICON="\uF09C"#POWERLEVEL9K_SUDO_ICON=$'\uF09C' # POWERLEVEL9K_TIME_FORMAT="%D{%H:%M}"#POWERLEVEL9K_VCS_GIT_ICON='\uF408 '#POWERLEVEL9K_VCS_GIT_GITHUB_ICON='\uF408 'ZSH_DISABLE_COMPFIX=trueENABLE_CORRECTION="true"COMPLETION_WAITING_DOTS="true"# POWERLEVEL9K_DIR_PATH_SEPARATOR="%F{red} $(print_icon 'LEFT_SUBSEGMENT_SEPARATOR') %F{black}"# 在提示符与要输入的指令之间增加空格POWERLEVEL9K_MULTILINE_FIRST_PROMPT_PREFIX="%f"# 当前用户为 root 时,提示符为"#",否则为"$"local user_symbol="$"if [[ $(print -P "%#") =~ "#" ]]; thenuser_symbol = "#"fiPOWERLEVEL9K_MULTILINE_LAST_PROMPT_PREFIX="%{%B%F{black}%K{yellow}%} $user_symbol%{%b%f%k%F{yellow}%} %{%f%}"# 没执行完一条指令在最后增加一空行POWERLEVEL9K_PROMPT_ADD_NEWLINE=true# zsh插件plugins=(gititerm2macportsmanosxpythoncomposerzsh-syntax-highlightingzsh-autosuggestions)source $ZSH/oh-my-zsh.sh# # # User configuration# source ~/.bash_profile# Example aliases# alias zshconfig="mate ~/.zshrc"# alias ohmyzsh="mate ~/.oh-my-zsh"alias clr='clear'alias ll='ls -l'alias la='ls -a'alias vi='vim'alias grep="grep --color=auto"alias suroot='sudo -E -s'# source ~/.bash_profile# if [ -f ~/.bash_profile ]; then# . ~/.bash_profile;# fi----------------------保存并退出最后执行source ~/.zshrc 关闭掉iTerm2,重新打开即可实现目标效果。
另外,此处Show Off Your Config.有更多的参数配置,大家可以尽情欣赏。
小福利
⌘ + 数字 :各 tab 标签切换⌘ + f :查找 ,所查找的内容会被自动复制 ,输入查找的部分字符,找到匹配的值按tab,即可复制⌘ + d :横着分屏⌘ + shift + d :竖着分屏⌘ + r = clear :换到新一屏,而不是 类似clear ,会创建一个空屏ctrl + u :清空当前行,无论光标在什么位置() + ⌘ + ; :[() 输入的命令开头字符],会自动列出输入过的命令⌘ + shift + h :会列出剪切板历史⌘← / ⌘→ : 到一行命令最左边/最右边⌘ + enter : 全屏
