


一、OB-operator简介
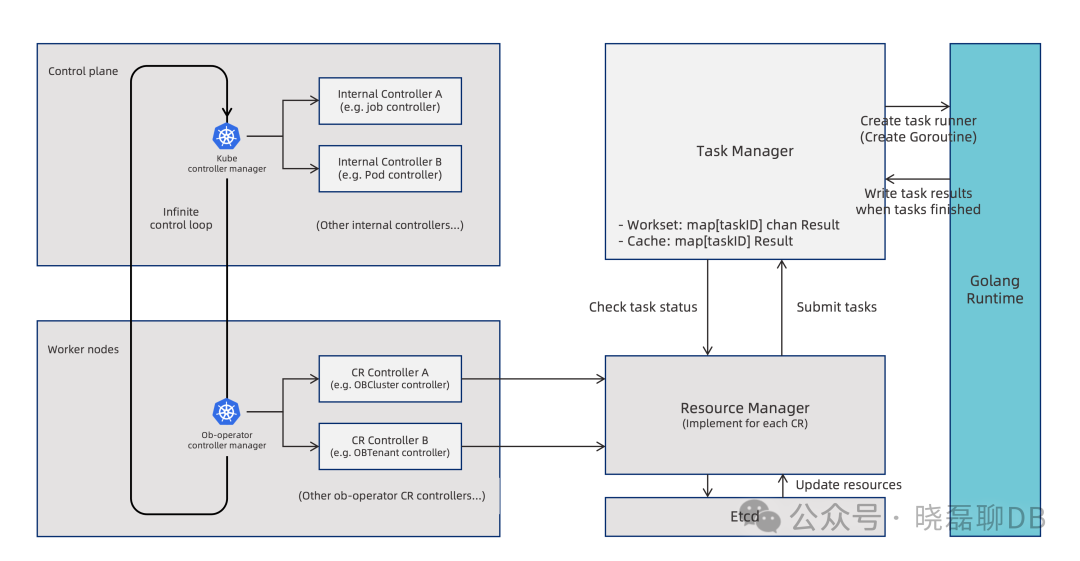
ob-operator
是满足 Kubernetes Operator 扩展范式的自动化工具,可以极大简化在 Kubernetes 上部署和管理 OceanBase 集群及相关资源的过程。
ob-operator 支持 OceanBase 集群的管理、租户管理、备份恢复、故障恢复等功能,具体如下:
集群管理:集群自举、调整集群拓扑、支持 K8s 拓扑配置、扩缩容、集群升级、修改参数
租户管理:创建租户、调整租户拓扑、管理资源单元、修改用户密码
备份恢复:向 OSS 或 NFS 目的地周期性备份数据、从 OSS 或 NFS 中恢复数据
物理备库:从备份中恢复出备租户、创建空备租户、备租户升主、主备切换
故障恢复:单节点故障恢复,IP 保持情况下的集群故障恢复
Dashboard(GUI):基于 ob-operator 的图形化 OceanBase 集群管理工具
二、部署OceanBase前置条件
在开始之前,请确保您已满足以下要求:
Kubernetes版本:>1.18版本
OceanBase版本:根据需求选择4.2.5/4.3.3
Kubernetes 资源:基于local-path-provisioner 来管理 PVC,并且nodes上创建目录生成的待绑定的local PV。
ob-operator 依赖 cert-manager,请确保您已安装 cert-manager。cert-manager 的安装方法请参考对应的 安装文档。
kubectl apply -f https://github.com/cert-manager/cert-manager/releases/download/v1.16.1/cert-manager.yamlnamespace/cert-manager createdcustomresourcedefinition.apiextensions.k8s.io/certificaterequests.cert-manager.io created.................customresourcedefinition.apiextensions.k8s.io/orders.acme.cert-manager.io createdserviceaccount/cert-manager-cainjector createdserviceaccount/cert-manager createdserviceaccount/cert-manager-webhook createdclusterrole.rbac.authorization.k8s.io/cert-manager-cainjector created..................rolebinding.rbac.authorization.k8s.io/cert-manager-webhook:dynamic-serving createdservice/cert-manager-cainjector createdservice/cert-manager createdservice/cert-manager-webhook createddeployment.apps/cert-manager-cainjector createddeployment.apps/cert-manager createddeployment.apps/cert-manager-webhook createdmutatingwebhookconfiguration.admissionregistration.k8s.io/cert-manager-webhook createdvalidatingwebhookconfiguration.admissionregistration.k8s.io/cert-manager-webhook created
三、部署 ob-operator
下面以部署version=2.2.0版本的ob-operator,operator最新应该已经到2.3.0版本(建议使用该版本)
/opt/ob-operator# helm repo add ob-operator https://oceanbase.github.io/ob-operator/WARNING: Kubernetes configuration file is group-readable. This is insecure. Location: root/.kube/configWARNING: Kubernetes configuration file is world-readable. This is insecure. Location: root/.kube/config"ob-operator" has been added to your repositories/opt/ob-operator# helm install ob-operator ob-operator/ob-operator --namespace=oceanbase-system --create-namespace --version=2.2.0WARNING: Kubernetes configuration file is group-readable. This is insecure. Location: root/.kube/configWARNING: Kubernetes configuration file is world-readable. This is insecure. Location: root/.kube/configNAME: ob-operatorLAST DEPLOYED: Mon Oct 28 10:53:12 2024NAMESPACE: oceanbase-systemSTATUS: deployedREVISION: 1TEST SUITE: None
部署过程依赖镜像,需要提前下载到自己公司的镜像中心,否则报错镜像拉取失败报错:
Events:Type Reason Age From Message---- ------ ---- ---- -------Warning Failed 31m (x60 over 165m) kubelet (combined from similar events): Failed to pull image "oceanbase/ob-operator:2.2.0": rpc error: code = Unknown desc = Error response from daemon: Get https://registry-1.docker.io/v2/: dial tcp 199.16.158.190:443: connect: connection timed outNormal Pulling 26m (x33 over 171m) kubelet Pulling image "oceanbase/ob-operator:2.2.0"Normal BackOff 91s (x728 over 171m) kubelet Back-off pulling image "oceanbase/ob-operator:2.2.0"
查看ob-operator安装是否OK(READY:2/2且STATUS:Running)
/opt/ob-operator# kubectl get pods -n oceanbase-systemNAME READY STATUS RESTARTS AGEoceanbase-controller-manager-85f4b9d58c-cl9rq 2/2 Running 0 3m27s
四、部署 OceanBase 集群
按照以下步骤在 Kubernetes 集群上部署 OceanBase 集群:
(1)新建namespace:kubectl create ns oceanbase-test
(2)创建 Secrets 在创建 OceanBase 集群之前,您必须创建特定用户所需的 secrets。创建的目的就是OB集群初始化密码,使用以下命令创建 secrets:
kubectl create secret generic ob-root-password --from-literal=password='yourpassword' -n oceanbase-testkubectl create secret generic ob-proxyro-password --from-literal=password='yourpassword' -n oceanbase-test
PS:注意在创建ob-proxyro-password时建议不要带特殊字符,
否则可能出现部署obproxy时因权限链接不上后端Observer的问题
(3)编辑集群配置文件oceanbase-test.yaml
apiVersion: oceanbase.oceanbase.com/v1alpha1kind: OBClustermetadata:name: obcluste-test #OB的kubectl get obcluster名namespace: oceanbase-testspec:clusterName: obcluster-test #OB集群名clusterId: 1userSecrets:root: ob-root-passwordproxyro: ob-proxyro-passwordtopology:- zone: zone1 #可以自定义zone名称replica: 1 #一个zone的observer数量# nodeSelector:# k1: v1# affinity: 亲和性设置,生产环境必备# nodeAffinity:# podAffinity:# podAntiAffinity:# tolerations: 污点设定,生产环境必备# - key: "obtopo"# value: "zone"# effect: "NoSchedule"- zone: zone2replica: 1# nodeSelector:# k1: v1# affinity:# nodeAffinity:# podAffinity:# podAntiAffinity:# tolerations:# - key: "obtopo"# value: "zone"# effect: "NoSchedule"- zone: zone3replica: 1# nodeSelector:# k1: v1# affinity:# nodeAffinity:# podAffinity:# podAntiAffinity:# tolerations:# - key: "obtopo"# value: "zone"# effect: "NoSchedule"observer:image: oceanbase/oceanbase-cloud-native:4.3.3.0-100000142024101215resource:cpu: 12memory: 40Gistorage:dataStorage:storageClass: local-ssd-storagesize: 500GiredoLogStorage:storageClass: local-ssd-storagesize: 150GilogStorage:storageClass: local-ssd-storagesize: 20Gimonitor:image: oceanbase/obagent:4.2.1-100000092023101717resource:cpu: 8memory: 10Gi
(4)应用yaml,需要等待OceanBase集群创建,大概2分钟
kubectl apply -f oceanbase-test.yaml -n oceanbase-test
注:如果需要镜像问题记得下载镜像到自己公司仓库
oceanbase/oceanbase-cloud-native:4.3.3.0-100000142024101215oceanbase/obagent:4.2.1-100000092023101717
(5)查看OB集群
/opt/ob-operator# kubectl get obcluster -n oceanbase-test1NAME STATUS AGEobcluster running 3d2h/opt/ob-operator# kubectl get pods -n oceanbase-test1 -o wideNAME READY STATUS RESTARTS AGE IP NODE NOMINATED NODE READINESS GATESobcluster-test-1-zone1-6a036c0d84bf 2/2 Running 0 3d2h 10.xxx.xxx.143 db02 <none> <none>obcluster-test-1-zone2-384f9bf55992 2/2 Running 0 3d2h 10.xxx.xxx.142 db08 <none> <none>obcluster-test-1-zone3-6f375db39867 2/2 Running 0 3d2h 10.xxx.xxx.242 db07 <none> <none>obproxy-test-6479ccb497-6r7xv 1/1 Running 0 2d6h 10.xxx.xxx.182 kube610 <none> <none>obproxy-test-6479ccb497-bnj48 1/1 Running 0 2d6h 10.xxx.xxx.227 kube600 <none> <none>
(6)访问集群,因为没有部署obproxy,所以先直通过OB pods ip访问。
/opt/ob-operator# mysql -h10.xxx.xxx.143 -P2881 -uroot@sys -p oceanbase -A -cEnter password:Welcome to the MySQL monitor. Commands end with ; or \g.Your MySQL connection id is 3221489701Server version: 5.7.25 OceanBase_CE 4.3.3.0 (r100000142024101215-0723f9774e5f77a1253149261ba75a94414625d0) (Built Oct 12 2024 16:04:08)Copyright (c) 2009-2023 Percona LLC and/or its affiliatesCopyright (c) 2000, 2023, Oracle and/or its affiliates.Oracle is a registered trademark of Oracle Corporation and/or itsaffiliates. Other names may be trademarks of their respectiveowners.Type 'help;' or '\h' for help. Type '\c' to clear the current input statement.mysql> show databases;+--------------------+| Database |+--------------------+| information_schema || LBACSYS || mysql || oceanbase || ORAAUDITOR || SYS || sys_external_tbs || test |+--------------------+8 rows in set (0.01 sec)mysql> exitBye
五、总结
ob-operator 是基于 Kubernetes Operator 框架构建的工具,实现了声明式管理、自动化调谐和统一管理等优势,它提供简单可靠的方式实现 OceanBase 集群的容器化部署,简化OceanBase集群运维。
如果想更深入的了解ob-operator,可以参考以下资料
ob-operator文档:https://www.oceanbase.com/docs/community-ob-operator-doc-1000000000659335
ob-operator github文档:https://oceanbase.github.io/ob-operator/
集群yaml的详细配置:https://www.oceanbase.com/docs/community-ob-operator-doc-1000000000659352
