




今天给大家整理一些实用的 Linux Shell 脚本案例
希望可以帮到大家,让大家更熟悉 shell 编程
1.显示系统一些基本信息
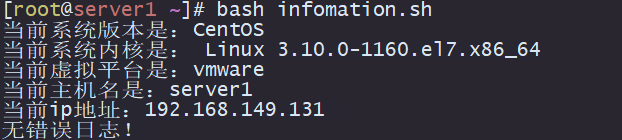
显示信息如下:
系统版本
系统内核
虚拟平台
主机名
ip地址
开机信息有没有报错,有的话输出到屏幕
可以将该脚本加入到开机自启动里面,这样开机就会输出基本信息
#!/bin/bashinfo(){system=$(hostnamectl | grep System | awk '{print $3}')kernel_release=$(hostnamectl | grep Kernel | awk -F : '{print $2}')Virtualization=$(hostnamectl | grep Virtualization | awk '{print $2}')server_name=$(hostname)ipaddr=$(hostname -I)echo "当前系统版本是:${system}"echo "当前系统内核是:${kernel_release}"echo "当前虚拟平台是:${Virtualization}"echo "当前主机名是:${server_name}"echo "当前ip地址:${ipaddr}"}checkerrror(){error_info=$(dmesg | grep error)if [ -e ${error_info} ]thenecho "无错误日志!"elseehcho ${error_info}fi}infocheckerrror
2.关闭系统防火墙和SELinux
检查防火墙状态,是否安装防火墙,如果安装则关闭
关闭SELinux
清空iptables规则
#!/bin/bashclose_firewalld(){code=$(systemctl status firewalld)if [ ${code} -eq 0 ]thensystemctl stop firewalldfi}close_selinux(){sed -i '/^SELINUX/s/=.*/=disabled/' etc/selinux/configsetenforce 0}close_iptables(){iptables -Fservice iptables saveservice iptables restart}close_firewalldclose_selinuxclose_iptables
3.定时任务计划:归档备份
打包压缩/var/log/nginx目录下所有内容,存放在/tmp/nginx目录里
压缩文件命名规范:yymmdd_logs.tar.gz,只保存七天内的文件,超过七天的文件会进行清理
#!bin/bashdate="$(date +%Y%m%d)"dir='/tmp/nginx'backupfile='yymmdd_logs.tar.gz'#查看/tmp/nginx是否存在,不存在则创建checkbak(){if [ ! -e ${dir} ]thenmkdir ${dir}fi}#压缩文件backup(){tar -zcvf ${dir}/${backupfile} var/log/nginx/ > dev/null 2>&1echo "${backupfile} Compressed and packaged successfully !"}#清除七天过期文件cleanup(){find ${dir} -type f -mtime +7 | xagrs rm -rfif [ $? -eq 0 ]thenecho "Cleaned up successfully!"elseecho "data cleaning failed error, please pay attention in time"fi}checkbakbackupcleanup
4.自动批量创建用户
批量创建user1、user2、user3.....
#!/bin/bash#检查用户是否存在,不存在则创建checkuser(){for i in $(seq 1 20)doid user${i} > dev/null 2>&1if [ $? -eq 0 ]thenecho "user${i} 已存在!"elseuseradd user${i} && echo "user${i}" | passwd --stdin user${i} > dev/null 2>&1fidone}checkuser
5.通过位置参数创建用户
$1 是执行脚本的第一个参数
$2 是执行脚本的第二个参数
#!/bin/bashcheckuser(){id ${1} > /dev/null 2>&1if [ $? -eq 0 ]thenecho "${1} 已存在!"elseuseradd "$1"echo "$2" | passwd ‐‐stdin "$1"fi}
6.批量删除用户
批量删除user1...user20
#!/bin/bash#检查用户是否存在,存在则删除checkuser(){for i in $(seq 1 20)doid user${i} > dev/null 2>&1if [ $? -eq 0 ]thenuserdel -r user${i}elseecho "user${i} 不存在!"fidone}checkuser
7.更新系统时间,并写入硬件时间里
查看是否安装ntpdate工具
创建上海时区文件的软链接
更新时间并写入到硬件时间里
#!/bin/bashpackage="ntpdate"info=$(rpm -q ${package})check_pkgs(){if [ ! -e ${info} ]thenecho "ntpdate already exists!"elseecho "start installation!"yum clean all > dev/null 2>&1fiyum update -y && yum install -y ${package} > dev/null 2>&1fi}modify_time(){echo "开始修改时间"rm -rf etc/localtime && ln -s usr/share/zoneinfo/Asia/Shanghai etc/localtime/usr/sbin/ntpdate cn.pool.ntp.org > dev/null 2>&1 && hwclock -w}check_pkgsmodify_time
8.检查服务运行状态
检查某一服务是否正常运行,执行脚本的时候第一个参数为服务名
#!/bin/bashresult=$(pidof $1 | wc -l)echo ${result}if [ ${result} -eq 0 ]thenecho "service does not exist !"elseecho "Service is running normally !"fi

9.对目标主机进行心跳检测
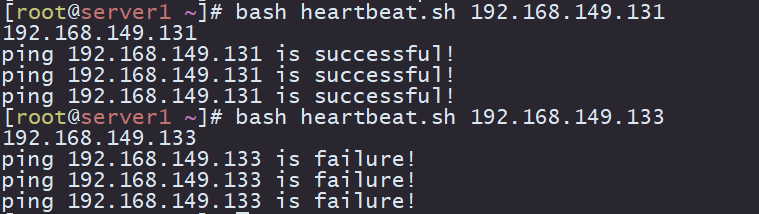
ping目标主机看是否ping得通,三次ping通表示主机正常运行
将目标主机的ip地址作为第一个参数传进去
#!/bin/bashipaddr=$1echo ${ipaddr}ping_status(){if ping -c 1 ${ipaddr} > dev/null 2>&1thenecho "ping ${ipaddr} is successful!"continuefi}for i in $(seq 1 3)doping_statusecho "ping ${ipaddr} is failure!"done
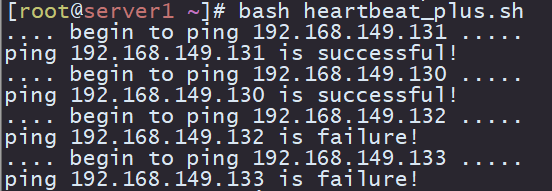
进阶版:对ip地址池里的主机分别进行心跳检测
ipaddr=(192.168.149.131 192.168.149.130 192.168.149.132 192.168.149.133)for i in ${ipaddr[*]}doecho ".... begin to ping ${i} ....."if ping -c 3 ${i} > /dev/null 2>&1thenecho "ping ${i} is successful!"elseecho "ping ${i} is failure!"fidone
10.系统磁盘内存容量告警
根分区剩余空间小于20%(即使用空间大于80%) 输出告警信息
内存使用空间大于80% 输出告警信息
配合crond每5分钟检查一次
#!/bin/bashdisk_letfspace=$(df -Th | grep -w / | awk '{print$6}' | cut -d % -f 1)mem_used=$(free -m | grep Mem | awk '{print$3}')mem_total=$(free -m | grep Mem | awk '{print$2}')mem_letfspace=$[${mem_used}*100/${mem_total}]if [ ${disk_letfspace} -gt 80 ]thenecho "Disk free space is less than 20%!"elseecho "${disk_letfspace}% of disk space left"fiif [ ${mem_letfspace} -gt 80 ]thenecho "memory space is less than 20%!"elseecho "${mem_letfspace}% of memory space left"fi
crontab -l*/5 * * * * /root/check_space.sh

- EOF -
看完本文有收获?请分享给更多人
推荐关注「Linux 运维进阶之路」,提升Linux技能


文章转载自Linux运维进阶之路,如果涉嫌侵权,请发送邮件至:contact@modb.pro进行举报,并提供相关证据,一经查实,墨天轮将立刻删除相关内容。
