


import streamlit as stimport requestsimport json# 设置本地DeepSeek API的URLDEEPSEEK_API_URL = "http://localhost:12345/api/generate"headers = {"Content-Type": "application/json"}streamflag=False# 设置Streamlit页面标题st.title("DeepSeek 本地对话界面")# 初始化会话状态if "messages" not in st.session_state:st.session_state.messages = []# 显示历史消息for message in st.session_state.messages:with st.chat_message(message["role"]):st.markdown(message["content"])# 用户输入if prompt := st.chat_input("请输入你的问题:"):# 添加用户消息到会话状态st.session_state.messages.append({"role": "user", "content": prompt})with st.chat_message("user"):st.markdown(prompt)# 定义请求的数据data = {"model": "deepseek-r1:14b", # 替换为你的本地模型名称"prompt": prompt,"stream": True # 启用流式响应为True,不启用为False}contentjson = json.dumps(data)# ---------------------------------------非流式响应的代码----------------------------------------------# try:# response = requests.post(DEEPSEEK_API_URL, headers=headers, data=contentjson)# response.raise_for_status() # 检查响应状态码# result = response.json()# returntxt=result['response']# returntxt=returntxt.replace('<think>\n\n</think>\n\n','').replace('<think>','').replace('</think>','')# st.markdown(returntxt)# except Exception as e:# st.error(f"调用API时出错:{str(e)}")# ---------------------------------------流式响应的代码----------------------------------------------# 发送请求并处理流式响应with st.chat_message("assistant"):response_placeholder = st.empty() # 创建一个占位符用于流式更新full_response = ""try:# 发送POST请求with requests.post(DEEPSEEK_API_URL, headers=headers, data=contentjson, stream=True) as response:if response.status_code == 200:# 逐行读取流式响应for line in response.iter_lines():if line:# 解析JSON数据decoded_line = line.decode("utf-8") # 转码chunk = json.loads(decoded_line) # 将字符串类型的字典转为真正的字典类型# 解析返回内容# 判断是否有返回内容if 'response' in chunk:piece = chunk['response'] # 获取返回内容piece=piece.replace('<think>\n\n</think>\n\n','').replace('<think>','').replace('</think>','') # 对一些符号进行额外处理if piece !='':full_response += pieceresponse_placeholder.markdown(full_response) # 更新占位符内容else:st.error(f"API调用失败,状态码:{response.status_code}")except Exception as e:st.error(f"调用API时出错:{str(e)}")# 将助手回复添加到会话状态st.session_state.messages.append({"role": "assistant", "content": full_response})
这里只需要执行一下相关命令即可
streamlit run deepseekV3.0.py
运行的效果如下:

在gradio代码中只实现了批量输出模式,关于流式的实在不想找了。
import gradio as grimport json,requestsDEEPSEEK_API_URL = "http://localhost:12345/api/generate"headers = {"Content-Type": "application/json"}streamflag=Falsedef generate_response(prompt):"""通过Ollama API生成响应"""content = {"model": "deepseek-r1:14b", # 模型名称"prompt": prompt, # 输入的提示信息"stream": True # 是否使用流式响应}contentjson = json.dumps(content)response = requests.post(DEEPSEEK_API_URL, headers=headers, data=contentjson, stream=True)response.raise_for_status()generated_text = ""for line in response.iter_lines():if line:decoded_line = line.decode('utf-8')chunk = json.loads(decoded_line)if 'response' in chunk:piece = chunk['response'] # 获取返回内容piece = piece.replace('<think>\n\n</think>\n\n', '').replace('<think>', '').replace('</think>','') # 对一些符号进行额外处理if piece != '':generated_text += piecereturn generated_text.strip() # 返回最终的文本,去除最后的换行符# 创建Gradio界面iface = gr.Interface(fn=generate_response, inputs=gr.components.Textbox(lines=3, label="输入你的提示"), outputs="text",live=True)iface.launch()
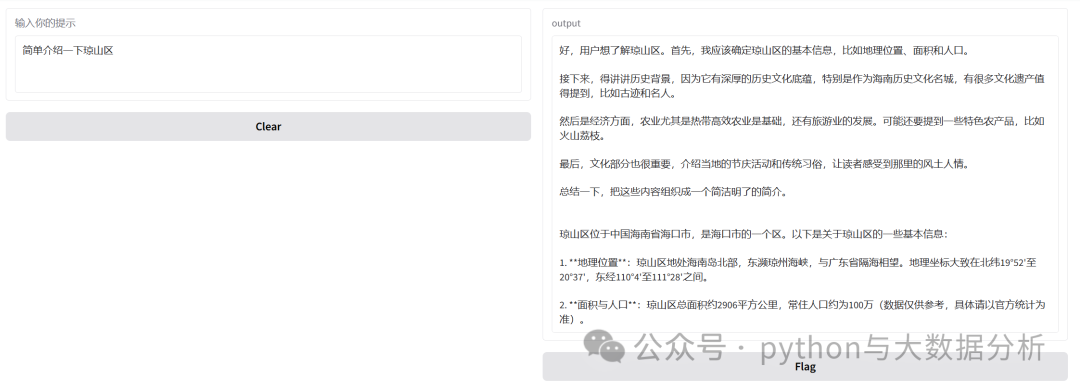
执行相关命令
python .\deepseekV3.0.py
运行的效果如下:

关于代码实现这部分就翻过去了,后续更多的会关注个人知识库构建和模型微调方面的事情,如有未有相关成效的情况下,也可能会把春节期间关于机器学习的系列先发上来。
最后欢迎关注公众号:python与大数据分析

文章转载自追梦IT人,如果涉嫌侵权,请发送邮件至:contact@modb.pro进行举报,并提供相关证据,一经查实,墨天轮将立刻删除相关内容。
