


一、Open WebUI的核心优势

Open WebUI 是一个基于 Web 的界面,用于管理和交互各种 AI 模型。open-webui后端使用Flask3.1+fastapi框架开发的,前端使用Svelte框架结合Vite+TypeScript+Tailwindcss开发。核心优势如下:
1.开源免费 - 无商业限制,代码透明可审计
2.轻量化设计 - 仅需300MB内存即可流畅运行
3.隐私保障 - 数据100%本地化处理,无云端传输风险
4.跨平台支持 - 基于Docker实现Mac/Windows/Linux全兼容
5.模块化扩展 - 支持插件机制,可对接API/数据库等开发场景
二、K8S安装Open WebUI步骤
1、下载open web ui镜像并推送到镜像仓库,镜像名称根据实际定义:
docker load -i open-webui_main.tar
docker push harbor-t.xxx.com/milvus/openwebui:v1
2、定义Deployment,Service,Ingress的yaml文件:
kind: Deployment
apiVersion: apps/v1
metadata:
  name: openwebui
  namespace: autoops
  labels:
    app: openwebui
  annotations:
    deployment.kubernetes.io/revision: '3'
spec:
  replicas: 1
  selector:
    matchLabels:
      app: openwebui
  template:
    metadata:
      creationTimestamp: null
      labels:
        app: openwebui
      annotations:
        logging.kubesphere.io/logsidecar-config: '{}'
    spec:
      volumes:
        - name: host-time
          hostPath:
            path: etc/localtime
            type: ''
        - name: volume-sjbp0y
          persistentVolumeClaim:
            claimName: openwebui
      containers:
        - name: openwebui
          image: 'harbor.xxx.com/milvus/openwebui:v1'
          ports:
            - name: openwebui
              containerPort: 8080
              protocol: TCP
          resources:
            limits:
              cpu: '4'
              memory: 8Gi
            requests:
              cpu: '2'
              memory: 1Gi
          volumeMounts:
            - name: host-time
              readOnly: true
              mountPath: etc/localtime
            - name: volume-sjbp0y
              mountPath: app/backend/data
          terminationMessagePath: dev/termination-log
          terminationMessagePolicy: File
          imagePullPolicy: IfNotPresent
      restartPolicy: Always
      terminationGracePeriodSeconds: 30
      dnsPolicy: ClusterFirst
      serviceAccountName: default
      serviceAccount: default
      securityContext: {}
      imagePullSecrets:
        - name: dhharbor-t
      schedulerName: default-scheduler
  strategy:
    type: RollingUpdate
    rollingUpdate:
      maxUnavailable: 25%
      maxSurge: 25%
  revisionHistoryLimit: 10
  progressDeadlineSeconds: 600

-------------------------------------------------------
kind: Service
apiVersion: v1
metadata:
  name: openwebui
  namespace: autoops
  labels:
    app: openwebui
  annotations:
spec:
  ports:
    - name: openwebui
      protocol: TCP
      port: 8080
      targetPort: 8080
  selector:
    app: openwebui
  clusterIP: 172.18.139.9
  clusterIPs:
    - 172.18.139.9
  type: ClusterIP
  sessionAffinity: None
  ipFamilies:
    - IPv4
  ipFamilyPolicy: SingleStack

----------------------------------------------
kind: Ingress
apiVersion: networking.k8s.io/v1
metadata:
  name: openwebui
  namespace: autoops
spec:
  rules:
   - host: openwebui.sit.xxx.com
     http:
       paths:
        - path:
          pathType: ImplementationSpecific
          backend:
            service:
              name: openwebui
              port:
                number: 8080
3、分配一个存储卷:
kind: PersistentVolumeClaim
apiVersion: v1
metadata:
  name: openwebui
  namespace: autoops
  annotations:
    pv.kubernetes.io/bind-completed: 'yes'
    pv.kubernetes.io/bound-by-controller: 'yes'
    volume.beta.kubernetes.io/storage-provisioner: cluster.local/nfs-nfs-client-provisioner
  finalizers:
    - kubernetes.io/pvc-protection
spec:
  accessModes:
    - ReadWriteMany
  resources:
    requests:
      storage: 50Gi
  volumeName: pvc-38d19f8d-afdb-4188-a83a-abb5e6df945c
  storageClassName: nfs-client
  volumeMode: Filesystem
4、使用kubectl部署文件
kubectl apply -f上述部署文件
kubectl apply -f .5、部署完成后就可以用定义的域名(openwebui.sit.xxx.com)进行访问了。

首次使用需要先创建账号,按要求填写信息

使用账号登录进入后看到如下信息
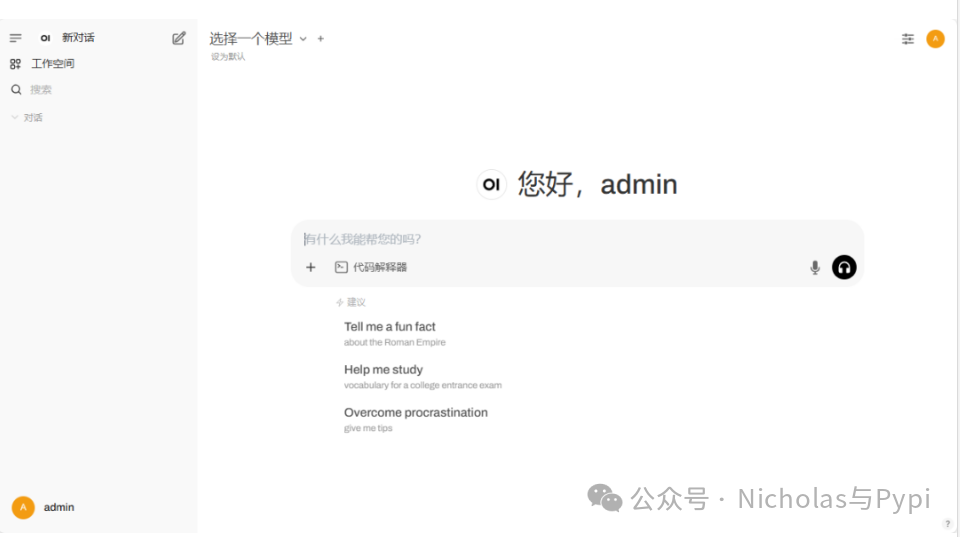
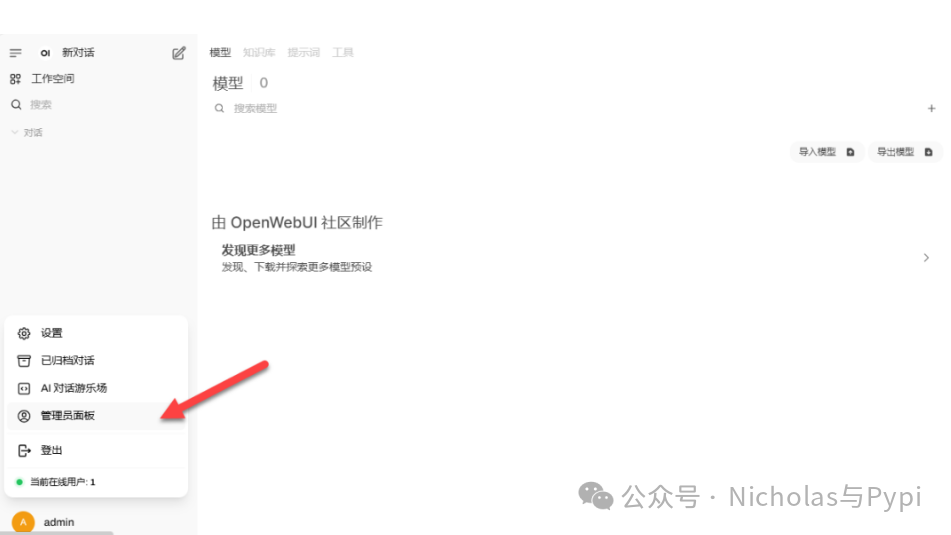
点击管理员面板配置模型
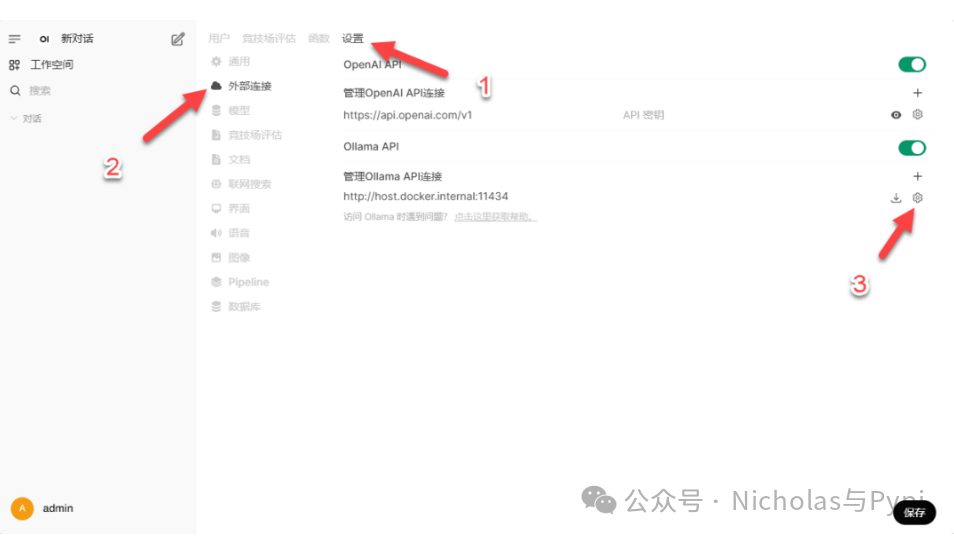
根据实际的数据进行模型地址的配置
配置完成后可以看到模型数据,这里跟我们使用其他应用配置对应的数据源链接样的,可以配置多个模型。
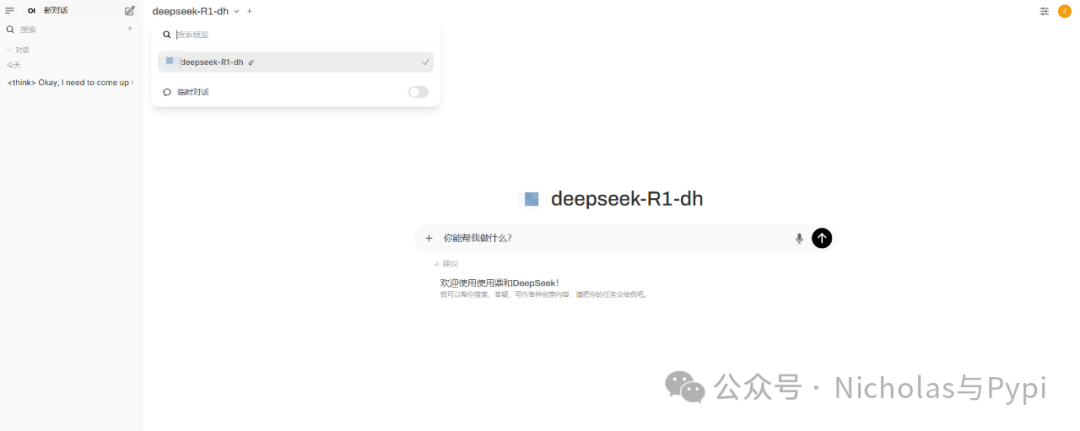
现在可以进行对话了
输入支持文件和捕获
总结:
如果是已经部署了模型框架,推荐部署open web ui,图形化界面操作方便,上手简单,同时进阶用户可以自由调节其他的高级功能。
非常适合如下场景:
•🛠️ 本地API调试:替代Postman的私有化部署方案•🔒 敏感数据操作:企业内部系统的安全操作门户•🧪 原型开发:快速搭建功能演示界面
OpenWebUI开源地址: https://github.com/open-webui/open-webui
继续关注,后续持续更新......
