


点击蓝字,关注我们

转载自神龙大侠
01
生产环境部署方案
测试环境 线上环境
02
DolphinScheduler介绍
Apache DolphinScheduler 是一个分布式易扩展的可视化DAG工作流任务调度开源系统。适用于企业级场景,提供了一个可视化操作任务、工作流和全生命周期数据处理过程的解决方案。
03
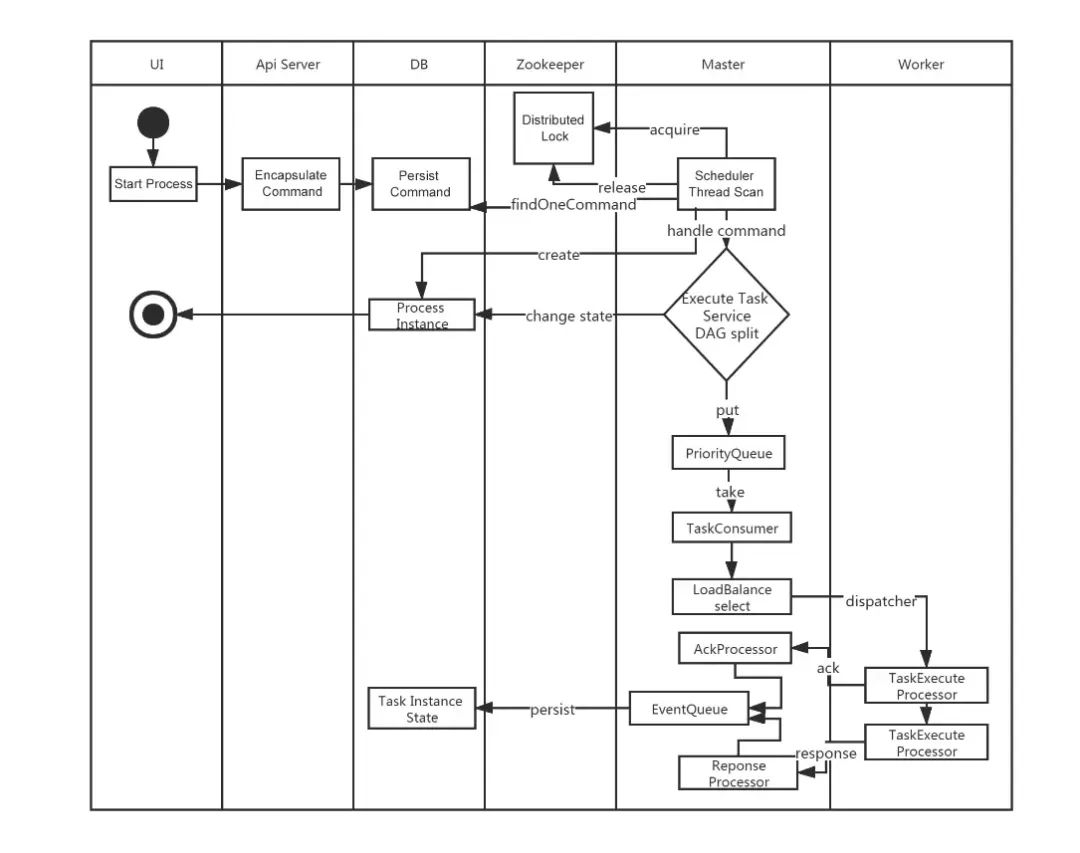
工作流定义启动流程
很丝滑有木有(这里面没有alert-server的位置,不过这个也不负责具体的任务执行)
04
DolphinScheduler核心模块
在二进制文件部署方案中,DolphinScheduler主要是有4个核心server如下:
alert-server
提供告警服务,通过告警插件的方式实现丰富的告警手段。master-server
MasterServer采用分布式无中心设计理念,MasterServer主要负责 DAG 任务切分、任务提交监控,并同时监听其它MasterServer和WorkerServer的健康状态。MasterServer服务启动时向Zookeeper注册临时节点,通过监听Zookeeper临时节点变化来进行容错处理。MasterServer基于netty提供监听服务。
DistributedQuartz分布式调度组件,主要负责定时任务的启停操作,当quartz调起任务后,Master内部会有线程池具体负责处理任务的后续操作;
worker-server
WorkerServer也采用分布式无中心设计理念,WorkerServer主要负责任务的执行和提供日志服务。WorkerServer服务启动时向Zookeeper注册临时节点,并维持心跳。WorkerServer基于netty提供监听服务。api-server
API接口层,主要负责处理前端UI层的请求。该服务统一提供RESTful api向外部提供请求服务。
api-ui
05
部署方案
单机部署(Standalone) 伪集群部署(Pseudo-Cluster) 集群部署(Cluster) 快速试用 Kubernetes 部署
伪集群部署方案 作为测试环境(stag) 集群部署方案 作为线上环境(prod)
升级版本信息3.2.1到3.2.2 使用snapshot版本
06
修改pom版本
本文基于3.2.1版本统一改成了snapshot版本,这样我自己修改的代码,重新编译之后可以在测试或者生产环境生效。
<groupId>org.apache.dolphinscheduler</groupId>
<artifactId>dolphinscheduler</artifactId>
<version>3.2.100-SNAPSHOT</version>
07
修改通用环境配置
mysql-connector-java-8.0.33.jar。可以把
mysql-connector-java-8.0.33.jar放在
/script/env目录下,这个测试和线上环境都是一致的配置和需求版本。
dolphinscheduler_env.sh文件。
dolphinscheduler_env.sh用来配置各种路径和环境变量信息。
/script/env/stag /script/env/prod
dolphinscheduler_env.sh文件copy到这两个目录下。
dolphinscheduler_env.sh文件包含的配置信息包括
JAVA_HOME,
PYTHON_LAUNCHER,
HADOOP_CLASSPATH,
SPARK_DIST_CLASSPATH,
HADOOP_CLIENT_OPTS,
SPARK_SUBMIT_OPTS等环境信息,根据实际情况配置好就ok了。
dolphinscheduler_env.sh配置信息包括如下(这个根据自己的情况配置,不能直接copy哦)
export HADOOP_CLASSPATH=`hadoop classpath`:${DOLPHINSCHEDULER_HOME}/tools/libs/*
export SPARK_DIST_CLASSPATH=$HADOOP_CLASSPATH:$SPARK_DIST_CLASS_PATH
export HADOOP_CLIENT_OPTS="-javaagent:${DOLPHINSCHEDULER_HOME}/tools/libs/aspectjweaver-1.9.7.jar":$HADOOP_CLIENT_OPTS
export SPARK_SUBMIT_OPTS="-javaagent:${DOLPHINSCHEDULER_HOME}/tools/libs/aspectjweaver-1.9.7.jar":$SPARK_SUBMIT_OPTS
export FLINK_ENV_JAVA_OPTS="-javaagent:${DOLPHINSCHEDULER_HOME}/tools/libs/aspectjweaver-1.9.7.jar":$FLINK_ENV_JAVA_OPTS
export JAVA_HOME=${JAVA_HOME:-/usr/java/jdk1.8.0_181-amd64/}
export PYTHON_LAUNCHER=${PYTHON_LAUNCHER:-/usr/local/python3.7.2/bin/python3}

export SPRING_CACHE_TYPE=${SPRING_CACHE_TYPE:-none}
export SPRING_JACKSON_TIME_ZONE=${SPRING_JACKSON_TIME_ZONE:-UTC}
export MASTER_FETCH_COMMAND_NUM=${MASTER_FETCH_COMMAND_NUM:-10}


export PATH=$PYTHON_LAUNCHER:$JAVA_HOME/bin:$HADOOP_CLASSPATH:$SPARK_DIST_CLASSPATH:$FLINK_ENV_JAVA_OPTS:$PATH
08
dolphinscheduler-api双环境部署方案改造
增加线上和测试环境配置信息
/dolphinscheduler-api/resources/application.yaml这个是配置样例,可以根据实际需要修改对应的配置信息。
/dolphinscheduler-api/resources/stag/application.yaml/dolphinscheduler-api/resources/prod/application.yamlapplication.yaml需要修改的内容包括(我列的这几个是需要修改的项,其他的可以留着不动)。
spring:
  profiles:
    active: mysql
  datasource:
    driver-class-name: com.mysql.cj.jdbc.Driver
    url: jdbc:mysql://ip:port/dolphinscheduler
    username: user
    password: pass
quartz:
  properties:
    org.quartz.jobStore.driverDelegateClass:org.quartz.impl.jdbcjobstore.StdJDBCDelegate
registry:
  type: zookeeper
  zookeeper:
    namespace: dolphinscheduler
    connect-string: ip:port
    retry-policy:
      base-sleep-time: 60ms
      max-sleep: 300ms
      max-retries: 5
    session-timeout: 30s
    connection-timeout: 9s
    block-until-connected: 600ms
    digest: ~
增加双环境jvm启动参数信息
创建d olphinscheduler-api/src/main/bin/stag
目录,mv并修改jvm_args_env.sh
配置信息。
jvm_args_env.sh-Xms1g
-Xmx1g
-Xmn512m
-XX:+IgnoreUnrecognizedVMOptions
-XX:+PrintGCDateStamps
-XX:+PrintGCDetails
-Xloggc:gc.log
-XX:+ExitOnOutOfMemoryError
-XX:+HeapDumpOnOutOfMemoryError
-XX:HeapDumpPath=dump.hprof
-Duser.timezone=${SPRING_JACKSON_TIME_ZONE}
创建 dolphinscheduler-api/src/main/bin/prod
目录,mv并修改jvm_args_env.sh
配置信息
-Xms8g
-Xmx8g
-Xmn2g

-XX:+IgnoreUnrecognizedVMOptions
-XX:+PrintGCDateStamps
-XX:+PrintGCDetails
-Xloggc:gc.log

-XX:+ExitOnOutOfMemoryError
-XX:+HeapDumpOnOutOfMemoryError
-XX:HeapDumpPath=dump.hprof

-Duser.timezone=${SPRING_JACKSON_TIME_ZONE}
start.sh文件不用做改动,直接copy到对应的目录即可。
增加src/main/assembly/xml 线上和测试环境打包配置文件
dolphinscheduler-api-server-stag.xml
dolphinscheduler-api-server-prod.xml<fileSet>
<directory>${basedir}/../../script/env</directory>
<outputDirectory>libs</outputDirectory>
<includes>
<include>mysql-connector-java-8.0.33.jar</include>
</includes>
<fileMode>0755</fileMode>
<directoryMode>0755</directoryMode>
</fileSet>
    <fileSet>
        <directory>${basedir}/src/main/resources/stag</directory>
        <includes>
            <include>*.yaml</include>
            <include>*.xml</include>
        </includes>
        <outputDirectory>conf</outputDirectory>
    </fileSet>
    <fileSet>
        <directory>${basedir}/src/main/bin/stag</directory>
        <outputDirectory>bin</outputDirectory>
        <fileMode>0755</fileMode>
        <directoryMode>0755</directoryMode>
    </fileSet>
    <fileSet>
        <directory>${basedir}/src/main/resources/prod</directory>
        <includes>
            <include>*.yaml</include>
            <include>*.xml</include>
        </includes>
        <outputDirectory>conf</outputDirectory>
    </fileSet>
    <fileSet>
        <directory>${basedir}/src/main/bin/prod</directory>
        <outputDirectory>bin</outputDirectory>
        <fileMode>0755</fileMode>
        <directoryMode>0755</directoryMode>
    </fileSet>
修改pom文件
增加profile信息
    <profiles>
        <!--测试环境-->
        <profile>
            <id>stag</id>
            <properties>
                <spring.profiles.active>stag</spring.profiles.active>
            </properties>
            <activation>
                <activeByDefault>true</activeByDefault>
            </activation>
        </profile>
        <!--生产环境-->
        <profile>
            <id>prod</id>
            <properties>
                <spring.profiles.active>prod</spring.profiles.active>
            </properties>
        </profile>
    </profiles>
根据环境信息修改对应的assembly文件
           <plugin>
                <artifactId>maven-assembly-plugin</artifactId>
                <executions>
                    <execution>
                        <id>dolphinscheduler-api-server</id>
                        <goals>
                            <goal>single</goal>
                        </goals>
                        <phase>package</phase>
                        <configuration>
                            <finalName>api-server</finalName>
                            <descriptors>
                                <descriptor>src/main/assembly/dolphinscheduler-api-server-${spring.profiles.active}.xml</descriptor>
                            </descriptors>
                            <appendAssemblyId>false</appendAssemblyId>
                        </configuration>
                    </execution>
                </executions>
             </plugin>
mvn clean install -P prod '-Dmaven.test.skip=true' '-Dcheckstyle.skip=true' '-Dmaven.javadoc.skip=true'
mvn clean install -P stag '-Dmaven.test.skip=true' '-Dcheckstyle.skip=true' '-Dmaven.javadoc.skip=true'
ApiApplicationServer的main方法,支持生成pid文件信息
   public static void main(String[] args) {
        ApiServerMetrics.registerUncachedException(DefaultUncaughtExceptionHandler::getUncaughtExceptionCount);
        Thread.setDefaultUncaughtExceptionHandler(DefaultUncaughtExceptionHandler.getInstance());
        SpringApplication application = new SpringApplicationBuilder(ApiApplicationServer.class).application();
        application.addListeners(new ApplicationPidFileWriter("ApiServer.pid"));
        application.run(args);
    }
sh bin/start.sh.09
dolphinscheduler-ui部署方案
配置测试环境和线上环境后端接口api域名
.env.development测试环境
VITE_APP_PROD_WEB_URL='https://stag.busi.com'.env.production测试环境
VITE_APP_PROD_WEB_URL='https://prod.busi.com'dolphinscheduler-api提供http接口的地址。
修改package.json文件,在"build:prod"下面增加一行测试环境 build:stag命令
"build:stag": "vue-tsc --noEmit && vite build --mode development",
修改router
const router = createRouter({
  history: createWebHistory(
    import.meta.env.MODE === 'production' ? '/' : '/'
  ),
  routes
})
修改pom文件(增加build:stag)配置
                            <execution>
                                <id>pnpm run build:stag</id>
                                <goals>
                                    <goal>pnpm</goal>
                                </goals>
                                <configuration>
                                    <arguments>run build:stag</arguments>
                                </configuration>
                            </execution>
修改vite.config.ts文件中base目录信息
base: process.env.NODE_ENV === 'production' ? '/' : '/',
10
nginx配置信息
       server {
            listen 你的port; # 自定义接口
            server_name dolphinscheduler-test.buis.com;
            root home/deploy/api-ui_stag; #本地网站文件路径

            index index.html;  #设置默认网页
            try_files $uri $uri/ index.html;
            location dolphinscheduler {
                 proxy_pass http://api-server-ip:api-server-port;
            }
        }
       server {
            listen 你的port; # 自定义接口
            server_name dolphinscheduler-prod.buis.com;
            root home/deploy/api-ui_prod; #本地网站文件路径

            index index.html;  #设置默认网页
            try_files $uri $uri/ index.html;
            location dolphinscheduler {
                 proxy_pass http://api-server-ip:api-server-port;
            }
        }
api-ui_prod和
api-ui_stag为
dolphinscheduler-uibuild之后的dist目录。
nginx有一个配置非常关键
try_files $uri $uri/ index.html;
dolphinscheduler-ui的vue router 模式为history模式,所有页面的录入都是通过域名根目录进入的。
访问https://dolphinscheduler-test.busi.com/目录会跳转到
https://dolphinscheduler-test.busi.com/home目录。
try_files $uri $uri/ index.html;
location  {

}
Checks the existence of files in the specified order and uses the first found
 file for request processing; the processing is performed in the current
context. The path to a file is constructed from the file parameter according
 to the root and alias directives. It is possible to check directory’s
existence by specifying a slash at the end of a name, e.g. “$uri/”.
If none of the files were found, an internal redirect to the uri
specified in the last parameter is made.
参考
https://juejin.cn/post/6844903856359342087
build命令
线上环境打包:pnpm run build:prod
nginx -s reload使得nginx部署生效
11
看一下效果
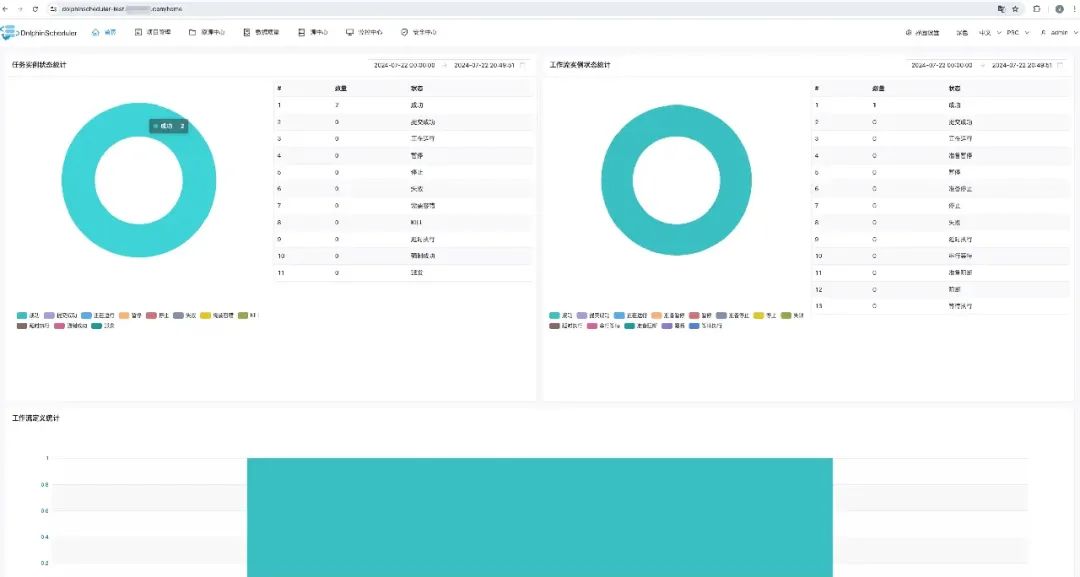
用户名:admin 密码:dolphinscheduler123 image.png
钉钉报警和优化
start process success
[{"projectCode":14285493640640,"projectName":"xxx_test","owner":"admin",
"processId":12,"processDefinitionCode":14285512555584,
"processName":"flow_test1-1-20240717191405669","processType":"START_PROCESS",
"processState":"SUCCESS","modifyBy":"admin","recovery":"NO",
"runTimes":1,"processStartTime":"2024-07-17 19:14:05",
"processEndTime":"2024-07-17 19:14:09","processHost":"10.76.6.66:5678"}]
@xxx
start process success
projectCode:14285493640640
projectName:xxx_test
owner:admin
processId:22
processDefinitionCode:14371091350208
processName:testflow123-1-20240723111659147
processType:START_PROCESS
processState:SUCCESS
modifyBy:admin
recovery:NO
runTimes:1
processStartTime:2024-07-23 11:16:59
processEndTime:2024-07-23 11:17:00
processHost:10.76.6.66:5678
@xxx

我知道你在看哟
文章转载自大数据技能圈,如果涉嫌侵权,请发送邮件至:contact@modb.pro进行举报,并提供相关证据,一经查实,墨天轮将立刻删除相关内容。
