


1、准备三台机器,并分别修改主机名(重启生效)
[root@localhost ~]# hostnamectl set-hostname server
client_1
[root@localhost ~]# hostnamectl set-hostname client_1
2、配置静态IP
[root@server ~]# nmcli connection modify ens160 ipv4.addresses 192.168.5.128/24 ipv4.gateway 192.168.5.2 ipv4.dns 8.8.8.8 ipv4.method manual connection.autoconnect yes[root@server ~]# nmcli connection up ens160
[root@client_1 ~]# nmcli connection modify ens160 ipv4.addresses 192.168.5.129/24 ipv4.gateway 192.168.5.2 ipv4.dns 8.8.8.8 ipv4.method manual connection.autoconnect yes[root@client_1 ~]# nmcli connection up ens160
[root@client_2 ~]# nmcli connection modify ens160 ipv4.addresses 192.168.5.130/24 ipv4.gateway 192.168.5.2 ipv4.dns 8.8.8.8 ipv4.method manual connection.autoconnect yes[root@client_2 ~]# nmcli connection up ens160
3、在/etc/hosts文件中配置主机名映射关系,确保多台主机能够通过主机名互访
[root@server ~]# vim etc/hosts[root@client_1 ~]# vim etc/hosts[root@client_2 ~]# vim /etc/hosts#配置内容127.0.0.1 localhost localhost.localdomain localhost4 localhost4.localdomain4::1 localhost localhost.localdomain localhost6 localhost6.localdomain6192.168.5.128 server192.168.5.129 client_1192.168.5.130 client_2"/etc/hosts" 6L, 226C 6,0-1 All
4、然后去配置server在受控主机的免密登录
#生成密钥[root@server ~]# ssh-keygen -t rsa -P '' -q -f ~/.ssh/id_rsa#rsa加密,密码为空,静默执行,存放文件为 ~/.ssh/id_rsa
#转发公钥给两个受控主机[root@server ~]# ssh-copy-id root@client_1[root@server ~]# ssh-copy-id root@client_2
5、要确保控制主机与受控主机上都有python和ssh服务(一般系统都会自带)
6、配置yum源使用Centos-stream.repo
将Centos-stream.repo文件放在/etc/yum.repo.d目录下
[root@server ~]# ls /etc/yum.repos.d/CentOS-Stream.repo
7、安装ansible
[root@server yum.repos.d]# yum install ansible -yComplete!
8、使用ansible --version验证ansible是否安装成功
[root@server ~]# ansible --versionansible [core 2.12.7] #安装成功config file = /etc/ansible/ansible.cfgconfigured module search path = ['/root/.ansible/plugins/modules', '/usr/share/ansible/plugins/modules']ansible python module location = /usr/lib/python3.8/site-packages/ansibleansible collection location = /root/.ansible/collections:/usr/share/ansible/collectionsexecutable location = /usr/bin/ansiblepython version = 3.8.8 (default, Aug 2 2021, 14:57:02) [GCC 8.5.0 20210514 (Red Hat 8.5.0-3)]jinja version = 2.11.3libyaml = True
9、配置清单指定受控主机 :/etc/ansible/hosts
[root@server ~]# vim /etc/ansible/hosts……## db-[99:101]-node.example.com[client]client_1client_2
10、使用ansible node -m ping验证配置是否成功
[root@server ~]# ansible client -m pingclient_2 | SUCCESS => {"ansible_facts": {"discovered_interpreter_python": "/usr/libexec/platform-python"},"changed": false,"ping": "pong"}client_1 | SUCCESS => {"ansible_facts": {"discovered_interpreter_python": "/usr/libexec/platform-python"},"changed": false,"ping": "pong"}
11、配置ansible.cfg文件【去掉警告】
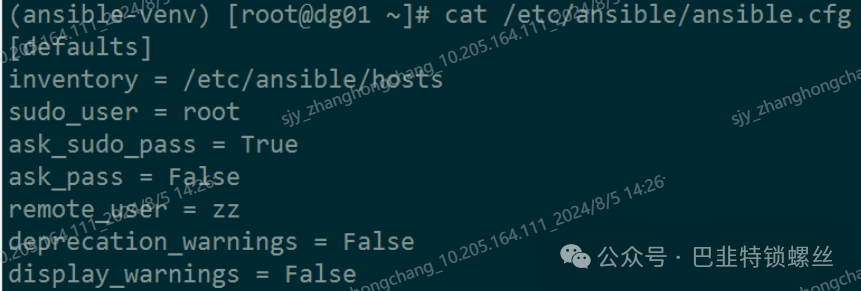
(ansible-venv) [root@dg01 ~]# cat /etc/ansible/ansible.cfg[defaults]inventory = /etc/ansible/hostssudo_user = rootask_sudo_pass = Trueask_pass = Falseremote_user = zzdeprecation_warnings = Falsedisplay_warnings = False[privilege_escalation]become = Truebecome_method = sudobecome_user = rootbecome_ask_pass = False

版权声明:本文内容来自CSDN:俗人不俗鸭,遵循CC 4.0 BY-SA版权协议上原文接及本声明。本作品采用知识共享署名-非商业性使用-禁止演绎 2.5 中国大陆许可协议进行可。原文链接:https://blog.csdn.net/m0_60861848/article/details/126130628如有涉及到侵权,请联系,将立即予以删除处理。在此特别鸣谢原作者的创作。此篇文章的所有版权归原作者所有,与本公众号无关,商业转载建议请联系原作者,非商业转载请注明出处。
文章转载自巴韭特锁螺丝,如果涉嫌侵权,请发送邮件至:contact@modb.pro进行举报,并提供相关证据,一经查实,墨天轮将立刻删除相关内容。
