


摘要
本文以实践的方式展示如何利用 PG-14、Citus 和 Patroni 搭建高可用集群。参考官方文档:https://www.citusdata.com/blog/2023/03/06/patroni-3-0-and-citus-scalable-ha-postgres/
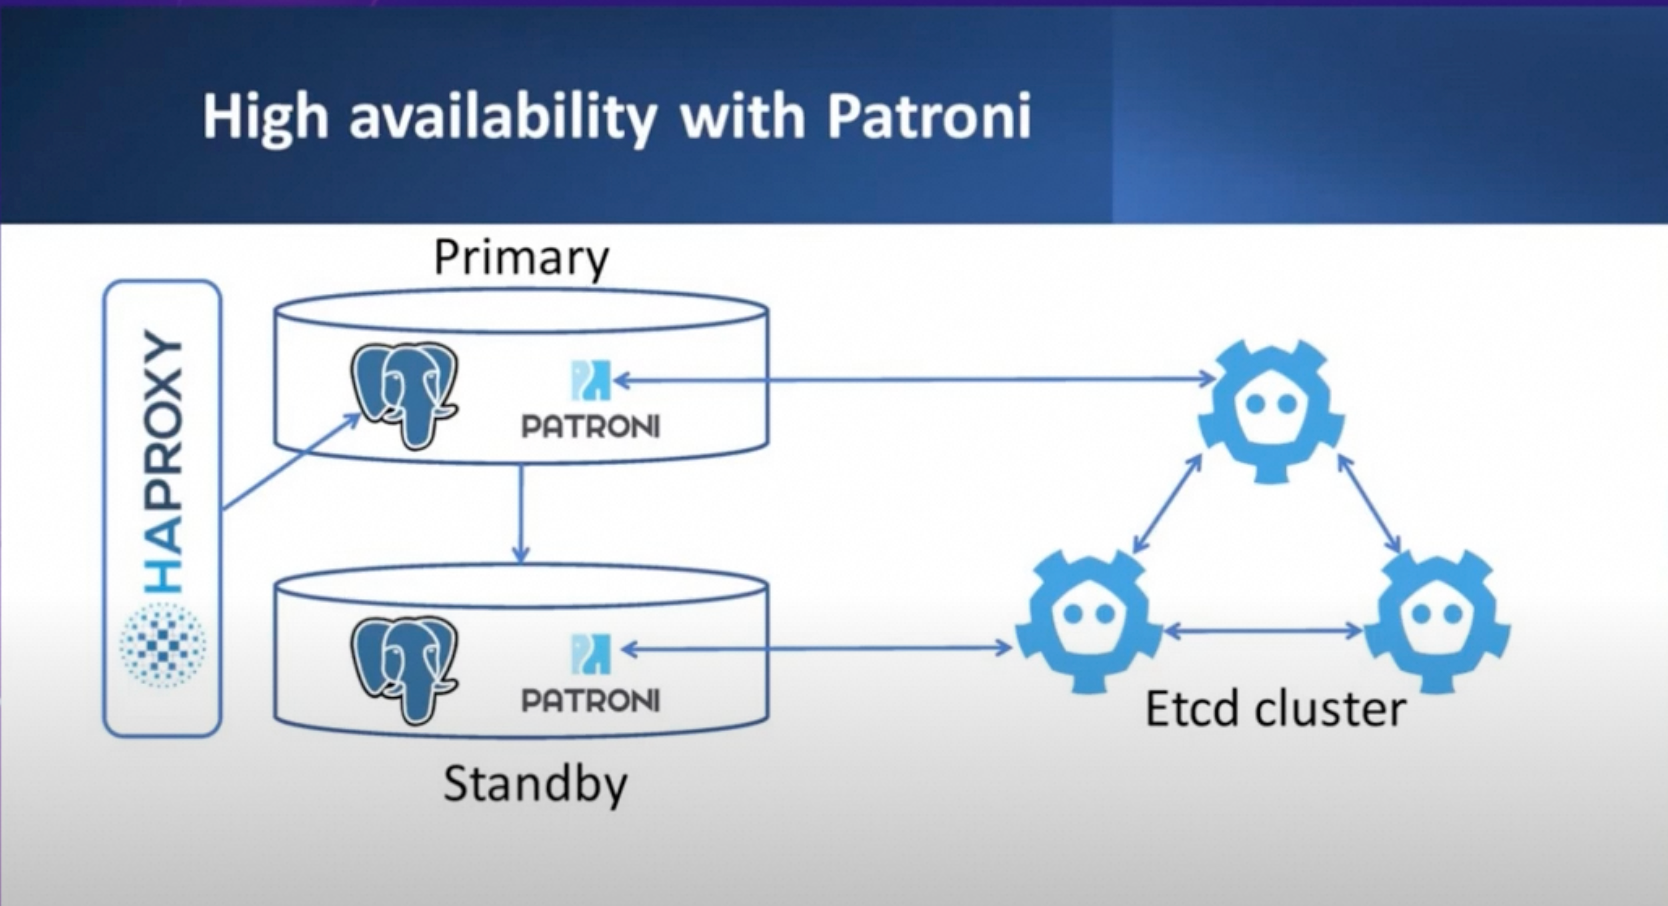
Patroni + Citus 的优势在于,当 Citus 集群中某个 PG 集群发生主备切换时,Patroni 将自动更新 Citus 集群元数据,维护一个正确的 Citus 集群拓扑。
Patroni 运行架构参考图:
Citus + Patroni 架构参考图:
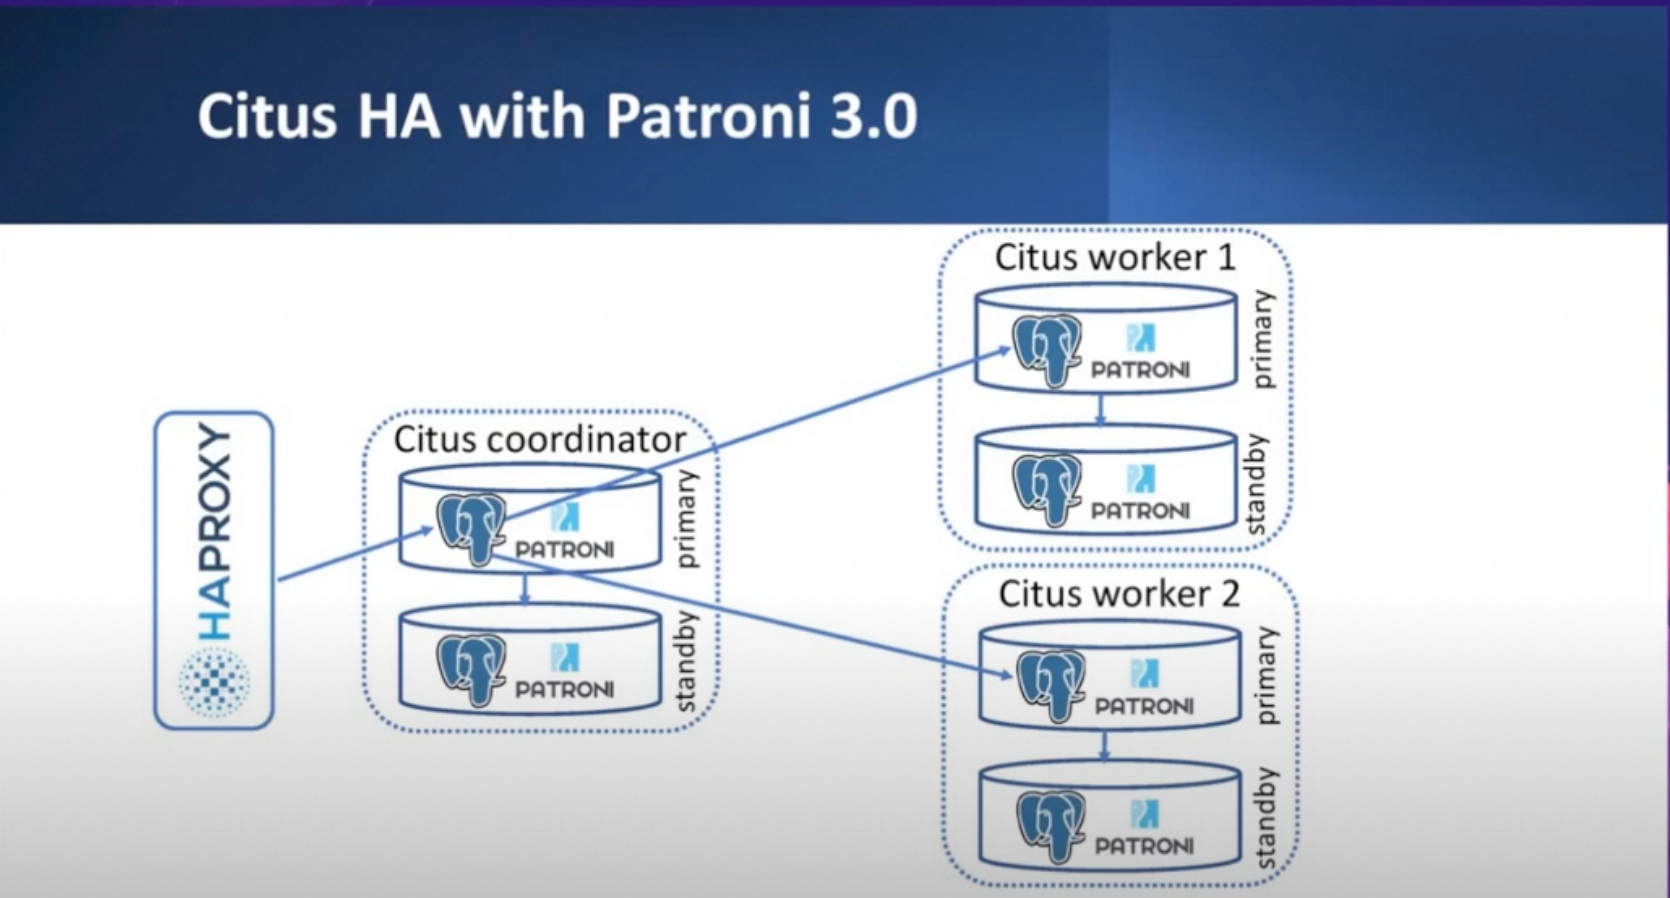
接下来将手把手地帮助您搭建一个 1 CN + 1 DN 的高可用 Citus 集群,其中 CN 和 DN 各自都是 3 副本高可用(3 个 PG 实例组成一个高可用 Citus 节点)。
硬件和软件资源:6 台安装 Ubuntu 22.04 的阿里云 ECS,PG 内核使用 PG-14,Patroni 版本为 4.0.4,etcd 版本为 3.5.0,其它系统资源及部署组件见下表。
ECS | Patroni 节点名称 | cpu/memory | 磁盘 | 系统 | 内网 ip | 部署组件 |
1 | postgresql0 | 4C/8G | 200G ESSD | Ubuntu 22.04 | 192.168.0.229 | PG 14、Patroni、etcd、Citus |
2 | postgresql1 | 4C/8G | 200G ESSD | Ubuntu 22.04 | 192.168.0.230 | PG 14、Patroni、etcd、Citus |
3 | postgresql2 | 4C/8G | 200G ESSD | Ubuntu 22.04 | 192.168.0.231 | PG 14、Patroni、etcd、Citus |
4 | postgresql3 | 4C/8G | 200G ESSD | Ubuntu 22.04 | 192.168.0.232 | PG 14、patroni、Citus |
5 | postgresql4 | 4C/8G | 200G ESSD | Ubuntu 22.04 | 192.168.0.233 | PG 14、patroni、Citus |
6 | postgresql5 | 4C/8G | 200G ESSD | Ubuntu 22.04 | 192.168.0.234 | PG 14、patroni、Citus |
最终搭建出的集群拓扑结构如下:
ETCD 集群
ECS | 节点名称 | 内网 ip |
1 | etcd1 | 192.168.0.229 |
2 | etcd2 | 192.168.0.230 |
3 | etcd3 | 192.168.0.231 |
Patroni 集群
ECS | Patroni 节点名称 | ip | Citus 身份 |
1 | postgresql0 | 192.168.0.229 | CN primary |
2 | postgresql1 | 192.168.0.230 | CN secondary1 |
3 | postgresql2 | 192.168.0.231 | CN secondary2 |
4 | postgresql3 | 192.168.0.232 | DN primary |
5 | postgresql4 | 192.168.0.233 | DN secondary1 |
6 | postgresql5 | 192.168.0.234 | DN secondary2 |
*如无特殊说明,表示命令需要在所有机器(6 个 ECS)上都执行,并使用 root 用户来执行。
名词解释
- PG 节点(PG 实例):表示一个 PG 单实例,指代一个 database cluster。
- PG 集群:由多个 PG 单实例组成的高可用 PG 集群。一主多备形态。
- Citus 节点(Citus 实例):表示 Citus 架构中的一个 PG 集群。例如 CN 节点、DN 节点。
- Citus 集群:表示一个 Citus 分布式数据库系统中的所有 Citus 节点的集合。
- etcd 集群:多个运行 etcd 的实例组成的 etcd 高可用集群。
搭建步骤
- 搭建高可用 etcd 集群。
- 用 Patroni 搭建高可用的 Citus 集群。通过正确配置 Patroni 配置文件和安装必要的依赖库、插件,让 Patroni 自动搭建出 高可用 Citus 集群。
接下来介绍各步骤细节。
postgresql-14 安装
在 6 台 ECS 上都执行以下命令,安装好 PG-14:
sudo apt update
apt install postgresql-14 -y
etcd 安装及配置
本步骤的目标是搭建出一个高可用的 etcd 集群。这个 etcd 集群将会被 Patroni 进程使用,存储 Patroni 集群各节点状态信息。方便起见,这里直接使用所购买的前 3 个 ECS 实例来搭建高可用 etcd 集群,而不再新开机器专门用作 etcd 集群搭建。你也可以任意选择其中某几台 ECS,或新开几个 ECS 专门用于搭建 etcd 集群。
安装 etcd
接下来安装 etcd,由于我们仅使用所购买的前 3 个 ECS 实例搭建高可用 etcd 集群,该安装命令只需在前 3 个 ECS 实例上执行:
apt install etcd -y
# 创建目录并把权限赋给postgres
mkdir /etc/etcd
chown -R postgres:postgres /usr/bin/etcd /etc/etcd
chown -R postgres:postgres /usr/bin/etcdctl
chown -R postgres:postgres /var/lib/etcd
准备配置文件
以下依次为前 3 个 ECS 实例的 etcd 配置文件,使用的 ETCD_DATA_DIR 为。各项配置解读如下(参考如下链接 https://etcd.io/docs/v3.4/op-guide/configuration/):
- ETCD_NAME: 表明本节点在 etcd 集群当中的身份标识。
- ETCD_DATA_DIR: 指定当前 etcd 节点数据存储的目录。
- ETCD_LISTEN_PEER_URLS:
- 作用:用于指定当前 etcd 节点监听其他节点的 URL 列表。此参数告诉 etcd 在哪些地址和端口上接受来自其他节点的请求。
- 支持以下格式:
- 协议:可以是 或 。
- Unix 套接字:也可以使用 或 来指定 Unix 套接字。
- 如果 IP 地址设置为 ,则 etcd 会在所有网络接口上监听指定的端口。如果指定了具体的 IP 地址和端口,则 etcd 会仅在该 IP 和端口上监听。
- 可以指定多个 URL,以监听多个地址和端口。etcd 将响应来自任何列出的地址和端口的请求。
- ETCD_LISTEN_CLIENT_URLS
- 用于指定 etcd 节点监听客户端通信流量的 URL 列表。
- 此参数告诉 etcd 在哪些地址和端口上接受来自客户端的请求。支持以下格式:
- 协议:可以是 或 。
- Unix 套接字:也可以使用 或 来指定 Unix 套接字。
- 如果 IP 地址设置为 ,则 etcd 会在所有网络接口上监听指定的端口。如果指定了具体的 IP 地址和端口,则 etcd 会仅在该 IP 和端口上监听。
- 可以指定多个 URL,以监听多个地址和端口。etcd 将响应来自任何列出的地址和端口的请求。
- ETCD_INITIAL_ADVERTISE_PEER_URLS
- 该参数用于指定当前成员(节点)向集群中其他成员广播的 Peer URL 列表。
- 这些地址用于在集群内进行 etcd 数据通信,让其他节点知道如何联系上该节点 etcd。至少需要有一个地址能够被集群中的所有成员访问(路由可达)。与 ETCD_LISTEN_PEER_URLS 不同,这些 URL 可以包含域名。
- ETCD_INITIAL_CLUSTER_STATE
- 指定集群的初始状态,可选值为 或 。
- :表示这是一个全新的集群。在通过静态配置或 DNS 引导集群时,所有成员都需要将此选项设置为 。
- :表示当前节点尝试加入一个已经存在的集群。
- 如果设置了错误的值(例如,将新集群设置为 ,或将现有集群设置为 ),etcd 会尝试启动,但会安全地失败。
- 指定集群的初始状态,可选值为 或 。
- ETCD_INITIAL_CLUSTER_TOKEN
- 指定 etcd 集群名称。etcd 集群各节点配置完全相同即可。
- ETCD_ADVERTISE_CLIENT_URLS
- 该参数用于指定当前成员(节点)向集群中其他成员广播的客户端 URL 列表。
- 这些地址用于让其他集群成员都知道客户端如何与当前节点通信。这些 URL 可以包含域名。
- 此处配置为 <自身内网 ip 地址>:2379 即可。若需要可公网访问,配置公网 IP 即可。
在 ECS 1 上执行下述命令,完成配置 Patroni 节点 postgresql0:
cat > /etc/etcd/etcd.conf << EOF
ETCD_NAME=etcd1
ETCD_DATA_DIR="/var/lib/etcd"
ETCD_LISTEN_PEER_URLS="http://192.168.0.229:2380"
ETCD_LISTEN_CLIENT_URLS="http://127.0.0.1:2379,http://192.168.0.229:2379"
ETCD_INITIAL_ADVERTISE_PEER_URLS="http://192.168.0.229:2380"
ETCD_INITIAL_CLUSTER="etcd1=http://192.168.0.229:2380,etcd2=http://192.168.0.230:2380,etcd3=http://192.168.0.231:2380"
ETCD_INITIAL_CLUSTER_STATE="new"
ETCD_INITIAL_CLUSTER_TOKEN="cn-cluster"
ETCD_ADVERTISE_CLIENT_URLS="http://192.168.0.229:2379"
EOF
在 ECS 2 上执行下述命令,完成配置 Patroni 节点 postgresql1:
cat > /etc/etcd/etcd.conf << EOF
ETCD_NAME=etcd2
ETCD_DATA_DIR="/var/lib/etcd"
ETCD_LISTEN_PEER_URLS="http://192.168.0.230:2380"
ETCD_LISTEN_CLIENT_URLS="http://127.0.0.1:2379,http://192.168.0.230:2379"
ETCD_INITIAL_ADVERTISE_PEER_URLS="http://192.168.0.230:2380"
ETCD_INITIAL_CLUSTER="etcd1=http://192.168.0.229:2380,etcd2=http://192.168.0.230:2380,etcd3=http://192.168.0.231:2380"
ETCD_INITIAL_CLUSTER_STATE="new"
ETCD_INITIAL_CLUSTER_TOKEN="cn-cluster"
ETCD_ADVERTISE_CLIENT_URLS="http://192.168.0.230:2379"
EOF
在 ECS 3 上执行下述命令,完成配置 Patroni 节点 postgresql2:
cat > /etc/etcd/etcd.conf << EOF
ETCD_NAME=etcd3
ETCD_DATA_DIR="/var/lib/etcd"
ETCD_LISTEN_PEER_URLS="http://192.168.0.231:2380"
ETCD_LISTEN_CLIENT_URLS="http://127.0.0.1:2379,http://192.168.0.231:2379"
ETCD_INITIAL_ADVERTISE_PEER_URLS="http://192.168.0.231:2380"
ETCD_INITIAL_CLUSTER="etcd1=http://192.168.0.229:2380,etcd2=http://192.168.0.230:2380,etcd3=http://192.168.0.231:2380"
ETCD_INITIAL_CLUSTER_STATE="new"
ETCD_INITIAL_CLUSTER_TOKEN="cn-cluster"
ETCD_ADVERTISE_CLIENT_URLS="http://192.168.0.231:2379"
EOF
配置 service 并启动 etcd
这一步是为了配置由 systemd 管理 etcd,这样能实现开机自启动,并且在进程异常退出的时候能自动重启。
在前 3 个 ECS 实例上都执行以下命令。这里可以通过配置看出,使用的 etcd 配置文件是上一节中的:
cat > /usr/lib/systemd/system/etcd.service << EOF
[Unit]
Description=Etcd Server
After=network.target
After=network-online.target
Wants=network-online.target
[Service]
Type=notify
WorkingDirectory=/var/lib/etcd/
EnvironmentFile=-/etc/etcd/etcd.conf
User=postgres
# set GOMAXPROCS to number of processors
ExecStart=/bin/bash -c "GOMAXPROCS=$(nproc) /usr/bin/etcd"
Restart=on-failure
LimitNOFILE=65536
RestartSec=5s
StandardOutput=journal
StandardError=journal
[Install]
WantedBy=multi-user.target
EOF
在前 3 个实例上都执行以下命令,启动 etcd service:
sudo systemctl daemon-reload
sudo systemctl start etcd
sudo systemctl enable etcd
sudo systemctl status etcd
如果启动失败,可以尝试在前 3 个 ECS 实例均执行下述命令,然后再次尝试启动 service:
sudo systemctl stop etcd
sudo systemctl disable etcd
rm -rf /var/lib/etcd/member
可以通过下面两种命令观察 etcd 运行日志,排查错误:
sudo journalctl -u etcd -f
sudo journalctl -u etcd | less -R
检查状态
具体使用的命令会因为 etcd 版本、操作系统差异等有所不同。可执行以下命令:
etcdctl endpoint health --cluster
etcdctl cluster-health # 如果上一条命令报错,可以执行本命令。
etcdctl member list
参考输出如下:
root@iZt4n05e8zx8v2qpknl9iZ:/usr/lib/postgresql/14/bin# etcctl cluster-health
member a5bae218b8afbd0 is healthy: got healthy result from http://192.168.0.229:2379
member 25ea1034b7e68121 is healthy: got healthy result from http://192.168.0.230:2379
member f4c0e51251575a04 is healthy: got healthy result from http://192.168.0.231:2379
root@iZt4n05e8zx8v2qpknl9iZ:/usr/lib/postgresql/14/bin# etcctl member list
cluster is healthy
a5bae218b8afbd0: name=etcd1 peerURLs=http://192.168.0.229:2380 clientURLs=http://192.168.0.229:2379 isLeader=false
25ea1034b7e68121: name=etcd2 peerURLs=http://192.168.0.230:2380 clientURLs=http://192.168.0.230:2379 isLeader=true
f4c0e51251575a04: name=etcd3 peerURLs=http://192.168.0.231:2380 clientURLs=http://192.168.0.231:2379 isLeader=false
Citus 安装
执行以下命令为所有机器安装 Citus。由于我们的 PG 选择了 14 版本,这里 Citus 选择 postgresql-14-citus-12.1:
curl https://install.citusdata.com/community/deb.sh > add-citus-repo.sh
sudo bash add-citus-repo.sh
sudo apt-get -y install postgresql-14-citus-12.1
Patroni 安装部署
安装 Patroni
接下来在 6 台机器安装 patroni。使用 root 用户执行以下命令,安装、和:
pip3 install patroni
sudo apt-get install python3-psycopg2 -y
pip3 install patroni[etcd]
准备配置文件
在 6 台机器分别创建需要的目录和配置文件。配置文件将指明节点 1、2、3 构成一个高可用 CN,节点 4、5、6 构成一个高可用 DN。其中节点 1 是 CN primary 节点,节点 2、3 是 CN secondary 节点;节点 4 是 DN primary 节点,节点 5、6 是 DN secondary 节点。
- 在 6 个节点上均使用 root 用户执行以下命令,保证 postgres 用户可以使用目录 /var/lib/postgresql(该目录在安装 postgresql-14 时就已建立):
chown -R postgres:postgres /var/lib/postgresql
su - postgres
mkdir /var/lib/postgresql/etc
mkdir /var/lib/postgresql/log
- 在各台 ECS 编写好 Patroni 配置文件 。在 ECS 1 上用 postgres 用户执行下述命令:
cat > /var/lib/postgresql/etc/postgres-pg01.yml << EOF
scope: citus
namespace: /service/
name: postgresql0
restapi:
listen: 192.168.0.229:8008
connect_address: 192.168.0.229:8008
citus:
database: citus
group: 0
etcd3:
hosts:
- 192.168.0.229:2379
- 192.168.0.230:2379
- 192.168.0.231:2379
bootstrap:
dcs:
ttl: 30
loop_wait: 10
retry_timeout: 10
maximum_lag_on_failover: 1048576
postgresql:
use_pg_rewind: true
use_slots: true
parameters:
max_connections: 100
max_locks_per_transaction: 64
max_worker_processes: 8
port: 5432
wal_level: "logical"
citus.node_conninfo: "sslmode=disable"
citus.replication_model: "streaming"
citus.task_assignment_policy: "round-robin"
wal_keep_segments: 1000
max_wal_senders: 64
max_replication_slots: 64
wal_log_hints: "on"
max_prepared_transactions: "100"
hot_standby: "on"
listen_addresses: "*"
initdb:
- encoding: UTF8
- data-checksums
pg_hba:
- host replication replicator 0.0.0.0/0 trust
- host citus postgres 0.0.0.0/0 trust
- host postgres postgres 0.0.0.0/0 trust
users:
admin:
password: adminpassword
options:
- createrole
- createdb
postgresql:
listen: 0.0.0.0:5432
connect_address: 192.168.0.229:5432 # 替换为实际的IP地址
data_dir: /var/lib/postgresql/pg-14
pgpass: /tmp/pgpass0
bin_dir: /usr/lib/postgresql/14/bin/
authentication:
superuser:
username: postgres
password: yourpassword
replication:
username: replicator
password: pg_rep
parameters:
unix_socket_directories: '/tmp'
tags:
nofailover: false
noloadbalance: false
clonefrom: false
nosync: false
EOF
该配置文件中几个重要配置参数解释如下:
- scope :要求整个 Citus 集群中的所有 PG 实例相同,用于标识自己是某个 Citus 集群的一部分。该名称不一定要是 citus,只需要整个 Citus 分布式集群中的所有 PG 实例(包括 CN primary、CN secondary、DN primary、DN secondary 等)相同即可;
- namespace + name:构成了 scope 内唯一的 PG 节点身份标识;
- restapi.connection_address :代表其他节点上的 Patroni 进程如果想访问本节点 Patroni 进程,应该以什么 IP 和 port 来连接(因为不同的 Patroni 进程是需要交换同步各自的状态信息的,需要互相通讯)。由于不同节点在不同主机上,此处的 ip 不能写 127.0.0.1,应当写本节点内网 IP(如果其他 Patroni 进程所在机器跟本机器在同一内网) 或公网 IP;
- restapi.listen: 代表当前 Patroni 所在节点会监听哪个端口,以及监听哪些源 IP 打过来的访问请求。当前配置为接受本地 IP 的访问请求,因此 IP 写本机内网 IP;
- postgrsql.connection_address: 代表其他节点如果想访问本节点 PG,应该以什么 IP 和 port 来连接。由于不同节点在不同主机上,这里的 ip 不能写 127.0.0.1,应当写本节点所在的宿主机 IP;
- postgresql.listen: 代表当前 PG 所在节点会监听哪个端口,以及监听哪些源 IP 打过来的访问请求。当前配置为接受所有 IP 的访问请求,因此 IP 写 0.0.0.0;监听端口为容器的 5432 端口;
- citus.group: 用于指定 Citus 节点的 groupid,若是 CN 节点则该值为 0,若是 DN 节点,则该值为大于等于 1 的正整数。同一 group 的节点将属于同一 CN 或 DN,例如若有三个节点的 citus.group 都指定为 0,这标志着 Citus 的 CN 节点将会有 3 个 PG 实例组成三副本高可用集群。这些节点的角色会被自动调整为 Leader 或 Quorum Standby,在本文示例中会形成 1 Leader 2 Quorum Standby 的高可用集群。更多有关 quorum-based replication 的机制可参考 https://www.modb.pro/db/93928。
同理,在 ECS 2 上执行下述命令:
cat > /var/lib/postgresql/etc/postgres-pg01.yml << EOF
scope: citus
namespace: /service/
name: postgresql1
restapi:
listen: 192.168.0.230:8008
connect_address: 192.168.0.230:8008
citus:
database: citus
group: 0
etcd3:
hosts:
- 192.168.0.229:2379
- 192.168.0.230:2379
- 192.168.0.231:2379
bootstrap:
dcs:
ttl: 30
loop_wait: 10
retry_timeout: 10
maximum_lag_on_failover: 1048576
postgresql:
use_pg_rewind: true
use_slots: true
parameters:
max_connections: 100
max_locks_per_transaction: 64
max_worker_processes: 8
port: 5432
wal_level: "logical"
shared_preload_libraries: "citus"
citus.node_conninfo: "sslmode=disable"
citus.replication_model: "streaming"
citus.task_assignment_policy: "round-robin"
wal_keep_segments: 1000
max_wal_senders: 64
max_replication_slots: 64
wal_log_hints: "on"
max_prepared_transactions: "100"
hot_standby: "on"
listen_addresses: "*"
initdb:
- encoding: UTF8
- data-checksums
pg_hba:
- host replication replicator 0.0.0.0/0 trust
- host citus postgres 0.0.0.0/0 trust
- host postgres postgres 0.0.0.0/0 trust
users:
admin:
password: adminpassword
options:
- createrole
- createdb
postgresql:
listen: 0.0.0.0:5432
connect_address: 192.168.0.230:5432 # 替换为实际的IP地址
data_dir: /var/lib/postgresql/pg-14
pgpass: /tmp/pgpass0
bin_dir: /usr/lib/postgresql/14/bin/
authentication:
superuser:
username: postgres
password: yourpassword
replication:
username: replicator
password: pg_rep
parameters:
unix_socket_directories: '/tmp'
tags:
nofailover: false
noloadbalance: false
clonefrom: false
nosync: false
EOF
在 ECS 3 上执行下述命令:
cat > /var/lib/postgresql/etc/postgres-pg01.yml << EOF
scope: citus
namespace: /service/
name: postgresql2
restapi:
listen: 192.168.0.231:8008
connect_address: 192.168.0.231:8008
citus:
database: citus
group: 0
etcd3:
hosts:
- 192.168.0.229:2379
- 192.168.0.230:2379
- 192.168.0.231:2379
bootstrap:
dcs:
ttl: 30
loop_wait: 10
retry_timeout: 10
maximum_lag_on_failover: 1048576
postgresql:
use_pg_rewind: true
use_slots: true
parameters:
max_connections: 100
max_locks_per_transaction: 64
max_worker_processes: 8
port: 5432
wal_level: "logical"
citus.node_conninfo: "sslmode=disable"
citus.replication_model: "streaming"
citus.task_assignment_policy: "round-robin"
wal_keep_segments: 1000
max_wal_senders: 64
max_replication_slots: 64
wal_log_hints: "on"
max_prepared_transactions: "100"
hot_standby: "on"
listen_addresses: "*"
initdb:
- encoding: UTF8
- data-checksums
pg_hba:
- host replication replicator 0.0.0.0/0 trust
- host citus postgres 0.0.0.0/0 trust
- host postgres postgres 0.0.0.0/0 trust
users:
admin:
password: adminpassword
options:
- createrole
- createdb
postgresql:
listen: 0.0.0.0:5432
connect_address: 192.168.0.231:5432 # 替换为实际的IP地址
data_dir: /var/lib/postgresql/pg-14
pgpass: /tmp/pgpass0
bin_dir: /usr/lib/postgresql/14/bin/
authentication:
superuser:
username: postgres
password: yourpassword
replication:
username: replicator
password: pg_rep
parameters:
unix_socket_directories: '/tmp'
tags:
nofailover: false
noloadbalance: false
clonefrom: false
nosync: false
EOF
在 ECS 4 上执行下述命令:
cat > /var/lib/postgresql/etc/postgres-pg01.yml << EOF
scope: citus
namespace: /service/
name: postgresql3
restapi:
listen: 192.168.0.232:8008
connect_address: 192.168.0.232:8008
citus:
database: citus
group: 1
etcd3:
hosts:
- 192.168.0.229:2379
- 192.168.0.230:2379
- 192.168.0.231:2379
bootstrap:
dcs:
ttl: 30
loop_wait: 10
retry_timeout: 10
maximum_lag_on_failover: 1048576
postgresql:
use_pg_rewind: true
use_slots: true
parameters:
max_connections: 100
max_locks_per_transaction: 64
max_worker_processes: 8
port: 5432
wal_level: "logical"
citus.node_conninfo: "sslmode=disable"
citus.replication_model: "streaming"
citus.task_assignment_policy: "round-robin"
wal_keep_segments: 1000
max_wal_senders: 64
max_replication_slots: 64
wal_log_hints: "on"
max_prepared_transactions: "100"
hot_standby: "on"
listen_addresses: "*"
initdb:
- encoding: UTF8
- data-checksums
pg_hba:
- host replication replicator 0.0.0.0/0 trust
- host citus postgres 0.0.0.0/0 trust
- host postgres postgres 0.0.0.0/0 trust
users:
admin:
password: adminpassword
options:
- createrole
- createdb
postgresql:
listen: 0.0.0.0:5432
connect_address: 192.168.0.232:5432 # 替换为实际的IP地址
data_dir: /var/lib/postgresql/pg-14
pgpass: /tmp/pgpass0
bin_dir: /usr/lib/postgresql/14/bin/
authentication:
superuser:
username: postgres
password: yourpassword
replication:
username: replicator
password: pg_rep
parameters:
unix_socket_directories: '/tmp'
tags:
nofailover: false
noloadbalance: false
clonefrom: false
nosync: false
EOF
在 ECS 5 上执行下述命令:
cat > /var/lib/postgresql/etc/postgres-pg01.yml << EOF
scope: citus
namespace: /service/
name: postgresql4
restapi:
listen: 192.168.0.233:8008
connect_address: 192.168.0.233:8008
citus:
database: citus
group: 1
etcd3:
hosts:
- 192.168.0.229:2379
- 192.168.0.230:2379
- 192.168.0.231:2379
bootstrap:
dcs:
ttl: 30
loop_wait: 10
retry_timeout: 10
maximum_lag_on_failover: 1048576
postgresql:
use_pg_rewind: true
use_slots: true
parameters:
max_connections: 100
max_locks_per_transaction: 64
max_worker_processes: 8
port: 5432
wal_level: "logical"
citus.node_conninfo: "sslmode=disable"
citus.replication_model: "streaming"
citus.task_assignment_policy: "round-robin"
wal_keep_segments: 1000
max_wal_senders: 64
max_replication_slots: 64
wal_log_hints: "on"
max_prepared_transactions: "100"
hot_standby: "on"
listen_addresses: "*"
initdb:
- encoding: UTF8
- data-checksums
pg_hba:
- host replication replicator 0.0.0.0/0 trust
- host citus postgres 0.0.0.0/0 trust
- host postgres postgres 0.0.0.0/0 trust
users:
admin:
password: adminpassword
options:
- createrole
- createdb
postgresql:
listen: 0.0.0.0:5432
connect_address: 192.168.0.233:5432 # 替换为实际的IP地址
data_dir: /var/lib/postgresql/pg-14
pgpass: /tmp/pgpass0
bin_dir: /usr/lib/postgresql/14/bin/
authentication:
superuser:
username: postgres
password: yourpassword
replication:
username: replicator
password: pg_rep
parameters:
unix_socket_directories: '/tmp'
tags:
nofailover: false
noloadbalance: false
clonefrom: false
nosync: false
EOF
在 ECS 6 上执行下述命令:
cat > /var/lib/postgresql/etc/postgres-pg01.yml << EOF
scope: citus
namespace: /service/
name: postgresql5
restapi:
listen: 192.168.0.234:8008
connect_address: 192.168.0.234:8008
citus:
database: citus
group: 1
etcd3:
hosts:
- 192.168.0.229:2379
- 192.168.0.230:2379
- 192.168.0.231:2379
bootstrap:
dcs:
ttl: 30
loop_wait: 10
retry_timeout: 10
maximum_lag_on_failover: 1048576
postgresql:
use_pg_rewind: true
use_slots: true
parameters:
max_connections: 100
max_locks_per_transaction: 64
max_worker_processes: 8
port: 5432
wal_level: "logical"
citus.node_conninfo: "sslmode=disable"
citus.replication_model: "streaming"
citus.task_assignment_policy: "round-robin"
wal_keep_segments: 1000
max_wal_senders: 64
max_replication_slots: 64
wal_log_hints: "on"
max_prepared_transactions: "100"
hot_standby: "on"
listen_addresses: "*"
initdb:
- encoding: UTF8
- data-checksums
pg_hba:
- host replication replicator 0.0.0.0/0 trust
- host citus postgres 0.0.0.0/0 trust
- host postgres postgres 0.0.0.0/0 trust
users:
admin:
password: adminpassword
options:
- createrole
- createdb
postgresql:
listen: 0.0.0.0:5432
connect_address: 192.168.0.234:5432 # 替换为实际的IP地址
data_dir: /var/lib/postgresql/pg-14
pgpass: /tmp/pgpass0
bin_dir: /usr/lib/postgresql/14/bin/
authentication:
superuser:
username: postgres
password: yourpassword
replication:
username: replicator
password: pg_rep
parameters:
unix_socket_directories: '/tmp'
tags:
nofailover: false
noloadbalance: false
clonefrom: false
nosync: false
EOF
启动 Patroni
由于先前安装了 postgresql-14,默认会在本地启动一个 PG 占用 5432 端口。如果 ECS 实例上已有 PG 实例在运行,注意要先清理,否则 5432 端口会被占用。可以通过以下命令清理,或自行 ps -ef 寻找并杀死。
ps -ef | grep postgresql | grep -v grep | awk '{print $2}' | xargs -n 1 kill
在六台 ECS 上分别启动 patroni 进程,观察进程是否正常运行,如果异常退出可以在文件中分析原因。
su - postgres # 如果已经在 postgres 用户则不要执行此命令
patroni /var/lib/postgresql/etc/postgres-pg01.yml > /var/lib/postgresql/log/patroni.log 2>&1 &
校验集群状态
查看 pg_dist_node 系统表——在任一 ECS 实例上执行下面的命令登录数据库,开启 psql 会话:
/usr/lib/postgresql/14/bin/psql -h localhost -p 5432 -U postgres -d citus
在 psql 会话中,查询 Citus 集群拓扑(查询 pg_dist_node 系统表):
SELECT * FROM pg_dist_node;
参考输出如下:
citus=# SELECT * FROM pg_dist_node;
nodeid | groupid | nodename | nodeport | noderack | hasmetadata | isactive | noderole | nodecluster | metadatasynced | shouldhaveshards
--------+---------+---------------+----------+----------+-------------+----------+----------+-------------+----------------+-----------------
1 | 0 | 192.168.0.229 | 5432 | default | t | t | primary | default | t | f
2 | 0 | 192.168.0.230 | 5432 | default | t | t | secondary| default | t | f
3 | 0 | 192.168.0.231 | 5432 | default | t | t | secondary| default | t | f
4 | 1 | 192.168.0.232 | 5432 | default | t | t | primary | default | t | t
5 | 1 | 192.168.0.233 | 5432 | default | f | t | secondary| default | f | t
6 | 1 | 192.168.0.234 | 5432 | default | f | t | secondary| default | f | t
(6 rows)
查看 Patroni 集群状态。各 Group 内部应当有一个 Leader 和多个 Quorum Standby,且 TL 值在 Group 内部应当完全相同,集群才算进入了稳定正确的状态。
patronictl -c /var/lib/postgresql/etc/postgres-pg01.yml topology
patronictl -c /var/lib/postgresql/etc/postgres-pg01.yml list
参考输出如下:
+ Citus cluster: citus -+-----------------+------------------+-------------+----+-----------+
| Group | Member | Host | Role | State | TL | Lag in MB |
|-------|---------------|-----------------|------------------|-------------|----|-----------|
| 0 | postgresql0 | 192.168.0.229 | Leader | running | 1 | |
| 0 | + postgresql1 | 192.168.0.230 | Quorum Standby | streaming | 1 | 0 |
| 0 | + postgresql2 | 192.168.0.231 | Quorum Standby | streaming | 1 | 0 |
| 1 | postgresql3 | 192.168.0.232 | Leader | running | 1 | |
| 1 | + postgresql4 | 192.168.0.233 | Quorum Standby | streaming | 1 | 0 |
| 1 | + postgresql5 | 192.168.0.234 | Quorum Standby | streaming | 1 | 0 |
+-------+---------------+-----------------+------------------+-------------+----+-----------+
+ Citus cluster: citus -+-----------------+------------------+-------------+----+-----------+
| Group | Member | Host | Role | State | TL | Lag in MB |
|-------|---------------|-----------------|------------------|-------------|----|-----------|
| 0 | postgresql0 | 192.168.0.229 | Leader | running | 1 | |
| 0 | postgresql1 | 192.168.0.230 | Quorum Standby | streaming | 1 | 0 |
| 0 | postgresql2 | 192.168.0.231 | Quorum Standby | streaming | 1 | 0 |
| 1 | postgresql3 | 192.168.0.232 | Leader | running | 1 | |
| 1 | postgresql4 | 192.168.0.233 | Quorum Standby | streaming | 1 | 0 |
| 1 | postgresql5 | 192.168.0.234 | Quorum Standby | streaming | 1 | 0 |
+-------+---------------+-----------------+------------------+-------------+----+-----------+
Patroni 运维
主备切换
这里以对 DN 执行主备切换为例,在六台中任意一台 ECS 实例上,用 postgres 用户执行如下命令:
patronictl -c /var/lib/postgresql/etc/postgres-pg01.yml switchover
执行上述命令后会进入交互式命令行。其中 Citus group 填写 1 用于指定哪个 Citus 节点进行主备切换,groupid 为 0 表示要主备切换 CN,groupid 为其他值标识您要执行主备切换的 DN。Candidate 表明你想在主备切换后选择哪个 PG 实例作为 Leader。参考输出如下:
postgres@iZt4n6zjeia139k9wky0l1Z:~$ patronictl -c /var/lib/postgresql/etc/postgres-pg01.yml switchover
Current cluster topology
+ Citus cluster: citus ---------------+----------------+-----------+----+-----------+
| Group | Member | Host | Role | State | TL | Lag in MB |
|-------|-------------|---------------|----------------|-----------|----|-----------|
| 0 | postgresql0 | 192.168.0.229 | Leader | running | 1 | |
| 0 | postgresql1 | 192.168.0.230 | Quorum Standby | streaming | 1 | 0 |
| 0 | postgresql2 | 192.168.0.231 | Quorum Standby | streaming | 1 | 0 |
| 1 | postgresql3 | 192.168.0.232 | Leader | running | 1 | |
| 1 | postgresql4 | 192.168.0.233 | Quorum Standby | streaming | 1 | 0 |
| 1 | postgresql5 | 192.168.0.234 | Quorum Standby | streaming | 1 | 0 |
+-------+-------------+---------------+----------------+-----------+----+-----------+
Citus group: 1
Primary [postgresql3]:
Candidate ['postgresql4', 'postgresql5'] []: postgresql4
When should the switchover take place (e.g. 2025-02-14T12:19) [now]:
Are you sure you want to switchover cluster citus, demoting current leader postgresql3? [y/N]: y
2025-02-14 11:19:16.75610 Successfully switched over to "postgresql4"
+ Citus cluster: citus (group: 1, 7471107500721613600) --+----+-----------+
| Member | Host | Role | State | TL | Lag in MB |
|-------------|---------------|----------------|---------|----|-----------|
| postgresql3 | 192.168.0.232 | Replica | stopped | | unknown |
| postgresql4 | 192.168.0.233 | Leader | running | 1 | |
| postgresql5 | 192.168.0.234 | Quorum Standby | running | 1 | 0 |
+-------------+---------------+----------------+---------+----+-----------+
在任意一台 ECS 上执行以下命令,查看集群状态:
patronictl -c /var/lib/postgresql/etc/postgres-pg01.yml topology
最终,通过如下参考输出可以看到 DN1 Leader 成功切到了 postgresql 4:
postgres@iZt4n6zjeia139k9wky0l1Z:~$ patronictl -c /var/lib/postgresql/etc/postgres-pg01.yml topology
+ Citus cluster: citus -+---------------+----------------+-------------+----+-----------+
| Group | Member | Host | Role | State | TL | Lag in MB |
|-------|---------------|---------------|----------------|-------------|----|-----------|
| 0 | postgresql0 | 192.168.0.229 | Leader | running | 1 | |
| 0 | + postgresql1 | 192.168.0.230 | Quorum Standby | streaming | 1 | 0 |
| 0 | + postgresql2 | 192.168.0.231 | Quorum Standby | streaming | 1 | 0 |
| 1 | postgresql4 | 192.168.0.233 | Leader | running | 2 | |
| 1 | + postgresql3 | 192.168.0.232 | Quorum Standby | streaming | 2 | 0 |
| 1 | + postgresql5 | 192.168.0.234 | Quorum Standby | streaming | 2 | 0 |
+-------+---------------+---------------+----------------+-------------+----+-----------+
其他运维
后续可以使用 patronictl 命令来运维数据库,比如修改配置、重启数据库节点、主备切换等操作。具体可参考 Patroni 官方文档 Introduction — Patroni 4.0.4 documentation。
触发主备切换的命令:failover/switchover
patronictl -c /var/lib/postgresql/etc/postgres-pg01.yml failover
patronictl -c /var/lib/postgresql/etc/postgres-pg01.yml switchover
从分布式 Citus 集群中移除 CN/DN 节点:
# 先杀死各个 CN 或 DN 的 patroni 进程。
# 然后,执行以下两个命令,从 Patroni 元数据中移除 CN 或 DN 节点。
patronictl -c /var/lib/postgresql/etc/postgres-pg01.yml remove citus --group 0 # 移除 CN
patronictl -c /var/lib/postgresql/etc/postgres-pg01.yml remove citus --group 1 # 移除 DN
如果要重新搭建 patroni 集群,切记将各个节点旧的 data 目录删除。
rm -rf /var/lib/postgresql/pg-14
总结
本文简单介绍了通过 Patroni 搭建 PG-14 + Citus 高可用分布式集群,如果希望在本文基础上做更多高可用方面的测试,建议根据需要对文中的配置进行调整。
