



➜ spring-boot-starters git:(2.0.x) tree -L 1.├── README.adoc├── pom.xml├── spring-boot-starter├── spring-boot-starter-activemq├── spring-boot-starter-actuator├── spring-boot-starter-amqp├── spring-boot-starter-aop├── spring-boot-starter-artemis├── spring-boot-starter-batch├── spring-boot-starter-cache├── spring-boot-starter-cloud-connectors├── spring-boot-starter-data-cassandra├── spring-boot-starter-data-cassandra-reactive├── spring-boot-starter-data-couchbase├── spring-boot-starter-data-couchbase-reactive├── spring-boot-starter-data-elasticsearch├── spring-boot-starter-data-jpa├── spring-boot-starter-data-ldap├── spring-boot-starter-data-mongodb├── spring-boot-starter-data-mongodb-reactive├── spring-boot-starter-data-neo4j├── spring-boot-starter-data-redis├── spring-boot-starter-data-redis-reactive├── spring-boot-starter-data-rest├── spring-boot-starter-data-solr├── spring-boot-starter-freemarker├── spring-boot-starter-groovy-templates├── spring-boot-starter-hateoas├── spring-boot-starter-integration├── spring-boot-starter-jdbc├── spring-boot-starter-jersey├── spring-boot-starter-jetty├── spring-boot-starter-jooq├── spring-boot-starter-json├── spring-boot-starter-jta-atomikos├── spring-boot-starter-jta-bitronix├── spring-boot-starter-jta-narayana├── spring-boot-starter-log4j2├── spring-boot-starter-logging├── spring-boot-starter-mail├── spring-boot-starter-mustache├── spring-boot-starter-parent├── spring-boot-starter-quartz├── spring-boot-starter-reactor-netty├── spring-boot-starter-security├── spring-boot-starter-test├── spring-boot-starter-thymeleaf├── spring-boot-starter-tomcat├── spring-boot-starter-undertow├── spring-boot-starter-validation├── spring-boot-starter-web├── spring-boot-starter-web-services├── spring-boot-starter-webflux├── spring-boot-starter-websocket└── src
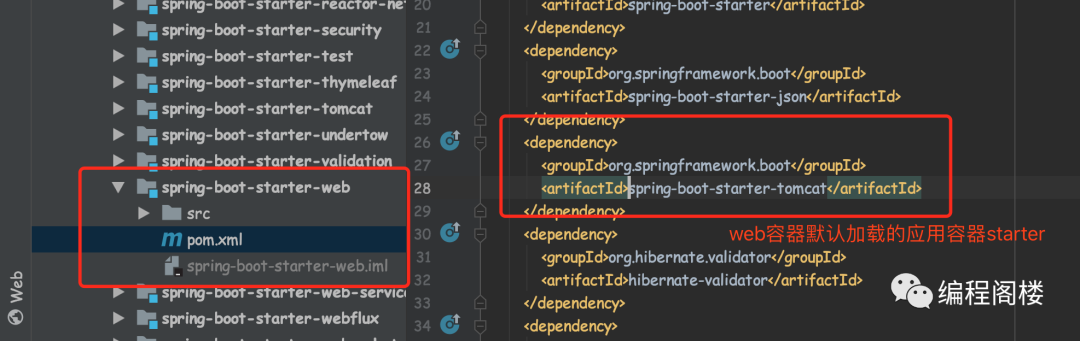
可以看到,几乎所有常用的功能或中间件都已经被官方设计成了starter。这些starter组件随着spring boot容器启动按需装配,如果我们不显示配置则默认采用官方定义配置,例如应用部署容器默认启动的就是spring-boot-starter-tomcat。
自动配置文件,根据classpath是否存在指定的类来决定是否要执行该功能的自动配置 spring.factories,spring boot启动时通过SPI机制查找和自动装配 endpoint:该插件的查询、管理功能接口(可选) health indicator:该starter提供的服务的健康指标(可选)
# 题外话(非本次重点)在应用程序启动过程中,Spring Boot使用SpringFactoriesLoader类加载器查找org.springframework.boot.autoconfigure.EnableAutoConfiguration关键字对应的Java配置文件。Spring Boot会遍历所有META-INF目录下的spring.factories文件,构建成一个配置文件链表。除了EnableAutoConfiguration关键字对应的配置文件,还有其他类型的配置文件,如:- org.springframework.context.ApplicationContextInitializer- org.springframework.context.ApplicationListener- org.springframework.boot.SpringApplicationRunListener- org.springframework.boot.env.PropertySourceLoader- org.springframework.boot.autoconfigure.template.TemplateAvailabilityProvider- org.springframework.test.contex.TestExecutionListener
03. 案例说明
➜ spring-boot-starter-sensitive git:(master) tree.├── pom.xml├── spring-boot-starter-sensitive.iml└── src│ ├── main│ │ ├── java│ │ │ └── cn│ │ │ └── gov│ │ │ └── zcy│ │ │ └── sensitive│ │ │ ├── HttpFileKWSeekerProcessor.java│ │ │ ├── KWSeekerAutoConfigration.java│ │ │ ├── SeekerFactory.java│ │ │ ├── SimpleKWSeekerProcessor.java│ │ │ ├── conf│ │ │ │ ├── Config.java│ │ │ │ └── SensitiveConfigProperties.java│ │ │ ├── core│ │ │ │ ├── KWSeeker.java│ │ │ │ └── KWSeekerManage.java│ │ │ ├── model│ │ │ │ ├── KeyWord.java│ │ │ │ └── SensitiveWordResult.java│ │ │ ├── processor│ │ │ │ ├── AbstractFragment.java│ │ │ │ ├── AdaptiveProcessor.java│ │ │ │ ├── HTMLFragment.java│ │ │ │ ├── IgnoreFragment.java│ │ │ │ ├── Processor.java│ │ │ │ └── WordFinder.java│ │ │ └── util│ │ │ ├── AnalysisUtil.java│ │ │ ├── EmojiUtil.java│ │ │ └── EndTagUtil.java│ │ └── resources│ │ ├── sensitive-word-single.properties│ │ └── sensitive-word.properties│ │ └── META-INF│ │ └── spring.factories│ └── test│ └── java│ ├── KWSeekerManageTest.java│ └── KwSeekerManageOSSTest.java
# Auto Configureorg.springframework.boot.autoconfigure.EnableAutoConfiguration=\cn.gov.zcy.web.security.sensitive.SensitiveFilterConfig,\cn.gov.zcy.web.security.sensitive.RuleAutoConfig
@Configuration@Slf4jpublic class SensitiveFilterConfig {/*** 默认关闭脱敏插件* */@Value("${security.filter.sensitive.enable:false}")private String sensitiveFilterEnable;@Autowiredprivate RuleProperties ruleProperties;@Bean@ConditionalOnProperty(prefix = "security.filter.sensitive", name = "enable", havingValue = "true") // #1 当security.filter.sensitive.enable = true时才进行bean装配public FilterRegistrationBean filterRegistrationBean() {Set<String> urlPatterns = new HashSet<>();for (Rule rule : ruleProperties.getRules()) {urlPatterns.add(rule.getUrlPatterns()==null?"/*":rule.getUrlPatterns());}String[] patternArray = new String[urlPatterns.size()];ObjectMapper mapper = new ObjectMapper();FilterRegistrationBean registration = new FilterRegistrationBean();try {registration.setFilter(sensitiveResponseFilter());registration.addUrlPatterns(urlPatterns.toArray(patternArray));// #2 设置filter参数,传递到具体的SensitiveResponseFilter类实例中进行使用registration.addInitParameter("enable", sensitiveFilterEnable);registration.addInitParameter("rules", mapper.writeValueAsString(ruleProperties.getRules()));registration.setName("sensitiveResponseFilter");} catch (JsonProcessingException e) {log.error("Registrat filter throw exception: {}", Throwables.getStackTraceAsString(e));}return registration;}/*** 创建一个bean* @return*/@Bean(name = "sensitiveResponseFilter")public Filter sensitiveResponseFilter() {return new SensitiveResponseFilter();}}@Configuration@EnableConfigurationProperties(RuleProperties.class) // #3 定义配置属性,最终配置内容会被包装成#4public class RuleAutoConfig {}
@Data@ConfigurationProperties(prefix = RuleProperties.SENSITIVE_PREFIX)public class RuleProperties {public final static String SENSITIVE_PREFIX = "security.filter.sensitive";// #4 配置属性包装类private List<Rule> rules = new ArrayList<>();}
以上代码已经对核心的地方#1 #2 #3 #4 进行了注释说明,理解起来还是比较简单的。
#1 设置条件加载,当security.filter.sensitive.enable = true时才进行bean装配 #2 透传filter参数,传递到具体的SensitiveResponseFilter类实例中进行使用,因为本例中的SensitiveResponseFilter是servlet filter,并非spring容器管理的bean,无法通过@Autowired方式注入 #3 定义本插件配置属性,最终配置内容会被包装成@ConfigurationProperties注解类中的具体属性 #4 属性包装类
# 题外话# @Configuration注解类被容器哪个实现类进行扫描,根据应用类型进行确定的,具体使用AnnotationConfigApplicationContext还是AnnotationConfigWebApplicationContext,spring容器启动时要进行应用类型判断后进行选择。当容器中存在javax.servlet.Servlet或org.springframework.web.context.ConfigurableWebApplicationContext实现时判定为servlet容器,即web应用this.webApplicationType = deduceWebApplicationType();private WebApplicationType deduceWebApplicationType() {if (ClassUtils.isPresent(REACTIVE_WEB_ENVIRONMENT_CLASS, null)&& !ClassUtils.isPresent(MVC_WEB_ENVIRONMENT_CLASS, null)) {return WebApplicationType.REACTIVE;}for (String className : WEB_ENVIRONMENT_CLASSES) {if (!ClassUtils.isPresent(className, null)) {return WebApplicationType.NONE;}}return WebApplicationType.SERVLET;}private static final String[] WEB_ENVIRONMENT_CLASSES = { "javax.servlet.Servlet","org.springframework.web.context.ConfigurableWebApplicationContext" };
文章转载自编程阁楼,如果涉嫌侵权,请发送邮件至:contact@modb.pro进行举报,并提供相关证据,一经查实,墨天轮将立刻删除相关内容。
