


导读:

[root@instance2 ~]#
[root@instance2 ~]# cat etc/redhat-release
CentOS Linux release 7.4.1708 (Core)
[root@instance2 ~]#
[root@instance2 ~]# cat proc/cpuinfo | grep name | cut -f2 -d: | uniq -c
      8  Intel(R) Xeon(R) Gold 5118 CPU @ 2.30GHz
[root@instance2 ~]# free -h
              total        used        free      shared  buff/cache   available
Mem:            31G         14G        6.3G        676K         10G         16G
Swap:            0B          0B          0B
[root@instance2 ~]# df -Th
Filesystem                      Type      Size  Used Avail Use% Mounted on
/dev/mapper/centos_caip122-root ext4       42G   27G   13G  68%
devtmpfs                        devtmpfs   16G     0   16G   0% dev
tmpfs                           tmpfs      16G     0   16G   0% dev/shm
tmpfs                           tmpfs      16G  676K   16G   1% run
tmpfs                           tmpfs      16G     0   16G   0% sys/fs/cgroup
/dev/sda2                       ext4      190M   93M   83M  53% boot
/dev/sdc1                       xfs       100G  103M  100G   1% redo
/dev/sdb1                       xfs       100G   41G   60G  41% data
[root@instance2 ~]# yum install -y epel-release
Loaded plugins: fastestmirror
Could not retrieve mirrorlist http://mirrorlist.centos.org/?release=7&arch=x86_64&repo=os&infra=stock error was
14: curl#7 - "Failed to connect to 2600:1f16:c1:5e01:4180:6610:5482:c1c0: Network is unreachable"
base                                                                                                     | 3.6 kB  00:00:00
epel/x86_64/metalink                                                                                     | 4.7 kB  00:00:00
Could not retrieve mirrorlist http://mirrorlist.centos.org/?release=7&arch=x86_64&repo=extras&infra=stock error was
14: curl#7 - "Failed to connect to 2600:1f16:c1:5e01:4180:6610:5482:c1c0: Network is unreachable"
extras                                                                                                   | 2.9 kB  00:00:00
mysql-connectors-community                                                                               | 2.6 kB  00:00:00
mysql-tools-community                                                                                    | 2.6 kB  00:00:00
mysql57-community                                                                                        | 2.6 kB  00:00:00
Could not retrieve mirrorlist http://mirrorlist.centos.org/?release=7&arch=x86_64&repo=updates&infra=stock error was
14: curl#7 - "Failed to connect to 2600:1f16:c1:5e01:4180:6610:5482:c1c0: Network is unreachable"
updates                                                                                                  | 2.9 kB  00:00:00
Determining fastest mirrors
 * base: mirrors.bupt.edu.cn
 * epel: repo.jing.rocks
 * extras: mirrors.bupt.edu.cn
 * updates: mirrors.bupt.edu.cn
Package epel-release-7-14.noarch already installed and latest version
Nothing to do
[root@instance2 ~]#
[root@instance2 ~]# yum install -y wget curl tar gcc make cmake openssl-devel python3-devel
Loaded plugins: fastestmirror
Loading mirror speeds from cached hostfile
 * base: mirrors.bupt.edu.cn
 * epel: repo.jing.rocks
 * extras: mirrors.bupt.edu.cn
 * updates: mirrors.bupt.edu.cn
Package wget-1.14-18.el7_6.1.x86_64 already installed and latest version
Package gcc-4.8.5-44.el7.x86_64 already installed and latest version
Package 1:openssl-devel-1.0.2k-26.el7_9.x86_64 already installed and latest version
Resolving Dependencies
//Centos 7
https://oss-cdn.nebula-graph.com.cn/package/<release_version>/nebula-graph-<release_version>.el7.x86_64.rpm
wget https://oss-cdn.nebula-graph.com.cn/package/3.8.0/nebula-graph-3.8.0.ubuntu1804.amd64.deb

wget https://oss-cdn.nebula-graph.com.cn/package/3.8.0/nebula-graph-3.8.0.ubuntu1804.amd64.deb.sha256sum.txt
[root@instance2 soft]# wget https://oss-cdn.nebula-graph.com.cn/package/3.8.0/nebula-graph-3.8.0.el7.x86_64.rpm
--2025-01-07 14:07:36--  https://oss-cdn.nebula-graph.com.cn/package/3.8.0/nebula-graph-3.8.0.el7.x86_64.rpm
Resolving oss-cdn.nebula-graph.com.cn (oss-cdn.nebula-graph.com.cn)... 220.181.166.204
Connecting to oss-cdn.nebula-graph.com.cn (oss-cdn.nebula-graph.com.cn)|220.181.166.204|:443... connected.
HTTP request sent, awaiting response... 200 OK
Length: 64791652 (62M) [application/x-redhat-package-manager]
Saving to: ‘nebula-graph-3.8.0.el7.x86_64.rpm’

100%[======================================================================================>] 64,791,652  7.54MB/s   in 10s

2025-01-07 14:07:46 (6.12 MB/s) - ‘nebula-graph-3.8.0.el7.x86_64.rpm’ saved [64791652/64791652]

[root@instance2 soft]# wget https://oss-cdn.nebula-graph.com.cn/package/3.8.0/nebula-graph-3.8.0.el7.x86_64.rpm.sha256sum.txt
--2025-01-07 14:08:06--  https://oss-cdn.nebula-graph.com.cn/package/3.8.0/nebula-graph-3.8.0.el7.x86_64.rpm.sha256sum.txt
Resolving oss-cdn.nebula-graph.com.cn (oss-cdn.nebula-graph.com.cn)... 220.181.166.204
Connecting to oss-cdn.nebula-graph.com.cn (oss-cdn.nebula-graph.com.cn)|220.181.166.204|:443... connected.
HTTP request sent, awaiting response... 200 OK
Length: 125 [text/plain]
Saving to: ‘nebula-graph-3.8.0.el7.x86_64.rpm.sha256sum.txt’

100%[======================================================================================>] 125         --.-K/s   in 0s

2025-01-07 14:08:06 (923 KB/s) - ‘nebula-graph-3.8.0.el7.x86_64.rpm.sha256sum.txt’ saved [125/125]

[root@instance2 soft]#
[root@instance2 opt]# mkdir -p app/nebula-graph
[root@instance2 opt]# cd app/nebula-graph/
[root@instance2 nebula-graph]# pwd
/opt/app/nebula-graph
[root@instance2 nebula-graph]#
[root@instance2 soft]# ls
nebula-graph-3.8.0.el7.x86_64.rpm  nebula-graph-3.8.0.el7.x86_64.rpm.sha256sum.txt  openssh-rpms
[root@instance2 soft]# rpm -ivh --prefix=/opt/app/nebula-graph nebula-graph-3.8.0.el7.x86_64.rpm
Preparing...                          ################################# [100%]
Updating  installing...
   1:nebula-graph-3.8.0-1             ################################# [100%]
[root@instance2 soft]#
sudo rpm -ivh nebula-graph-3.8.0.el7.x86_64.rpm
[root@instance2 opt]# cd app/nebula-graph/
[root@instance2 nebula-graph]# ls
bin  etc  scripts  share
[root@instance2 nebula-graph]# cd etc/
[root@instance2 etc]# ls
nebula-graphd.conf             nebula-metad.conf.default     nebula-storaged.conf.production
nebula-graphd.conf.default     nebula-metad.conf.production  nebula-storaged-listener.conf.production
nebula-graphd.conf.production  nebula-storaged.conf
nebula-metad.conf              nebula-storaged.conf.default
[root@instance2 etc]# vim nebula-graphd.conf
$ sudo usr/local/nebula/scripts/nebula.service
[-v] [-c <config_file_path>]
<start | stop | restart | kill | status>
<metad | graphd | storaged | all>
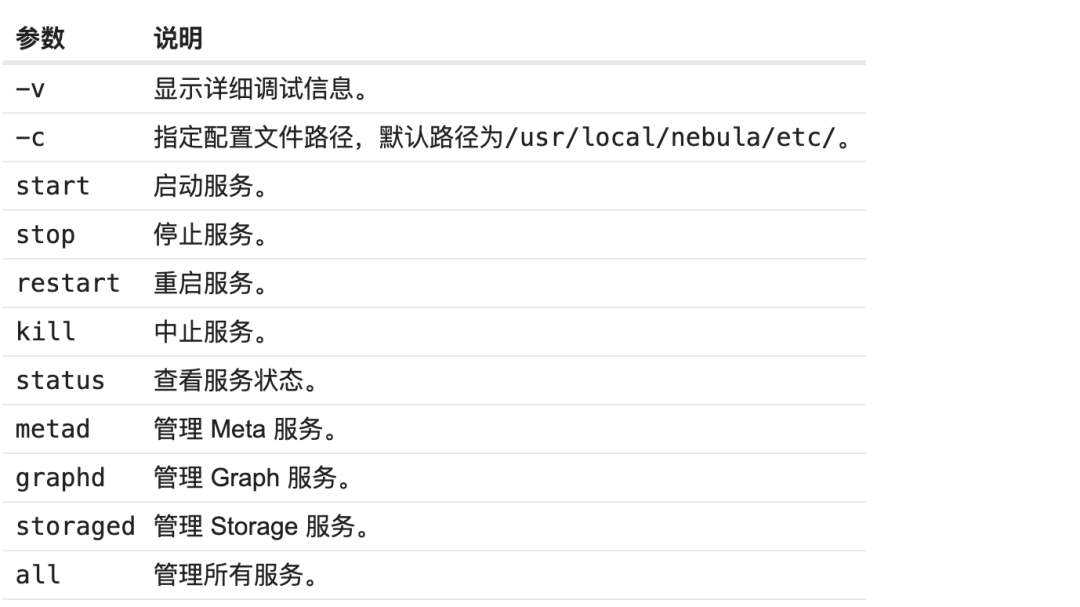
[root@instance2 etc]# opt/app/nebula-graph/scripts/nebula.service status all
[INFO] nebula-metad(7458486): Exited
[INFO] nebula-graphd(7458486): Exited
[INFO] nebula-storaged(7458486): Exited
[root@instance2 etc]#
sudo usr/local/nebula/scripts/nebula.service status all
[root@instance2 etc]# opt/app/nebula-graph/scripts/nebula.service start all
[INFO] Starting nebula-metad...
[INFO] Done
[INFO] Starting nebula-graphd...
[INFO] Done
[INFO] Starting nebula-storaged...
[INFO] Done
[root@instance2 etc]#
[root@instance2 nebula-graph]# opt/app/nebula-graph/scripts/nebula.service stop all
[INFO] Stopping nebula-metad...
[INFO] Done
[INFO] Stopping nebula-graphd...
[INFO] Done
[INFO] Stopping nebula-storaged...
[INFO] Done
[root@instance2 nebula-graph]#
$ sudo usr/local/nebula/scripts/nebula.service status all
[INFO] nebula-metad(33fd35e): Running as 29020, Listening on 9559
[INFO] nebula-graphd(33fd35e): Running as 29095, Listening on 9669
[WARN] nebula-storaged after v3.0.0 will not start service until it is added to cluster.
[WARN] See Manage Storage hosts:ADD HOSTS in https://docs.nebula-graph.io/
[INFO] nebula-storaged(33fd35e): Running as 29147, Listening on 9779
Note
nebula-storaged 在启动流程中会等待 nebula-metad 添加当前 Storage 服务,当前 Storage 服务收到 Ready 信号后才会正式启动服务。
[root@instance2 etc]# opt/app/nebula-graph/scripts/nebula.service status all
[INFO] nebula-metad(7458486): Running as 26056, Listening on 9559
[INFO] nebula-graphd(7458486): Running as 26079, Listening on 9669
[WARN] nebula-storaged after v3.0.0 will not start service until it is added to cluster.
[WARN] See Manage Storage hosts:ADD HOSTS in https://docs.nebula-graph.io/
[INFO] nebula-storaged(7458486): Running as 26101, Listening on 9779
[root@instance2 etc]#
(root@nebula) [(none)]> SHOW HOSTS STORAGE;
+----------------+------+-----------+-----------+--------------+---------+
| Host           | Port | Status    | Role      | Git Info Sha | Version |
+----------------+------+-----------+-----------+--------------+---------+
| "127.0.0.1"    | 9779 | "OFFLINE" | "STORAGE" | ""           |         |
+----------------+------+-----------+-----------+--------------+---------+
Got 2 rows (time spent 1.722ms/2.445398ms)

Tue, 07 Jan 2025 15:16:46 CST
(root@nebula) [(none)]>
(root@nebula) [(none)]> ADD HOSTS 127.0.0.1:9779;
Execution succeeded (time spent 1.593ms/2.152096ms)

Tue, 07 Jan 2025 15:16:40 CST

(root@nebula) [(none)]>
[root@instance2 nebula-graph]# opt/app/nebula-graph/scripts/nebula.service status all
[INFO] nebula-metad(7458486): Running as 43288, Listening on 9559
[INFO] nebula-graphd(7458486): Running as 43320, Listening on 9669
[INFO] nebula-storaged(7458486): Running as 43408, Listening on 9779
[root@instance2 nebula-graph]#
(root@nebula) [(none)]> SHOW HOSTS STORAGE;
+-------------+------+----------+-----------+--------------+---------+
| Host        | Port | Status   | Role      | Git Info Sha | Version |
+-------------+------+----------+-----------+--------------+---------+
| "127.0.0.1" | 9779 | "ONLINE" | "STORAGE" | "7458486"    | "3.8.0" |
+-------------+------+----------+-----------+--------------+---------+
Got 1 rows (time spent 1.198ms/1.961314ms)

Tue, 07 Jan 2025 15:21:41 CST

(root@nebula) [(none)]>
[root@instance2 nebula-graph]# ls
bin  data  etc  logs  pids  scripts  share
[root@instance2 nebula-graph]# ls
bin  data  etc  logs  nebula-console-linux-amd64-v3.8.0  pids  scripts  share
[root@instance2 nebula-graph]# mv nebula-console-linux-amd64-v3.8.0 nebula-console
[root@instance2 nebula-graph]# ls
bin  data  etc  logs  nebula-console  pids  scripts  share
[root@instance2 nebula-graph]#
[root@instance2 nebula-graph]# ls
bin  data  etc  logs  nebula-console  pids  scripts  share
[root@instance2 nebula-graph]# chmod +x nebula-console
[root@instance2 nebula-graph]# ls
bin  data  etc  logs  nebula-console  pids  scripts  share
[root@instance2 nebula-graph]#
$ chmod 111 nebula-console
[root@instance2 nebula-graph]# ls
bin  cluster.id  data  etc  logs  nebula-console  pids  scripts  share
[root@instance2 nebula-graph]# ./nebula-console --addr 127.0.0.1 --port 9669 -u root -p nebula

Welcome!

(root@nebula) [(none)]>

[root@instance2 nebula-graph]# ./nebula-console --addr 127.0.0.1 --port 9669 -u root -p nebula

Welcome!

(root@nebula) [(none)]> SHOW HOSTS;
+-------------+------+----------+--------------+----------------------+------------------------+---------+
| Host        | Port | Status   | Leader count | Leader distribution  | Partition distribution | Version |
+-------------+------+----------+--------------+----------------------+------------------------+---------+
| "127.0.0.1" | 9779 | "ONLINE" | 0            | "No valid partition" | "No valid partition"   | "3.8.0" |
+-------------+------+----------+--------------+----------------------+------------------------+---------+
Got 1 rows (time spent 1.732ms/2.91408ms)

Wed, 08 Jan 2025 11:18:14 CST

(root@nebula) [(none)]>
wget https://oss-cdn.nebula-graph.com.cn/nebula-graph-studio/3.8.0/nebula-graph-studio-3.8.0.x86_64.rpm
[root@instance2 soft]# wget https://oss-cdn.nebula-graph.com.cn/nebula-graph-studio/3.8.0/nebula-graph-studio-3.8.0.x86_64.rpm
--2025-01-08 10:13:04--  https://oss-cdn.nebula-graph.com.cn/nebula-graph-studio/3.8.0/nebula-graph-studio-3.8.0.x86_64.rpm
Resolving oss-cdn.nebula-graph.com.cn (oss-cdn.nebula-graph.com.cn)... 220.181.167.219
Connecting to oss-cdn.nebula-graph.com.cn (oss-cdn.nebula-graph.com.cn)|220.181.167.219|:443... connected.
HTTP request sent, awaiting response... 200 OK
Length: 27310960 (26M) [application/x-rpm]
Saving to: ‘nebula-graph-studio-3.8.0.x86_64.rpm’

100%[======================================================================================>] 27,310,960  15.0MB/s   in 1.7s

2025-01-08 10:13:07 (15.0 MB/s) - ‘nebula-graph-studio-3.8.0.x86_64.rpm’ saved [27310960/27310960]

[root@instance2 soft]#
[root@instance2 soft]# rpm -ivh --prefix=/opt/app/nebula-graph-studio nebula-graph-studio-3.8.0.x86_64.rpm
Preparing...                          ################################# [100%]
Start installing NebulaGraph Studio now...
Updating / installing...
   1:nebula-graph-studio-3.8.0-1      ################################# [100%]
NebulaGraph Studio has been installed.
Created symlink from /etc/systemd/system/multi-user.target.wants/nebula-graph-studio.service to /usr/lib/systemd/system/nebula-graph-studio.service.
NebulaGraph Studio started automatically.
[root@instance2 soft]#
sudo rpm -ivh nebula-graph-studio-3.8.0.x86_64.rpm
127.0.0.1:7001/login

 4. 报错及解决办法
[root@instance2 soft]# rpm -ivh --prefix=/opt/app/nebula-graph-studio nebula-graph-studio-3.8.0.x86_64.rpm
Preparing... ################################# [100%]
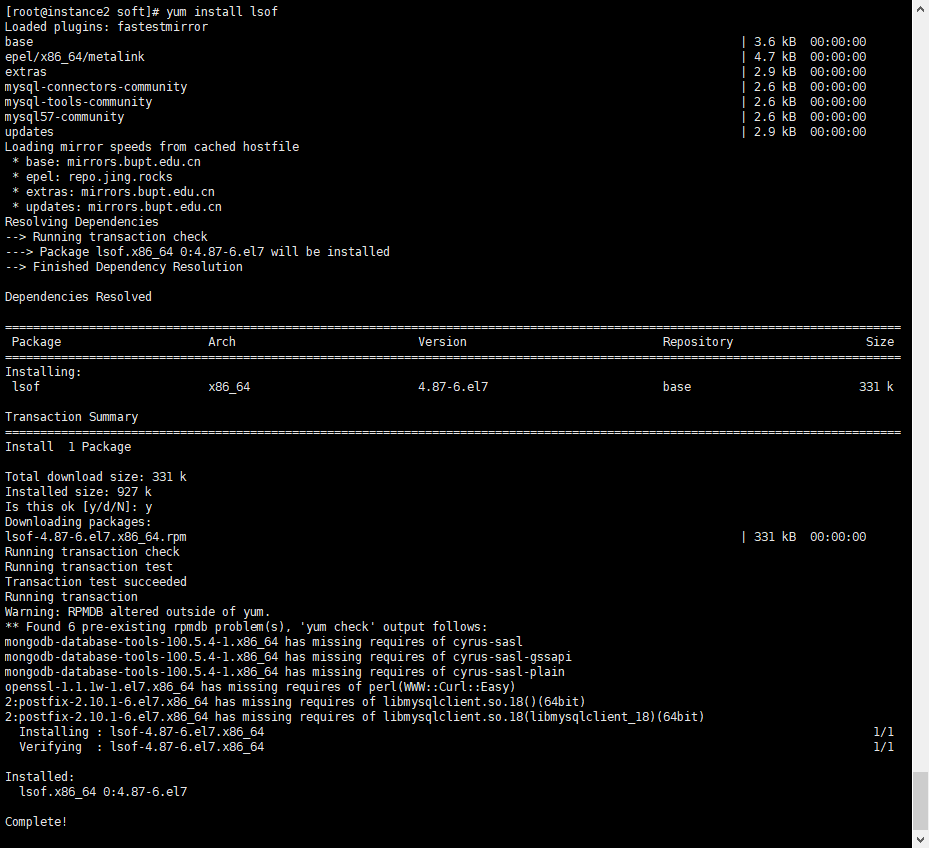
/var/tmp/rpm-tmp.w5nIeb: line 2: type: lsof: not found
Install failed for the reason: the command lsof required
error: %pre(nebula-graph-studio-3.8.0-1.x86_64) scriptlet failed, exit status 1
error: nebula-graph-studio-3.8.0-1.x86_64: install failed
[root@instance2 soft]#
[root@instance2 soft]# yum install lsof
 4.3 重新尝试安装 nebula-graph-studio
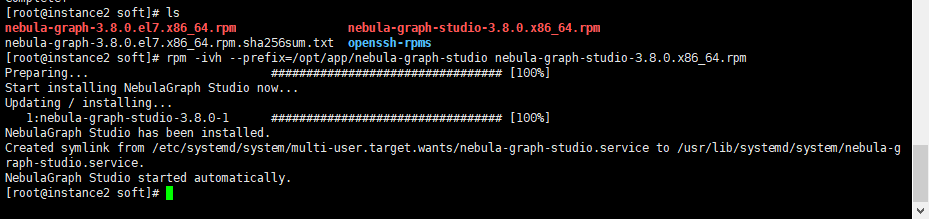
调优 JVM 参数:对于 Java 进程(如 Graph 服务),适当调整 JVM 的堆大小和其他相关参数可以显著提升性能。 合理规划分区与副本:根据业务特点和数据分布情况,精心设计分区策略和副本因子,以保证高可用性和读写效率。 监控与报警:部署监控系统实时跟踪 NebulaGraph 的运行状态,及时发现潜在问题并通过报警机制快速响应。
检查日志文件 (/var/log/nebula/) 中是否有错误信息。 确认防火墙规则是否允许所需的端口通信。
确保客户端 IP 地址已被正确添加到白名单中。 尝试减少查询复杂度或分批提交请求。
分析慢查询日志,识别并优化低效查询。 增加硬件资源(如 CPU、内存)或调整配置参数。
✦
如果你觉得 NebulaGraph能帮到你,或者你只是单纯支持开源精神,可以在 GitHub 上为 NebulaGraph 点个 Star!每一个 Star 都是对我们的支持和鼓励✨
https://github.com/vesoft-inc/nebula
✦
✦

扫码添加
可爱星云
技术交流
资料分享
NebulaGraph 用户案例
✦
风控场景:携程|Airwallex|众安保险|中国移动|Akulaku|邦盛科技|360数科|BOSS直聘|金蝶征信|快手|青藤云安全
平台建设:博睿数据|携程|众安科技|微信|OPPO|vivo|美团|百度爱番番|携程金融|普适智能|BIGO
✦
✦


文章转载自NebulaGraph 技术社区,如果涉嫌侵权,请发送邮件至:contact@modb.pro进行举报,并提供相关证据,一经查实,墨天轮将立刻删除相关内容。
