


前言
前面讲了 MySQL keyring 加密,我写这两篇也是有小伙伴说:对 8.0 的 keyring 搭建主从步骤不太熟悉,有验证过的文档嘛?
但是我直接写搭建的话有点太粗糙了,所以就有了上一篇,这篇就是回答小伙伴的问题了,怎么使用 Keyring(下面统称密钥环) 搭建主从。
密钥环对主从的影响
首先我们需要知道密钥环对主从的影响的哪些?
我们知道密钥环可以管理 binlog 的加密密钥,binlog 是主从复制的关键,那么哪个参数控制加密 binlog ,还记得吗?
答案是:binlog_encryption
binlog_encryption
同时也加密 Relay Log。
我们可以看看官网对此的描述:
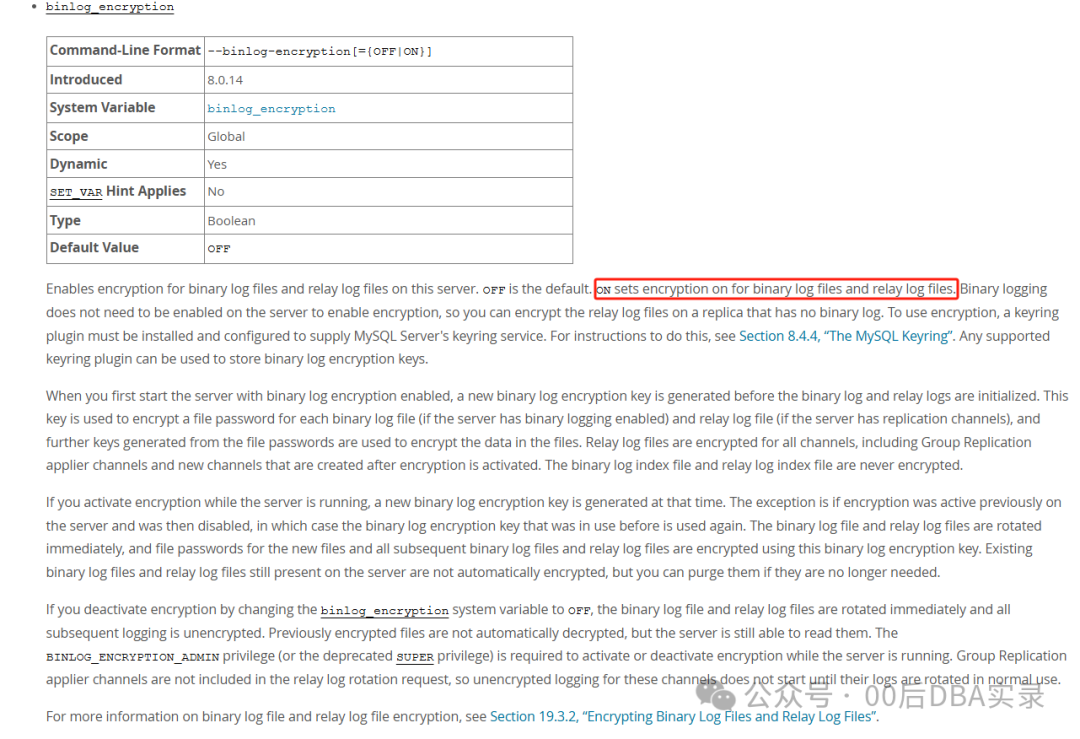
可以看到 binlog_encryption
是 8.0.14 引入的,红色的框框起来的说明了会对 binary log files 和 relay log files 都加密。
上一篇我们测试过,启动了 binlog_encryption
二进制日志是无法查看的。
那么就可以得出密钥环主从相当于普通的主从的作用:
有助于保护 binary log files 和 relay log files 文件及其中包含的潜在敏感数据免遭外部攻击者滥用,同时也防止操作系统用户未经授权地查看这些文件。(文件使用的加密算法是 AES 高级加密标准密码算法)
主从的基础架构图
下面看看普通主从的基础架构图:
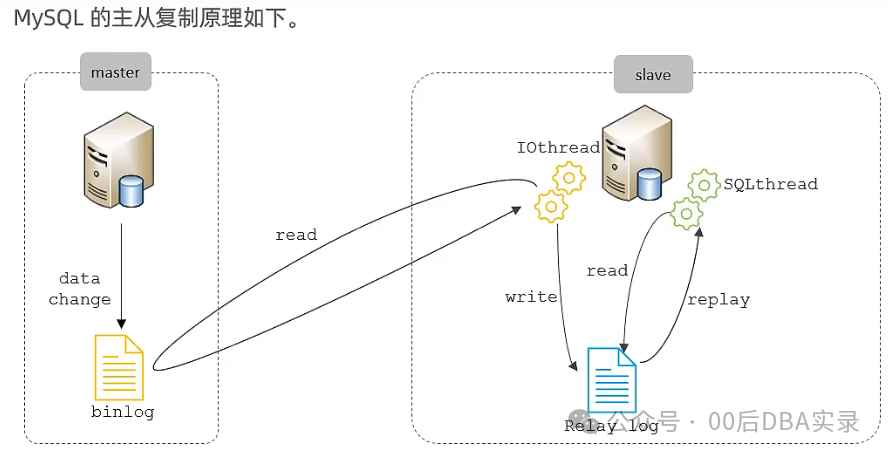
图片来源:bilibili 2022 年1月黑马程序员MySQL数据库课程(我懒得画哈哈哈,借用一下黑马程序员那边画的图。)
简单讲解一下过程:
当在副本服务器上发出 START REPLICA
语句时,副本会创建一个 I/O(接收器)线程,该线程连接到源服务器并请求源发送二进制日志中记录的更新。(此线程在线程表显示为 Binlog Dump)源服务器发送完 binlog 中的更改后,IO 线程会将其写入 relay log 然后再由 SQL 线程来重放 relay log 中记录的 binlog 更改。
那么就可以从格式说 relaylog ≈ binlog,所以 binlog_encryption
同时加密 relaylog/binlog ,格式几乎类似,写的内容也是相同的,只不过位置不同,肯定可以加密了。
注意:这里我并没有说明从库的 binlog 的概念,因为在主从原理,不需要从库的 binlog。写不写从库的 binlog 由 log_replica_updates
(8.0.26)/log_slave_updates
参数控制。
讲完这个大家是不是就可以得出一个明确的解决方案了。
主加密 binlog 从接收 binlog,但是不写自己的 binlog(除非这个从做为别的从的主,要不然没有意义,主要作用就是保护 binlog) mysqlbinlog 持续拉取 binlog
解决方案演示
下面我就来演示一下这个解决方案。这里主要讲 keyring 主从搭建过程,不对主从搭建/keyring 配置做讲解,keyring 详细配置请参考上一篇。
我这里配置为:
主加密 binlog,从不加密也不写 binlog,使用 mysqlbinlog 获取未加密 binlog。
当然大家也可以在从使用密钥环,开启对 relay log 的加密(我这里懒得搞了)。
配置密钥环组件
这里只需要对主的 binlog 加密即可,大家可以可选的在从上也配置密钥环。主要配置项和详解参考上一篇,这里只给出命令:
先配置一下全局清单文件,输入到 basedir
cat <<EOF > /application/mysql_8_3306/bin/mysqld.my
{
  "read_local_manifest": true
}
EOF
配置本地清单文件,输入到 datadir
cat <<EOF> /data/mysql_8_3306/mysqld.my
{
  "components": "file://component_keyring_file"
}
EOF
mysql 的 os 用户需要为只读权限,最后的 r-- 表示其他用户只读,mysql 也属于其中。
[root@master ~]# ll /application/mysql_8_3306/bin/mysqld.my /data/mysql_8_3306/mysqld.my
-rw-r--r-- 1 root root 34 11月  4 14:31 /application/mysql_8_3306/bin/mysqld.my
-rw-r--r-- 1 root root 52 11月  4 14:31 /data/mysql_8_3306/mysqld.my
然后配置密钥环组件的配置文件
先配置一下全局配置文件,输入到 plugin_dir
cat <<EOF> /application/mysql_8_3306/lib/plugin/component_keyring_file.cnf
{
  "read_local_config": true
}
EOF
[root@master ~]# ll /application/mysql_8_3306/lib/plugin/component_keyring_file.cnf
-rw-r--r-- 1 root root 32 11月  4 14:34 /application/mysql_8_3306/lib/plugin/component_keyring_file.cnf
配置本地配置文件,输入到 data_dir
cat <<EOF> /data/mysql_8_3306/component_keyring_file.cnf
{
  "path": "/log/component_keyring_file",
  "read_only": false
}
EOF
[root@master ~]# ll /data/mysql_8_3306/component_keyring_file.cnf
-rw-r--r-- 1 root root 66 11月  4 14:34 /data/mysql_8_3306/component_keyring_file.cnf
创建密钥环文件
mkdir /log
chown mysql.mysql /log
touch /log/component_keyring_file
chown mysql.mysql /log/component_keyring_file
查看一下
[root@master ~]# ll /log/component_keyring_file
-rw-r--r-- 1 mysql mysql 0 11月  4 14:37 /log/component_keyring_file
配置主从
master 主要配置内容:
gtid_mode=ON
enforce_gtid_consistency=true
#log_replica_updates=OFF(可选),我这里默认
binlog_encryption=ON
replica 上的主要配置内容:
gtid_mode=ON
log_replica_updates=OFF
enforce_gtid_consistency=true
主从都重启 mysqld
systemctl restart mysqld
看看密钥环组件服务是否正常。
root@localhost [(none)] 15:04:12 > SELECT * FROM performance_schema.keyring_component_status;
+---------------------+-----------------------------+
| STATUS_KEY          | STATUS_VALUE                |
+---------------------+-----------------------------+
| Component_name      | component_keyring_file      |
| Author              | Oracle Corporation          |
| License             | GPL                         |
| Implementation_name | component_keyring_file      |
| Version             | 1.0                         |
| Component_status    | Active                      |
| Data_file           | /log/component_keyring_file |
| Read_only           | No                          |
+---------------------+-----------------------------+
8 rows in set (0.01 sec)
Component_status
为 Active
,已经启动了。
看看 binlog
root@localhost [(none)] 15:04:14 > show binary logs;
+------------------+-----------+-----------+
| Log_name         | File_size | Encrypted |
+------------------+-----------+-----------+
| mysql-bin.000012 |       220 | No        |
| mysql-bin.000013 |       732 | Yes       |
| mysql-bin.000014 |       709 | Yes       |
+------------------+-----------+-----------+
3 rows in set (0.00 sec)

root@localhost [(none)] 15:05:40 > show master status;
+------------------+----------+--------------+------------------+--------------------------------------------+
| File             | Position | Binlog_Do_DB | Binlog_Ignore_DB | Executed_Gtid_Set                          |
+------------------+----------+--------------+------------------+--------------------------------------------+
| mysql-bin.000014 |      197 |              |                  | 541e12fa-d5f5-11ed-8994-000c29c34822:1-105 |
+------------------+----------+--------------+------------------+--------------------------------------------+
1 row in set (0.00 sec)
当前正在使用 mysql-bin.000014
。
重启之前立刻切了一个日志 mysql-bin.000014
并开启了二进制加密。因为我重启了 2 次所以切了 2 个(mysql-bin.000013
,mysql-bin.000014
)。
在主上创建用户,复制到从。
create user if not exists replica@'192.168.58.%' identified  by '123456';
grant replication slave ,replication client on *.* to replica@'192.168.58.%';
从连接主
reset master;
set global gtid_purged='541e12fa-d5f5-11ed-8994-000c29c34822:1-105';
change replication source to source_host='192.168.58.30',source_user='replica',source_password='123456',source_auto_position=1,get_source_public_key=1,source_port=3306;
start slave;
查看一下
root@localhost [(none)] 15:16:46 > show replica status\G
*************************** 1. row ***************************
          ······
          Replica_IO_Running: Yes
          Replica_SQL_Running: Yes
          ······
OK没问题。
查看从的 pos 点
root@localhost [(none)] 15:26:48 > show master status;
+------------------+----------+--------------+------------------+--------------------------------------------+
| File             | Position | Binlog_Do_DB | Binlog_Ignore_DB | Executed_Gtid_Set                          |
+------------------+----------+--------------+------------------+--------------------------------------------+
| mysql-bin.000003 |      197 |              |                  | 541e12fa-d5f5-11ed-8994-000c29c34822:1-112 |
+------------------+----------+--------------+------------------+--------------------------------------------+
1 row in set (0.00 sec)
在主上插入点数据,测试结果:
create database enc;
use enc;
create table t1(id int primary key);
insert into t1 select 1;
再次查看
root@localhost [(none)] 15:28:04 > show master status;
+------------------+----------+--------------+------------------+--------------------------------------------+
| File             | Position | Binlog_Do_DB | Binlog_Ignore_DB | Executed_Gtid_Set                          |
+------------------+----------+--------------+------------------+--------------------------------------------+
| mysql-bin.000003 |      197 |              |                  | 541e12fa-d5f5-11ed-8994-000c29c34822:1-115 |
+------------------+----------+--------------+------------------+--------------------------------------------+
1 row in set (0.00 sec)
可以看到是不写 binlog 的
这里大家思考一个问题,主配置加密 binlog,从未配置加密然后写自己的 binlog,这样的情况下从的 binlog 是否加密?
我们测试一下:
从配置为
log_replica_updates=ON
master上执行
root@localhost [(none)] 15:13:57 > create database test;
Query OK, 1 row affected (0.01 sec)

root@localhost [(none)] 15:20:00 > use test;
Database changed
root@localhost [test] 15:20:04 > create table t1(id int primary key);
Query OK, 0 rows affected (0.17 sec)

root@localhost [test] 15:20:06 > insert into t1 select 1;
Query OK, 1 row affected (0.07 sec)
Records: 1  Duplicates: 0  Warnings: 0

root@localhost [test] 15:20:48 > insert into t1 select 2;
Query OK, 1 row affected (0.02 sec)
Records: 1  Duplicates: 0  Warnings: 0
binlog 内容为
[root@slave1 mysql_8_3306]# mysqlbinlog  --base64-output=DECODE-ROWS -vv mysql-bin.000002|grep -E 'create|INSERT'  -A 2
#241104 14:44:11 server id 40  end_log_pos 126 CRC32 0x17aa6488         Start: binlog v 4, server v 8.0.32 created 241104 14:44:11 at startup
ROLLBACK/*!*/;
# at 126
--
create database test
/*!*/;
# at 961
--
create table t1(id int primary key)
/*!*/;
# at 1168
--
### INSERT INTO `test`.`t1`
### SET
###   @1=1 /* INT meta=0 nullable=0 is_null=0 */
--
### INSERT INTO `test`.`t1`
### SET
###   @1=2 /* INT meta=0 nullable=0 is_null=0 */
为什么能看见?
虽然主做了加密,但是从对 binlog 读取的时候做了解密,然后写入自己的时候是未加密的,所以能明文看见。
所以要么对从使用 log_replica_updates=OFF
要么将从也配置为加密(加密了也解析不了,只能做为下一层结构的 IO 拉取信息)。
配置拉取未加密 binlog
我是配了从不写 binlog,所以下面就使用 mysqlbinlog 拉取主上的 binlog。
刚才是从 mysql-bin.000014
开始的。
建个目录放 binlog
mkdir -p /log/binlog
所属用户无所谓,能调用 mysqlbinlog 就行
[root@slave1 mysql_8_3306]# ll /log/binlog -d
drwxr-xr-x. 2 root root 6 11月  4 15:52 /log/binlog
连接
mysqlbinlog -R --raw --host=192.168.58.30 --stop-never --user=replica --password=123456 --result-file=/log/binlog/ --connection-server-id=5 mysql-bin.000014 &
看一下,可以看到没问题:
[root@slave1 binlog]# ll
总用量 4
-rw-r-----. 1 root root 2650 11月  4 16:03 mysql-bin.000014
我们在主切换个日志看看,再做一些操作看看:
root@localhost [enc] 15:28:17 > flush binary logs;
Query OK, 0 rows affected (0.04 sec)

[root@slave1 binlog]# ll
总用量 8
-rw-r-----. 1 root root 2697 11月  4 16:04 mysql-bin.000014
-rw-r-----. 1 root root  197 11月  4 16:04 mysql-bin.000015
可以看到已经读取过来了。
主上做一些操作。
root@localhost [enc] 16:05:17 > insert into t1 select 2;
Query OK, 1 row affected (0.03 sec)
Records: 1  Duplicates: 0  Warnings: 0

root@localhost [enc] 16:05:25 > insert into t1 select 3;
Query OK, 1 row affected (0.01 sec)
Records: 1  Duplicates: 0  Warnings: 0
读取一下看看
[root@slave1 binlog]# mysqlbinlog --base64-output=DECODE-ROWS -vv mysql-bin.000015
# The proper term is pseudo_replica_mode, but we use this compatibility alias
# to make the statement usable on server versions 8.0.24 and older.
/*!50530 SET @@SESSION.PSEUDO_SLAVE_MODE=1*/;
/*!50003 SET @OLD_COMPLETION_TYPE=@@COMPLETION_TYPE,COMPLETION_TYPE=0*/;
DELIMITER /*!*/;
# at 4
#241104 16:04:19 server id 30  end_log_pos 126 CRC32 0xb2cee189         Start: binlog v 4, server v 8.0.32 created 241104 16:04:19
# at 126
#241104 16:04:19 server id 30  end_log_pos 197 CRC32 0xd7fe31aa         Previous-GTIDs
# 541e12fa-d5f5-11ed-8994-000c29c34822:1-115
# at 197
#241104 16:05:25 server id 30  end_log_pos 276 CRC32 0x989a61d4         GTID    last_committed=0        sequence_number=1       rbr_only=yesoriginal_committed_timestamp=1730707525696194    immediate_commit_timestamp=1730707525696194     transaction_length=271
/*!50718 SET TRANSACTION ISOLATION LEVEL READ COMMITTED*//*!*/;
# original_commit_timestamp=1730707525696194 (2024-11-04 16:05:25.696194 CST)
# immediate_commit_timestamp=1730707525696194 (2024-11-04 16:05:25.696194 CST)
/*!80001 SET @@session.original_commit_timestamp=1730707525696194*//*!*/;
/*!80014 SET @@session.original_server_version=80032*//*!*/;
/*!80014 SET @@session.immediate_server_version=80032*//*!*/;
SET @@SESSION.GTID_NEXT= '541e12fa-d5f5-11ed-8994-000c29c34822:116'/*!*/;
# at 276
#241104 16:05:25 server id 30  end_log_pos 350 CRC32 0xa255f941         Query   thread_id=8     exec_time=0     error_code=0
SET TIMESTAMP=1730707525/*!*/;
SET @@session.pseudo_thread_id=8/*!*/;
SET @@session.foreign_key_checks=1, @@session.sql_auto_is_null=0, @@session.unique_checks=1, @@session.autocommit=1/*!*/;
SET @@session.sql_mode=1168113696/*!*/;
SET @@session.auto_increment_increment=1, @@session.auto_increment_offset=1/*!*/;
/*!\C utf8mb4 *//*!*/;
SET @@session.character_set_client=255,@@session.collation_connection=255,@@session.collation_server=255/*!*/;
SET @@session.lc_time_names=0/*!*/;
SET @@session.collation_database=DEFAULT/*!*/;
/*!80011 SET @@session.default_collation_for_utf8mb4=255*//*!*/;
BEGIN
/*!*/;
# at 350
#241104 16:05:25 server id 30  end_log_pos 397 CRC32 0x88c80df6         Table_map: `enc`.`t1` mapped to number 103
# has_generated_invisible_primary_key=0
# at 397
#241104 16:05:25 server id 30  end_log_pos 437 CRC32 0xcd0289a0         Write_rows: table id 103 flags: STMT_END_F
### INSERT INTO `enc`.`t1`
### SET
###   @1=2 /* INT meta=0 nullable=0 is_null=0 */
# at 437
#241104 16:05:25 server id 30  end_log_pos 468 CRC32 0x1fee3b2b         Xid = 100
COMMIT/*!*/;
# at 468
#241104 16:05:27 server id 30  end_log_pos 547 CRC32 0xab841eb8         GTID    last_committed=1        sequence_number=2       rbr_only=yesoriginal_committed_timestamp=1730707527894748    immediate_commit_timestamp=1730707527894748     transaction_length=271
/*!50718 SET TRANSACTION ISOLATION LEVEL READ COMMITTED*//*!*/;
# original_commit_timestamp=1730707527894748 (2024-11-04 16:05:27.894748 CST)
# immediate_commit_timestamp=1730707527894748 (2024-11-04 16:05:27.894748 CST)
/*!80001 SET @@session.original_commit_timestamp=1730707527894748*//*!*/;
/*!80014 SET @@session.original_server_version=80032*//*!*/;
/*!80014 SET @@session.immediate_server_version=80032*//*!*/;
SET @@SESSION.GTID_NEXT= '541e12fa-d5f5-11ed-8994-000c29c34822:117'/*!*/;
# at 547
#241104 16:05:27 server id 30  end_log_pos 621 CRC32 0xedbdab41         Query   thread_id=8     exec_time=0     error_code=0
SET TIMESTAMP=1730707527/*!*/;
BEGIN
/*!*/;
# at 621
#241104 16:05:27 server id 30  end_log_pos 668 CRC32 0xef6b5466         Table_map: `enc`.`t1` mapped to number 103
# has_generated_invisible_primary_key=0
# at 668
#241104 16:05:27 server id 30  end_log_pos 708 CRC32 0x207895de         Write_rows: table id 103 flags: STMT_END_F
### INSERT INTO `enc`.`t1`
### SET
###   @1=3 /* INT meta=0 nullable=0 is_null=0 */
# at 708
#241104 16:05:27 server id 30  end_log_pos 739 CRC32 0x7d8d8f8d         Xid = 101
COMMIT/*!*/;
SET @@SESSION.GTID_NEXT= 'AUTOMATIC' /* added by mysqlbinlog */ /*!*/;
DELIMITER ;
# End of log file
/*!50003 SET COMPLETION_TYPE=@OLD_COMPLETION_TYPE*/;
/*!50530 SET @@SESSION.PSEUDO_SLAVE_MODE=0*/;
没问题啦。
总结
我这里只是提供思路,具体大家想要什么方案请自行选择。
我给的方案为 :
主加密 binlog 从接收 binlog,但是不写自己的 binlog mysqlbinlog 持续拉取 binlog
这个方案的缺点:
mysqlbinlog 没有断联续连的功能,怎么解决的问题这里不做讨论,大家可以自行写脚本完成此功能。
参考
https://dev.mysql.com/doc/refman/8.0/en/replication-options-binary-log.html#sysvar_binlog_encryption
bilibili 2022 年1月黑马程序员MySQL数据库课程
https://dev.mysql.com/doc/refman/8.0/en/mysqlbinlog.html
往期回顾
MySQL keyring 加密 - 详细介绍 MySQL Keyring 配置项及作用 MySQL/PG 数据脱敏 - data_masking 插件和 postgresql_anonymizer 扩展初体验 ONLINE DDL 收尾篇|如何有效实现 ONLINE - 关于 ONLINE DDL 的最佳实践 MySQL/PG 索引对于排序规则的依赖性 - 排序规则与索引的相关性问题,涉及到索引是否会失效 如何正确杀会话, KILL processlist_id/KILL QUERY? - 你知道如何正确杀掉活跃会话吗?
感谢阅读!关注我获取更多精彩内容。
