


热衷于分享各种干货知识,大家有想看或者想学的可以评论区留言,秉承着“开源知识来源于互联网,回归于互联网”的理念,分享一些日常工作中能用到或者比较重要的内容,希望大家能够喜欢,不足之处请大家多提宝贵地意见,我们一起提升,守住自己的饭碗。
正文开始
一、背景
有个客户需求是从Oracle 11g RAC集群(4个实例)迁移到Oracle11g单机,实现Oracle数据库不停机迁移。实现的方式有很多种,比如ADG,OGG、DG和各大厂商的DTS工具等。当然,前提是网络和端口要通,主要是22和1521端口。今天主要使用DG实现数据迁移。
二、环境准备
三、安装目的端数据库
(一)只安装数据库软件和监听
执行以下脚本
#!/bin/bash
#一键安装oracle数据库
#修改主机名
start_time=$(date +%s)
hostnamectl set-hostname myoracle
#添加主机名与IP对应记录
public_ip=$(hostname -I| grep -o -e '[0-9]\{1,3\}.[0-9]\{1,3\}.[0-9]\{1,3\}.[0-9]\{1,3\}' |head -n 1)
node_name=$(hostname)
echo -e "${public_ip} ${node_name}">> etc/hosts
cat etc/hosts
service iptables stop
chkconfig iptables off
#关闭Selinux
sed -i "s/SELINUX=enforcing/SELINUX=disabled/" etc/selinux/config
setenforce 0
# 获取当前所在目录位置
current_dir=$(pwd)
echo "当前所在目录位置: $current_dir"
# 目标路径
target_dir="/soft"
# 检查目标路径是否存在,如果不存在则创建
if [ ! -d "$target_dir" ]; then
    mkdir -p "$target_dir"
    echo "已创建目录: $target_dir"
fi
# 移动当前目录下的所有文件到目标路径
mv $current_dir/* $target_dir
echo "已将当前目录下所有文件移动至 $target_dir"
#添加离线yum源
cd soft
#tar -xvf oracle_repo.tar.gz
#cd /soft/my_oracle_repo
#rpm -ivh *.rpm --nodeps --force
cd etc/yum.repos.d
rm -rf *.repo
#注意将iso镜像挂载
echo "[EL]" >> hellodba.repo
echo "name=oracle linux 6.6" >> hellodba.repo
echo "baseurl=file:///mnt" >> hellodba.repo
echo "gpgcheck=0" >> hellodba.repo
echo "enabled=1" >> hellodba.repo
mount dev/sr0 mnt
yum clean all
yum makecache
yum -y install binutils*
yum -y install compat-libcap1*
yum -y install compat-libstdc++-33*
yum -y install gcc-*
yum -y install gcc-c*
yum -y install glibc*
yum -y install glibc-devel*
yum -y install ksh*
yum -y install libaio*
yum -y install libaio-devel*
yum -y install libgcc*
yum -y install libstdc++*
yum -y install libstdc++-devel*
yum -y install libXi*
yum -y install libXtst*
yum -y install *make*
yum -y install sysstat*
yum -y install unixODBC
yum -y install elfutils-libelf*
#添加用户组及用户
groupadd oinstall
groupadd dba
useradd -g oinstall -G dba oracle
echo oracle | passwd --stdin oracle
chmod 644 etc/sysctl.conf
#修改环境变量
cat <<EOF >>/etc/sysctl.conf
#ORACLE SETTING
#可以拥有的异步IO请求数
fs.aio-max-nr = 1048576
#允许文件句柄的最大数目
fs.file-max = 6815744
#信号参数
kernel.sem = 250 32000 100 128
#IP V4的端口范围
net.ipv4.ip_local_port_range = 9000 65500
#缓存区的缺省值
net.core.rmem_default = 262144
#缓存区的最大值
net.core.rmem_max = 4194304
#发送缓存区的缺省值
net.core.wmem_default = 262144
#发送缓存区的最大值
net.core.wmem_max = 1048586
#当系统检测到oops时,重新启动系统,以便系统能够重新初始化恢复正常工作
kernel.panic_on_oops = 1
#单个共享内存段最大值,让数据库在一个共享段里面的可以容纳整个SGA
#最大值:比物理内存小1字节
#(kernel.shmmax = 物理内存*1024*1024*1024-1)
kernel.shmmax = 2684354560
#控制共享内存页数(kernel.shmall = shmmax/4096)
kernel.shmall = 655360
#共享内存的最大数量
kernel.shmmni = 4096
#当系统内存使用90%的时候开始使用交换页面
vm.swappiness=10
#默认是100,增大这个参数设置了虚拟内存回收directory和i-node缓冲的倾向,这个值越大。越容易回收。
vm.vfs_cache_pressure=200
EOF
sysctl -p
chmod 644 etc/security/limits.conf
cat <<EOF >>/etc/security/limits.conf
oracle soft nproc 16384
oracle hard nproc 16384
oracle soft nofile 65536
oracle hard nofile 65536
oracle soft stack 32768
oracle hard stack 32768
oracle  soft  memlock unlimited
oracle  hard  memlock unlimited
oracle  soft  core unlimited
oracle  hard  core unlimited
EOF
EOF
chmod 644 etc/pam.d/login
cat <<EOF >>/etc/pam.d/login
session required lib64/security/pam_limits.so
session required pam_limits.so
EOF
chmod 644 etc/profile
cat <<EOF >>/etc/profile
if [ $USER = "oracle" ]; then
   if [ $SHELL = "/bin/ksh" ]; then
       ulimit -p 16384
       ulimit -n 65536
    else
       ulimit -u 16384 -n 65536
   fi
fi
EOF
source etc/profile
mkdir -p u01/app/
chown -R oracle:oinstall u01/app/
chmod -R 775 u01/app/
mkdir -p usr/local/src
cd  /usr/local/src
#解压oracle安装包
mv soft/*.zip  /usr/local/src/
cd usr/local/src/
unzip p13390677_112040_Linux-x86-64_1of7.zip
unzip p13390677_112040_Linux-x86-64_2of7.zip
mkdir home/oracle/etc
chown -R oracle.oinstall home/oracle/etc
cp  /usr/local/src/database/response/* home/oracle/etc/
chmod 777 home/oracle/etc/*.rsp
chown -R  oracle:oinstall home/oracle/etc/
cat <<EOF >/home/oracle/etc/db_install.rsp
####################################################################

## Copyright(c) Oracle Corporation 1998,2013. All rights reserved.##

##                                                                ##

## Specify values for the variables listed below to customize     ##

## your installation.                                             ##

##                                                                ##

## Each variable is associated with a comment. The comment        ##

## can help to populate the variables with the appropriate        ##

## values.         ##

##                                                                ##

## IMPORTANT NOTE: This file contains plain text passwords and    ##

## should be secured to have read permission only by oracle user  ##

## or db administrator who owns this installation.                ##

##                                                                ##

####################################################################

#------------------------------------------------------------------------------

# Do not change the following system generated value.

#------------------------------------------------------------------------------
oracle.install.responseFileVersion=/oracle/install/rspfmt_dbinstall_response_schema_v11_2_0

#------------------------------------------------------------------------------
# Specify the installation option.
# It can be one of the following:
#   - INSTALL_DB_SWONLY
#   - INSTALL_DB_AND_CONFIG
#   - UPGRADE_DB
#-------------------------------------------------------------------------------
oracle.install.option=INSTALL_DB_SWONLY
#-------------------------------------------------------------------------------
# Specify the hostname of the system as set during the install. It can be used
# to force the installation to use an alternative hostname rather than using the
# first hostname found on the system. (e.g., for systems with multiple hostnames
# and network interfaces)
#-------------------------------------------------------------------------------
ORACLE_HOSTNAME=myoracle
#-------------------------------------------------------------------------------
# Specify the Unix group to be set for the inventory directory.
#-------------------------------------------------------------------------------
UNIX_GROUP_NAME=oinstall
#-------------------------------------------------------------------------------
# Specify the location which holds the inventory files.
# This is an optional parameter if installing on
# Windows based Operating System.
#-------------------------------------------------------------------------------
INVENTORY_LOCATION=/u01/app/oraInventory
#-------------------------------------------------------------------------------
# Specify the languages in which the components will be installed.
#
# en   : English                  ja   : Japanese
# fr   : French                   ko   : Korean
# ar   : Arabic                   es   : Latin American Spanish
# bn   : Bengali                  lv   : Latvian
# pt_BR: Brazilian Portuguese     lt   : Lithuanian
# bg   : Bulgarian                ms   : Malay
# fr_CA: Canadian French          es_MX: Mexican Spanish
# ca   : Catalan                  no   : Norwegian
# hr   : Croatian                 pl   : Polish
# cs   : Czech                    pt   : Portuguese
# da   : Danish                   ro   : Romanian
# nl   : Dutch                    ru   : Russian
# ar_EG: Egyptian                 zh_CN: Simplified Chinese
# en_GB: English (Great Britain)  sk   : Slovak
# et   : Estonian                 sl   : Slovenian
# fi   : Finnish                  es_ES: Spanish
# de   : German                   sv   : Swedish
# el   : Greek                    th   : Thai
# iw   : Hebrew                   zh_TW: Traditional Chinese
# hu   : Hungarian                tr   : Turkish
# is   : Icelandic                uk   : Ukrainian
# in   : Indonesian               vi   : Vietnamese
# it   : Italian
#
# all_langs   : All languages
#
# Specify value as the following to select any of the languages.
# Example : SELECTED_LANGUAGES=en,fr,ja
#
# Specify value as the following to select all the languages.
# Example : SELECTED_LANGUAGES=all_langs
#------------------------------------------------------------------------------
SELECTED_LANGUAGES=en
#------------------------------------------------------------------------------
# Specify the complete path of the Oracle Home.
#------------------------------------------------------------------------------
ORACLE_HOME=/u01/app/oracle/product/11.2.0/db_1
#------------------------------------------------------------------------------
# Specify the complete path of the Oracle Base.
#------------------------------------------------------------------------------
ORACLE_BASE=/u01/app/oracle
#------------------------------------------------------------------------------
# Specify the installation edition of the component.
#
# The value should contain only one of these choices.

#   - EE     : Enterprise Edition

#   - SE     : Standard Edition

#   - SEONE  : Standard Edition One

#   - PE     : Personal Edition (WINDOWS ONLY)

#------------------------------------------------------------------------------
oracle.install.db.InstallEdition=EE

#------------------------------------------------------------------------------

# This variable is used to enable or disable custom install and is considered

# only if InstallEdition is EE.

#

# true  : Components mentioned as part of 'optionalComponents' property

#         are considered for install.

# false : Value for 'optionalComponents' is not considered.

#------------------------------------------------------------------------------
oracle.install.db.EEOptionsSelection=false

#------------------------------------------------------------------------------

# This variable is considered only if 'EEOptionsSelection' is set to true.

#

# Description: List of Enterprise Edition Options you would like to enable.

#

#              The following choices are available. You may specify any

#              combination of these choices.  The components you choose should

#              be specified in the form "internal-component-name:version"

#              Below is a list of components you may specify to enable.

#

#              oracle.oraolap:11.2.0.4.0 - Oracle OLAP

#              oracle.rdbms.dm:11.2.0.4.0 - Oracle Data Mining

#              oracle.rdbms.dv:11.2.0.4.0 - Oracle Database Vault

#              oracle.rdbms.lbac:11.2.0.4.0 - Oracle Label Security

#              oracle.rdbms.partitioning:11.2.0.4.0 - Oracle Partitioning

#              oracle.rdbms.rat:11.2.0.4.0 - Oracle Real Application Testing

#------------------------------------------------------------------------------
oracle.install.db.optionalComponents=oracle.rdbms.partitioning:11.2.0.4.0,oracle.oraolap:11.2.0.4.0,oracle.rdbms.dm:11.2.0.4.0,oracle.rdbms.dv:11.2.0.4.0,oracle.rdbms.lbac:11.2.0.4.0,oracle.rdbms.rat:11.2.0.4.0

###############################################################################

#                                                                             #

# PRIVILEGED OPERATING SYSTEM GROUPS                                         #

# ------------------------------------------                                  #

# Provide values for the OS groups to which OSDBA and OSOPER privileges       #

# needs to be granted. If the install is being performed as a member of the   #

# group "dba", then that will be used unless specified otherwise below.       #

#                                                                             #

# The value to be specified for OSDBA and OSOPER group is only for UNIX based #

# Operating System.                                                           #

#                                                                             #

###############################################################################

#------------------------------------------------------------------------------

# The DBA_GROUP is the OS group which is to be granted OSDBA privileges.

#------------------------------------------------------------------------------
oracle.install.db.DBA_GROUP=dba

#------------------------------------------------------------------------------

# The OPER_GROUP is the OS group which is to be granted OSOPER privileges.

# The value to be specified for OSOPER group is optional.

#------------------------------------------------------------------------------
oracle.install.db.OPER_GROUP=oinstall

#------------------------------------------------------------------------------

# Specify the cluster node names selected during the installation.

# Example : oracle.install.db.CLUSTER_NODES=node1,node2

#------------------------------------------------------------------------------
oracle.install.db.CLUSTER_NODES=

#------------------------------------------------------------------------------

# This variable is used to enable or disable RAC One Node install.

#

#   - true  : Value of RAC One Node service name is used.

#   - false : Value of RAC One Node service name is not used.

#

# If left blank, it will be assumed to be false

#------------------------------------------------------------------------------
oracle.install.db.isRACOneInstall=

#------------------------------------------------------------------------------

# Specify the name for RAC One Node Service.

#------------------------------------------------------------------------------
oracle.install.db.racOneServiceName=

#------------------------------------------------------------------------------

# Specify the type of database to create.

# It can be one of the following:

#   - GENERAL_PURPOSE/TRANSACTION_PROCESSING

#   - DATA_WAREHOUSE

#------------------------------------------------------------------------------
oracle.install.db.config.starterdb.type=GENERAL_PURPOSE

#------------------------------------------------------------------------------

# Specify the Starter Database Global Database Name.

#------------------------------------------------------------------------------
oracle.install.db.config.starterdb.globalDBName=orcl

#------------------------------------------------------------------------------

# Specify the Starter Database SID.

#------------------------------------------------------------------------------
oracle.install.db.config.starterdb.SID=dbsrv2

#------------------------------------------------------------------------------

# Specify the Starter Database character set.

#

# It can be one of the following:

# AL32UTF8, WE8ISO8859P15, WE8MSWIN1252, EE8ISO8859P2,

# EE8MSWIN1250, NE8ISO8859P10, NEE8ISO8859P4, BLT8MSWIN1257,

# BLT8ISO8859P13, CL8ISO8859P5, CL8MSWIN1251, AR8ISO8859P6,

# AR8MSWIN1256, EL8ISO8859P7, EL8MSWIN1253, IW8ISO8859P8,

# IW8MSWIN1255, JA16EUC, JA16EUCTILDE, JA16SJIS, JA16SJISTILDE,

# KO16MSWIN949, ZHS16GBK, TH8TISASCII, ZHT32EUC, ZHT16MSWIN950,

# ZHT16HKSCS, WE8ISO8859P9, TR8MSWIN1254, VN8MSWIN1258

#------------------------------------------------------------------------------
oracle.install.db.config.starterdb.characterSet=AL32UTF8

#------------------------------------------------------------------------------

# This variable should be set to true if Automatic Memory Management

# in Database is desired.

# If Automatic Memory Management is not desired, and memory allocation

# is to be done manually, then set it to false.

#------------------------------------------------------------------------------
oracle.install.db.config.starterdb.memoryOption=true

#------------------------------------------------------------------------------

# Specify the total memory allocation for the database. Value(in MB) should be

# at least 256 MB, and should not exceed the total physical memory available

# on the system.

# Example: oracle.install.db.config.starterdb.memoryLimit=512

#------------------------------------------------------------------------------
oracle.install.db.config.starterdb.memoryLimit=8192

#------------------------------------------------------------------------------

# This variable controls whether to load Example Schemas onto

# the starter database or not.

#------------------------------------------------------------------------------
oracle.install.db.config.starterdb.installExampleSchemas=false

#------------------------------------------------------------------------------

# This variable includes enabling audit settings, configuring password profiles

# and revoking some grants to public. These settings are provided by default.

# These settings may also be disabled.

#------------------------------------------------------------------------------
oracle.install.db.config.starterdb.enableSecuritySettings=true

###############################################################################

#                                                                             #

# Passwords can be supplied for the following four schemas in the       #

# starter database:                  #

#   SYS                                                                       #

#   SYSTEM                                                                    #

#   SYSMAN (used by Enterprise Manager)                                       #

#   DBSNMP (used by Enterprise Manager)                                       #

#                                                                             #

# Same password can be used for all accounts (not recommended)         #

# or different passwords for each account can be provided (recommended)       #

#                                                                             #

###############################################################################

#------------------------------------------------------------------------------

# This variable holds the password that is to be used for all schemas in the

# starter database.

#-------------------------------------------------------------------------------
oracle.install.db.config.starterdb.password.ALL=oracle

#-------------------------------------------------------------------------------

# Specify the SYS password for the starter database.

#-------------------------------------------------------------------------------
oracle.install.db.config.starterdb.password.SYS=

#-------------------------------------------------------------------------------

# Specify the SYSTEM password for the starter database.

#-------------------------------------------------------------------------------
oracle.install.db.config.starterdb.password.SYSTEM=

#-------------------------------------------------------------------------------

# Specify the SYSMAN password for the starter database.

#-------------------------------------------------------------------------------
oracle.install.db.config.starterdb.password.SYSMAN=

#-------------------------------------------------------------------------------

# Specify the DBSNMP password for the starter database.

#-------------------------------------------------------------------------------
oracle.install.db.config.starterdb.password.DBSNMP=

#-------------------------------------------------------------------------------

# Specify the management option to be selected for the starter database.

# It can be one of the following:

#   - GRID_CONTROL

#   - DB_CONTROL

#-------------------------------------------------------------------------------
oracle.install.db.config.starterdb.control=DB_CONTROL

#-------------------------------------------------------------------------------

# Specify the Management Service to use if Grid Control is selected to manage

# the database.

#-------------------------------------------------------------------------------
oracle.install.db.config.starterdb.gridcontrol.gridControlServiceURL=

###############################################################################

#                                                                             #

# SPECIFY BACKUP AND RECOVERY OPTIONS                                        #

# ------------------------------------                                #

# Out-of-box backup and recovery options for the database can be mentioned    #

# using the entries below.            #

#                                                                             #

###############################################################################

#------------------------------------------------------------------------------

# This variable is to be set to false if automated backup is not required. Else

# this can be set to true.

#------------------------------------------------------------------------------
oracle.install.db.config.starterdb.automatedBackup.enable=false

#------------------------------------------------------------------------------

# Regardless of the type of storage that is chosen for backup and recovery, if

# automated backups are enabled, a job will be scheduled to run daily to backup

# the database. This job will run as the operating system user that is

# specified in this variable.

#------------------------------------------------------------------------------
oracle.install.db.config.starterdb.automatedBackup.osuid=

#-------------------------------------------------------------------------------

# Regardless of the type of storage that is chosen for backup and recovery, if

# automated backups are enabled, a job will be scheduled to run daily to backup

# the database. This job will run as the operating system user specified by the

# above entry. The following entry stores the password for the above operating

# system user.

#-------------------------------------------------------------------------------
oracle.install.db.config.starterdb.automatedBackup.ospwd=

#-------------------------------------------------------------------------------

# Specify the type of storage to use for the database.

# It can be one of the following:

#   - FILE_SYSTEM_STORAGE

#   - ASM_STORAGE

#------------------------------------------------------------------------------
oracle.install.db.config.starterdb.storageType=

#-------------------------------------------------------------------------------

# Specify the database file location which is a directory for datafiles, control

# files, redo logs.

#

# Applicable only when oracle.install.db.config.starterdb.storage=FILE_SYSTEM_STORAGE

#-------------------------------------------------------------------------------
oracle.install.db.config.starterdb.fileSystemStorage.dataLocation=

#-------------------------------------------------------------------------------

# Specify the backup and recovery location.

#

# Applicable only when oracle.install.db.config.starterdb.storage=FILE_SYSTEM_STORAGE

#-------------------------------------------------------------------------------
oracle.install.db.config.starterdb.fileSystemStorage.recoveryLocation=

#-------------------------------------------------------------------------------

# Specify the existing ASM disk groups to be used for storage.

#

# Applicable only when oracle.install.db.config.starterdb.storage=ASM_STORAGE

#-------------------------------------------------------------------------------
oracle.install.db.config.asm.diskGroup=

#-------------------------------------------------------------------------------

# Specify the password for ASMSNMP user of the ASM instance.

#

# Applicable only when oracle.install.db.config.starterdb.storage=ASM_STORAGE

#-------------------------------------------------------------------------------
oracle.install.db.config.asm.ASMSNMPPassword=

#------------------------------------------------------------------------------

# Specify the My Oracle Support Account Username.

#

#  Example   : MYORACLESUPPORT_USERNAME=abc@oracle.com

#------------------------------------------------------------------------------
MYORACLESUPPORT_USERNAME=

#------------------------------------------------------------------------------

# Specify the My Oracle Support Account Username password.

#

# Example    : MYORACLESUPPORT_PASSWORD=password

#------------------------------------------------------------------------------
MYORACLESUPPORT_PASSWORD=

#------------------------------------------------------------------------------

# Specify whether to enable the user to set the password for

# My Oracle Support credentials. The value can be either true or false.

# If left blank it will be assumed to be false.

#

# Example    : SECURITY_UPDATES_VIA_MYORACLESUPPORT=true

#------------------------------------------------------------------------------
SECURITY_UPDATES_VIA_MYORACLESUPPORT=false

#------------------------------------------------------------------------------

# Specify whether user doesn't want to configure Security Updates.

# The value for this variable should be true if you don't want to configure

# Security Updates, false otherwise.

#

# The value can be either true or false. If left blank it will be assumed

# to be false.

#

# Example    : DECLINE_SECURITY_UPDATES=false

#------------------------------------------------------------------------------
DECLINE_SECURITY_UPDATES=true

#------------------------------------------------------------------------------

# Specify the Proxy server name. Length should be greater than zero.

#

# Example    : PROXY_HOST=proxy.domain.com

#------------------------------------------------------------------------------
PROXY_HOST=

#------------------------------------------------------------------------------

# Specify the proxy port number. Should be Numeric and at least 2 chars.

#

# Example    : PROXY_PORT=25

#------------------------------------------------------------------------------
PROXY_PORT=

#------------------------------------------------------------------------------

# Specify the proxy user name. Leave PROXY_USER and PROXY_PWD

# blank if your proxy server requires no authentication.

#

# Example    : PROXY_USER=username

#------------------------------------------------------------------------------
PROXY_USER=

#------------------------------------------------------------------------------

# Specify the proxy password. Leave PROXY_USER and PROXY_PWD

# blank if your proxy server requires no authentication.

#

# Example    : PROXY_PWD=password

#------------------------------------------------------------------------------
PROXY_PWD=

#------------------------------------------------------------------------------

# Specify the proxy realm. This value is used if auto-updates option is selected.

#

# Example    : PROXY_REALM=metalink

#------------------------------------------------------------------------------
PROXY_REALM=

#------------------------------------------------------------------------------

# Specify the Oracle Support Hub URL.

#

# Example    : COLLECTOR_SUPPORTHUB_URL=https://orasupporthub.company.com:8080/

#------------------------------------------------------------------------------
COLLECTOR_SUPPORTHUB_URL=

#------------------------------------------------------------------------------

# Specify the auto-updates option. It can be one of the following:

#   - MYORACLESUPPORT_DOWNLOAD

#   - OFFLINE_UPDATES

#   - SKIP_UPDATES

#------------------------------------------------------------------------------
oracle.installer.autoupdates.option=
#------------------------------------------------------------------------------

# In case MYORACLESUPPORT_DOWNLOAD option is chosen, specify the location where

# the updates are to be downloaded.

# In case OFFLINE_UPDATES option is chosen, specify the location where the updates

# are present.

#------------------------------------------------------------------------------
oracle.installer.autoupdates.downloadUpdatesLoc=
#------------------------------------------------------------------------------

# Specify the My Oracle Support Account Username which has the patches download privileges

# to be used for software updates.

#  Example   : AUTOUPDATES_MYORACLESUPPORT_USERNAME=abc@oracle.com

#------------------------------------------------------------------------------
AUTOUPDATES_MYORACLESUPPORT_USERNAME=

#------------------------------------------------------------------------------

# Specify the My Oracle Support Account Username password which has the patches download privileges

# to be used for software updates.

#

# Example    : AUTOUPDATES_MYORACLESUPPORT_PASSWORD=password

#------------------------------------------------------------------------------
AUTOUPDATES_MYORACLESUPPORT_PASSWORD=
EOF
chown -R  oracle:oinstall home/oracle/etc/db_install.rsp
chmod 660 home/oracle/etc/db_install.rsp
cd usr/local/src/database/
su - oracle -c "/usr/local/src/database/runInstaller -silent -responseFile home/oracle/etc/db_install.rsp"
sleep 500
/u01/app/oraInventory/orainstRoot.sh
/u01/app/oracle/product/11.2.0/db_1/root.sh
cat <<EOF >>/home/oracle/.bash_profile
#for oracle
export  ORACLE_BASE=/u01/app/oracle
export  ORACLE_SID=sjzx
export  ORACLE_HOME=/u01/app/oracle/product/11.2.0/db_1
export  LANG="zh_CN.UTF-8"
export  ORACLE_TERM=xterm
export  NLS_LANG="SIMPLIFIED CHINESE_CHINA.AL32UTF8"
export  NLS_DATE_FORMAT='yyyy-mm-dd hh24:mi:ss'
export  PATH=/usr/sbin:\$PATH
export  PATH=\$ORACLE_HOME/bin:\$PATH
export  LD_LIBRARY_PATH=\$ORACLE_HOME/lib:/lib:/usr/lib
export  CLASSPATH=\$ORACLE_HOME/JRE:\$ORACLE_HOME/jlib:\$ORACLE_HOME/rdbms/jlib
EOF
####使配置文件生效###
source home/oracle/.bash_profile
su - oracle -c "echo $ORACLE_HOME"
echo -e "\n\n****** start listener config  ******\n\n"
su - oracle -c "/u01/app/oracle/product/11.2.0/db_1/bin/netca -silent -responsefile home/oracle/etc/netca.rsp"
echo -e "\n\n****** listener config completed ******\n\n"
chmod 644 home/oracle/etc/dbca.rsp
cat <<EOF >>/home/oracle/etc/dbca.rsp
[GENERAL]
RESPONSEFILE_VERSION = "11.2.0"
OPERATION_TYPE = "createDatabase"
[CREATEDATABASE]
GDBNAME = "orcl11g"
SID = "orcl11g"
TEMPLATENAME = "General_Purpose.dbc"
CHARACTERSET = "AL32UTF8"
sysPassword= "oracle"
SYSTEMPASSWORD = "oracle"
DBSNMPPASSWORD= "oracle"
[SYSTEM]
SYSTEM_USER_PASSWORD="oracle"
[EXAMPLE]
EXAMPLE_SCHEMA=FALSE
EOF
sleep 60
echo -e "\n\n****** start db instance create ******\n\n"
end_time=$(date +%s)
execution_time=$((end_time - start_time))
echo "脚本执行时间:${execution_time} 秒"
echo -e "\n\n****** db instance create complete ******\n\n"
四、源端和目的端部署DG
(一)基础环境配置
两个节点都执行:修改主备库的主机名并进行hosts文件配置
[root@myoracle ~]# hostnamectl set-hostname primarynode  #主库
[root@myoracle ~]# hostnamectl set-hostname standbynode  #备库
cat <<EOF >>/etc//etc/hosts
192.168.11.11 primarynode
192.168.2.1 standbynode
EOF
注意:使用一键脚本安装的需要注意修改listener.ora和tnsnames.ora两个文件对应的HOST。 路径为/u01/app/oracle/product/11.2.0/db_1/network/admin。
(二)源端rac1配置:
登录到sjzx这个实例
[root@myoracle ~]#export ORACLE_SID=sjzx
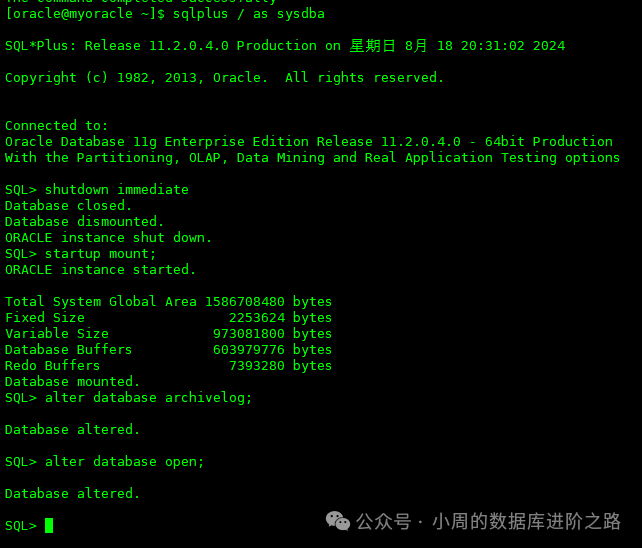
1、开启归档(如开启,不用操作)
关闭数据库
SQL> shutdown immediate
启动数据库到 mount
SQL> startup mount;
开启归档
SQL> alter database archivelog;
打开数据库
SQL> alter database open;
查询是否启用归档
SQL>archive log list
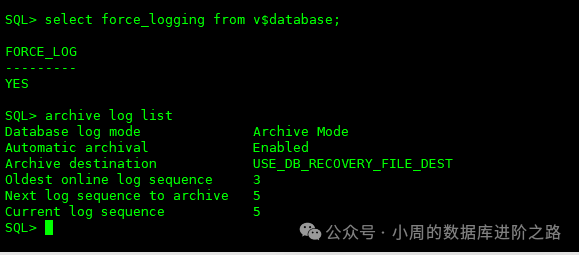
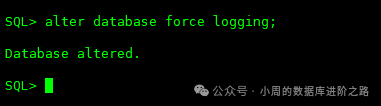
2、主库启用强制记录日志功能
查询是否启用强制记录日志
SQL>select force_logging from v$database;
如果未启用,则使用下面语句来开启强制记录日志
SQL> alter database force logging;
3、主库参数配置
(1)添加日志组
SQL>select name from v$datafile; #查看数据文件位置; SQL>select member from v$logfile; #查看日志文件位置; SQL> select file_name from dba_temp_files; #查看临时文件位置; SQL>col member format a50; SQL>select a.thread#,a.group#,a.bytes/1024/1024,b.member from v$log a,v$logfile b where a.group#=b.group#; #查看有几个日志组,根据查出来的信息添加以下日志组。每个 thread 都需要创建,standby redo log 比 redo log 多一组,大小相同 SQL>alter database add standby logfile thread 1 group 11 ('+SZYDATA') size 50m; SQL>alter database add standby logfile thread 1 group 12 ('+SZYDATA') size 50m; SQL>alter database add standby logfile thread 1 group 13 ('+SZYDATA') size 50m; SQL>alter database add standby logfile thread 2 group 21 ('+SZYDATA') size 50m; SQL>alter database add standby logfile thread 2 group 22 ('+SZYDATA') size 50m; SQL>alter database add standby logfile thread 2 group 23 ('+SZYDATA') size 50m;
(2)设置主库参数
一共12个参数需要进行配置。这是关键,如果参数有误,那么搭建会失败。
SQL>alter system set db_unique_name = 'sjzx' scope=spfile; SQL>alter system set log_archive_config='dg_config=(sjzx,sjzxnew)' scope=both sid='*'; SQL>alter system set log_archive_dest_1='location=+SZYDATA valid_for=(all_logfiles,all_roles) db_unique_name=sjzx' scope=both sid='*'; SQL>alter system set log_archive_dest_2='service=sjzxnew async noaffirm valid_for=(online_logfiles,primary_role) db_unique_name=sjzxnew' scope=both sid='*'; SQL>alter system set log_archive_dest_state_1 = 'enable'; SQL>alter system set log_archive_dest_state_2 = 'enable'; SQL>alter system set standby_file_management=auto scope=both sid='*'; SQL>alter system set fal_client='sjzx' scope=both sid='*'; SQL>alter system set fal_server='sjzxnew' scope=both sid='*'; SQL>alter system set log_archive_max_processes=10 scope=both; SQL>alter system set db_file_name_convert='/u01/app/oracle/sjzxnew/oradata/orcldg/datafile','+SZYDATA/sjzx/datafile','/u01/app/oracle/sjzxnew/oradata/orcldg/tempfile','+SZYDATA/sjzx/tempfile' scope=spfile sid='*'; SQL>alter system set log_file_name_convert='/u01/app/oracle/sjzxnew/oradata/orcldg/onlinelog','+SZYDATA/sjzx/onlinelog','/u01/app/oracle/sjzxnew/oradata/orcldg/archdglog','+ARCHDG/sjzx/onlinelog' scope=spfile sid='*';
注意!不要重启主库。rac集群db_file_name_convert和log_file_name_convert不建议按照以上示例设置,应设置db_create_file_dest参数。如设置为以上方式,遇到rac集群2节点重启,会导致起不来报错。
解决方案:
SQL>show parameter convert SQL> alter system set log_file_name_convert=''; #参数置空 SQL> alter system set db_file_name_convert=''; #参数置空
4、主库静态监听配置
[oracle@primarynode admin]$cd u01/app/oracle/product/11.2.0/db_1/network/admin
添加主库的tnsnames.ora参数
[oracle@primarynode admin]$ cat tnsnames.ora sjzx = (DESCRIPTION = (ADDRESS_LIST = (ADDRESS = (PROTOCOL = TCP)(HOST = 192.168.11.11)(PORT = 1521)) ) (CONNECT_DATA = (SERVICE_NAME = sjzx) ) ) #添加以下内容 sjzxnew = (DESCRIPTION = (ADDRESS_LIST = (ADDRESS = (PROTOCOL = TCP)(HOST = 192.168.2.1)(PORT = 1521)) ) (CONNECT_DATA = (SERVICE_NAME = sjzxnew)
注意:主库的listener.ora 不用动,监听也不用重启。其他的三个库,也可以现在配置。 这里需要注意的是RAC环境下home和grid用户下的tns都需要修改。
(三)目的端配置
1、密码文件
在dataguard中,主库与备库sys密码需一致,需要将主库的密码文件拷贝到备库中,拷贝过来后名称也需要修改。
[oracle@primarynode admin]$ cd $ORACLE_HOME/dbs
[oracle@primarynode dbs]$ scp orapsjzx oracle@192.168.2.1:/u01/app/oracle/product/11.2.0/db_1/dbs

“如果不拷贝密码文件,直接使用orapwd生成一个新的密码文件,密码需与主库一致: [oracle@primarynode dbs]$ orapwd file=orapworcl11g password='password';
2、初始化参数文件
1、在主库生成初始化参数文件
SQL> create pfile from spfile;

2、拷贝主库的参数文件到备库
[oracle@primarynode dbs]$ scp initorcl11g.ora oracle@192.168.59.250:/u01/app/oracle/product/11.2.0/db_1/dbs
[oracle@primarynode dbs]$mv  initorcl11g.ora initorcl11gnew.ora
3、修改备库的参数文件内容
[oracle@standbynode dbs]$ cat initorcl11g.ora
*.audit_file_dest='/u01/app/oracle/sjzxnew/admin/orcldg/adump'
*.audit_trail='db'
*.compatible='11.2.0.4.0'
*.control_files='/u01/app/oracle/sjzxnew/oradata/orcldg/controlfile/control01.ctl','/u01/app/oracle/sjzxnew/oradata/orcldg/controlfile/control02.ctl'
*.db_block_size=8192
*.db_domain=''
*.db_file_name_convert='+SZYDATA/sjzx/datafile','/u01/app/oracle/sjzxnew/oradata/orcldg/datafile','+SZYDATA/sjzx/tempfile','/u01/app/oracle/sjzxnew/oradata/orcldg/tempfile'
*.log_file_name_convert='+SZYDATA/sjzx/onlinelog','/u01/app/oracle/sjzxnew/oradata/orcldg/onlinelog','+ARCHDG/sjzx/onlinelog','/u01/app/oracle/sjzxnew/oradata/orcldg/archdglog'
*.db_name='sjzx'
*.db_recovery_file_dest_size=6005194752
*.memort_target=18924699648
*.db_recovery_file_dest='/u01/app/oracle/sjzxnew/fast_recover_area'
*.diagnostic_dest='/u01/app/oracle/sjzxnew'
*.fal_client='sjzxnew'
*.fal_server='sjzx'
*.log_archive_config='DG_CONFIG=(sjzx,sjzxnew)'
*.log_archive_dest_1='location=/u01/app/oracle/sjzxnew/oradata/orcldg/archivelog valid_for=(all_logfiles,all_roles) db_unique_name=sjzxnew'
*.log_archive_dest_2='service=sjzx  ASYNC NOAFFIRM valid_for=(online_logfiles,primary_role) db_unique_name=sjzx'
*.log_archive_format='%t_%s_%r.dbf'
*.open_cursors=1000
*.processes=500
*.remote_login_passwordfile='exclusive'
*.standby_file_management='AUTO'
*.db_unique_name='sjzxnew'
*.service_names='sjzx'
*.undo_tablespace='UNDOTBS1'
**注意**:里面涉及到路径的需要手动创建
注意:里面涉及到路径的需要手动创建
3、在备库创建所需路径
[oracle@standbynode dbs]$ mkdir -p u01/app/oracle/sjzxnew/oradata/orcldg/datafile [oracle@standbynode dbs]$ mkdir -p u01/app/oracle/sjzxnew/oradata/orcldg/onlinelog [oracle@standbynode dbs]$ mkdir -p u01/app/oracle/sjzxnew/oradata/orcldg/tempfile [oracle@standbynode dbs]$ mkdir -p u01/app/oracle/sjzxnew/oradata/orcldg/controlfile [oracle@standbynode dbs]$ mkdir -p u01/app/oracle/sjzxnew/oradata/orcldg/archivelog [oracle@standbynode dbs]$ mkdir -p u01/app/oracle/sjzxnew/admin/orcldg/adump [oracle@standbynode dbs]$ mkdir -p u01/app/oracle/sjzxnew/admin/orcldg/dpdump [oracle@standbynode dbs]$ mkdir -p u01/app/oracle/sjzxnew/admin/orcldg/hdump [oracle@standbynode dbs]$ mkdir -p u01/app/oracle/sjzxnew/admin/orcldg/pfile [oracle@standbynode dbs]$ mkdir -p u01/app/oracle/sjzxnew/fast_recover_area [oracle@standbynode dbs]$ mkdir -p u01/app/oracle/sjzxnew/oradata/orcldg/archdglog
使用pfile文件创建spfile文件登陆到idle数据库
[oracle@standbynode dbs]$sqlplus  as sysdba;
SQL> create spfile from pfile;

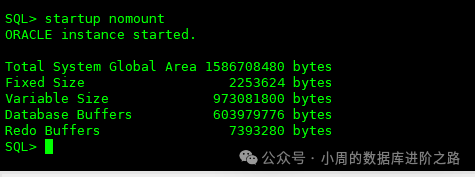
SQL> startup nomount
如有以下报错,需要进行以下配置:
vi etc/fstab
新增
tmpfs                   dev/shm                tmpfs   defaults,size=4096M        0 0
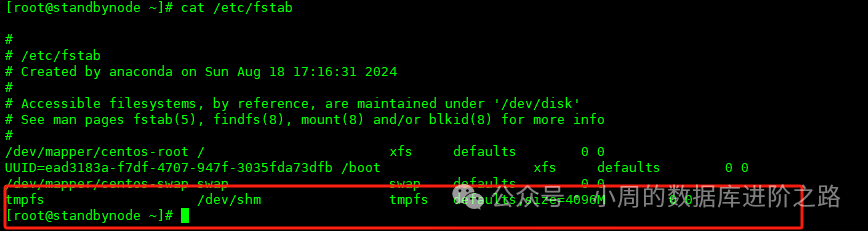
[root@standbynode ~]# mount -o remount dev/shm
然后继续执行 startup nomount
SQL> startup nomount
4、配置静态监听
[oracle@standbynode dbs]$ cd u01/app/oracle/product/11.2.0/db_1/network/admin/
[oracle@orarac1dg admin]$ cat tnsnames.ora  #这里tns我们4个实例一起设置
sjzx =
  (DESCRIPTION =
    (ADDRESS_LIST =
      (ADDRESS = (PROTOCOL = TCP)(HOST = 192.168.11.11)(PORT = 1521))
    )
    (CONNECT_DATA =
      (SERVICE_NAME = szycq)
    )
  )
sjzxnew =
  (DESCRIPTION =
    (ADDRESS_LIST =
      (ADDRESS = (PROTOCOL = TCP)(HOST = 192.168.2.1)(PORT = 1521))
    )
    (CONNECT_DATA =
      (SERVICE_NAME = szycqnew)
    )
  )
 slyy =
  (DESCRIPTION =
    (ADDRESS_LIST =
      (ADDRESS = (PROTOCOL = TCP)(HOST = 192.168.11.11)(PORT = 1521))
    )
    (CONNECT_DATA =
      (SERVICE_NAME = slyy)
    )
  )
slyynew =
  (DESCRIPTION =
    (ADDRESS_LIST =
      (ADDRESS = (PROTOCOL = TCP)(HOST = 192.168.2.1)(PORT = 1521))
    )
    (CONNECT_DATA =
      (SERVICE_NAME = slyynew)
    )
  )
  szycq =
  (DESCRIPTION =
    (ADDRESS_LIST =
      (ADDRESS = (PROTOCOL = TCP)(HOST = 192.168.11.11)(PORT = 1521))
    )
    (CONNECT_DATA =
      (SERVICE_NAME = szycq)
    )
  )
 szycq new =
  (DESCRIPTION =
    (ADDRESS_LIST =
      (ADDRESS = (PROTOCOL = TCP)(HOST = 192.168.2.1)(PORT = 1521))
    )
    (CONNECT_DATA =
      (SERVICE_NAME = szycqnew)
    )
  )
  zhgl =
  (DESCRIPTION =
    (ADDRESS_LIST =
      (ADDRESS = (PROTOCOL = TCP)(HOST = 192.168.11.11)(PORT = 1521))
    )
    (CONNECT_DATA =
      (SERVICE_NAME = zhgl)
    )
  )
zhglnew =
  (DESCRIPTION =
    (ADDRESS_LIST =
      (ADDRESS = (PROTOCOL = TCP)(HOST = 192.168.2.1)(PORT = 1521))
    )
    (CONNECT_DATA =
      (SERVICE_NAME =zhglnew)
    )
  )
[oracle@orarac1dg admin]$ cat listener.ora  #这里静态监听我们4个实例一起设置
# Generated by Oracle configuration tools.
LISTENER =
  (DESCRIPTION_LIST =
    (DESCRIPTION =
      (ADDRESS_LIST =
        (ADDRESS = (PROTOCOL = TCP)(HOST = 192.168.2.1)(PORT = 1521))
      )
    )
  )
SID_LIST_LISTENER =
  (SID_LIST =
    (SID_DESC =
      (GLOBAL_DBNAME=sjzxnew)
      (SID_NAME = szycqnew)
      (ORACLE_HOME = /u01/app/oracle/product/11.2.0/db_1)
    )
    (SID_DESC =
      (GLOBAL_DBNAME=slyynew)
      (SID_NAME = szycqnew)
      (ORACLE_HOME = /u01/app/oracle/product/11.2.0/db_1)
     )
     (SID_DESC =
      (GLOBAL_DBNAME=szycqnew)
      (SID_NAME = szycqnew)
      (ORACLE_HOME = /u01/app/oracle/product/11.2.0/db_1)
     )
     (SID_DESC =
      (GLOBAL_DBNAME=zhglnew)
      (SID_NAME = szycqnew)
      (ORACLE_HOME = /u01/app/oracle/product/11.2.0/db_1)
     )
  )
5、测试网络连通性
主备之间互相测试连通性
[oracle@standbynode admin]$ tnsping sjzx
[oracle@primarynode dbs]$ tnsping sjzxnew
6、在主备库进行登录测试
[oracle@primarynode dbs]$ sqlplus sys/password@sjzx as sysdba
[oracle@primarynode dbs]$ sqlplus sys/password@sjzxnew as sysdba
注意:这里一定要全部弄通,要不然下面的步骤执行不下去。需要注意的是Oracle RAC集群同步到Oracle单机的,需要home和grid用户下的tns配置都改成一样的。这里我也是踩过坑的。
7、使用duplicate创建物理standby
连接到主备库
[oracle@primarynode dbs]$ rman target sys/password@sjzx auxiliary sys/password@sjzx nocatalog
使用duplicate复制数据库
RMAN> duplicate target database for standby from active database nofilenamecheck;
当然,也可以用脚本。
vi duplicate.sh #!/bin/bash rman target sys/password@sjzx auxiliary sys/password@sjzx log=/home/oracle/rman01.log<<EOF run { allocate channel prmy1 type disk; allocate channel prmy2 type disk; allocate channel prmy3 type disk; allocate channel prmy4 type disk; allocate auxiliary channel stby1 type disk; allocate auxiliary channel stby2 type disk; allocate auxiliary channel stby3 type disk; allocate auxiliary channel stby4 type disk; duplicate target database for standby from active database nofilenamecheck; release channel prmy1; release channel prmy2; release channel prmy3; release channel prmy4; release channel stby1; release channel stby2; release channel stby3; release channel stby4; } exit EOF echo "************duplicate is over!************">>/home/oracle/rman01.log
[oracle@standbynode dbs]$chown -R oracle:oinstall duplicate.sh [oracle@standbynode dbs]$chmod -R 775 duplicate.sh [oracle@standbynode dbs]$nohup ./duplicate.sh &
查看日志rman01.log日志即可。
踩过的坑1:因为脚本里面的主备库的参数通道设置的不一样,导致克隆很慢。这一点大家要注意。

踩过的坑2:找不到备库的文件,这里我们不需要紧张,正常等数据克隆完成,我们在备库进行日志的创建。这一点大家要注意。

大家可以看我的这篇文章。https://mp.weixin.qq.com/s/zR1N9IvcylXWmiKaA6xMVw
8、开始同步数据库,在备库上执行
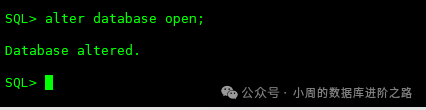
SQL>alter database open;
9、开启实时同步
SQL> alter database recover managed standby database using current logfile disconnect from session;

1、主库切换归档日志
SQL> alter system switch logfile; SQL> archive log list
2、查看主备库状态
主库检查
SQL>set line 200
set pagesize 200
select name,remote_archive,database_role,guard_status,db_unique_name from v$database;
3、备库检查
SQL>set line 200
set pagesize 200
select name,remote_archive,database_role,guard_status,db_unique_name from v$database;
SQL>archive log list
注意:主库的状态应该是PHYSICAL STANDBY,备库应该是此时状态应该是TO PRIMARY。特别要注意备库的SHITCHOVER STATUS和trace日志,如果有GAP存在,则主库切换会存在问题,要及时进行修复。这个我也踩过坑,备库提示缺少几个归档日志,主库的归档被删掉了,这种情况就需要去修复了。
SQL>select * from V$ARCHIVE_GAP;
4、查询主备库日志是否同步(确保最大 SEQUENCE#相同)
SQL>SELECT SEQUENCE#, FIRST_TIME, NEXT_TIME  FROM V$ARCHIVED_LOG ORDER BY
SEQUENCE#;


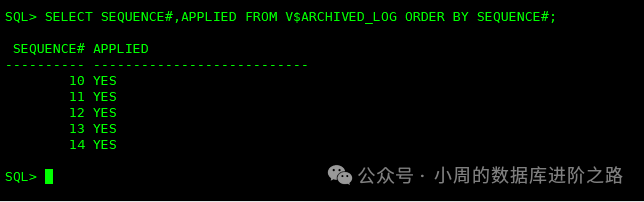
5、检查日志是否被备库使用(APPLIED 值为 yes)
SQL> SELECT SEQUENCE#,APPLIED FROM V$ARCHIVED_LOG ORDER BY SEQUENCE#;
如果需要修改备库的参数,我们可以暂时关闭DG的同步,等修改完再开启同步
SQL> ALTER DATABASE RECOVER MANAGED STANDBY DATABASE CANCEL;
SQL> alter database recover managed standby database disconnect from session;
到这里,我们第一个实例就已经完成了。
[oracle@standbynode dbs]$ vi /home/oracle/.bash_profile #修改oracle_sid,大家按照实例同步的顺利去修改。修改完成后一定要记得source export ORACLE_SID=slyy [oracle@standbynode dbs]$source /home/oracle/.bash_profile
[oracle@standbynode dbs]$ echo $ORACLE_SID #这里显示为slyy即正常。
五、其他三个实例的DG配置
接下来,大家重复第四部分的操作,注意主库也要切换环境变量。
主库:开启附加日志,修改主库的参数、添加日志组,添加tns的配置、传密码的操作即可。
备库:创建路径,创建参数文件,修改克隆脚本,进行克隆即可。克隆完成后,开库和开启复制关系。
六、切换
这步也是最关键的一步。
在 RAC 状态下,主从数据库的切换时主从库只能有一个实例在运行状态。在切换前需关掉其他节点,在切换完成后再启动其他节点。
1、登录RAC节点2的grid用户,关掉监听和数据库服务。
SQL>crsctl check cluster SQL>srvctl status instance -d szycq -i szycq2 SQL>srvctl status instance -d zhgl -i zhgl2 SQL>srvctl status instance -d sjzx -i sjzx2 SQL>srvctl status instance -d slyy-i slyy2 SQL>srvctl stop instance -d szycq -i szycq2 SQL>srvctl stop instance -d zhgl -i zhgl2 SQL>srvctl stop instance -d sjzx -i sjzx2 SQL>srvctl stop instance -d slyy -i slyy2
2、查询主备库状态
主库多切换归档
SQL> alter system switch logfile; set linesize 200; select name,open_mode,database_role,protection_mode,protection_level,switchover_status from gv$database; SQL> SELECT SEQUENCE#, FIRST_TIME, NEXT_TIME FROM V$ARCHIVED_LOG ORDER BY SEQUENCE#; 备库结果应该是 to standby
3、将主库(11.11)切换到从库状态
SQL> alter database commit to switchover to physical standby with session shutdown; SQL> startup mount; SQL> select name,open_mode,database_role,protection_mode,protection_level,switchover_status from gv$database; 此时状态应该是PHYSICAL STANDBY
4、在备库2.1上执行切换命令
--先检查是否能切换到主库
SQL> SELECT OPEN_MODE, DATABASE_ROLE, SWITCHOVER_STATUS, FORCE_LOGGING, DATAGUARD_BROKER, GUARD_STATUS FROM V$DATABASE; 确认可以后,执行切换命令: SQL> alter database commit to switchover to primary with session shutdown; SQL> alter database open; SQL> SELECT OPEN_MODE, DATABASE_ROLE, SWITCHOVER_STATUS, FORCE_LOGGING, DATAGUARD_BROKER, GUARD_STATUS FROM V$DATABASE; 此时状态应该是TO PRIMARY
5、在原主库上开启 redo apply,保证主备库同步。
--打开备库 SQL>alter database open; --在备库启动实时日志同步模式 SQL> alter database recover managed standby database using current logfile disconnect;
6、再次检查主备的切换情况
SQL>set linesize 999 SQL>select name,open_mode,database_role,protection_mode,switchover_status from v$database;
7、整体切换完成后修改主机的IP地址,监听文件,tns文件,重启监听
建议将2.1的主机地址改为原RAC集群的scanip,这样对业务的影响最小。
8、其他
如果修改数据库服务名
SQL>alter system set service_names='szycq' scope=both; SQL>alter system set service_names='zhgl' scope=both; SQL>alter system set service_names='sjzx' scope=both; SQL>alter system set service_names='slyy' scope=both;
切换环境变量
[oracle@standbynode dbs]$export ORACLE_SID=szycq [oracle@standbynode dbs]$export ORACLE_SID=sjzx [oracle@standbynode dbs]$export ORACLE_SID=slyy [oracle@standbynode dbs]$export ORACLE_SID=zhgl
修改GAP的具体操作,大家可以参考三哥的这篇文章:https://mp.weixin.qq.com/s/LOs4tNr6uFd3qfvun2mvdQ
七、总结
这样,我们就完成了数据的迁移工作,如果是生产环境,建议大家操作前先进行测试,充分验证后再进行迁移工作。
欢迎关注公众号《小周的数据库进阶之路》,更多精彩知识和干货尽在其中。
文中的概念来源于互联网,如有侵权,请联系我删除。
欢迎关注公众号:小周的数据库进阶之路,一起交流数据库、中间件和云计算等技术。如果觉得读完本文有收获,可以转发给其他朋友,大家一起学习进步!感兴趣的朋友可以加我微信,拉您进群与业界的大佬们一起交流学习。
