


前言:简单学习使用思科三层交换机进行不同网段之间的通信。
一.背景
对于最近工作上遇到各种网络问题,处理起来不是特别得心应手,需要自己从头拾起交换机知识,这样才不会叫天天不应叫地地不灵,故而从简单的vlan划分复习,慢慢进阶到复杂的网络架构配置。
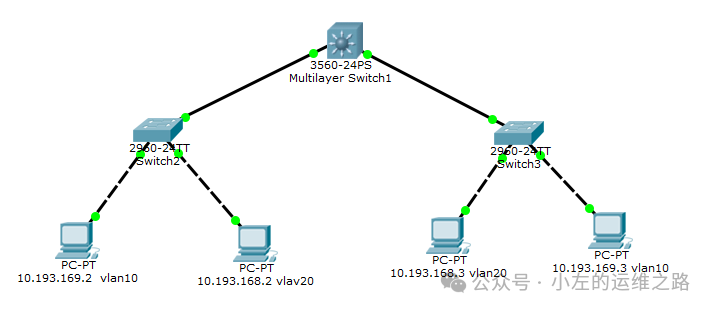
二.建立网络拓扑
实验开始先搭建一套完整的网络拓扑,其中以4台PC作为测试机器,2台2960交换机做为通信设备,一台三层交换机开启路由功能,达到不同vlan间通信的桥梁。
PC1:10.193.168.2 255.255.255.0 10.193.168.1
PC2:10.193.169.2 255.255.255.0 10.193.169.1
PC3:10.193.168.3 255.255.255.0 10.193.168.1
PC4:10.193.169.3 255.255.255.0 10.193.169.1
交换机分别配置vlan10,vlan20,三层交换机端口配置10.193.168.1和10.193.169.1两个IP。
三.交换机配置
1)二层交换机配置
Switch>enable Switch#conf t Enter configuration commands, one per line. End with CNTL/Z. Switch(config)#vlan 10 #创建vlan10 Switch(config-vlan)#vlan 20 #创建vlan20 Switch(config-vlan)#exit Switch(config)#interface f0/2 #进入接口f0/2 Switch(config-if)#switchport access vlan 10 #配置接口f0/2为vlan10 Switch(config-if)#exit Switch(config)#interface f0/3 #进入接口f0/3 Switch(config-if)#switchport access vlan 20 #配置为vlan20 Switch#exit Switch>show vlan #查看vlan信息,可以看到两个接口加入到了对应的vlan VLAN Name Status Ports ---- -------------------------------- --------- ------------------------------- 1 default active Fa0/4, Fa0/5, Fa0/6, Fa0/7 Fa0/8, Fa0/9, Fa0/10, Fa0/11 Fa0/12, Fa0/13, Fa0/14, Fa0/15 Fa0/16, Fa0/17, Fa0/18, Fa0/19 Fa0/20, Fa0/21, Fa0/22, Fa0/23 Fa0/24, Gig0/1, Gig0/2 10 VLAN0010 active Fa0/2 20 VLAN0020 active Fa0/3 1002 fddi-default active 1003 token-ring-default active 1004 fddinet-default active 1005 trnet-default active VLAN Type SAID MTU Parent RingNo BridgeNo Stp BrdgMode Trans1 Trans2 ---- ----- ---------- ----- ------ ------ -------- ---- -------- ------ ------ 1 enet 100001 1500 - - - - - 0 0 10 enet 100010 1500 - - - - - 0 0 20 enet 100020 1500 - - - - - 0 0 1002 fddi 101002 1500 - - - - - 0 0 1003 tr 101003 1500 - - - - - 0 0 1004 fdnet 101004 1500 - - - ieee - 0 0 1005 trnet 101005 1500 - - - ibm - 0 0 Remote SPAN VLANs ------------------------------------------------------------------------------ Primary Secondary Type Ports ------- --------- ----------------- ------------------------------------------ Switch# |
2)三层交换机配置
配置好二层交换机后,开始配置三层交换机,三层交换机除了配置vlan外,还要在vlan上配置IP做为4台主机的网关。
Switch>enable Switch#conf t Enter configuration commands, one per line. End with CNTL/Z. Switch(config)#vlan 10 #创建vlan10 Switch(config-vlan)#vlan 20 #创建vlan20 Switch(config-vlan)#exit Switch(config)#interface f0/2 #进入接口f0/2 Switch(config-if)#switchport trunk encapsulation dot1q #配置Trunk封装为802.1q协议 Switch(config-if)#switchport mode trunk #设置为主干道Trunk模式 Switch(config-if)#exit Switch(config)#interface f0/3 #进入接口f0/3 Switch(config-if)#switchport trunk encapsulation dot1q #配置Trunk封装为802.1q协议 Switch(config-if)#switchport mode trunk #设置为主干道Trunk模式 Switch#exit Switch(config)#interface vlan 10 Switch(config-if)# %LINK-5-CHANGED: Interface Vlan10, changed state to up %LINEPROTO-5-UPDOWN: Line protocol on Interface Vlan10, changed state to up Switch(config-if)#ip address 10.193.169.1 255.255.255.0 #在VLAN端口配置网关的IP与SM Switch(config-if)#no shutdown #开启端口 Switch(config-if)#exit Switch(config)#interface vlan 20 Switch(config-if)# %LINK-5-CHANGED: Interface Vlan20, changed state to up %LINEPROTO-5-UPDOWN: Line protocol on Interface Vlan10, changed state to up Switch(config-if)#ip address 10.193.168.1 255.255.255.0 #在VLAN端口配置网关的IP与SM Switch(config-if)#no shutdown #开启端口 Switch(config-if)#exit Switch(config)#ip routing #开启三层交换机的IP路由功能 |
四.测试实验结果
使用PC1分别ping PC2,PC3和PC4,能够ping通表示配置成功:
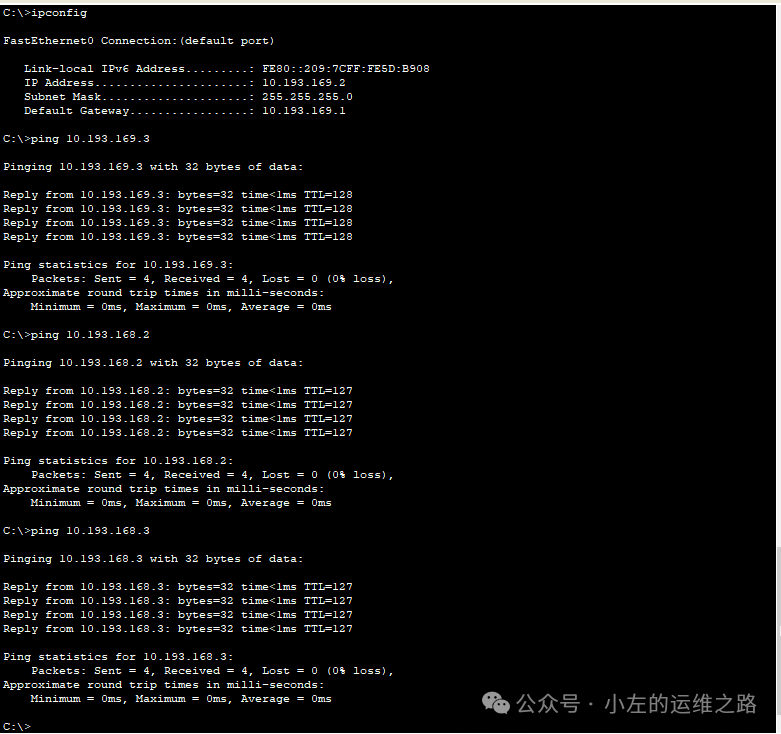
实验成功!
五.总结
1)什么是vlan
VLAN(Virtual Local Area Network,虚拟局域网)是一种网络隔离技术,主要应用于路由器和交换机上。它允许将交换机上的端口进行分组,创建虚拟的局域网,从而实现在不受网络用户的物理位置限制而根据用户需求进行网络分段。
2)10.193.168.1和10.193.169.1是配置在vlan还是接口上?评论区回答一下
