如何通过脚本的方式进行K8s集群的备份
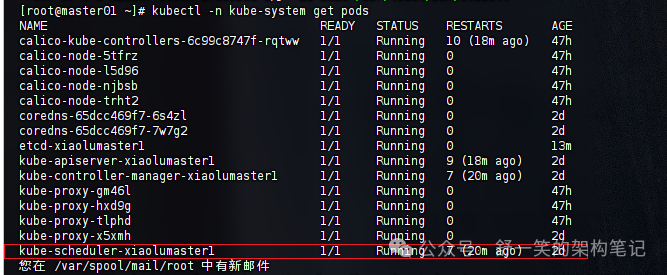
查看K8s中master节点中etcd集群的状态
kubectl get pods -n kube-system | grep etcd

由于使用的etcd服务是K8s搭建时自身携带的,并不是独立搭建的etcd集群信息。使用 K8s 搭建集群时,etcd
是 Kubernetes 集成的一个重要组件因此需要查看此K8s中etcd的配置信息如何。执行下面的命令。
kubectl -n kube-system get pods # 首先执行这个命令查看一下master节点中etcd服务的name信息
拿到信息之后需要将 kubectl -n kube-system describe pod
kubectl -n kube-system describe pod etcd-xiaolumaster1
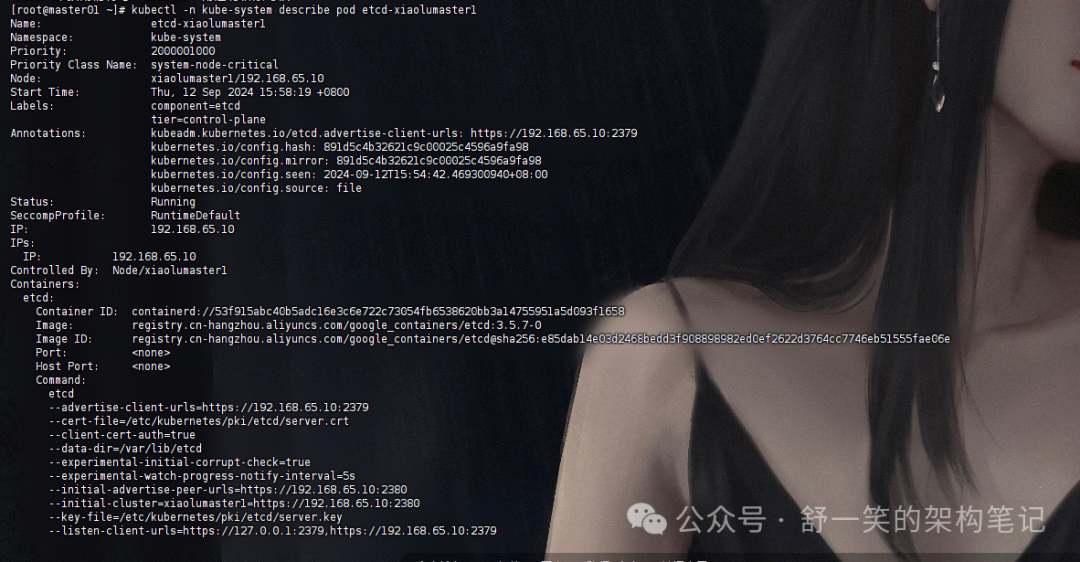
此处是上述命令执行结果中详细信息做一下展示,我在下面的信息中使用了「提取这个密钥信息」这个标注出了信息的位置在哪里。
[root@master01 ~]# kubectl -n kube-system describe pod etcd-xiaolumaster1Name: etcd-xiaolumaster1Namespace: kube-systemPriority: 2000001000Priority Class Name: system-node-criticalNode: xiaolumaster1/192.168.65.10Start Time: Thu, 12 Sep 2024 15:58:19 +0800Labels: component=etcdtier=control-planeAnnotations: kubeadm.kubernetes.io/etcd.advertise-client-urls: https://192.168.65.10:2379kubernetes.io/config.hash: 891d5c4b32621c9c00025c4596a9fa98kubernetes.io/config.mirror: 891d5c4b32621c9c00025c4596a9fa98kubernetes.io/config.seen: 2024-09-12T15:54:42.469300940+08:00kubernetes.io/config.source: fileStatus: RunningSeccompProfile: RuntimeDefaultIP: 192.168.65.10IPs:IP: 192.168.65.10Controlled By: Node/xiaolumaster1Containers:etcd:Container ID: containerd://53f915abc40b5adc16e3c6e722c73054fb6538620bb3a14755951a5d093f1658Image: registry.cn-hangzhou.aliyuncs.com/google_containers/etcd:3.5.7-0Image ID: registry.cn-hangzhou.aliyuncs.com/google_containers/etcd@sha256:e85dab14e03d2468bedd3f908898982ed0ef2622d3764cc7746eb51555fae06ePort: <none>Host Port: <none>Command:etcd--advertise-client-urls=https://192.168.65.10:2379--cert-file=/etc/kubernetes/pki/etcd/server.crt ### 提取这个密钥信息--client-cert-auth=true--data-dir=/var/lib/etcd--experimental-initial-corrupt-check=true--experimental-watch-progress-notify-interval=5s--initial-advertise-peer-urls=https://192.168.65.10:2380--initial-cluster=xiaolumaster1=https://192.168.65.10:2380--key-file=/etc/kubernetes/pki/etcd/server.key ### 提取这个密钥信息--listen-client-urls=https://127.0.0.1:2379,https://192.168.65.10:2379--listen-metrics-urls=http://127.0.0.1:2381--listen-peer-urls=https://192.168.65.10:2380--name=xiaolumaster1--peer-cert-file=/etc/kubernetes/pki/etcd/peer.crt--peer-client-cert-auth=true--peer-key-file=/etc/kubernetes/pki/etcd/peer.key--peer-trusted-ca-file=/etc/kubernetes/pki/etcd/ca.crt--snapshot-count=10000--trusted-ca-file=/etc/kubernetes/pki/etcd/ca.crt ### 提取这个密钥信息 虽然上面有一个和这个一样的,但是不提取 --peer-trusted-ca-file=/etc/kubernetes/pki/etcd/ca.crt 这个的原因是 --trusted-ca-file:这个参数用于为 etcd 客户端连接提供 CA 证书,确保客户端能够验证服务器的身份。因此,这个 CA 证书是客户端与服务器通信时使用的。而--peer-trusted-ca-file:这个参数用于 etcd 集群内节点之间(peer-to-peer)的通信。它确保节点之间能够相互验证身份,使用的是集群内节点之间的 CA 证书。--peer-trusted-ca-file:这个参数用于 etcd 集群内节点之间(peer-to-peer)的通信。它确保节点之间能够相互验证身份,使用的是集群内节点之间的 CA 证书。State: RunningStarted: Thu, 12 Sep 2024 15:54:55 +0800Ready: TrueRestart Count: 0Requests:cpu: 100mmemory: 100MiLiveness: http-get http://127.0.0.1:2381/health%3Fexclude=NOSPACE&serializable=true delay=10s timeout=15s period=10s #success=1 #failure=8Startup: http-get http://127.0.0.1:2381/health%3Fserializable=false delay=10s timeout=15s period=10s #success=1 #failure=24Environment: <none>Mounts:etc/kubernetes/pki/etcd from etcd-certs (rw)var/lib/etcd from etcd-data (rw)Conditions:Type StatusInitialized TrueReady TrueContainersReady TruePodScheduled TrueVolumes:etcd-certs:Type: HostPath (bare host directory volume)Path: etc/kubernetes/pki/etcdHostPathType: DirectoryOrCreateetcd-data:Type: HostPath (bare host directory volume)Path: var/lib/etcdHostPathType: DirectoryOrCreateQoS Class: BurstableNode-Selectors: <none>Tolerations: :NoExecute op=ExistsEvents:Type Reason Age From Message---- ------ ---- ---- -------Normal Killing 63m kubelet Stopping container etcdNormal Pulled 16m (x4 over 47h) kubelet Container image "registry.cn-hangzhou.aliyuncs.com/google_containers/etcd:3.5.7-0" already present on machineNormal Created 16m (x4 over 47h) kubelet Created container etcdNormal Started 16m (x4 over 47h) kubelet Started container etcd
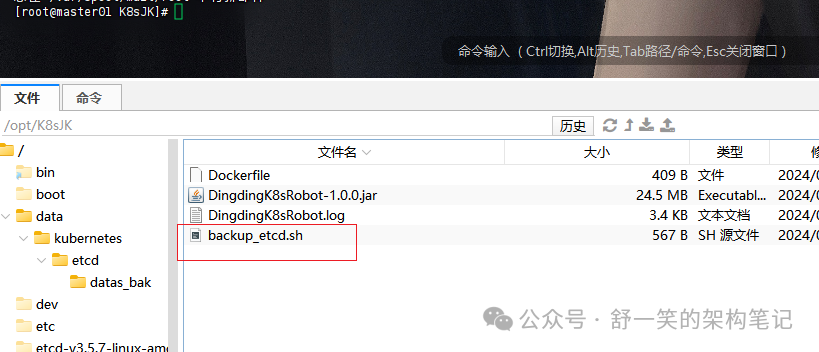
编写备份的脚本shell文件
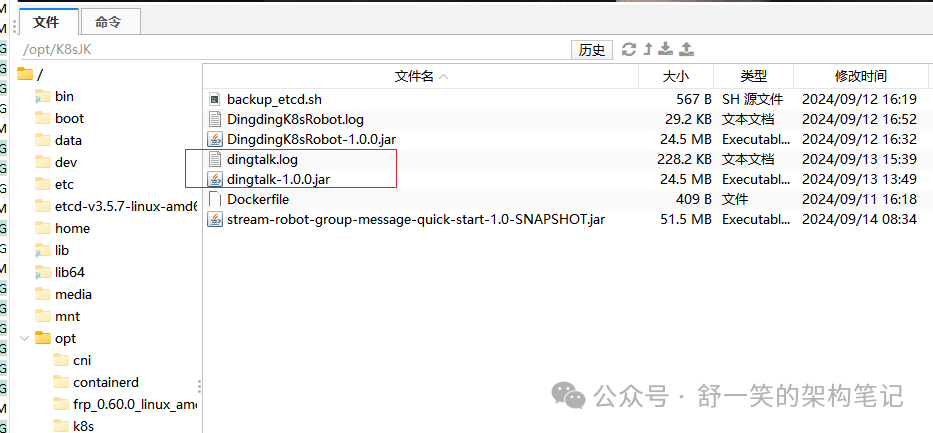
文件名称 backup_etcd.sh
#!/bin/bash#时间戳,用来区分不同备份timestamp=`date +%Y%m%d-%H%M%S`#备份到哪个文件夹back_dir="/opt/k8s"#etcd集群列表endpoints="https://192.168.65.10:2379"#etcd证书路径cert_file="/etc/kubernetes/pki/etcd/server.crt"#etcd证书的key路径key_file="/etc/kubernetes/pki/etcd/server.key"#ca证书路径cacert_file="/etc/kubernetes/pki/etcd/ca.crt"mkdir -p $back_dirETCDCTL_API=3 etcdctl \--endpoints="${endpoints}" \--cert=$cert_file \--key=$key_file \--cacert=$cacert_file \snapshot save $back_dir/snapshot_$timestamp.db
赋予文件执行权限并查看权限信息
这边我使用的上述路径下的文件,所以后续跟上的是这个路径在命令中。
chmod +x opt/K8sJK/backup_etcd.sh
查看一下权限是否已经赋予

这里给上面的权限信息做一下详细的解释
「文件类型与权限」: -rwxr-xr-x-
:表示这是一个普通文件(不是目录)。rwx
:文件所有者(528287
,后面解释)拥有「读」、「写」和「执行」权限。r-x
:文件所属的组(89939
)拥有「读」和「执行」权限,但没有写权限。r-x
:其他用户(即系统中的其他任何人)拥有「读」和「执行」权限,但没有写权限。「硬链接数量」: 1表示有 1 个硬链接指向这个文件。
执行备份文件的命令进行备份的验证
/opt/K8sJK/backup_etcd.sh

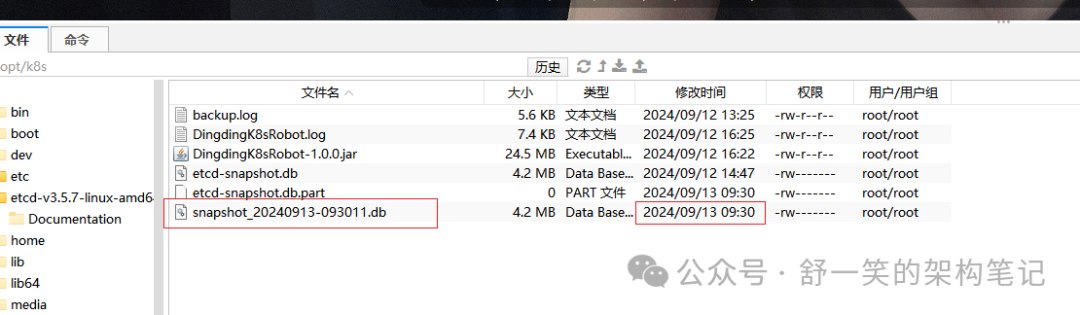
在配置的备份文件位置查看备份的信息,时间也可以刚好对上就是刚才的备份文件。
对接钉钉机器人进行报备
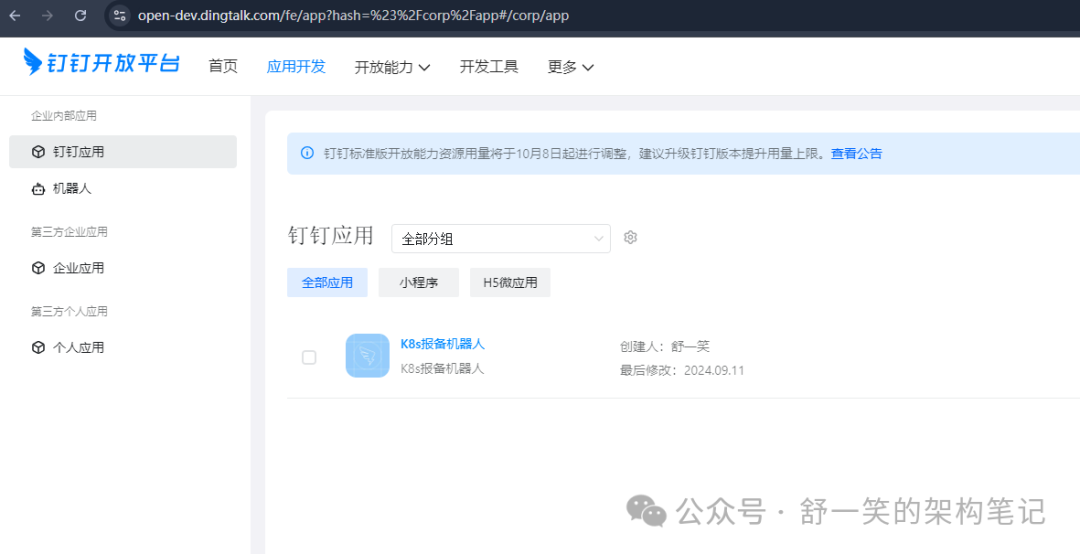
创建一下自己的组织获取管理员身份
钉钉机器人开发平台直达链接
https://open.dingtalk.com/document/tutorial/create-a-robot
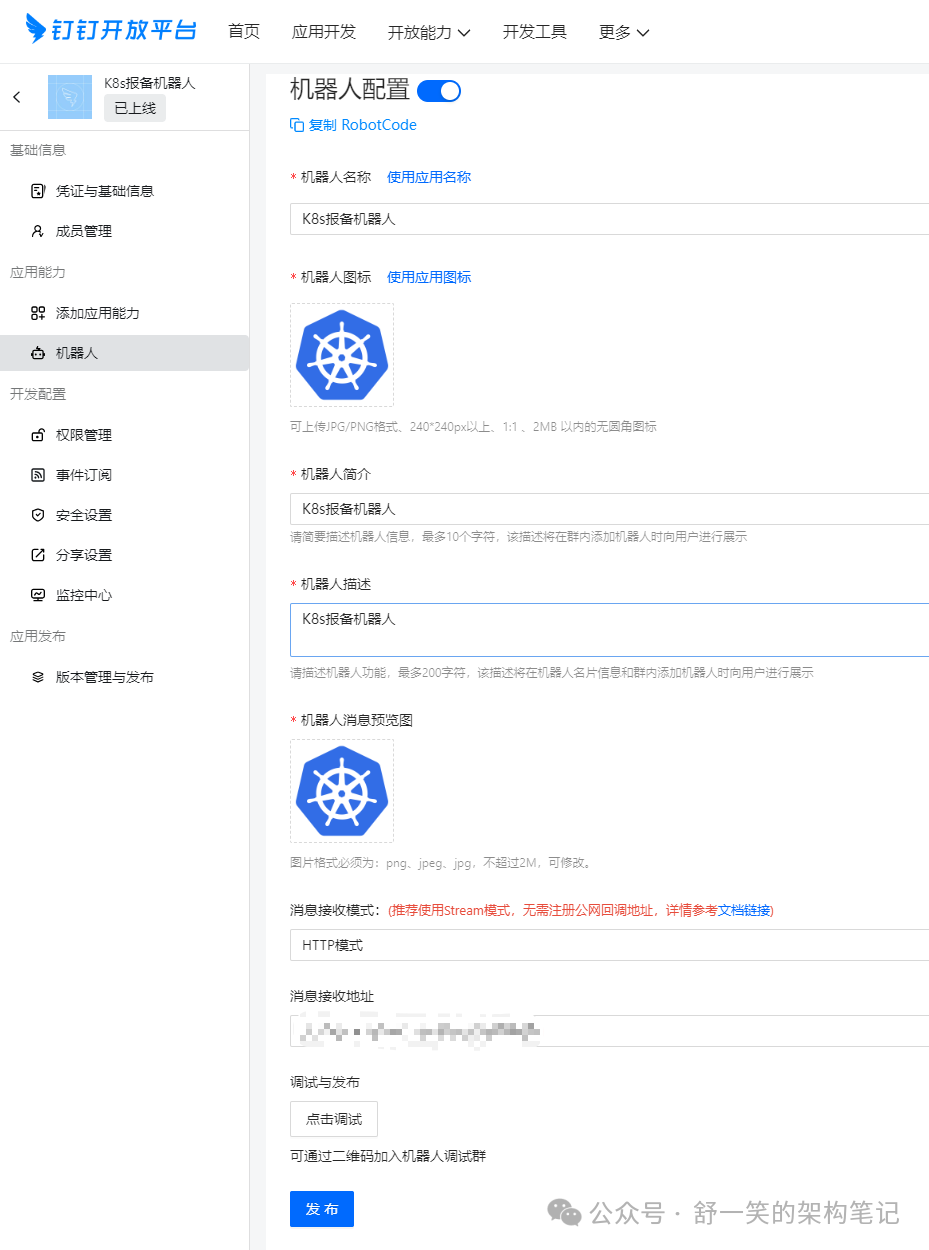
具体的配置信息展示
梳理开发对接钉钉的SDK功能jar包
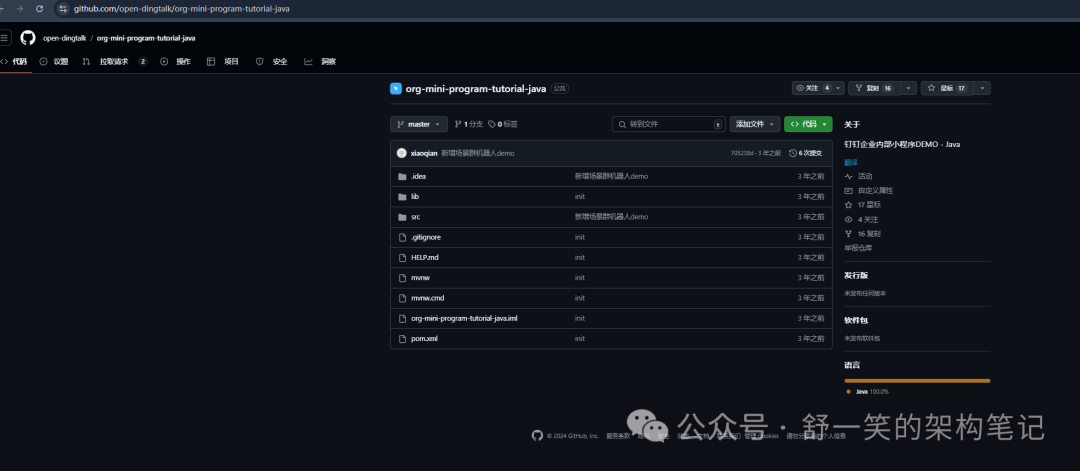
这里采用钉钉官方旧版本SDK基础之上进行二开,后续如果需要进行持续迭代升级会考虑尝试新版本SDK风格进行二开。这里需要说明的是这个只是一个钉钉官方的小demo,二开需要根据自己的需求信息适量的修改和原创。
https://github.com/open-dingtalk/org-mini-program-tutorial-java
钉钉官方的参考文章地址:
https://open.dingtalk.com/document/tutorial/create-a-robot
修改pom文件中旧版SDK最新地址
<dependency><groupId>com.aliyun</groupId><artifactId>alibaba-dingtalk-service-sdk</artifactId><version>2.0.0</version></dependency>
定时任务与@回复消息的大体代码展示
定时备份etcd
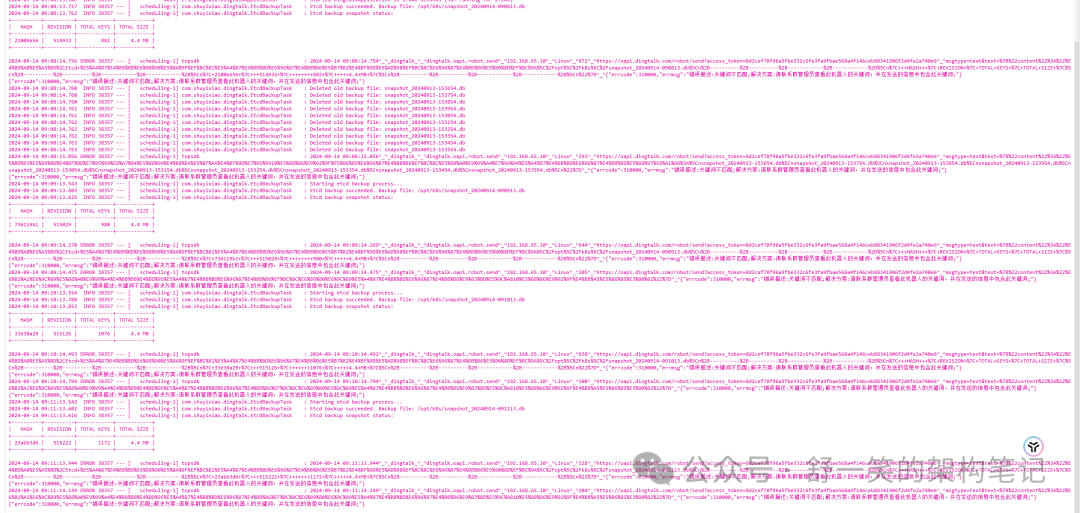
/*** Copyright © 2024年 integration-projects-maven. All rights reserved.* ClassName EtcdBackupTask.java* author 舒一笑 yixiaoshu88@163.com* version 1.0.0* Description etcd定时备份逻辑实现* createTime 2024年09月11日 15:41:00*/@Component@Slf4jpublic class EtcdBackupTask {@Value("${dingtalk.webhook}")private String dingTalkWebhook;@Value("${shell.script.path}")private String shellScriptPath;@Value("${backup.file.path}")private String backupFilePath;private final RobotsController robotsController;public EtcdBackupTask(RobotsController robotsController) {this.robotsController = robotsController;}@Scheduled(fixedRate = 60000) 每1分钟执行一次备份public void backupEtcd() {log.info("Starting etcd backup process...");try {使用 ProcessBuilder 调用 shell 脚本ProcessBuilder processBuilder = new ProcessBuilder("/bin/bash", shellScriptPath);processBuilder.environment().remove("ETCDCTL_CERT"); 移除可能存在的环境变量processBuilder.redirectErrorStream(true);Process process = processBuilder.start();捕获输出日志String backupLog = captureProcessOutput(process);等待进程完成,设置较长的超时时间,例如10分钟boolean finished = process.waitFor(10, TimeUnit.MINUTES);if (!finished) {如果进程未在规定时间内完成,强制终止并发送警告消息process.destroyForcibly();sendDingTalkMessage("你好,Etcd 备份失败!备份进程超时。");log.error("Etcd backup process timed out.");return;}int exitCode = process.exitValue();if (exitCode == 0) {// String backupFileName = getBackupFileName(backupLog);// log.info("Etcd backup succeeded. Backup file: " + backupFileName);// sendDingTalkMessage("你好,Etcd 备份成功!备份文件已保存,文件名:" + backupFileName);String backupFileName = getBackupFileName(backupLog);log.info("Etcd backup succeeded. Backup file: " + backupFileName);获取备份文件状态String snapshotStatus = getSnapshotStatus(backupFileName);log.info("Etcd backup snapshot status: \n" + snapshotStatus);将备份文件名和状态发送到钉钉sendDingTalkMessage("你好,Etcd 备份成功!备份文件已保存,文件名:" + backupFileName + "\n" + snapshotStatus);清理一周前的备份文件cleanOldBackups(backupFilePath);} else {log.error("Etcd backup failed with exit code: " + exitCode);log.error("Etcd backup failed. Error log: \n" + backupLog);sendDingTalkMessage("你好,Etcd 备份失败!错误信息:" + backupLog);}} catch (IOException e) {log.error("IOException occurred during etcd backup process.", e);sendDingTalkMessage("你好,Etcd 备份过程中发生IO异常:" + e.getMessage());} catch (InterruptedException e) {log.error("Backup process interrupted.", e);Thread.currentThread().interrupt(); 恢复中断状态sendDingTalkMessage("你好,Etcd 备份过程中发生中断:" + e.getMessage());} catch (Exception e) {log.error("An unexpected error occurred during etcd backup.", e);sendDingTalkMessage("你好,Etcd 备份过程中发生异常:" + e.getMessage());}}捕获命令的输出和错误流private String captureProcessOutput(Process process) throws IOException {BufferedReader errorStream = new BufferedReader(new InputStreamReader(process.getErrorStream()));BufferedReader outputStream = new BufferedReader(new InputStreamReader(process.getInputStream()));StringBuilder logBuilder = new StringBuilder();String line;捕获错误输出while ((line = errorStream.readLine()) != null) {logBuilder.append("ERROR: ").append(line).append("\n");}捕获标准输出while ((line = outputStream.readLine()) != null) {logBuilder.append("OUTPUT: ").append(line).append("\n");}return logBuilder.toString();}private void sendDingTalkMessage(String message) {robotsController.sendMessage(dingTalkWebhook, message);}从日志中提取备份文件名的逻辑,假设日志里有明确的文件路径private String getBackupFileName(String backupLog) {使用正则表达式提取 "Snapshot saved at" 后的文件路径String regex = "Snapshot saved at (.+\\.db)"; 匹配最终保存的 ".db" 文件路径Pattern pattern = Pattern.compile(regex);Matcher matcher = pattern.matcher(backupLog);if (matcher.find()) {return matcher.group(1).trim(); 返回捕获的文件路径}return "unknown"; 如果未找到则返回 unknown}获取快照状态的方法private String getSnapshotStatus(String backupFileName) throws IOException, InterruptedException {执行 `etcdctl snapshot status` 命令ProcessBuilder processBuilder = new ProcessBuilder("etcdctl", "--write-out=table", "snapshot", "status", backupFileName);Process process = processBuilder.start();String snapshotStatus = captureProcessOutput(process);process.waitFor(1, TimeUnit.MINUTES);清理掉 "OUTPUT:" 前缀,但保留行内容StringBuilder cleanedOutput = new StringBuilder();String[] lines = snapshotStatus.split("\n");for (String line : lines) {// 移除 "OUTPUT:" 前缀,但保留行的内容if (line.startsWith("OUTPUT:")) {cleanedOutput.append(line.replace("OUTPUT: ", "")).append("\n");} else if (!line.contains("ERROR") && !line.contains("Deprecated")) {cleanedOutput.append(line).append("\n");}}return cleanedOutput.toString();}// public void cleanOldBackups(String backupDirectory) throws IOException {// try (Stream<Path> files = Files.list(Paths.get(backupDirectory))) {// files.forEach(file -> {// try {// BasicFileAttributes attr = Files.readAttributes(file, BasicFileAttributes.class);// LocalDateTime fileTime = LocalDateTime.ofInstant(attr.lastModifiedTime().toInstant(), ZoneId.systemDefault());//// // 检查文件是否超过7天// if (fileTime.isBefore(LocalDateTime.now().minusDays(7))) {// Files.delete(file);// log.info("Deleted old backup file: " + file.getFileName());// }// } catch (IOException e) {// log.error("Error while deleting old backup file: " + file.getFileName(), e);// }// });// }// }public void cleanOldBackups(String backupDirectory) throws IOException {// 存储删除的文件名StringBuilder deletedFiles = new StringBuilder("当前保留规则为只保留10分钟内文件,删除的备份文件列表:\n");// 删除过期文件try (Stream<Path> files = Files.list(Paths.get(backupDirectory))) {files.forEach(file -> {try {BasicFileAttributes attr = Files.readAttributes(file, BasicFileAttributes.class);LocalDateTime fileTime = LocalDateTime.ofInstant(attr.lastModifiedTime().toInstant(), ZoneId.systemDefault());// 检查文件是否超过10分钟if (fileTime.isBefore(LocalDateTime.now().minusMinutes(10))) {Files.delete(file);log.info("Deleted old backup file: " + file.getFileName());deletedFiles.append(file.getFileName()).append("\n"); // 将删除的文件名添加到消息中}} catch (IOException e) {log.error("Error while deleting old backup file: " + file.getFileName(), e);}});}// // 构建剩余文件列表// StringBuilder remainingFiles = new StringBuilder("当前剩余的备份文件列表:\n");// try (Stream<Path> remaining = Files.list(Paths.get(backupDirectory))) {// remaining.forEach(file -> remainingFiles.append(file.getFileName()).append("\n"));// }// 如果有删除的文件,添加到钉钉消息中if (deletedFiles.length() > "当前保留规则为只保留10分钟内文件,删除的备份文件列表:\n".length()) {// 将删除文件和剩余文件列表集成到消息// sendDingTalkMessage(deletedFiles.toString() + "\n" + remainingFiles.toString());sendDingTalkMessage(deletedFiles.toString());} else {// 没有删除的文件,也要展示剩余文件// sendDingTalkMessage("没有删除任何备份文件,所有备份文件都在10分钟以内。\n" + remainingFiles.toString());sendDingTalkMessage("没有删除任何备份文件,所有备份文件都在10分钟以内。");}}}
@回复消息代码展示
@RestController@Slf4j/*** 实现了机器人的简单问答功能*/public class RobotsController {private static final String Hello = "你好";@Autowiredprivate RobotsController robotsController;@Value("${dingtalk.webhook}")private String dingTalkWebhook;@Value("${backup.file.path}")private String backupFilePath;@RequestMapping(value = "/robots", method = RequestMethod.POST)public String helloRobots(@RequestBody(required = false) JSONObject json) throws ApiException {System.out.println(json);String content = json.getJSONObject("text").get("content").toString().replaceAll(" ", "");// 获取用户手机号,用于发送@消息// String mobile = getUserMobile(json.getString("senderStaffId"));String sessionWebhook = json.getString("sessionWebhook");DingTalkClient client = new DefaultDingTalkClient(sessionWebhook);if (content.contains(Hello)) {hello(client,backupFilePath);} else {learning(client);}return null;}/*** 发送钉钉通知消息*/public void sendMessage(String webhookUrl, String messageContent) {DingTalkClient client = new DefaultDingTalkClient(webhookUrl);try {OapiRobotSendRequest request = new OapiRobotSendRequest();request.setMsgtype("text");OapiRobotSendRequest.Text text = new OapiRobotSendRequest.Text();text.setContent(messageContent);request.setText(text);OapiRobotSendResponse response = client.execute(request);System.out.println(response.getBody());} catch (ApiException e) {e.printStackTrace();}}/*** 回答其他*/private void learning(DingTalkClient client) {try {OapiRobotSendRequest request = new OapiRobotSendRequest();request.setMsgtype("text");OapiRobotSendRequest.Text text = new OapiRobotSendRequest.Text();text.setContent("我是问好机器人 ~");request.setText(text);// OapiRobotSendRequest.At at = new OapiRobotSendRequest.At();// at.setAtMobiles(Arrays.asList(mobile));// isAtAll类型如果不为Boolean,请升级至最新SDK// at.setIsAtAll(false);// request.setAt(at);OapiRobotSendResponse response = client.execute(request);System.out.println(response.getBody());} catch (ApiException e) {e.printStackTrace();}}/*** 回答你好*/public void hello(DingTalkClient client,String backupDirectory) throws ApiException {OapiRobotSendRequest request = new OapiRobotSendRequest();request.setMsgtype("text");OapiRobotSendRequest.Text text = new OapiRobotSendRequest.Text();text.setContent("哈哈,稍等马上给你当前备份的剩余文件信息~");request.setText(text);// // OapiRobotSendRequest.At at = new OapiRobotSendRequest.At();// // at.setAtMobiles(Arrays.asList(mobile));// // isAtAll类型如果不为Boolean,请升级至最新SDK// // at.setIsAtAll(false);// // request.setAt(at);OapiRobotSendResponse response = client.execute(request);System.out.println(response.getBody());// 构建剩余文件列表StringBuilder remainingFiles = new StringBuilder("当前剩余的备份文件列表:\n");try (Stream<Path> remaining = Files.list(Paths.get(backupDirectory))) {remaining.forEach(file -> remainingFiles.append(file.getFileName()).append("\n"));sendDingTalkMessage(remainingFiles.toString());} catch (IOException e) {throw new RuntimeException(e);}}private void sendDingTalkMessage(String message) {robotsController.sendMessage(dingTalkWebhook, message);}}
yml配置文件展示
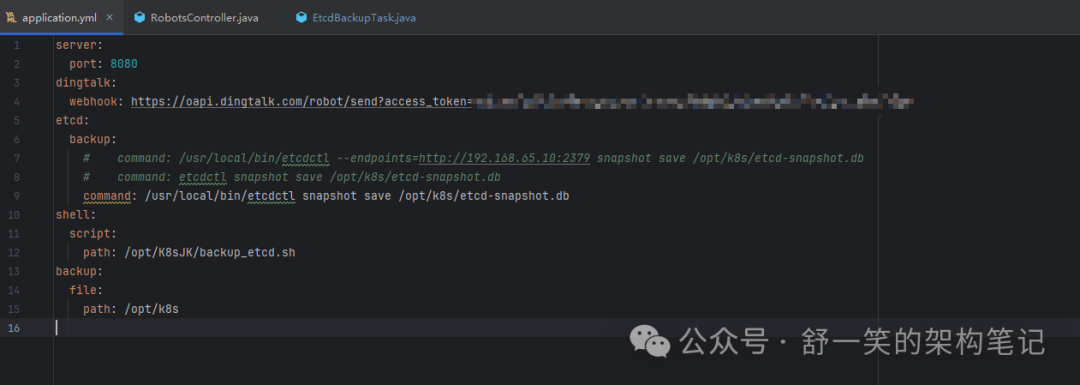
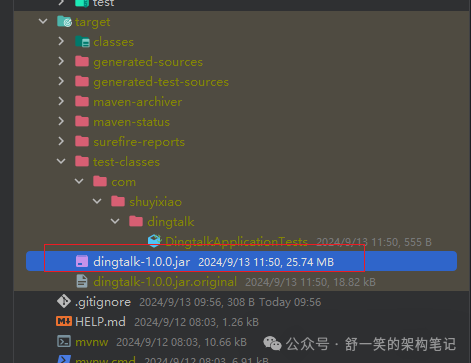
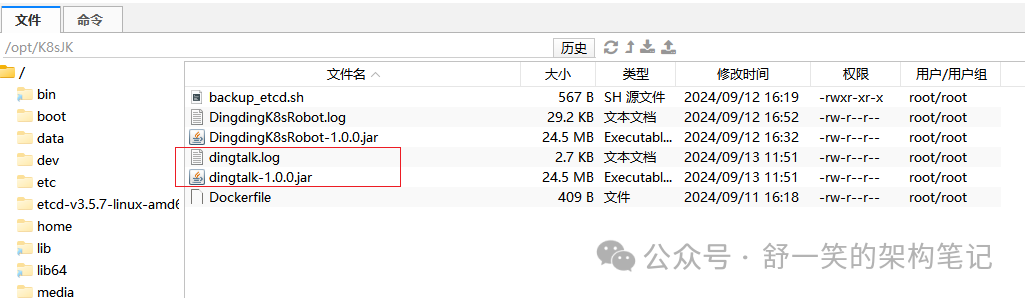
打包成jar部署在master节点服务器中
在对应位置执行运行脚本
nohup java -jar dingtalk-1.0.0.jar > dingtalk.log 2>&1 &

执行上述命令时候可以在运行位置的目录中得到log日志文件方便查看日志信息
内网穿透搭建
本地搭建的内网穿透工具为开源工具ngrok,为什么使用这个因为这个免费版启动之后会得到一个免费的域名。下面是目前常见的内网穿透解决方案的对比。

Linux中搭建的参考网址,这里的话就不过多介绍如何注册网站用于等信息,直接百度或者谷歌搜索ngrok之后按照官网的引导就可以创建好自己的账户。下面就是记录一下如何做一个免费域名的搭建步骤。
https://dashboard.ngrok.com/get-started/setup/linux
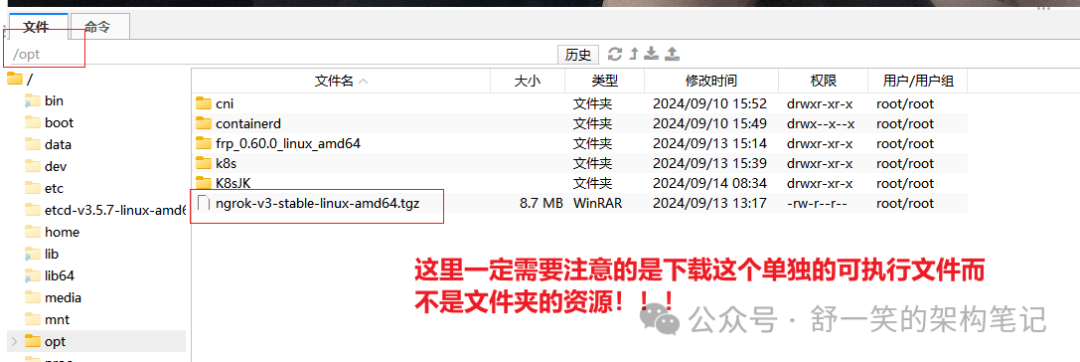
这块只需要根据官网下面的指示进行操作就可以。「但是介绍一个下载这边取巧的技巧就是可以通过科学的手段进行将ngrok下载下来之后将下面的命令修改一下执行」,我这边是已经把这个ngrok下载之后放在了opt目录下才这么写~
sudo tar -xvzf /opt/ngrok-v3-stable-linux-amd64.tgz -C /usr/local/bin
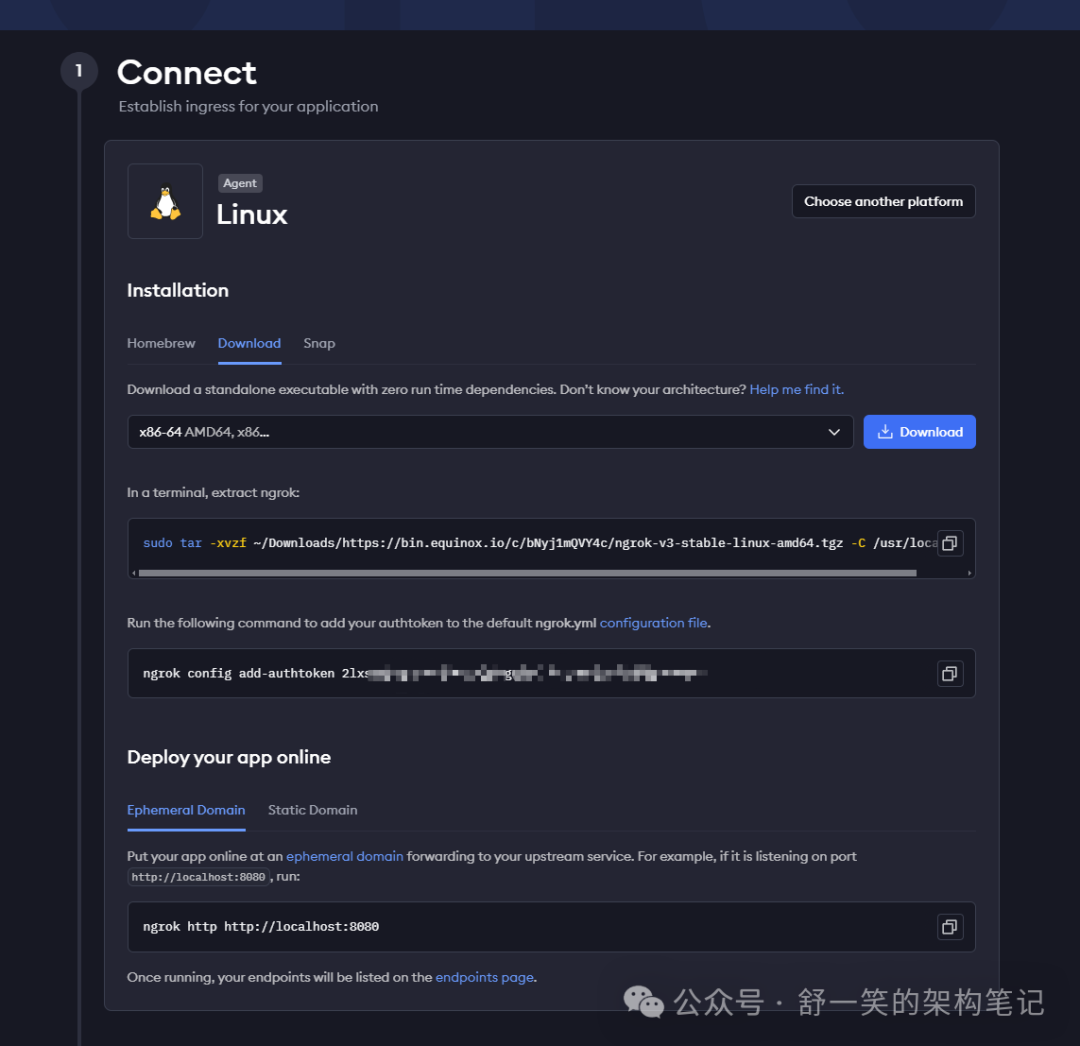
执行token配置命令
ngrok config add-authtoken 2lxsXmbcgyFXXXXXXXXXXXXXXXXXXXXXXXXXXXXXXXXXXXXXXXXXXXXXXXXX
执行内网穿透命令,这边执行8080是因为服务的端口我设置的也是8080,两者需要匹配上。
ngrok http http://localhost:8080
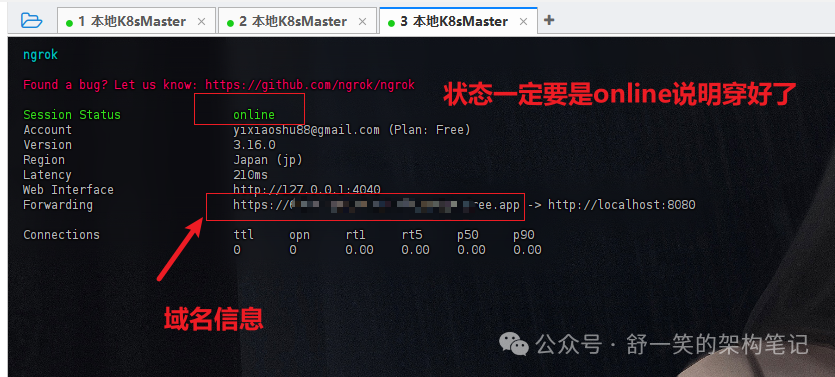
内网穿透命令执行成功之后就可以得到一个ngrok分配给你的带通用ssl认证的域名信息,但是这边需要注意一下的是,虽然可以在浏览器中去掉了不安全的告警信息,但是使用HTTP模式的钉钉机器人那边过不了,所以为了实现与机器人即时通讯的功能我们需要部署两个机器人(主要带ssl认证的域名穿透有点贵)。
执行定时备份的服务进行备份
nohup java -jar dingtalk-1.0.0.jar > dingtalk.log 2>&1 &
使用上述命令可以得到一个运行的服务,然后也可以得到想要的日志文件
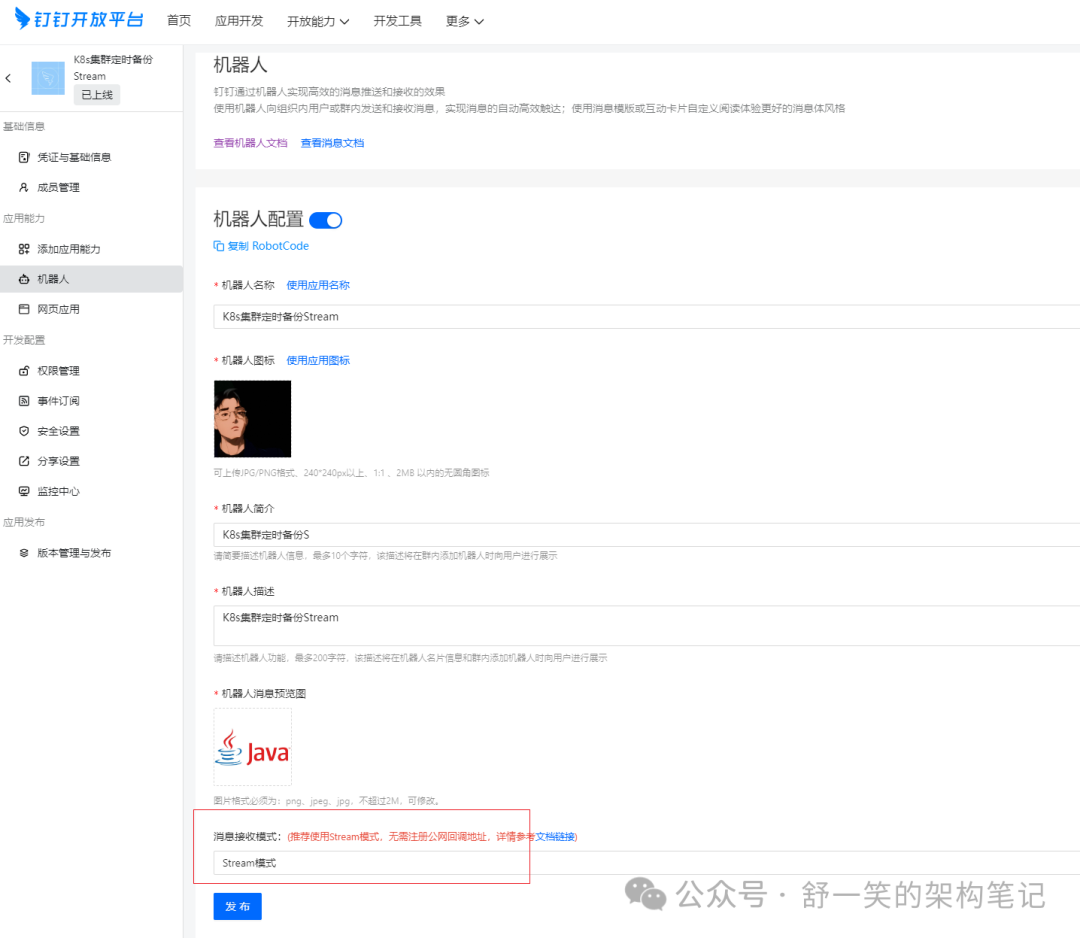
钉钉机器人的配置
需要在这个位置配置你的域名信息,然后这块由于是ngrok穿透得到的免费域名,上面说了就是过不了钉钉的ssl认证,因此在写的时候就是要把https中的s去掉
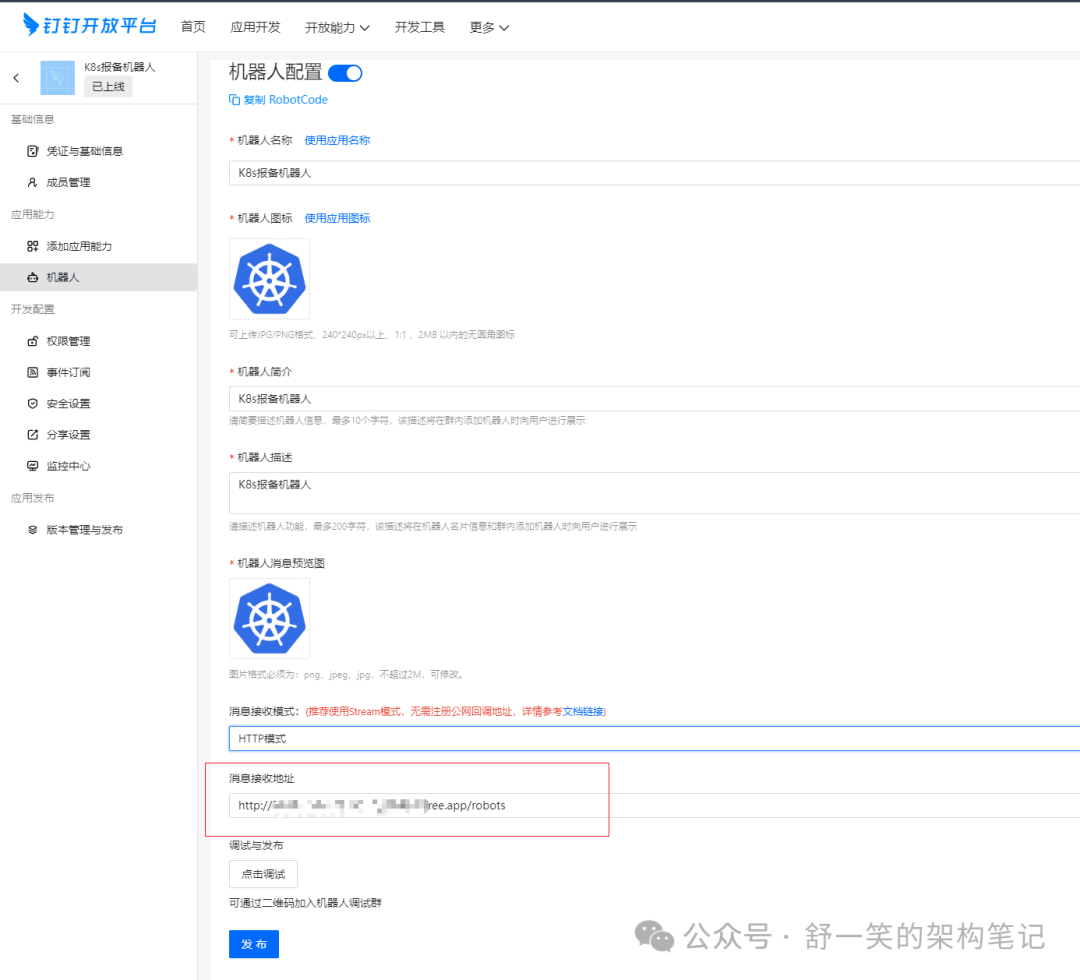
完成上述配置之后需要在钉钉客户端中也一样配置机器人的信息,还有就是自己个性化的回复语不然会有报错
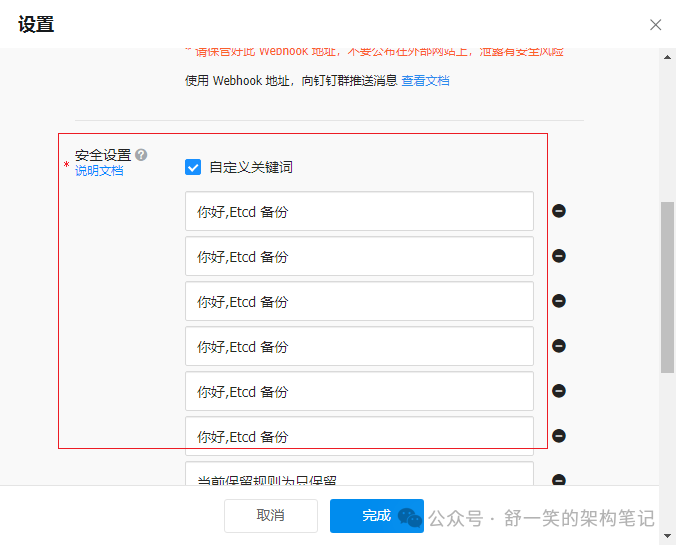
如何这边不设置自定义的回复消息,就会出现下面的报错信息。
好了到这里就配置部署好了基本的定时的钉钉消息机器人,给大家看一下效果

即时聊天机器人配置
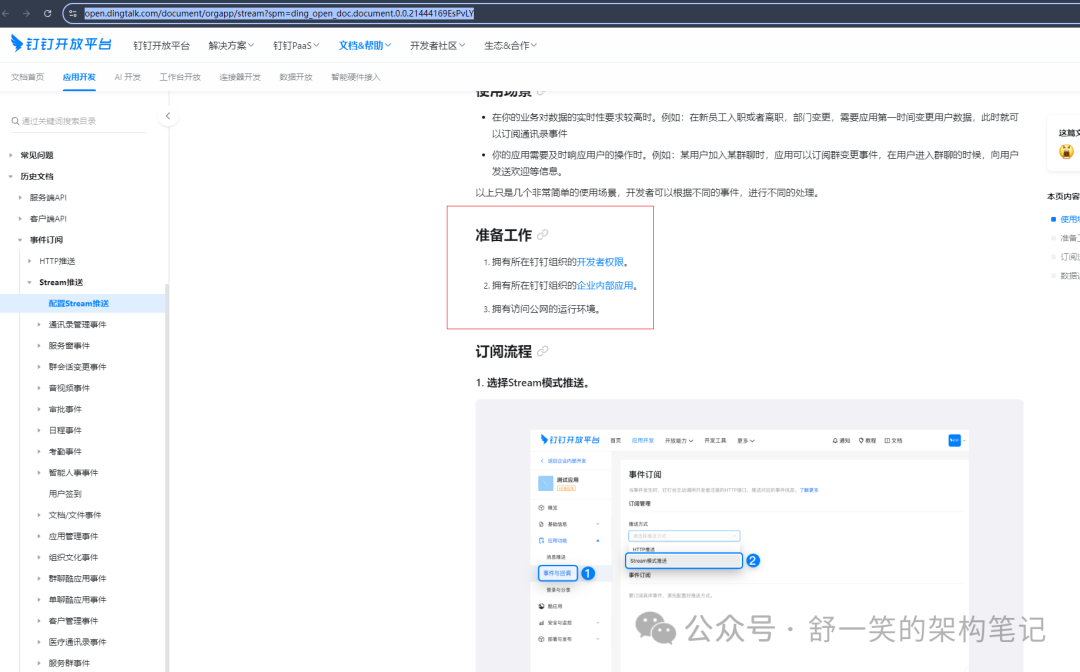
下面就是给大家演示一下这边这个机器人如何配置,没错这边就是需要使用到钉钉机器人的另一个Stream流方式,从我下面的名字定义应该也能看出来。

话不多说直接上干货
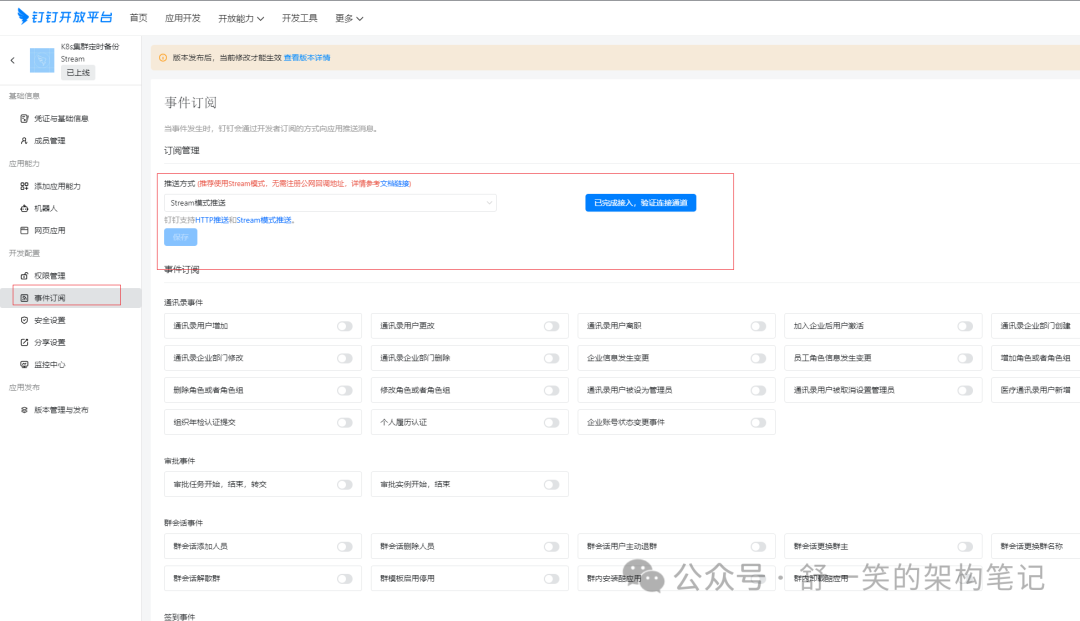
钉钉Stream模式文章介绍与SDK获取
https://open.dingtalk.com/document/resourcedownload/introduction-to-stream-mode?spm=a2q3p.21071111.0.0.267d65eeHyQGLW
https://open.dingtalk.com/document/orgapp/stream?spm=ding_open_doc.document.0.0.21444169EsPvLY
在上述官方的链接介绍中已经将基本操作说比较清楚了,这边有几点主要主要的我这里说明一下。如果你是要为公司组织开发一定要获取到开发者权限不然做不了。
可以更多的参考一下,下面这篇文章的介绍。
https://open.dingtalk.com/document/orgapp/the-application-robot-in-the-enterprise-sends-group-chat-messages?spm=ding_open_doc.document.0.0.21444169EsPvLY
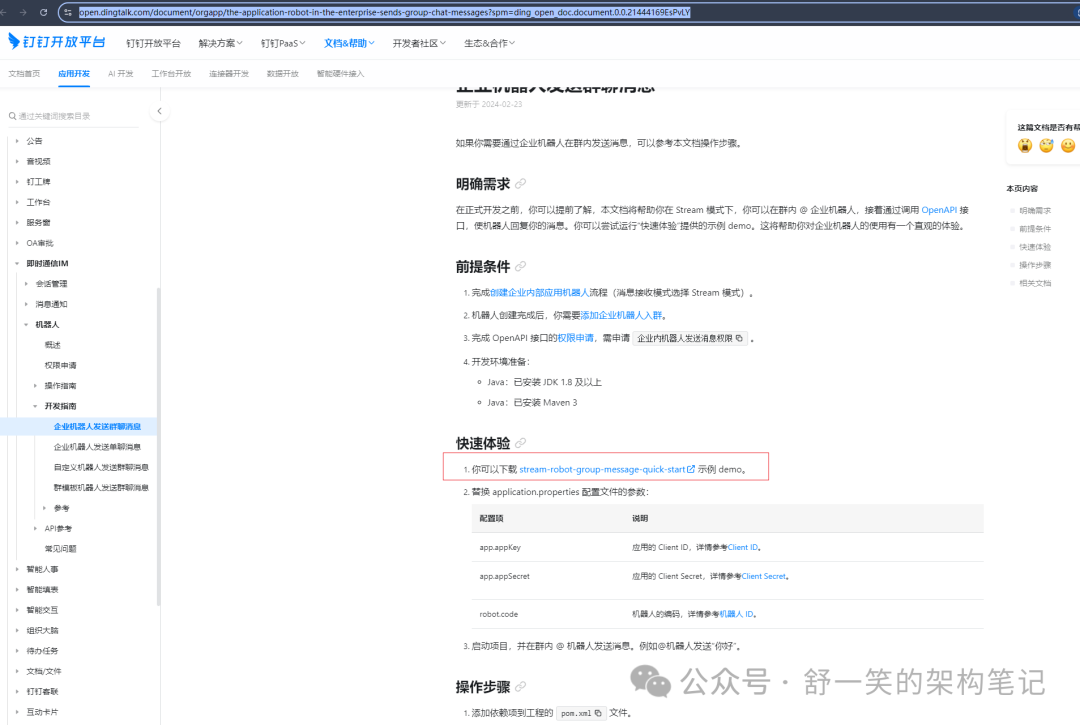
官方演示demo下载地址
https://help-static-aliyun-doc.aliyuncs.com/file-manage-files/zh-CN/20240221/buuola/stream-robot-group-message-quick-start.zip?spm=ding_open_doc.document.0.0.1f621cc0qRNFho&file=stream-robot-group-message-quick-start.zip
官方演示需要的依赖
<dependencies><dependency><groupId>com.dingtalk.open</groupId><artifactId>dingtalk-stream</artifactId><version>1.1.0</version></dependency><dependency><groupId>org.springframework.boot</groupId><artifactId>spring-boot-starter-web</artifactId><version>2.7.4</version></dependency><dependency><groupId>com.aliyun</groupId><artifactId>dingtalk</artifactId><version>2.0.76</version></dependency><dependency><groupId>org.projectlombok</groupId><artifactId>lombok</artifactId><version>1.18.26</version><optional>true</optional></dependency><dependency><groupId>com.alibaba</groupId><artifactId>fastjson</artifactId><version>1.2.68</version></dependency></dependencies>
官方演示的代码
import com.alibaba.fastjson.JSONObject;import com.aliyun.dingtalkoauth2_1_0.models.GetAccessTokenRequest;import com.aliyun.dingtalkoauth2_1_0.models.GetAccessTokenResponse;import com.aliyun.dingtalkrobot_1_0.Client;import com.aliyun.dingtalkrobot_1_0.models.OrgGroupSendHeaders;import com.aliyun.dingtalkrobot_1_0.models.OrgGroupSendRequest;import com.aliyun.dingtalkrobot_1_0.models.OrgGroupSendResponse;import com.aliyun.tea.TeaException;import com.aliyun.teaopenapi.models.Config;import com.dingtalk.open.app.api.OpenDingTalkClient;import com.dingtalk.open.app.api.OpenDingTalkStreamClientBuilder;import com.dingtalk.open.app.api.callback.OpenDingTalkCallbackListener;import com.dingtalk.open.app.api.security.AuthClientCredential;import lombok.extern.slf4j.Slf4j;import java.util.Objects;@Slf4jpublic class sendGroupMessage {public static final String CLIENT_ID = "< your client id>";public static final String CLIENT_SECRET = "<your client secret>";public static void main(String[] args) throws Exception {OpenDingTalkClient client = OpenDingTalkStreamClientBuilder.custom().credential(new AuthClientCredential(CLIENT_ID, CLIENT_SECRET)).registerCallbackListener("/v1.0/im/bot/messages/get", new RobotMsgCallbackConsumer()).build();client.start();}public static class RobotMsgCallbackConsumer implements OpenDingTalkCallbackListener<JSONObject, JSONObject> {/** @param request* @return*/@Overridepublic JSONObject execute(JSONObject request) {String userId = request.get("senderStaffId").toString();String content = request.getJSONObject("text").getString("content");String openConversationId = request.get("conversationId").toString();String robotCode = request.get("robotCode").toString();log.info("receive bot message from user={}, msg={},openConversationId={},robotCode={} ", userId, content, openConversationId, robotCode);OrgGroupSendHeaders orgGroupSendHeaders = new OrgGroupSendHeaders();orgGroupSendHeaders.setXAcsDingtalkAccessToken(getToken());OrgGroupSendRequest orgGroupSendRequest = new OrgGroupSendRequest();orgGroupSendRequest.setMsgKey("sampleText");orgGroupSendRequest.setRobotCode(robotCode);orgGroupSendRequest.setOpenConversationId(openConversationId);JSONObject msgParam = new JSONObject();msgParam.put("content", "java-getting-start say : " + "hello");orgGroupSendRequest.setMsgParam(msgParam.toJSONString());try {Config config = new Config();config.protocol = "https";config.regionId = "central";com.aliyun.dingtalkrobot_1_0.Client client = new Client(config);OrgGroupSendResponse orgGroupSendResponse = client.orgGroupSendWithOptions(orgGroupSendRequest,orgGroupSendHeaders, new com.aliyun.teautil.models.RuntimeOptions());if (Objects.isNull(orgGroupSendResponse) || Objects.isNull(orgGroupSendResponse.getBody())) {log.error("RobotGroupMessagesService_send orgGroupSendWithOptions return error, response={}",orgGroupSendResponse);return null;}return new JSONObject();} catch (TeaException e) {log.error("RobotGroupMessagesService_send orgGroupSendWithOptions throw TeaException, errCode={}, " +"errorMessage={}", e.getCode(), e.getMessage(), e);throw e;} catch (Exception e) {log.error("RobotGroupMessagesService_send orgGroupSendWithOptions throw Exception", e);try {throw e;} catch (Exception ex) {throw new RuntimeException(ex);}}}public static String getToken() {GetAccessTokenRequest getAccessTokenRequest = new GetAccessTokenRequest();getAccessTokenRequest.setAppKey(CLIENT_ID);getAccessTokenRequest.setAppSecret(CLIENT_SECRET);Config config = new Config();config.protocol = "https";config.regionId = "central";try {com.aliyun.dingtalkoauth2_1_0.Client client = new com.aliyun.dingtalkoauth2_1_0.Client(config);GetAccessTokenResponse accessToken = client.getAccessToken(getAccessTokenRequest);return accessToken.getBody().getAccessToken();} catch (Exception e) {throw new RuntimeException(e);}}}}
按照上述官方的演示说明就可以得到基本的效果

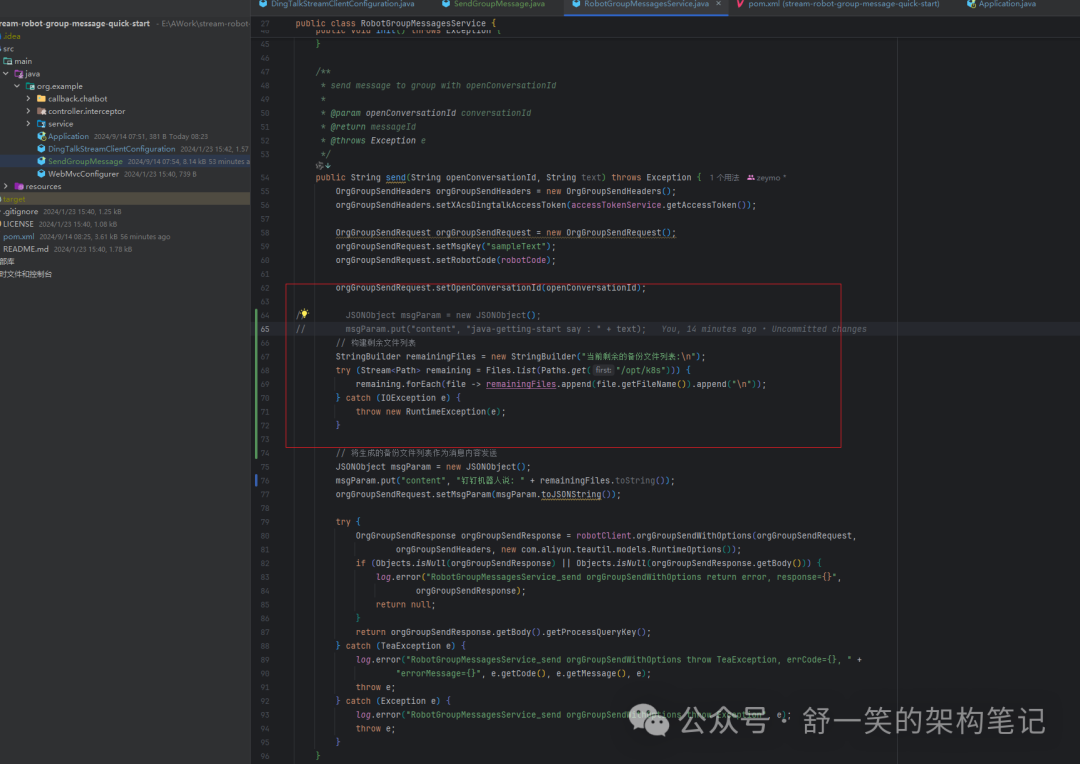
下面介绍一下交互我做出的修改
我在原先基础上将这边代码做了自身效果的修改,从而实现将我我@之后能拿到我想要的信息
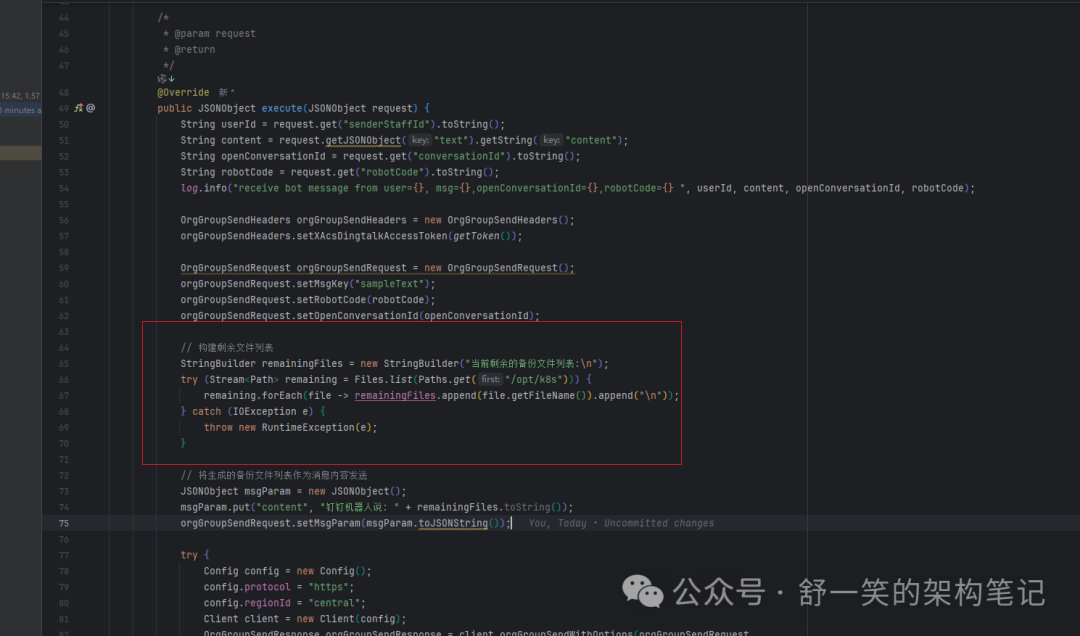
@Overridepublic JSONObject execute(JSONObject request) {String userId = request.get("senderStaffId").toString();String content = request.getJSONObject("text").getString("content");String openConversationId = request.get("conversationId").toString();String robotCode = request.get("robotCode").toString();log.info("receive bot message from user={}, msg={},openConversationId={},robotCode={} ", userId, content, openConversationId, robotCode);OrgGroupSendHeaders orgGroupSendHeaders = new OrgGroupSendHeaders();orgGroupSendHeaders.setXAcsDingtalkAccessToken(getToken());OrgGroupSendRequest orgGroupSendRequest = new OrgGroupSendRequest();orgGroupSendRequest.setMsgKey("sampleText");orgGroupSendRequest.setRobotCode(robotCode);orgGroupSendRequest.setOpenConversationId(openConversationId);// 构建剩余文件列表StringBuilder remainingFiles = new StringBuilder("当前剩余的备份文件列表:\n");try (Stream<Path> remaining = Files.list(Paths.get("/opt/k8s"))) {remaining.forEach(file -> remainingFiles.append(file.getFileName()).append("\n"));} catch (IOException e) {throw new RuntimeException(e);}// 将生成的备份文件列表作为消息内容发送JSONObject msgParam = new JSONObject();msgParam.put("content", "钉钉机器人说: " + remainingFiles.toString());orgGroupSendRequest.setMsgParam(msgParam.toJSONString());try {Config config = new Config();config.protocol = "https";config.regionId = "central";Client client = new Client(config);OrgGroupSendResponse orgGroupSendResponse = client.orgGroupSendWithOptions(orgGroupSendRequest,orgGroupSendHeaders, new com.aliyun.teautil.models.RuntimeOptions());if (Objects.isNull(orgGroupSendResponse) || Objects.isNull(orgGroupSendResponse.getBody())) {log.error("RobotGroupMessagesService_send orgGroupSendWithOptions return error, response={}", orgGroupSendResponse);return null;}return new JSONObject();} catch (TeaException e) {log.error("RobotGroupMessagesService_send orgGroupSendWithOptions throw TeaException, errCode={}, errorMessage={}", e.getCode(), e.getMessage(), e);throw e;} catch (Exception e) {log.error("RobotGroupMessagesService_send orgGroupSendWithOptions throw Exception", e);throw new RuntimeException(e);}}
这里需要注意一下的是如果说你希望@之后能拿到自己想要的效果那么需要在,这边也进行一下修改,提出一下上述demo中的演示效果
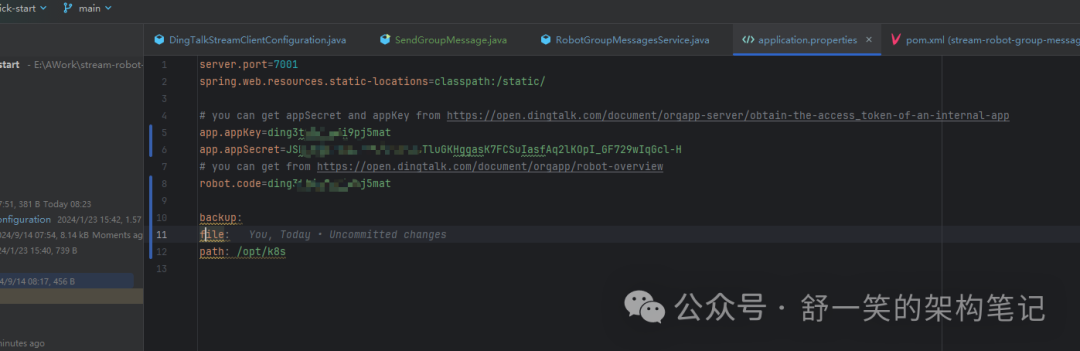
配置文件中配置的app.appKey和 robot.code,两者是一样的东西
我这边就是直接把我的逻辑类顺手写在了这里
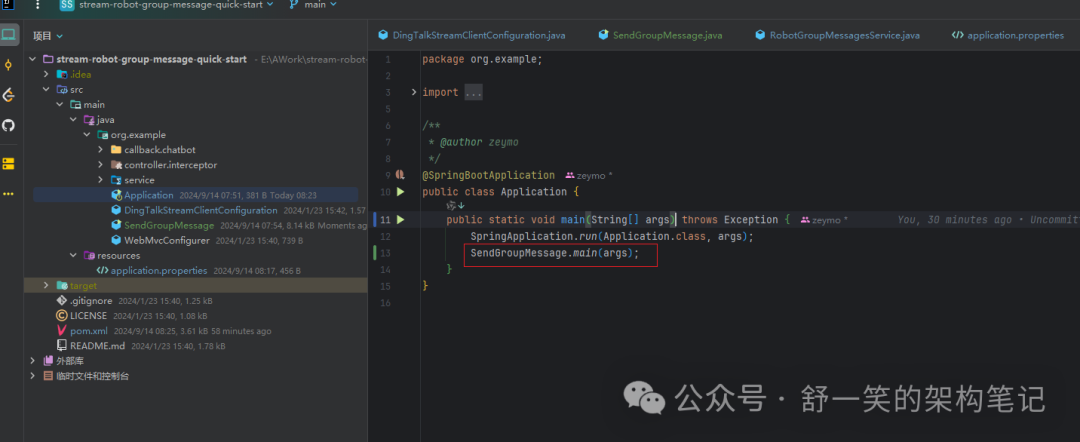

最后的话打包这边需要给官方的POM做一下修改不然打包不出可运行的jar
<?xml version="1.0" encoding="UTF-8"?><project xmlns="http://maven.apache.org/POM/4.0.0"xmlns:xsi="http://www.w3.org/2001/XMLSchema-instance"xsi:schemaLocation="http://maven.apache.org/POM/4.0.0 http://maven.apache.org/xsd/maven-4.0.0.xsd"><modelVersion>4.0.0</modelVersion><parent><groupId>org.springframework.boot</groupId><artifactId>spring-boot-starter-parent</artifactId><version>2.4.2</version><relativePath/></parent><groupId>com.dingtalk</groupId><artifactId>stream-robot-group-message-quick-start</artifactId><version>1.0-SNAPSHOT</version><packaging>jar</packaging><properties><maven.compiler.source>8</maven.compiler.source><maven.compiler.target>8</maven.compiler.target></properties><dependencies><dependency><groupId>com.dingtalk.open</groupId><artifactId>dingtalk-stream</artifactId><version>1.1.0</version></dependency><dependency><groupId>org.springframework.boot</groupId><artifactId>spring-boot-starter-web</artifactId></dependency><dependency><groupId>org.slf4j</groupId><artifactId>slf4j-api</artifactId><version>1.7.7</version></dependency><dependency><groupId>org.projectlombok</groupId><artifactId>lombok</artifactId><version>1.18.26</version><optional>true</optional></dependency><dependency><groupId>com.aliyun</groupId><artifactId>dingtalk</artifactId><version>1.5.59</version></dependency><dependency><groupId>org.asynchttpclient</groupId><artifactId>async-http-client</artifactId><version>2.12.3</version><exclusions><exclusion><groupId>io.netty</groupId><artifactId>netty-common</artifactId></exclusion><exclusion><groupId>io.netty</groupId><artifactId>netty-resolver</artifactId></exclusion></exclusions></dependency><dependency><groupId>org.apache.httpcomponents</groupId><artifactId>httpclient</artifactId><version>4.5.12</version></dependency><dependency><groupId>org.apache.httpcomponents</groupId><artifactId>httpmime</artifactId><version>4.5.12</version></dependency><dependency><groupId>org.apache.httpcomponents</groupId><artifactId>httpcore</artifactId><version>4.4.13</version></dependency><dependency><groupId>com.aliyun</groupId><artifactId>alibaba-dingtalk-service-sdk</artifactId><version>2.0.0</version></dependency><dependency><groupId>com.alibaba</groupId><artifactId>fastjson</artifactId><version>1.2.68</version></dependency></dependencies><build><plugins><plugin><groupId>org.springframework.boot</groupId><artifactId>spring-boot-maven-plugin</artifactId><configuration><mainClass>org.example.Application</mainClass></configuration></plugin></plugins></build></project>
执行打包命令拿到可运行的jar上传到可以访问外网的机器之后跑起来就可以进行与机器人交流获取你想要的信息。当然这边你可以使用一下上面说的命令后台启动的方式。
nohup java -jar stream-robot-group-message-quick-start-1.0-SNAPSHOT.jar > stream.log 2>&1 &
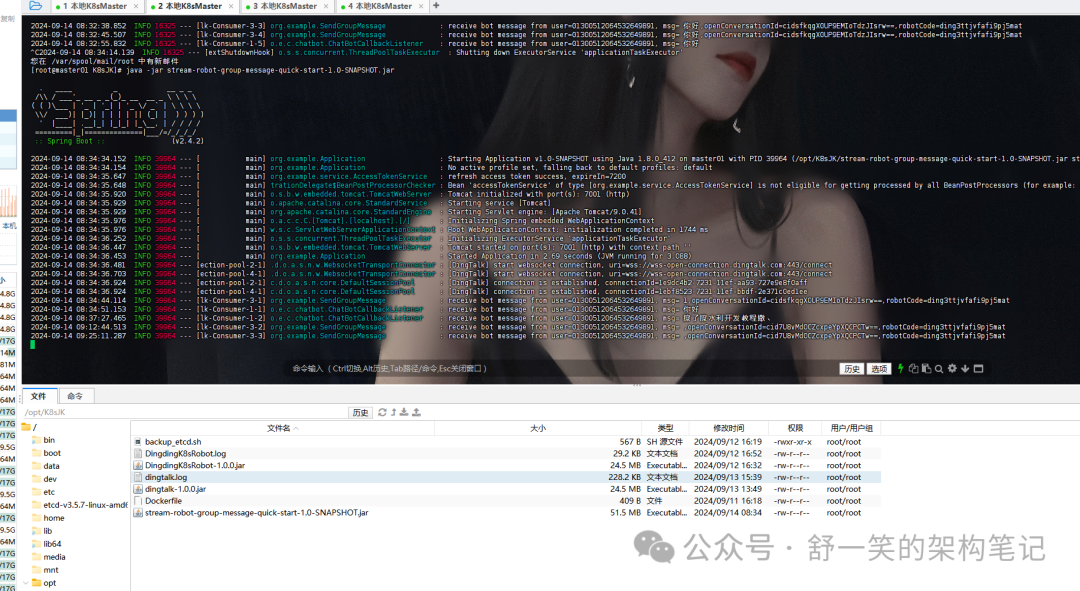
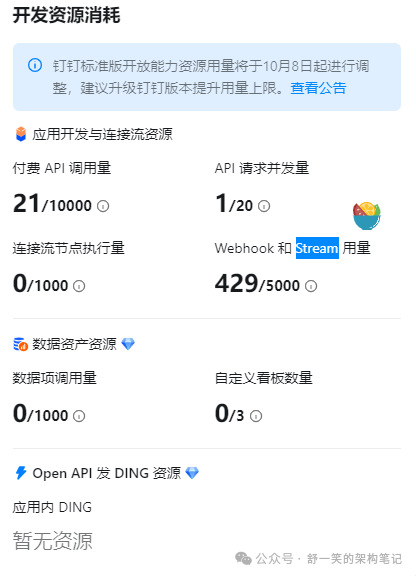
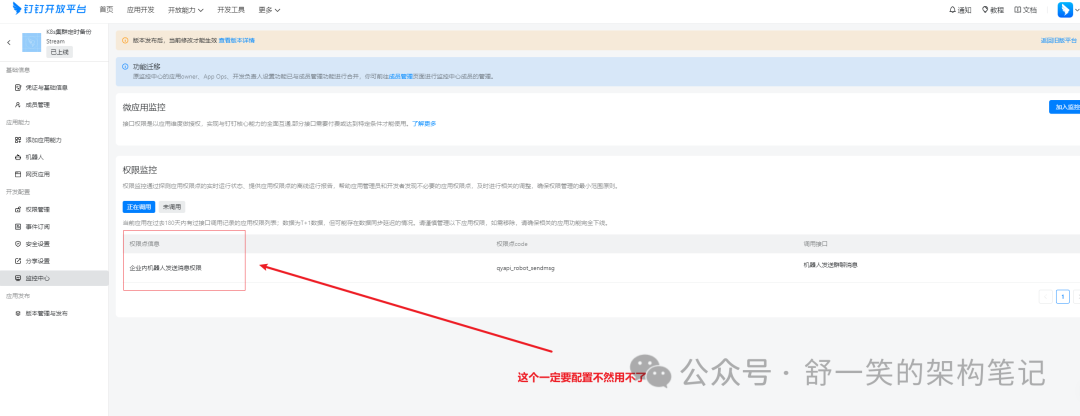
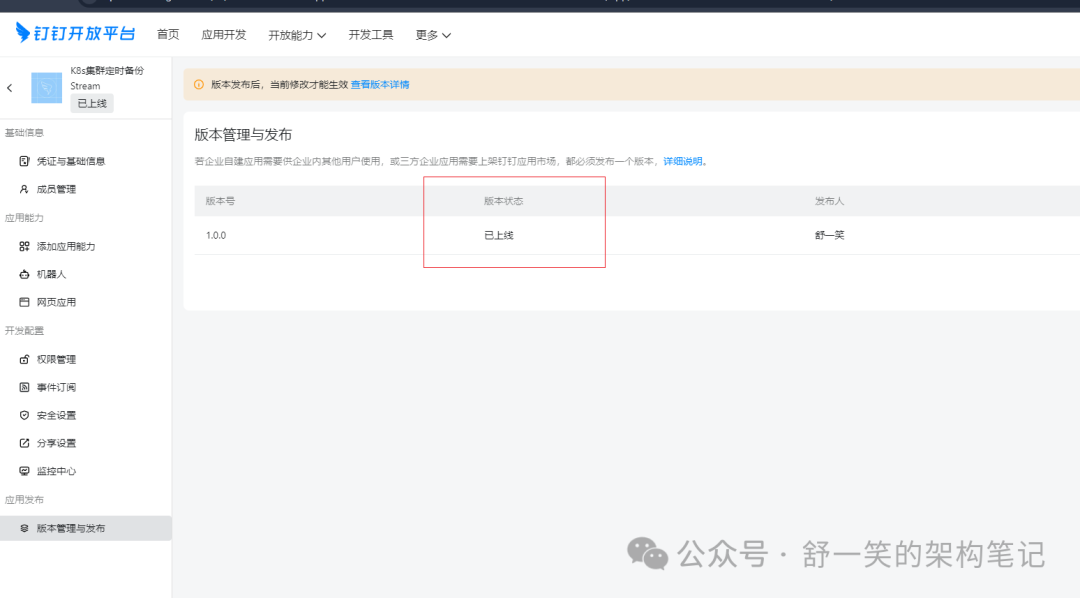
最后运气起来之后就可以@他愉快的交流啦。如果说还有哪些小问题没有解决可以看看钉钉官网的介绍,对了机器人这边一定需要修改之后发布上线才行。
最后附录几张配置的详情图片
写在最后
好了本次的介绍到这里就结束了,需要注意的是上述的解决方案可以解决没有ssl认证但又可以与机器人交流的功能效果,但是需要注意的是由于上述的两个机器人分别使用了Webhook和Stream两种。这两种钉钉官方是存在调用的限制的,如果是长期需要频繁稳定的使用需要开通钉钉的会员。不然额度这块不是很够。