


近期打算写一序列文章分享 OBCP V4 培训认证相关的知识。欢迎关注并转发,关注度越高,更新的动力越大!
本文是第一篇,主要解释 OBCP V4 考试中一项实验题的前置实验环境的准备方法,方便没有接触过实验环境的人提前学习。
OBCP V4 数据迁移实验
OBCP V4 其中一项实验是数据迁移集成技术实验,内容是 OB DBA 日常工作内容,详细如下:
实验需要的环境要有:
其实这些实验里涉及到的技术此前的文章都有介绍过,只是版本不一定是最新的 V4 版本,所以后面还会再给大家演示一遍。
在做实验之前,对大部分初学者而言(特别是学生),最难的就是服务器环境。所以我这里测试的时候资源要求都比官方要求要低很多。当然资源低能力也就有限。我们的主要目的是看 OB 和 OMS 的产品功能。至于数据迁移,就迁移几十 MB 数据,不需要太大的资源。资源环境的不同会体现在一些参数配置上,这里的参数仅用于小规格服务器的测试,不要复制到生产环境。但是如果通过这个实验你理解了这个参数的用法秘诀,那是可以自由的去调整生产环境参数。
单机 OB 虚拟机环境准备
学习用的是虚拟机环境,资源 4C12G内存 50G 磁盘的 VMWare 虚拟机即可。
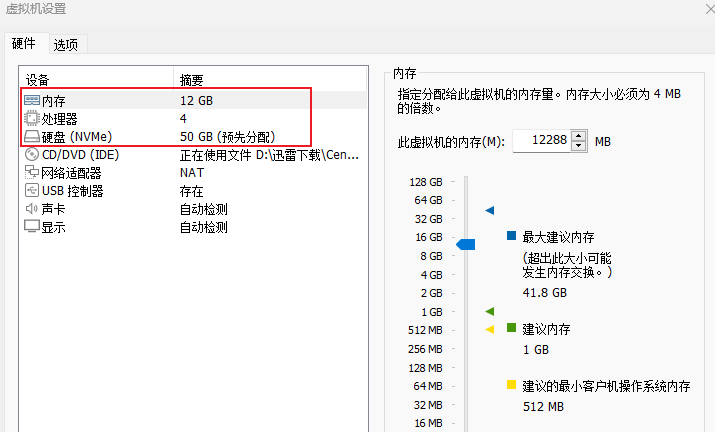
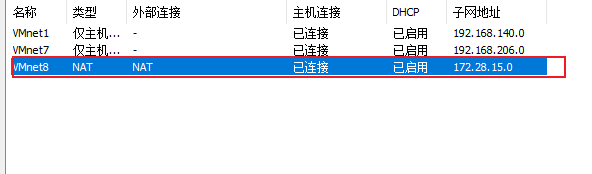
虚拟机网络用 NAT 模式,网络子网用 172.28.15.0/24 。这样跟教材中的示例子网保持一致。
操作系统用 CentOS 7.x 版本即可,我的是 7.9 .
# cat etc/redhat-release
CentOS Linux release 7.9.2009 (Core)
这个里面最紧要的资源就是内存和磁盘。
磁盘说明
我这里是分一块盘 50G (选 thick provision
提前分配好磁盘空间)。虚拟机就一块盘,所以 OS 跟 OB 都会共用一块盘。其实我很讨厌这种用法或教法(误人子弟)。但是有些人实在是资源有限。在笔记本电脑上搞虚拟机,没有那么多的磁盘空间。所以我就这么推荐了。请注意,生产环境,OB 的磁盘一定要是独立的 SSD 盘,并且最好是 NVMe SSD 。
如果个别人的磁盘资源充裕,建议给虚拟机两块盘。一块盘装 OS ,最小 30G ;一块盘装 OB ,最小 30G 。后面 OBD 安装 OB 步骤里有一步会检查根分区(/
)剩余空间,装完 OS 后如果根分区剩余空间不足 20G ,那一步检查就跳不过去了。到时候又要回过头来搞虚拟机磁盘。所以我为了省点磁盘空间,就用一块盘了。
如果你磁盘空间足,建议你再加点。 OB 社区版论坛上很多初学者部署 OB 使用一段时间后重启就起不来了,大半是磁盘空间剩余空间不足问题导致。
虚拟机安装说明
虚拟机装 OS 方法我就不介绍了,软件安装选精简安装(最省空间)。安装完 CentOS 后,将 YUM 镜像切换到阿里云镜像,方便后面安装依赖软件。
虚拟机 NAT 模式默认下能通过宿主机上网,如果虚拟机不能上网,这个问题网上搜索一下自己解决。当然后面安装步骤也不是说非要能联网。但是阿里云的实验环境是可以联网的。
内存说明
虚拟机内存 12G,装完 OS 后查看剩余内存肯定是不足 12G 的。默认 CentOS 会 OS 设置了一些保留内存(参数:vm.min_free_kbytes
)。这里需要对 OS 设置一些内核参数,参考官网文档,我修改了个别参数大小以及去掉了不必要的参数。
vim + etc/sysctl.conf

#  for oceanbase
net.core.somaxconn = 2048
net.core.netdev_max_backlog = 10000
net.core.rmem_default = 16777216
net.core.wmem_default = 16777216
net.core.rmem_max = 16777216
net.core.wmem_max = 16777216

net.ipv4.ip_local_port_range = 3500 65535
net.ipv4.ip_forward = 0
net.ipv4.conf.default.rp_filter = 1
net.ipv4.conf.default.accept_source_route = 0
net.ipv4.tcp_syncookies = 1
net.ipv4.tcp_rmem = 4096 87380 16777216
net.ipv4.tcp_wmem = 4096 65536 16777216
net.ipv4.tcp_max_syn_backlog = 16384
net.ipv4.tcp_fin_timeout = 15
net.ipv4.tcp_tw_reuse = 1
net.ipv4.tcp_slow_start_after_idle=0
net.ipv4.ip_local_reserved_ports = 62881-63881

kernel.numa_balancing = 0
kernel.sched_migration_cost_ns = 0
vm.zone_reclaim_mode = 0
vm.swappiness = 0
vm.max_map_count = 655360
vm.min_free_kbytes = 524288
vm.overcommit_memory = 0
修改后用命令 sysctl -p
让参数生效。 这几个参数里关键是不用 SWAP 内存,保留内存设置为 512MB .所以最后剩下的内存就没多少了.只要不少于 10G 就可以。如果你的剩余内存比 10G 小,就用命令 sysctl -w vm.drop_caches=3
清理释放一部分文件系统缓存(PageCache
)。
[root@server01 soft]# sysctl -w vm.drop_caches=3
vm.drop_caches = 3
[root@server01 soft]# free -h
              total        used        free      shared  buff/cache   available
Mem:            11G        326M         11G         11M         60M         10G
Swap:          5.0G          0B        5.0G
用户会话参数说明
此外还有用户会话参数 ulimit
相关。
其实对于测试环境不设置这个也没关系,没有那么多表和连接等。这里是为了养成生产环境部署好习惯,也顺便设置上。
vim + etc/security/limits.d/oceanbase_limits.conf

*   soft    nofile  655360
*   hard    nofile  655360
*   soft    nproc   655360
*   hard    nproc   655360
*   hard    core    unlimited
*   soft    core    unlimited
*   hard    stack   10240
*   soft    stack   10240
*   hard    cpu     unlimited
*   soft    cpu     unlimited
admin   soft    nofile  655360
admin   hard    nofile  655360
admin   soft    nproc   655360
admin   hard    nproc   655360
admin   hard    core    unlimited
admin   soft    core    unlimited
admin   hard    stack   10240
admin   soft    stack   10240
admin   hard    cpu     unlimited
admin   soft    cpu     unlimited
设置完后,为了检查效果,断开所有终端会话重新连接,然后通过命令 ulimit -a
查看。
[root@server01 soft]# ulimit -a
core file size          (blocks, -c) unlimited
data seg size           (kbytes, -d) unlimited
scheduling priority             (-e) 0
file size               (blocks, -f) unlimited
pending signals                 (-i) 47888
max locked memory       (kbytes, -l) 64
max memory size         (kbytes, -m) unlimited
open files                      (-n) 655360
pipe size            (512 bytes, -p) 8
POSIX message queues     (bytes, -q) 819200
real-time priority              (-r) 0
stack size              (kbytes, -s) 10240
cpu time               (seconds, -t) unlimited
max user processes              (-u) 655360
virtual memory          (kbytes, -v) unlimited
file locks                      (-x) unlimited
我们关注的是 open files
。OB 的数据文件只有一个,但是日志文件和备份文件有很多,并且很碎(日志文件很多大小是固定的)。所以这个参数值不能太小。至于 max user processes
其实没什么关系,OB 以及 OBProxy 都是单进程软件,没有用户进程的概念,都是进程内部的线程。
用户准备
OB 企业版最佳实践里 OB 软件是部署在用户 admin
下。不过 OB 社区版给的很多方法步骤说明都习惯部署在用户 root
下。这也导致不少早期 OB 社区版客户的数据库真的部署在 root
用户下。我个人是很反对这个做法的,虽然它看起来很方便。
OBCP V4 的数据迁移实验为了演示 OB 的数据迁移,对这个 OB 要求有没有那么严格。为了方便学员部署一个 OB ,这里也不搞 OCP 了(那个太重,以前分享过,以后还会分享)。所以 OBCP V4 培训实验就拿了社区版的部署工具 OBD 来部署企业版,并且教材里的配置文件也是默认安装在 root
用户下的 /root
目录。
但是,为了把这个错误用法的影响扭转过来,我后面是部署在用户 admin
下。区别只是在配置文件上,以及多准备了一个用户 admin
。如果你理解了 OBD 的原理,那么这个修改就不会对你有影响。
创建用户命令:
useradd admin && echo 'admin:aaAA11__' | chpasswd
软件下载准备
对于初学者,我更建议手动部署 OB 软件,步骤并不多,对理解原理有帮助。方法看后面参考。
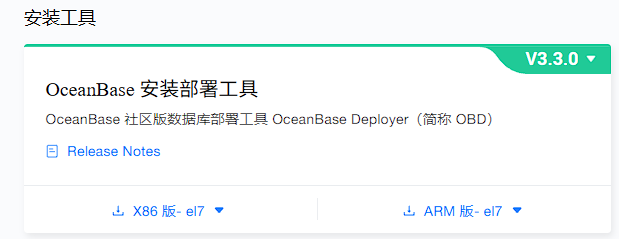
不过 OB 社区版推荐的是 OBD 软件,用在这个实验里也算方便。 OBD 软件在 OB 社区官网上可以下载,地址:https://www.oceanbase.com/softwarecenter
。任意版本都行,一般就下载最新版本。
软件下载后,直接安装。
yum -y localinstall ob-deploy-3.3.0-3.el7.x86_64.rpm

[root@server01 soft]# which obd
/usr/bin/obd
[root@server01 soft]# obd -h
Usage: obd <command> [options]
Available commands:
binlog         binlog service tools
cluster        Deploy and manage a cluster.
demo           Quickly start
display-trace  display trace_id log.
host           Host tools
license        Register and display license.
mirror         Manage a component repository for OBD.
obdiag         Oceanbase Diagnostic Tool
pwd            Obd cluster password management.
repo           Manage local repository for OBD.
test           Run testfor a running deployment.
tool           Tools
update         Update OBD.
web            Start obd deploy application as web.

Options:
  --version      show program's version number and exit
  -h, --help     Show help and exit.
  -v, --verbose  Activate verbose output.
此外就是 OB 软件。在 OB 社区版论坛和文档里, OBD 只有部署社区版 OB 的案例,没有介绍部署企业版的。OB 企业版软件跟社区版软件形态基本一样,只是社区版名字多了一个 -ce
字眼。在部署的配置文件上,也要体现这点。方法得当的话,确实可以使用 OBD 部署 OB 企业版。
少数学员是 OB 企业版用户,可能能拿到 “OB单机版” 软件。那个版本名字叫 oceanbase-standalone
,其实就是名字不一样,本质上还是 OB 软件。在部署的配置文件上有些区别而已。这里不要求是那个软件。 为了跟教程中版本保持一致,我特地去找了对应的企业版软件。
OB 企业版软件也可以在官网下载,版本不一样并不妨碍这个实验。
软件下载后,放到一个目录 rpms
下,然后加入到 OBD 本地仓库里。
[root@server01 soft]# ls -lrth rpms
total 219M
-rwxr-xr-x. 1 root root 181M Jun 28 03:33 oceanbase-4.2.1.3-103030022024011313.el7.x86_64.rpm
-rwxr-xr-x. 1 root root  38M Jun 28 03:33 obproxy-4.3.1.0-602024090512.el7.x86_64.rpm

[root@server01 oceanbase-standalone-all-in-one] obd mirror clone rpms/*.rpm

[root@server01 soft]# obd mirror clone rpms/*.rpm
name: obproxy
version: 4.3.1.0
release:602024090512.el7
arch: x86_64
md5: 6f3cc5964c29d5be76ea4e958d321445a00711de
size: 211743385
add rpms/obproxy-4.3.1.0-602024090512.el7.x86_64.rpm to local mirror
name: oceanbase
version: 4.2.1.3
release:103030022024011313.el7
arch: x86_64
md5: 4c82d4a4f2d824038ece244cccad493b626e6afa
size: 862977527
add rpms/oceanbase-4.2.1.3-103030022024011313.el7.x86_64.rpm to local mirror
Trace ID: 04c13c5e-53dc-11f0-b822-000c29c06ce7
If you want to view detailed obd logs, please run: obd display-trace 04c13c5e-53dc-11f0-b822-000c29c06ce7

[root@server01 oceanbase-standalone-all-in-one]# obd mirror list
+-----------------------------------------------------------------------------+
|                            Mirror Repository List                           |
+----------------------------+--------+---------+----------+------------------+
| SectionName                | Type   | Enabled | Avaiable | Update Time      |
+----------------------------+--------+---------+----------+------------------+
| local                      | local  | -       | True     | 2025-06-27 21:22 |
| oceanbase.community.stable | remote | True    | False    | 1969-12-31 16:00 |
| oceanbase.development-kit  | remote | True    | False    | 1969-12-31 16:00 |
+----------------------------+--------+---------+----------+------------------+
Use `obd mirror list <section name>` for more details
Trace ID: 868b4d60-53d7-11f0-9ad4-000c29c06ce7
If you want to view detailed obd logs, please run: obd display-trace 868b4d60-53d7-11f0-9ad4-000c29c06ce7
OBD 部署 OB 单机版
OB 的部署过程大概分为几步:
准备相关目录: /home/admin/oceanbase
、/data/1
、/data/log1
。启动 OB 进程:需要指定相关参数。 SQL 里初始化集群 : bootstrap
操作。
OBD 部署 OB 单机版的原理就是把上面这个主要过程自动化,主要分为 deploy
和 start
两步。 deploy
就是安装软件和准备目录,start
就是启动 OB 进程并初始化集群。
OB 单机版部署配置文件
配置文件模板可以从 OB 社区版开源地址里获取然后修改。源地址:https://github.com/oceanbase/obdeploy/tree/master/example
。
下面是修改后的配置文件,可以复制并稍加调整。
vim obsingle-with-obproxy.yaml


## Only need to configure when remote login is required
user:
username:admin
password:aaAA11__
#   key_file: your ssh-key file path if need
#   port: your ssh port, default 22
#   timeout: ssh connection timeout (second), default 30
oceanbase:
servers:
    -name:server01
      # Please don't use hostname, only IP can be supported
      ip:172.28.15.129
global:
    production_mode:false
    #  The working directory for OceanBase Database. OceanBase Database is started under this directory. This is a required field.
    home_path:/home/admin/oceanbase
    # The directory for data storage. The default value is $home_path/store.
    data_dir:/data/1
    # The directory for clog, ilog, and slog. The default value is the same as the data_dir value.
    redo_dir:/data/log1
    # Starting from observer version 4.2, the network selection for the observer is based on the 'local_ip' parameter, and the 'devname' parameter is no longer mandatory.
    # If the 'local_ip' parameter is set, the observer will first use this parameter for the configuration, regardless of the 'devname' parameter.
    # If only the 'devname' parameter is set, the observer will use the 'devname' parameter for the configuration.
    # If neither the 'devname' nor the 'local_ip' parameters are set, the 'local_ip' parameter will be automatically assigned the IP address configured above.
    # devname: eth0
    mysql_port:2881# External port for OceanBase Database. The default value is 2881. DO NOT change this value after the cluster is started.
    rpc_port:2882# Internal port for OceanBase Database. The default value is 2882. DO NOT change this value after the cluster is started.
    obshell_port:2886# Operation and maintenance port for Oceanbase Database. The default value is 2886. This parameter is valid only when the version of oceanbase-ce is 4.2.2.0 or later.
    zone:zone1
    cpu_count:16
    # if current hardware's memory capacity is smaller than 50G, please use the setting of "mini-single-example.yaml" and do a small adjustment.
    memory_limit:10G# The maximum running memory for an observer
    # The reserved system memory. system_memory is reserved for general tenants. The default value is 30G.
    system_memory:2G
    datafile_size:2G# Size of the data file.
    datafile_next:1G# Size of autoextend of the data file
    datafile_maxsize:20G# The maxnium size of the data file
    log_disk_size:20G# The size of disk space used by the clog files.
    enable_syslog_wf:false# Print system logs whose levels are higher than WARNING to a separate log file. The default value is true.
    enable_syslog_recycle:true
    max_syslog_file_count:4# The maximum number of reserved log files before enabling auto recycling. The default value is 0.
    syslog_level:ERROR
    syslog_io_bandwidth_limit:10MB
    # observer cluster name, consistent with obproxy's cluster_name
    appname:obcpv4
    root_password:aaAA11__# root user password, can be empty
    proxyro_password:proxyRO11__# proxyro user pasword, consistent with obproxy's observer_sys_password, can be empty
obproxy:
# Set dependent components for the component.
# When the associated configurations are not done, OBD will automatically get the these configurations from the dependent components.
depends:
    -oceanbase
servers:
    -172.28.15.129
global:
    listen_port:2883# External port. The default value is 2883.
    prometheus_listen_port:2884# The Prometheus port. The default value is 2884.
    home_path:/home/admin/obproxy
    # oceanbase root server list
    # format: ip:mysql_port;ip:mysql_port. When a depends exists, OBD gets this value from the oceanbase-ce of the depends.
    # rs_list: 192.168.1.2:2881;192.168.1.3:2881;192.168.1.4:2881
    enable_cluster_checkout:false
    # observer cluster name, consistent with oceanbase-ce's appname. When a depends exists, OBD gets this value from the oceanbase-ce of the depends.
    # cluster_name: obcluster
    skip_proxy_sys_private_check:true
    enable_strict_kernel_release:false
    obproxy_sys_password:proxySYS11__# obproxy sys user password, can be empty. When a depends exists, OBD gets this value from the oceanbase-ce of the depends.
    observer_sys_password:proxyRO11__# proxyro user pasword, consistent with oceanbase-ce's proxyro_password, can be empty. When a depends exists, OBD gets this value from the oceanbase-ce of the depends.
修改建议:
涉及到 IP 的改为实际虚拟机 IP 。 如果虚拟机内存比 12G 大,多的部分可以同步加到文件中的 memory_limit
参数中。如果虚拟机磁盘空间比 50G 大很多,多的部分可以同步分开加到文件中的 datafile_maxsize
和log_disk_size
中。集群名 appname: obcpv4
是我改了实验环境的集群名称。这个自己练习可以改,实验环境不要去动这个参数。
再强调一次,这个参数文件是方便学员在自己的环境里模拟搭建实验环境,并不等于真实的实验环境配置文件。实验环境可能有些不一样(至少虚拟机内存资源是 16G ,参数也少一些)。
创建目录 /data
并授权用户 admin
访问。
mkdir -p data/{1,log1} && chown -R admin.admin data/
然后调用 OBD 的 deploy
命令初始化运行环境。
[root@server01 soft]# obd cluster deploy obcpv4 -c obsingle-with-obproxy.yaml

Package oceanbase-4.2.1.3-103030022024011313.el7 is available.
Package obproxy-4.3.1.0-602024090512.el7 is available.
install oceanbase-4.2.1.3 forlocal ok
install obproxy-4.3.1.0 forlocal ok
+------------------------------------------------------------------------------------------+
|                                         Packages                                         |
+------------+---------+------------------------+------------------------------------------+
| Repository | Version | Release                | Md5                                      |
+------------+---------+------------------------+------------------------------------------+
| oceanbase  | 4.2.1.3 | 103030022024011313.el7 | 4c82d4a4f2d824038ece244cccad493b626e6afa |
| obproxy    | 4.3.1.0 | 602024090512.el7       | 6f3cc5964c29d5be76ea4e958d321445a00711de |
+------------+---------+------------------------+------------------------------------------+
Repository integrity check ok
Load param plugin ok
Open ssh connection ok
Initializes observer work home ok
Initializes obproxy work home ok
Parameter check ok
Remote oceanbase-4.2.1.3-103030022024011313.el7-4c82d4a4f2d824038ece244cccad493b626e6afa repository install ok
Remote oceanbase-4.2.1.3-103030022024011313.el7-4c82d4a4f2d824038ece244cccad493b626e6afa repository lib check ok
Remote obproxy-4.3.1.0-602024090512.el7-6f3cc5964c29d5be76ea4e958d321445a00711de repository install ok
Remote obproxy-4.3.1.0-602024090512.el7-6f3cc5964c29d5be76ea4e958d321445a00711de repository lib check ok
obcpv4 deployed
Please execute ` obd cluster start obcpv4 ` to start
Trace ID: 31f580ae-53dc-11f0-8152-000c29c06ce7
If you want to view detailed obd logs, please run: obd display-trace 31f580ae-53dc-11f0-8152-000c29c06ce7
这里面会做一些检查,只要不是 ERROR 告警就行。如果卡在根分区 /
剩余空间不足,那就要自己想办法清理一些空间了。
下面看看安装部署后的目录结构。
[root@server01 soft]# tree home/admin/oceanbase/store/  /data/
/home/admin/oceanbase/store/
├── clog -> data/log1/clog
├── slog
└── sstable
/data/
├── 1
│   ├── clog -> data/log1/clog
│   ├── slog
│   └── sstable
└── log1
    └── clog

9 directories, 0 files
OB 的软件目录,数据目录和日志目录通过软连接巧妙的联系在一起,生产环境部署又期望分开放到独立的磁盘上,特别是数据盘和日志盘要跟 OS 盘分开。
OBD 启动 OB 集群
在使用 OBD 命令初始化集群之前,再做一次内存和空间资源检查。不成功的原因主要就是这两个资源问题。
[root@server01 soft]# sysctl -w vm.drop_caches=3
vm.drop_caches = 3
[root@server01 soft]# free -h
              total        used        free      shared  buff/cache   available
Mem:            11G        326M         11G         11M         60M         10G
Swap:          5.0G          0B        5.0G

[root@server01 soft]# df -h
OBD 启动 OB 集群的命令是:obd cluster start obcpv4
。
[root@server01 soft]# obd cluster start obcpv4
Get local repositories ok
Load cluster param plugin ok
Open ssh connection ok
[WARN] OBD-1011: (172.28.15.130) The recommended value of fs.aio-max-nr is 1048576 (Current value: 65536)
[WARN] OBD-1007: (172.28.15.130) The recommended number of stack size is unlimited (Current value: 10240)
[WARN] OBD-1017: (172.28.15.130) The value of the "fs.file-max" must be greater than 6573688 (Current value: 1205826, Recommended value: 6573688)
[WARN] OBD-1012: (172.28.15.130) clog and data use the same disk (/)
[WARN] OBD-4521: The config observer_sys_password in obproxy did not take effect, please config it in oceanbase
cluster scenario: None
Start observer ok
observer program health check ok
Connect to observer 172.28.15.130:2881 ok
oceanbase bootstrap ok
start obproxy ok
obproxy program health check ok
Connect to obproxy ok
Connect to observer 172.28.15.130:2881 ok
Wait for observer init ok
+-------------------------------------------------+
|                    oceanbase                    |
+---------------+---------+------+-------+--------+
| ip            | version | port | zone  | status |
+---------------+---------+------+-------+--------+
| 172.28.15.130 | 4.2.1.3 | 2881 | zone1 | ACTIVE |
+---------------+---------+------+-------+--------+
obclient -h172.28.15.130 -P2881 -uroot@sys -p'aaAA11__' -Doceanbase -A

cluster unique id: 60ad27d4-5259-50e9-b423-14a730ed0998-197b5871b8d-03010204

Connect to obproxy ok
+-------------------------------------------------------------------+
|                              obproxy                              |
+---------------+------+-----------------+-----------------+--------+
| ip            | port | prometheus_port | rpc_listen_port | status |
+---------------+------+-----------------+-----------------+--------+
| 172.28.15.130 | 2883 | 2884            | 2885            | active |
+---------------+------+-----------------+-----------------+--------+
obclient -h172.28.15.130 -P2883 -uroot@proxysys -p'proxySYS11__' -Doceanbase -A

obcpv4 running
Trace ID: dd393650-53f4-11f0-9cd4-000c292f0c7d
If you want to view detailed obd logs, please run: obd display-trace dd393650-53f4-11f0-9cd4-000c292f0c7d
如果不报错,看到上面这些提示,就表示成功了。
[root@server01 soft]# netstat -ntlp |grep 288
tcp        0      0 0.0.0.0:2881            0.0.0.0:*               LISTEN      8698/observer
tcp        0      0 0.0.0.0:2882            0.0.0.0:*               LISTEN      8698/observer
tcp        0      0 0.0.0.0:2883            0.0.0.0:*               LISTEN      9796/obproxy
tcp        0      0 0.0.0.0:2884            0.0.0.0:*               LISTEN      9796/obproxy
tcp        0      0 0.0.0.0:2885            0.0.0.0:*               LISTEN      9796/obproxy
当然为了保险,也登录一下 OB 集群看看。需要提前安装 mysql
客户端 或者 obclient
客户端。
yum -y localinstall obclient-2.2.10-22025032014.el7.x86_64.rpm

[admin@server01 oceanbase]$obclient -h172.28.15.130 -uroot@sys#obcpv4 -P2883 -paaAA11__ -c -A oceanbase
Welcome to the OceanBase.  Commands end with ; or \g.
Your OceanBase connection id is 5
Server version: OceanBase 4.2.1.3 (r103030022024011313-c6afef2be5748fc54b1b0159b5224ae288491424) (Built Jan 13 2024 13:36:43)

Copyright (c) 2000, 2018, OceanBase and/or its affiliates. All rights reserved.

Type 'help;' or '\h'forhelp. Type '\c' to clear the current input statement.

obclient(root@sys)[oceanbase]> status;
--------------
obclient  Ver 2.2.10 Distrib 10.4.18-MariaDB, for Linux (x86_64) using readline 5.1

Connection id:          5
Current database:       oceanbase
Current user:           root@172.28.15.130
SSL:                    Not in use
Current pager:          stdout
Using outfile:          ''
Using delimiter:        ;
Server version:         OceanBase 4.2.1.3 (r103030022024011313-c6afef2be5748fc54b1b0159b5224ae288491424) (Built Jan 13 2024 13:36:43)
Protocol version:       10
Connection:             172.28.15.130 via TCP/IP
Server characterset:    utf8mb4
Db     characterset:    utf8mb4
Client characterset:    utf8mb4
Conn.  characterset:    utf8mb4
TCP port:               2883
Active                  --------------
初始化成功后,空间使用会有些变化。

OB 租户分配
首先查看一下集群的总资源和可用资源。 这个需要登录 OB 默认管理员租户 SYS 租户里。
[admin@server01 oceanbase]$obclient -h172.28.15.130 -uroot@sys#obcpv4 -P2883 -paaAA11__ -c -A oceanbase

obclient(root@sys)[oceanbase]> select zone,concat(SVR_IP,':',SVR_PORT) observer, cpu_capacity_max cpu_total,cpu_assigned_max cpu_assigned, cpu_capacity-cpu_assigned_max as cpu_free, round(memory_limit/1024/1024/1024,2) as memory_total, round((memory_limit-mem_capacity
)/1024/1024/1024,2) as system_memory, round(mem_assigned/1024/1024/1024,2) as mem_assigned, round((mem_capacity-mem_assigned)/1024/1024/1024,2) as memory_free, round(log_disk_capacity/1024/1024/1024,2) as log_disk_capacity, round(log_disk_assigned/1024/1024/1024,2) as
 log_disk_assigned, round((log_disk_capacity-log_disk_assigned)/1024/1024/1024,2) as log_disk_free, round((data_disk_capacity/1024/1024/1024),2) as data_disk, round((data_disk_in_use/1024/1024/1024),2) as data_disk_used, round((data_disk_capacity-data_disk_in_use)/102
4/1024/1024,2) as data_disk_free from gv$ob_servers \G
*************************** 1.row ***************************
             zone: zone1
         observer: 172.28.15.130:2882
        cpu_total: 16
     cpu_assigned: 3
         cpu_free: 13
     memory_total: 10.00
    system_memory: 2.00
     mem_assigned: 2.00
      memory_free: 6.00
log_disk_capacity: 20.00
log_disk_assigned: 2.00
    log_disk_free: 18.00
        data_disk: 15.22
   data_disk_used: 0.05
   data_disk_free: 15.17
1rowinset (0.011 sec)
接下来就是按照教程里要求和需要创建租户了。认证考试创建租户名要严格符合考试要求。
create resource unit u1_T2 max_cpu=3,min_cpu=3,memory_size='6G',log_disk_size='8G';
create resource pool pool_T2 unit='u1_T2',unit_num=1,zone_list=('zone1');
CREATE TENANT IF NOT EXISTS T2 charset='utf8mb4',primary_zone='zone1', resource_pool_list=('pool_T2') SET ob_tcp_invited_nodes='%', ob_compatibility_mode='mysql';
然后退出 SYS 租户会话,登录用户租户,然后修改密码。
[admin@server01 oceanbase]$obclient -h172.28.15.130 -uroot@T2#obcpv4 -P2883 -paaAA11__ -c -A oceanbase
ERROR 1045 (42000): Access denied for user 'root'@'xxx.xxx.xxx.xxx' (using password: YES)
[admin@server01 oceanbase]$obclient -h172.28.15.130 -uroot@T2#obcpv4 -P2883 -p -c -A oceanbase
Enter password:
Welcome to the OceanBase.  Commands end with ; or \g.
Your OceanBase connection id is 33
Server version: OceanBase 4.2.1.3 (r103030022024011313-c6afef2be5748fc54b1b0159b5224ae288491424) (Built Jan 13 2024 13:36:43)

Copyright (c) 2000, 2018, OceanBase and/or its affiliates. All rights reserved.

Type 'help;' or '\h'forhelp. Type '\c' to clear the current input statement.

obclient(root@T2)[oceanbase]> alter user root identified by 'aaAA11__';
Query OK, 0 rows affected (0.039 sec)
到这里一个用于数据迁移的租户就准备好了。 不过为了让数据迁移尽可能顺利(性能好),可能还需要调整一些参数。这个就放在后面数据迁移文章里。
这个实验再次说明,OB 软件一直都支持单机版。
更多阅读
这个里面很多技术点以前的文章都有总结,OB 版本的变化可能导致部署、使用、调优有一些细节的变化,后面再在具体文章中介绍。感兴趣的朋友也可以读以前的文章了解一下基础原理。基础原理这东西是不大变的。
上海招聘一名 初级或中级 OBDBA 。 杭州/宁波 招聘一名初级或中级 PostgreSQL / GaussDB DBA 。 共同要求:有至少 1 年相关数据库运维经验;有自己的总结,喜欢钻研数据库技术,能沟通喜欢分享。 待遇方面:公司专注数据库生态产品和服务,不算大,工作不算忙;鼓励工作中学习考证,待遇跟能力匹配,面议。
